• Cake
  • Frosting
  • YouTube
  • My Favorite Tools
  • Nav Social Icons

  • Skip to primary navigation
  • Skip to main content
  • Skip to primary sidebar
  • Skip to footer
  • Recipes
    • Cake
    • Cupcakes
    • Frosting
    • Ice Cream
    • Vegan
  • Cake Basics
  • Tutorials
  • Blog
  • About
  • Mobile Menu Widgets

    Connect

    Search

Sugar & Sparrow logo in script font

Sugar & Sparrow

Lifestyle and Cake from Portland Oregon

  • Cake Basics
  • Recipes
    • Cake
    • Cupcakes
    • Cookies & Bars
    • Filling
    • Frosting
    • Ice Cream
    • No-Bake
    • Small Batch
    • Vegan
  • Tutorials
  • Book
  • Blog
  • About

White Chocolate Brushstroke Cupcakes Tutorial

March 19, 2018 · In: Decorations & Garnishes, Recipes, Tutorials

Over the years I’ve learned that, aside from fondant, white chocolate is one of the best mediums for creating cake toppers. It’s great for making fun geometric shapes, 3D art (I hope to master the white chocolate sphere someday!), and one of my favorite techniques: painting with white chocolate to create brush strokes. It’s one of the easiest techniques ever, and when you get a little creative with your colors the results can be breathtaking. Let me show you how it’s done:

You will need:

  • 1 cup (183g) white chocolate chips
  • Food color gels of your choosing 
  • A clean, dry paintbrush
  • Parchment paper
  • Baked and frosted cupcakes

Step 1: Temper Your Chocolate

Even though white chocolate isn’t a “true” chocolate (it’s made primarily of cocoa butter), it still needs to be tempered to keep it from getting flimsy and looking dull once it’s dry. To start, measure out one cup of white chocolate chips and pour them into a microwave safe bowl. Reserve ¼ of the chips (so in this case, ¼ cup) and set them aside. These reserved chips are what’s called a “seed” that will be mixed into the melted white chocolate to quickly decrease the overall temperature.

how to temper white chocolate

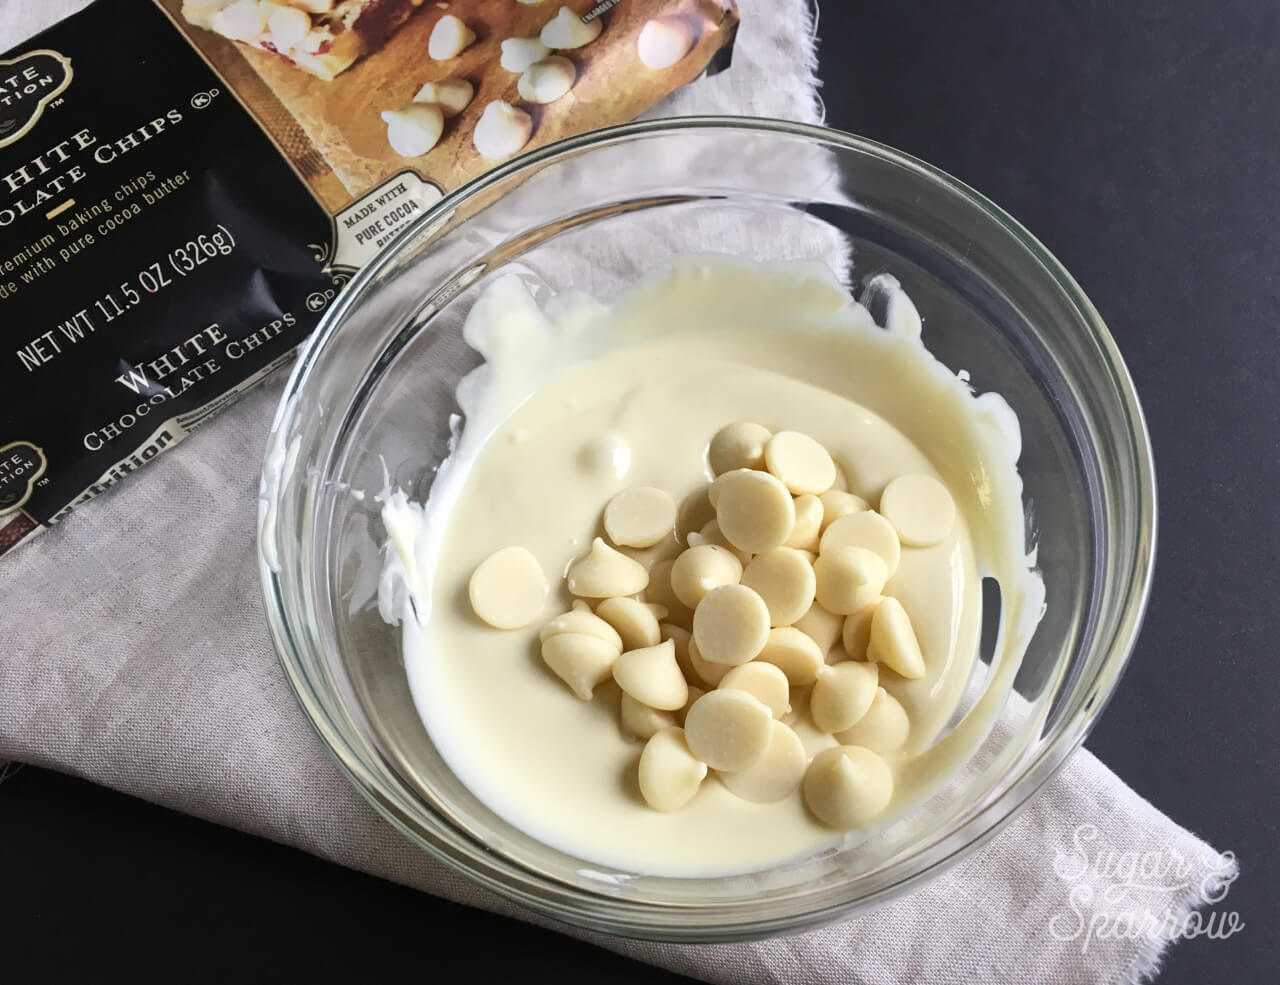
Microwave your white chocolate (minus the seed) in increments of 30 seconds, stirring after each interval, until the chips are melted. In my case, it only took 2 intervals to get the white chocolate nice and melted. Then stir in the seed until those chips are melted and you have uniform consistency.

how to temper chocolate in the microwave

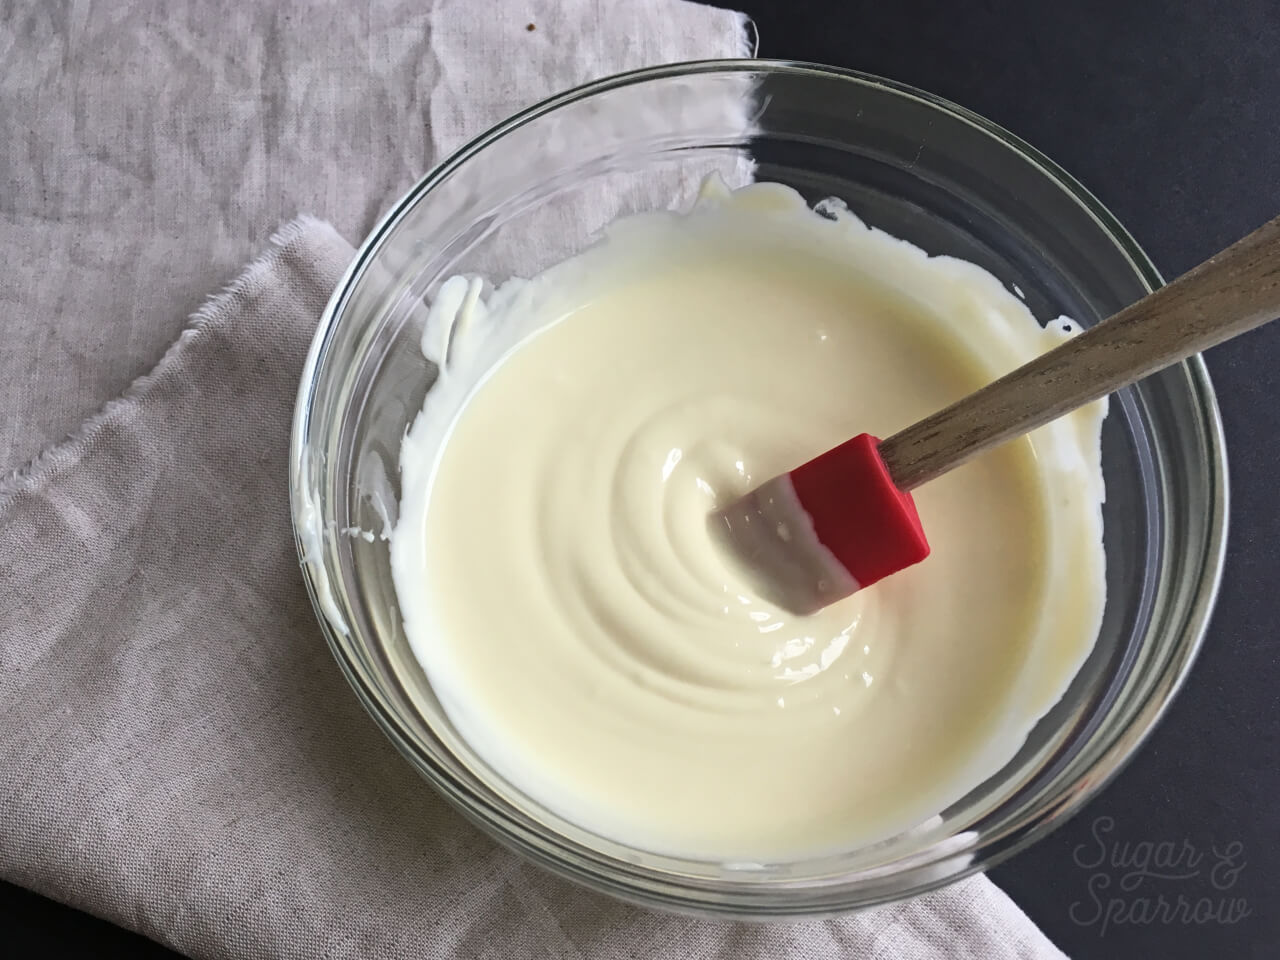
Step 2: Give It Some Color

When you’ve got a nice smooth finish, it’s time to color – my favorite part. I separated my melted white chocolate into three bowls and started adding some Wilton Color gel until I achieved these three colors.

how to color white chocolate

I’ll be honest, I usually start with an idea of what colors I want and then fly by the seat of my pants until I get there. There’s no real method to my coloring madness. For the seafoam, I used a little Sky Blue, for the peach, a little Pink, and for the purple, a combination of Sky Blue and Rose. When these colors mixed with the natural creamish yellow tone of the white chocolate, they ended up being perfect.

Step 3: Paint Your White Chocolate Brushstrokes

Now for the fun. Grab your paint brush, dip it into the white chocolate, and start brushstroking the white chocolate onto a sheet of parchment paper. A single brushstroke will usually do, as long as you’ve got enough white chocolate on the brush.

how to make white chocolate brushstrokes

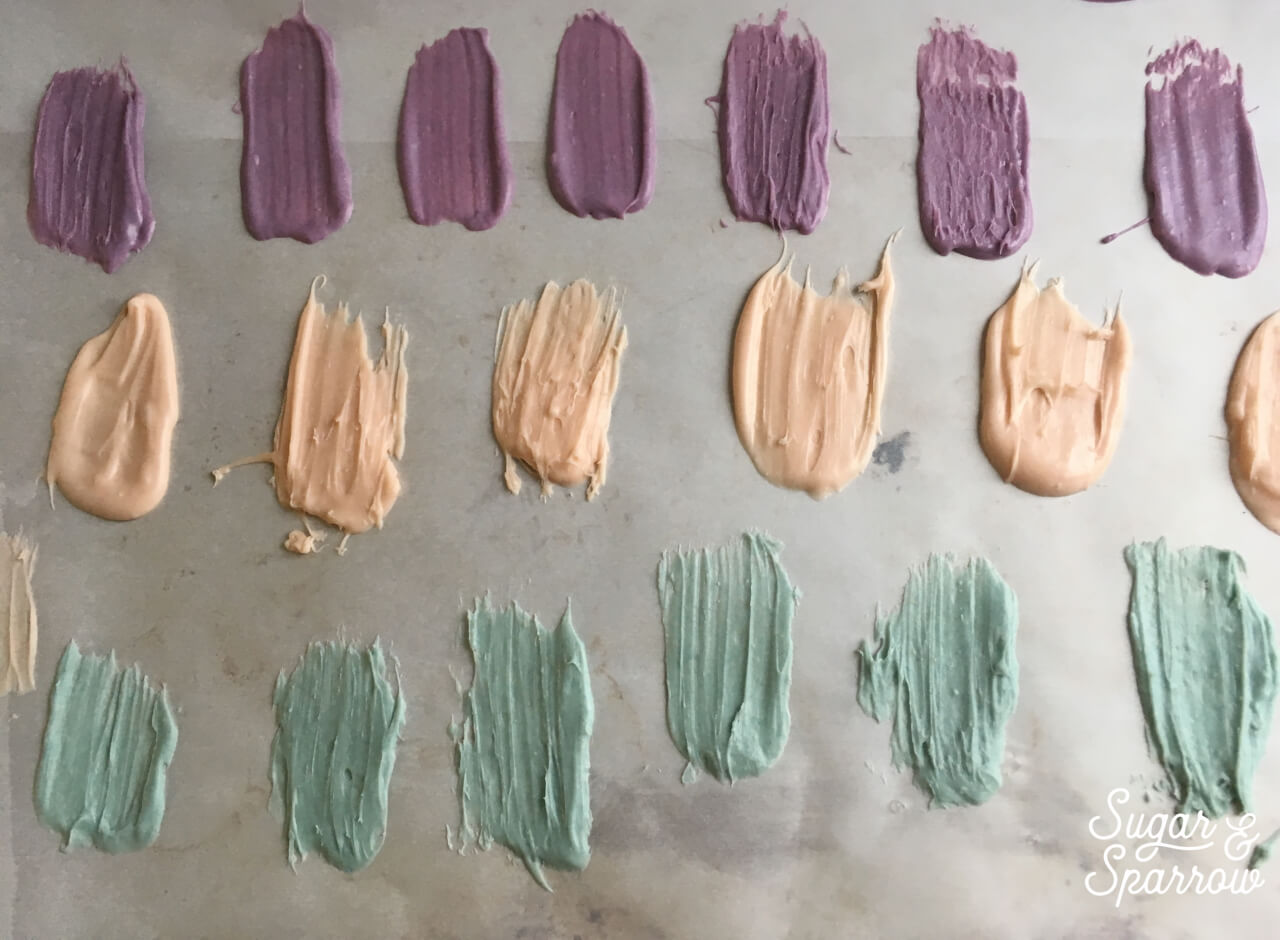
The brushstrokes dry in about 20 minutes at room temp and are ready to use! If you live in a particularly humid environment, you can pop your brushstrokes into the fridge for about 10 minutes and they’ll firm right up.

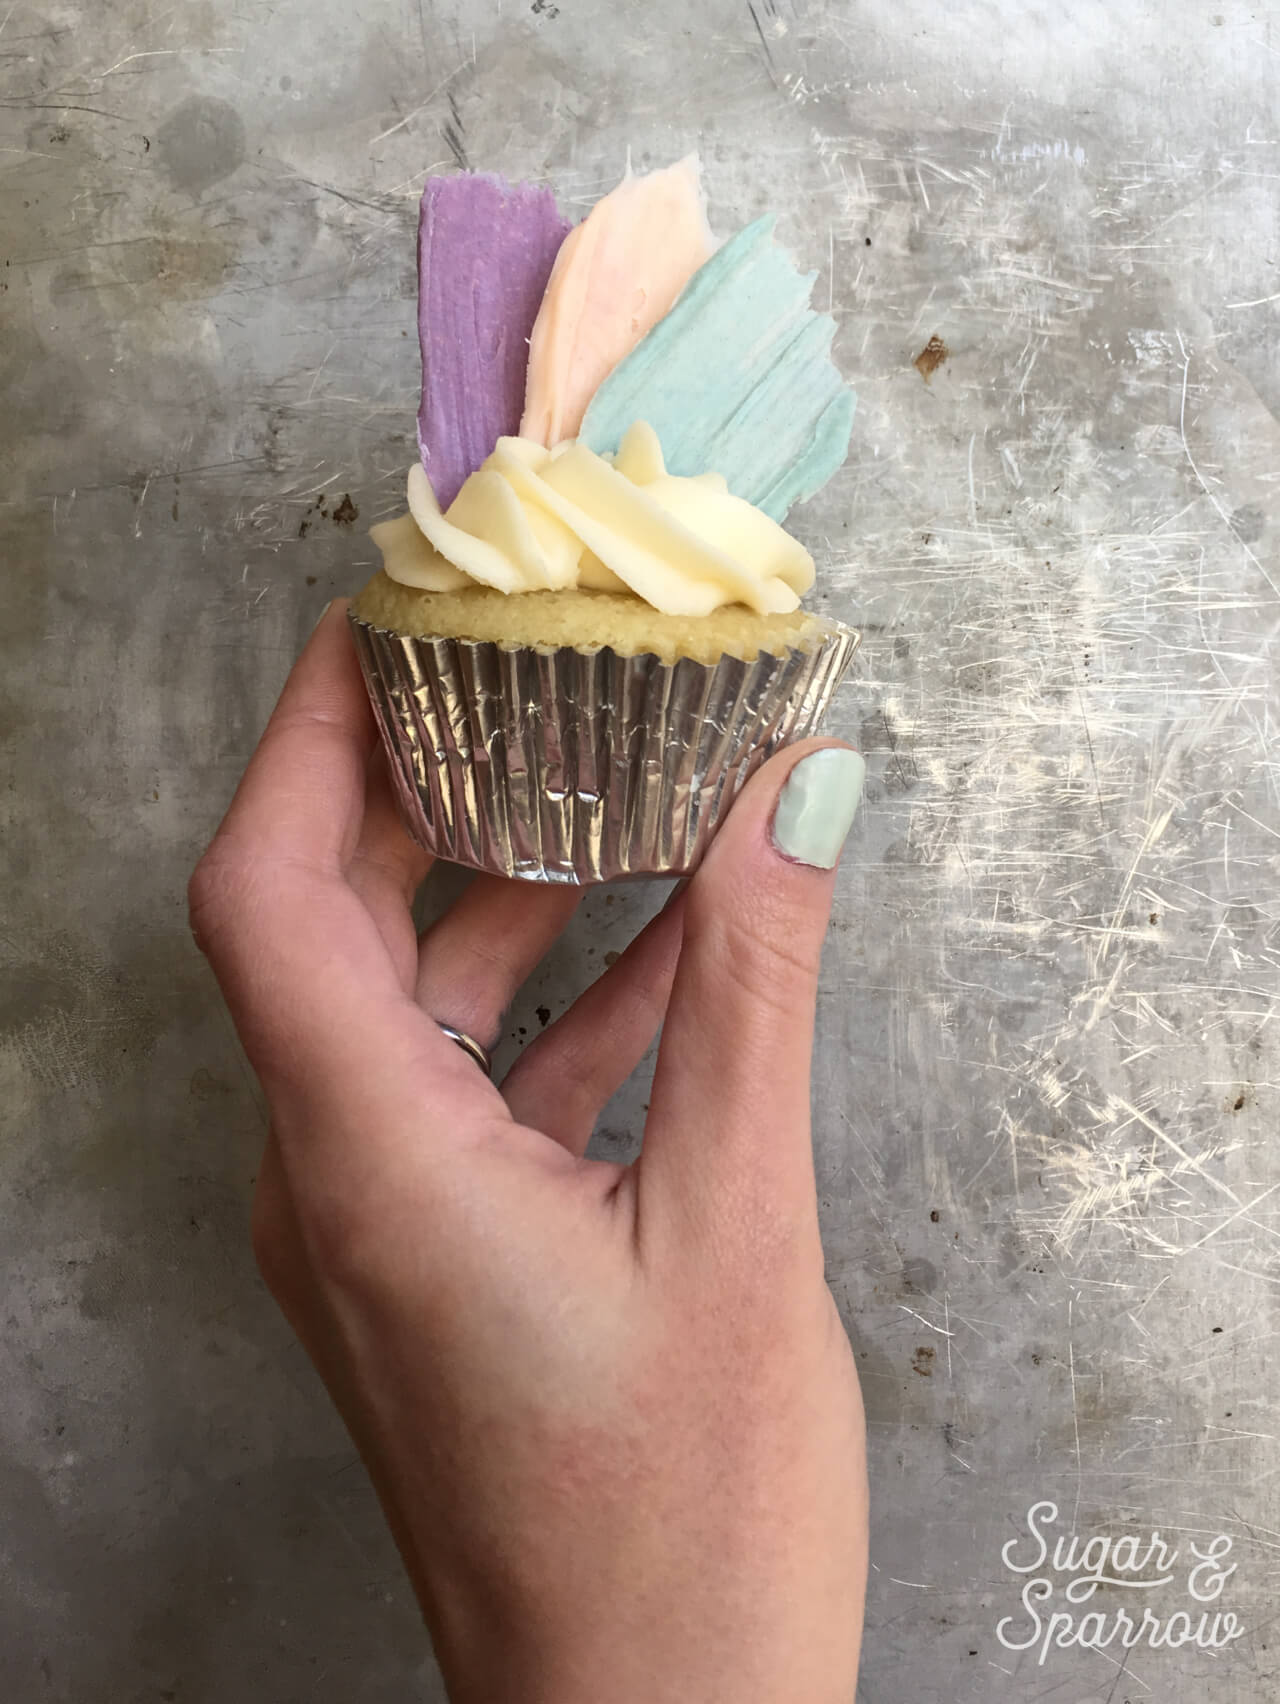
Step 4: Assemble Your Designs

After your white chocolate brushstrokes are nice and dry, all that’s left to do is add them on top of some frosted cupcakes. For these, I piped a swirl of buttercream onto each cupcake using Wilton Tip 1M, then simply stuck a few brushstrokes into the swirl.

brushstroke cupcakes by sugar and sparrow

white chocolate brushstroke cupcakes by sugar and sparrow

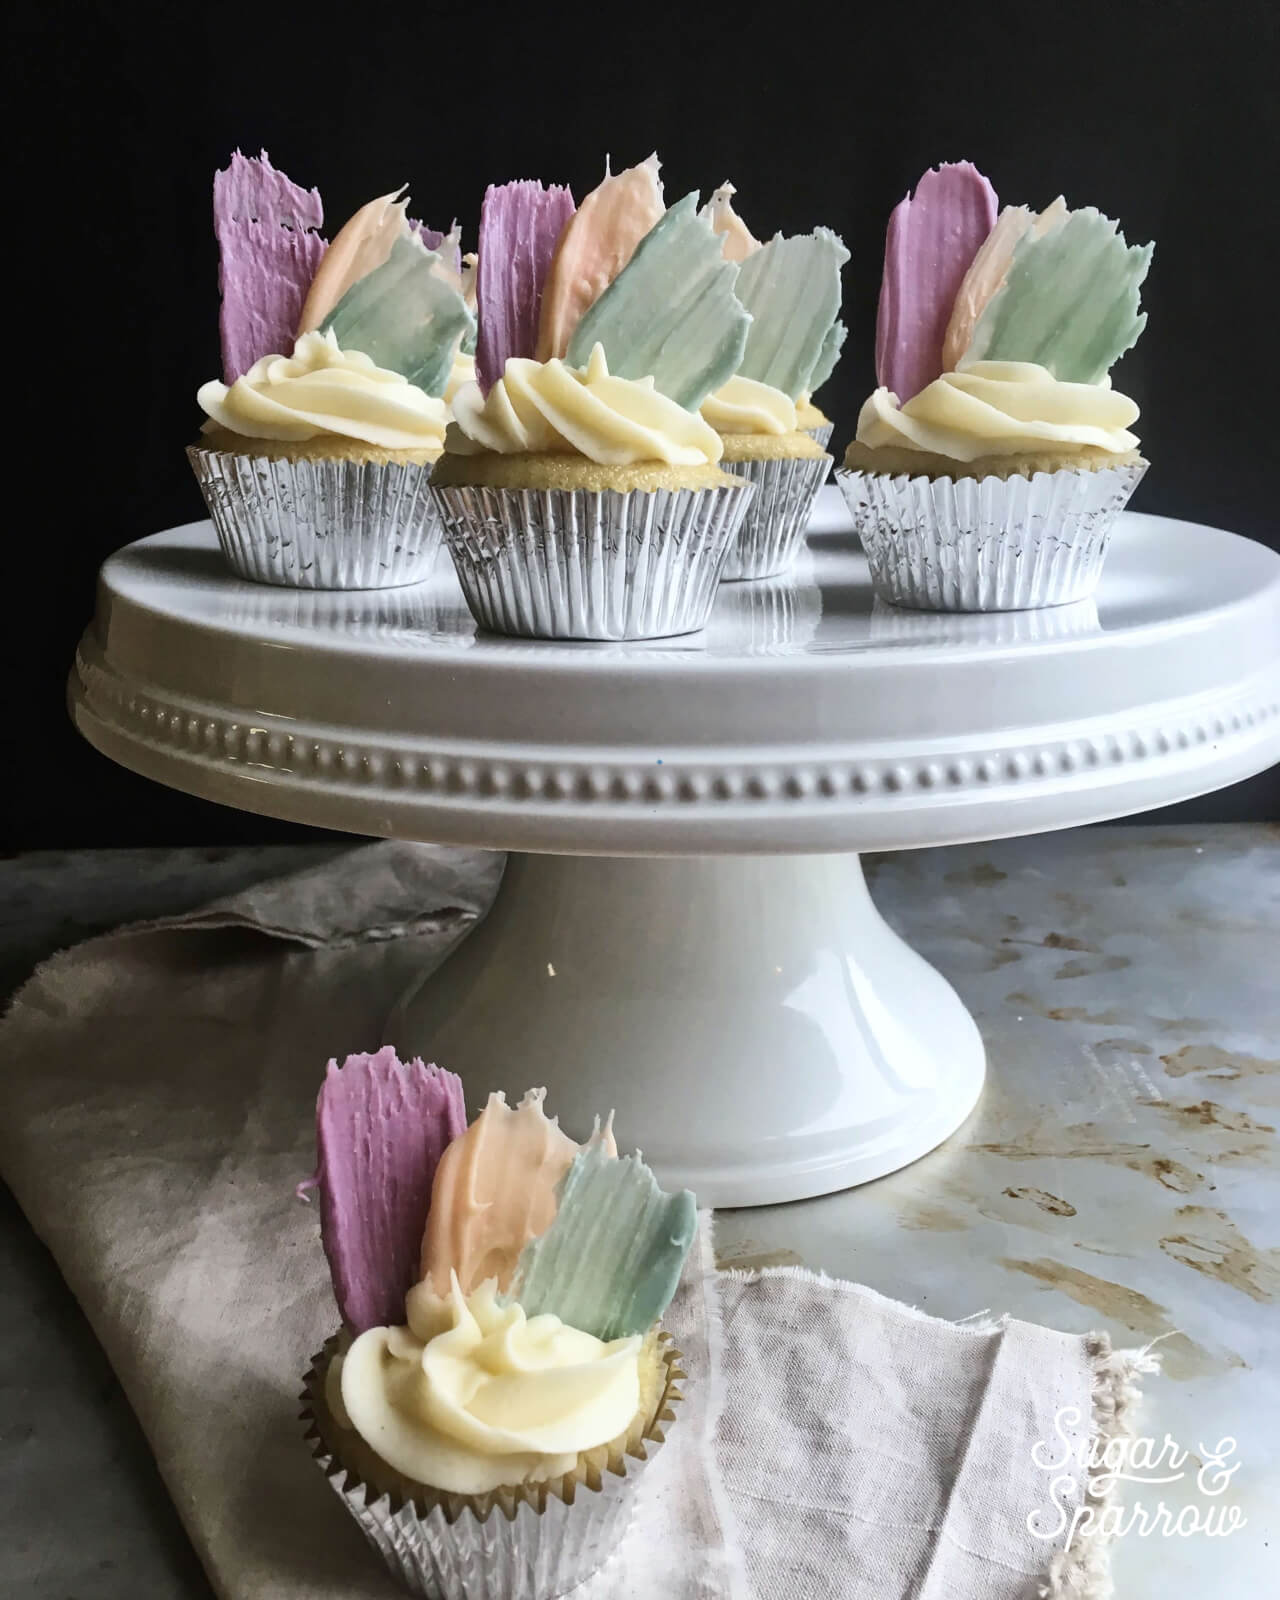
These white chocolate brushstrokes would also look incredible on top of a cake, or stuck to the side of a cake using some buttercream as adhesive. I have yet to try the brushstroke technique on a cake, but I’ve definitely been Pinning a few inspiring looks and hope to try it someday. Follow me on Pinterest to see some of the looks I’m loving!

By: Whitney · In: Decorations & Garnishes, Recipes, Tutorials · Tagged: brushstroke cupcakes, cake tutorial, chocolate, cupcake tutorial, tutorial, white chocolate, white chocolate brushstrokes

you’ll also love

white chocolate ganache recipe for drip cakesWhite Chocolate Ganache Drip Cake Recipe + Tips [Video Included!]
layered ombre buttercream cake tutorialLayered Ombrè Buttercream Cake Tutorial
raspberry chocolate cake recipeRaspberry Chocolate Cake Recipe

Join the List

Stay up to date & receive the latest posts in your inbox.

Reader Interactions

Comments

  1. Georgia says

    June 18, 2019 at 5:14 am

    Hi these look lovely – do you know how long I can store them for? Want to prep ahead of making a lot of cupcakes!

    Reply
    • Whitney says

      June 18, 2019 at 10:51 am

      Hi Georgia! You can create the brushstrokes about a week ahead of time and store them in an airtight container until you’re ready to use them. Let me know how it goes!

      Reply

Leave a Reply Cancel reply

Your email address will not be published. Required fields are marked *

Recipe Rating


Next Post >

My Favorite Piping Tip: Wilton 4B

Primary Sidebar

Welcome to Sugar & Sparrow

Welcome to Sugar & Sparrow

Helping you whip up pretty desserts with confidence and creativity. And hopefully sharing a few laughs with you along the way!

Learn More

Connect

let’s bake!

Get my very best recipes, baking tips, and decorating tutorials sent to your inbox

Featured Posts

black chocolate ganache recipe by sugar and sparrow

Black Chocolate Ganache Drip Cake Recipe

using a kitchen scale

Baking With The Metric System: My New OXO Kitchen Scale

green velvet cake recipe for st patricks day dessert

Green Velvet Cake with Rainbow Frosting

Search

Archives

Follow Along

@sugarandsparrowco

STRAWBERRY SHORTCAKE ICE CREAM CAKE 🍓if Strawbe STRAWBERRY SHORTCAKE ICE CREAM CAKE 🍓if Strawberry Shortcake Ice Cream Bars make you nostalgic for your childhood ice cream truck days, you’re going to LOVE this easy ice cream cake version - no ice cream maker needed 🙌🏼 

Full recipe on my blog at https://sugarandsparrow.com/strawberry-shortcake-ice-cream-cake/

STRAWBERRY CRUNCH 
24 whole (280g) Golden Oreos, finely ground
3 Oz box strawberry jello
4 Tbsp unsalted butter, melted

ICE CREAM LAYERS
1/2 Cup (15g) freeze-dried strawberries
2 Cups heavy whipping cream, cold
1 Tbsp pure vanilla extract, divided
14 Oz sweetened condensed milk
1 1/2 tsp strawberry jam or preserves

1. Combine the strawberry crunch ingredients and bake on a lined cookie sheet at 350ºF for 4 min.
2. For the crust, combine 1 Cup of the strawberry crunch with 2 Tbsp melted butter. Press into the bottom of a 6-inch springform pan and line with an acetate collar. Place in the freezer while you move on.
3. Using a food processor, grind the freeze-dried strawberries into a fine powder. Set aside.
4. Add the heavy whipping cream and 2 tsp of vanilla extract into a chilled bowl, then whip it with a hand mixer to stiff peaks. Place in the refrigerator.
5. Divide the condensed milk between two medium bowls. To one bowl, add 1 teaspoon of vanilla. To the second bowl, add the finely strawberry powder and the jam/preserves. Whisk the ingredients together within each individual bowl.
6. Divide the whipping cream evenly between each of the two bowls you created in the previous step. Fold each sweetened condensed milk mixture together with the divided whipped cream to create the vanilla ice cream and strawberry ice cream.
7. Layer half of each of the ice creams on top of the strawberry crunch crust, sprinkle a layer of strawberry crunch on top, then repeat. Freeze for 6 hours and serve. 
#icecreamcake #strawberryshortcake #nochurnicecream #icecreamlover #strawberry
LEMON CUPCAKES 🍋 after about a dozen recipe tes LEMON CUPCAKES 🍋 after about a dozen recipe tests, this one is everything I could want in a lemon cupcake! Fluffy-yet-moist, bursting with natural lemon flavor, and absolutely irresistible topped with lemon cream cheese buttercream. 

Full recipe (with frosting) linked in my bio + at https://sugarandsparrow.com/homemade-lemon-cupcakes/

INGREDIENTS:
1 Cup (132g) all-purpose flour
1 tsp baking powder
1/4 tsp salt
1/4 Cup (60ml) whole milk, room temperature
3 Tbsp (45ml) lemon juice from 1 medium lemon
3/4 Cup (150g) granulated sugar
3 Tbsp (42g) unsalted butter, room temperature
2 Tbsp (30ml) vegetable oil
2 large eggs, room temperature
1 tsp pure vanilla extract

INSTRUCTIONS:
1. Preheat the oven to 350ºF (177ºF) and line a standard cupcake pan with 12 paper liners.
2. In a large bowl, whisk together the flour, baking powder, and salt. Set aside. 
3. In the bowl of a stand mixer fitted with the paddle attachment (or with a hand mixer and large bowl), add the lemon zest to the sugar and mix on low speed until fragrant and well combined, about 1 minute. Meanwhile, combine the lemon juice with the milk and set aside. 
4. Add the butter to the lemon-sugar mixture and cream on medium speed until and combined, about 2 minutes. Add the vegetable oil and beat until light and creamy, about 3 minutes. Scrape down the bowl and paddle as needed.
5. Mix in the eggs one at a time on low speed, then add the vanilla and turn the mixer to medium speed for one minute.
6. Turn the mixer off and add the flour mixture all at once. Mix on low speed until just combined, then slowly pour in the lemon-milk mixture. Mix until just combined, about 30 seconds.
7. Divide the batter equally between the liners and bake for 14-18 min. Cool, then top with frosting of your choice (link in bio for lemon cream cheese frosting)�
#lemoncupcakes #creamcheesefrosting #lemon #cupcakes #cupcakedecorating
April in my kitchen 🌸 I published 5 NEW recipes April in my kitchen 🌸 I published 5 NEW recipes on my site, baked my Oreo cupcake recipe for a fundraiser and found it was just as delicious as I remember, and filmed/photographed 3 recipes that will be on my blog in May (Lemon Cupcakes, Lemon Cream Cheese Buttercream, and No-Bake Marbled Strawberry Cheesecake) 🥰 

Comment “APRIL” to get all the available recipes and stay tuned for more! 

#bakersofinstagram #springbaking #cakedecorating #cupcakes #bakinglove
SHEET PAN COOKIE CAKE 🍪 slice it warm for a fud SHEET PAN COOKIE CAKE 🍪 slice it warm for a fudgy chocolate chip cookie OR let it settle into a moist and chewy cookie cake that’s perfect for decorating! My fave vanilla buttercream + sprinkles turn this giant chocolate chip cookie into the perfect birthday cake alternative at the end 🥳
⁣
Full recipe + decorating ideas at https://sugarandsparrow.com/sheet-pan-chocolate-chip-cookie-cake/
⁣
INGREDIENTS⁣
1 Cup (226g) unsalted butter, melted⁣
1 1/3 Cups (267g) packed light or dark brown sugar⁣
1/2 Cup (100g) granulated sugar⁣
3 large eggs⁣
1 Tbsp pure vanilla extract⁣
1 tsp baking soda⁣
1 tsp cornstarch⁣
1/2 tsp salt⁣
3 Cups (398g) all purpose flour⁣
2 Cups (350g) semi-sweet chocolate chips⁣
⁣
INSTRUCTIONS⁣
1. Preheat the oven to 350ºF (177ºC). Grease and line a 13×18 inch sheet pan.⁣
2. In a large bowl, add the brown sugar and granulated sugar. Melt the butter in the microwave and pour it over the top of the sugars. Whisk together until uniform. Add the eggs and vanilla, then continue whisking until uniform. Whisk in the baking soda, cornstarch, and salt.⁣
3. Add the flour and use a silicone spatula to fold it in until smooth cookie dough forms. Reserve 1/2 Cup of the chocolate chips and set them aside, then fold the remaining 1 1/2 Cups of chocolate chips into the cookie dough.⁣
4. Place the chocolate chip cookie dough onto the prepared sheet pan and use an offset spatula to spread it all the way to the edges in an even layer.⁣
5. Bake the cookie cake for 14-16 minutes, until it looks golden brown on the edges and set. 
6. Enjoy warm or let it cool and decorate with vanilla buttercream and sprinkles! ⁣
⁣
#cookiecake #chocolatechipcookies #sheetcake #birthdaycake #cakedecorating
STRAWBERRY CUPCAKES 🍓based on my beloved strawb STRAWBERRY CUPCAKES 🍓based on my beloved strawberry layer cake recipe, this cupcake version is just as moist yet fluffy and bursting with natural strawberry flavor! Between the mix of fresh strawberries in the cupcakes + freeze-dried strawberries in the frosting, the flavor is out of this world 🚀

Full recipe link in my bio (with strawberry buttercream) + at https://sugarandsparrow.com/strawberry-cupcakes/

STRAWBERRY CUPCAKES
Yield: 14 cupcakes

INGREDIENTS:
5 oz (143g) fresh or frozen strawberries
1/3 Cup (80ml) whole milk, room temp
1 1/2 Cups (158g) sifted cake flour
1 tsp baking powder
1/4 tsp baking soda
1/2 tsp salt
6 Tbsp (85g) unsalted butter, room temp
1 Cup (200g) granulated sugar
2 large eggs, room temp
3 Tbsp (45g) sour cream, room temp
1 tsp vanilla extract
1 drop pink food coloring (optional)

INSTRUCTIONS: 
1. Puree the strawberries using a food processor (you’ll have about 1/2 cup of puree), then place into a saucepan over medium-low heat. Bring to a simmer, then cook for 10-15 min, stirring occasionally, until you have 1/4 cup. Refrigerate until room temp.
2. Preheat oven to 350ºF (177ºC) and line a standard cupcake pan with liners.
3. Whisk together the sifted cake flour, baking powder, baking soda, and salt and set aside.
4. In a stand mixer w/ paddle attachment (or hand mixer + large bowl), whip the butter on high for 2 min. Add sugar and beat for 2 min, until light and fluffy. Turn the mixer to low and add the eggs one at a time, then add the vanilla and sour cream, turn the mixer to high and beat for 1 min. Meanwhile, whisk together the strawberry puree, whole milk, and food coloring (if using).
5. Turn the mixer off and add all of the dry ingredients at once. Mix on low until just combined, then add the strawberry milk mixture until just combined, about 30 seconds.
6. Fill the cupcake liners 2/3 full and bake for 14-18 minutes. Cool completely before topping with strawberry buttercream (full recipe linked above). 

#strawberrycupcakes #strawberrycake #pinkcupcakes #strawberry #cupcakes

Footer

On the Blog

  • Cake Basics
  • Recipes
  • Tutorials

Info

  • About
  • Privacy Policy & Disclosure

stay in the know

Copyright © 2026 · Theme by Sugar & Sparrow