I dream of Spring all Winter long, and now that it’s only a few days away I can literally feel my excitement level going up! My favorite thing about Spring is the flowers start blooming again, which always gets me in the mood to incorporate buttercream flowers into my cake designs. They’re so easy to whip up with the right piping tips, a few flower nails, and some pre-cut parchment paper squares – all of which I found at my local JOANN store! With such a great selection of craft and cake decorating supplies, I always find what I’m looking for.
UPDATE 2025: JOANN is (sadly!!) no longer in business, so I have changed these product links slightly.
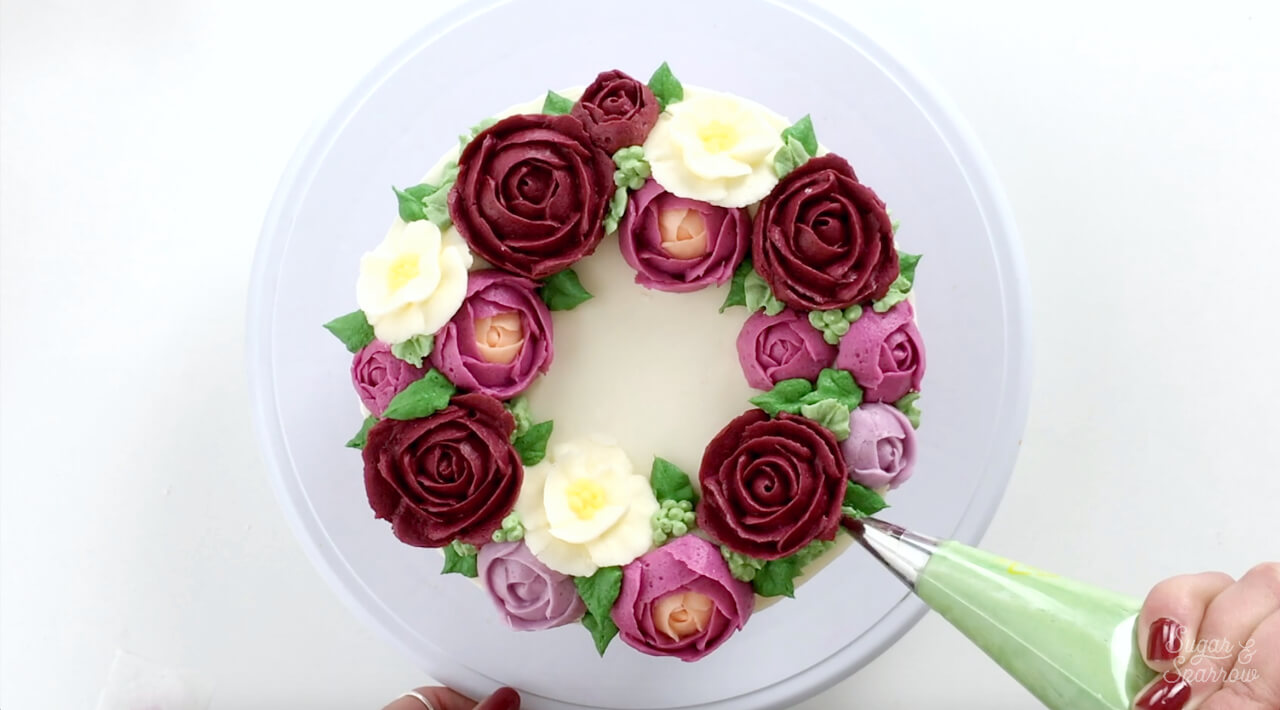
There are three types of buttercream flowers involved in this wreath cake topper: roses, ranunculus, and camellias. Although they may look intricate, they’re easy to make with a little practice and the right materials. They look so pretty all on their own, but it’s really fun to arrange them into a flower wreath as a cake topper. Total showstopper!


I whipped up a quick video to show you the process of making the buttercream flowers and assembling them onto the cake, so have a look before you read the tutorial below:
You Will Need:
- A cake that has been frosted and chilled
- 1.5 batches of vanilla buttercream, stiff consistency
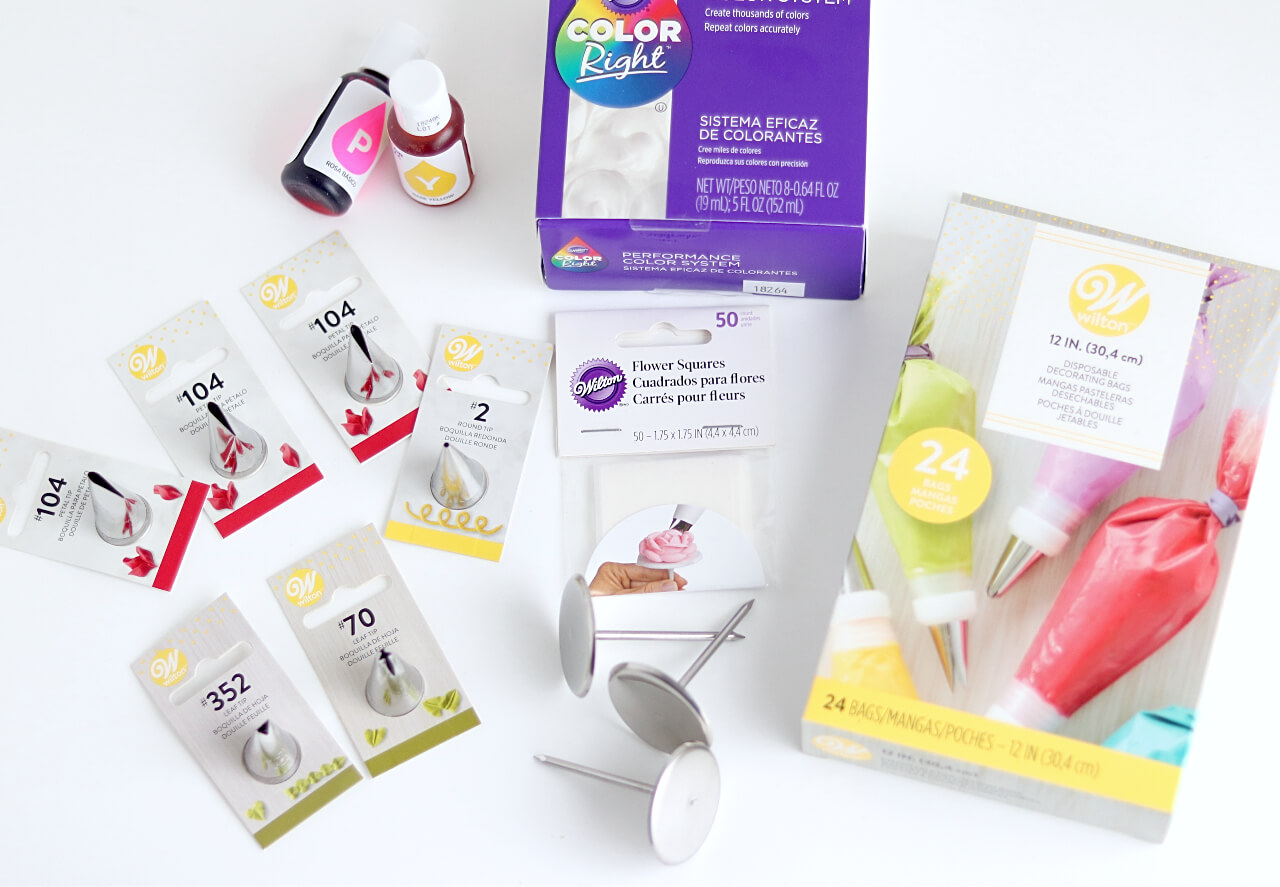
- Wilton Tips 104 (for petals), 3 (for flower centers), and 352 (for leaves)
- Piping bags
- Pre-cut flower squares
- Flower nail
- Food color gels of your choice (I custom mixed my colors with the Wilton Color Right system)
- Bowls and spoons for color mixing
Step 1: Color The Buttercream
Divide your buttercream into different bowls and mix up the color scheme you’d like your flowers to be. I went with a dark brick red and light purple for the roses, fucshia ranunculus with peach centers, and white camellias with yellow centers, but these buttercream flowers can be made in any color scheme you’d like.

You’ll also need a few shades of green for the buttercream leaves, a little yellow for the centers of the camellias, and about ½ cup of plain white buttercream reserved. For all of the shades I created for this cake, I used the Wilton Color Right System from JOANN. It comes with a handy guide for mixing up any shade you could think of!
Step 2: Make The Buttercream Roses
To make the buttercream roses, fit a piping bag with Wilton Tip 104 and fill it with the buttercream color of your choice. Pipe a small dot of frosting on top of the flower nail, holding it in the hand you’re not piping with. Press a parchment paper square on top.
With the larger end of Tip 104 touching the flower nail and the skinny end pointed upwards, pipe the center bud as you twirl the flower nail 360 degrees. Pipe petals around the bud as you rotate the flower nail – shorter petals in the beginning and longer petals as you reach the edge of the flower nail.
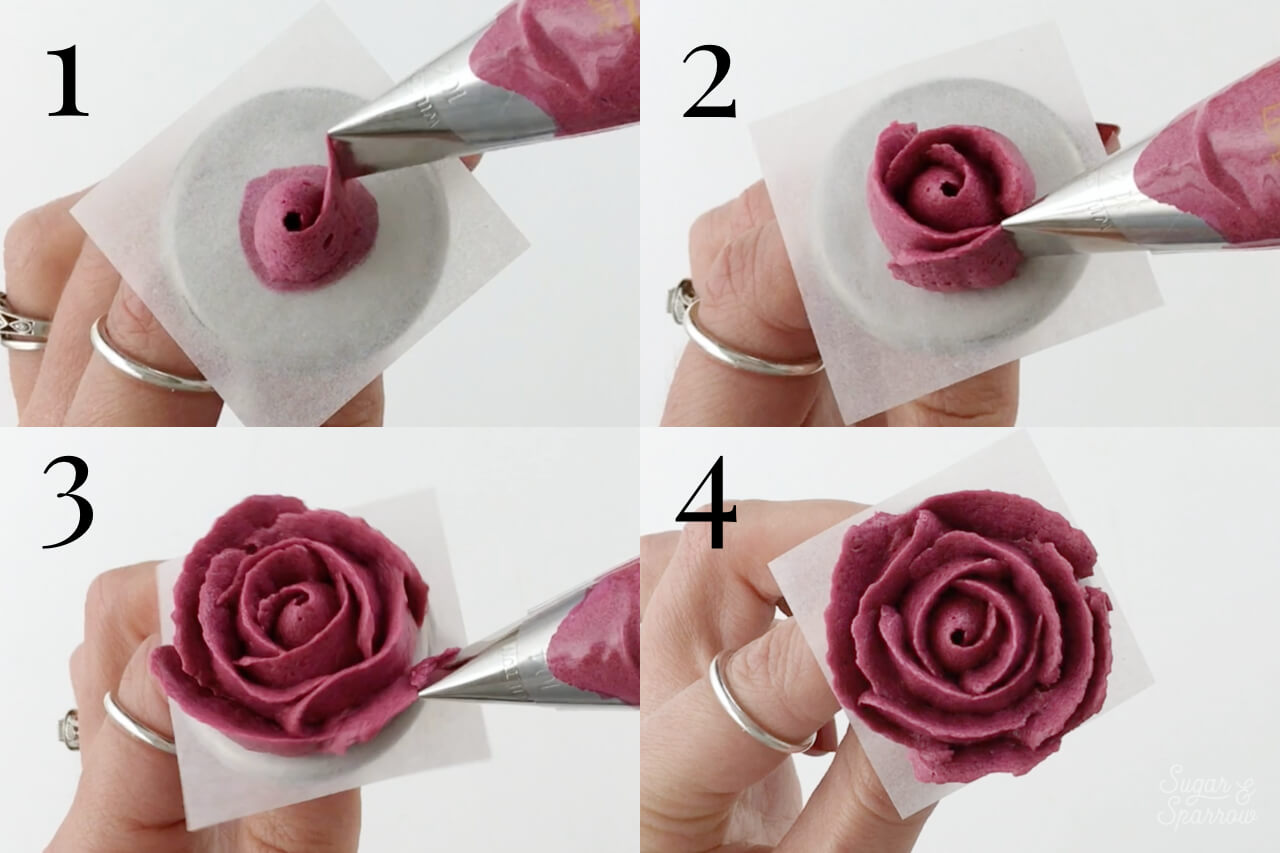
When your buttercream rose is finished, carefully drag the parchment paper square off the flower nail and onto a flat surface. I placed a piece of wax paper onto a baking sheet for this part. Repeat until you have 5-6 buttercream roses, and feel free to pipe smaller sizes for variety.
Step 3: Make The Buttercream Ranunculus
To make the buttercream ranunculus, fit a piping bag with Wilton Tip 104 and fill it with the peach buttercream (or color of your choice for the center of the flower). Prepare the flower nail by placing a dot of buttercream on top, then pressing a parchment paper square onto it.
Hold Tip 104 at a 45 degree angle, with the larger end of the piping tip touching the flower nail and the skinny end pointed toward the center of the flower nail. Pipe a swirl of buttercream as the base for your center bud as you twirl the flower nail 360 degrees. Then, create overlapping layers of buttercream as you rotate the flower nail. Imagine that you’re piping small rainbows over the center bud as you go around.

Next, switch to your main ranunculus buttercream color (I used fucshia for this), still using Wilton Tip 104. Continue the overlapping motion for the petals all the way around the bud. When you’re finished, carefully slide the parchment paper onto your baking sheet so the flower can begin to dry. Repeat until you have 5-6 different ranunculus flowers, and remember to create a variety of sizes.
Step 4: Make The Buttercream Camellias
To make the buttercream camellias, place your buttercream into a piping bag fitted with Wilton Tip 104 (I’m using white for these, but you can use any color!). Fit another piping bag with Wilton Tip 3 and fill it with yellow buttercream. The second piping bag will help create the flower centers. Prepare your flower nail by placing a dot of buttercream on top and pressing a parchment paper square onto it.
Starting on the outer edge of the flower nail with Tip 104 flat (the larger end toward the center of the flower nail and the skinny end pointed outwards), pipe a row of petals as you rotate the flower nail. When you’ve created a circle of outer petals, pipe a second row of petals with the same motion, only point the piping tip at a 45 degree angle so the inner row of petals stands up. Then, use your yellow buttercream to fill in the center of the petals with dots.

When you’re finished, carefully slide the parchment paper onto your baking sheet so the flower can begin to dry. Repeat until you have about 4-5 camellias.
Step 5: Refrigerate The Buttercream Flowers
Place your baking sheet with all of your beautiful buttercream flowers into the refrigerator for about 20 minutes to let them firm up before assembling the buttercream flower wreath.

After the refrigeration process, they should be firm to the touch and really easy to handle. Although you might be tempted to place them in the freezer to speed this part up, I have not had good luck with the freezer. I know some bakers swear by it, but in my experience, the refrigerator is better when it comes to these delicate buttercream flowers.
Step 6: Assemble The Buttercream Flower Wreath
Prepare a piping bag by filling with your reserved ½ cup of white buttercream and snipping off a 1-inch opening. On a cake that’s been frosted and chilled for at least thirty minutes, pipe a circle of white buttercream about ½ inch from the edge of the cake. This will help create height for your flower wreath.

Next, assemble your chilled buttercream flowers on top of the circle of buttercream, pressing them in and angling them outward and inward for variety.
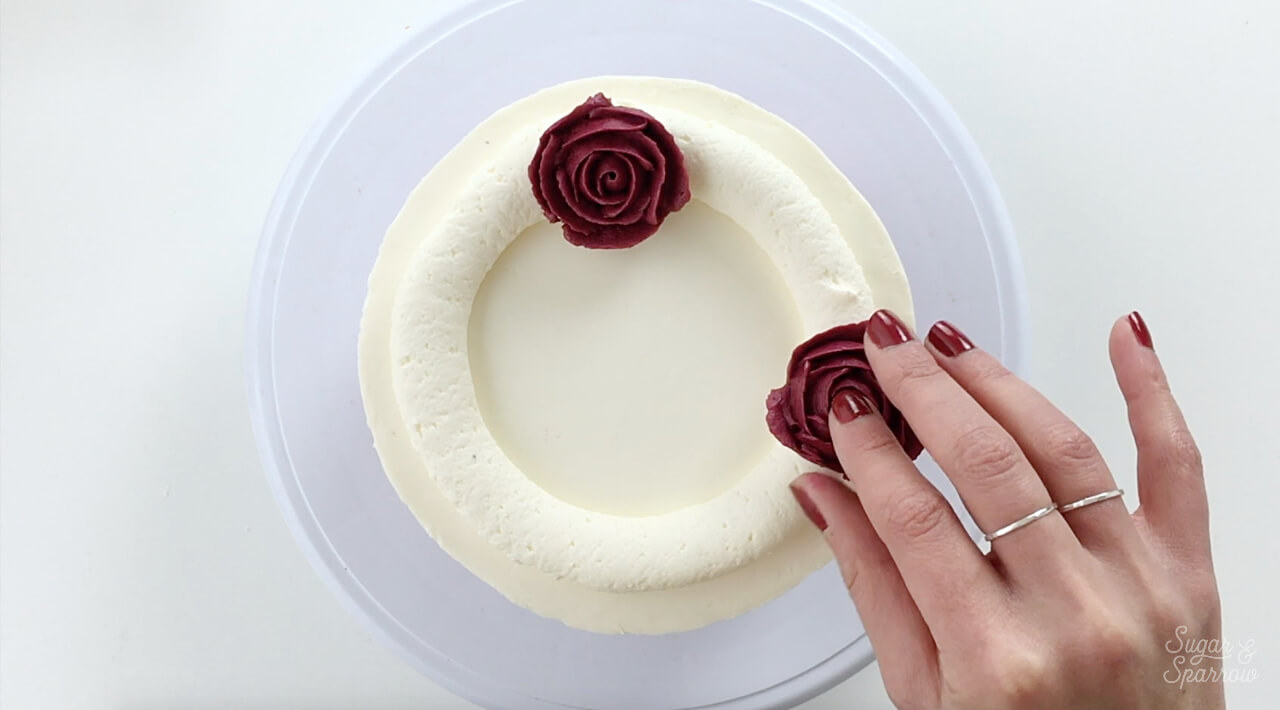
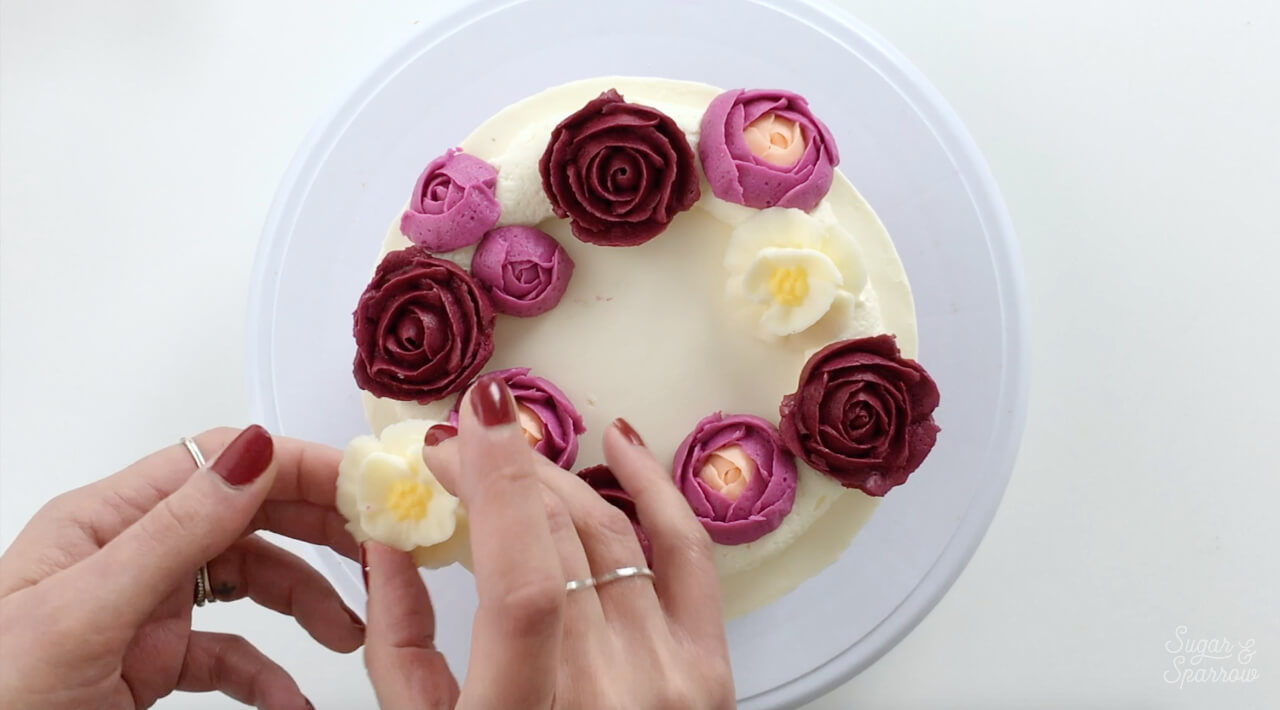
Feel free to overlap some of the flowers and don’t worry about small empty spaces – we’ll fill those in next!
Step 7: Pipe The Buttercream Leaves
Fit a piping bag with Wilton Tip 352 and fill it with green buttercream. I ended up fitting another piping bag with Wilton Tip 3 and using the lighter green buttercream to pipe dotted foliage around some of the flowers, but feel free to stick with leaves if that’s your jam.

Wherever there’s an empty space (aka the white buttercream is showing through), pipe leaves to fill in the gaps. Feel free to pipe green dots like I did or designs to fill in those empty spaces and complete your floral wreath cake.
And there you have it – the perfect cake for Spring! Remember that with more practice, your buttercream flowers will be so easy to whip up you’ll want to put them on everything.

Disclaimer: I was compensated by JOANN for my work of creating this cake, styling, filming, photographing, and writing about their products. As always, all opinions are honest and my own. Thank you for supporting brands that support Sugar & Sparrow.


Hi Whitney! I’d like to make a red velvet cake and create the same flowers but I was wondering if one could use a cream cheese buttercream frosting and still create the same structure of flowers? Do you think the consistency of icing would be different making it difficult to make them?
Thank you!
Hi fellow Whitney! I have successfully made buttercream flowers with cream cheese frosting before! It is a little softer than other American buttercream recipes but this is the recipe I use: https://sugarandsparrow.com/cream-cheese-buttercream-recipe/
I have been wanting to step my cake game up. So stoked you made a tutorial on this. I can’t wait for some free time to practice this. Thanks Whitney.
Yay, Tony! Excited for you to try these techniques out!
Hey! I loved your tutorial! How much would you charge for such a cake?
Hi Charlie! It’s been so long since I’ve sold my cakes I have no idea. But if you’re looking for info on pricing cakes, my friend Chelsey wrote a great article on the subject: https://chelsweets.com/cake-pricing-guide-how-to-price-a-cake/
Hello,
Thank you for all of the tips and very clear explanations ! It makes me want to try this cake for my grandma’s 80’s birthday.
However I will be working a lot the two days before her birthday. Do you have any idea about how long can the flowers be kept in the fridge for ? I could do them on the Wednesday (ideally) or on the Thursday to have the cake on the Saturday night.
Thank you so much !!
Hi Maureen! So excited for you to make this for your grandma’s 80th! You can store the flowers in an airtight container in the refrigerator for up to two weeks, so you should be totally good there. Here’s some more tips on making cakes/decor ahead of time: https://sugarandsparrow.com/making-cakes-ahead/
Thank you so much Whitney !! Knowing they will last for so long in the fridge will save my week ! I’ll be able to bake, work AND sleep
I’ll go through the other article to get even more tricks about saving time.
Thanks again !!
Hi Whitney
This is a beautiful cake! Thank you for your flower tutorial. I was wondering if you could also provide a tutorial for the technique you used on the bottom of the cake. It’s stunning!
Thank you
Sally
Thanks so much, Sally! I do have a tutorial for that watercolor ombre technique here: https://sugarandsparrow.com/watercolor-buttercream-tutorial/ enjoy!
What ratio did you use to make the burgundy color? I have purchased the Color Right package, but I cannot find a burgundy ratio. I am sure that I could play around with it, but I love your coloring, and I don’t want to waste any product. Thank you!
Hi Trista! To make the burgundy, I used the red color gel to make a deep red, then mixed in the tiniest bit of blue to cool it down to a burgundy color. I don’t really follow the drop amounts because it will vary depending on the amount of buttercream you’re coloring. I hope that helps though!
Thank you for your tutorial. I used your techniques for the flowers and BC icing consistency to create a mini wedding cake for my cousin and her soon to be husband tomorrow. Thank you!!! Have a great weekend.
That’s so wonderful to hear, Ashley! So happy the tutorial was helpful. Sounds like the perfect mini wedding cake design and I’m excited that you get to celebrate them!
Do you create a separate batch of buttercream for your flowers since it needs to be thicker? Or do you use one batch to frost your cake and then thicken the remaining buttercream for flowers?
Hi Camilla! I usually make one big batch of buttercream and frost the cake, then thicken the remaining buttercream to make the flowers.
Whitney, this is a lovely cake, beautifully presented. The tutorial is precise, detailed, especially regarding the tip placement against the flower nail, ie large end up, flat or angled, outward or inward, etc. You answered every question in my mind! Thank you for making each step clear, and the process seem easy ! Now to practice (and perhaps eat the mistakes !?)
I’m so happy to hear that the tutorial is so helpful, Cheri! Practice makes perfect with these buttercream flowers for sure. They’re a whole lot of fun to make once you have the technique down though!
Can these be made with royal icing?
Hi Mel! I’ve never made flowers with royal icing before, but my hunch is that if the royal icing is thick enough it can be done. I’d say try it!
Simply stunning! If only I was as good at working with edible flowers as I am real ones!
Thanks, Kelsey! It just takes some practice!