• Cake
  • Frosting
  • YouTube
  • My Favorite Tools
  • Nav Social Icons

  • Skip to primary navigation
  • Skip to main content
  • Skip to primary sidebar
  • Skip to footer
  • Recipes
    • Cake
    • Cupcakes
    • Frosting
    • Ice Cream
    • Vegan
  • Cake Basics
  • Tutorials
  • Blog
  • About
  • Mobile Menu Widgets

    Connect

    Search

Sugar & Sparrow logo in script font

Sugar & Sparrow

Lifestyle and Cake from Portland Oregon

  • Cake Basics
  • Recipes
    • Cake
    • Cupcakes
    • Cookies & Bars
    • Filling
    • Frosting
    • Ice Cream
    • No-Bake
    • Small Batch
    • Vegan
  • Tutorials
  • Book
  • Blog
  • About

Buttercream Terrazzo Cake Tutorial

March 16, 2020 · In: Featured, Tutorials

Terrazzo patterns seem to be everywhere these days, and I am all for it. These pretty mosaic prints were originally popularized in the early 1900’s as a trendy floor tile design. Nowadays you’ll find terrazzo prints on walls, ceramics, furniture finishes, and all the things. I’ve been dying to incorporate it into a cake design for awhile now, so when JOANN asked me to create a project for National Craft Month I knew it was the perfect time to make my terrazzo cake dreams come true! I stocked up on some essential Wilton supplies and got right to work on this beauty.

UPDATE 2025: JOANN has (sadly!!) gone out of business, so I have slightly changed these product links.

terrazzo cake by Sugar and Sparrow

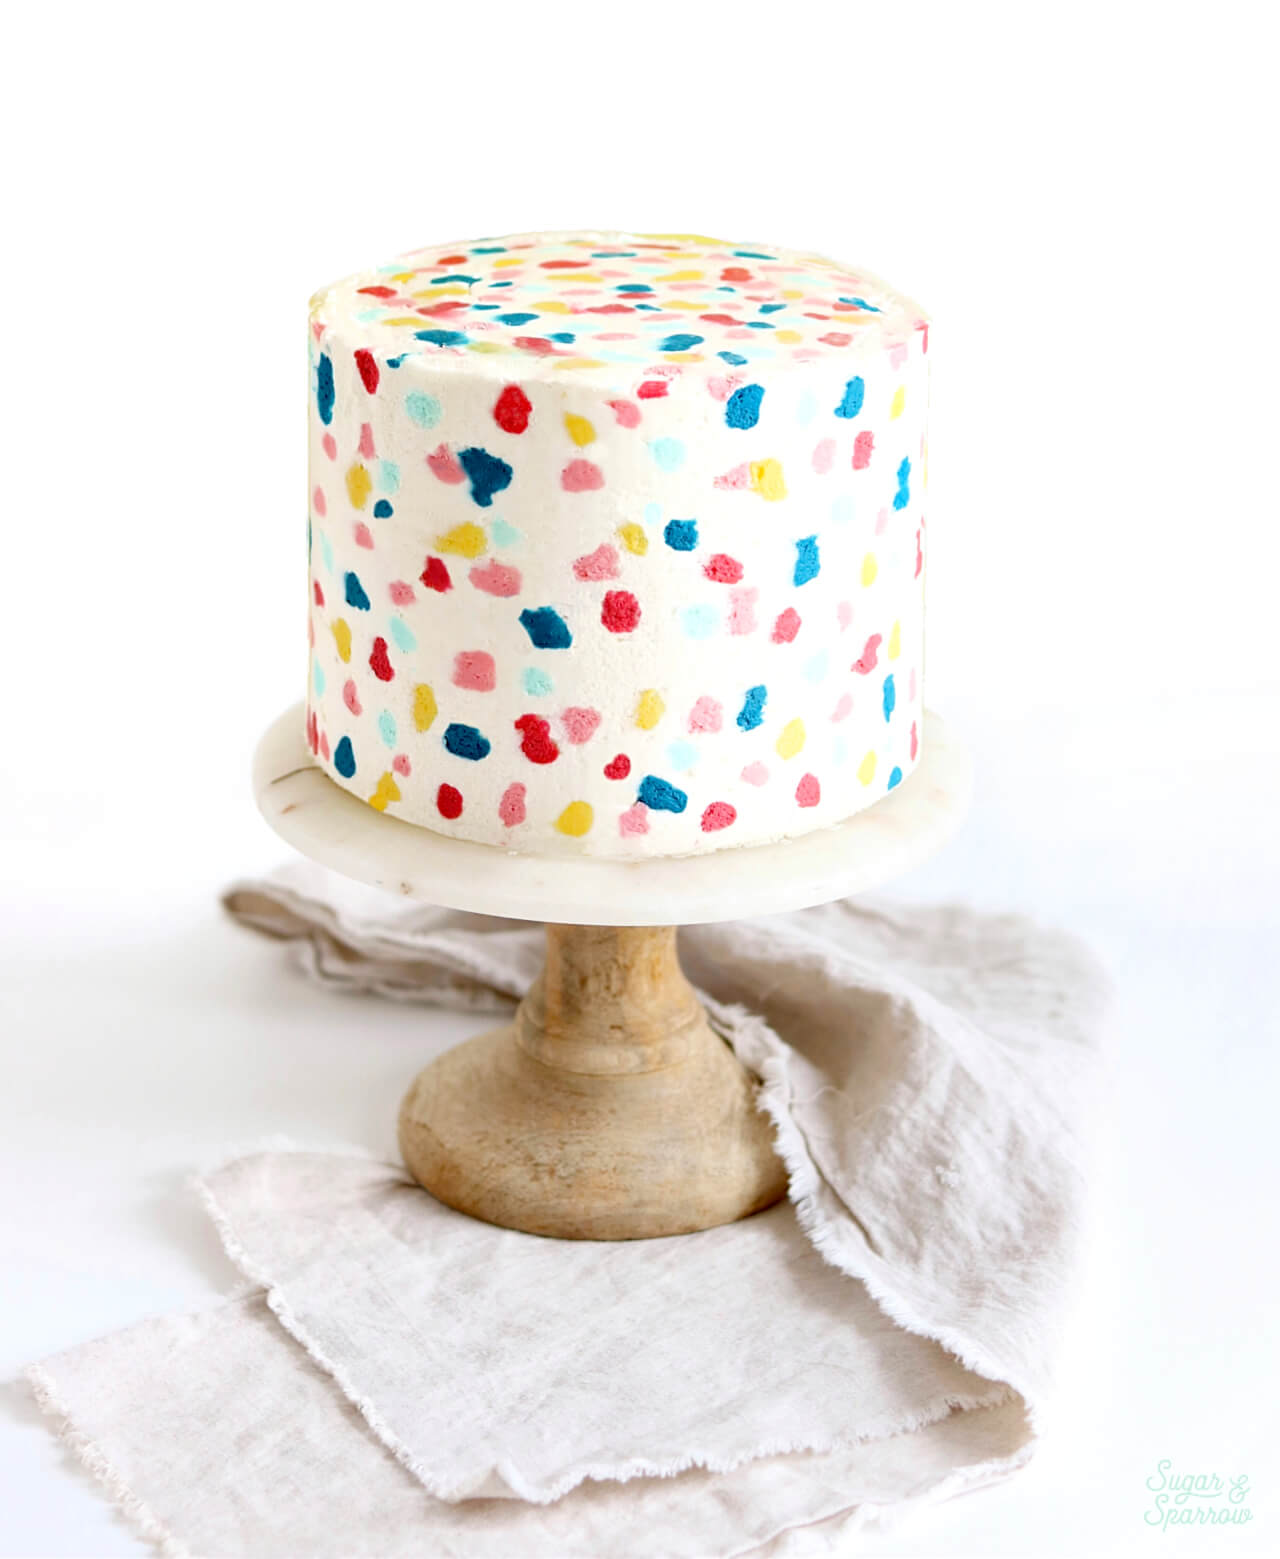
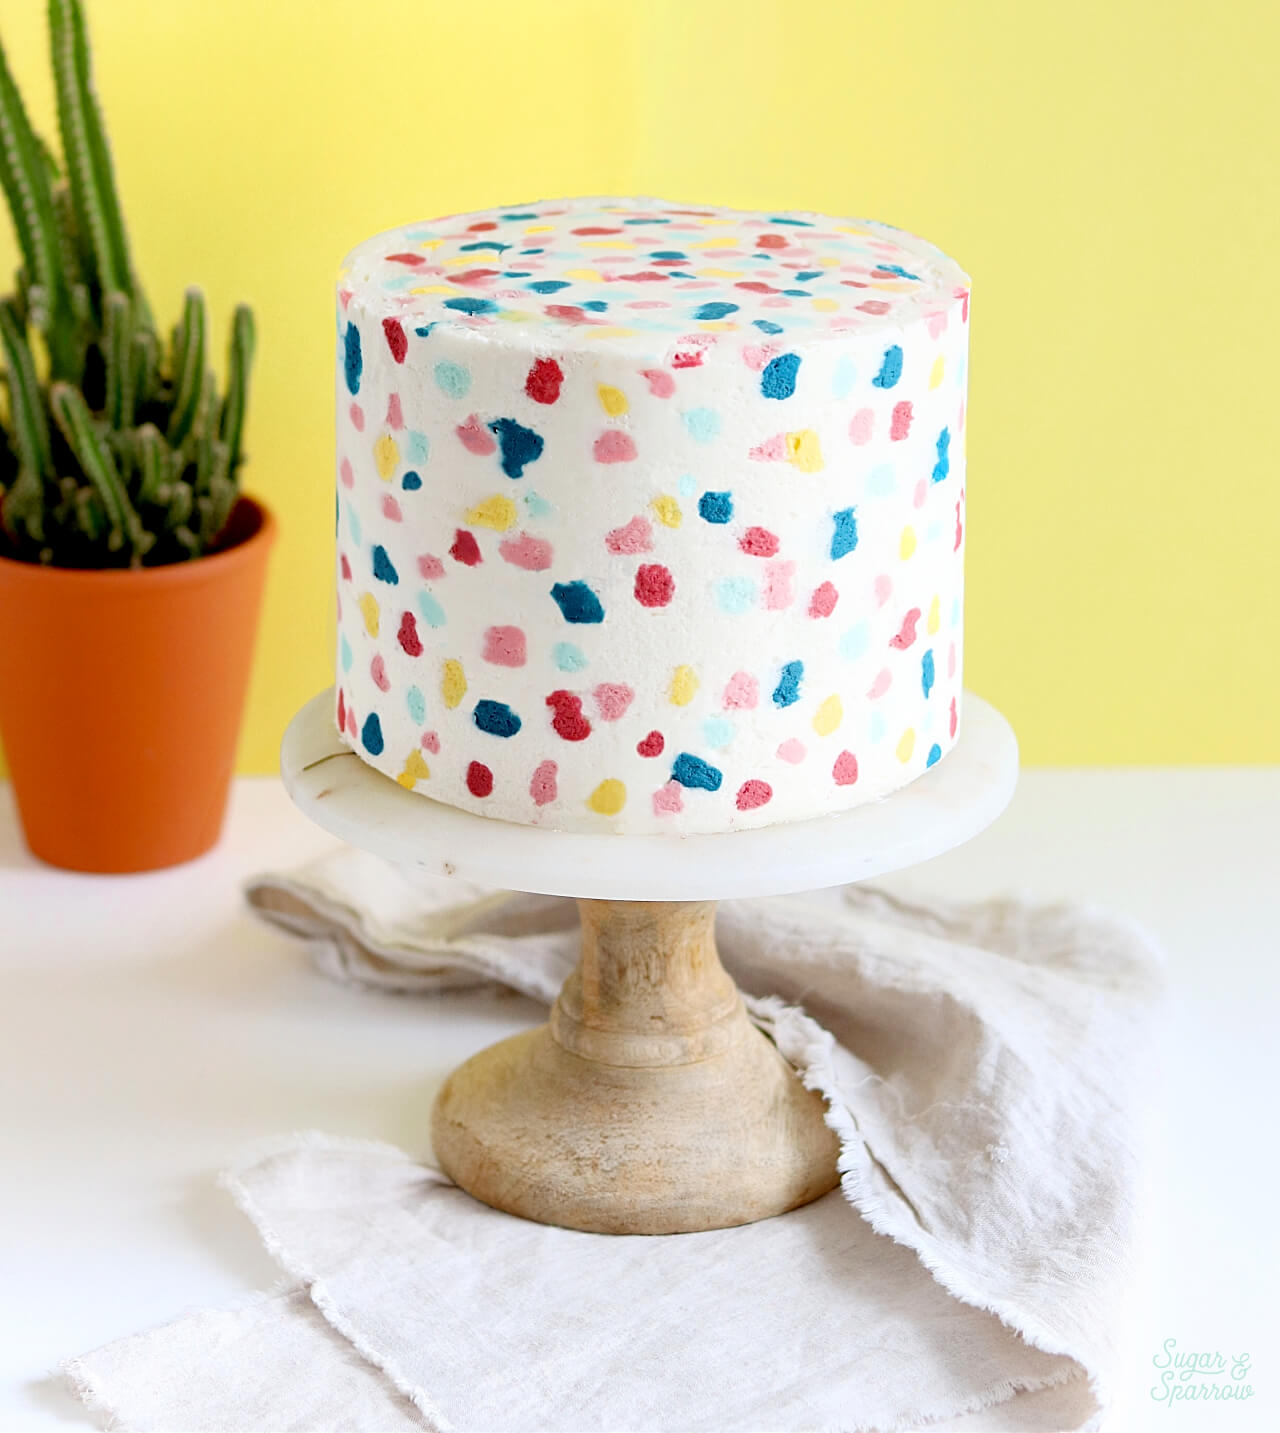
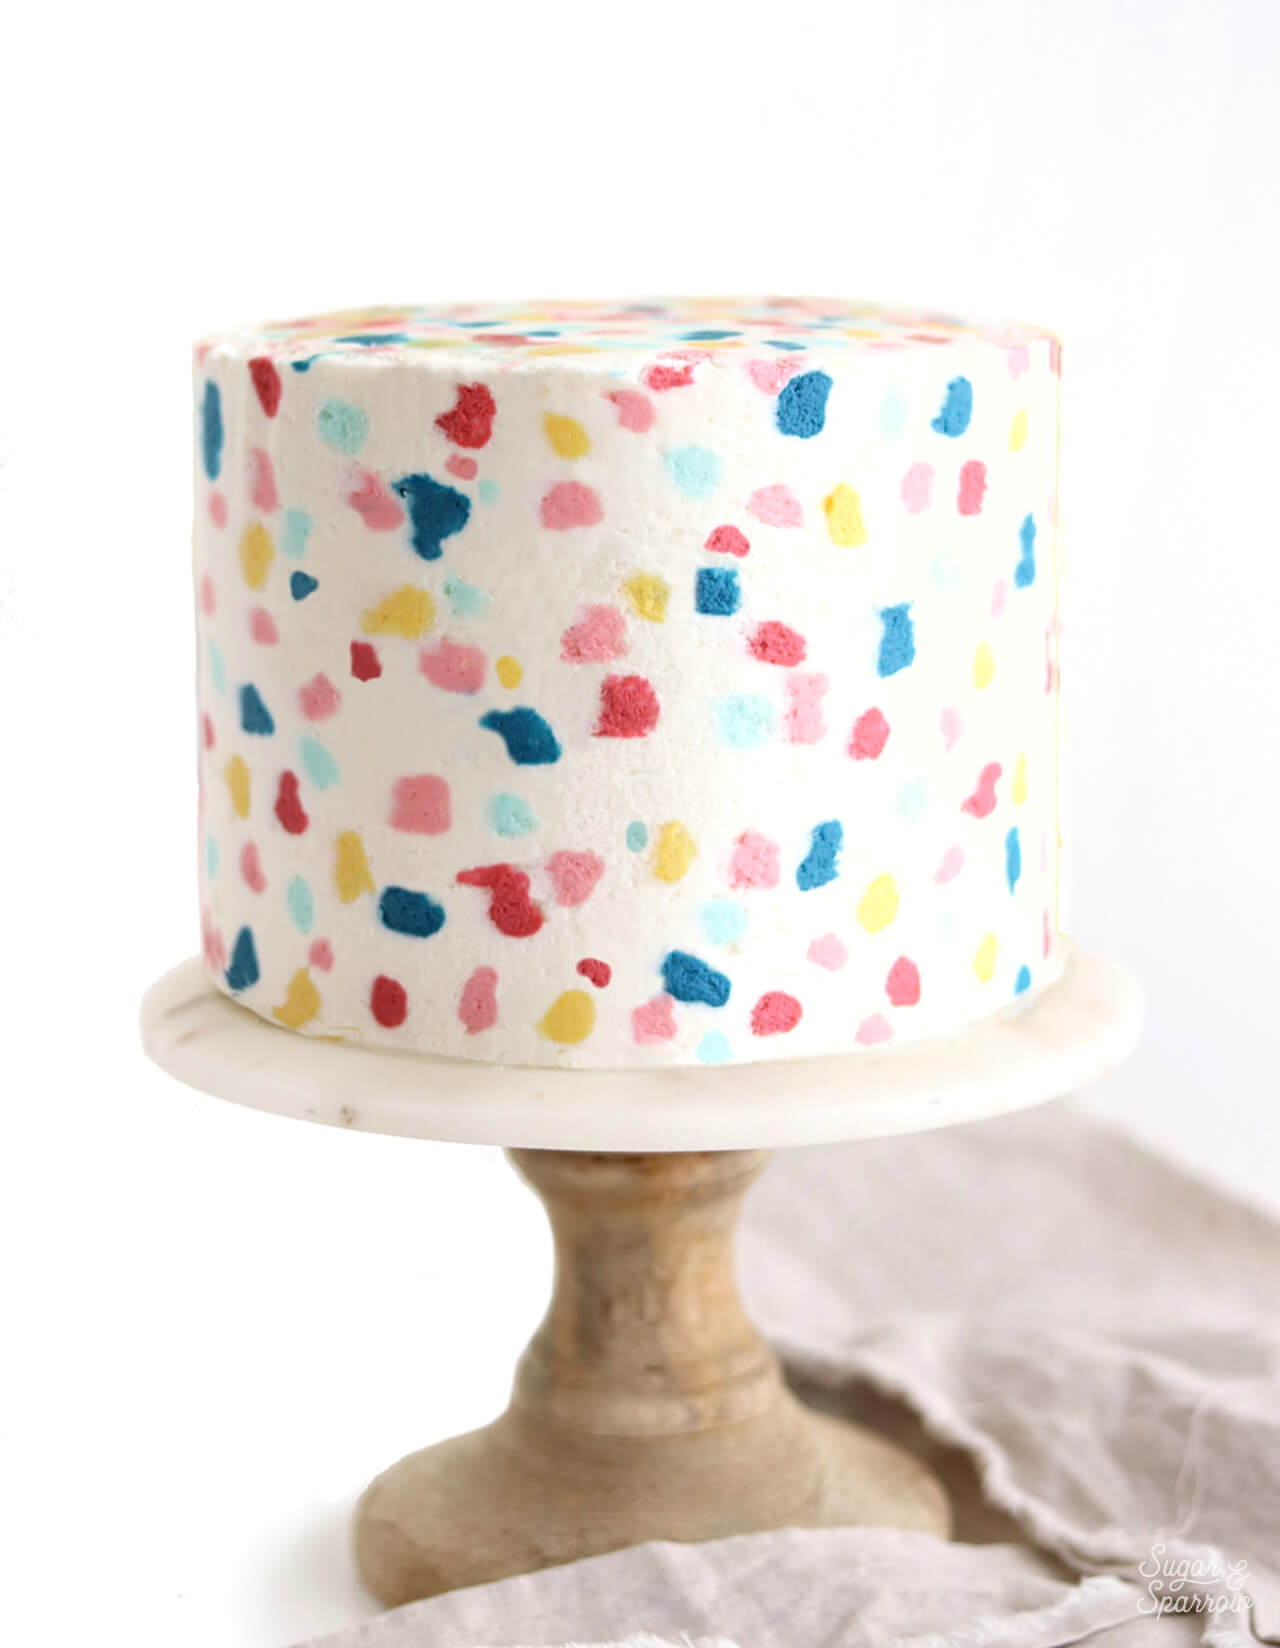
I am so, so happy with how this cake turned out! The vast majority of terrazzo cakes I’ve seen before have been made with fondant (and they do look amazing!), but since I’m such a buttercream nerd I really wanted to see if I could create the look entirely with frosting. I’m glad I challenged myself, because I figured out a technique that works so well! By creating the print with buttercream on parchment paper, I was able to transfer it onto the top and sides of my cake and get a smooth terrazzo print all over. Just imagine all the amazing color palettes this design will work with!

colorful terrazzo cake tutorial
terrazzo buttercream cake tutorial

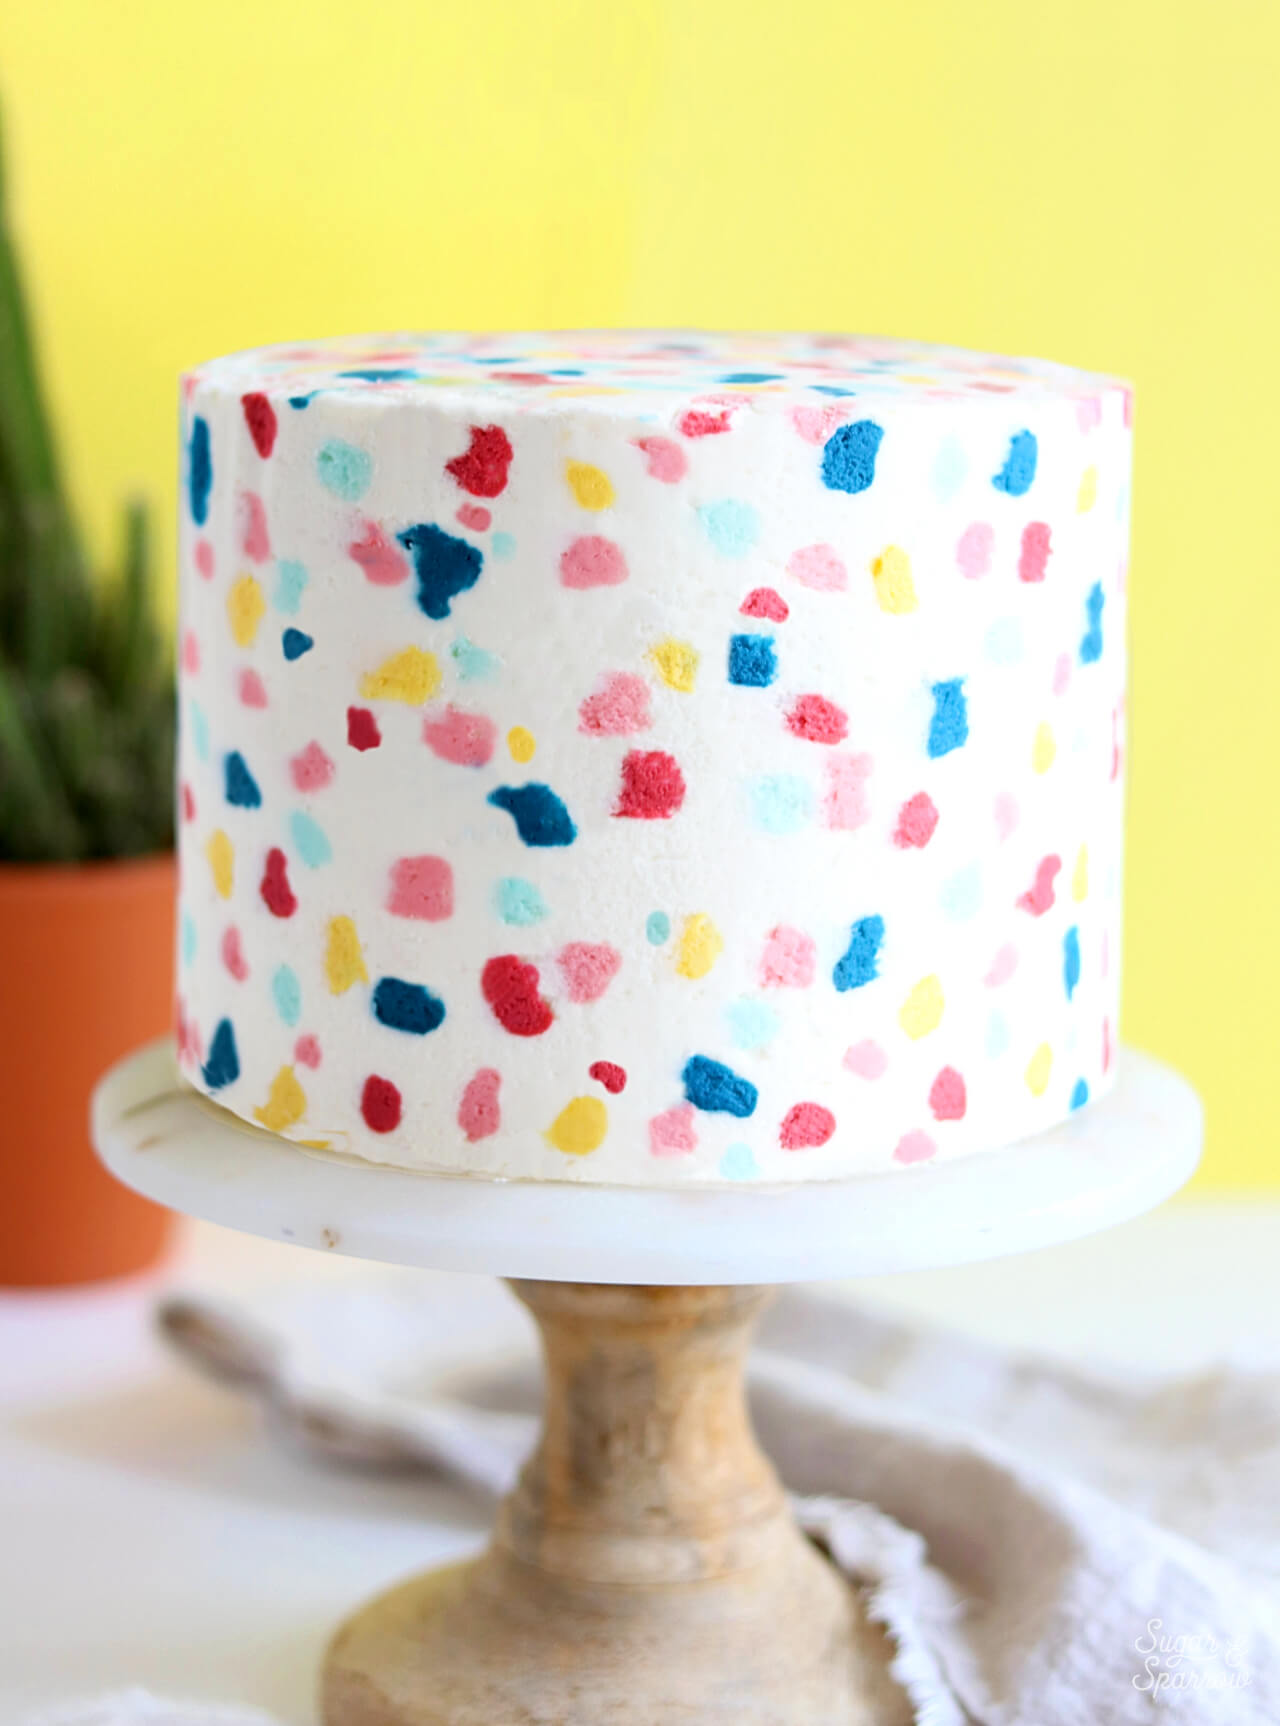
This terrazzo technique is super easy, but I will admit that using it on both the top and sides of the cake can be a little time consuming. It essentially involves creating large buttercream transfers (one for the top and one to wrap around the sides) and ironing them onto the cake with a fondant smoother. Most of your time is spent waiting for those transfers to firm up in the refrigerator until they’re just the right consistency to work with. If you’re short on time, using this technique on only the sides will give you that same terrazzo look while saving you half the time! Either way, this terrazzo technique is going to make your cake next level.

how to make a terrazzo cake

Here’s a quick video of the decorating process for you to visualize the technique before you read all about it below:

If you’re into cake decorating videos like this one, be sure to check out my YouTube Channel! You’ll find tons of videos to inspire you there, and make sure you never miss a new one by clicking the Subscribe button.  

You Will Need: 

  • 6-inch cake that’s been crumb coated and chilled
  • 1.5 batches of vanilla buttercream
  • Food color gels of your choice
  • Bowls and spoons for color mixing 
  • Parchment paper
  • Scissors
  • Pencil
  • A ruler and a piece of string for measuring
  • 6-inch cardboard cake circle
  • Wilton Tip 2 (x5) 
  • Piping Bags 
  • Angled Icing Spatula
  • Fondant Smoother

Step 1: Create a Buttercream Color Palette

Reserve 2.5 Cups of buttercream and divide the rest evenly amongst separate bowls, one per color of your terrazzo tiles. I decided to use five different colors in my design, so I divided my buttercream into five different bowls and used the Wilton Color Right System to color each one.

wilton color right system with buttercream

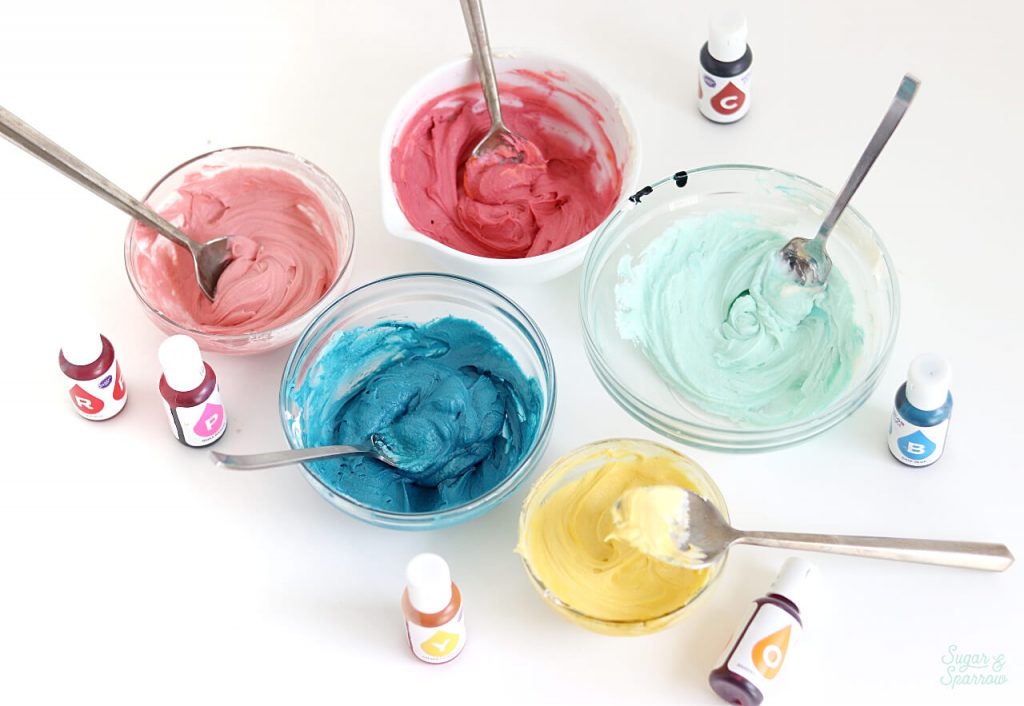
The Wilton Color Right System is great for creating custom colors, and it comes with a handy chart to help you mix just the right amounts to get the color you have in mind. For example, to get the muted pink tone I mixed a little of the Pink with the tiniest bit of Brown to create more of a dusty rose color. 

buttercream piping with Wilton Tip 2

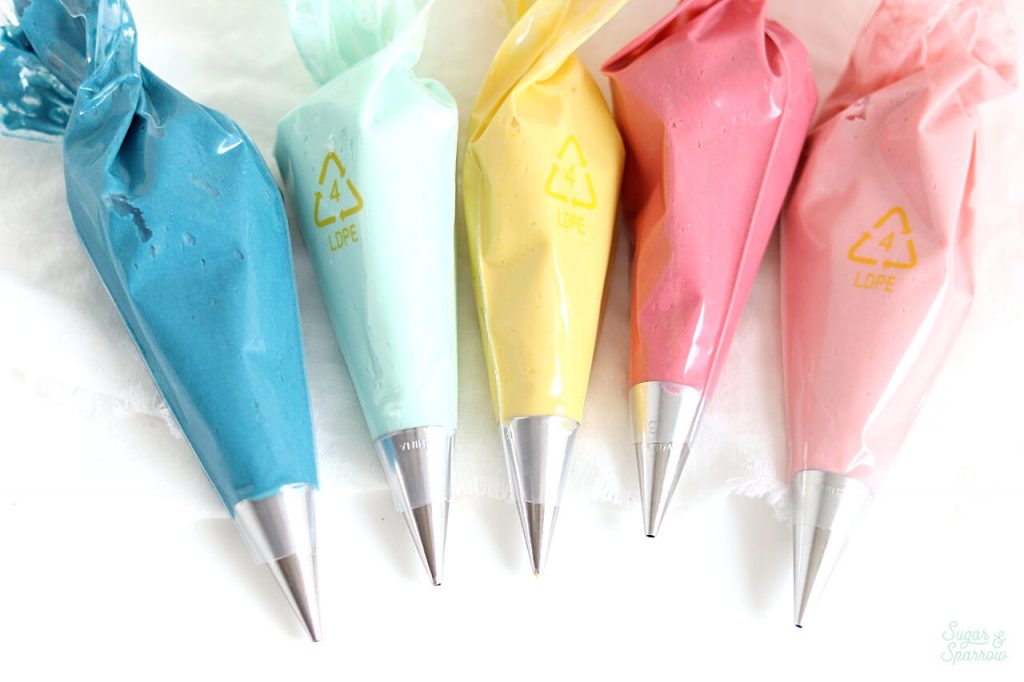
Mix away until you’ve got the ideal color palette, then add each color into a separate piping bag fitted with Wilton Tip 2. 

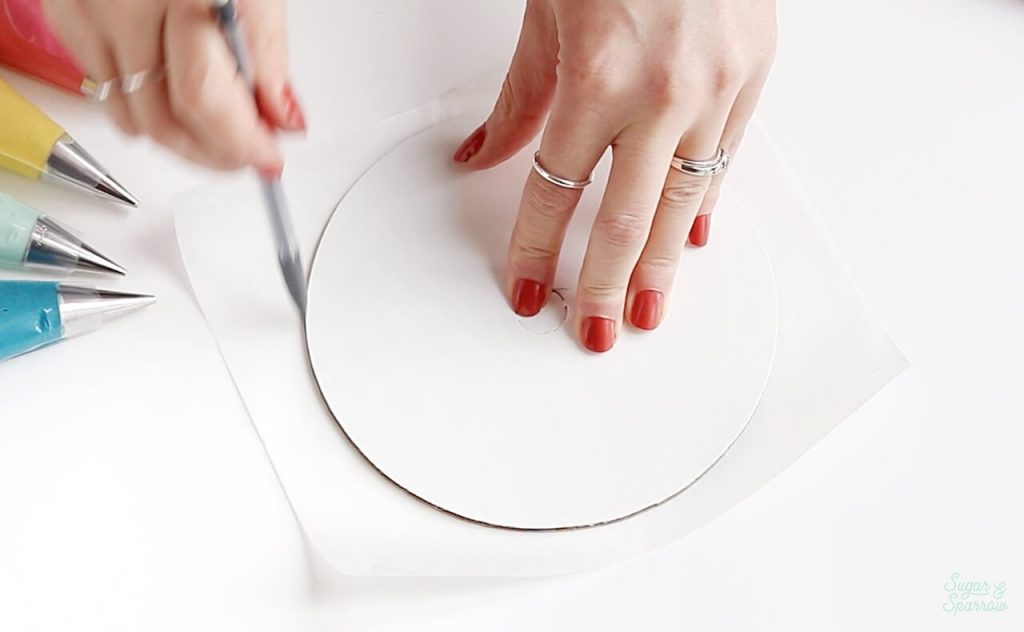
Step 2: Measure and Cut the Parchment Paper

Before you start piping away, you’ll first need to cut out parchment paper to fit the top and sides of your cake. Measuring the top is easy if you have a cardboard cake circle that’s the same size as the diameter of your cake. Simply trace the cake circle onto a piece of parchment paper and cut it out. 

measure and cut parchment paper round
how to cut a parchment paper round

For the sides, you’ll need a ruler and a piece of string. Measure the height of your cake with the ruler, then wrap a string around your cake and mark where it comes together before measuring it with the ruler. This will give you the height and circumference of your cake’s sides. Add about ½ inch to the height measurement and 1 inch to the circumference measurement, then trace the dimensions onto wax paper and cut it out. You’ll now have a strip of parchment paper that’s sized just a tiny bit bigger than you need (trust me on this!) to create your terrazzo pattern on. 

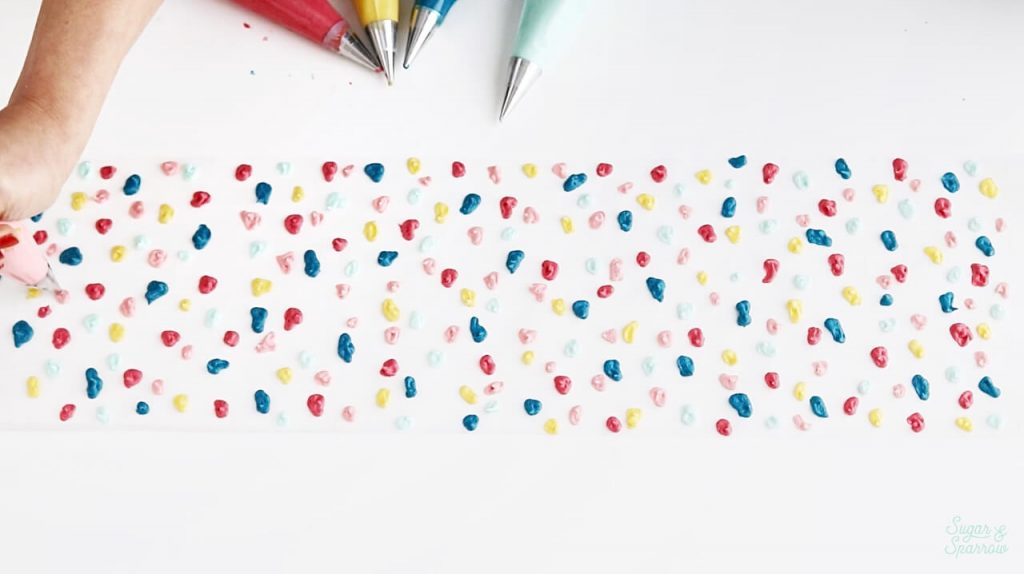
Step 3: Pipe the Terrazzo Colors

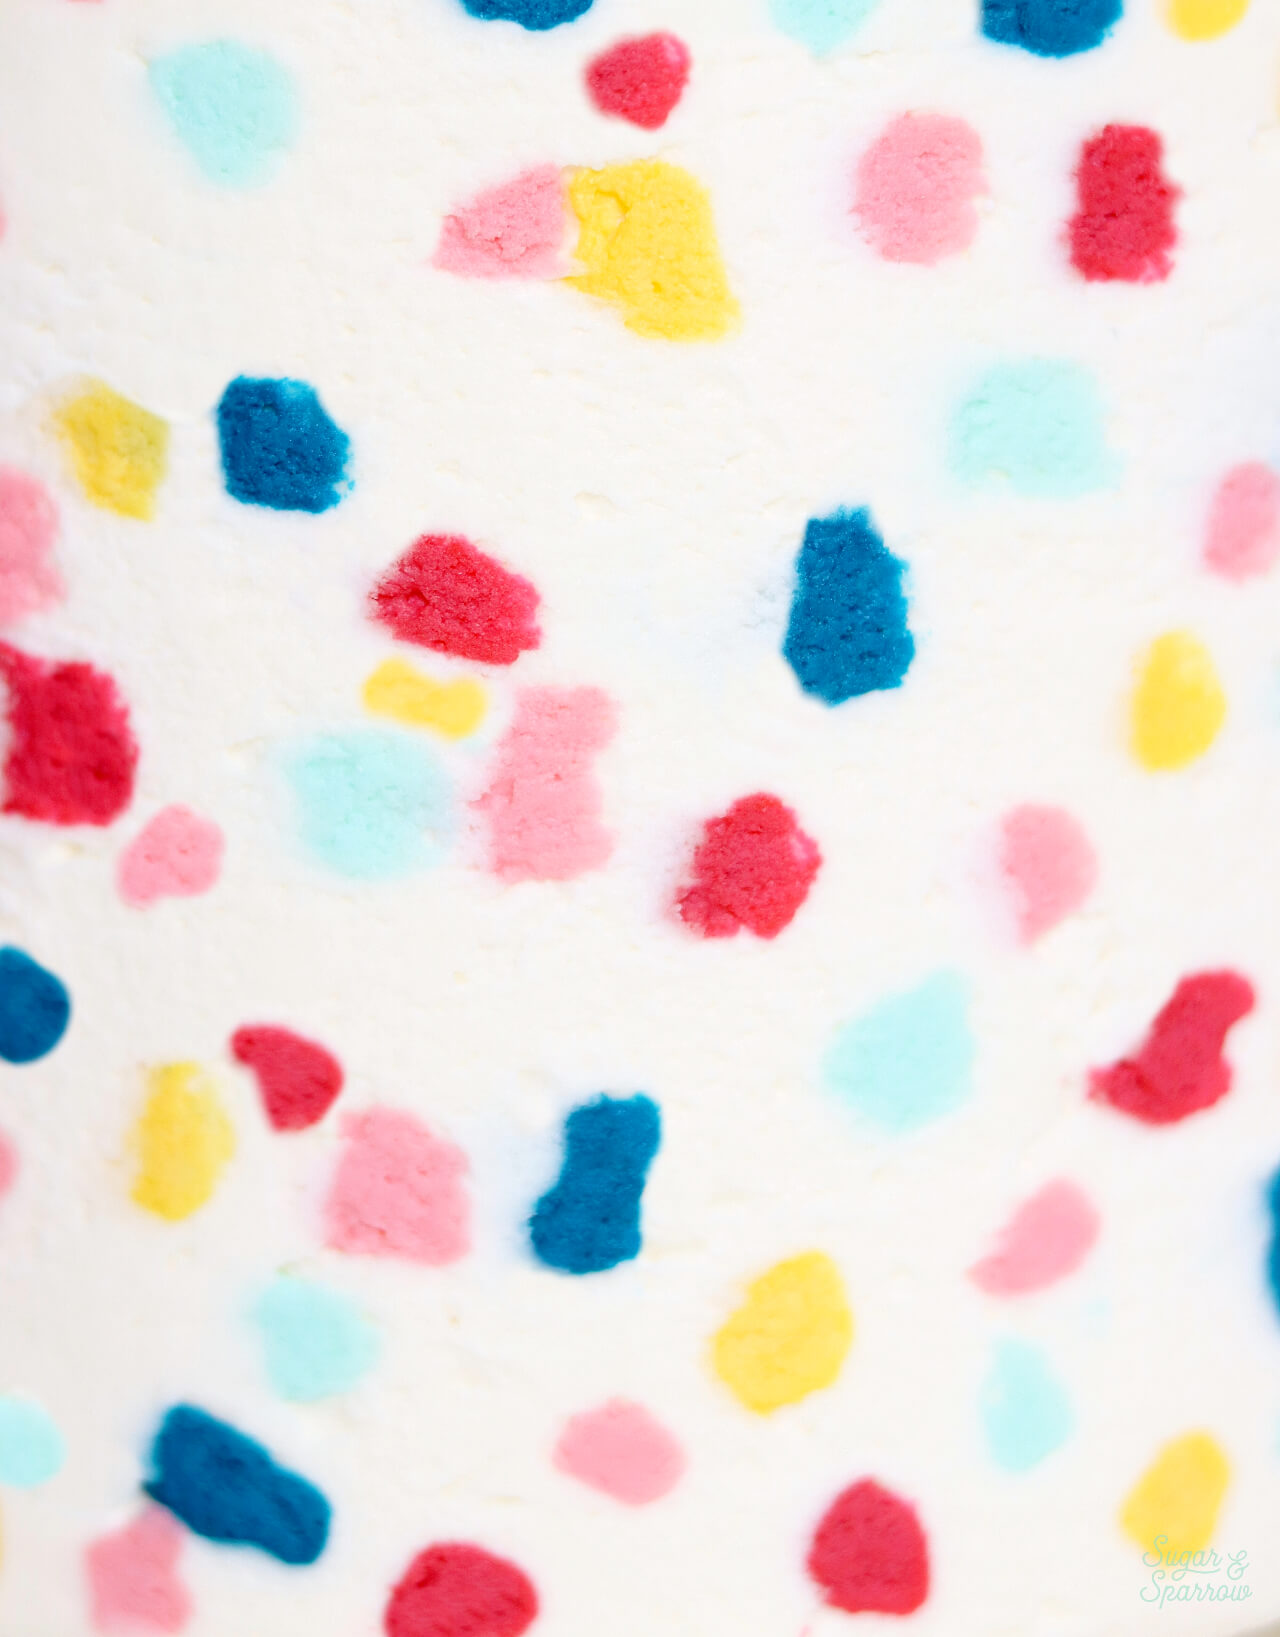
Starting with the circular piece, use your piping bags to create random terrazzo-inspired shapes all over the parchment paper. Be sure to leave some blank spaces in between to give the shapes just the right amount of space. It helps to pull up some images of terrazzo patterns for inspiration.

buttercream terrazzo pattern
how to pipe buttercream terrazzo pattern

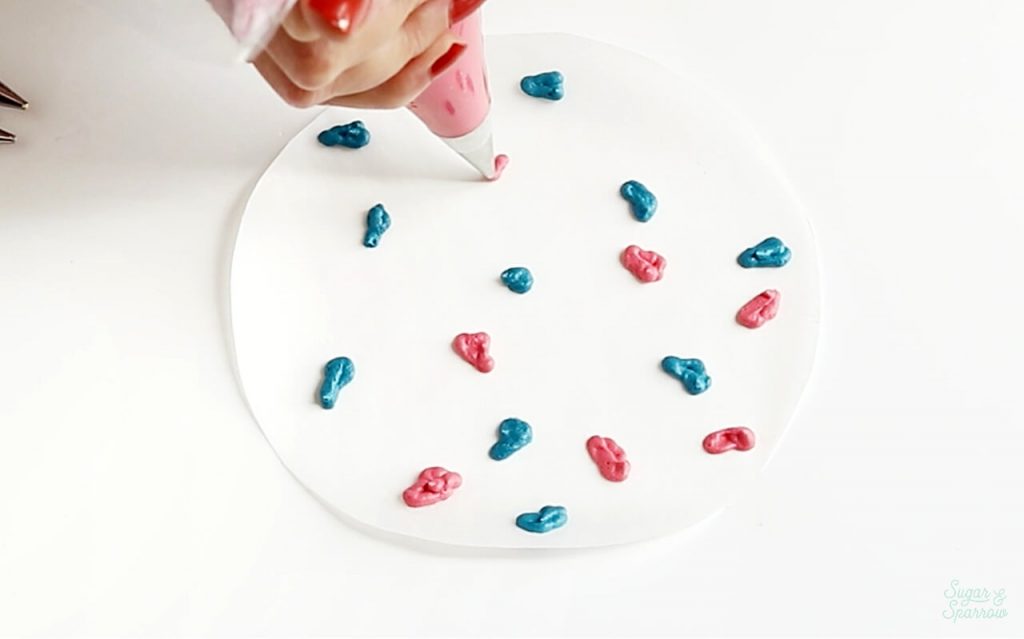
Once your terrazzo tiles are piped on, place the parchment into the refrigerator to firm up for about 20 minutes. This part is important for making sure the tiles maintain their perfect shapes during the next step. 

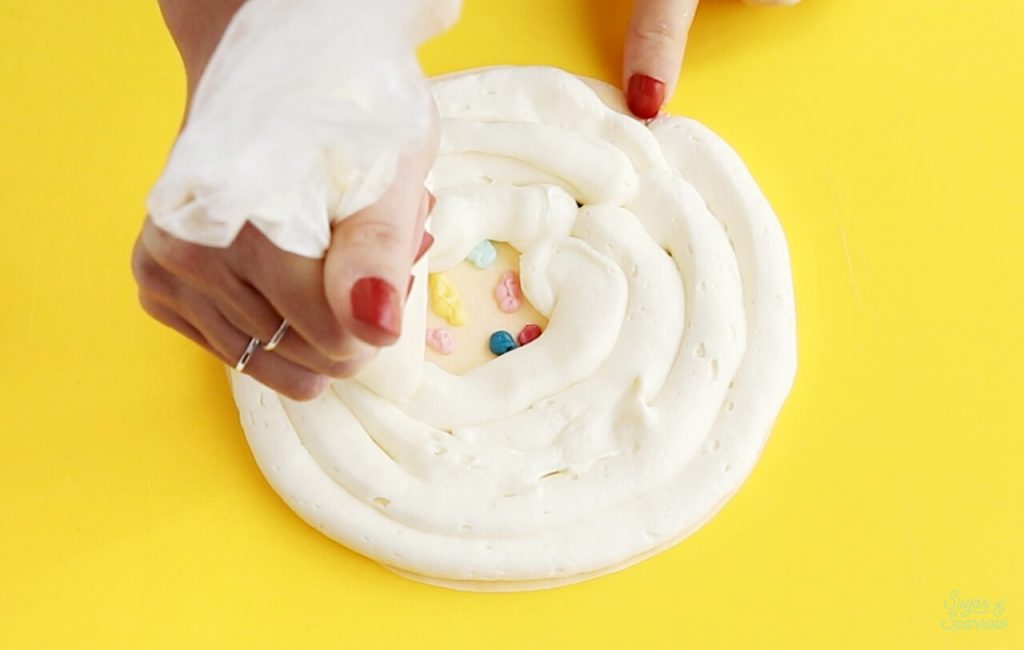
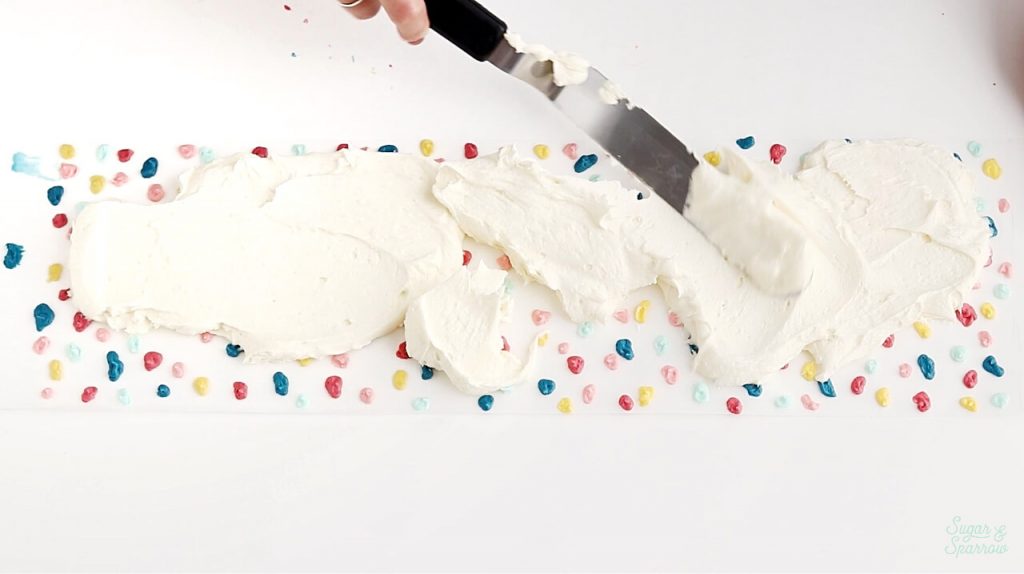
Step 4: Frost the Parchment Paper 

When your terrazzo tiles are nice and firm, spread the reserved buttercream over top of them, creating a ¼ inch thick layer of frosting over the entire piece of parchment paper. Make sure the buttercream is as smooth as possible and don’t be afraid to apply a little pressure to help fill in all the spaces between the color tiles.

frosting the parchment round
smoothing the parchment round

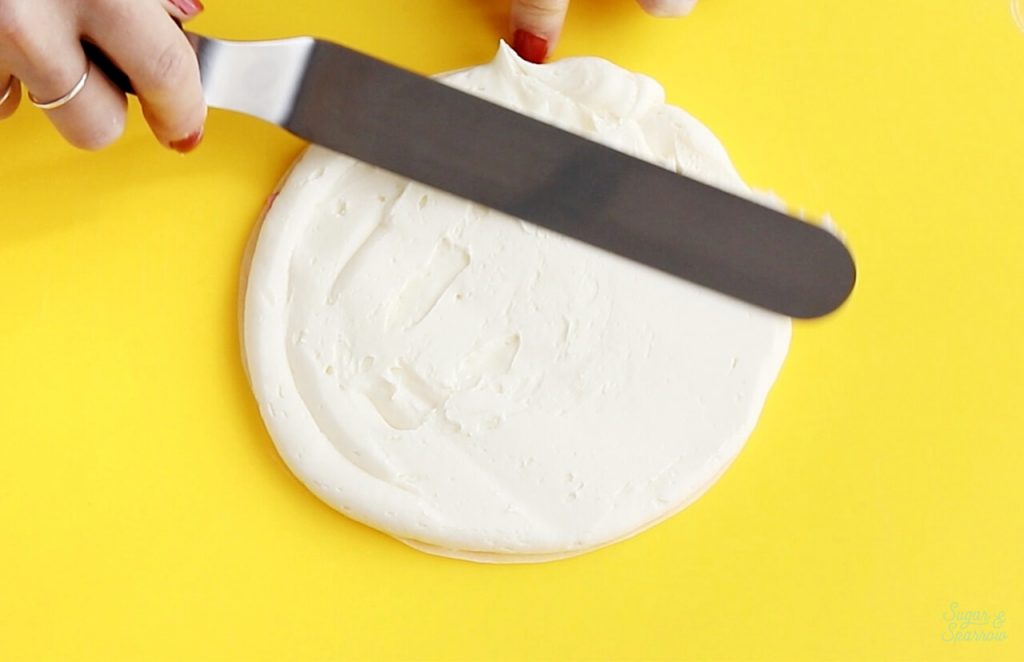
Then, place the frosted parchment pieces back into the refrigerator for another 10 minutes, but no longer. You want to make sure the buttercream is firm enough to work with, but not so firm that it doesn’t adhere to the cake easily. 

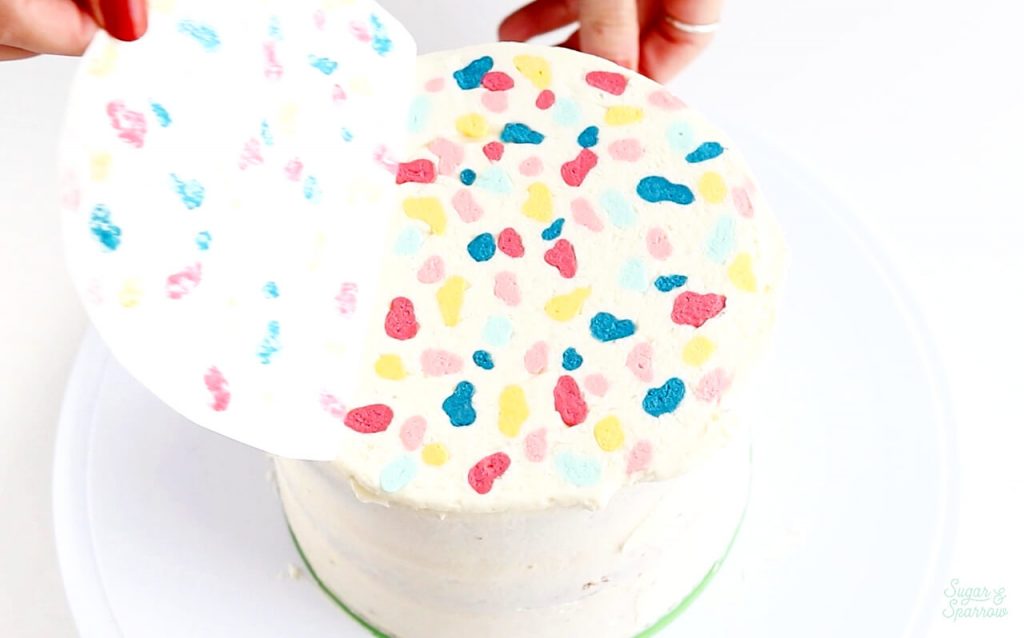
Step 5: Transfer the Terrazzo Pattern to the Top

Add a super thin layer of fresh buttercream frosting to the top of the cake to act as glue, then place the circular Terrazzo parchment on top, buttercream side down.

add frosting to top of cake
add buttercream transfer to top of cake

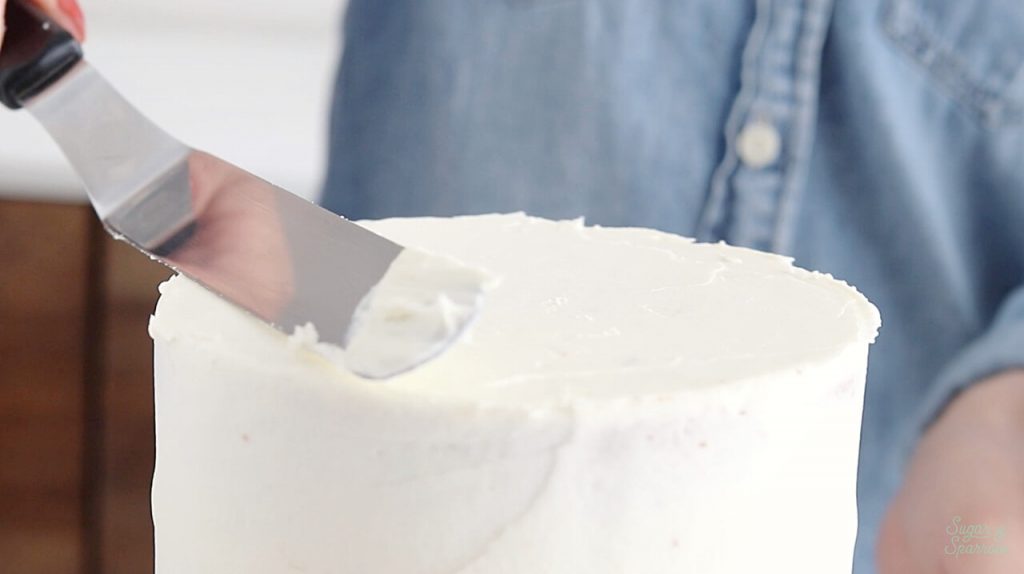
Use the Wilton Fondant smoother to press the parchment down so it adheres to the top of the cake perfectly, then place the cake back into the refrigerator for another 10 minutes. If you feel like the top needs to be flatter, you can put a weight (like a couple soup cans) into a cake pan that’s the same diameter as your cake and place it on top. This will keep just the right amount of pressure on it while it sets in the fridge.

smoothing buttercream transfer

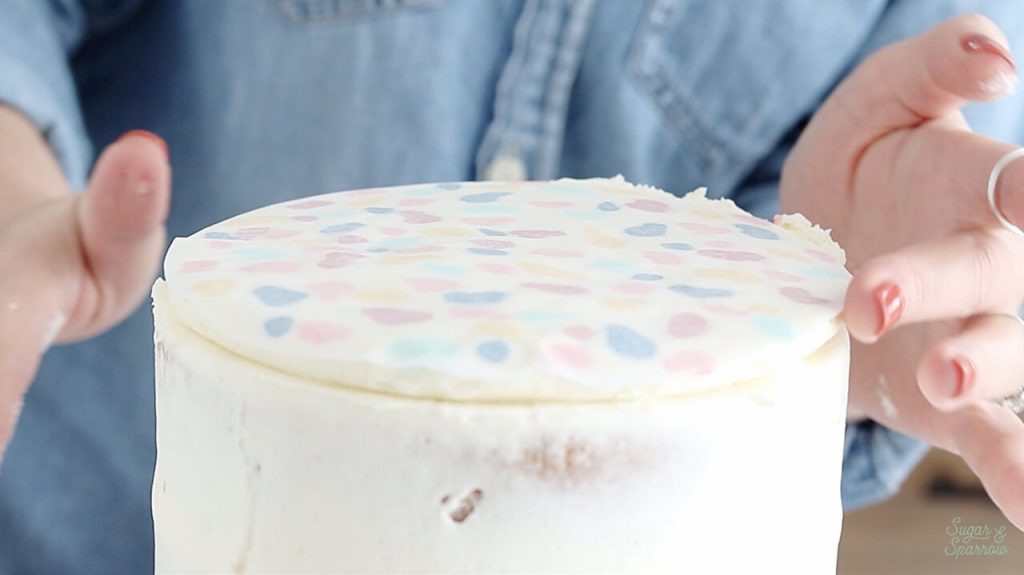
After it’s firmed up, carefully peel back the parchment paper to reveal your beautiful buttercream terrazzo!

how to make a terrazzo buttercream transfer

Step 6: Create the Terrazzo Pattern on the Sides

Repeat steps 3 and 4 using the strip of parchment paper you previously prepared for the sides of the cake.

how to make terrazzo buttercream transfer wrap
how to make a buttercream transfer wrap for cake
how to make a buttercream wrap for cake

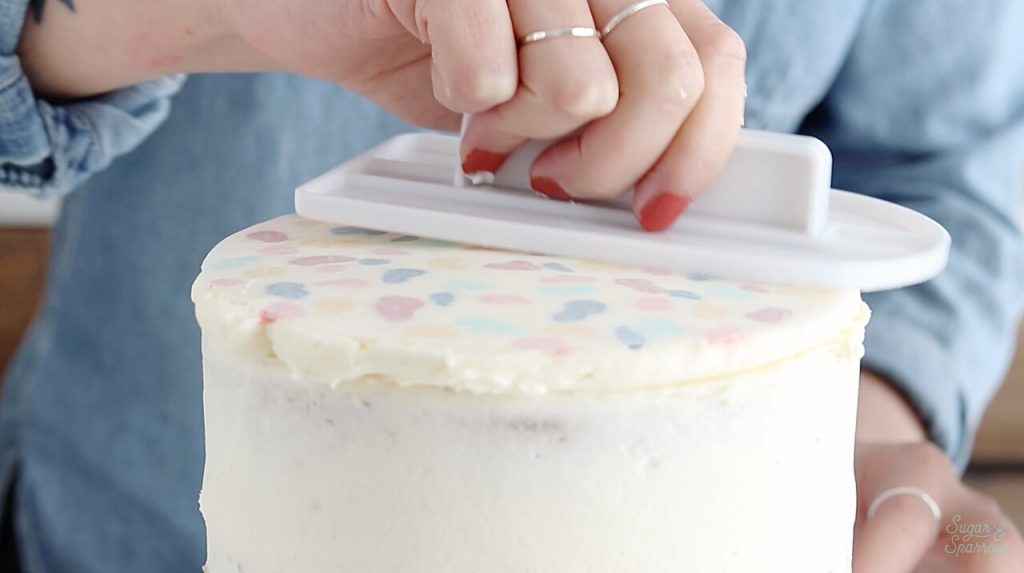
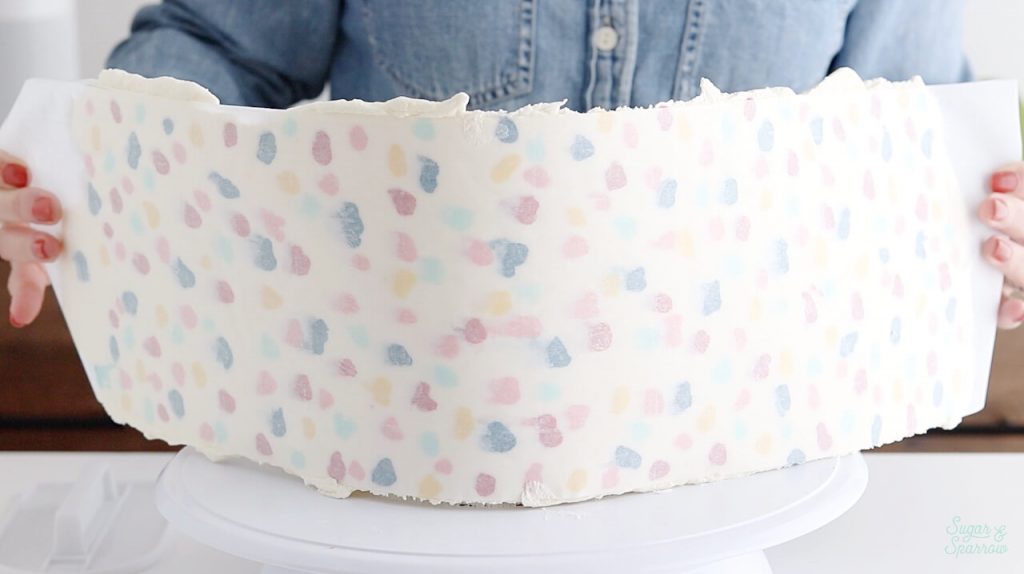
After its last trip to the refrigerator, where it’s semi-set, apply a thin layer of fresh buttercream to the sides of the cake for glue.

frosting the sides of cake

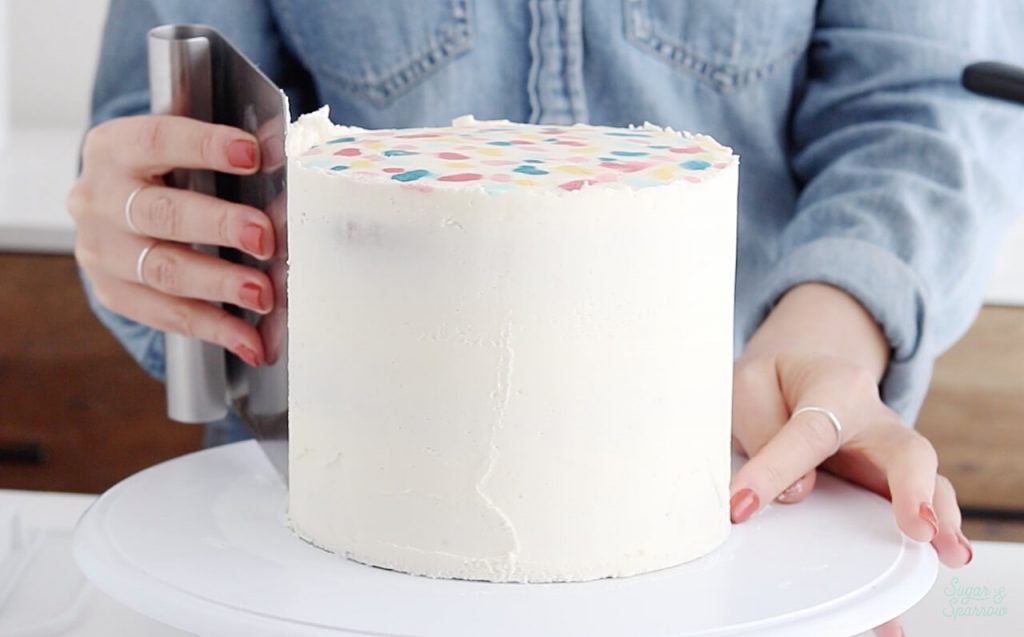
Wrap the parchment (buttercream side down) around the circumference of the cake and be sure to pull it as tightly as you can so it makes contact with every inch of those sides. You can secure the parchment with binder clips if you need to, but mine really stayed put once I had it wrapped.

terrazzo buttercream wrap tutorial
printed buttercream wrap cake decorating tutorial

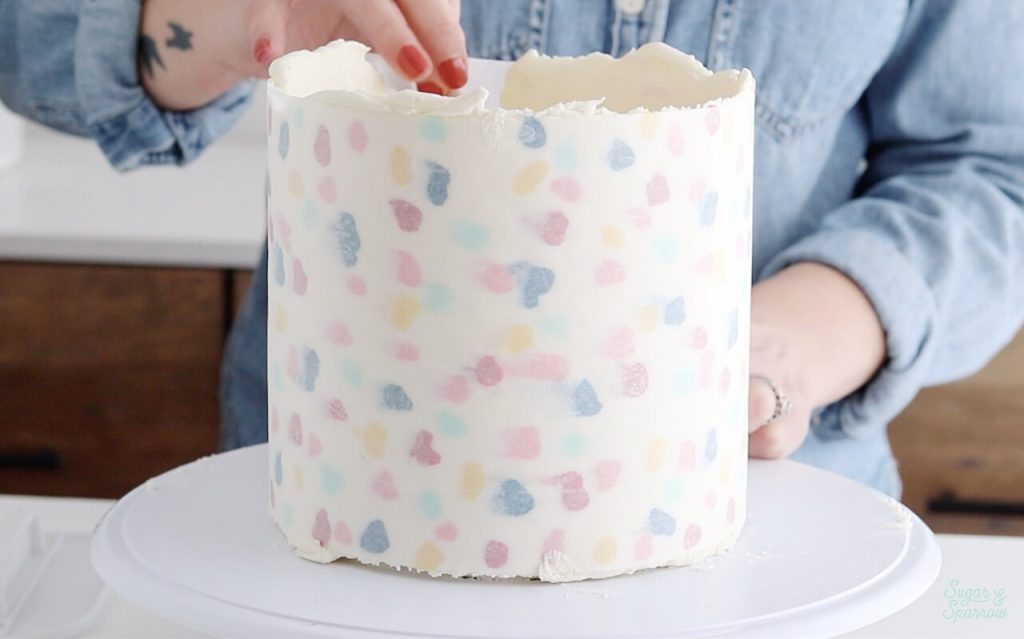
Smooth the terrazzo wrap with the Wilton Fondant smoother and place it back into the refrigerator for a final 10 minutes.

how to wrap cake with buttercream

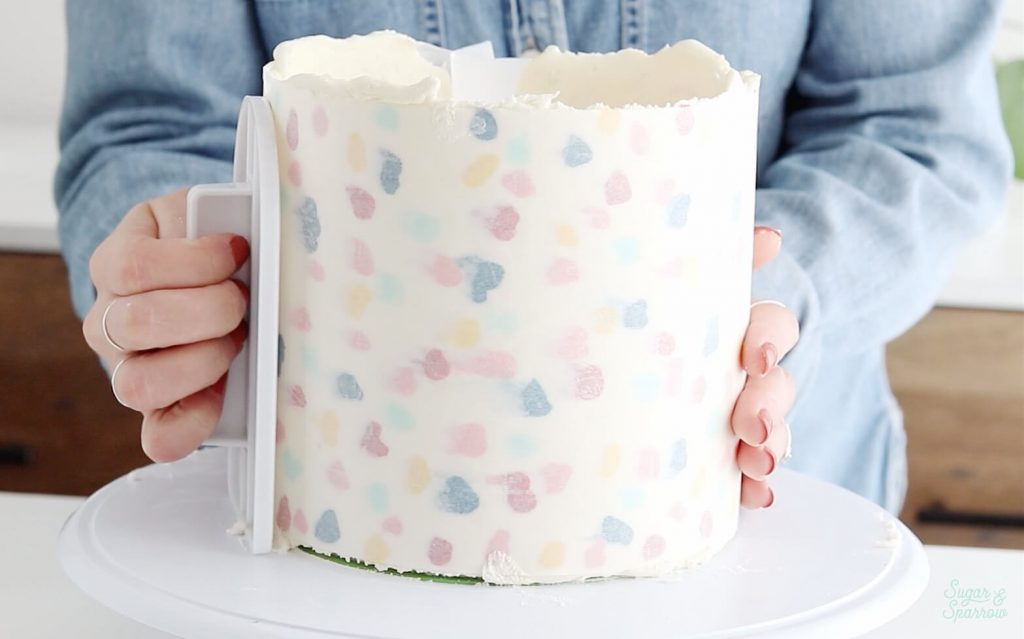
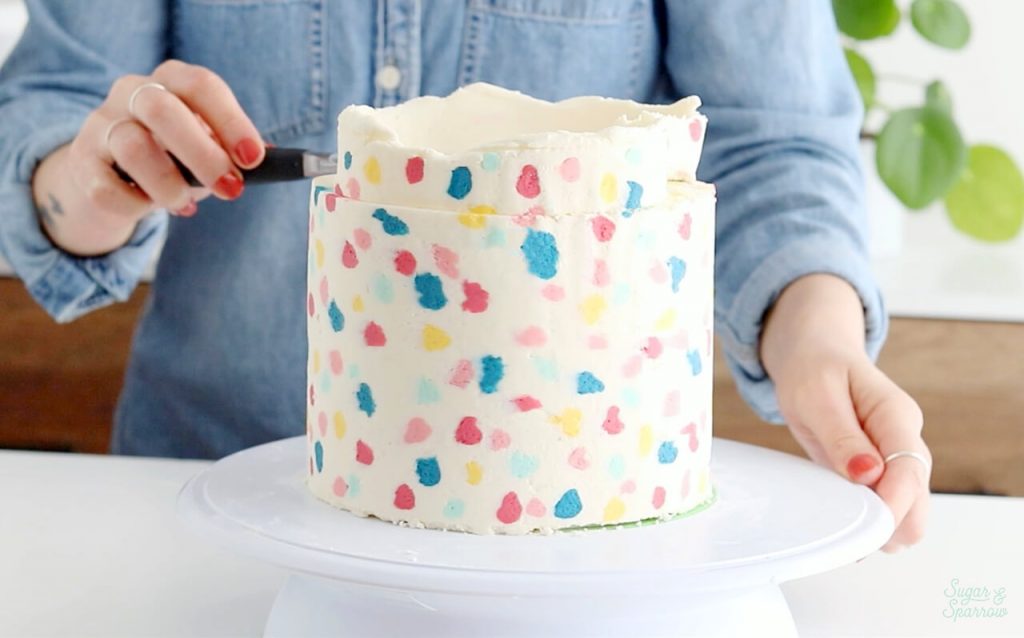
Now that the wrap is nice and set, gently peel the parchment paper off the cake to reveal those gorgeous terrazzo sides.

how to wrap a cake with buttercream terrazzo

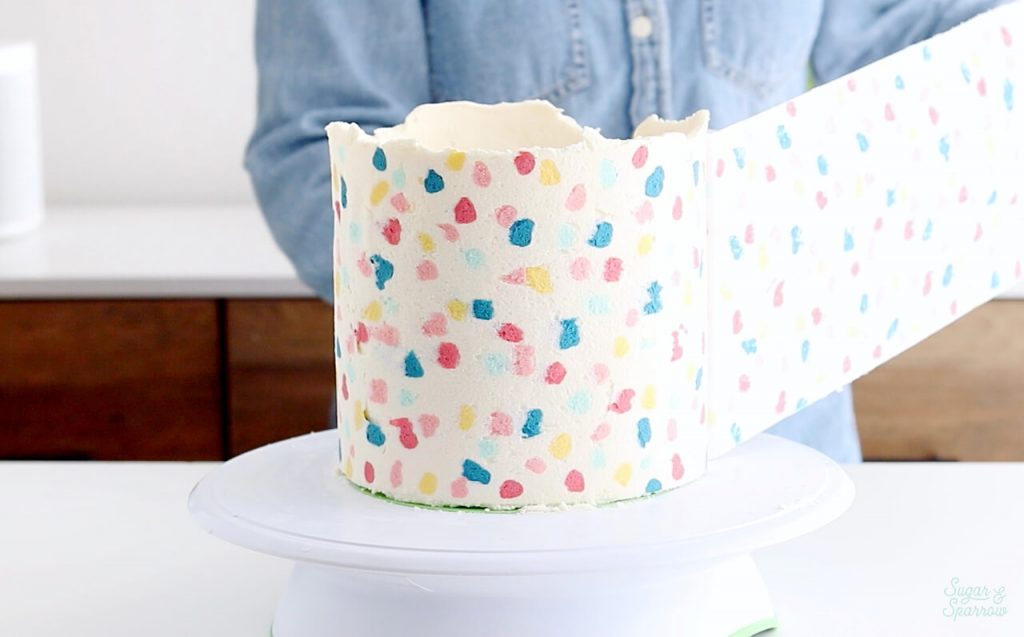
Finally, use a paring knife to cut away the excess buttercream around the top edge. This part is essential for making sure you’ve got perfect, sharp edges.

buttercream terrazzo cake tutorial
buttercream cake covered in terrazzo

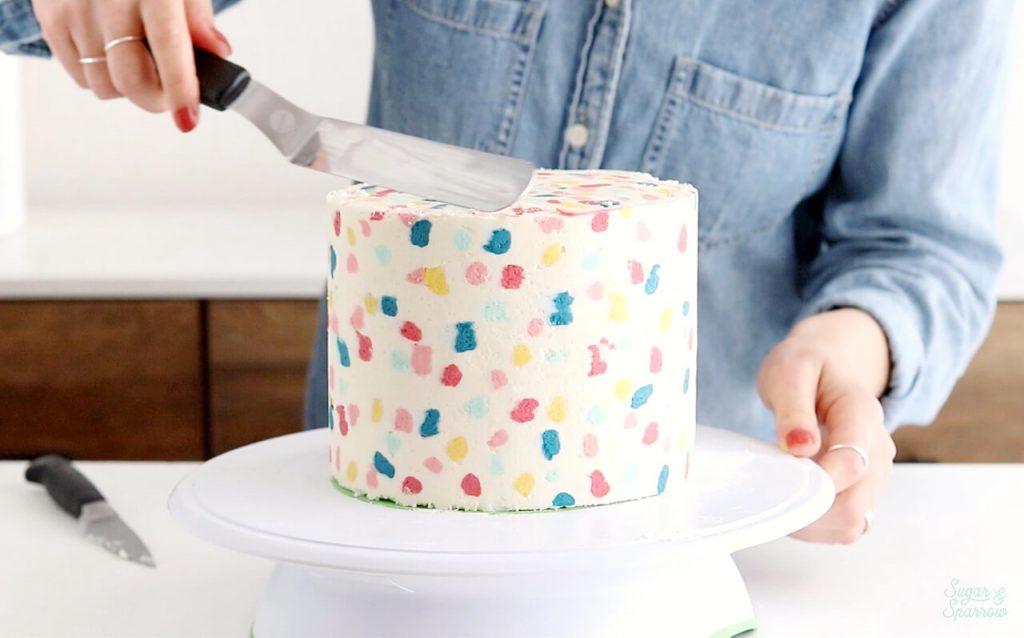
Just look at that pretty buttercream terrazzo transfer!

buttercream terrazzo cake tutorial by Sugar and Sparrow
terrazzo cake tutorial with buttercream

Disclaimer: I was compensated by JOANN for my work of creating this project, styling, filming, photographing, and writing about their products. As always, all opinions are honest and my own. Thank you for supporting brands that support Sugar & Sparrow.

By: Whitney · In: Featured, Tutorials · Tagged: buttercream cake, buttercream terrazzo cake, buttercream transfer, cake decorating, cake decorating tutorial, fondant smoother, JOANN, printed cake, terrazzo cake, wilton, wilton tip 2

you’ll also love

the best vanilla cupcakes recipeThe Perfect Vanilla Cupcake Recipe
pumpkin layer cake recipe by sugar and sparrowPerfect Pumpkin Layer Cake Recipe
oreo cookies and cream cakeOreo Layer Cake Recipe

Join the List

Stay up to date & receive the latest posts in your inbox.

Reader Interactions

Comments

  1. Beulah says

    August 7, 2020 at 9:07 am

    Awesome. Thanks

    Reply
  2. Pam says

    May 15, 2020 at 11:09 am

    I have subscribed but have never received any emails with tutorials.
    Just curious as to whether or not you received my information.

    Thank you

    Reply
    • Whitney says

      May 16, 2020 at 6:20 pm

      Hi Pam! Thanks for subscribing! I’ve got your info and you’ll be receiving an email as soon as I whip one up. Between pregnancy and my full time day job I can’t seem to get them out as regularly as I’d like to, but they’re coming!

      Reply

Leave a Reply Cancel reply

Your email address will not be published. Required fields are marked *

Recipe Rating


Next Post >

Sweet & Salty Pretzel Nutella Cake Recipe

Primary Sidebar

Welcome to Sugar & Sparrow

Welcome to Sugar & Sparrow

Helping you whip up pretty desserts with confidence and creativity. And hopefully sharing a few laughs with you along the way!

Learn More

Connect

let’s bake!

Get my very best recipes, baking tips, and decorating tutorials sent to your inbox

Featured Posts

christmas floral cake tutorial

Holiday Floral Buttercream Cake Tutorial

ocean cake tutorial

Under The Sea Cake Tutorial

strawberry cake recipe by sugar and sparrow

The Tastiest Strawberry Cake Recipe

Search

Archives

Follow Along

@sugarandsparrowco

LEMON CUPCAKES 🍋 after about a dozen recipe tes LEMON CUPCAKES 🍋 after about a dozen recipe tests, this one is everything I could want in a lemon cupcake! Fluffy-yet-moist, bursting with natural lemon flavor, and absolutely irresistible topped with lemon cream cheese buttercream. 

Full recipe (with frosting) linked in my bio + at https://sugarandsparrow.com/homemade-lemon-cupcakes/

INGREDIENTS:
1 Cup (132g) all-purpose flour
1 tsp baking powder
1/4 tsp salt
1/4 Cup (60ml) whole milk, room temperature
3 Tbsp (45ml) lemon juice from 1 medium lemon
3/4 Cup (150g) granulated sugar
3 Tbsp (42g) unsalted butter, room temperature
2 Tbsp (30ml) vegetable oil
2 large eggs, room temperature
1 tsp pure vanilla extract

INSTRUCTIONS:
1. Preheat the oven to 350ºF (177ºF) and line a standard cupcake pan with 12 paper liners.
2. In a large bowl, whisk together the flour, baking powder, and salt. Set aside. 
3. In the bowl of a stand mixer fitted with the paddle attachment (or with a hand mixer and large bowl), add the lemon zest to the sugar and mix on low speed until fragrant and well combined, about 1 minute. Meanwhile, combine the lemon juice with the milk and set aside. 
4. Add the butter to the lemon-sugar mixture and cream on medium speed until and combined, about 2 minutes. Add the vegetable oil and beat until light and creamy, about 3 minutes. Scrape down the bowl and paddle as needed.
5. Mix in the eggs one at a time on low speed, then add the vanilla and turn the mixer to medium speed for one minute.
6. Turn the mixer off and add the flour mixture all at once. Mix on low speed until just combined, then slowly pour in the lemon-milk mixture. Mix until just combined, about 30 seconds.
7. Divide the batter equally between the liners and bake for 14-18 min. Cool, then top with frosting of your choice (link in bio for lemon cream cheese frosting)�
#lemoncupcakes #creamcheesefrosting #lemon #cupcakes #cupcakedecorating
April in my kitchen 🌸 I published 5 NEW recipes April in my kitchen 🌸 I published 5 NEW recipes on my site, baked my Oreo cupcake recipe for a fundraiser and found it was just as delicious as I remember, and filmed/photographed 3 recipes that will be on my blog in May (Lemon Cupcakes, Lemon Cream Cheese Buttercream, and No-Bake Marbled Strawberry Cheesecake) 🥰 

Comment “APRIL” to get all the available recipes and stay tuned for more! 

#bakersofinstagram #springbaking #cakedecorating #cupcakes #bakinglove
SHEET PAN COOKIE CAKE 🍪 slice it warm for a fud SHEET PAN COOKIE CAKE 🍪 slice it warm for a fudgy chocolate chip cookie OR let it settle into a moist and chewy cookie cake that’s perfect for decorating! My fave vanilla buttercream + sprinkles turn this giant chocolate chip cookie into the perfect birthday cake alternative at the end 🥳
⁣
Full recipe + decorating ideas at https://sugarandsparrow.com/sheet-pan-chocolate-chip-cookie-cake/
⁣
INGREDIENTS⁣
1 Cup (226g) unsalted butter, melted⁣
1 1/3 Cups (267g) packed light or dark brown sugar⁣
1/2 Cup (100g) granulated sugar⁣
3 large eggs⁣
1 Tbsp pure vanilla extract⁣
1 tsp baking soda⁣
1 tsp cornstarch⁣
1/2 tsp salt⁣
3 Cups (398g) all purpose flour⁣
2 Cups (350g) semi-sweet chocolate chips⁣
⁣
INSTRUCTIONS⁣
1. Preheat the oven to 350ºF (177ºC). Grease and line a 13×18 inch sheet pan.⁣
2. In a large bowl, add the brown sugar and granulated sugar. Melt the butter in the microwave and pour it over the top of the sugars. Whisk together until uniform. Add the eggs and vanilla, then continue whisking until uniform. Whisk in the baking soda, cornstarch, and salt.⁣
3. Add the flour and use a silicone spatula to fold it in until smooth cookie dough forms. Reserve 1/2 Cup of the chocolate chips and set them aside, then fold the remaining 1 1/2 Cups of chocolate chips into the cookie dough.⁣
4. Place the chocolate chip cookie dough onto the prepared sheet pan and use an offset spatula to spread it all the way to the edges in an even layer.⁣
5. Bake the cookie cake for 14-16 minutes, until it looks golden brown on the edges and set. 
6. Enjoy warm or let it cool and decorate with vanilla buttercream and sprinkles! ⁣
⁣
#cookiecake #chocolatechipcookies #sheetcake #birthdaycake #cakedecorating
STRAWBERRY CUPCAKES 🍓based on my beloved strawb STRAWBERRY CUPCAKES 🍓based on my beloved strawberry layer cake recipe, this cupcake version is just as moist yet fluffy and bursting with natural strawberry flavor! Between the mix of fresh strawberries in the cupcakes + freeze-dried strawberries in the frosting, the flavor is out of this world 🚀

Full recipe link in my bio (with strawberry buttercream) + at https://sugarandsparrow.com/strawberry-cupcakes/

STRAWBERRY CUPCAKES
Yield: 14 cupcakes

INGREDIENTS:
5 oz (143g) fresh or frozen strawberries
1/3 Cup (80ml) whole milk, room temp
1 1/2 Cups (158g) sifted cake flour
1 tsp baking powder
1/4 tsp baking soda
1/2 tsp salt
6 Tbsp (85g) unsalted butter, room temp
1 Cup (200g) granulated sugar
2 large eggs, room temp
3 Tbsp (45g) sour cream, room temp
1 tsp vanilla extract
1 drop pink food coloring (optional)

INSTRUCTIONS: 
1. Puree the strawberries using a food processor (you’ll have about 1/2 cup of puree), then place into a saucepan over medium-low heat. Bring to a simmer, then cook for 10-15 min, stirring occasionally, until you have 1/4 cup. Refrigerate until room temp.
2. Preheat oven to 350ºF (177ºC) and line a standard cupcake pan with liners.
3. Whisk together the sifted cake flour, baking powder, baking soda, and salt and set aside.
4. In a stand mixer w/ paddle attachment (or hand mixer + large bowl), whip the butter on high for 2 min. Add sugar and beat for 2 min, until light and fluffy. Turn the mixer to low and add the eggs one at a time, then add the vanilla and sour cream, turn the mixer to high and beat for 1 min. Meanwhile, whisk together the strawberry puree, whole milk, and food coloring (if using).
5. Turn the mixer off and add all of the dry ingredients at once. Mix on low until just combined, then add the strawberry milk mixture until just combined, about 30 seconds.
6. Fill the cupcake liners 2/3 full and bake for 14-18 minutes. Cool completely before topping with strawberry buttercream (full recipe linked above). 

#strawberrycupcakes #strawberrycake #pinkcupcakes #strawberry #cupcakes
COFFEE BUTTERCREAM (recipe below)☕️ this frost COFFEE BUTTERCREAM (recipe below)☕️ this frosting has AMAZING coffee flavor, is so easy to decorate cakes with, and pairs beautifully with so many flavors (chocolate, vanilla, or any cake flavor you’d want to turn into a latte). 

All my cake pairing suggestions are linked in my bio or at https://sugarandsparrow.com/coffee-buttercream-recipe/ 

COFFEE BUTTERCREAM⁣
Yield: 2.5 Cups⁣

INGREDIENTS⁣
1 1/2 tsp instant coffee or espresso powder⁣
1 1/2 Tbsp whole milk, room temperature⁣
1 Cup (226g) unsalted butter, room temperature⁣
3 1/2 Cups (420g) powdered sugar⁣
2 tsp pure vanilla extract⁣
Pinch of salt⁣

INSTRUCTIONS⁣
1. Combine the instant espresso/coffee with the whole milk and set aside. In the bowl of a stand mixer, beat the butter on high until creamy and smooth (about 5 minutes), scraping down the bowl and paddle a few times in between.⁣
2. Turn the mixer to low and add the powdered sugar a few cups at a time, scraping down the bowl and paddle between intervals. Add the vanilla, the coffee/espresso milk mixture, and salt. Mix on low until fully incorporated, about one minute.⁣

#coffeebuttercream #buttercream #frosting #coffeecake

Footer

On the Blog

  • Cake Basics
  • Recipes
  • Tutorials

Info

  • About
  • Privacy Policy & Disclosure

stay in the know

Copyright © 2026 · Theme by Sugar & Sparrow