• Cake
  • Frosting
  • YouTube
  • My Favorite Tools
  • Nav Social Icons

  • Skip to primary navigation
  • Skip to main content
  • Skip to primary sidebar
  • Skip to footer
  • Recipes
    • Cake
    • Cupcakes
    • Frosting
    • Ice Cream
    • Vegan
  • Cake Basics
  • Tutorials
  • Blog
  • About
  • Mobile Menu Widgets

    Connect

    Search

Sugar & Sparrow logo in script font

Sugar & Sparrow

Lifestyle and Cake from Portland Oregon

  • Cake Basics
  • Recipes
    • Cake
    • Cupcakes
    • Cookies & Bars
    • Filling
    • Frosting
    • Ice Cream
    • No-Bake
    • Small Batch
    • Vegan
  • Tutorials
  • Book
  • Blog
  • About

Sprinkled Cactus Cupcakes Tutorial

July 24, 2019 · In: Featured, Seasonal, Summer, Tutorials

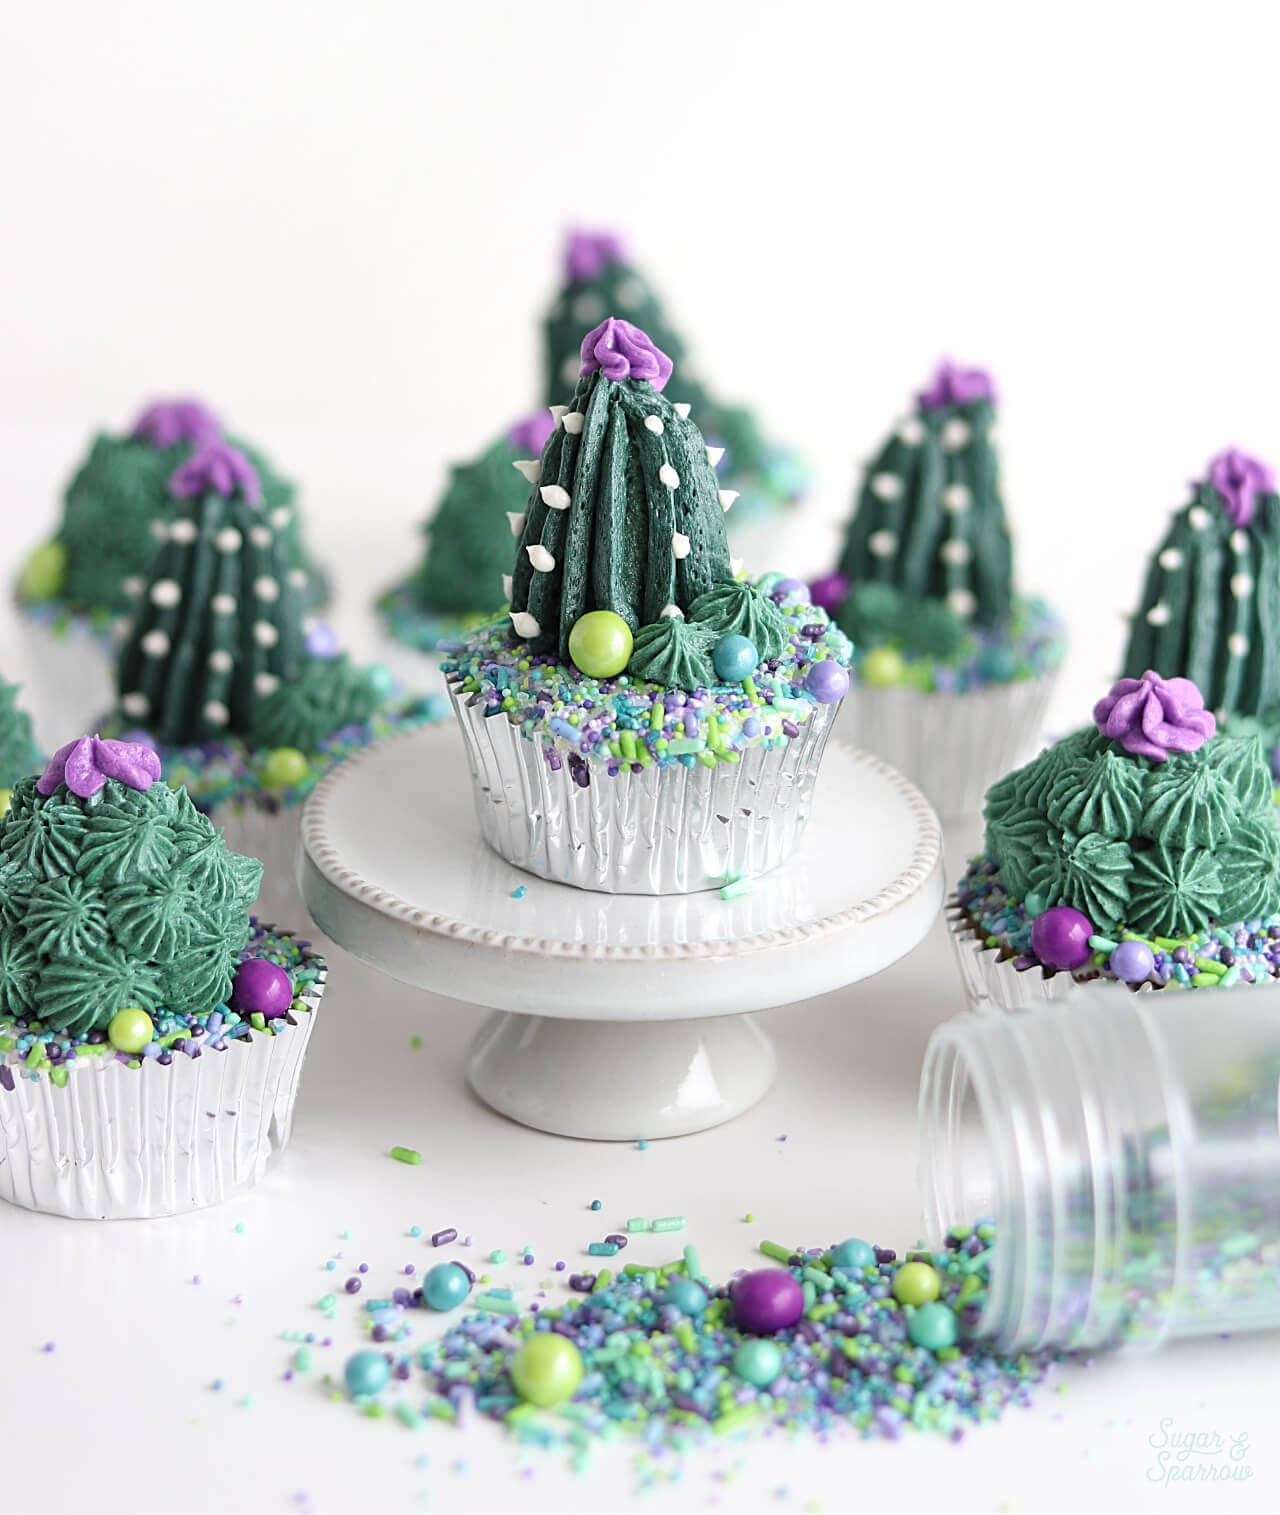
A few years back, the ultra-creative Alana Jones-Mann popularized the cactus cupcake trend and it was one of the earliest cupcake projects I tried. I’ve gotten to make the design for a handful of events, and they’re so much fun to create every time. So when I saw the gorgeous Cactus Flower sprinkle mix by SprinklePop, I instantly thought of re-creating the cactus cupcake design with a more sprinkly aesthetic. They added such a celebratory element to the look:

cactus cupcakes by Sugar and Sparrow

The first time I tried this cactus cupcake design, I shaped the base of each cactus with a big hunk of fondant, then covered it with buttercream piping to add detail. While it looked great, I realized how terrible it is to bite into the cactus and end up with a mouth full of fondant. No thank you! Since then I decided that creating a cake ball base (a mix of cupcake crumbs and buttercream) is much more tasty, sturdy, and easy to mold into cactus shapes.

succulent cupcakes tutorial
succulent cupcakes by sugar and sparrow

The Cactus Flower mix is the perfect color scheme to pair with these pretty green cacti. It’s basically all the colors you’d find in a lush succulent garden and adds so much pretty texture to these cupcakes. If you’re wanting to recreate the look with this sprinkle mix, don’t forget to use my code SUGARANDSPARROW15 at checkout to get 15% off your SprinklePop order. I don’t get any kickback from that code, it’s just a little something special for you. You’re welcome!

how to make cactus cupcakes

Before you get started with the tutorial below, here’s a quick video of the process I whipped up for you visual learners:

You Will Need

  • 18 baked cupcakes (12 for decorating and 6 chopped into bits)
  • 1 batch of vanilla buttercream
  • Green food color gel
  • Purple food color gel
  • Bowls and spoons for mixing
  • Baking sheet
  • Wax paper
  • 4 oz bottle of Cactus Flower sprinkles
  • Small icing spatula
  • Piping Bags  
  • Wilton Tips 4B, 352, 3, and 109 (or any drop flower tip)

Step 1: Prep The Materials

Before you get started, it’s best to get all your materials prepped and ready to go. Divide your buttercream into three different bowls: add about ¼ cup of the buttercream to a small bowl and keep it uncolored and add another ¼ cup of buttercream into another small bowl and color it with purple buttercream. Divide the rest of the buttercream into two separate bowls and color one a darker shade of green and one a lighter shade of green. I used different amounts of Americolor Forest Green for these two shades.

ingredients for cactus cupcakes

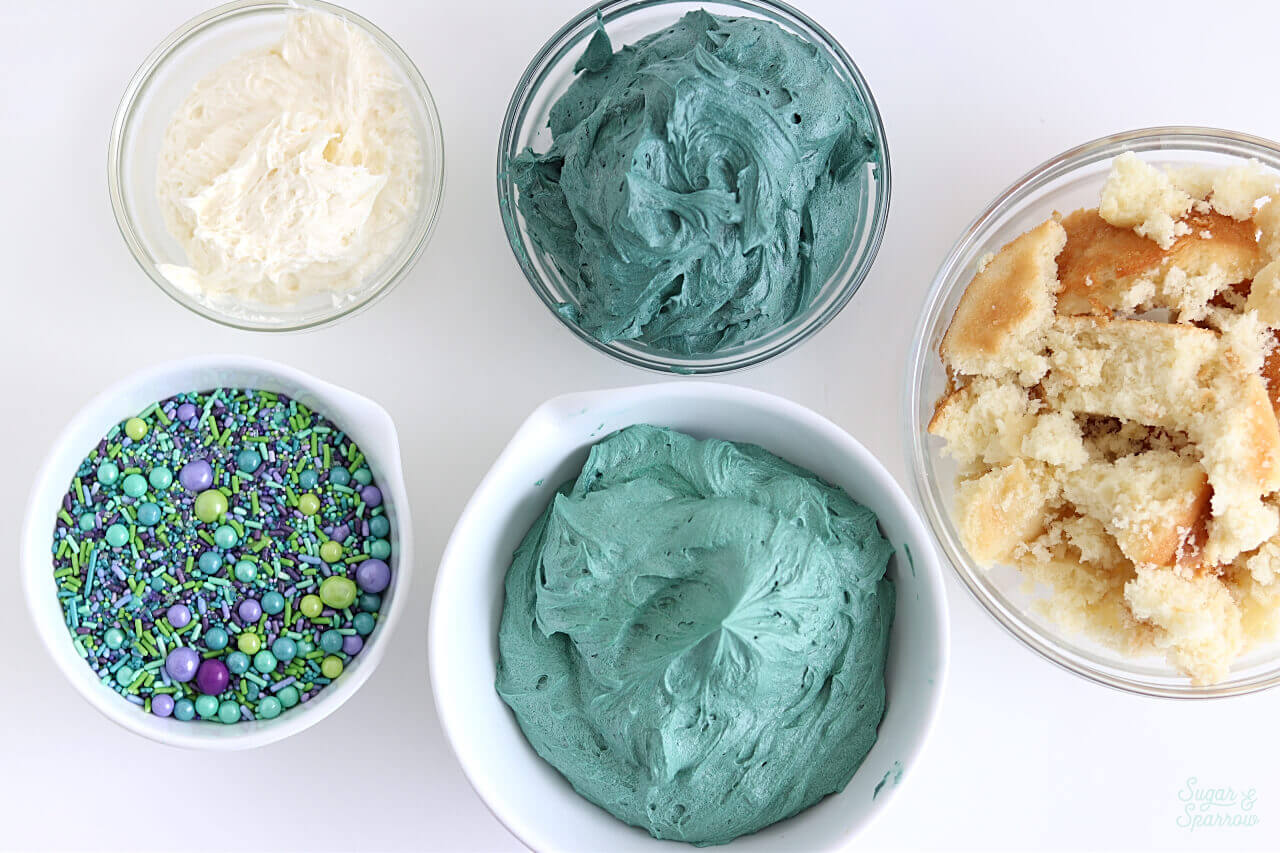
Next, pour the Cactus Flower sprinkles into a small bowl, then chop up six of the baked cupcakes into smaller bits and add them to a medium sized bowl.

Step 2: Make The Cake/Buttercream Mixture

Add about ¼ cup of either of the green buttercreams to the bowl of chopped up cupcake bits. Then, use a rubber spatula or spoon to mix it all together until it’s uniform in consistency.

how to make cake balls

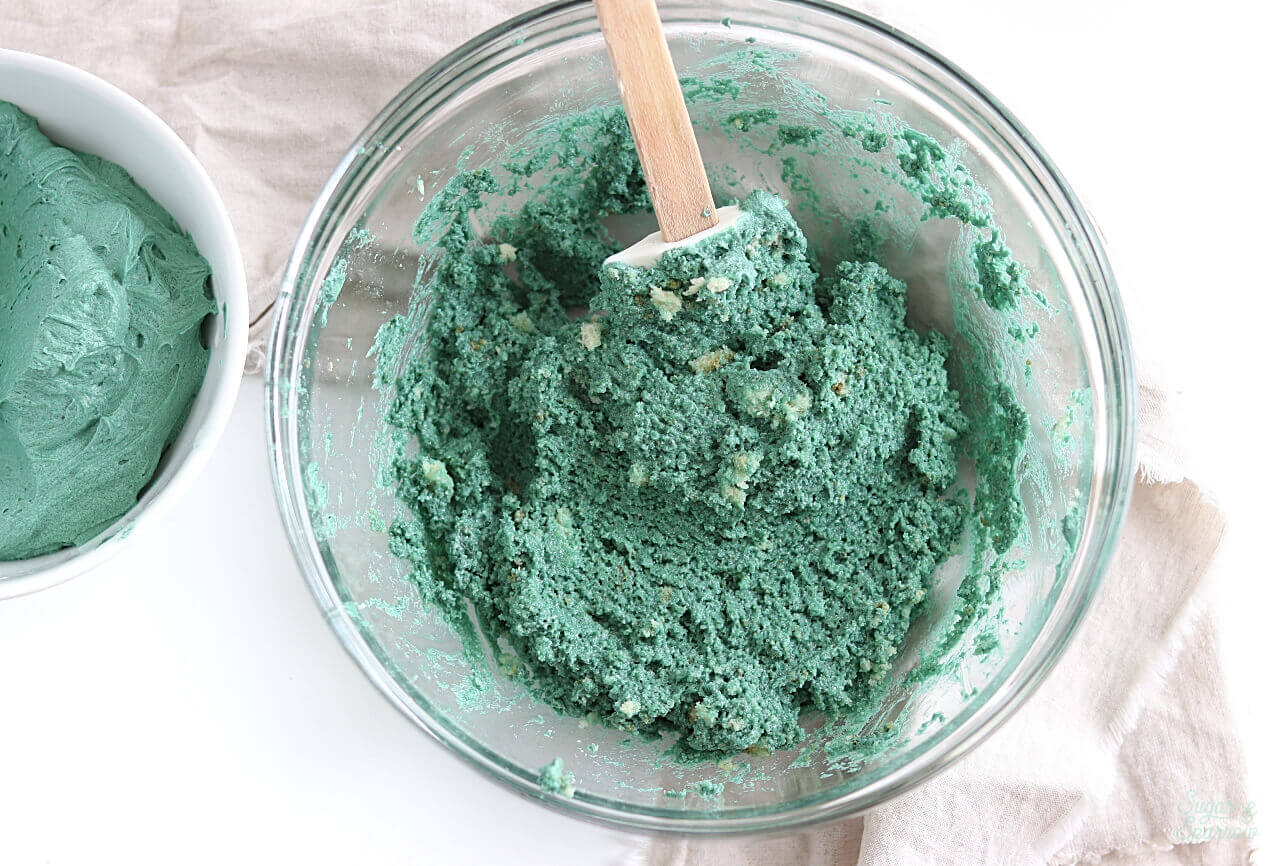
When you’re finished mixing, the result should be moldable when you try to shape it with your hands. If it’s not sticking together enough, just add a little bit more buttercream until it’s easy to mold with your hands.   

Step 3: Create The Cactus Shapes

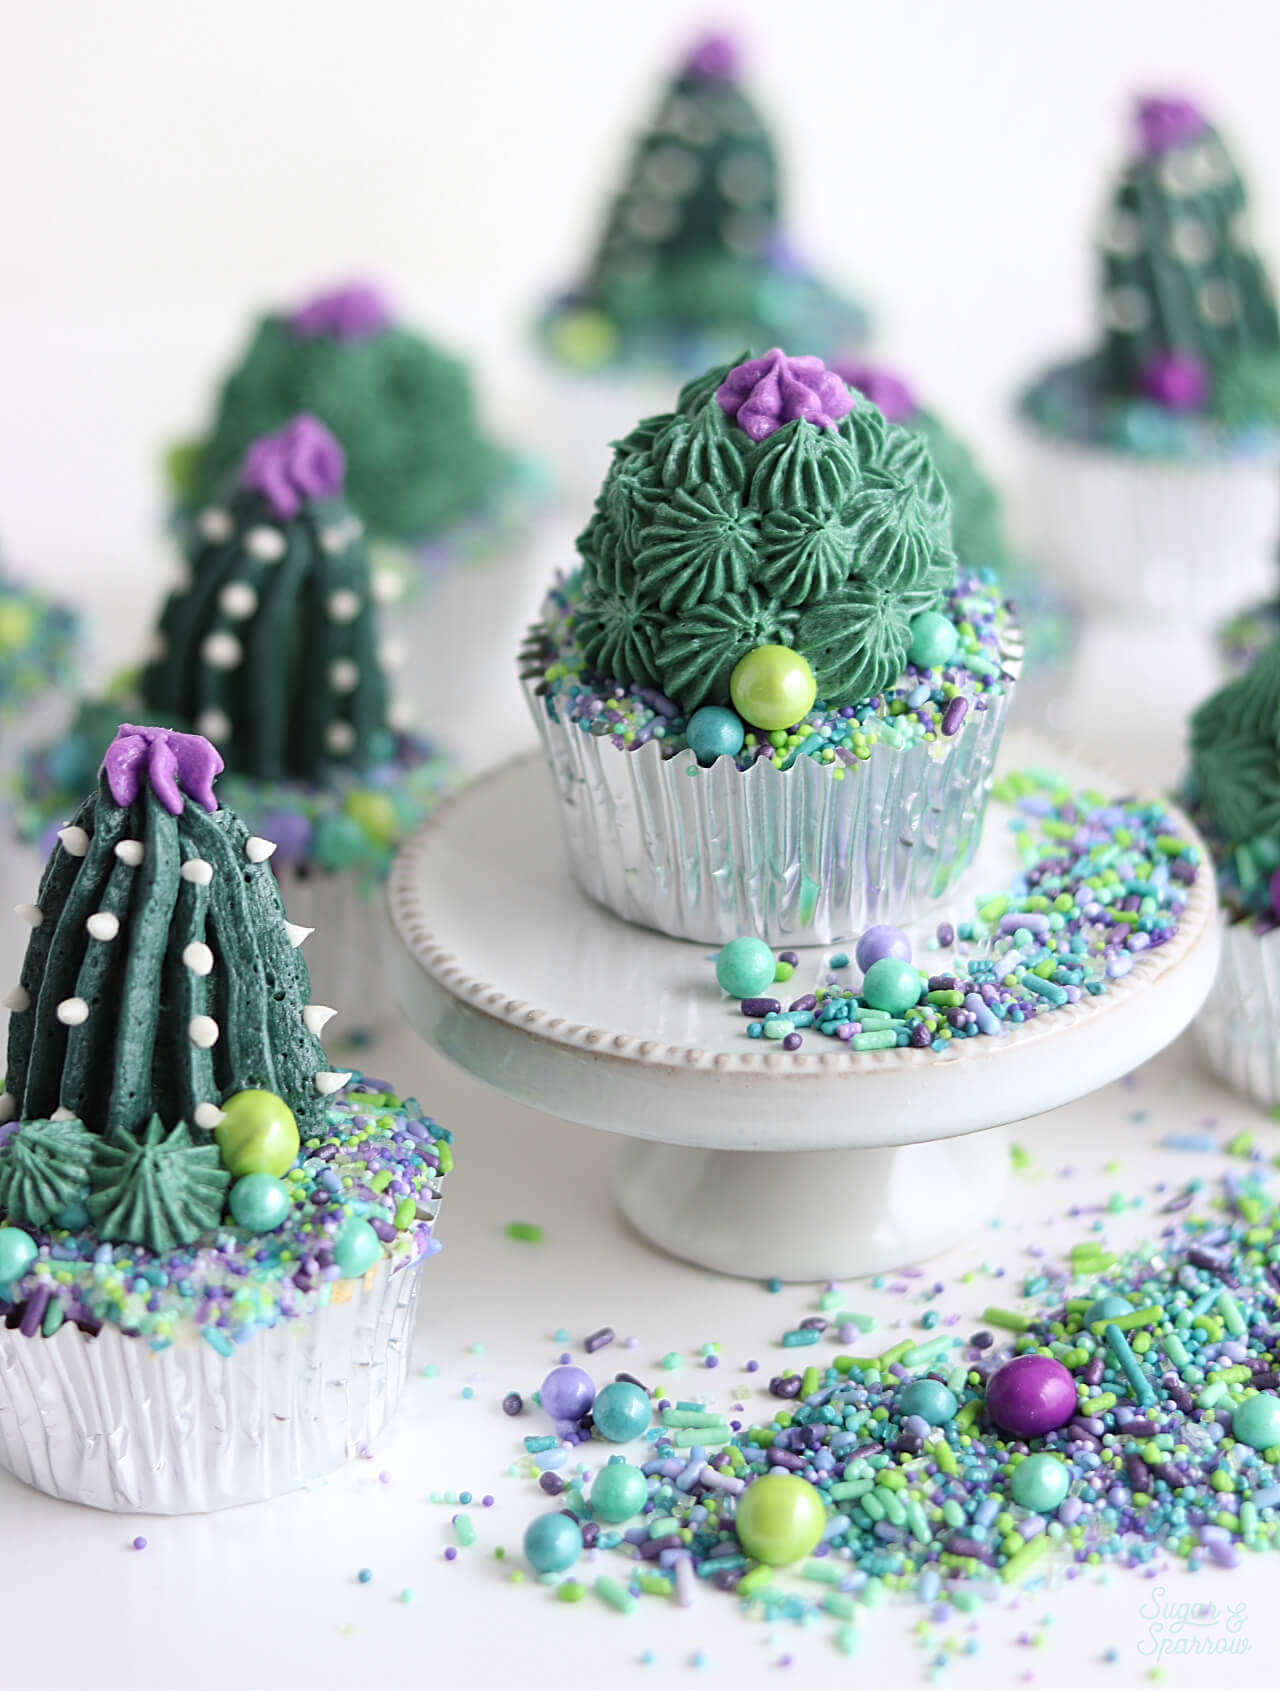
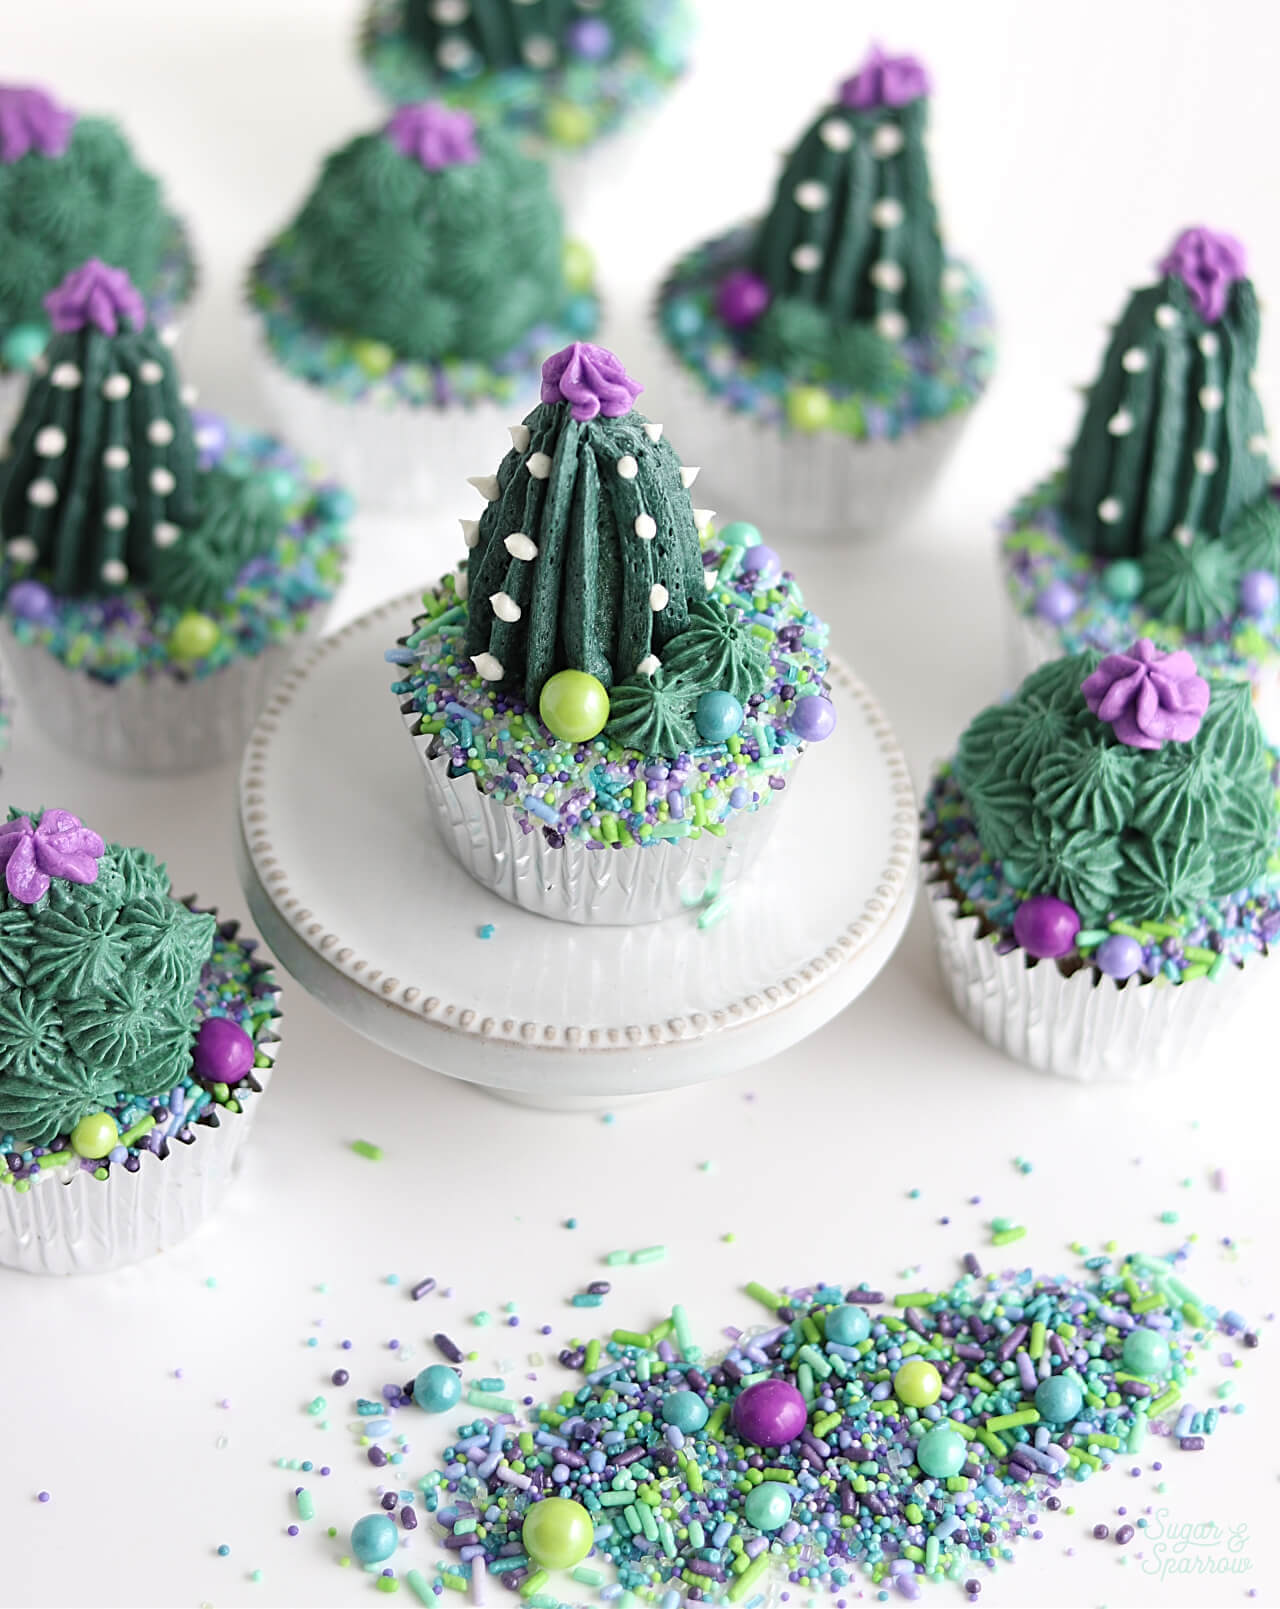
There are two different styles I love when it comes to cactus cupcakes. The first is a traditional elongated shape and the other is more spherical. Before you start shaping, fit a piece of wax paper onto a baking sheet. Then, roll a little bit of the cake/buttercream mixture into 1 inch spheres using your hands and place them one by one onto the baking sheet. You’ll want to make 6 of these.

cake balls tutorial

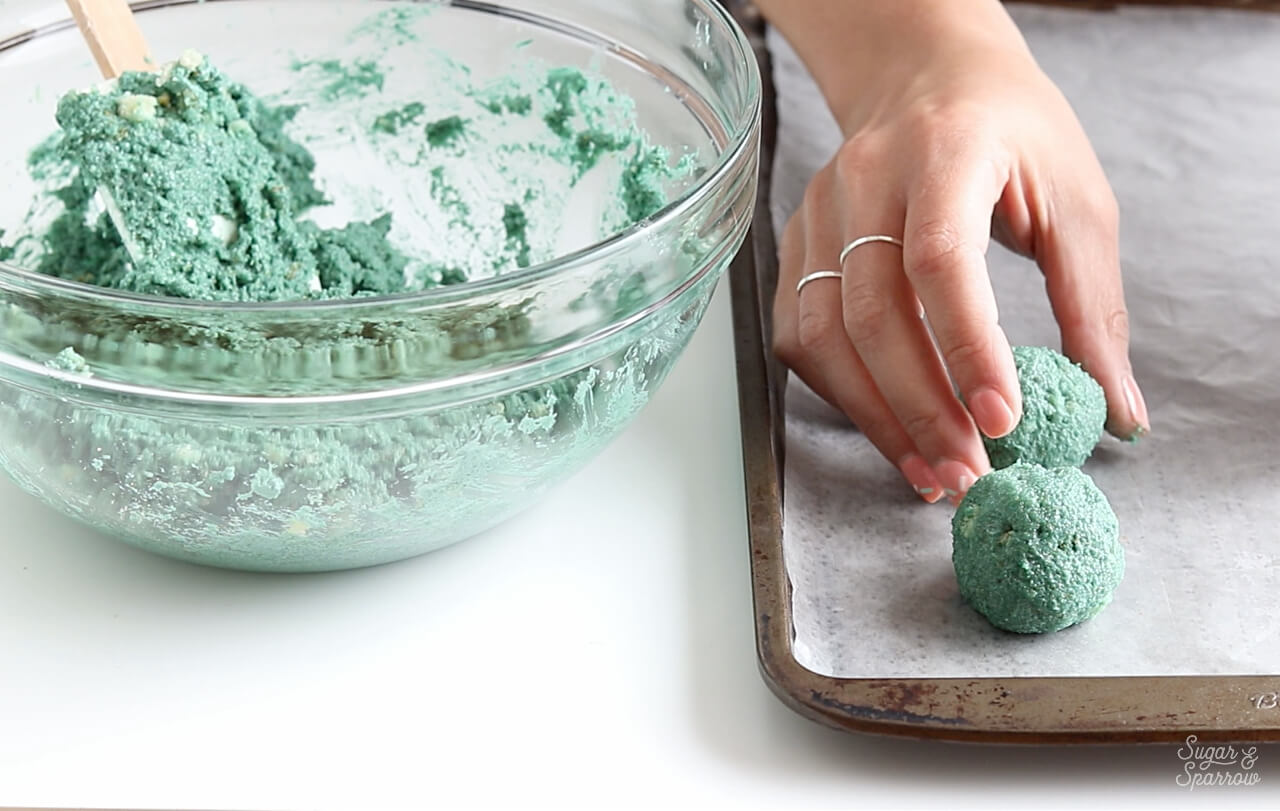
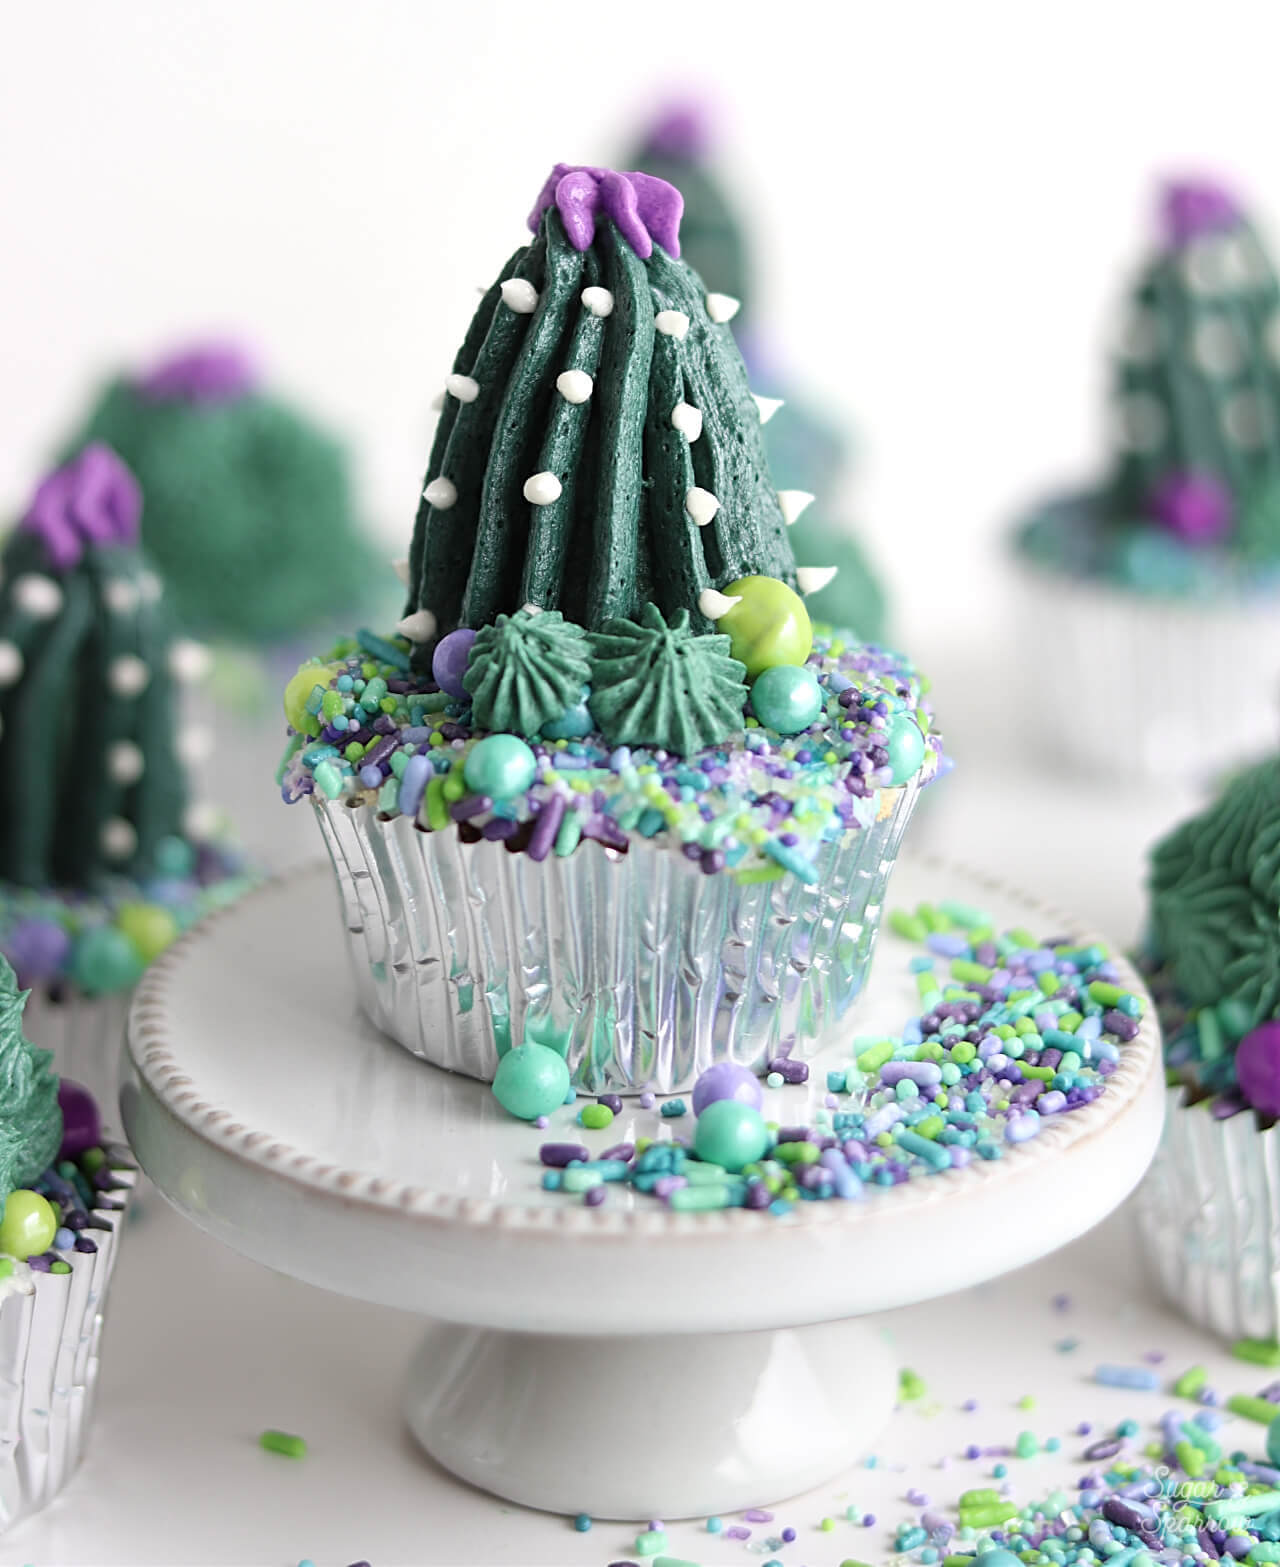
To make the elongated shape, roll the cake/buttercream mixture between your hands to make more of a rod shape. They should each be about 1.5-2 inches tall and about an inch wide. Place them one by one onto the baking sheet until you have 6 of them.

cactus shaped cake balls

When you’re finished making your cactus shapes, place the baking sheet in the refrigerator to let them firm up for about 20 minutes. They’ll be much easier to work with that way!

cactus cake pops

Step 4: Create The Sprinkled Cupcake Surface

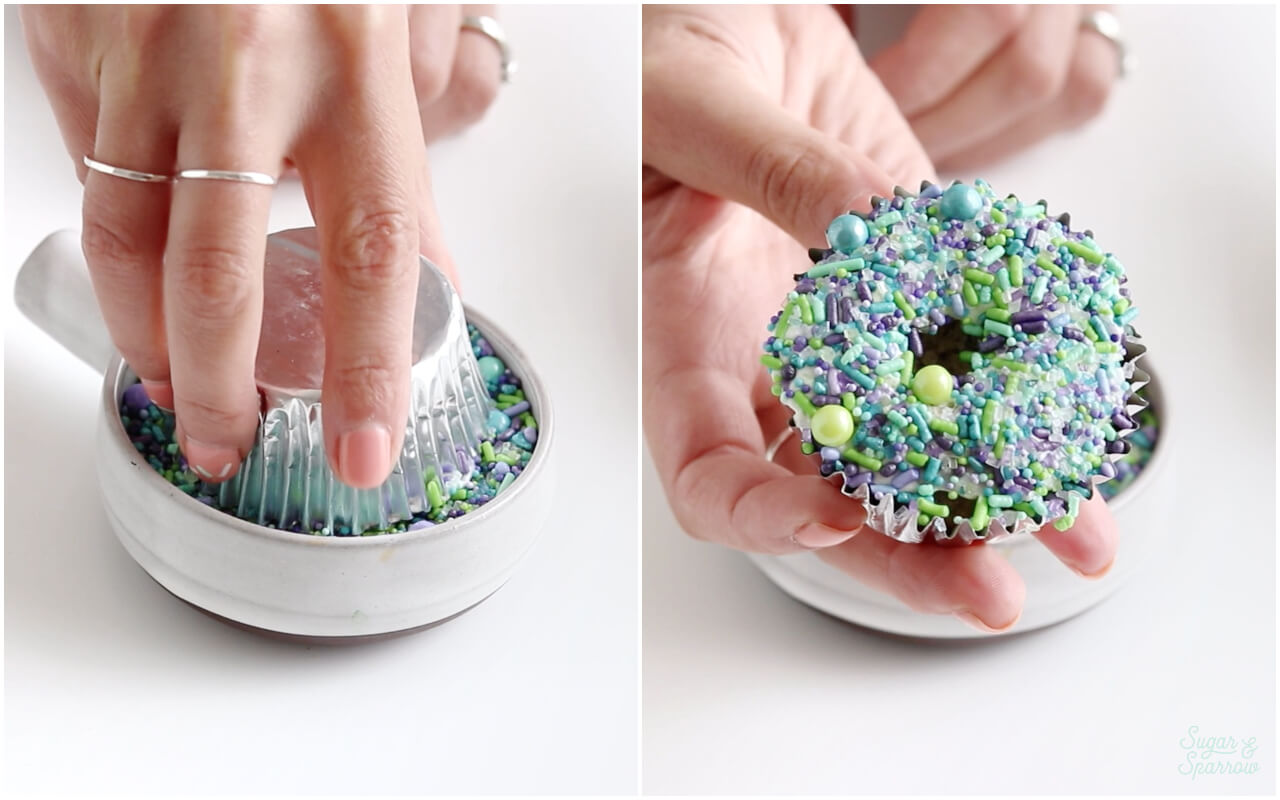
Using the bottom of one of your piping tips, create a small cutout in the center of each cupcake to give the cactus shapes a nice foundation to sit on later.

how to make a hole in cupcake

Use a small icing spatula to frost the surface of the cupcake, excluding the small hole you created.

cupcake frosting

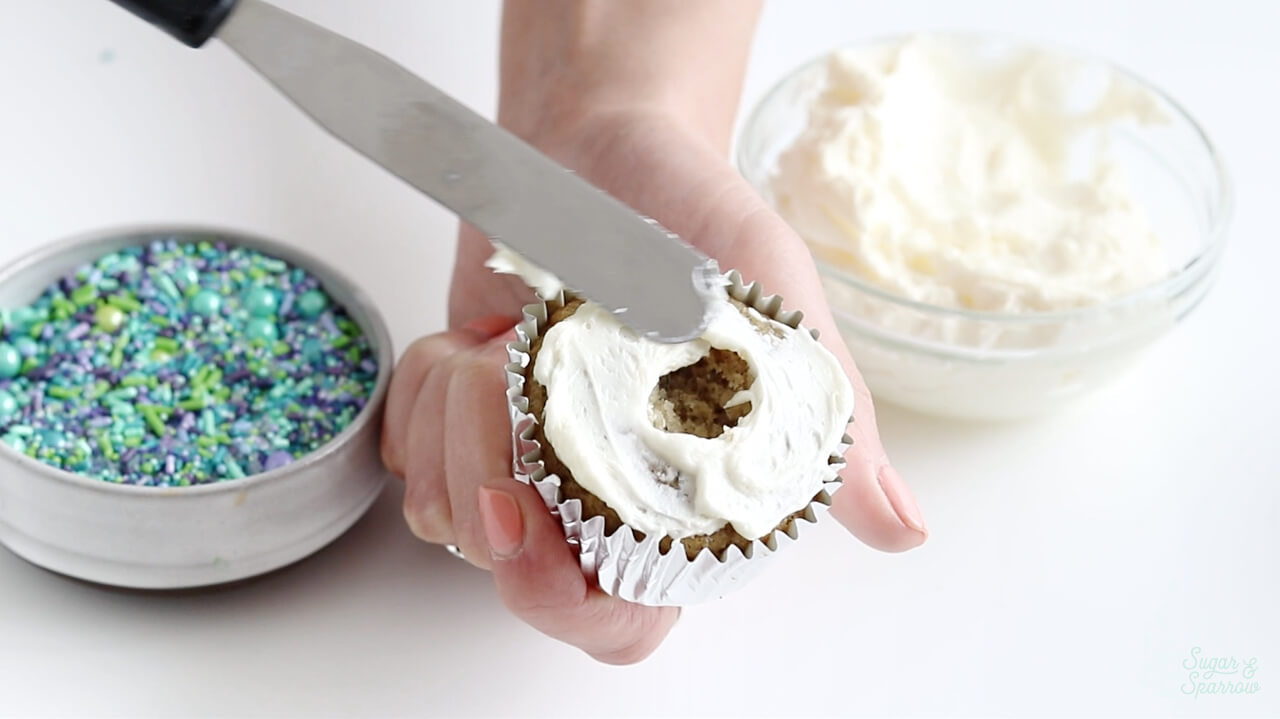
Then, dip the surface of the cupcakes into the Cactus Flower sprinkles. Repeat until you have all of the cupcake surfaces covered in sprinkles.

dipping cupcakes in sprinkles

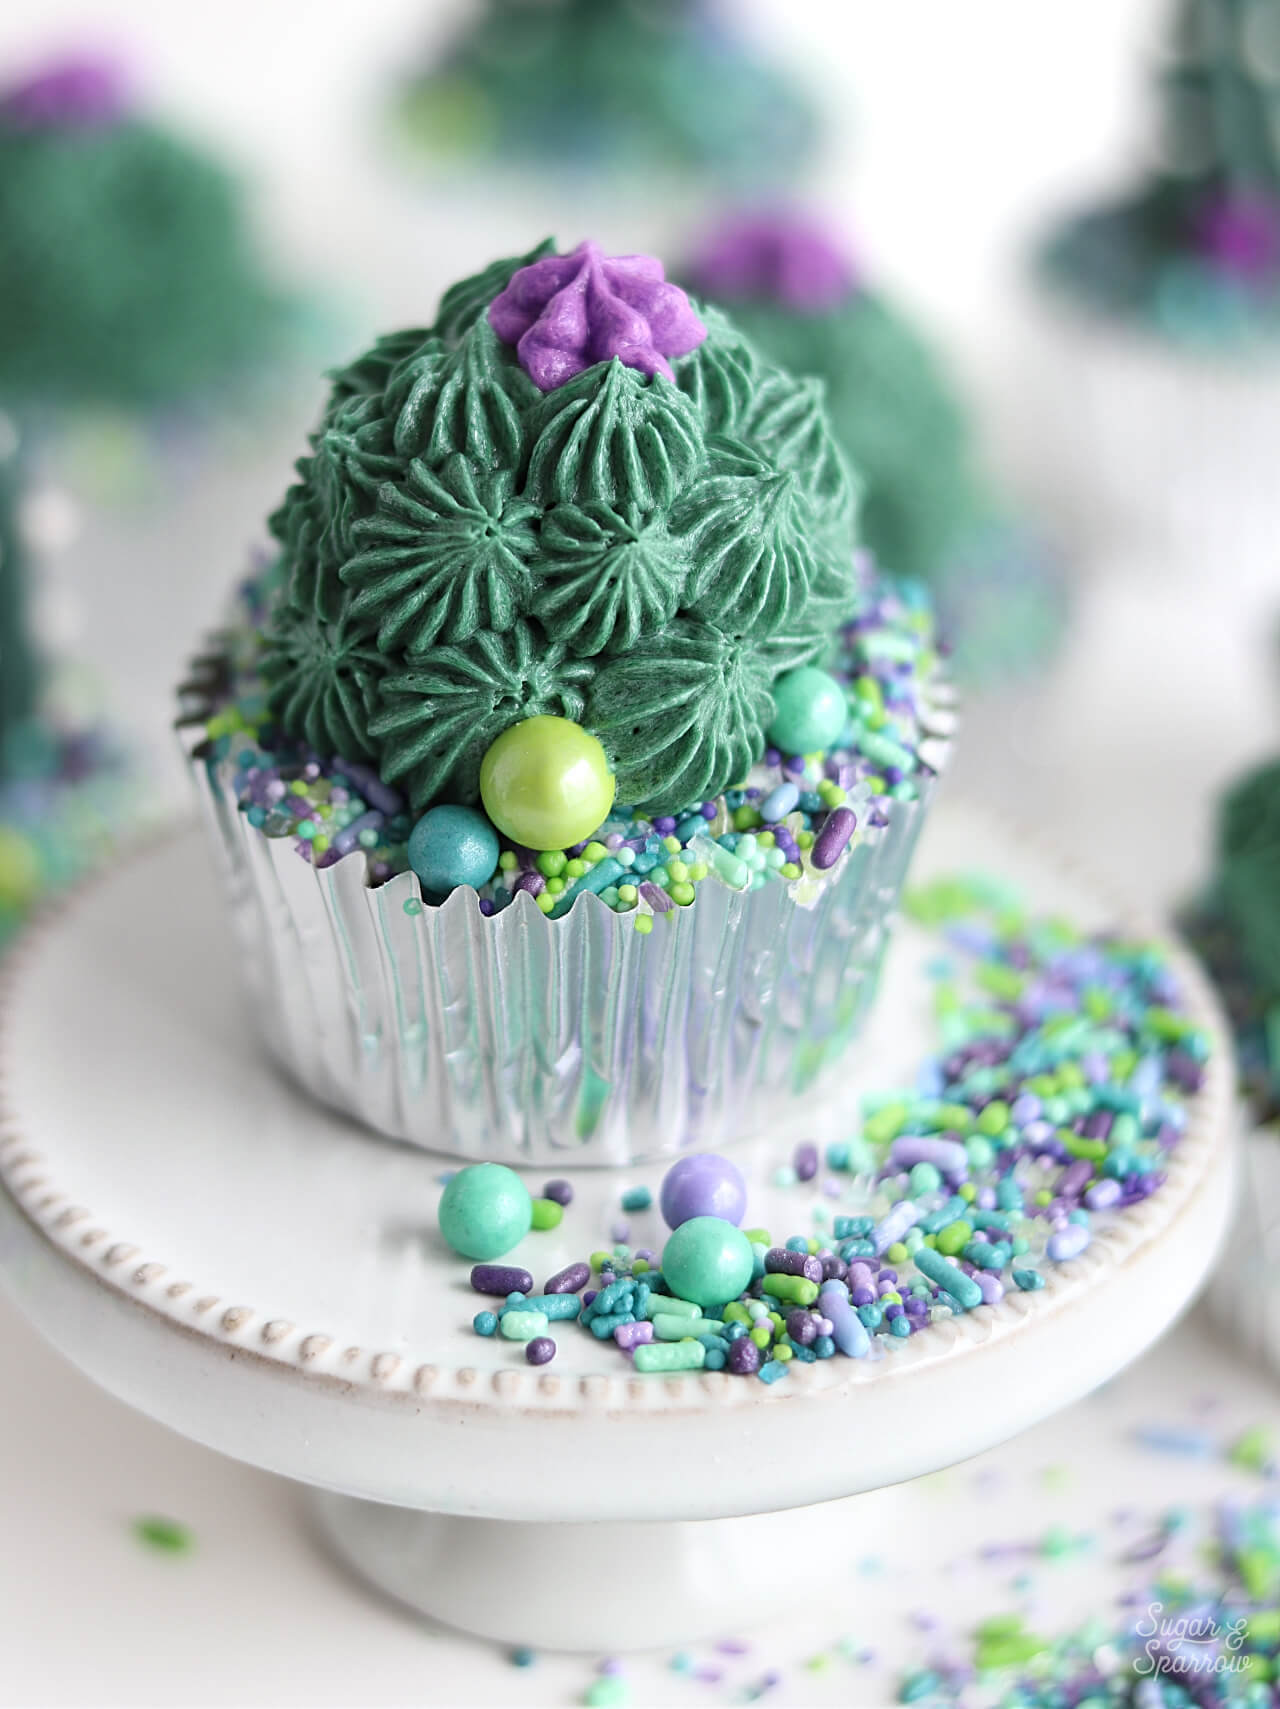
Step 5: Decorate The Spherical Cacti

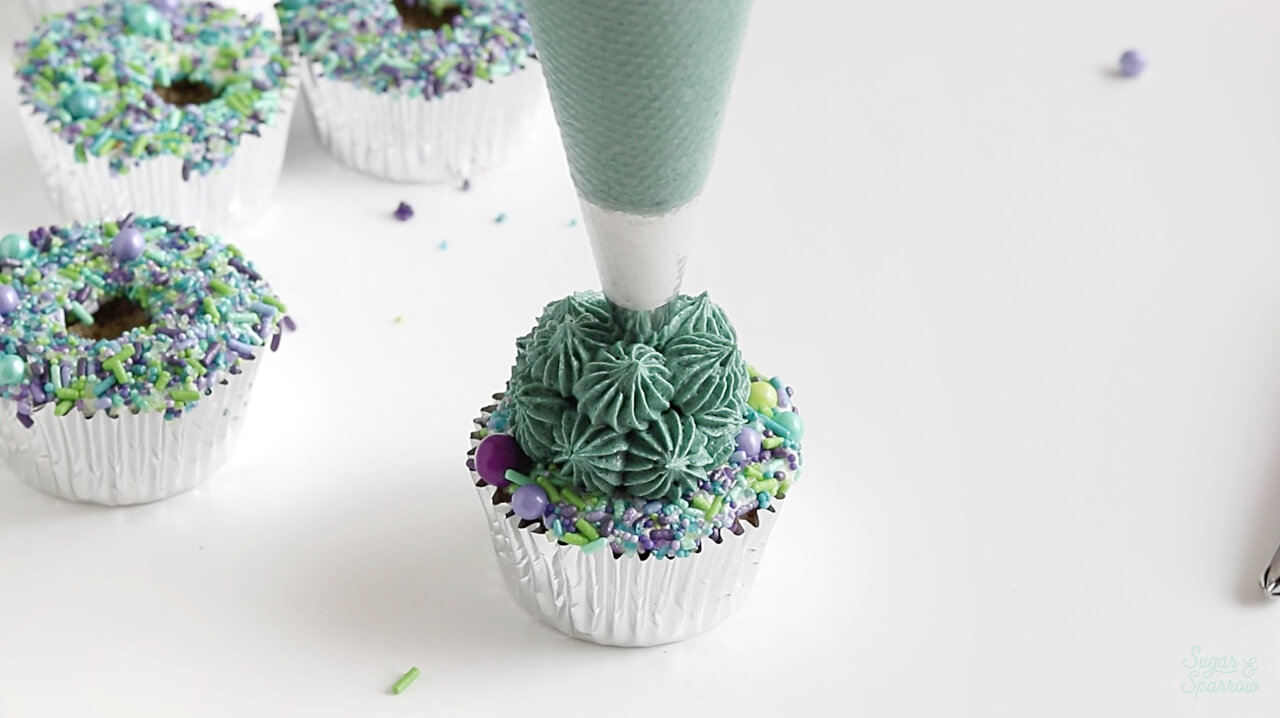
For the spherical cacti, add the refrigerated cake/buttercream balls to 6 of the cupcakes.

cake pops on cupcakes

Prepare a piping bag by fitting it with Wilton Tip 4B and filling it with the lighter green buttercream. Cover the surface of each spherical cactus in open stars.

buttercream succulent tutorial

Next, prepare a piping bag fitted with Wilton Tip 109 (or any drop flower tip) and fill it with purple buttercream. Pipe a drop flower onto the top of each one.

how to pipe a buttercream flower

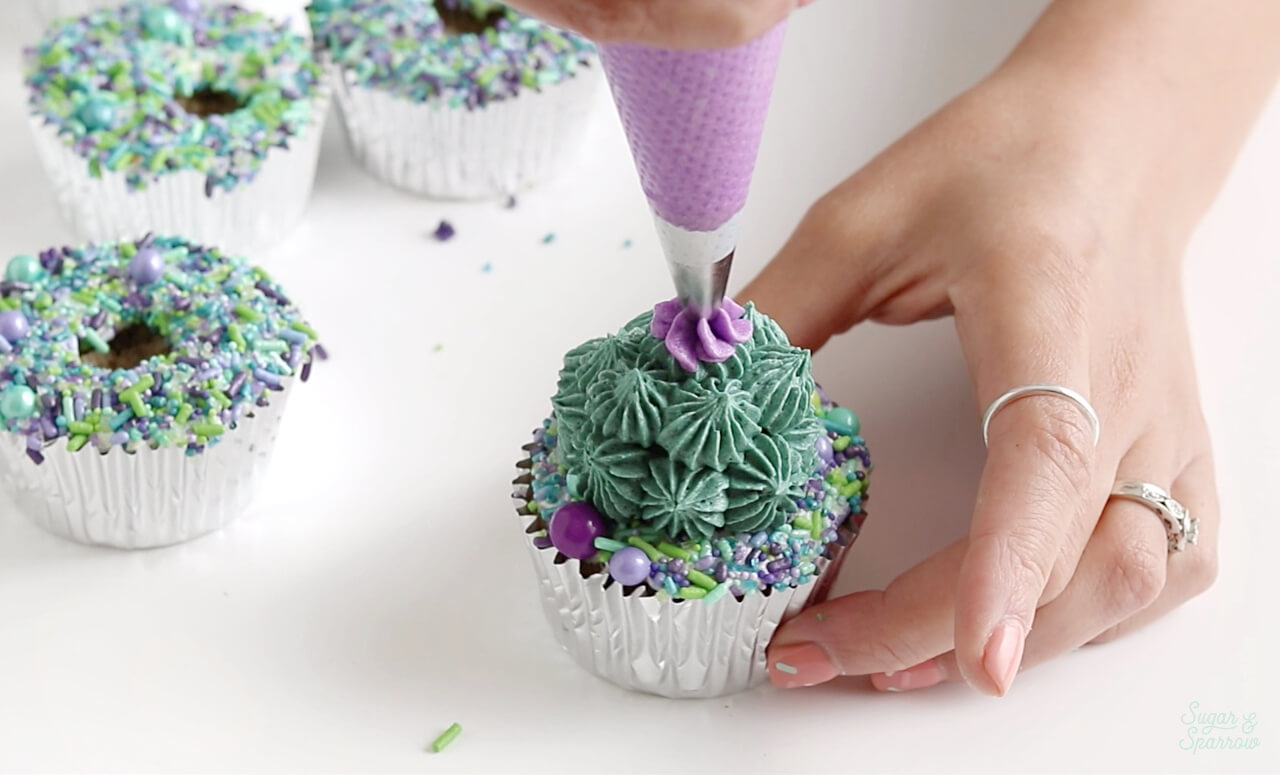
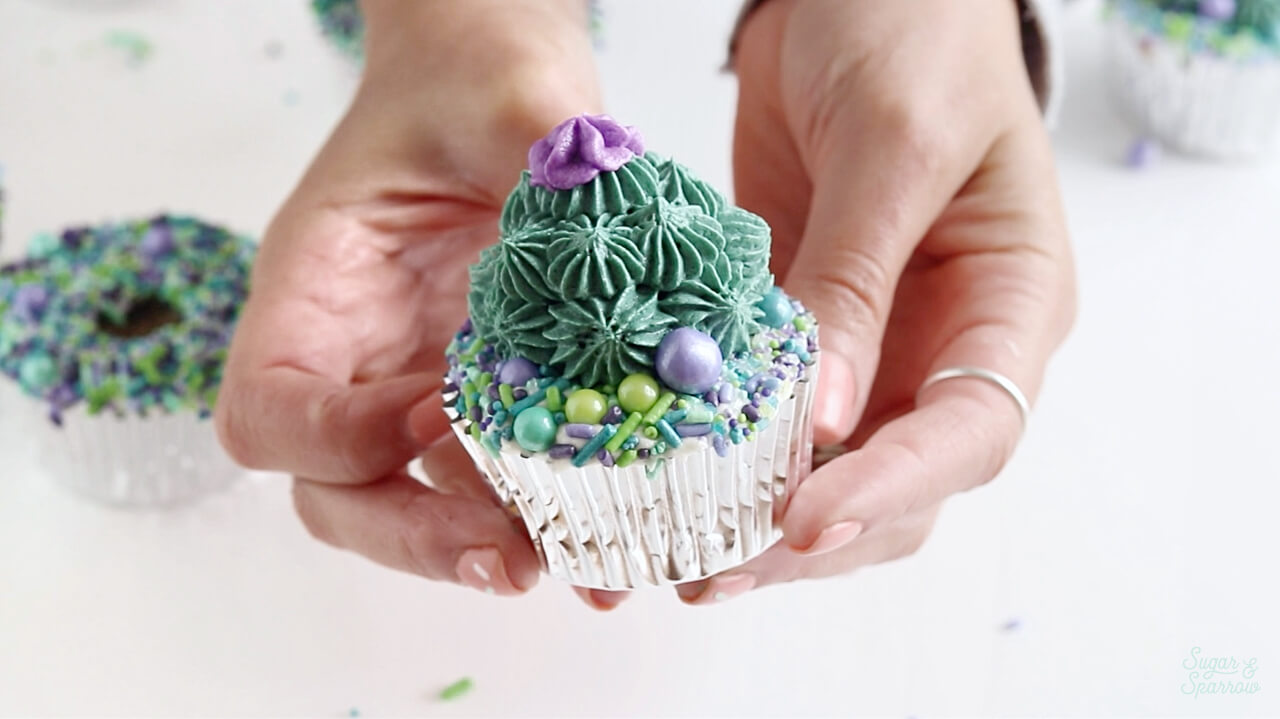
Continue decorating with spherical sprinkles from the Cactus Flower mix wherever you’d like.

succulent cupcakes with sprinkles

Step 6: Decorate The Elongated Cacti

For the elongated cacti, add the refrigerated cake/buttercream rods to 6 of the cupcakes. Prepare a piping bag by fitting it with Wilton Tip 352 and filling it with the darker green buttercream. Then, pipe a series of vertical lines around the surface of the rods.

how to make buttercream cactus

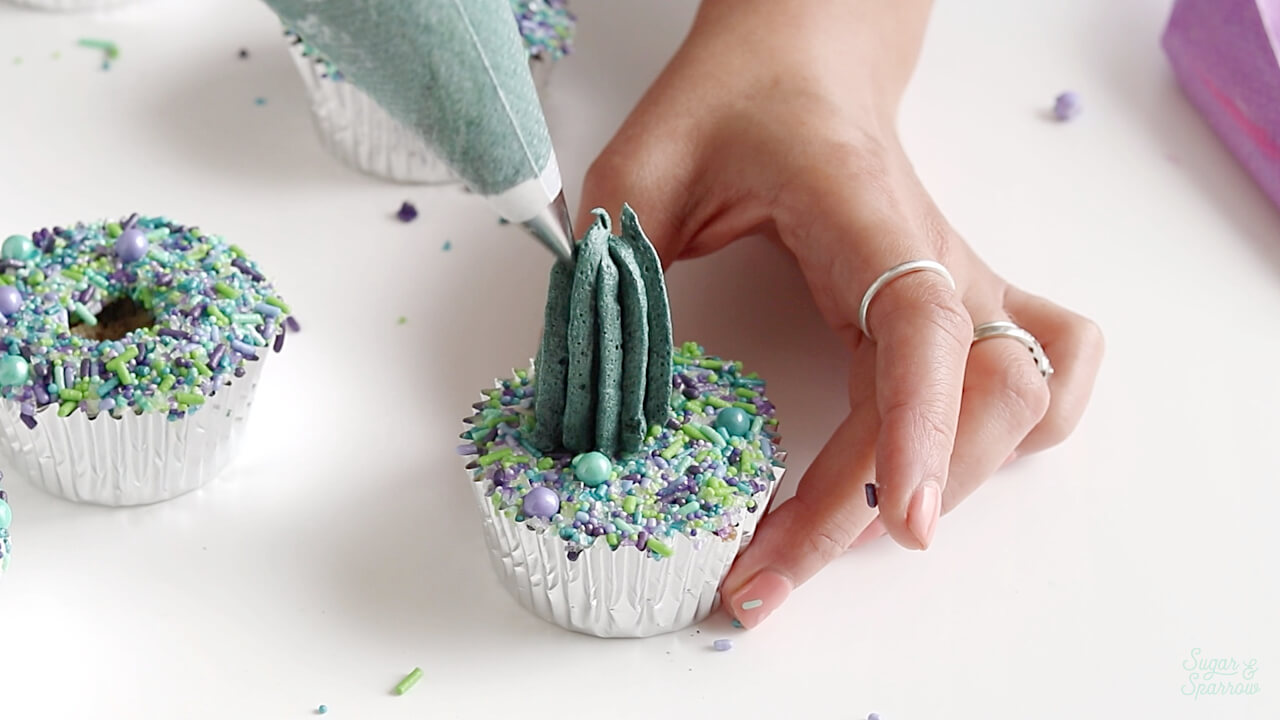
Use the purple buttercream bag to pipe a drop flower on top of each of the cacti. Then, prepare a piping bag fitted with Wilton tip 3 and fill it with the remaining white (uncolored) buttercream. Pipe a series of dots onto every other line on the cactus. These are meant to look like the spines of a cactus.

buttercream cactus tutorial

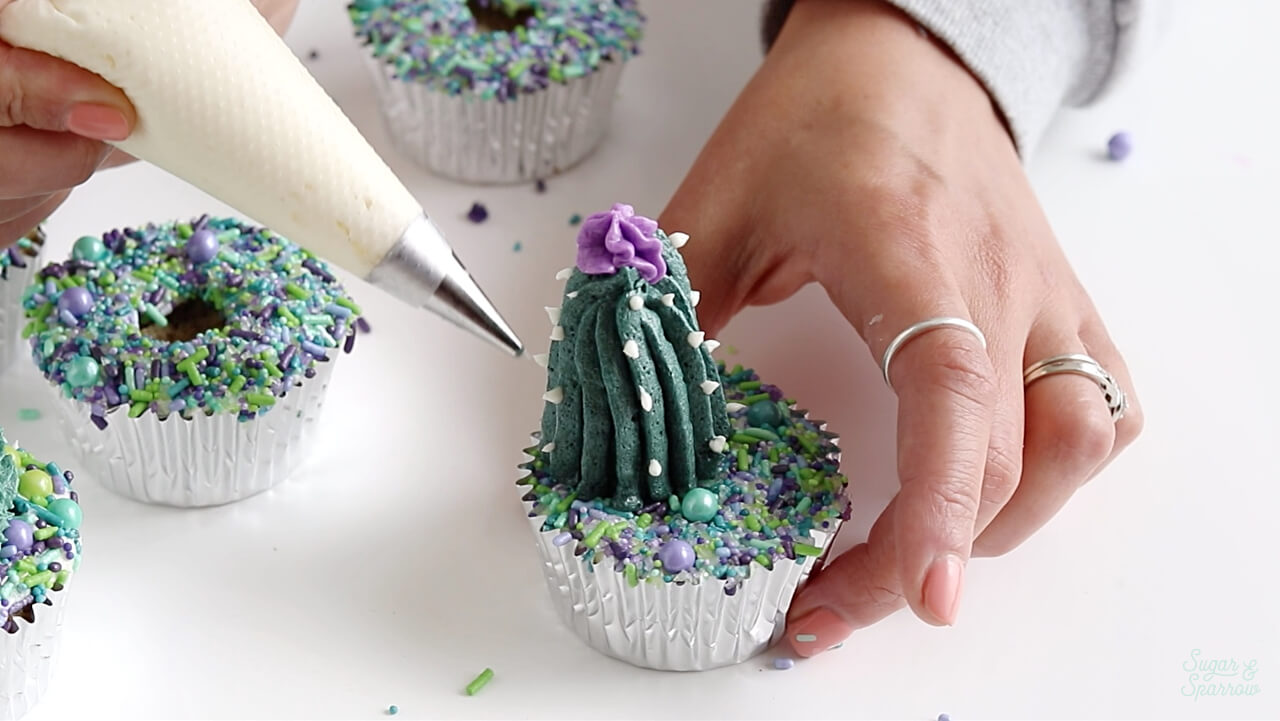
Use your lighter green buttercream to pipe a couple open stars next to the elongated cacti, then continue decorating with spherical sprinkled from the Cactus Flower mix wherever you’d like.

buttercream cactus cupcakes

Aren’t these sprinkled cactus cupcakes the cutest thing? They’re perfect for any Summer gathering and are sure to impress.

buttercream cactus cupcakes by sugar and sparrow
buttercream succulent cupcakes by Sugar and Sparrow

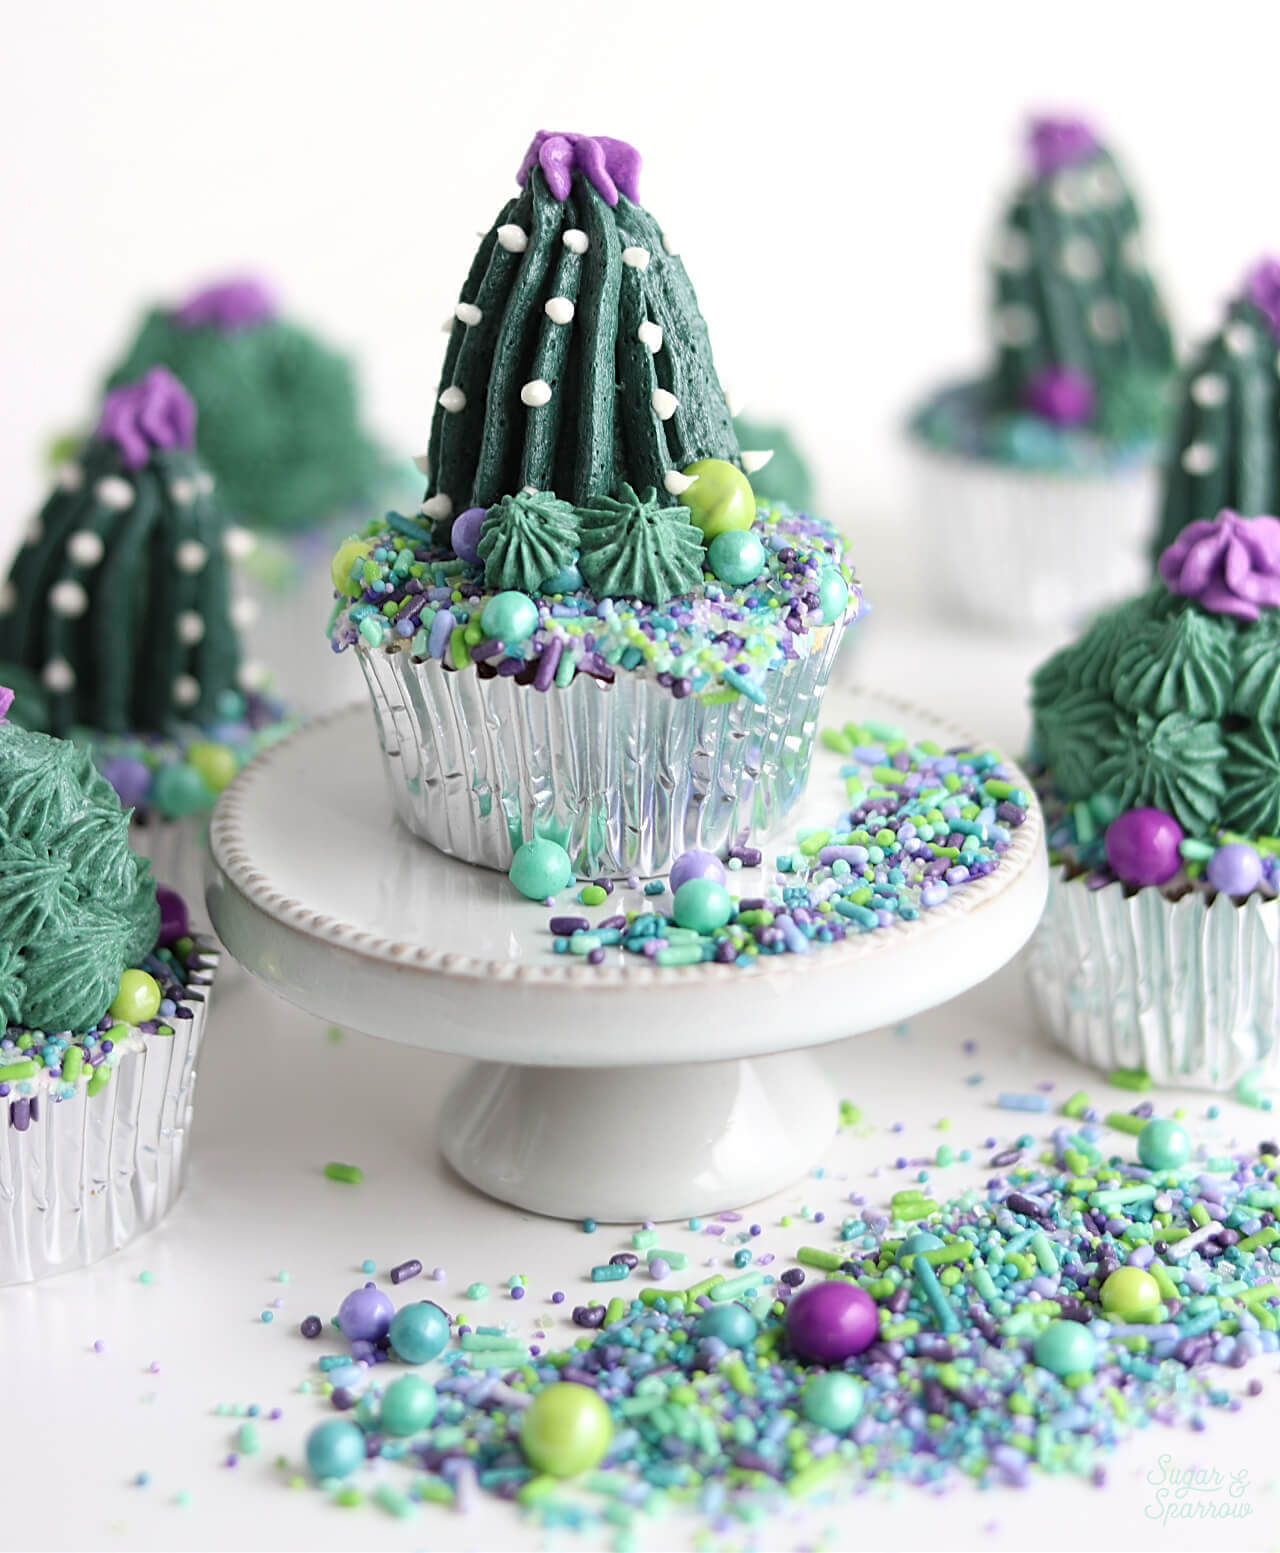
If you’re inspired to make these sprinkled cactus cupcakes, be sure to tag @sugarandsparrowco on Instagram so I can see! I love seeing what you create.

By: Whitney · In: Featured, Seasonal, Summer, Tutorials · Tagged: buttercream cactus, buttercream piping, buttercream succulent, cactus cupcake tutorial, cactus cupcakes, cake decorating, cake pops, cake tutorial, cupcake decorating, cupcake ideas, sprinklepop, sprinkles, succulent cupcakes, wilton tip 109, wilton tip 3, wilton tip 352, wilton tip 4b

you’ll also love

the best vanilla cupcakes recipeThe Perfect Vanilla Cupcake Recipe
pumpkin layer cake recipe by sugar and sparrowPerfect Pumpkin Layer Cake Recipe
oreo cookies and cream cakeOreo Layer Cake Recipe

Join the List

Stay up to date & receive the latest posts in your inbox.

Reader Interactions

Comments

  1. Lucy says

    August 1, 2019 at 3:21 am

    Hi Whitney! Really like your decorations, wish I was naturally this creative.
    Ps. I think you forgot to insert “read more” tag somewhere in there.

    Reply
    • Whitney says

      August 1, 2019 at 9:38 am

      Thank you, Lucy! You’re right – totally forgot to add the read more tag. Fixed!

      Reply
  2. jayne says

    July 29, 2019 at 11:10 pm

    They are AMAZING!

    Reply
    • Whitney says

      August 1, 2019 at 9:37 am

      Thank you, Jayne!

      Reply

Leave a Reply Cancel reply

Your email address will not be published. Required fields are marked *

Recipe Rating


Next Post >

How To Create Striped Buttercream Cakes With A Cake Comb

Primary Sidebar

Welcome to Sugar & Sparrow

Welcome to Sugar & Sparrow

Helping you whip up pretty desserts with confidence and creativity. And hopefully sharing a few laughs with you along the way!

Learn More

Connect

let’s bake!

Get my very best recipes, baking tips, and decorating tutorials sent to your inbox

Featured Posts

how to cover a cake in sprinkles

How To Cover A Cake In Sprinkles

lemon blueberry cupcakes with lemon cream cheese frosting on a cupcake stand

Lemon Blueberry Cupcakes with Lemon Cream Cheese Frosting

hummingbird cake recipe by sugar and sparrow

Hummingbird Cake

Search

Archives

Follow Along

@sugarandsparrowco

STRAWBERRY SHORTCAKE ICE CREAM CAKE 🍓if Strawbe STRAWBERRY SHORTCAKE ICE CREAM CAKE 🍓if Strawberry Shortcake Ice Cream Bars make you nostalgic for your childhood ice cream truck days, you’re going to LOVE this easy ice cream cake version - no ice cream maker needed 🙌🏼 

Full recipe on my blog at https://sugarandsparrow.com/strawberry-shortcake-ice-cream-cake/

STRAWBERRY CRUNCH 
24 whole (280g) Golden Oreos, finely ground
3 Oz box strawberry jello
4 Tbsp unsalted butter, melted

ICE CREAM LAYERS
1/2 Cup (15g) freeze-dried strawberries
2 Cups heavy whipping cream, cold
1 Tbsp pure vanilla extract, divided
14 Oz sweetened condensed milk
1 1/2 tsp strawberry jam or preserves

1. Combine the strawberry crunch ingredients and bake on a lined cookie sheet at 350ºF for 4 min.
2. For the crust, combine 1 Cup of the strawberry crunch with 2 Tbsp melted butter. Press into the bottom of a 6-inch springform pan and line with an acetate collar. Place in the freezer while you move on.
3. Using a food processor, grind the freeze-dried strawberries into a fine powder. Set aside.
4. Add the heavy whipping cream and 2 tsp of vanilla extract into a chilled bowl, then whip it with a hand mixer to stiff peaks. Place in the refrigerator.
5. Divide the condensed milk between two medium bowls. To one bowl, add 1 teaspoon of vanilla. To the second bowl, add the finely strawberry powder and the jam/preserves. Whisk the ingredients together within each individual bowl.
6. Divide the whipping cream evenly between each of the two bowls you created in the previous step. Fold each sweetened condensed milk mixture together with the divided whipped cream to create the vanilla ice cream and strawberry ice cream.
7. Layer half of each of the ice creams on top of the strawberry crunch crust, sprinkle a layer of strawberry crunch on top, then repeat. Freeze for 6 hours and serve. 
#icecreamcake #strawberryshortcake #nochurnicecream #icecreamlover #strawberry
LEMON CUPCAKES 🍋 after about a dozen recipe tes LEMON CUPCAKES 🍋 after about a dozen recipe tests, this one is everything I could want in a lemon cupcake! Fluffy-yet-moist, bursting with natural lemon flavor, and absolutely irresistible topped with lemon cream cheese buttercream. 

Full recipe (with frosting) linked in my bio + at https://sugarandsparrow.com/homemade-lemon-cupcakes/

INGREDIENTS:
1 Cup (132g) all-purpose flour
1 tsp baking powder
1/4 tsp salt
1/4 Cup (60ml) whole milk, room temperature
3 Tbsp (45ml) lemon juice from 1 medium lemon
3/4 Cup (150g) granulated sugar
3 Tbsp (42g) unsalted butter, room temperature
2 Tbsp (30ml) vegetable oil
2 large eggs, room temperature
1 tsp pure vanilla extract

INSTRUCTIONS:
1. Preheat the oven to 350ºF (177ºF) and line a standard cupcake pan with 12 paper liners.
2. In a large bowl, whisk together the flour, baking powder, and salt. Set aside. 
3. In the bowl of a stand mixer fitted with the paddle attachment (or with a hand mixer and large bowl), add the lemon zest to the sugar and mix on low speed until fragrant and well combined, about 1 minute. Meanwhile, combine the lemon juice with the milk and set aside. 
4. Add the butter to the lemon-sugar mixture and cream on medium speed until and combined, about 2 minutes. Add the vegetable oil and beat until light and creamy, about 3 minutes. Scrape down the bowl and paddle as needed.
5. Mix in the eggs one at a time on low speed, then add the vanilla and turn the mixer to medium speed for one minute.
6. Turn the mixer off and add the flour mixture all at once. Mix on low speed until just combined, then slowly pour in the lemon-milk mixture. Mix until just combined, about 30 seconds.
7. Divide the batter equally between the liners and bake for 14-18 min. Cool, then top with frosting of your choice (link in bio for lemon cream cheese frosting)�
#lemoncupcakes #creamcheesefrosting #lemon #cupcakes #cupcakedecorating
April in my kitchen 🌸 I published 5 NEW recipes April in my kitchen 🌸 I published 5 NEW recipes on my site, baked my Oreo cupcake recipe for a fundraiser and found it was just as delicious as I remember, and filmed/photographed 3 recipes that will be on my blog in May (Lemon Cupcakes, Lemon Cream Cheese Buttercream, and No-Bake Marbled Strawberry Cheesecake) 🥰 

Comment “APRIL” to get all the available recipes and stay tuned for more! 

#bakersofinstagram #springbaking #cakedecorating #cupcakes #bakinglove
SHEET PAN COOKIE CAKE 🍪 slice it warm for a fud SHEET PAN COOKIE CAKE 🍪 slice it warm for a fudgy chocolate chip cookie OR let it settle into a moist and chewy cookie cake that’s perfect for decorating! My fave vanilla buttercream + sprinkles turn this giant chocolate chip cookie into the perfect birthday cake alternative at the end 🥳
⁣
Full recipe + decorating ideas at https://sugarandsparrow.com/sheet-pan-chocolate-chip-cookie-cake/
⁣
INGREDIENTS⁣
1 Cup (226g) unsalted butter, melted⁣
1 1/3 Cups (267g) packed light or dark brown sugar⁣
1/2 Cup (100g) granulated sugar⁣
3 large eggs⁣
1 Tbsp pure vanilla extract⁣
1 tsp baking soda⁣
1 tsp cornstarch⁣
1/2 tsp salt⁣
3 Cups (398g) all purpose flour⁣
2 Cups (350g) semi-sweet chocolate chips⁣
⁣
INSTRUCTIONS⁣
1. Preheat the oven to 350ºF (177ºC). Grease and line a 13×18 inch sheet pan.⁣
2. In a large bowl, add the brown sugar and granulated sugar. Melt the butter in the microwave and pour it over the top of the sugars. Whisk together until uniform. Add the eggs and vanilla, then continue whisking until uniform. Whisk in the baking soda, cornstarch, and salt.⁣
3. Add the flour and use a silicone spatula to fold it in until smooth cookie dough forms. Reserve 1/2 Cup of the chocolate chips and set them aside, then fold the remaining 1 1/2 Cups of chocolate chips into the cookie dough.⁣
4. Place the chocolate chip cookie dough onto the prepared sheet pan and use an offset spatula to spread it all the way to the edges in an even layer.⁣
5. Bake the cookie cake for 14-16 minutes, until it looks golden brown on the edges and set. 
6. Enjoy warm or let it cool and decorate with vanilla buttercream and sprinkles! ⁣
⁣
#cookiecake #chocolatechipcookies #sheetcake #birthdaycake #cakedecorating
STRAWBERRY CUPCAKES 🍓based on my beloved strawb STRAWBERRY CUPCAKES 🍓based on my beloved strawberry layer cake recipe, this cupcake version is just as moist yet fluffy and bursting with natural strawberry flavor! Between the mix of fresh strawberries in the cupcakes + freeze-dried strawberries in the frosting, the flavor is out of this world 🚀

Full recipe link in my bio (with strawberry buttercream) + at https://sugarandsparrow.com/strawberry-cupcakes/

STRAWBERRY CUPCAKES
Yield: 14 cupcakes

INGREDIENTS:
5 oz (143g) fresh or frozen strawberries
1/3 Cup (80ml) whole milk, room temp
1 1/2 Cups (158g) sifted cake flour
1 tsp baking powder
1/4 tsp baking soda
1/2 tsp salt
6 Tbsp (85g) unsalted butter, room temp
1 Cup (200g) granulated sugar
2 large eggs, room temp
3 Tbsp (45g) sour cream, room temp
1 tsp vanilla extract
1 drop pink food coloring (optional)

INSTRUCTIONS: 
1. Puree the strawberries using a food processor (you’ll have about 1/2 cup of puree), then place into a saucepan over medium-low heat. Bring to a simmer, then cook for 10-15 min, stirring occasionally, until you have 1/4 cup. Refrigerate until room temp.
2. Preheat oven to 350ºF (177ºC) and line a standard cupcake pan with liners.
3. Whisk together the sifted cake flour, baking powder, baking soda, and salt and set aside.
4. In a stand mixer w/ paddle attachment (or hand mixer + large bowl), whip the butter on high for 2 min. Add sugar and beat for 2 min, until light and fluffy. Turn the mixer to low and add the eggs one at a time, then add the vanilla and sour cream, turn the mixer to high and beat for 1 min. Meanwhile, whisk together the strawberry puree, whole milk, and food coloring (if using).
5. Turn the mixer off and add all of the dry ingredients at once. Mix on low until just combined, then add the strawberry milk mixture until just combined, about 30 seconds.
6. Fill the cupcake liners 2/3 full and bake for 14-18 minutes. Cool completely before topping with strawberry buttercream (full recipe linked above). 

#strawberrycupcakes #strawberrycake #pinkcupcakes #strawberry #cupcakes

Footer

On the Blog

  • Cake Basics
  • Recipes
  • Tutorials

Info

  • About
  • Privacy Policy & Disclosure

stay in the know

Copyright © 2026 · Theme by Sugar & Sparrow