• Cake
  • Frosting
  • YouTube
  • My Favorite Tools
  • Nav Social Icons

  • Skip to primary navigation
  • Skip to main content
  • Skip to primary sidebar
  • Skip to footer
  • Recipes
    • Cake
    • Cupcakes
    • Frosting
    • Ice Cream
    • Vegan
  • Cake Basics
  • Tutorials
  • Blog
  • About
  • Mobile Menu Widgets

    Connect

    Search

Sugar & Sparrow logo in script font

Sugar & Sparrow

Lifestyle and Cake from Portland Oregon

  • Cake Basics
  • Recipes
    • Cake
    • Cupcakes
    • Cookies & Bars
    • Filling
    • Frosting
    • Ice Cream
    • No-Bake
    • Small Batch
    • Vegan
  • Tutorials
  • Book
  • Blog
  • About

Cascading Floral Cake Tutorial

April 24, 2020 · In: Featured, Seasonal, Spring, Tutorials

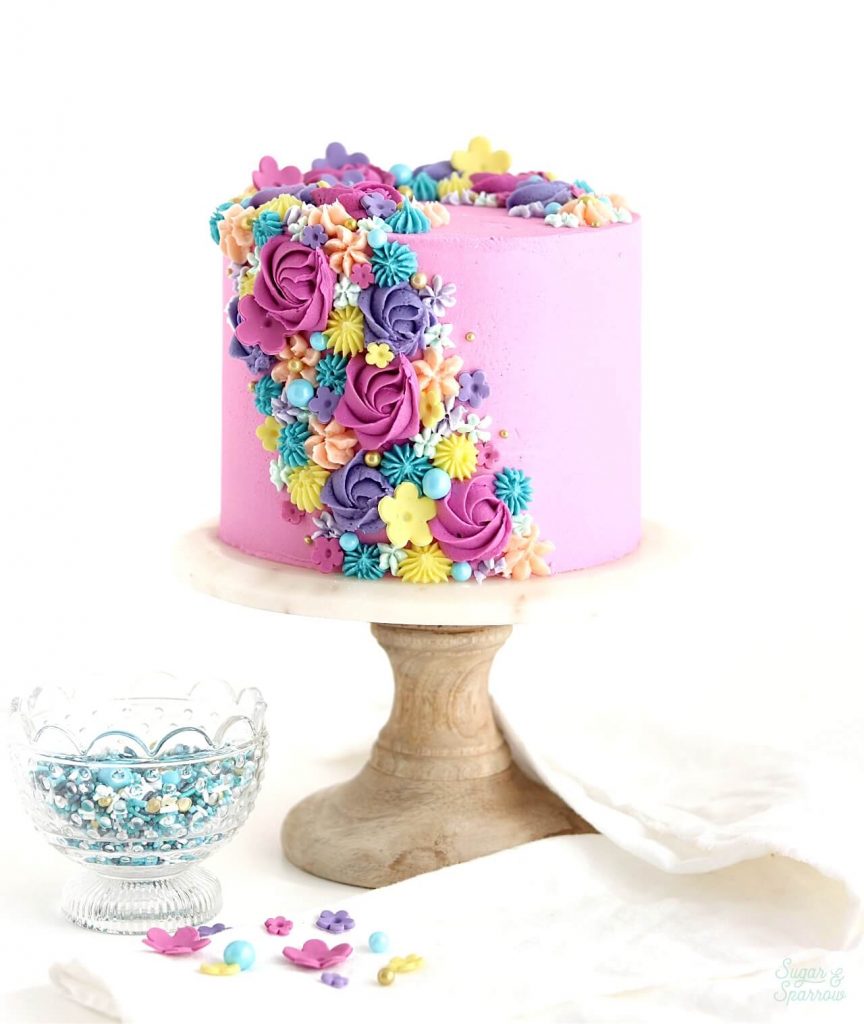
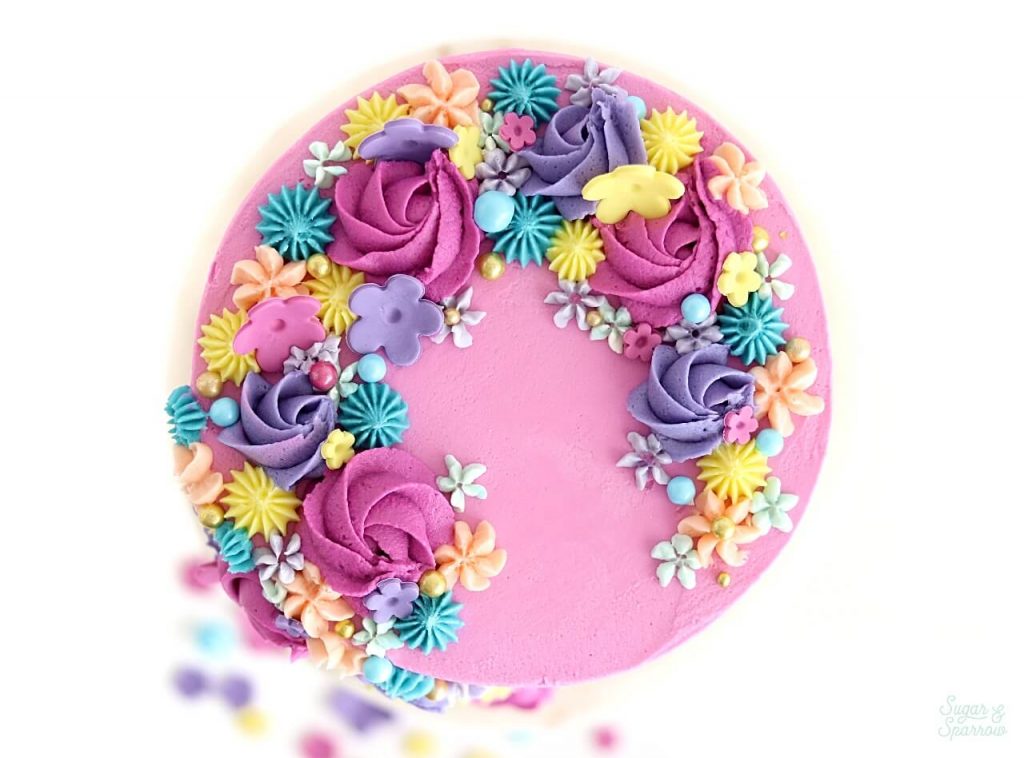
Before the whole world shut down, I made this colorful Cascading Floral Cake inspired by the pretty Spring flowers that were just starting to bloom. Nowadays, seeing the Spring flowers is the highlight of my daily walks and I find them just as inspiring (and totally worth celebrating!), even in this wild season. Whether you need a fun cake project in your life, have a #QuarantineBirthday to celebrate, or you just need something pretty to look at, I’m showing you how to get this look with some quick and easy floral techniques! 

spring floral cake by sugar and sparrow

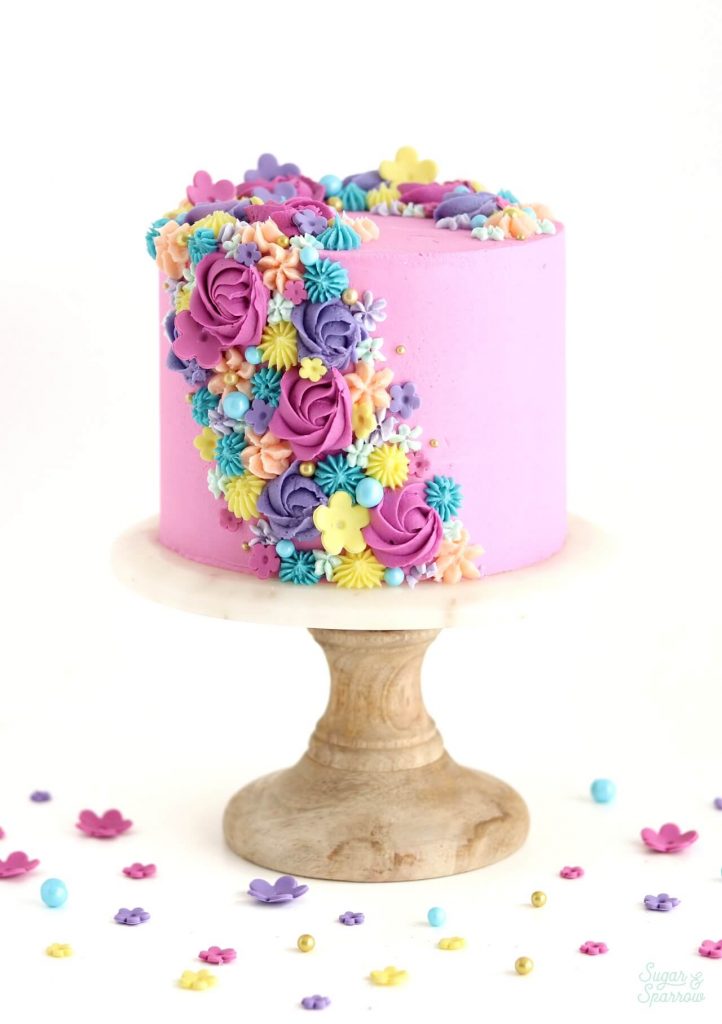
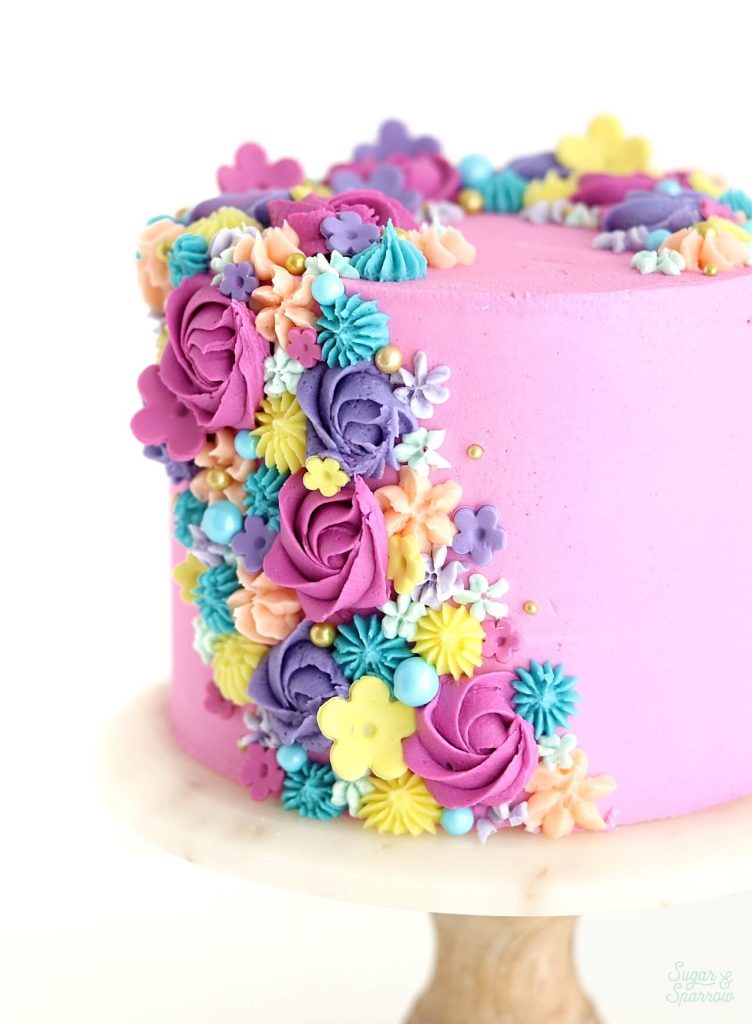
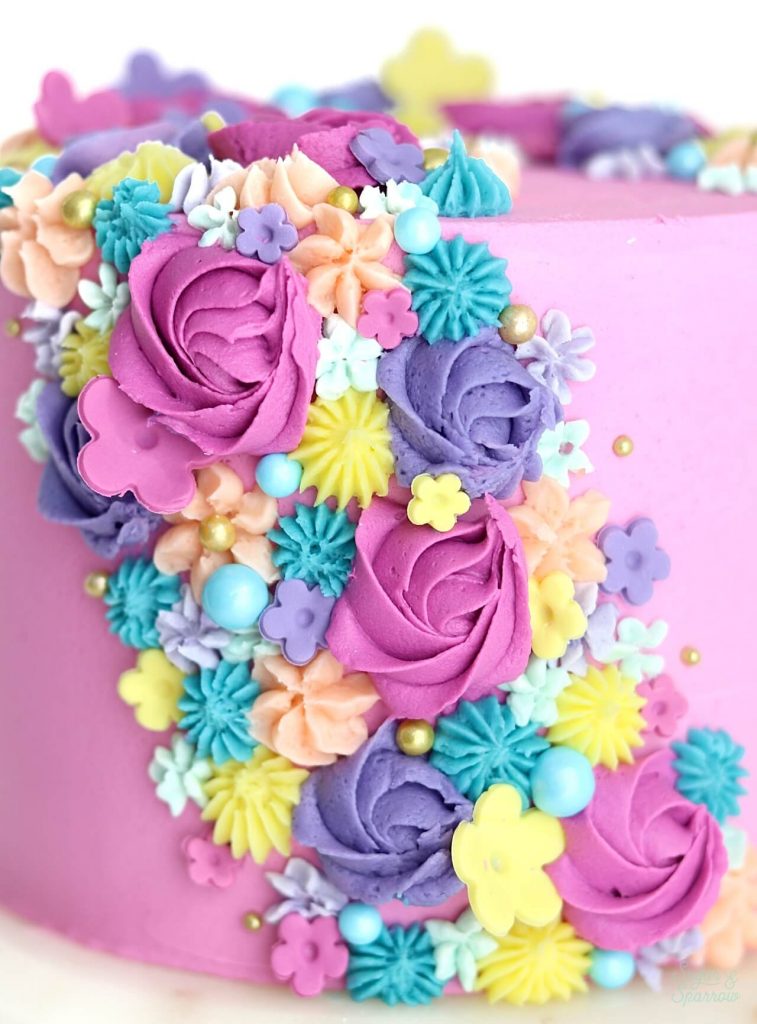
Although there’s a ton of texture going on here, the design could not be simpler to create. I used a mix of simple fondant flowers, buttercream piped flowers, and sprinkles to make this cascading bouquet of blooms come to life. Incorporating all three of those elements helps to give depth to the design, but I’ve also created this cascading floral look with just buttercream and both ways look incredible! Whatever techniques you use, as long as you nail this floral placement, you really can’t lose. 

buttercream floral cake tutorial
buttercream flowers cake tutorial

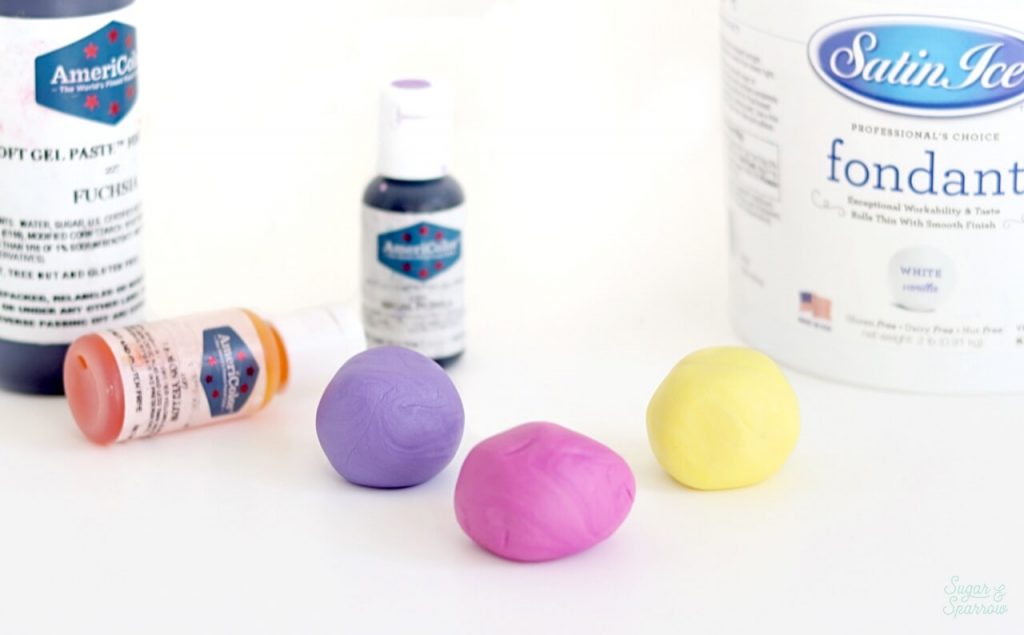
If you do include the cute little fondant flowers, I do recommend making them at least a day ahead, just because they’re much easier to work with when they’re firm. I made them with this plunger cutter set and loved how quick they were to cut out in a variety of sizes and colors. Allowing them to dry in a semi-sphere mold (or even on the inside curve of a bowl!) really helped give the petals the perfect shape. Probably the easiest fondant flowers I’ve ever made!  

spring flowers cake by sugar and sparrow
cake with flowers by sugar and sparrow

And as far as the buttercream flowers go, all they really take is the right piping tips and a fun color palette. Including the Fuschia background color I used for the cake, this color palette consists of seven different buttercream colors! I do tend to get a little carried away when color mixing sometimes (it’s therapeutic!) but keep in mind that you can create this look with less colors, or really any color palette you want. With that in mind, feel free to follow the tutorial below closely or use it as inspiration for your floral cake creation. You do you! 

Here’s a quick video to show you the decorating techniques before you read all about them below:

Be sure to check out my YouTube channel to see even more cake decorating videos, tutorials, and recipes. Hit the Subscribe button while you’re there so you never miss a new video!

You Will Need 

  • A 6-inch cake, filled and frosted in a solid color of your choice
  • 3 1-inch balls of fondant
  • Small rolling pin
  • 1 tsp vegetable shortening
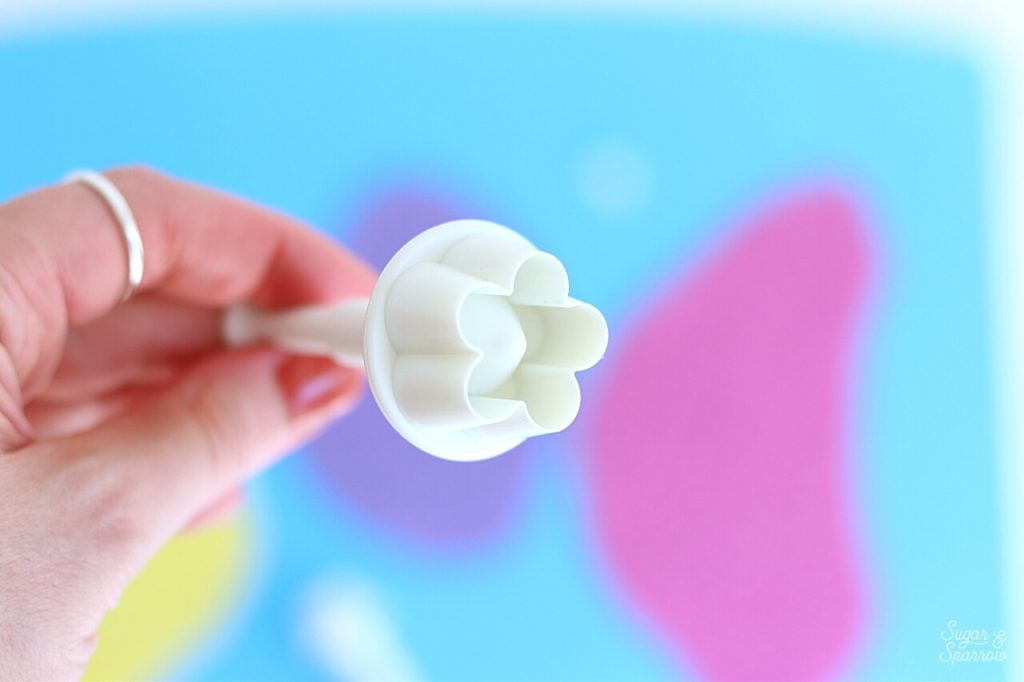
  • Flower Plunger Cutter Set
  • Flower drying mold
  • 1 batch of vanilla buttercream
  • Food color gels of your choice
  • Bowls and spoons for mixing
  • Piping bags
  • Wilton Tip 1M (x2)
  • Wilton Tip 4B (x2)
  • Wilton Drop Flower tips: 190 and 225
  • Sprinkles of your choice (I used the Sea Glass Mix by Sprinkle Pop)

Step 1: Make the Fondant Flowers

At least a day ahead (so the fondant flowers have time to dry), color the three 1-inch balls of fondant according to your chosen color scheme. I used Americolor Lemon Yellow, Fuschia, and Regal Purple for the colors shown below.

satin ice fondant

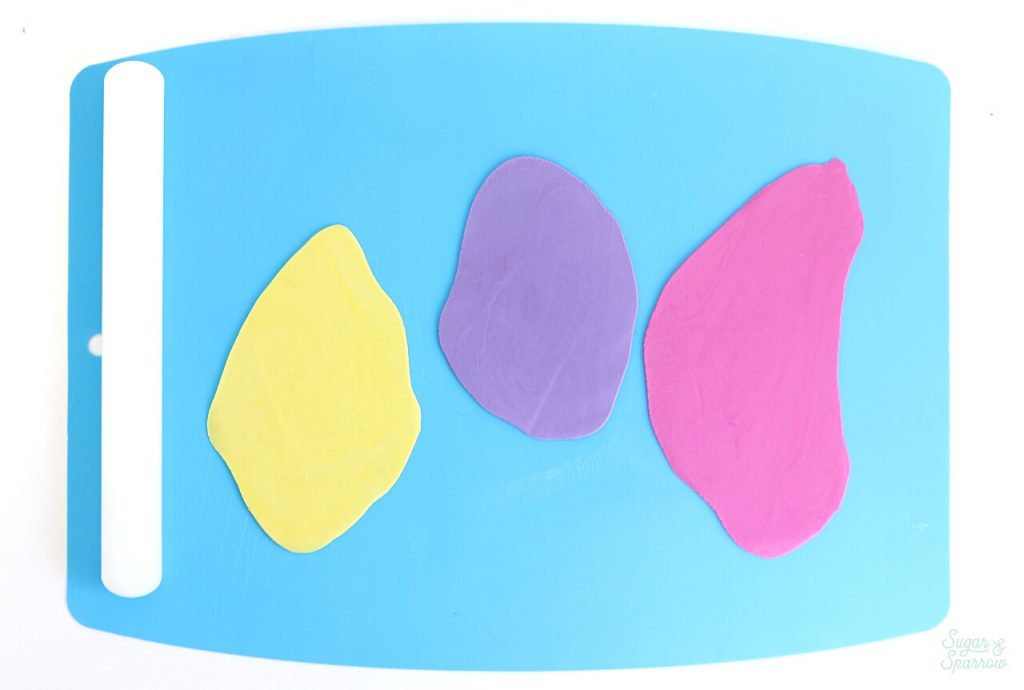
Coat a flat surface with a little bit of vegetable shortening, then roll the fondant out to about ⅛ inch thick.

rolling out fondant

Use the flower plungers to cut out a variety of floral shapes, gently pressing the plunge button to create the dot center on each one.

flower cutters for fondant
how to make fondant flowers

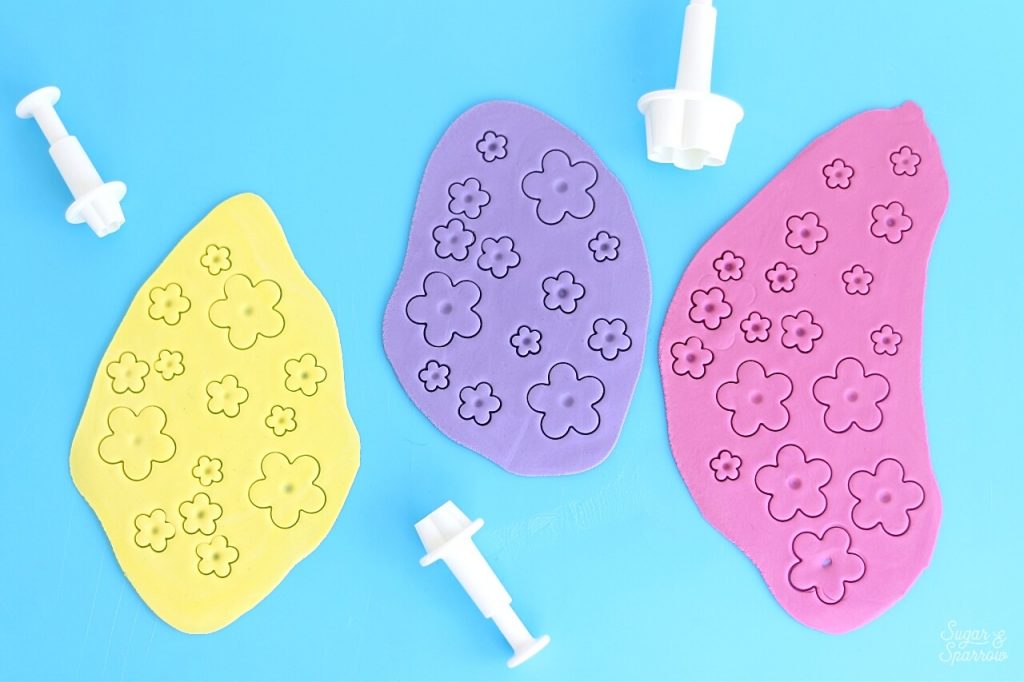
Finally, set the flowers to dry in a semi-sphere mold or the inside of a bowl so that the petals dry with some upward lift.

how to dry fondant flowers

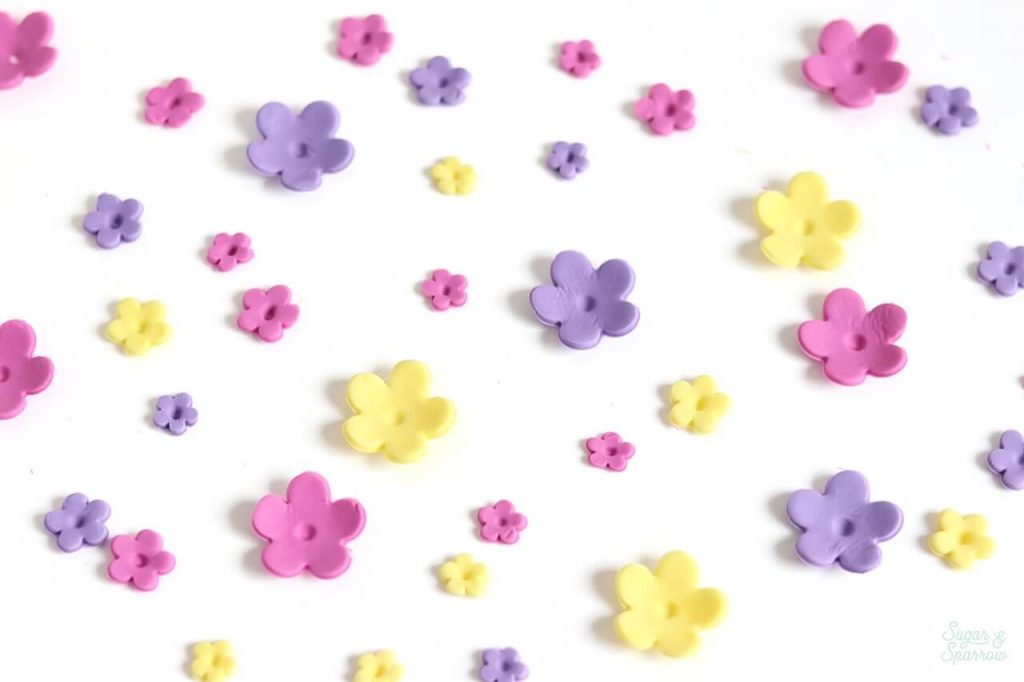
After about 24 hours, your fondant flowers should be dry and fully ready to use on your cake.

fondant flowers tutorial

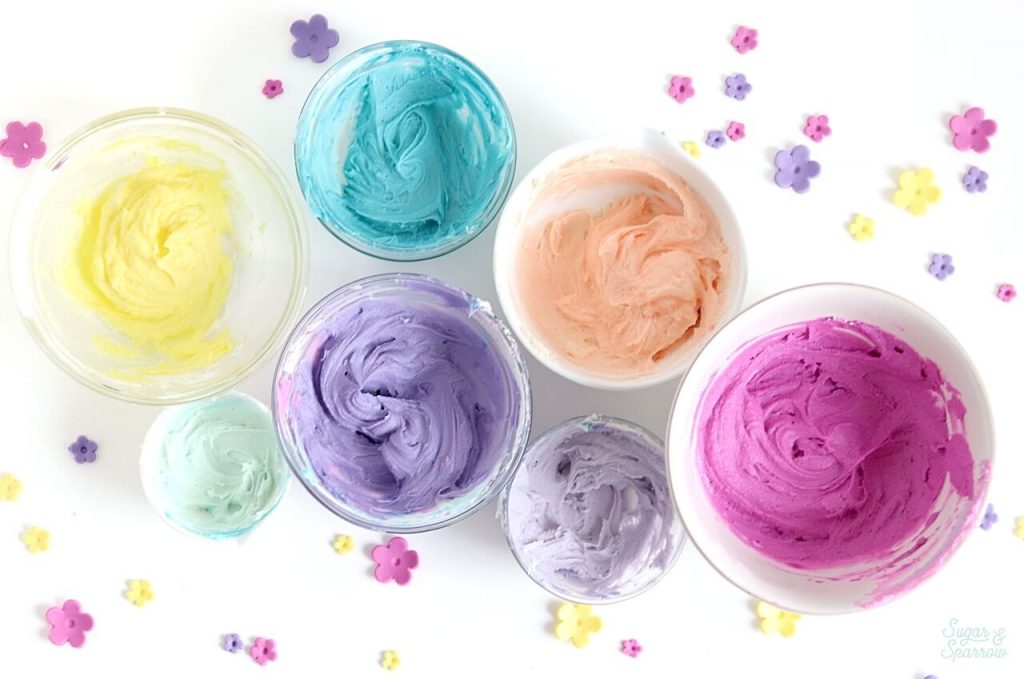
Step 2: Prepare the Buttercream 

Divide the vanilla buttercream evenly amongst separate bowls, one per color in your palette. Then color each bowl with your favorite color gels. For the color palette shown below, I used Americolor Fuschia, Lemon Yellow, Regal Purple (for both the light and dark purple), Turquoise (for both the light and dark turquoise), and Peach.

how to color buttercream

When your buttercream colors are ready to go, fit your piping bags with tips and fill each one with a different color. I fit the Fuschia and dark Regal Purple piping bags with Wilton Tip 1M, the Lemon Yellow and dark Turquoise piping bags with Wilton Tip 4B, the Peach bag with Wilton Tip 190, and the light Regal Purple and light Turquoise bags with Wilton Tip 225.

buttercream piping bags

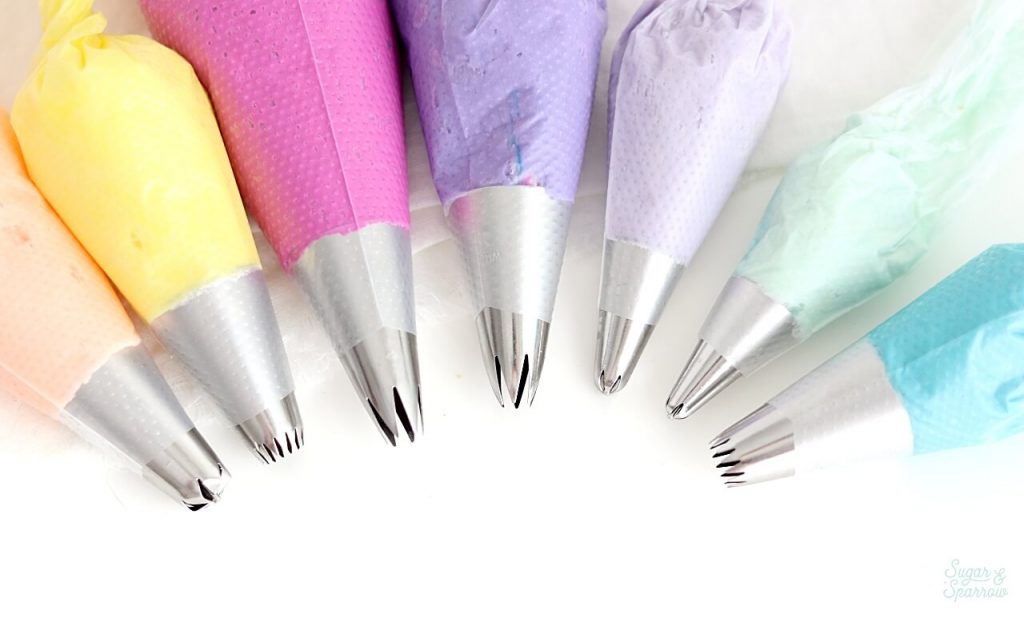
Feel free to use any variety of floral piping tips and colors you’d like for this look! 

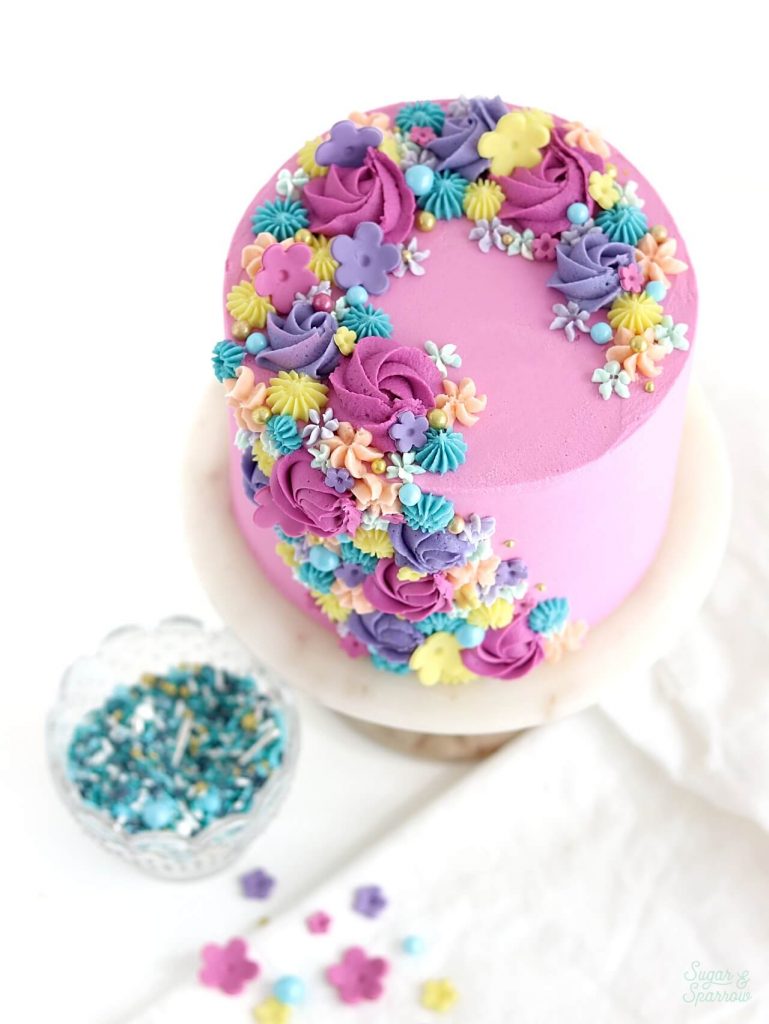
Step 3: Decorate the Top of the Cake 

On the top of your frosted cake, start by piping some scattered rosettes with Wilton Tip 1M in a crescent moon shape.

how to pipe buttercream rosettes

Use the piping bags fitted with Wilton Tip 4B to pipe stars that follow the same crescent moon shape, allowing plenty of space to fill in with more florals.

piping stars with wilton tip 4b

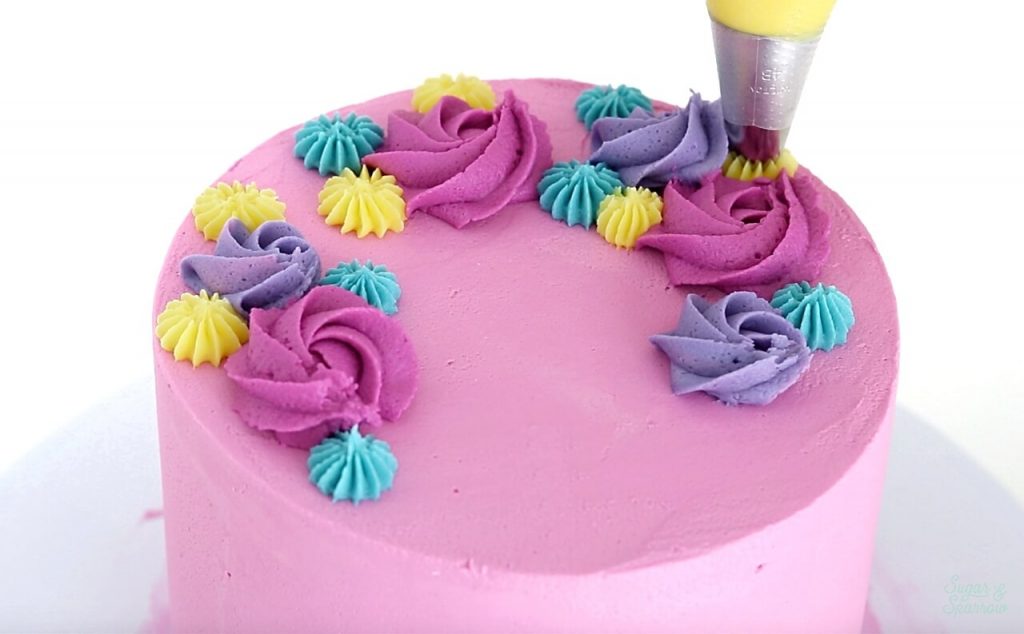
Fill in most of the space with your drop flowers using Wilton Tips 190 and 225. If you’ve never piped a drop flower before, they’re super easy! Simply hold the piping tip at a 90 degree angle (straight down) about ⅛ inch from the cake surface. Then, twist the tip in a clockwise motion while you squeeze to swirl the petals before releasing.

how to pipe buttercream flowers on cake

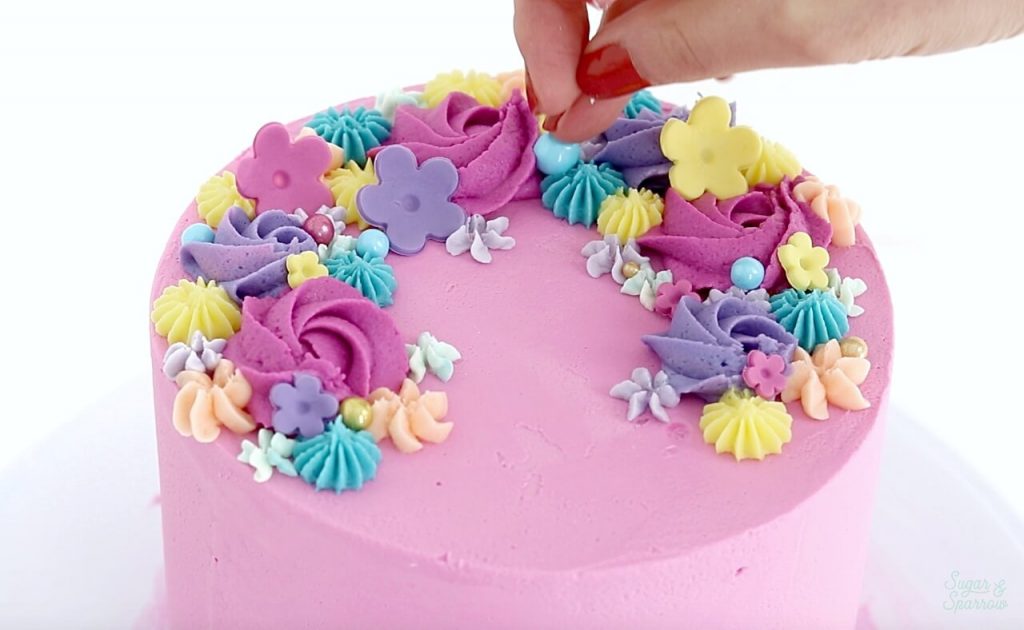
Next, add the fondant flowers wherever you’d like, standing them at different angles. They’re super light weight, so they should stick right onto the buttercream without shifting or falling over.

adding fondant flowers to cake

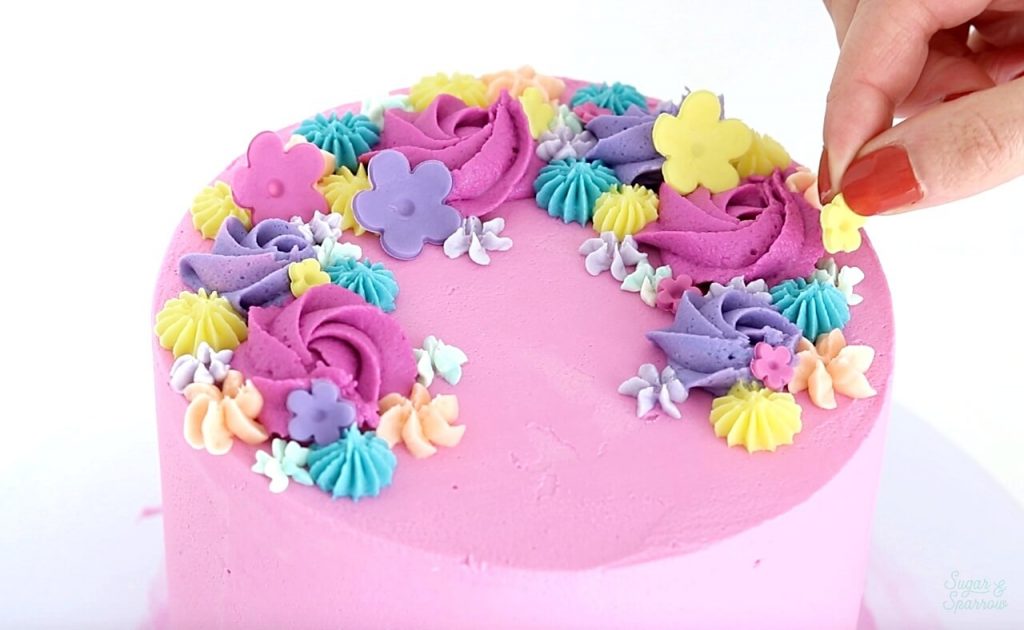
Finally, fill in the empty spaces with spherical sprinkles of varying sizes. I loved adding some of the sprinkles to the buttercream flowers to give them a pretty center!

adding sprinkles to cake

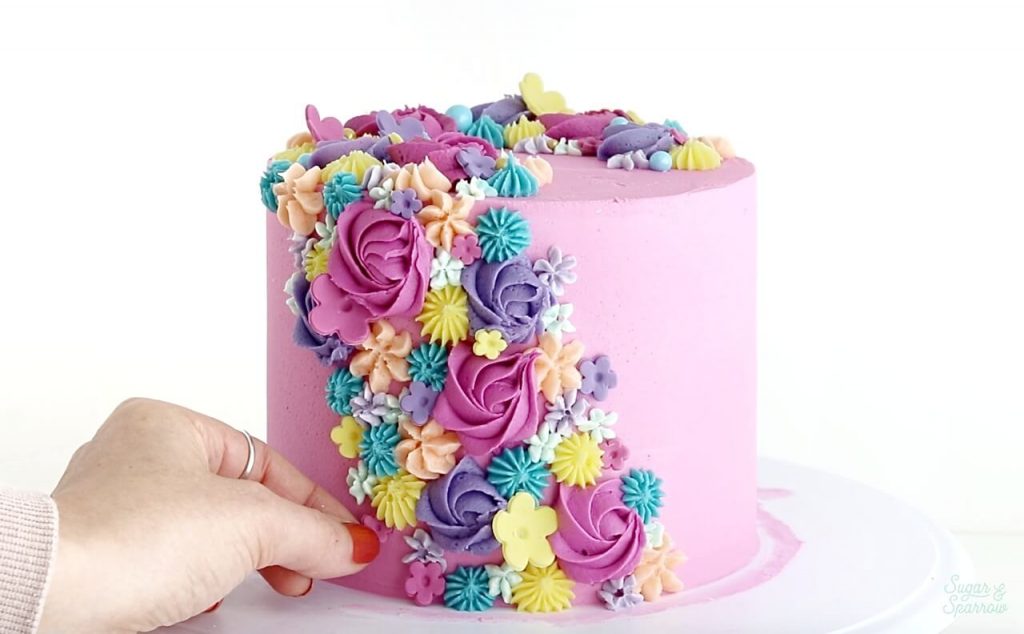
Step 4: Create the Floral Cascade 

To make these beautiful blooms look like they’re cascading down the side of the cake, repeat the above steps for piping, adding fondant flowers, and attaching sprinkles – only this time at a diagonal angle. Starting near one of the edges of the crescent moon shape you created along the top, pipe scattered rosettes diagonally down the side of the cake.

how to pipe rosettes on side of cake

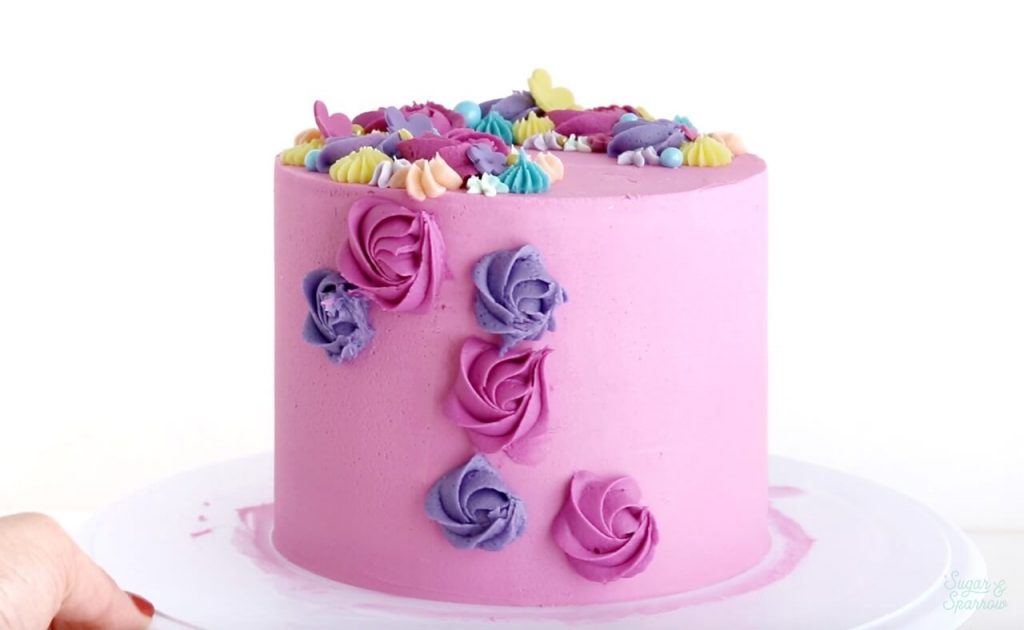
Pipe more stars with Wilton Tip 4B in that same diagonal direction down the side, then fill in most of the empty space with the drop flower tips to complete the general cascading shape.

how to create a cascading floral cake with buttercream
piping buttercream flowers onto cake

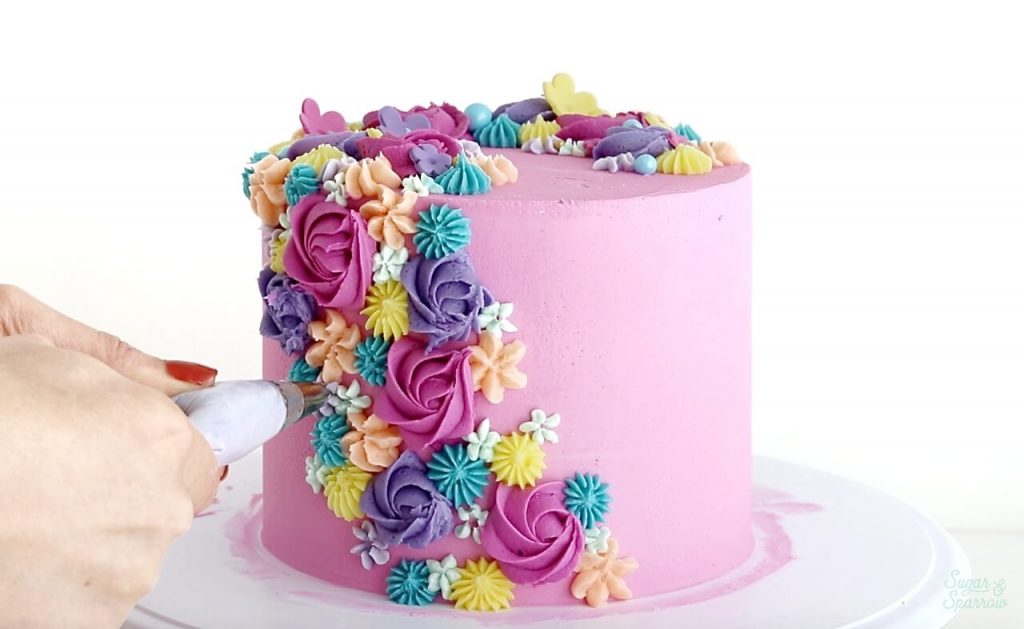
Accent your cascading florals with fondant flowers and sprinkles until you are totally satisfied with all the textures going on.

how to create a buttercream floral cake

This is one of those cake designs I get totally lost in and just keep adding things until I feel like it’s time to step back and marvel. These floral textures get me every time!

floral buttercream cake tutorial by sugar and sparrow
spring floral cake tutorial by sugar and sparrow

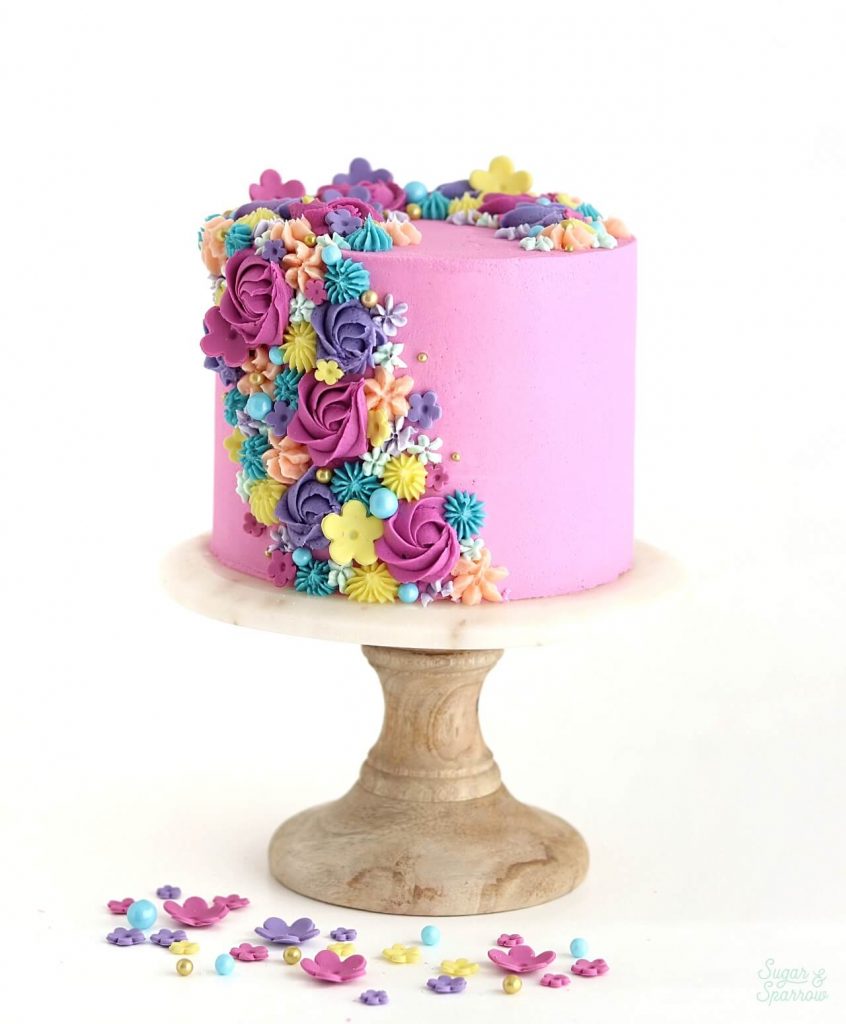
So pretty, right? I can’t wait to see your cascading floral cake creations – be sure to tag @sugarandsparrowco on Instagram to show me! We could all use something pretty to look at nowadays, so no matter what your reason is for making this cake design, it’s sure to bring some life to this crazy season. Hope you’re all safe, well and staying creative (or doing whatever brings you joy these days)!

By: Whitney · In: Featured, Seasonal, Spring, Tutorials · Tagged: americolor, buttercream floral cake, buttercream flowers, cake with flowers, cascading floral cake, floral cake, floral cake tutorial, flower cake, fondant, fondant decorations, fondant flowers, fondant flowers tutorial, pink cake, piping techniques, spring cake, wilton drop flower tips, wilton tip 190, wilton tip 1m, wilton tip 225, wilton tip 4b

you’ll also love

chocolate strawberry cake recipe by sugar and sparrowChocolate Covered Strawberry Cake
pumpkin layer cake recipe by sugar and sparrowPerfect Pumpkin Layer Cake Recipe
berry chantilly cake recipe inspired by whole foodsBerry Chantilly Cake Recipe

Join the List

Stay up to date & receive the latest posts in your inbox.

Reader Interactions

Comments

  1. Nanajee Travels says

    December 8, 2024 at 6:03 am

    Very creative and amazingly beautiful
    Thanks for sharing

    Reply
  2. Miski Homenick says

    March 26, 2024 at 10:21 am

    Hi Whitney, this is my favorite cake since it mixes both buttercream and fondant. I have issues making a really smooth frosting and was wondering if maybe it’s my recipe. The recipe I have been using uses shortening instead of butter (pinch of salt, butter and vanilla flavoring, meringue powder, and milk). The taste is very good but was wondering if using butter instead would help with my frosting layer. Any advice is appreciated!

    Reply
    • Whitney says

      March 27, 2024 at 9:03 am

      Hi Miski! Your recipe sounds similar to my heat-resistant buttercream recipe (https://sugarandsparrow.com/buttercream-recipe-for-hot-weather/) and you should be able to create a smooth consistency for frosting cakes. My best advice is: 1) use room temperature milk ingredients when mixing up the buttercream 2) if the buttercream is too thick, add a little more room temperature milk to thin it out until it’s easier to spread, and 3) take a look at this blog post to help guide you through frosting a smooth buttercream cake https://sugarandsparrow.com/smooth-buttercream-cake-tutorial/

      Reply
  3. Connie says

    March 11, 2024 at 8:56 am

    I’m so excited to try making this cake. I’m wondering if the cake was chilled while you were applying the cascade, or would the piping adhere better if the cake was room temperature? Thank you for this tutorial!

    Reply
    • Whitney says

      March 11, 2024 at 10:49 am

      Hi Connie! I chilled the buttercream before applying the cascade. I’m excited for you to make this!

      Reply
  4. Whitney says

    September 29, 2022 at 12:52 pm

    I am wanting to make this but only have two 9 in cake pans. Will it still look cute with two layers of 9 in cakes?

    Reply
    • Whitney says

      October 1, 2022 at 10:01 pm

      Hi fellow Whitney! It won’t be as tall of a cascade but I think it would still look super cute.

      Reply
  5. Amelia says

    May 2, 2022 at 2:44 am

    Hi. Can you please tell me what measurements you used for your buttercream? I want to make sure I make enough. Thank you

    Reply
    • Whitney says

      May 5, 2022 at 3:58 pm

      Hi Amelia! If you’re starting with a cake that’s already been frosted, you’ll need 2-3 Cups of buttercream for the piped flower cascade. If you need enough to fill and frost the cake as well, you’ll need about 7 Cups of buttercream total (2.5 Cups for filling/crumb coat, 1.5 Cups for frosting, and 3 for the piped decorations). Hope that helps!

      Reply
  6. Vickie says

    January 27, 2022 at 5:48 pm

    Hi Whitney! How many layers does this cake contain?

    Reply
    • Whitney says

      January 30, 2022 at 8:05 pm

      Hi Vickie! This cake is a triple layer 6 inch.

      Reply
  7. Sonia says

    July 3, 2021 at 10:42 pm

    Do you ice your cake here with buttercream or fondant? If buttercream do you crumb coat it first. I am a novice cake decorator, your finish looks so smooth!

    Reply
    • Whitney says

      July 7, 2021 at 2:52 pm

      Hi Sonia! I only use buttercream for my cakes. I crumb coat the cake first, chill the cake for about 30 min, then frost the cake with a final layer. I have a great series called Cake Basics that details everything I do when it comes to building and decorating cakes from start to finish. Check it out here: https://sugarandsparrow.com/category/cakebasics/ I have a specific post on how to frost a cake smooth as well: https://sugarandsparrow.com/smooth-buttercream-cake-tutorial/

      Reply
  8. Deanna says

    May 14, 2021 at 6:33 am

    Why is my bakery telling me they cannot do flowers cascading down the side if the cake? It’s a round cake with white butter ream frosting.

    Reply
    • Whitney says

      May 14, 2021 at 3:01 pm

      Hi Deanna! I’m not sure why your bakery isn’t comfortable with this style. Have you asked them?

      Reply
  9. Sandra says

    November 7, 2020 at 4:39 pm

    Pretty cake, what is the consistency of your buttercream for the flowers? And what kind of buttercream are you using? Thanks

    Reply
    • Whitney says

      November 7, 2020 at 10:44 pm

      Hi Sandra! I am using my Vanilla Buttercream Recipe, medium consistency: https://sugarandsparrow.com/vanilla-buttercream-recipe/ the details for buttercream consistency are linked there beneath the recipe 🙂

      Reply
  10. CH says

    July 5, 2020 at 2:27 pm

    When you write a 6 inch cake, approx. how tall are each of your layers? (looking to get good quality cake pans)

    Reply
    • Whitney says

      July 6, 2020 at 3:52 pm

      My 6-inch cake pans are 2 inches tall, and my cake layers end up being about that tall as well.

      Reply

Leave a Reply Cancel reply

Your email address will not be published. Required fields are marked *

Recipe Rating


Next Post >

Vegan Chocolate Cake with Oreo Buttercream

Primary Sidebar

Welcome to Sugar & Sparrow

Welcome to Sugar & Sparrow

Helping you whip up pretty desserts with confidence and creativity. And hopefully sharing a few laughs with you along the way!

Learn More

Connect

let’s bake!

Get my very best recipes, baking tips, and decorating tutorials sent to your inbox

Featured Posts

Sky High Cookies & Cream Ice Cream Cake

how to crumb coat a cake

How to Crumb Coat Cakes (and Why it’s Important)

monster cake by sugar and sparrow

Spooky Black Buttercream Halloween Cake

Search

Archives

Follow Along

@sugarandsparrowco

RASPBERRY CAKE FILLING (recipe below) ♥️ this RASPBERRY CAKE FILLING (recipe below) ♥️ this perfectly sweet/tart raspberry cake filling is beautifully thick, seedless, and so rewarding to make from scratch! It takes just a handful of ingredients and can be made with fresh OR frozen raspberries 🙌🏼 

Get the full recipe + cake pairing suggestions at the link in my bio or at https://sugarandsparrow.com/seedless-raspberry-cake-filling/

INGREDIENTS:
2 1/2 Cups (10oz, 315g) fresh or frozen raspberries
1/2 Cup (100g) granulated sugar
1 Tbsp lemon juice
1 tsp lemon zest
1 1/2 Tbsp (12g) cornstarch
1 1/2 Tbsp (22ml) water

INSTRUCTIONS: 
1. In a saucepan set over medium heat, add the raspberries, granulated sugar, lemon juice, and lemon zest. Cook until the mixture begins to boil, stirring occasionally. 
2. Once boiling, lower the heat and simmer for 10-15 minutes while you continue stirring occasionally. Then, remove from heat and use a fine mesh sieve to strain out the seeds over a medium bowl. After straining, you’ll be left with about 1/4 Cup of seedy pulp.
3. In a small separate bowl, combine the cornstarch and water until uniform. Return the strained raspberry filling to the saucepan (wipe it free of any remaining seeds if needed) and add the cornstarch/water mixture. Cook over medium heat until boiling, stirring constantly, then reduce to a simmer and cook for 1-3 minutes, until the filling has thickened slightly, is no longer cloudy, and coats the back of the spatula.
4. Pour into an airtight container and refrigerate for at least 4 hours and up to 1 week. It will be jello-like once set but after stirring it will become a thick, jammy consistency that’s perfect to use as a cake or cupcake filling!

#raspberrycake #cakefilling #cakedecorating #raspberries #baking
STRAWBERRY LEMON CAKE 🍓🍋 this cake is so lig STRAWBERRY LEMON CAKE 🍓🍋 this cake is so light and refreshing and bursting with all-natural flavors! It’s layers of my favorite extra fluffy lemon cake + the most delicious freeze-dried strawberry buttercream that ends up the prettiest natural pink color. I’ll never get over those little flecks of strawberry in the buttercream or the tiny chamomile flowers adding so much cheer! 

Grab the recipe at the link in my bio or at https://sugarandsparrow.com/strawberry-lemon-cake/

#strawberrylemon #lemoncake #strawberrycake #cakedecorating #strawberrybuttercream
CHOCOLATE SHEET CAKE (recipe below) 🍫 🥳 this CHOCOLATE SHEET CAKE (recipe below) 🍫 🥳 this is everything I want in a chocolate cake: rich and decadent, stick-to-your-fork fudgy, ultra-chocolatey, shareable, and EASY! Like box mix easy but from-scratch and a MUST try if you’re in need of a good chocolate cake recipe to feed a crowd👩🏽‍🍳⁣ 
 
Get the full recipe (with chocolate frosting) at the link in my bio or at https://sugarandsparrow.com/chocolate-sheet-cake/ ✨⁣ 
⁣ 
CHOCOLATE SHEET CAKE
2 Cups (265g) all purpose flour⁣ 
1 2/3 Cups (340g) white granulated sugar⁣ 
2/3 Cup (60g) unsweetened natural cocoa powder⁣ 
2 tsp baking soda⁣ 
1 tsp baking powder⁣ 
1/2 tsp kosher salt⁣ 
1/2 Cup (120ml) vegetable oil⁣ 
2 eggs, room temperature⁣ 
1 1/2 tsp pure vanilla extract⁣ 
1 Cup (240ml) full-fat buttermilk⁣ 
1 Cup (240ml) hot coffee OR hot water⁣ 
⁣ 
INSTRUCTIONS⁣ 
1. Preheat the oven to 325ºF. Grease and line a 9x13 inch cake pan. ⁣ 
2. Place all of the dry ingredients into the bowl of a stand mixer (or use a large bowl with a hand mixer) and mix on low to combine. Add the vegetable oil, eggs, vanilla, and buttermilk and mix on low until combined. With the mixer still on low, add the hot coffee or hot water in a slow stream, then turn the mixer to medium and beat until smooth, about 2 minutes. The batter will be very thin. ⁣ 
3. Pour the batter into the prepared pan and bake for 35-40 minutes, until a toothpick inserted comes out clean.⁣ Full recipe (with frosting) link in my bio.
⁣ 
#chocolatecake #chocolate #sheetcake #chocolatelover #birthdaycake
VANILLA RASPBERRY LAYER CAKE ♥️ between the na VANILLA RASPBERRY LAYER CAKE ♥️ between the naturally pink raspberry buttercream, jammy homemade raspberry filling, and soft vanilla cake layers, this is the perfect cake for Spring!! It’s has amazing, authentic raspberry flavor in every bite from fresh (or frozen) raspberries in the filling + freeze-dried raspberries in the frosting 😋

Get the full recipe link in my bio or find it at https://sugarandsparrow.com/vanilla-raspberry-layer-cake/ 

#raspberrycake #raspberries #vanillacake #cakedecorating #pinkcake
SMALL BATCH VANILLA CAKE 🎂🥳 this mini vanill SMALL BATCH VANILLA CAKE 🎂🥳 this mini vanilla cake recipe makes the PERFECT amount for 2-4 people and can be baked as a tiny 4-inch layer cake or a single layer 6-inch cake. It goes with any frosting flavor but vanilla buttercream keeps it classic for date night, a small gathering, a smash cake, or satisfying a cake craving. 
⁣
✨Full recipe (with frosting) linked in my bio + at https://sugarandsparrow.com/small-batch-vanilla-cake/ 
⁣⁣⁣⁣
SMALL BATCH VANILLA CAKE⁣⁣⁣⁣
⁣⁣⁣⁣
INGREDIENTS⁣⁣⁣⁣
3/4 Cups (79g) sifted cake flour⁣⁣⁣
1 tsp baking powder⁣⁣⁣
1/4 tsp salt⁣⁣⁣
1/4 Cup (57g) unsalted butter, room temperature⁣⁣⁣
1/2 Cup (100g) granulated sugar⁣⁣⁣
1 large egg, room temperature⁣⁣⁣
2 Tbsp (30g) sour cream, room temperature⁣⁣⁣
1 tsp pure vanilla extract⁣⁣⁣
1/3 Cup (80ml) whole milk, room temperature⁣⁣⁣
⁣⁣⁣⁣
INSTRUCTIONS ⁣⁣⁣⁣
1. Preheat the oven to 350ºF. Grease and line three 4-inch or one 6-inch cake pan.⁣⁣⁣
2. In the bowl of your stand mixer (a handheld mixer works fine too!), cream together the butter and sugar on medium-high until light and fluffy, 3 min. Turn the mixer to low and add the egg, mixing until just combined. Add the vanilla and sour cream, turn the mixer to high, and beat for 1 min. ⁣⁣⁣
3. Turn the mixer to low speed and add the dry ingredients all at once. Mix until just combined, then slowly pour in the milk. Continue to mix on low speed until just combined, about 30 seconds. ⁣⁣⁣
4. Pour the batter evenly between the prepared cake 4-inch pans (or all into one 6-inch cake pan). If using 4-inch cake pans, bake for 18-22 minutes. If using a 6-inch cake pan bake for 24-28 minutes. The cake is done when it springs back to the touch and a toothpick inserted comes out with a few moist crumbs. ⁣⁣⁣
⁣⁣⁣⁣
#vanillacake #cakes #vanilla #minicake #cakedecorating

Footer

On the Blog

  • Cake Basics
  • Recipes
  • Tutorials

Info

  • About
  • Privacy Policy & Disclosure

stay in the know

Copyright © 2026 · Theme by Sugar & Sparrow