• Cake
  • Frosting
  • YouTube
  • My Favorite Tools
  • Nav Social Icons

  • Skip to primary navigation
  • Skip to main content
  • Skip to primary sidebar
  • Skip to footer
  • Recipes
    • Cake
    • Cupcakes
    • Frosting
    • Ice Cream
    • Vegan
  • Cake Basics
  • Tutorials
  • Blog
  • About
  • Mobile Menu Widgets

    Connect

    Search

Sugar & Sparrow logo in script font

Sugar & Sparrow

Lifestyle and Cake from Portland Oregon

  • Cake Basics
  • Recipes
    • Cake
    • Cupcakes
    • Cookies & Bars
    • Filling
    • Frosting
    • Ice Cream
    • No-Bake
    • Small Batch
    • Vegan
  • Tutorials
  • Book
  • Blog
  • About

How To Make A Christmas Tree Cake

December 19, 2018 · In: Featured, Holiday, Seasonal, Tutorials

I did a thing, people. I made a 3D Christmas tree cake! Never before have I strayed from making a regular shaped cake, and I’m so glad I tried it because it was a jolly good time. Although it seems like there would be cake carving involved, there isn’t – all you need for this design is a handful of circular cake layers in increasingly smaller sizes, some green buttercream, your favorite piping tip, and of course, plenty of pretty holiday sprinkles for decorating!

This sprinkle mix by SprinklePop is called Fahoo Fores and the name alone sold me. I’m a huge fan of all things Whoville, and when I saw the actual colors and shapes involved I almost squealed! It features all the Grinchy colors like neon pinks and greens, aquas and reds, plus some teeny tiny (shiny!) gelatin Christmas trees. Perfect for adorning festive holiday cakes, cookies, cupcakes, and whoopies! Ok, I’ll stop with the rhyming because I’m no Dr. Seuss but it was tempting to write this entire post that way. Nerd alert!

Fahoo Fores sprinkle mix by SprinklePop

Christmas tree cake

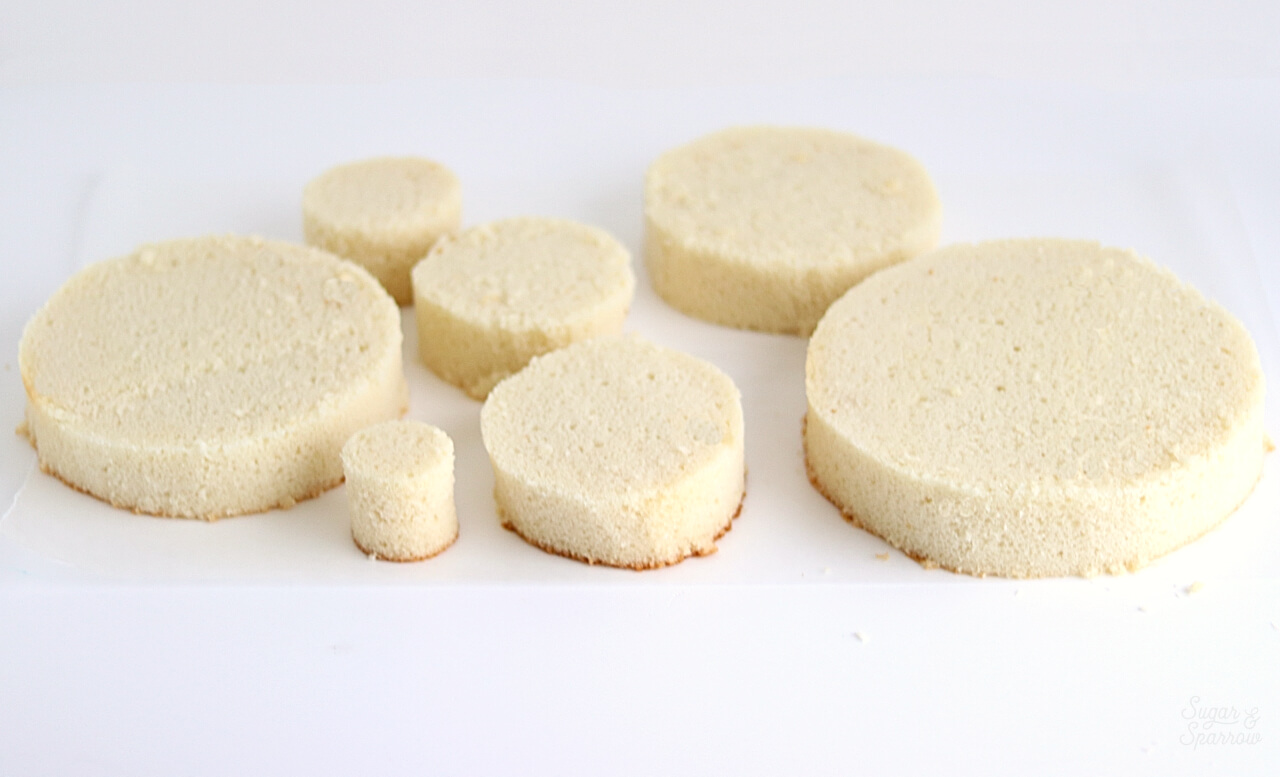
It all starts with a 12 x 18 inch sheet cake in whatever flavor you’d like. If you’ve got circular cake cutters to use, all the power to you! I don’t, so I printed out some circular templates on paper and cut out the layers out by hand. Every size you need is specified below. Then, stack those layers, frost them to create a cone-like shape, pipe on the leafy details, and sprinkle away! It’s really that simple. 

You Will Need:

  • A baked 12 x 18 inch sheet cake
  • Circular cake cutters or printed templates for 7”, 6”, 5”, 4”, 3.5”, 3”, and 2” circles
  • 8 inch cardboard cake circle
  • 2.5 batches vanilla buttercream (or other light colored buttercream) tinted green
  • Angled icing spatula
  • Wilton tip 4B
  • Piping bags
  • 8oz bottle of Fahoo Fores sprinkles (or other favorite Holiday mix)
  • ½ inch star made out of gumpaste or fondant

Step 1: Cut Out The Cake Layers

Use circular cake cutters to cut out cake circles that are 7”, 6”, 5”, 4”, 3.5”, 3”, and 2”. If you’re like me and you don’t have all those cake cutters, you can print out circles that are sized to the above dimensions, then use a paring knife to carefully cut those circles out of your sheet cake.

vanilla cake layers

Step 2: Stack The Cake Layers

Put a swipe of buttercream onto your cardboard cake circle and place your largest cake layer on top of it. Frost a thin layer of buttercream filling on top before adding the next largest cake layer.

how to make a christmas tree shaped cake

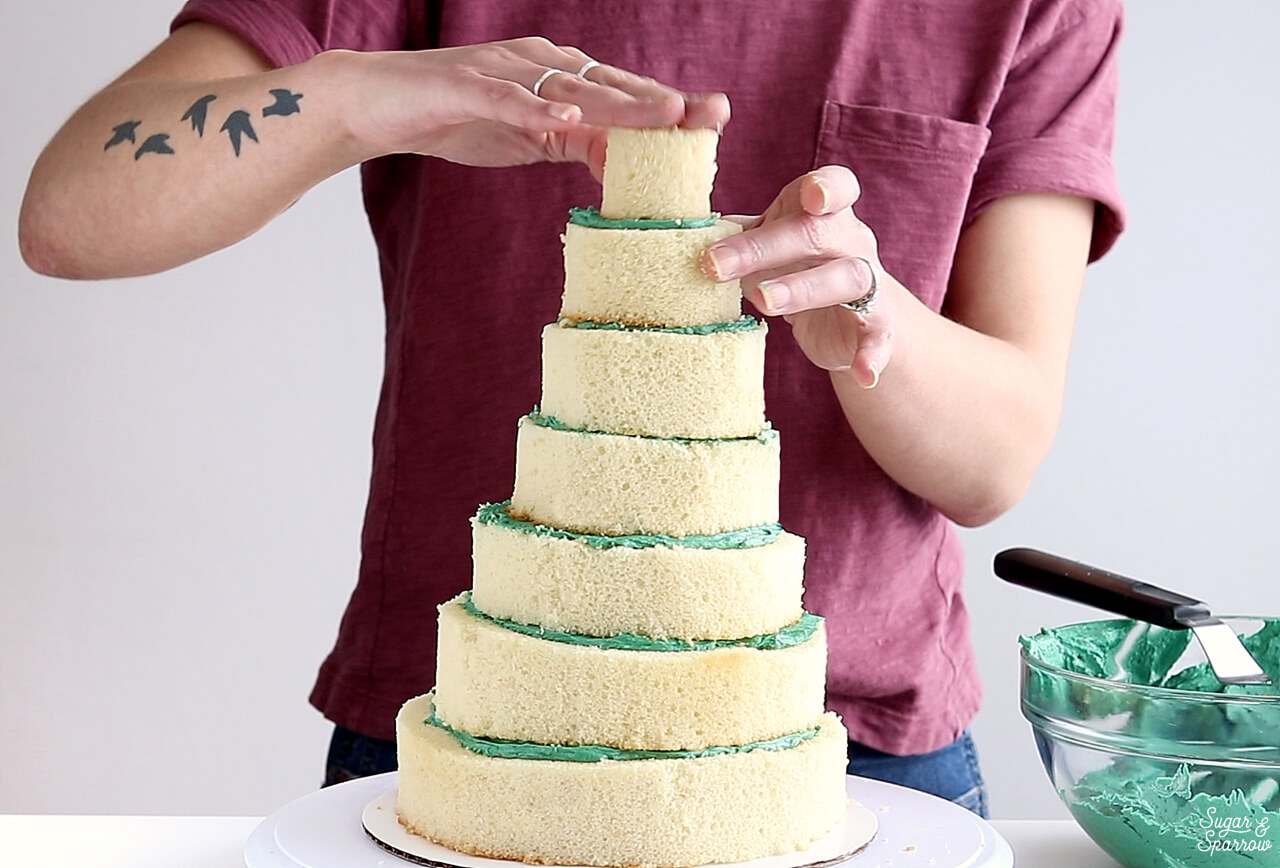
Repeat stacking the increasingly smaller cake layers until you’ve placed the smallest layer on top.

Step 3: Crumb Coat The Cake

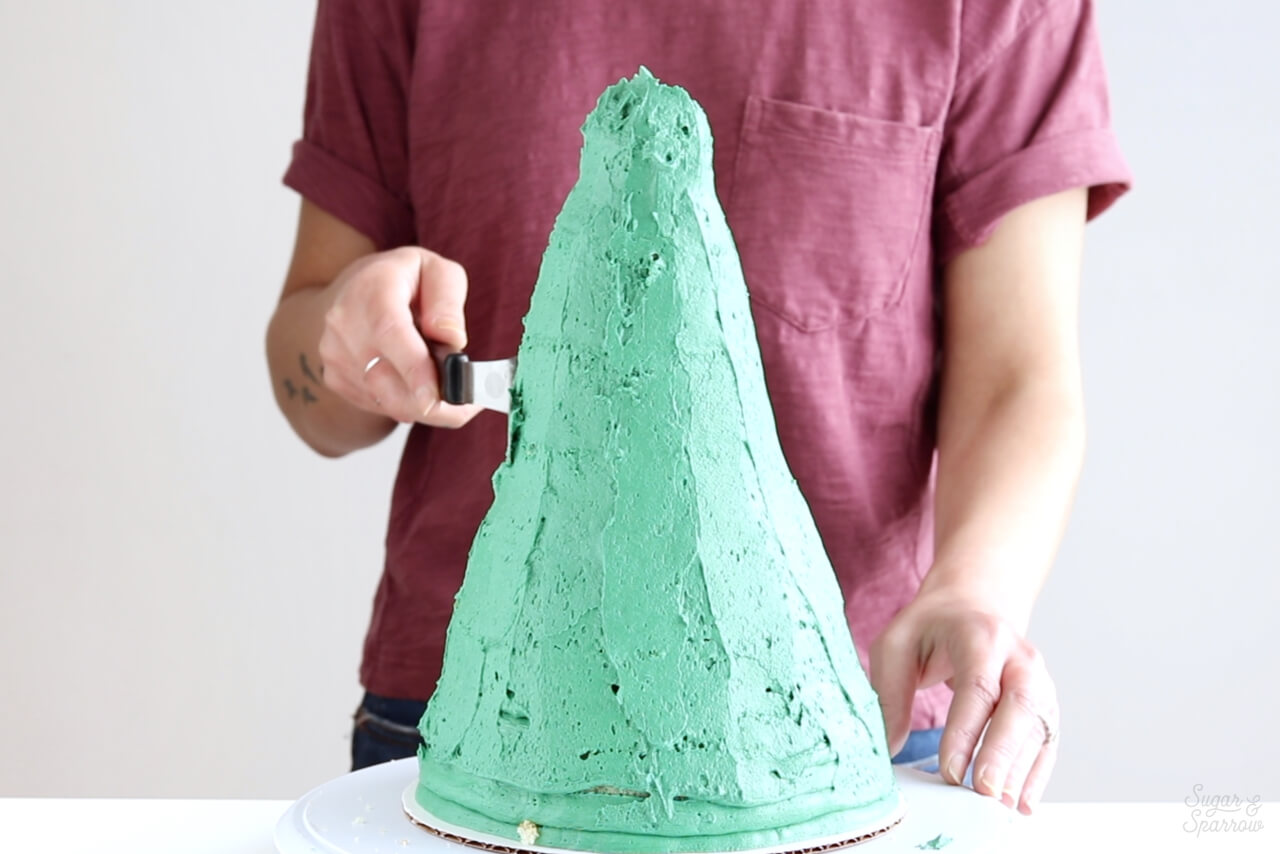
Place the green buttercream into a piping bag and snip off a ½ inch opening. Pipe over the outside of the cake to cover all the gaps.

forest green buttercream

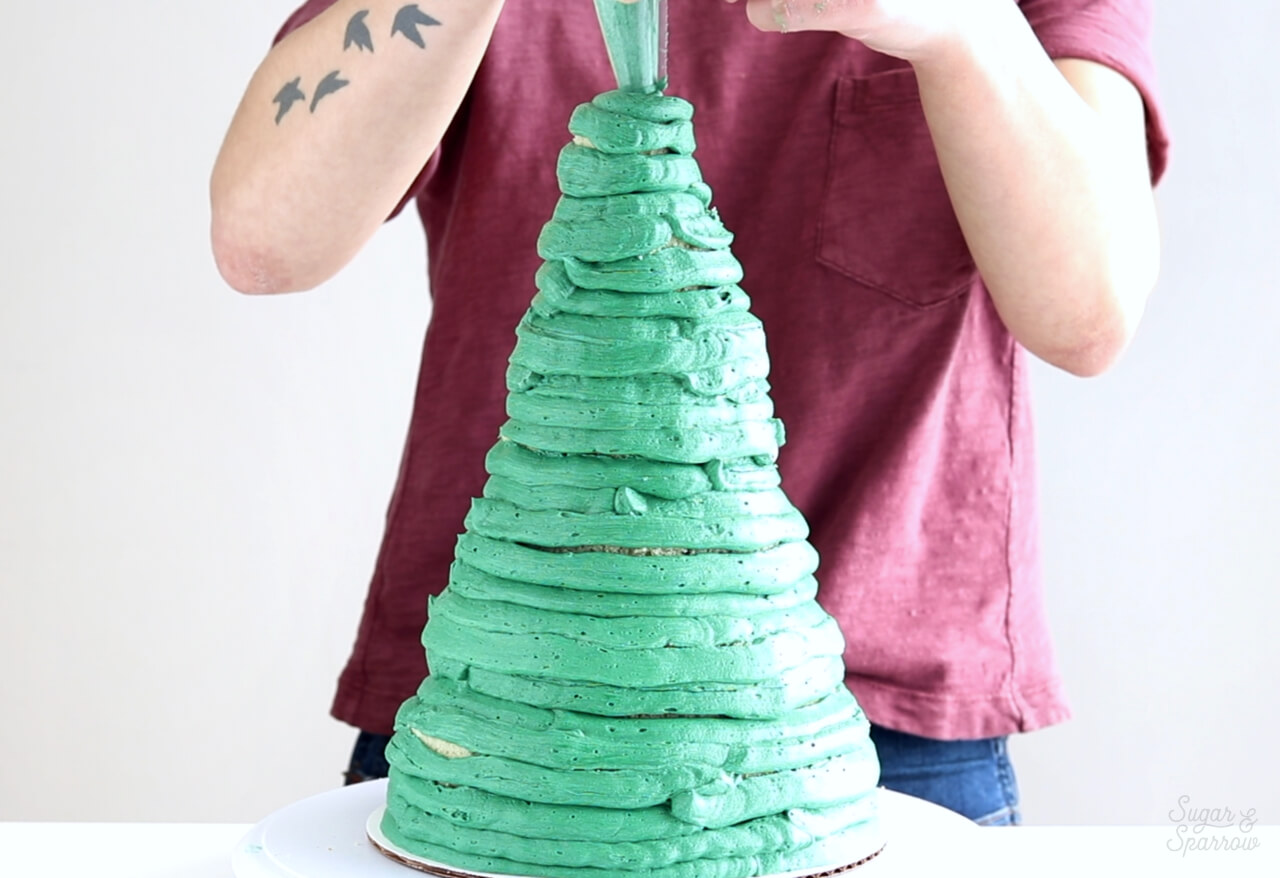
Next, use your angled icing spatula to smooth over the buttercream and shape it into a cone. When you’re finished shaping the cake, place it into the refrigerator for 20 minutes to let it firm up before moving on to the next step.

crumb coating christmas tree cake

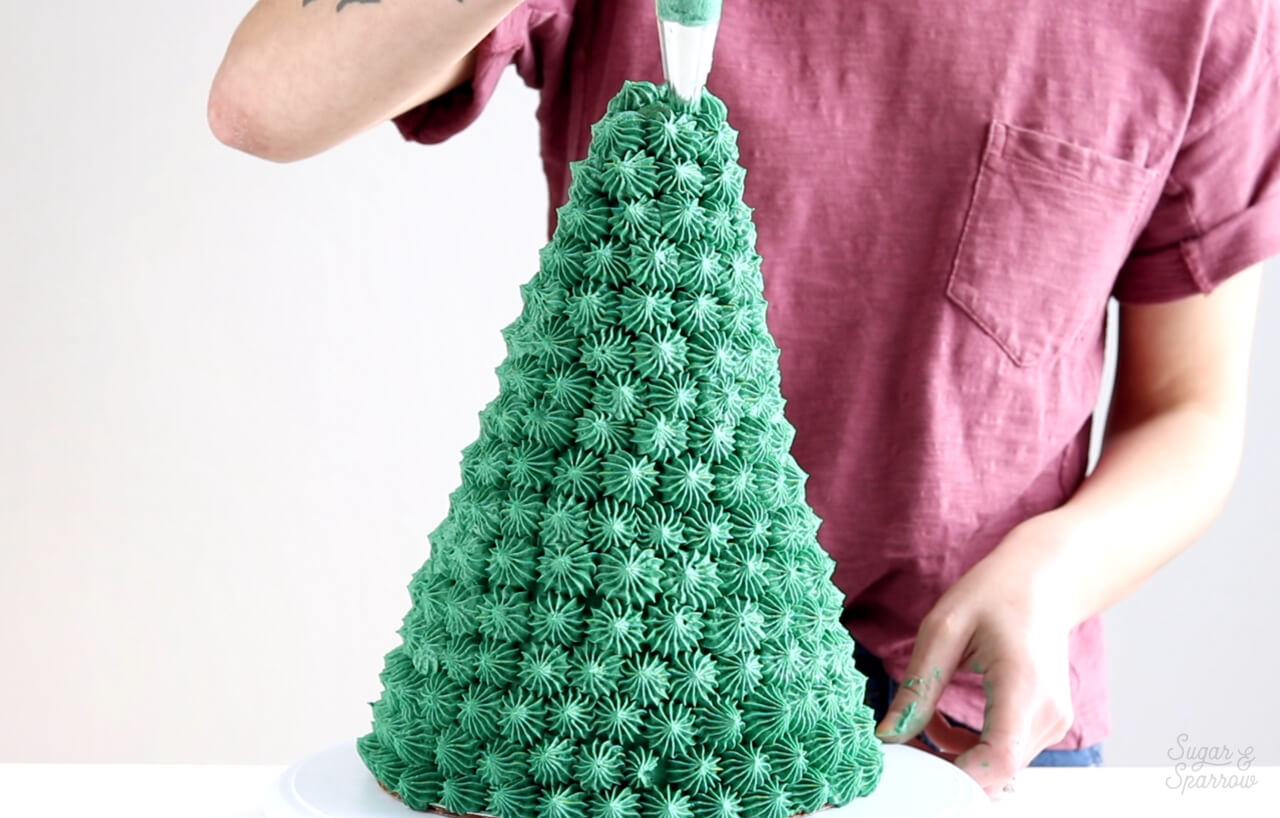
Step 4: Pipe The Cake

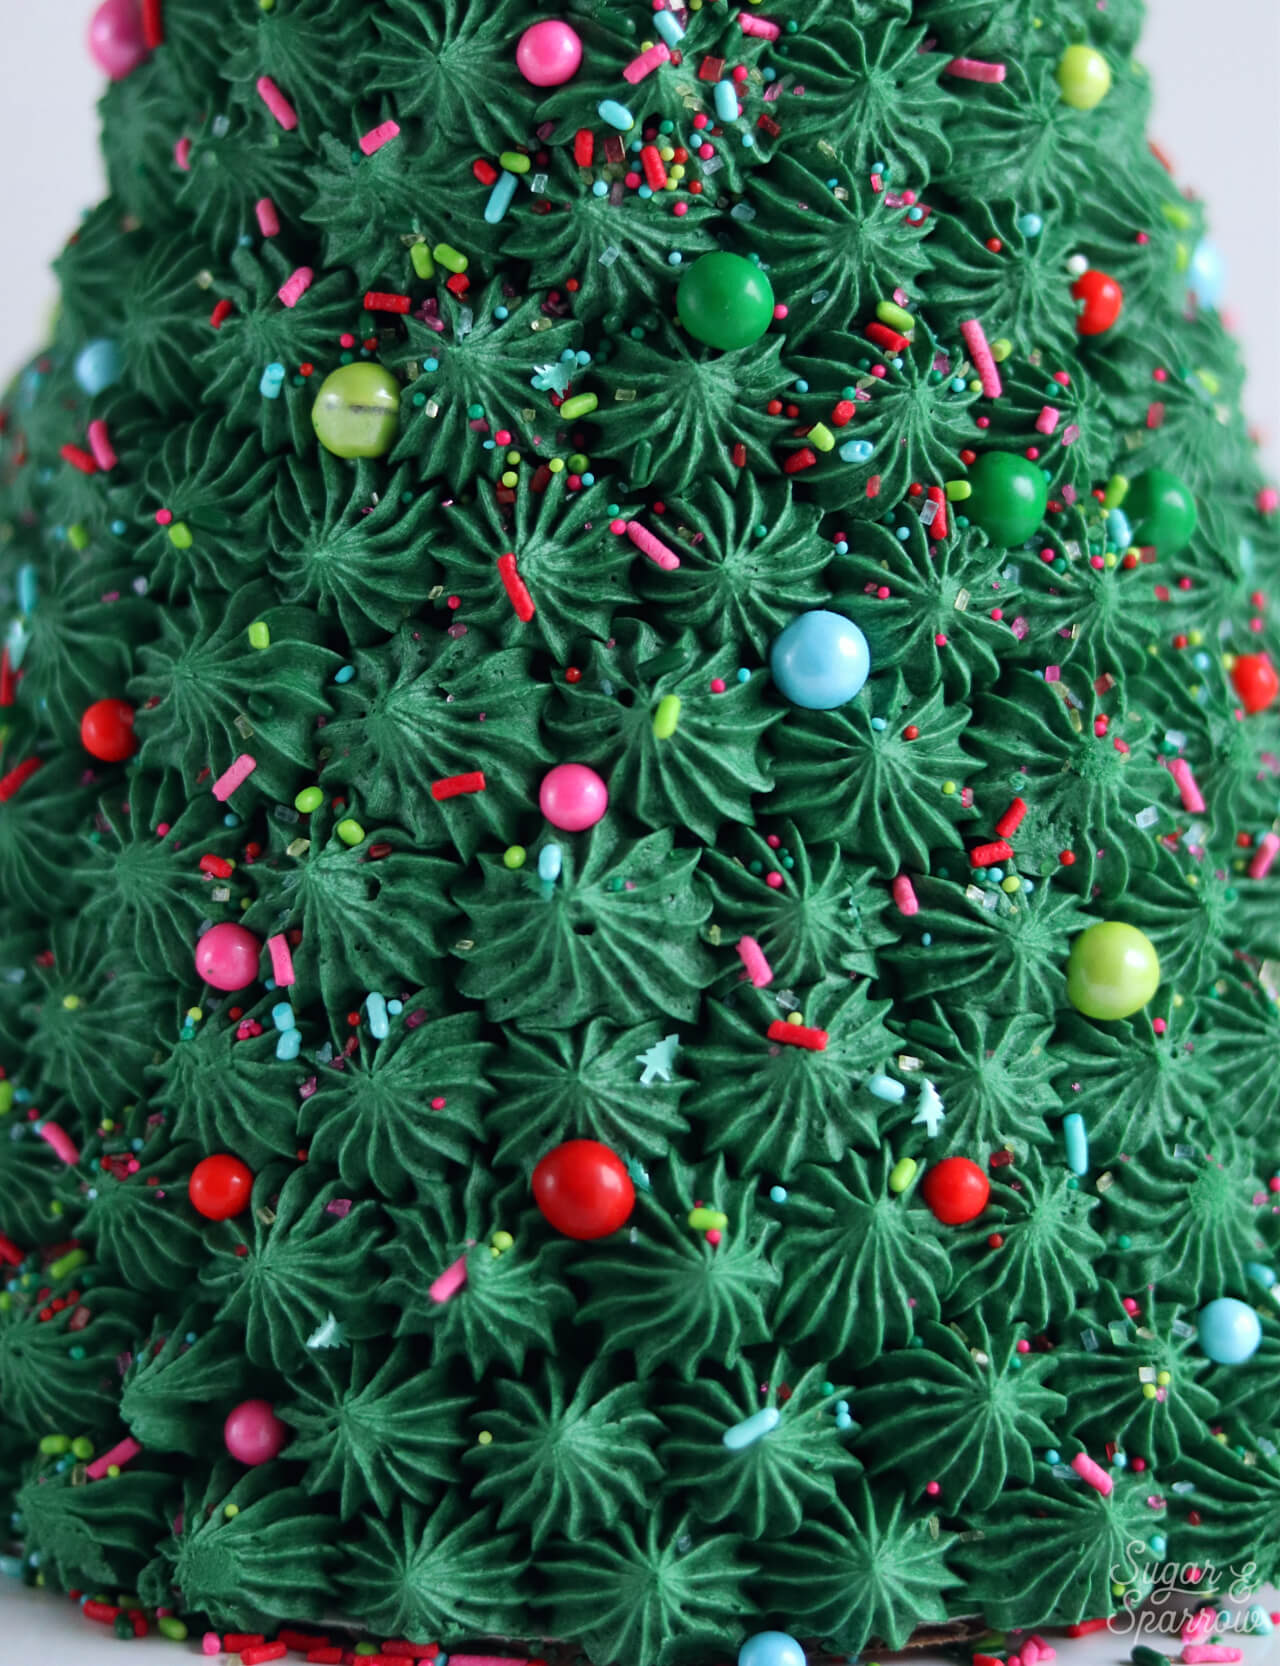
While the Christmas tree cake is chilling, prepare a piping bag by fitting it with Wilton Tip 4B (or other favorite piping tip for the finish) and pipe to cover the entire cake.

decorating christmas tree cake wilton 4b

Step 5: Decorate With Sprinkles

This part is the most fun, because just like decorating a real Christmas tree, you can place these Fahoo Fores sprinkles to look like ornaments!

christmas cake with sprinkles

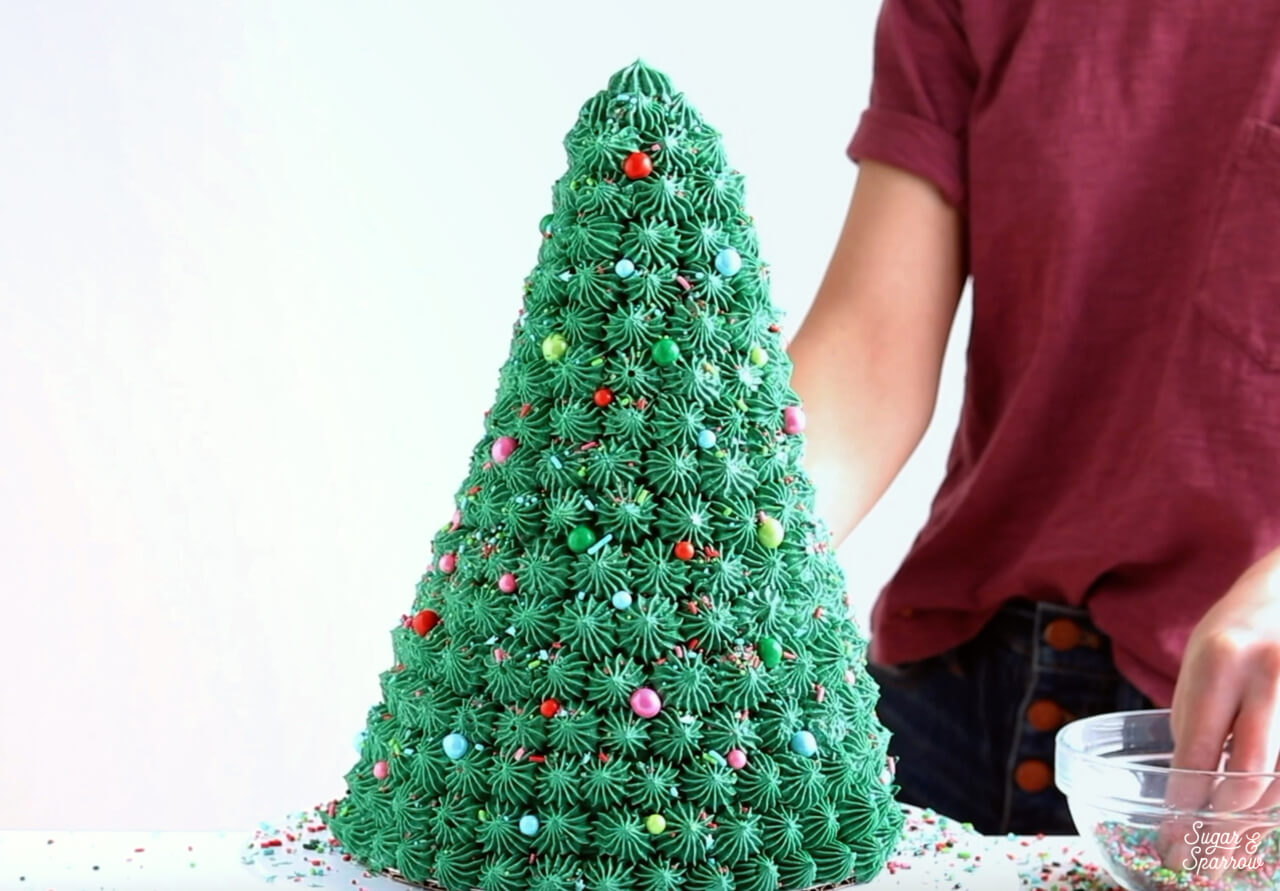
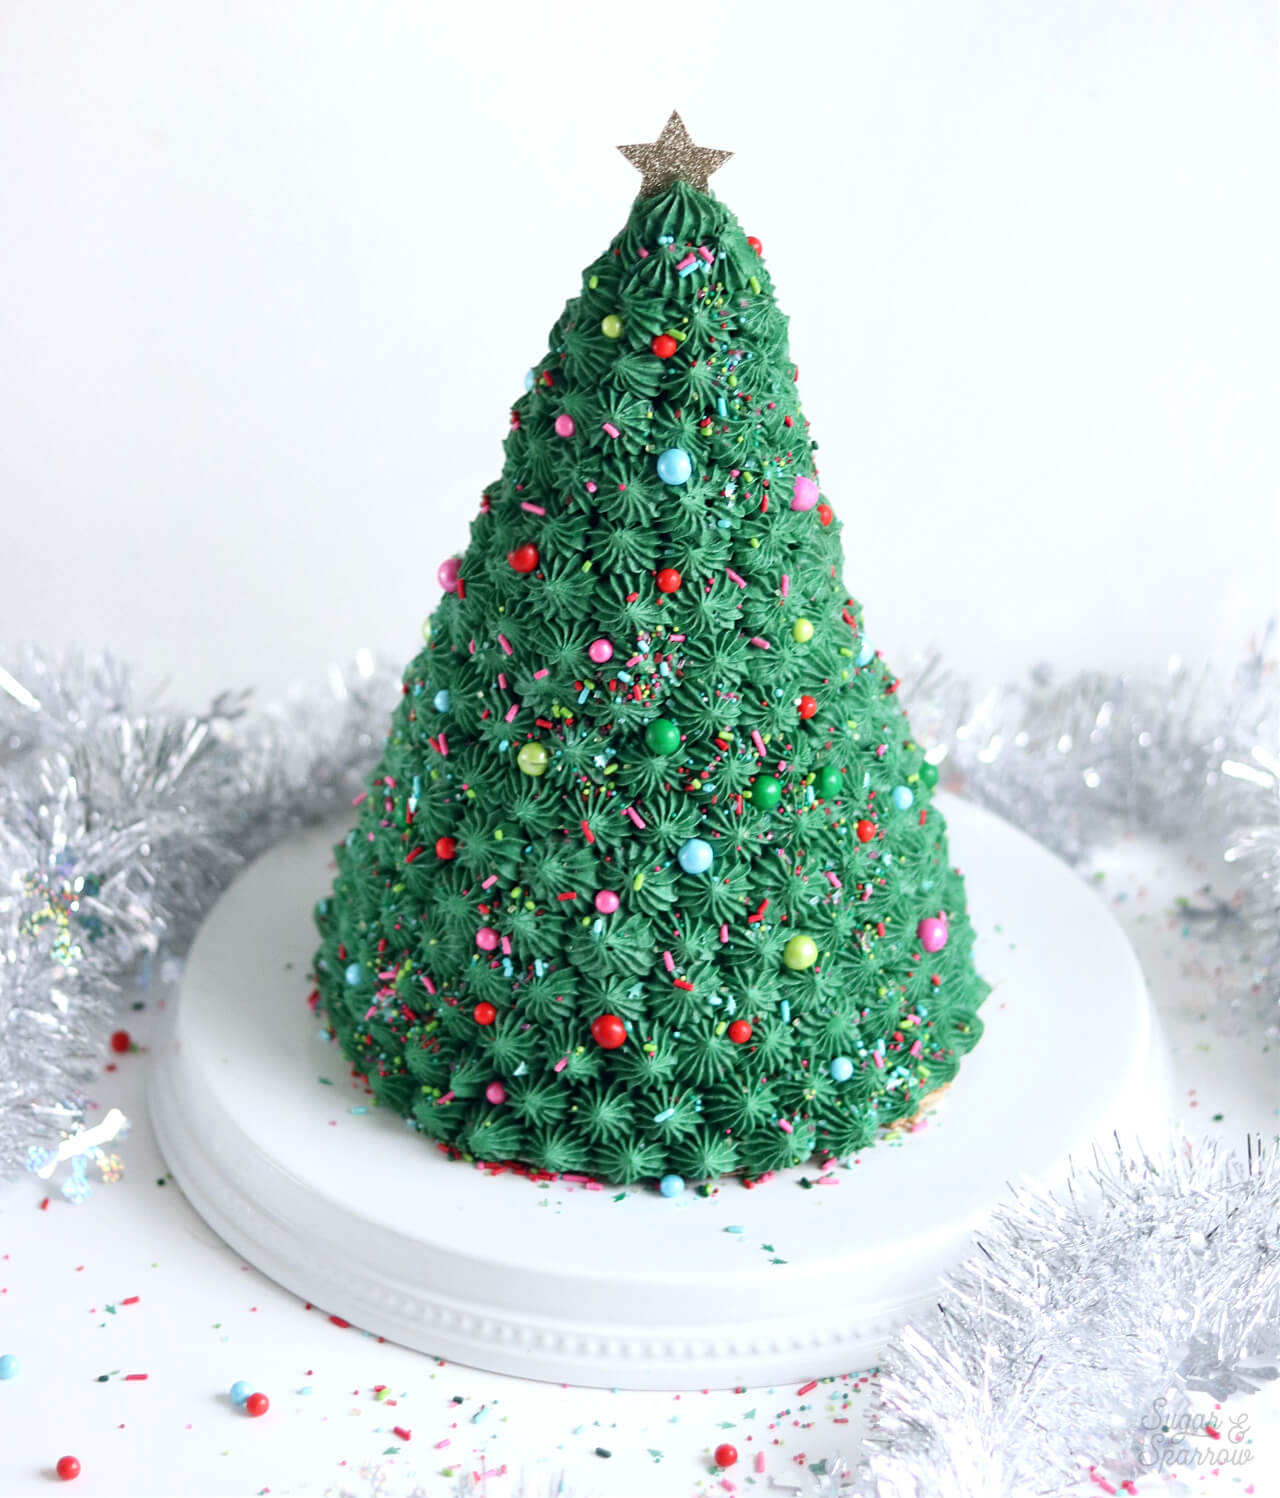
Place all of the larger spherical sprinkles around the tree by hand, then sprinkle the jimmies and gelatin Christmas trees all over it. Top it with a fondant or gumpaste star and marvel at your super easy (yet complicated looking) 3D Christmas tree!

christmas cake by sugar and sparrow

I hope you’re having the happiest Holiday season and baking all the things! If you’re ready to venture out into oddly shaped cakes, this is the perfect project for you. Let me know if you make it by tagging me on Instagram – I love to see what you’re working on!

Disclaimer: this post does contain some affiliate links, meaning I may receive a small commission if you click them and purchase items I’ve recommended. Using these links won’t cost you any extra money, but they do help to keep Sugar & Sparrow up and running. Thank you for your support!

By: Whitney · In: Featured, Holiday, Seasonal, Tutorials · Tagged: americolor, cake decorating, christmas cake, christmas cake ideas, christmas tree cake, christmas tree shaped cake, holiday cake, holiday dessert, sprinklepop, sprinkles, wilton 4b

you’ll also love

the best vanilla cupcakes recipeThe Perfect Vanilla Cupcake Recipe
pumpkin layer cake recipe by sugar and sparrowPerfect Pumpkin Layer Cake Recipe
oreo cookies and cream cakeOreo Layer Cake Recipe

Join the List

Stay up to date & receive the latest posts in your inbox.

Reader Interactions

Comments

  1. Carolina Herrera says

    November 29, 2022 at 5:10 am

    Hola!
    Podre elaborar ese arbolito 3D con crema Chantilly? O debe ser es crema de mantequilla?
    Muchas gracias!

    Reply
    • Whitney says

      December 4, 2022 at 2:40 pm

      Hi Carolina! Chantilly cream should work just fine with these piping techniques!

      Reply
  2. Emily C says

    November 22, 2021 at 7:33 am

    Hi! How many people does this serve?!

    Reply
    • Whitney says

      November 24, 2021 at 10:04 pm

      Hi Emily! This cake serves 15-20 people depending on how large the slices are.

      Reply
  3. Sierra says

    December 21, 2020 at 9:41 pm

    Hello!

    If I wanted to size this down, maybe by half – would you still use that star tip or is there a smaller size you’d recommend?

    Reply
    • Whitney says

      December 22, 2020 at 2:11 pm

      Hi Sierra! I would still use the same star tip. I actually have a tutorial for mini versions of this Christmas tree cake here: https://sugarandsparrow.com/mini-christmas-tree-cake-tutorial/ hope that helps!

      Reply
  4. Jess Gillotte says

    December 10, 2020 at 12:03 pm

    Hi,
    How many box mixes did you need to fill the sheet pan?

    Reply
    • Whitney says

      December 14, 2020 at 12:37 pm

      I believe I used two boxes, made them according to the instructions and baked in a 12 x 18 x 1.5 sheet pan at 350 for about 25-30 minutes.

      Reply
  5. Charlotte Jenkins says

    December 5, 2020 at 10:34 am

    Hi, I was wondering what cake and buttercream recipe you used for this cake?

    Reply
    • Whitney says

      December 7, 2020 at 3:37 pm

      Hi Charlotte! For this tutorial I just used a box cake mix and my vanilla buttercream recipe: https://sugarandsparrow.com/vanilla-buttercream-recipe.

      Reply

Leave a Reply Cancel reply

Your email address will not be published. Required fields are marked *

Recipe Rating


Next Post >

Gingerbread Layer Cake Recipe

Primary Sidebar

Welcome to Sugar & Sparrow

Welcome to Sugar & Sparrow

Helping you whip up pretty desserts with confidence and creativity. And hopefully sharing a few laughs with you along the way!

Learn More

Connect

let’s bake!

Get my very best recipes, baking tips, and decorating tutorials sent to your inbox

Featured Posts

red velvet cake recipe by sugar and sparrow

Red Velvet Cake with Cream Cheese Frosting

lemon cake with cream cheese buttercream

Lemon Cake With Lemon Cream Cheese Buttercream

how to bring ingredients to room temperature quickly

How to Quickly Bring Ingredients to Room Temperature

Search

Archives

Follow Along

@sugarandsparrowco

Everything I baked in June☀️I was so motivated to Everything I baked in June☀️I was so motivated to bake this month (summer flavors had me INSPIRED!) and could barely keep up with myself but I ended up publishing 7 new recipes on my website + finalized 5 more that will be up ASAP! 

Comment “JUNE” to get all the recipes that are available now:

-Cookie Dough Ice Cream Cake
-Rocky Road Cupcakes (w/ homemade marshmallow creme filling!)
-Blackberry Lavender Cake
-Homemade Blackberry Filling
-Whipped Cream Cheese Frosting
-Strawberry Shortcake Cookie Bars
-Berries & Cream Sheet Cake

https://sugarandsparrow.com/everything-i-baked-in-june
 
#cake #bakersofinstagram #baking #bakinglove #cakedecorating
WHIPPED CREAM CHEESE FROSTING ☁️ this easy 4-ingre WHIPPED CREAM CHEESE FROSTING ☁️ this easy 4-ingredient whipped cream frosting is deliciously light, comes together SO easily, and is stabilized with cream cheese to make it the perfect thick consistency for filling and frosting cakes and cupcakes!! It’s so good with my strawberry shortcake sheet cake and berries & cream cake and I have a feeling I’m going to be whipping it up for many more summer cakes😍

Full recipe with cake pairing suggestions at https://sugarandsparrow.com/whipped-cream-cheese-frosting/ 

INGREDIENTS 
1 Cup (8oz, 226g) full-fat brick-style cream cheese, cold
1 Cup (120g) powdered sugar
1 tsp pure vanilla extract
2 1/2 Cups (600ml) heavy whipping cream, cold

INSTRUCTIONS
1. Chill the bowl of your stand mixer (or the large bowl you’ll be using with your hand mixer) into the refrigerator for 20 minutes.
2. Into the cold mixing bowl, add the cream cheese and beat on medium speed with the whisk attachment until creamy, 2 min. Add the powdered sugar and mix on low speed until mostly incorporated, then turn the mixer to medium-high speed and mix for 1 min.
3. Add the vanilla extract, then turn the mixer to medium-high speed and slowly pour in the heavy whipping cream (down the side of the bowl so it doesn’t fly everywhere). Once all the cream is added, continue mixing on medium-high for just about 30 seconds longer, keeping a close eye on the mixing bowl to watch it thicken. It should come together into a thick, silky frosting consistency at this point, where you can dip the whisk into the frosting and it holds a slight peak when you hold it upright.
4. Use the frosting immediately to decorate cakes and/or cupcakes for best results!

#whippedcreamfrosting #creamcheesefrosting #cakedecorating #whippedcream #frosting
TOP 10 4TH OF JULY DESSERTS 🎆 These are just a few TOP 10 4TH OF JULY DESSERTS 🎆 These are just a few of my favorite summer dessert recipes that will disappear at any Fourth of July celebration.

Comment “JULY” and I’ll send you all 20+ of my favorite 4th of July dessert ideas – naturally red white and blue desserts like my berries and cream cake, easy no-bake desserts, no-churn ice cream, strawberry shortcake inspired recipes, and all the treats that will go FAST at any barbecue.

https://sugarandsparrow.com/4th-of-july-desserts/

#fourthofjuly #4thofjuly #summerdessert #partycake #dessertideas
STRAWBERRY SHORTCAKE COOKIE BARS 🍓my hot take: str STRAWBERRY SHORTCAKE COOKIE BARS 🍓my hot take: strawberry shortcake toppings on a buttery, soft sugar cookie base is WAY BETTER than traditional strawberry shortcake. I topped my favorite sugar cookie bar recipe with silky whipped cream cheese frosting + homemade strawberry sauce and now I’m ruined 😵

Full recipe is linked in my bio + at https://sugarandsparrow.com/strawberry-shortcake-cookie-bars/ 

SOFT SUGAR COOKIE BARS
2 Cups + 2 Tbsp (283g) all purpose flour
1 tsp baking powder
1/2 tsp baking soda
1/2 tsp salt
3/4 Cup (170g) unsalted butter, room temp
1 Cup (200g) granulated sugar
1 large egg
1 large egg yolk
1 1/2 tsp pure vanilla extract

1. Preheat the oven to 350ºF (177ºC). Grease and line an 8-inch square baking pan with parchment paper, leaving a slight overhang for easy release.
2. Whisk together the flour, baking powder, baking soda, and salt. Set aside.
3. Using a stand mixer with the paddle attachment (or hand mixer) cream together the butter and sugar on high speed until pale and fluffy, 2-3 min.
4. Turn the mixer to medium and add the egg, egg yolk, and vanilla. Mix until combined, then add the flour mixture and mix on low speed until a uniform cookie dough forms.
5. Press the cookie dough into the prepared pan in an even layer, all the way to the edges. Bake for 18-20 minutes, until the edges are just starting to brown. 
6. Cool the sugar cookie bars in the pan for 30 minutes, then transfer to a wire rack to cool completely. Top with whipped cream cheese frosting and strawberry sauce (full recipe linked in my bio!)

#strawberryshortcake #strawberries #whippedcreamfrosting #cookiebars #sugarcookies
BLACK FOREST CAKE 🍒 this is my favorite thing to m BLACK FOREST CAKE 🍒 this is my favorite thing to make during cherry season! My version is decadent chocolate cake soaked with homemade cherry syrup, fresh cherry filling, and whipped cream frosting. Top it with a chocolate ganache drip if you want to go the extra mile! 

Full recipe + decorating tutorial is linked in my bio + at https://sugarandsparrow.com/black-forest-cake-recipe/

PS I’m working on a sheet cake version of this recipe that’s even easier! Stay tuned.

#blackforestcake #cherrycake #chocolatecake #cherries #cakedecorating

Footer

On the Blog

  • Cake Basics
  • Recipes
  • Tutorials

Info

  • About
  • Privacy Policy & Disclosure

stay in the know

Copyright © 2026 · Theme by Sugar & Sparrow