• Cake
  • Frosting
  • YouTube
  • My Favorite Tools
  • Nav Social Icons

  • Skip to primary navigation
  • Skip to main content
  • Skip to primary sidebar
  • Skip to footer
  • Recipes
    • Cake
    • Cupcakes
    • Frosting
    • Ice Cream
    • Vegan
  • Cake Basics
  • Tutorials
  • Blog
  • About
  • Mobile Menu Widgets

    Connect

    Search

Sugar & Sparrow logo in script font

Sugar & Sparrow

Lifestyle and Cake from Portland Oregon

  • Cake Basics
  • Recipes
    • Cake
    • Cupcakes
    • Cookies & Bars
    • Filling
    • Frosting
    • Ice Cream
    • No-Bake
    • Small Batch
    • Vegan
  • Tutorials
  • Book
  • Blog
  • About

Daisy Cake Tutorial

April 5, 2023 · In: Featured, Seasonal, Spring, Tutorials

Spring is officially here! It’s probably my favorite time of year for cake decorating, purely because I’m so inspired by the flowers blooming all around me and adding some color back into the world. While I love all flowers, daisies are just the happiest there are. So to celebrate Spring, I whipped up this sunny cake and piped happy little daisies all over it! 

buttercream daisy cake by sugar and sparrow

This daisy cake design would make the sweetest birthday party cake (just imagine it with cute birthday candles on top!) or the centerpiece for any special gathering. I’m thinking of Mother’s Day, a picnic in the park, a Sunday brunch, or any happy event on your calendar. You can use any of my cake recipes as the base of the cake and any light colored buttercream for the topping. Here are some of my suggestions, but feel free to use your favorite type of buttercream that’s pipeable and easy to color: 

  • Vanilla Buttercream
  • Vegan Vanilla Buttercream
  • White Chocolate Buttercream
  • Cream Cheese Buttercream
  • Lavender Buttercream (it’s white if you don’t add the lavender color gel!)
buttercream daisy cake tutorial
buttercream daisy cake tutorial by sugar and sparrow

The best part about this daisy cake is that the technique for piping the flowers is so easy. All you need is Wilton Tip 104 for the petals and Tip 10 for the centers. Watch this quick video tutorial to see how it’s done: 

If you’re into cake decorating videos like this one, be sure to check out my YouTube channel for further learning! I’m always rolling out new videos, so click the subscribe button while you’re there to ensure you never miss a new one.

You Will Need

  • A layer cake that’s been crumb coated and chilled (mine is 6” diameter)
  • Cake turntable
  • Icing smoother
  • Angled spatula 
  • 3 Cups of light colored buttercream (I’m using one batch of this vanilla buttercream recipe)
  • AmeriColor Egg Yellow (or yellow color gel of your choice)
  • Wilton Tip 104
  • Wilton Tip 10
  • 2 piping bags 
  • Palette knife or small food-grade paint brush (optional)

Step 1: Color the Buttercream

Reserve about ⅓ Cup of buttercream for piping the daisies, then add 3-5 drops of AmeriColor Egg Yellow (or other yellow food color gel) to tint the rest of the buttercream a medium yellow color. 

Step 2: Frost a Smooth Buttercream Finish

Place your chilled and crumb coated cake on the turntable and use the yellow buttercream you tinted in the previous step to frost a smooth buttercream finish onto the cake. Start by frosting a smooth layer on the very top of the cake with your angled icing spatula. Next, add buttercream to the sides of the cake and glide your icing smoother over them while turning the turntable to create smooth sides.

How to frost a smooth buttercream cake
how to frost a cake with buttercream

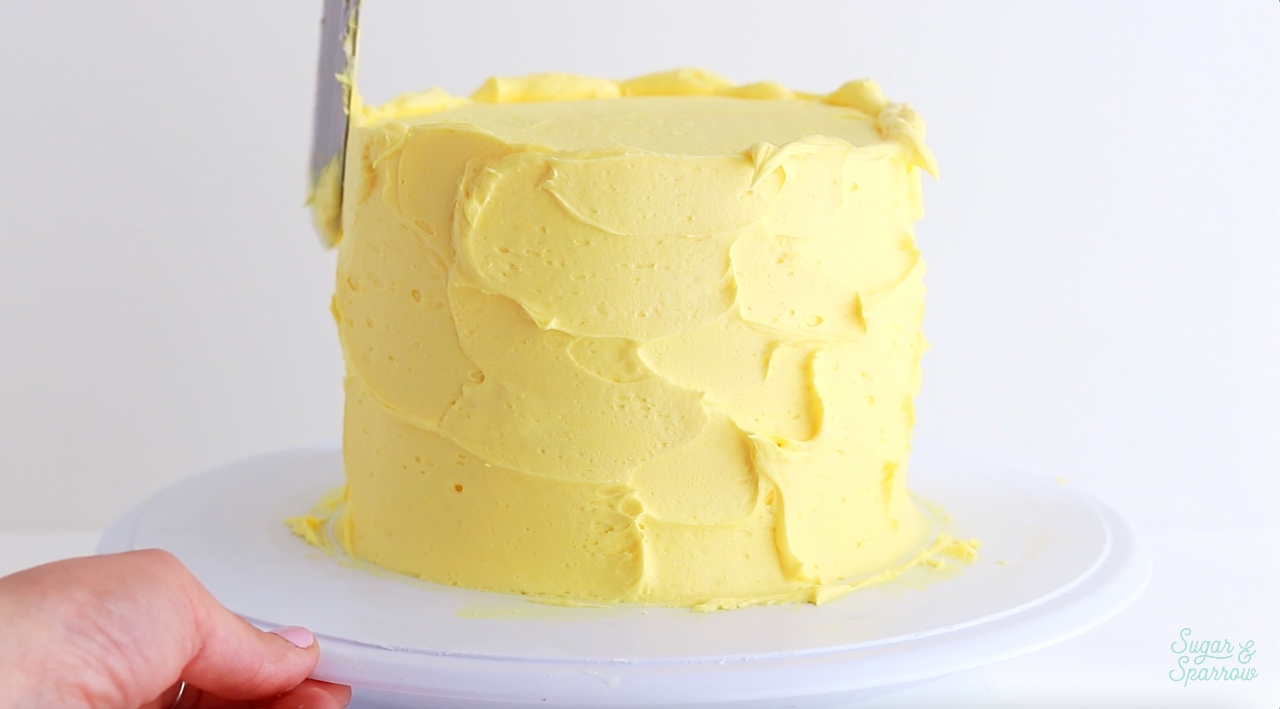
You’ll notice a crown of buttercream forming on the top edges of the cake, which is essential to getting sharp edges on the top. Use your angled icing spatula to swipe the crown inwards (toward the top center of the cake). Repeat until you’ve got nice sharp edges.

how to get sharp edges buttercream cake

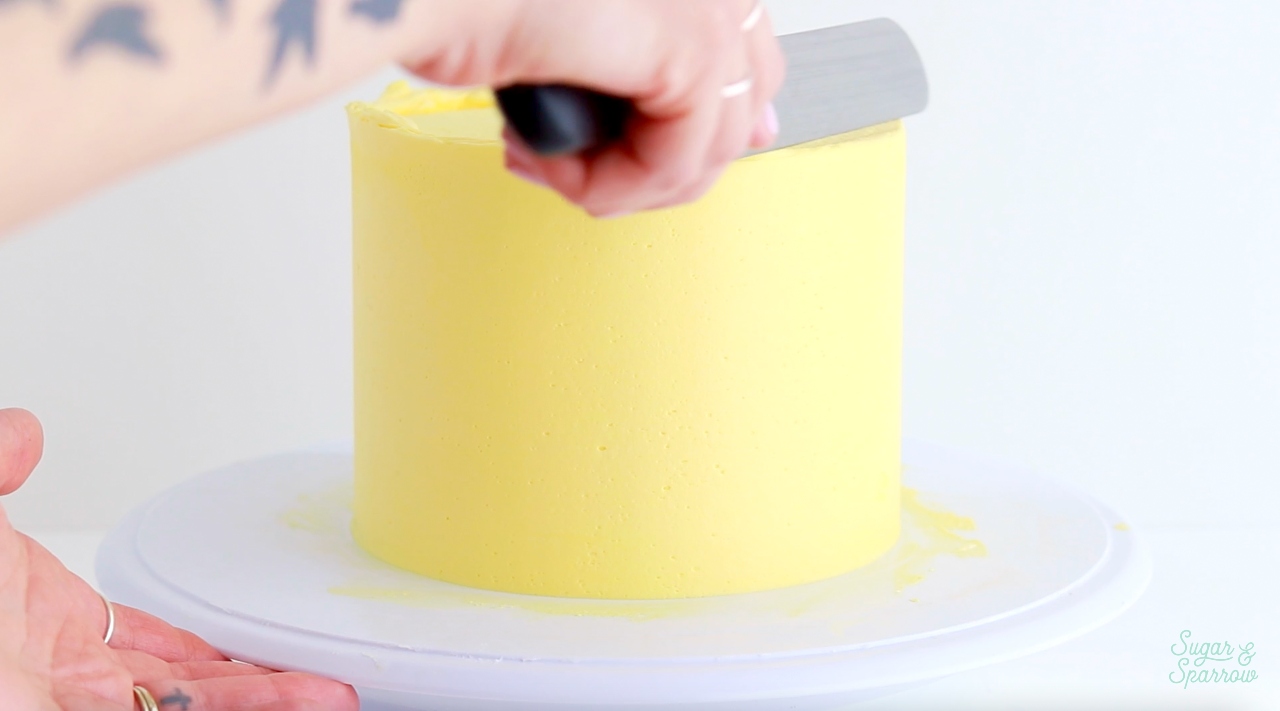
When your cake is looking ultra smooth, pop it into the refrigerator to firm up for at least 30 minutes. If you need more tips on creating a perfectly smooth cake finish, I’ve got a great tutorial for you here. 

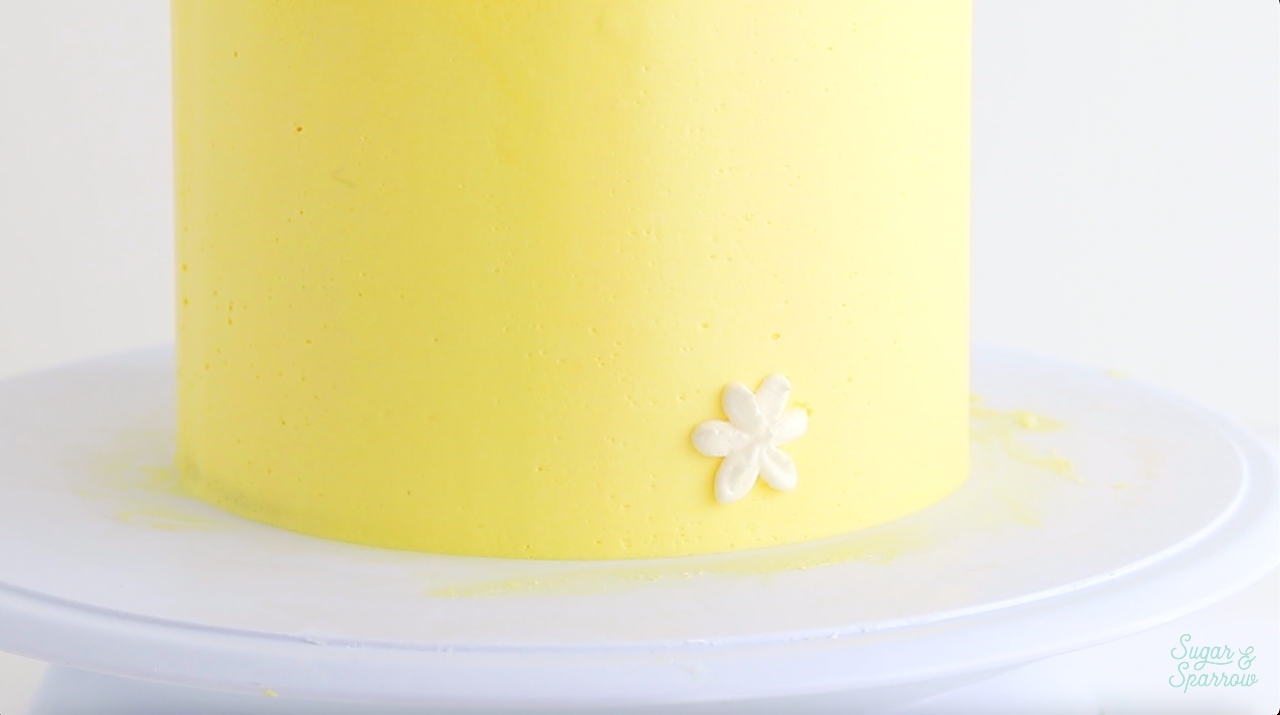
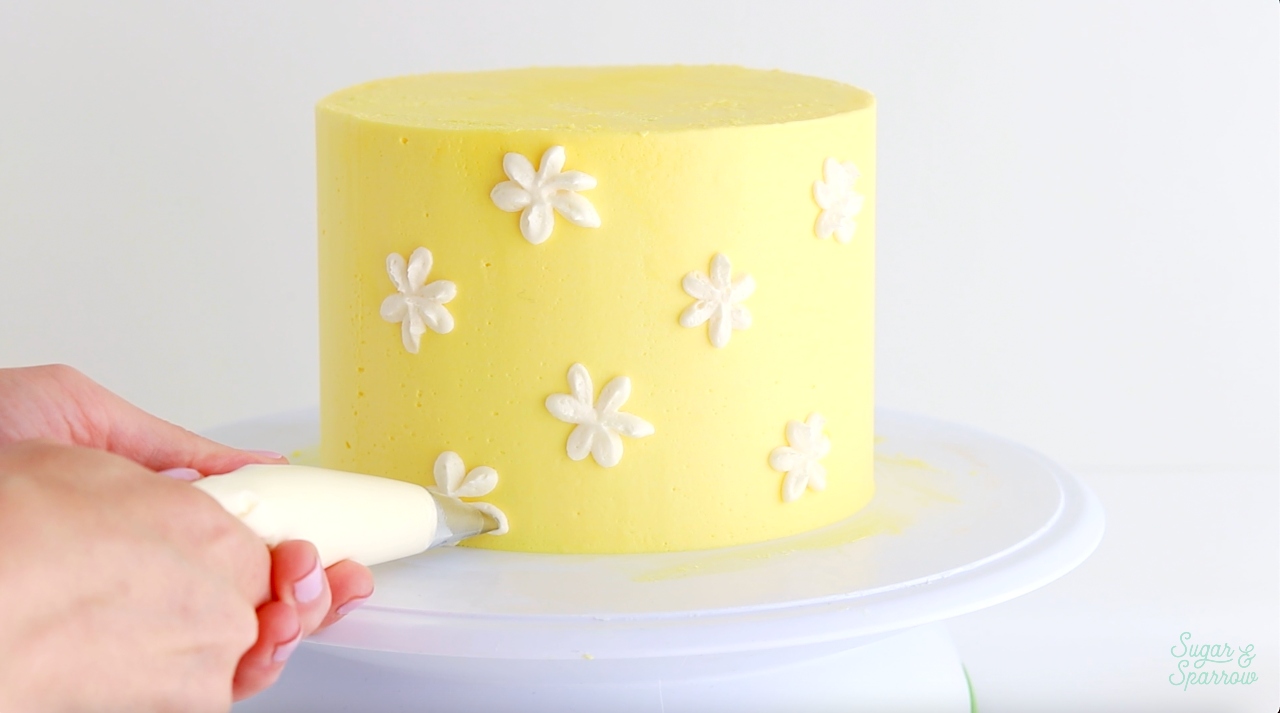
Step 3: Pipe the Daisies

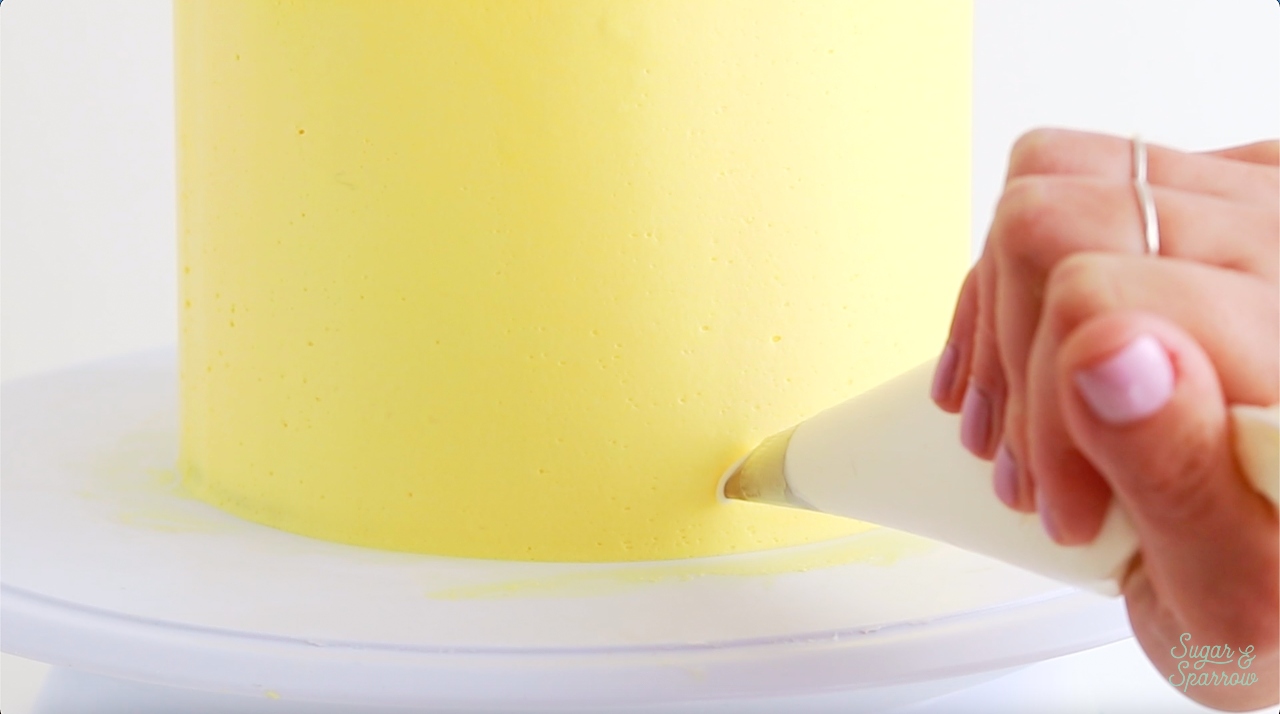
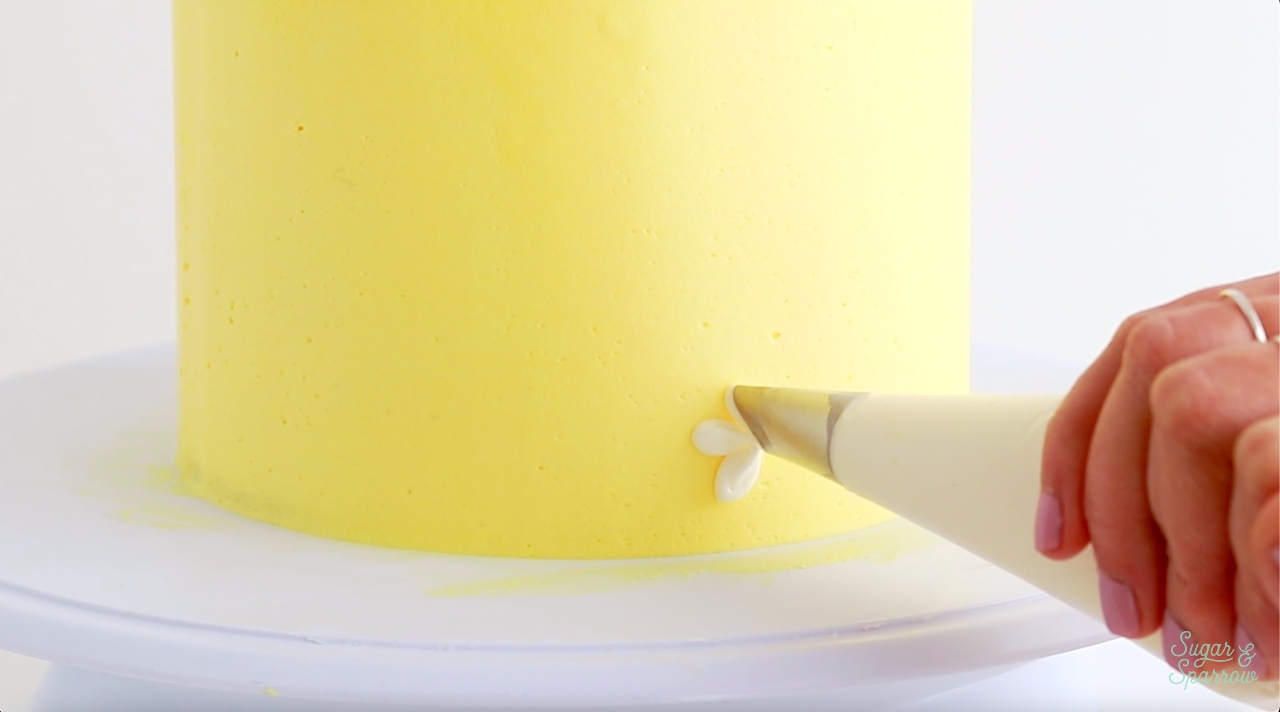
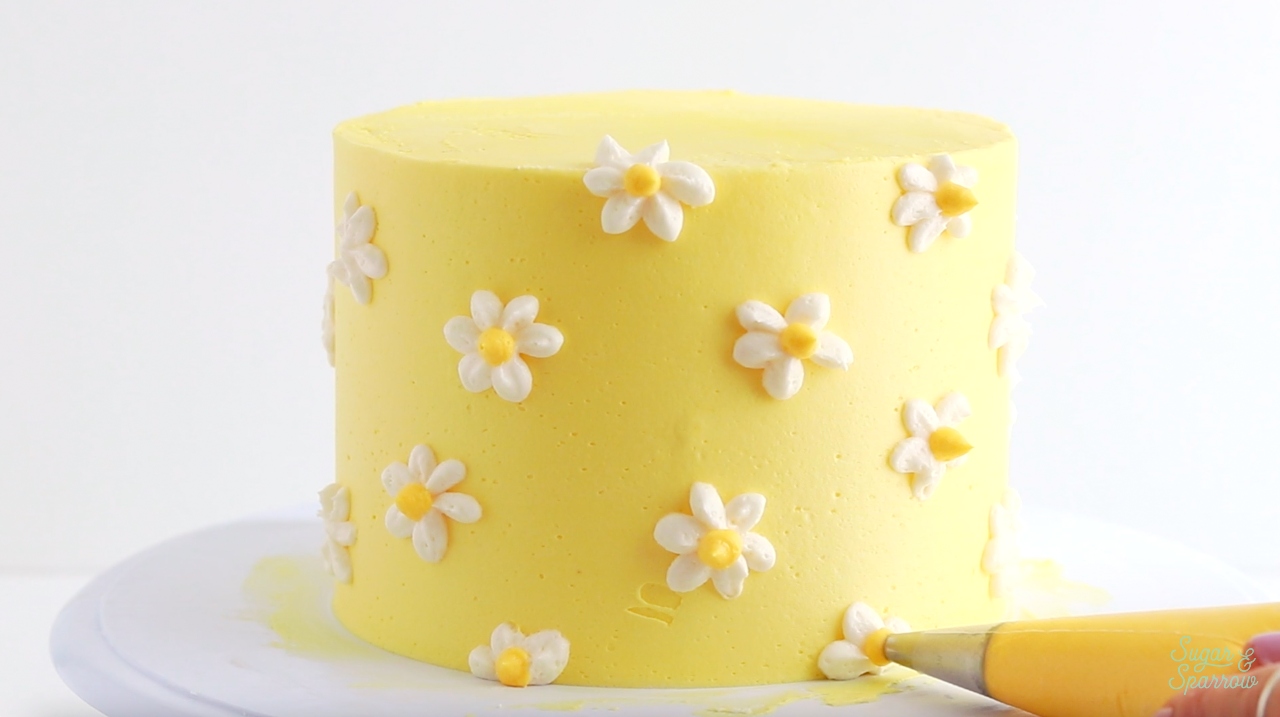
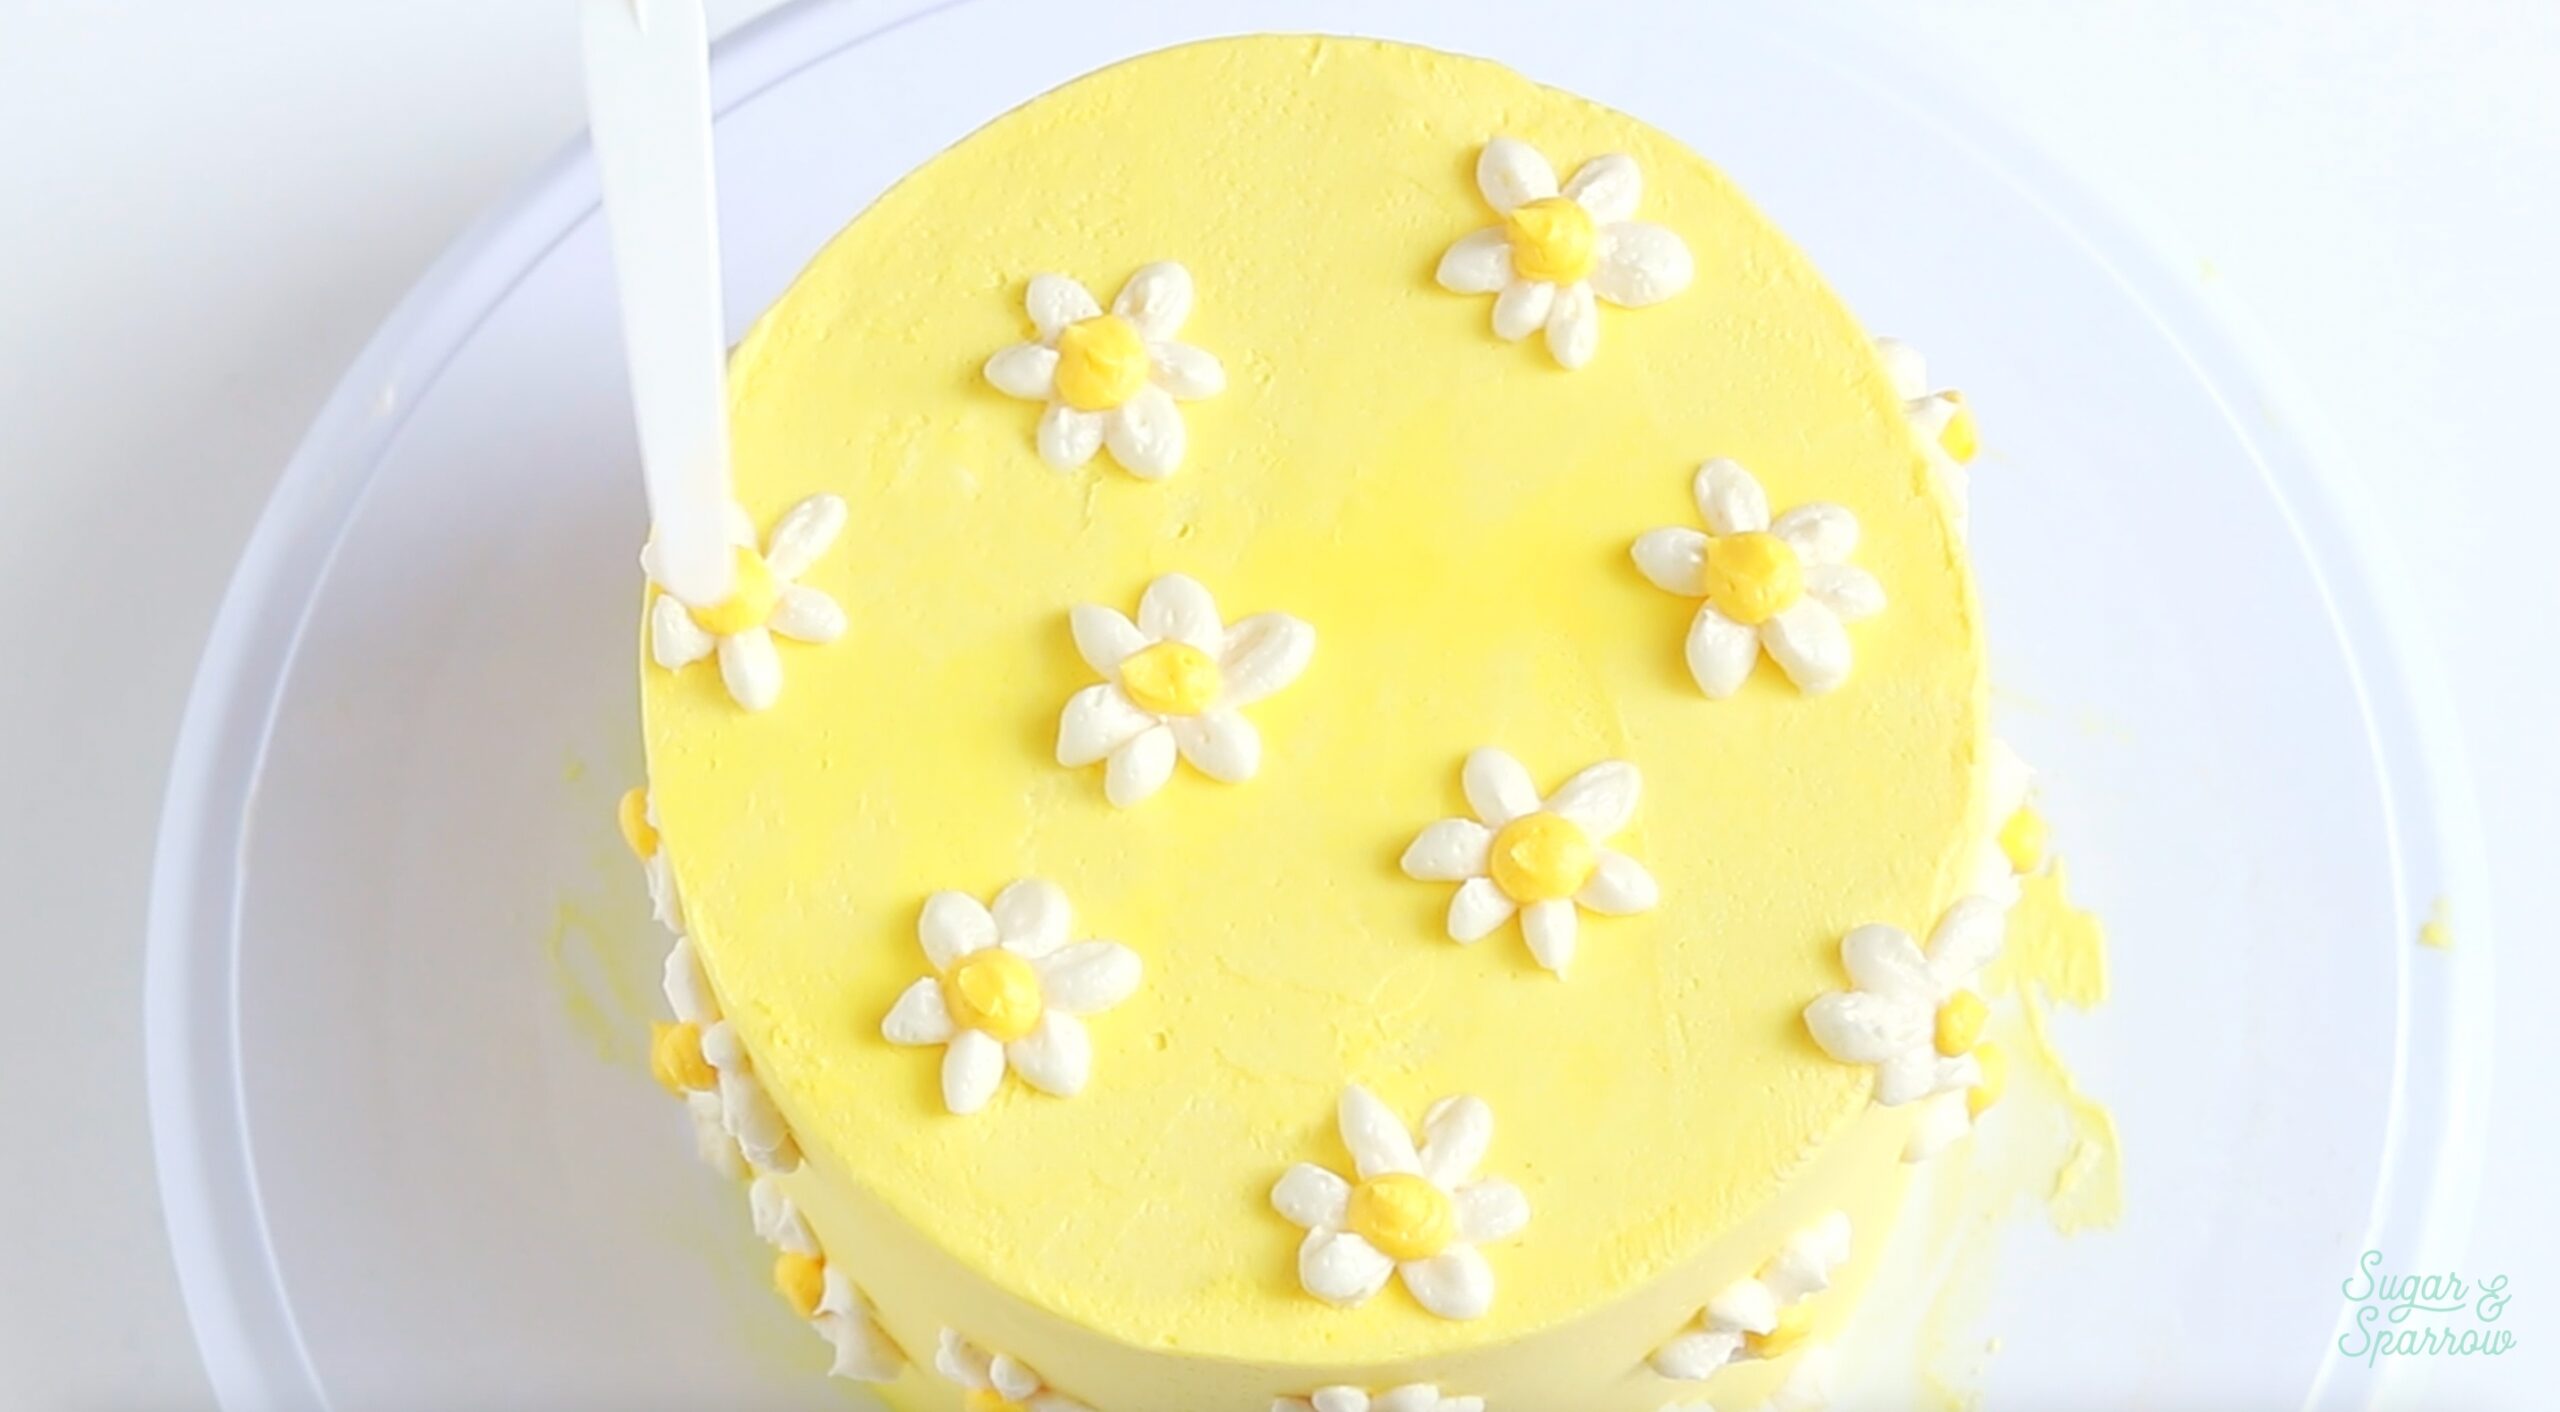
Place the white buttercream you reserved in Step 1 into a piping bag fitted with Wilton Tip 104. Add another drop of AmeriColor Egg Yellow to any leftover yellow buttercream and mix it to make a slightly darker yellow for the daisy centers. Add this darker yellow buttercream to a piping bag fitted with Wilton Tip 10. 

Starting with the white frosting, hold the piping bag so that Tip 104 is parallel to the side of the cake, angled so that the larger part of the opening is the tip of each daisy petal and the smaller part of the opening is the center of the flower. Hovering the piping tip about ⅛ inch from the surface, pipe the first daisy petal by squeezing the bag and quickly releasing pressure once you see a petal shape form. Repeat piping the petals in a circular formation, rotating your hand slightly after piping each petal. 

how to pipe flowers on a cake
buttercream daisy cake tutorial
how to pipe buttercream daisies

Repeat piping the clusters of daisy petals 1-2 inches apart, all over the sides and top of the cake. 

how to pipe buttercream daisies with wilton tip 104

Pipe a dot of the darker yellow buttercream in the very center of each daisy petal cluster to finish each flower.

how to make a buttercream daisy cake
yellow daisy cake tutorial

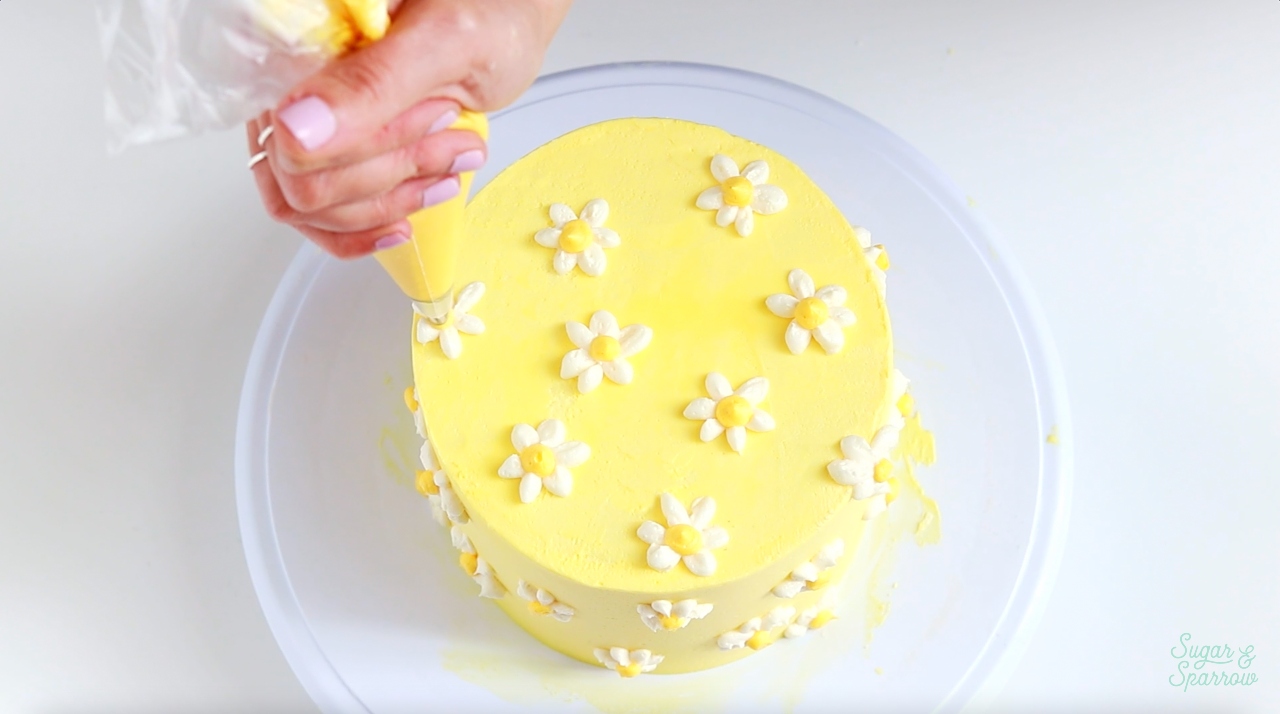
Step 4: Smooth the Centers (Optional) 

If the centers of the daisies are too peaked, you can smooth them down using either a small angled spatula or palette knife, or a small paint brush dipped in a little bit of water. Simply swipe the peaks with the palette knife or use the small paint brush (dipped in water) to gently press each peak down. 

yellow daisy cake tutorial by sugar and sparrow

And that’s it! The happiest little cake for your next Spring celebration and it couldn’t be easier to whip up with the right tools and a sunny color palette!

spring daisy cake by sugar and sparrow

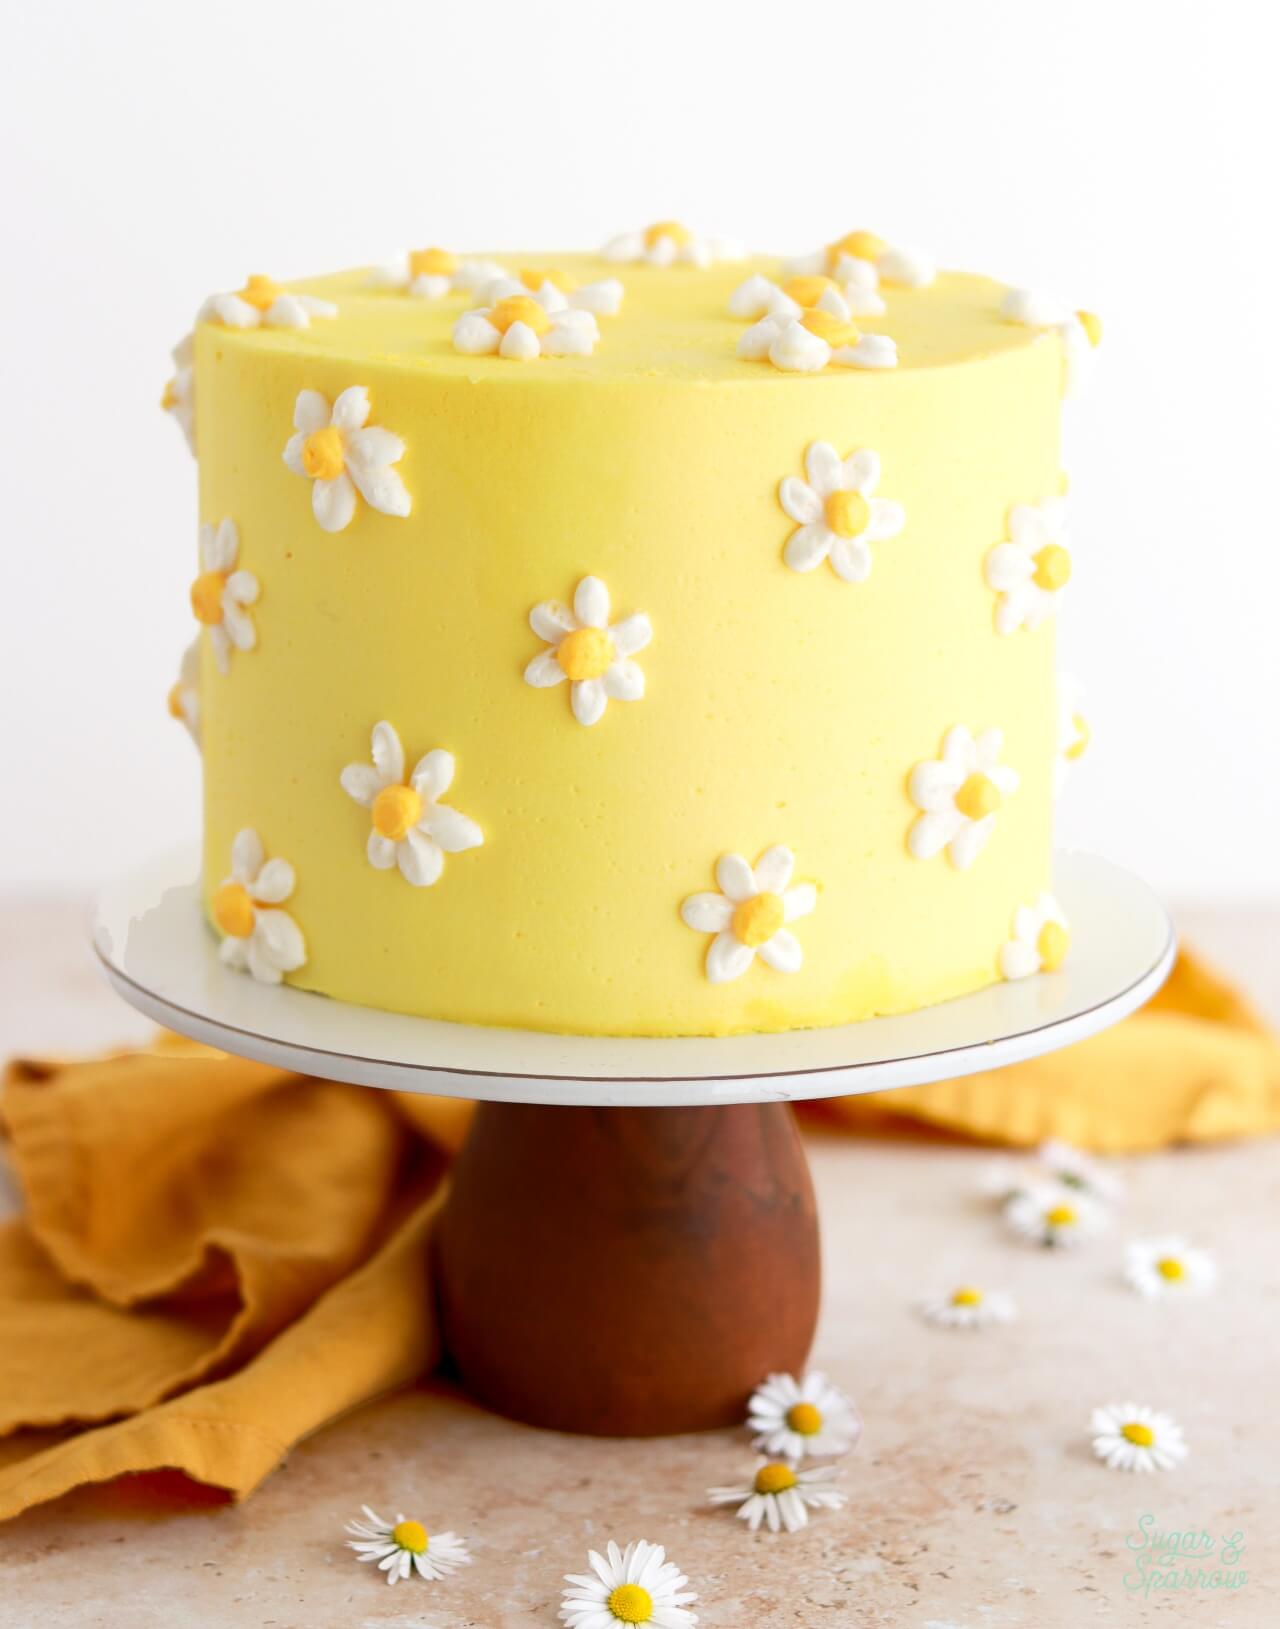
I hope you have the best time making this daisy cake! If you do end up making it, let me know what you’re celebrating in the comments below + be sure to tag @sugarandsparrowco on Instagram to show me. I love to see what you create! 

By: Whitney · In: Featured, Seasonal, Spring, Tutorials · Tagged: buttercream daisy cake, buttercream flowers, daisy cake, daisy cake tutorial, flower cake

you’ll also love

cascading floral cake tutorial by sugar and sparrowCascading Floral Cake Tutorial
floral sheet cake tutorialFloral Sheet Cake Tutorial
buttercream floral cake tutorialButtercream Painted Floral Cake

Join the List

Stay up to date & receive the latest posts in your inbox.

Reader Interactions

Leave a Reply Cancel reply

Your email address will not be published. Required fields are marked *

Recipe Rating


Next Post >

The Dreamiest Coconut Cake Recipe

Primary Sidebar

Welcome to Sugar & Sparrow

Welcome to Sugar & Sparrow

Helping you whip up pretty desserts with confidence and creativity. And hopefully sharing a few laughs with you along the way!

Learn More

Connect

let’s bake!

Get my very best recipes, baking tips, and decorating tutorials sent to your inbox

Featured Posts

marshmallow filling recipe for cake and cupcake

Marshmallow Creme Filling

easy chocolate mousse cake with raspberries

Easy Chocolate Mousse Cake

vanilla oreo cake with cookies and cream buttercream

Cookies & Cream Cake (Vanilla Oreo Cake)

Search

Archives

Follow Along

@sugarandsparrowco

LEMON CUPCAKES 🍋 after about a dozen recipe tes LEMON CUPCAKES 🍋 after about a dozen recipe tests, this one is everything I could want in a lemon cupcake! Fluffy-yet-moist, bursting with natural lemon flavor, and absolutely irresistible topped with lemon cream cheese buttercream. 

Full recipe (with frosting) linked in my bio + at https://sugarandsparrow.com/homemade-lemon-cupcakes/

INGREDIENTS:
1 Cup (132g) all-purpose flour
1 tsp baking powder
1/4 tsp salt
1/4 Cup (60ml) whole milk, room temperature
3 Tbsp (45ml) lemon juice from 1 medium lemon
3/4 Cup (150g) granulated sugar
3 Tbsp (42g) unsalted butter, room temperature
2 Tbsp (30ml) vegetable oil
2 large eggs, room temperature
1 tsp pure vanilla extract

INSTRUCTIONS:
1. Preheat the oven to 350ºF (177ºF) and line a standard cupcake pan with 12 paper liners.
2. In a large bowl, whisk together the flour, baking powder, and salt. Set aside. 
3. In the bowl of a stand mixer fitted with the paddle attachment (or with a hand mixer and large bowl), add the lemon zest to the sugar and mix on low speed until fragrant and well combined, about 1 minute. Meanwhile, combine the lemon juice with the milk and set aside. 
4. Add the butter to the lemon-sugar mixture and cream on medium speed until and combined, about 2 minutes. Add the vegetable oil and beat until light and creamy, about 3 minutes. Scrape down the bowl and paddle as needed.
5. Mix in the eggs one at a time on low speed, then add the vanilla and turn the mixer to medium speed for one minute.
6. Turn the mixer off and add the flour mixture all at once. Mix on low speed until just combined, then slowly pour in the lemon-milk mixture. Mix until just combined, about 30 seconds.
7. Divide the batter equally between the liners and bake for 14-18 min. Cool, then top with frosting of your choice (link in bio for lemon cream cheese frosting)�
#lemoncupcakes #creamcheesefrosting #lemon #cupcakes #cupcakedecorating
April in my kitchen 🌸 I published 5 NEW recipes April in my kitchen 🌸 I published 5 NEW recipes on my site, baked my Oreo cupcake recipe for a fundraiser and found it was just as delicious as I remember, and filmed/photographed 3 recipes that will be on my blog in May (Lemon Cupcakes, Lemon Cream Cheese Buttercream, and No-Bake Marbled Strawberry Cheesecake) 🥰 

Comment “APRIL” to get all the available recipes and stay tuned for more! 

#bakersofinstagram #springbaking #cakedecorating #cupcakes #bakinglove
SHEET PAN COOKIE CAKE 🍪 slice it warm for a fud SHEET PAN COOKIE CAKE 🍪 slice it warm for a fudgy chocolate chip cookie OR let it settle into a moist and chewy cookie cake that’s perfect for decorating! My fave vanilla buttercream + sprinkles turn this giant chocolate chip cookie into the perfect birthday cake alternative at the end 🥳
⁣
Full recipe + decorating ideas at https://sugarandsparrow.com/sheet-pan-chocolate-chip-cookie-cake/
⁣
INGREDIENTS⁣
1 Cup (226g) unsalted butter, melted⁣
1 1/3 Cups (267g) packed light or dark brown sugar⁣
1/2 Cup (100g) granulated sugar⁣
3 large eggs⁣
1 Tbsp pure vanilla extract⁣
1 tsp baking soda⁣
1 tsp cornstarch⁣
1/2 tsp salt⁣
3 Cups (398g) all purpose flour⁣
2 Cups (350g) semi-sweet chocolate chips⁣
⁣
INSTRUCTIONS⁣
1. Preheat the oven to 350ºF (177ºC). Grease and line a 13×18 inch sheet pan.⁣
2. In a large bowl, add the brown sugar and granulated sugar. Melt the butter in the microwave and pour it over the top of the sugars. Whisk together until uniform. Add the eggs and vanilla, then continue whisking until uniform. Whisk in the baking soda, cornstarch, and salt.⁣
3. Add the flour and use a silicone spatula to fold it in until smooth cookie dough forms. Reserve 1/2 Cup of the chocolate chips and set them aside, then fold the remaining 1 1/2 Cups of chocolate chips into the cookie dough.⁣
4. Place the chocolate chip cookie dough onto the prepared sheet pan and use an offset spatula to spread it all the way to the edges in an even layer.⁣
5. Bake the cookie cake for 14-16 minutes, until it looks golden brown on the edges and set. 
6. Enjoy warm or let it cool and decorate with vanilla buttercream and sprinkles! ⁣
⁣
#cookiecake #chocolatechipcookies #sheetcake #birthdaycake #cakedecorating
STRAWBERRY CUPCAKES 🍓based on my beloved strawb STRAWBERRY CUPCAKES 🍓based on my beloved strawberry layer cake recipe, this cupcake version is just as moist yet fluffy and bursting with natural strawberry flavor! Between the mix of fresh strawberries in the cupcakes + freeze-dried strawberries in the frosting, the flavor is out of this world 🚀

Full recipe link in my bio (with strawberry buttercream) + at https://sugarandsparrow.com/strawberry-cupcakes/

STRAWBERRY CUPCAKES
Yield: 14 cupcakes

INGREDIENTS:
5 oz (143g) fresh or frozen strawberries
1/3 Cup (80ml) whole milk, room temp
1 1/2 Cups (158g) sifted cake flour
1 tsp baking powder
1/4 tsp baking soda
1/2 tsp salt
6 Tbsp (85g) unsalted butter, room temp
1 Cup (200g) granulated sugar
2 large eggs, room temp
3 Tbsp (45g) sour cream, room temp
1 tsp vanilla extract
1 drop pink food coloring (optional)

INSTRUCTIONS: 
1. Puree the strawberries using a food processor (you’ll have about 1/2 cup of puree), then place into a saucepan over medium-low heat. Bring to a simmer, then cook for 10-15 min, stirring occasionally, until you have 1/4 cup. Refrigerate until room temp.
2. Preheat oven to 350ºF (177ºC) and line a standard cupcake pan with liners.
3. Whisk together the sifted cake flour, baking powder, baking soda, and salt and set aside.
4. In a stand mixer w/ paddle attachment (or hand mixer + large bowl), whip the butter on high for 2 min. Add sugar and beat for 2 min, until light and fluffy. Turn the mixer to low and add the eggs one at a time, then add the vanilla and sour cream, turn the mixer to high and beat for 1 min. Meanwhile, whisk together the strawberry puree, whole milk, and food coloring (if using).
5. Turn the mixer off and add all of the dry ingredients at once. Mix on low until just combined, then add the strawberry milk mixture until just combined, about 30 seconds.
6. Fill the cupcake liners 2/3 full and bake for 14-18 minutes. Cool completely before topping with strawberry buttercream (full recipe linked above). 

#strawberrycupcakes #strawberrycake #pinkcupcakes #strawberry #cupcakes
COFFEE BUTTERCREAM (recipe below)☕️ this frost COFFEE BUTTERCREAM (recipe below)☕️ this frosting has AMAZING coffee flavor, is so easy to decorate cakes with, and pairs beautifully with so many flavors (chocolate, vanilla, or any cake flavor you’d want to turn into a latte). 

All my cake pairing suggestions are linked in my bio or at https://sugarandsparrow.com/coffee-buttercream-recipe/ 

COFFEE BUTTERCREAM⁣
Yield: 2.5 Cups⁣

INGREDIENTS⁣
1 1/2 tsp instant coffee or espresso powder⁣
1 1/2 Tbsp whole milk, room temperature⁣
1 Cup (226g) unsalted butter, room temperature⁣
3 1/2 Cups (420g) powdered sugar⁣
2 tsp pure vanilla extract⁣
Pinch of salt⁣

INSTRUCTIONS⁣
1. Combine the instant espresso/coffee with the whole milk and set aside. In the bowl of a stand mixer, beat the butter on high until creamy and smooth (about 5 minutes), scraping down the bowl and paddle a few times in between.⁣
2. Turn the mixer to low and add the powdered sugar a few cups at a time, scraping down the bowl and paddle between intervals. Add the vanilla, the coffee/espresso milk mixture, and salt. Mix on low until fully incorporated, about one minute.⁣

#coffeebuttercream #buttercream #frosting #coffeecake

Footer

On the Blog

  • Cake Basics
  • Recipes
  • Tutorials

Info

  • About
  • Privacy Policy & Disclosure

stay in the know

Copyright © 2026 · Theme by Sugar & Sparrow