• Cake
  • Frosting
  • YouTube
  • My Favorite Tools
  • Nav Social Icons

  • Skip to primary navigation
  • Skip to main content
  • Skip to primary sidebar
  • Skip to footer
  • Recipes
    • Cake
    • Cupcakes
    • Frosting
    • Ice Cream
    • Vegan
  • Cake Basics
  • Tutorials
  • Blog
  • About
  • Mobile Menu Widgets

    Connect

    Search

Sugar & Sparrow logo in script font

Sugar & Sparrow

Lifestyle and Cake from Portland Oregon

  • Cake Basics
  • Recipes
    • Cake
    • Cupcakes
    • Cookies & Bars
    • Filling
    • Frosting
    • Ice Cream
    • No-Bake
    • Small Batch
    • Vegan
  • Tutorials
  • Book
  • Blog
  • About

How to Decorate a Cake with Sprinkles

August 14, 2020 · In: Cake Basics, Tutorials

Sprinkles these days aren’t what they used to be (in the best way). I remember swooning over the little vials of rainbow jimmies and sugar sprinkles in the baking aisle as a kid – little did I know that a few decades later sprinkles would come in all shapes and sizes and colors and textures with names like Bombshell and Party Monster and Unicorn Barf. You can find a sprinkle blend to match any color scheme you could dream of, and I think dressing up cakes with them is one of the easiest ways to add intrigue. 

how to decorate a cake with sprinkles

I get questions quite often about adding sprinkles to cake. Mainly: how do you get them to stick to the frosting? And how do you add them without indenting the buttercream? It’s about time I dedicated an entire post to my go-to methods for decorating cakes with sprinkles, and while I already have this post on how to cover an entire cake in sprinkles, this one will share all the little things I do to get the look pictured above. Here’s a quick video to show you the techniques before I get into all the details below:

Want to see more Cake Basics videos like this one? Head to my YouTube Channel to see the growing collection. You’ll also find tons of cake recipes and decorating videos to inspire you and broaden your skill set – be sure to hit the subscribe button so you never miss a new one!

What Kinds of Sprinkles Work with These Techniques? 

The cool thing about these techniques is that any sprinkles will work! Keep in mind that the smaller the sprinkles you’re using, the more tedious it will be to add them if you’re placing them one-by-one (like in Step 3). While it’s not impossible to work with teeny tiny sprinkles, it’s just much easier to place the sprinkles when they’re jimmy-size or bigger. 

sprinkle pop hey sugar

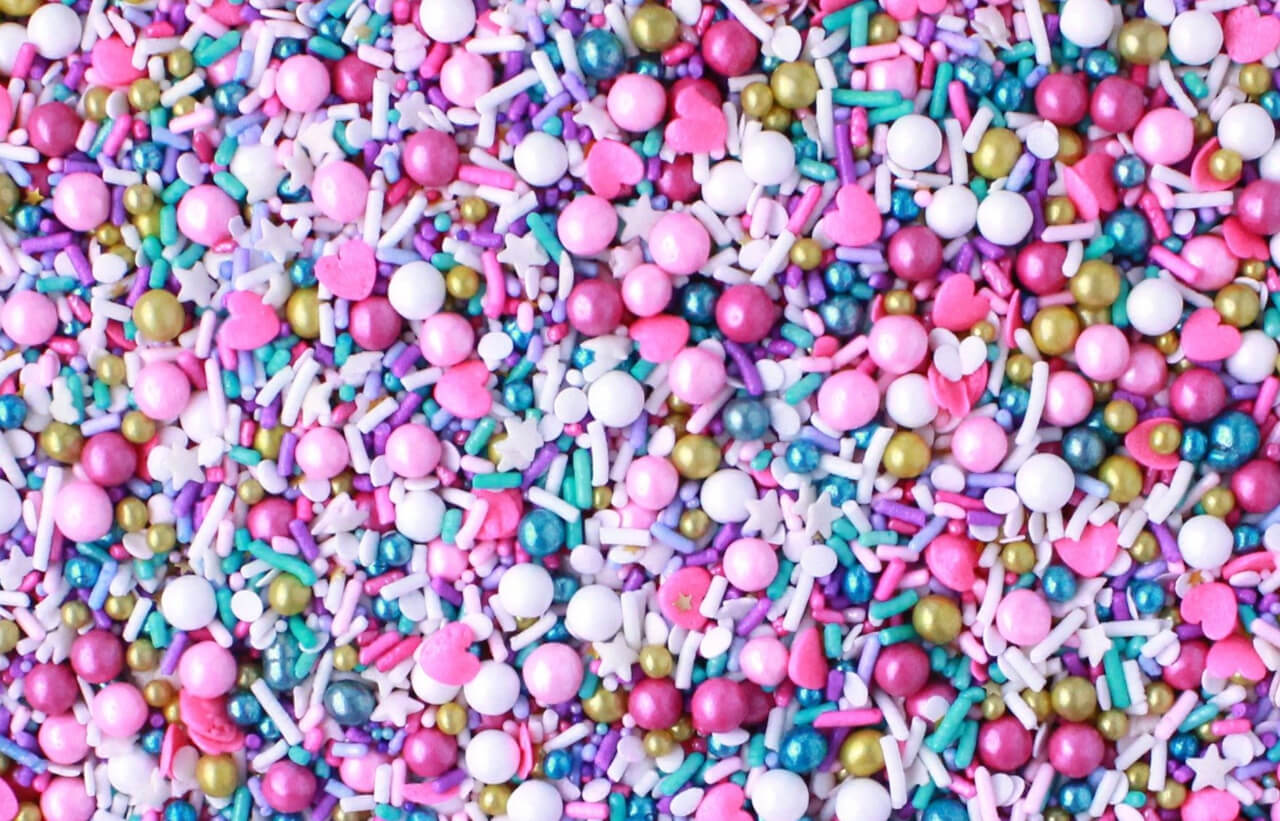
The sprinkles I’m using in my video (and throughout this post) are the Hey Sugar mix by Sprinkle Pop, simply because I love the color scheme and think they go well with my turquoise + fuchsia buttercream. Sprinkle Pop has lots of other mixes to choose from or you can check out other brands like Sweetapolita or the offerings in your local grocery store’s baking aisle.

How Many Sprinkles Do I Need? 

Sprinkles typically come in a few different jar sizes: 2oz (sample size), 4oz, 8oz, and beyond. The cake I’m working with throughout this post is a triple layer 6-inch cake that is about 5 inches tall. To get the look pictured (a thicker band of sprinkles around the base of the cake + individually placed sprinkles around the top) with this size of cake, you’ll need a 4oz bottle of sprinkles. In reality, you’ll only use about 2-3oz of sprinkles, but in my opinion, it’s always best to have more than enough than to have just barely enough. 

sprinkles for cake decorating

The good thing about this approach (buying a little more than you need) is that sprinkles keep for a long time, so you can always use the extra in future cake and cupcake projects. 

When to Add Sprinkles to Your Cake

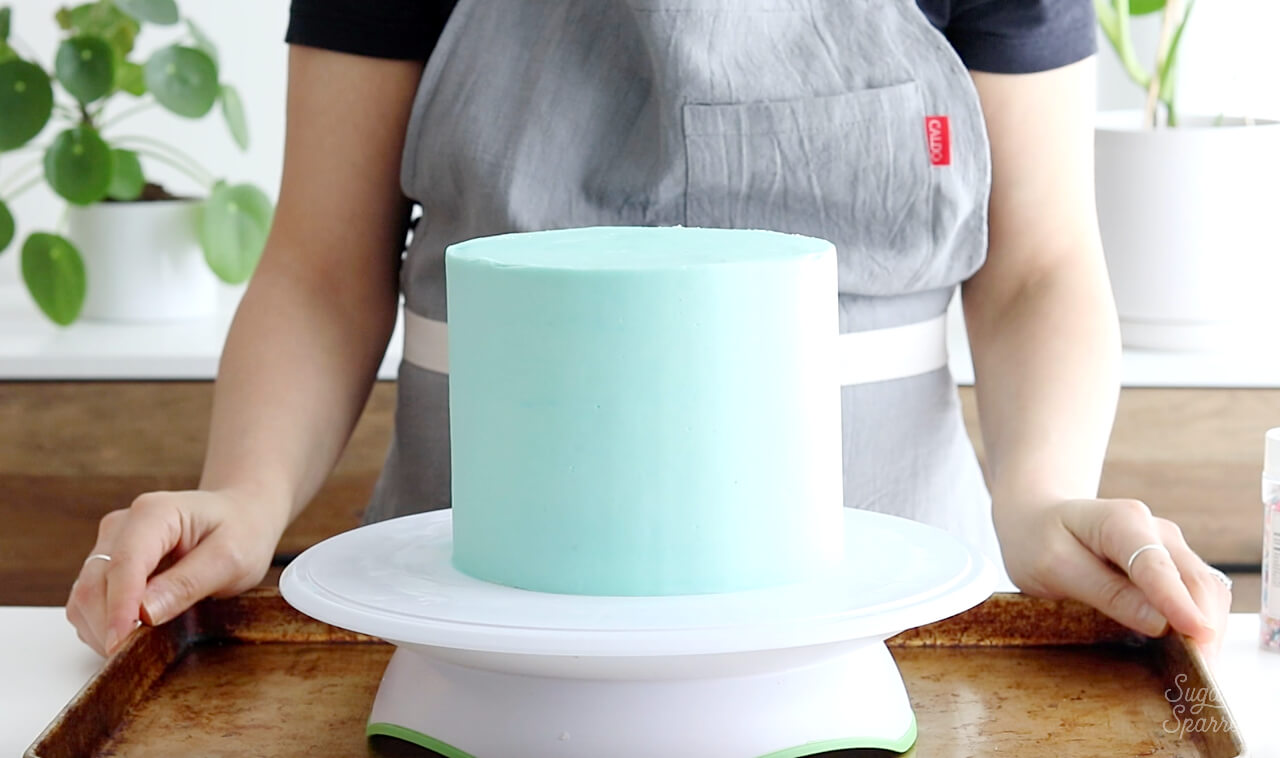
I always add sprinkles right after I add the final layer of frosting to my cake, while the frosting is still wet to the touch. Beneath that final frosting layer is a crumb coated cake that’s been chilled, which gives the entire cake a sturdy foundation and makes the final layer of frosting semi-set (because of the cold sublayers), yet still fresh enough for sprinkles to adhere easily. 

how to ice a cake with buttercream frosting

In my experience, this timing is essential to decrease the chances of indenting the frosting finish while you’re placing the sprinkles. If you add the sprinkles without crumb coating and chilling your cake before applying that final layer of frosting, you have an increased risk of the foundation (cake layers and filling) shifting around on you as you decorate. On the other hand, if the final frosting layer is too chilled (aka you placed your cake in the refrigerator after the final layer of frosting was added) before adding the sprinkles, they may not adhere as easily. 

While it’s not impossible to place sprinkles on a cake that’s not set enough and a cake that’s too chilled/set, I recommend following the timeline laid out in this Cake Basics series and adding the sprinkles right after that final layer of frosting.

Step 1: Prepare Your Cake & Workspace

Once your cake has been frosted with the final layer of buttercream, you’re ready to prepare your workspace and start adding sprinkles. To make cleanup super easy and ensure that you don’t waste a ton of sprinkles in the process, I recommend placing a large sheet pan underneath your cake, which should still be on its turntable.  

cake basics by sugar and sparrow

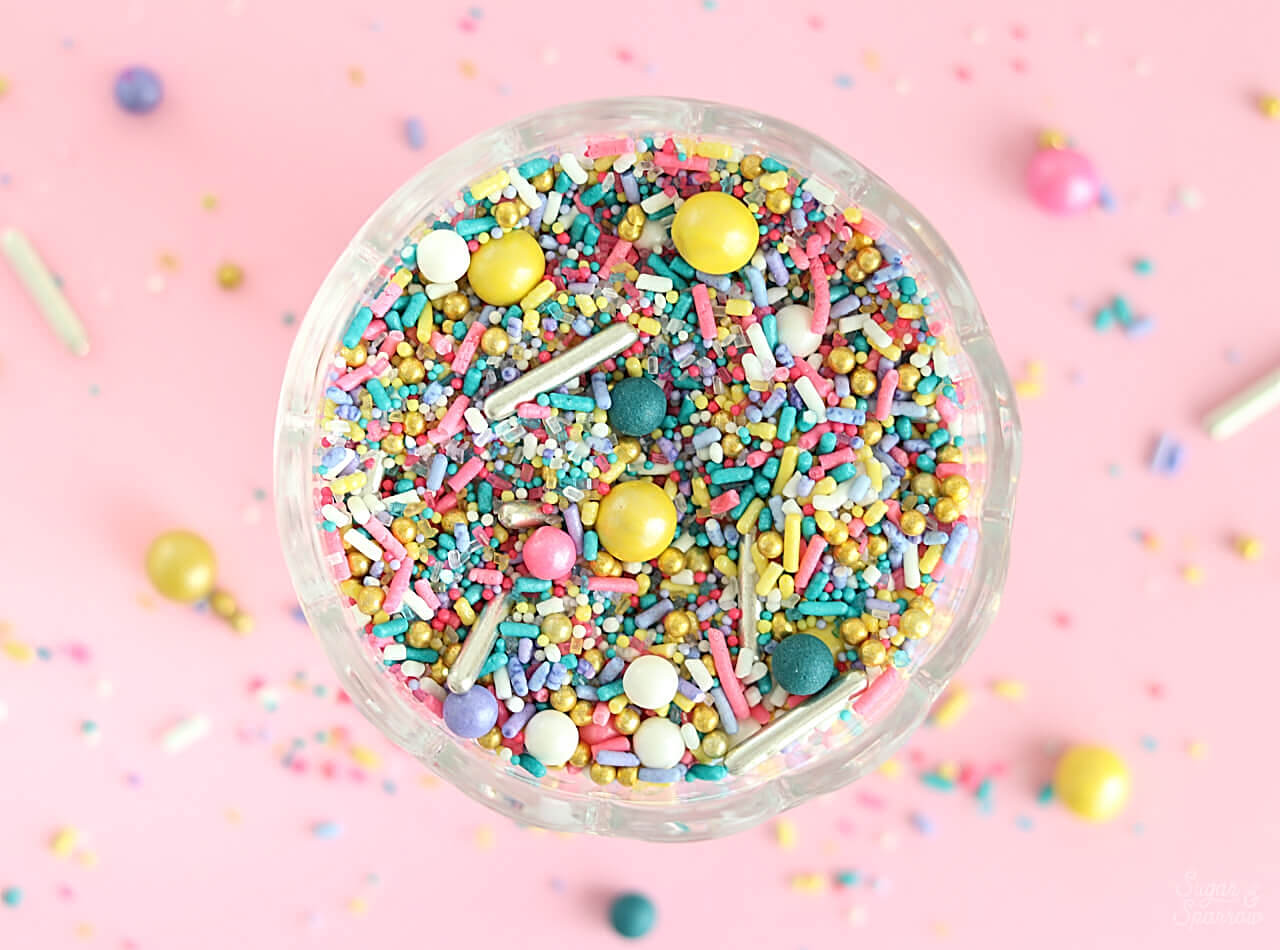
I also recommend pouring the sprinkles out into a bowl and mixing them up, just so you don’t end up with all of the larger sprinkles in only one area of the cake. 

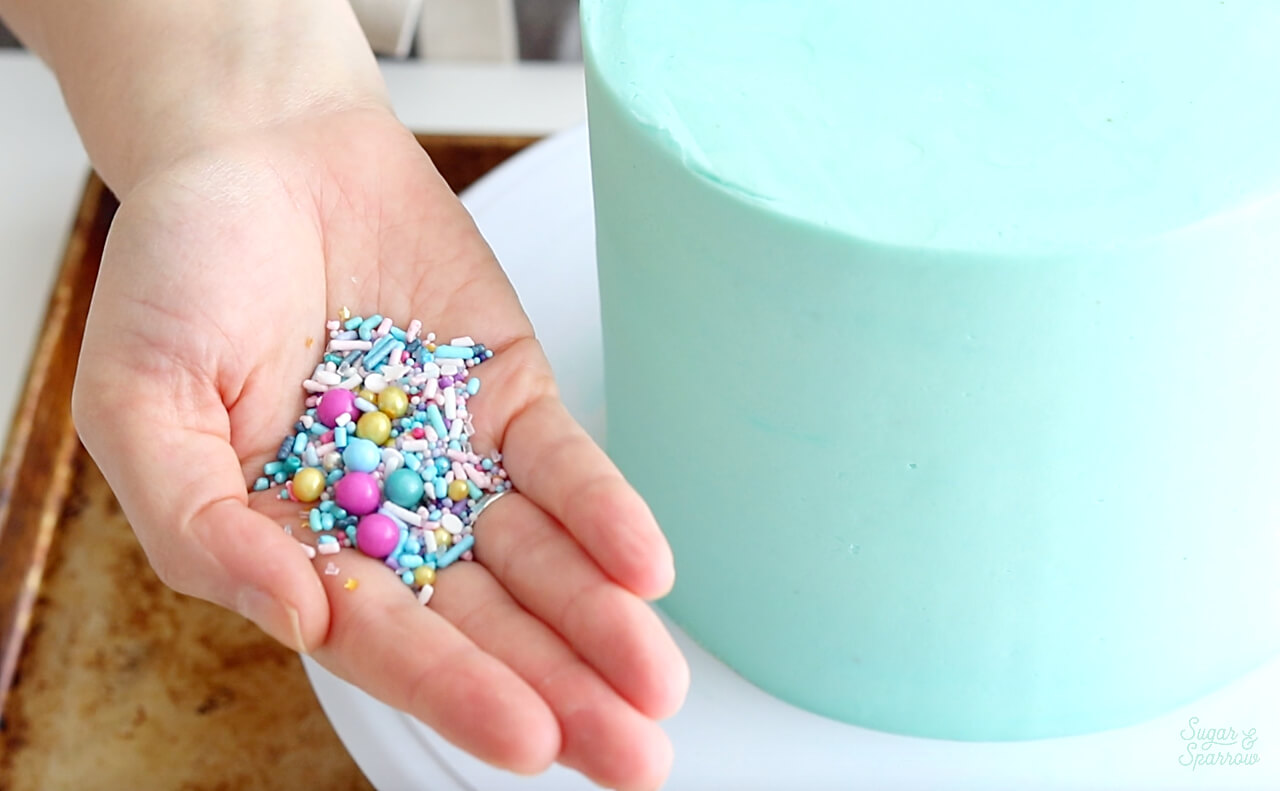
Step 2: Add the Concentrated Sprinkles

To add a concentrated amount of sprinkles around the bottom of the cake, I find it easiest to pour some sprinkles into the palm of my hand, then gently press them by the palmful onto the side of the cake. 

how to add sprinkles onto cake
adding sprinkles to the side of cake

Continue this process around the entire base of the cake until you’re happy with the way it looks. I prefer an imperfect boundary line when it comes to this technique so I like to add a lot of highs and lows instead of trying to create a perfectly straight line here.

how to place sprinkles on buttercream cake

Feel free to add in larger sprinkles and fill in gaps as you see them. Once you feel satisfied with the sprinkle placement around the base, it’s helpful to clean up the stray sprinkles on the turntable so you can ensure that you’ve covered all the spaces you want to before moving on.

adding sprinkles to cake tutorial

The easiest way to do this is with a pastry brush, and since you’ve got your sheet pan underneath the turntable, all of those extras will get swept away without covering your kitchen floor. 

Step 3: Add the Individual Sprinkles

Once I’ve got the base of the cake covered with a more concentrated sprinkle placement, it’s time to add individual sprinkles in what I like to call a “floating” pattern. I don’t really know what else to call it, but the only way to get the look is to add each sprinkle one-by-one. To get started, I press a sprinkle onto the pad of my pointer finger, then quickly (and gently) press that sprinkle to the side of the cake. 

sprinkle cake tutorial

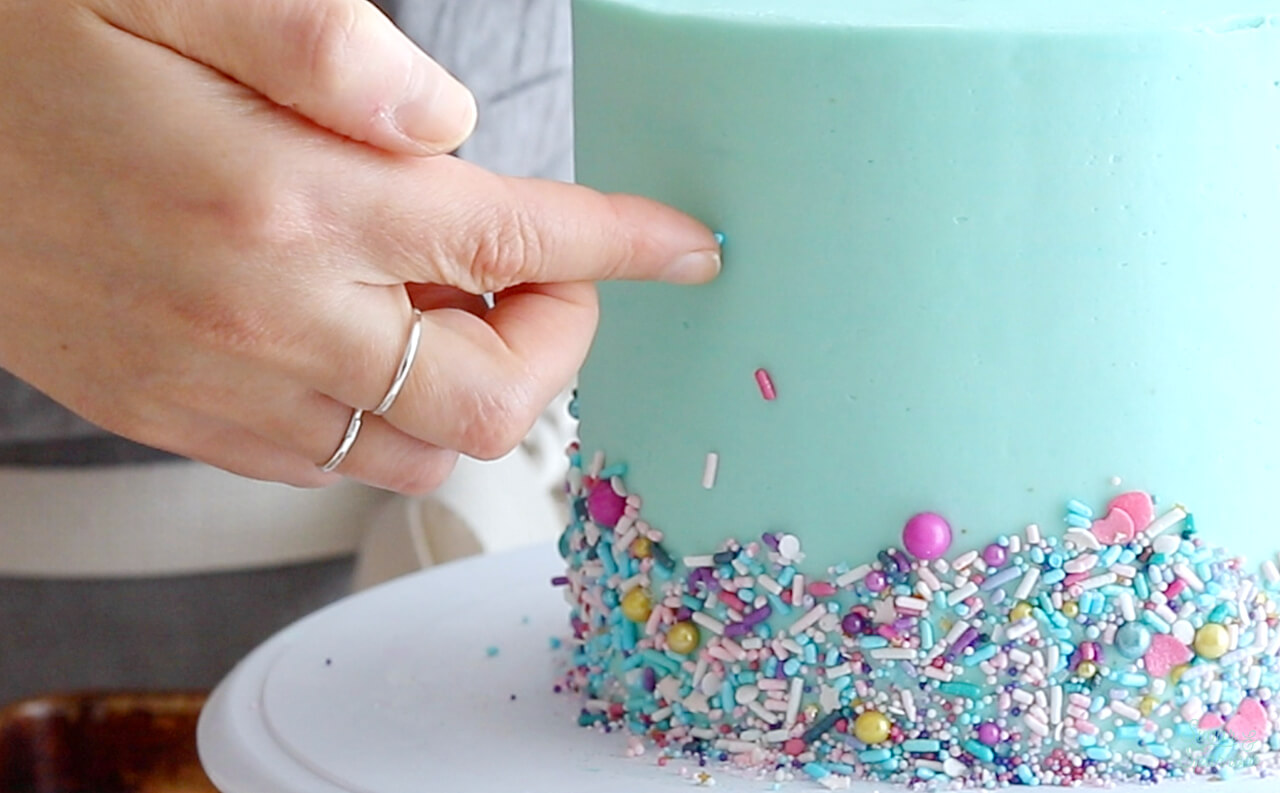
In my opinion, pressing the sprinkles on with the pad of your finger is the best way to prevent indents, since your fingernails won’t get in the way. Adding sprinkles with tweezers, your fingertip, or by pinching the sprinkle between two fingers is totally possible, but you have to be way more careful in regards to the sharp points of the tweezers or your nails indenting the cake finish. 

how to place sprinkles on cake by hand

You will drop a lot of sprinkles along the way whichever method you choose, but as a tip for getting the sprinkles to stick to your finger easier, it’s helpful to keep a damp paper towel handy. This way you can press your finger onto the paper towel before placing it onto a sprinkle – that little bit of moisture helps keep it stuck on for longer. 

cake decorating with sprinkles tutorial

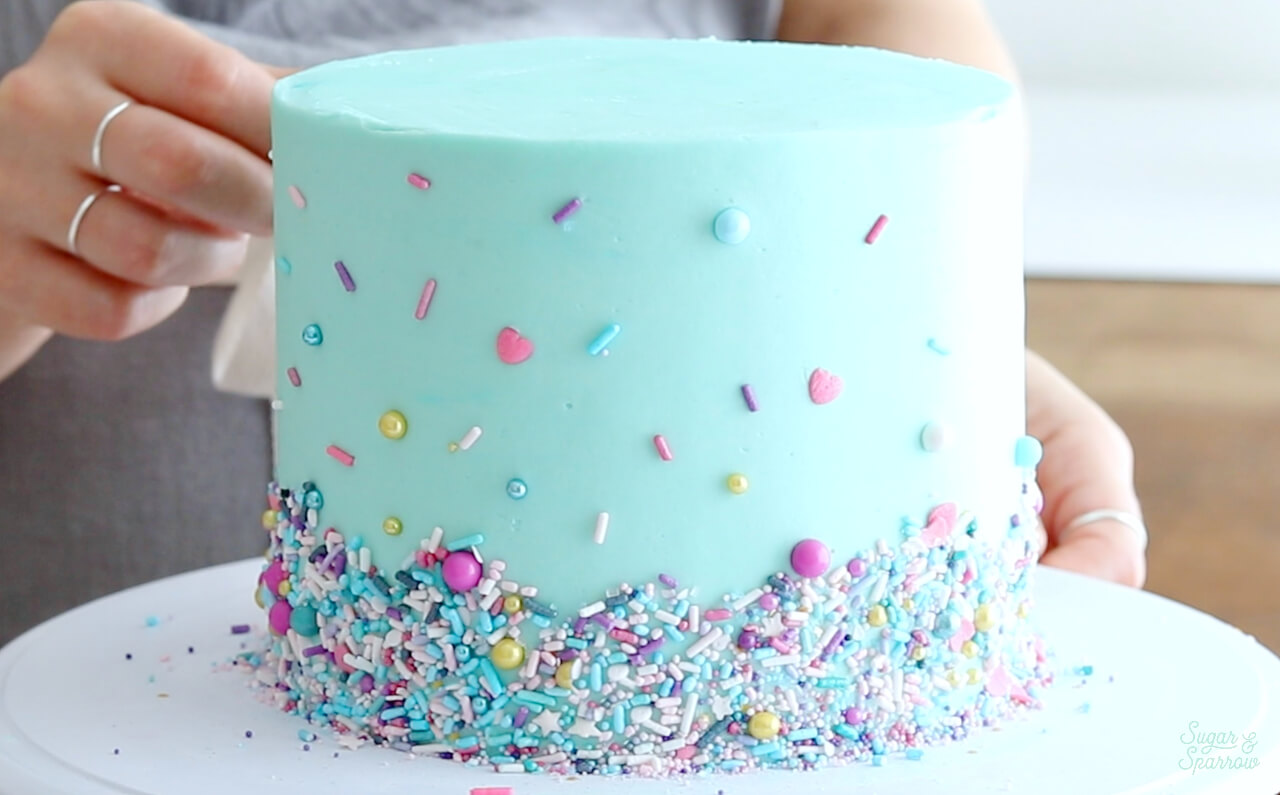
I like to place the individual sprinkles about an inch or so apart, always ensuring that no two colors or shapes are placed right next to one another. This process in total can take upwards of 15 minutes, so throw on some music and settle in for a tedious sprinkle sesh. Taking your time will be worth it in the end! 

Step 4: Continue Decorating 

For this particular design, I move on to decorating the top of the cake once I’ve got the sides sprinkled just the way I want them. Side note worth mentioning: If I’m adding sprinkles to a cake that will have a ganache drip, I tend to do Steps 1 and 2, add the drip, then complete Steps 3 and 4. Just thought I’d mention that in case anyone is wondering where a drip comes into play. 

wilton tip 4b swirls on cake

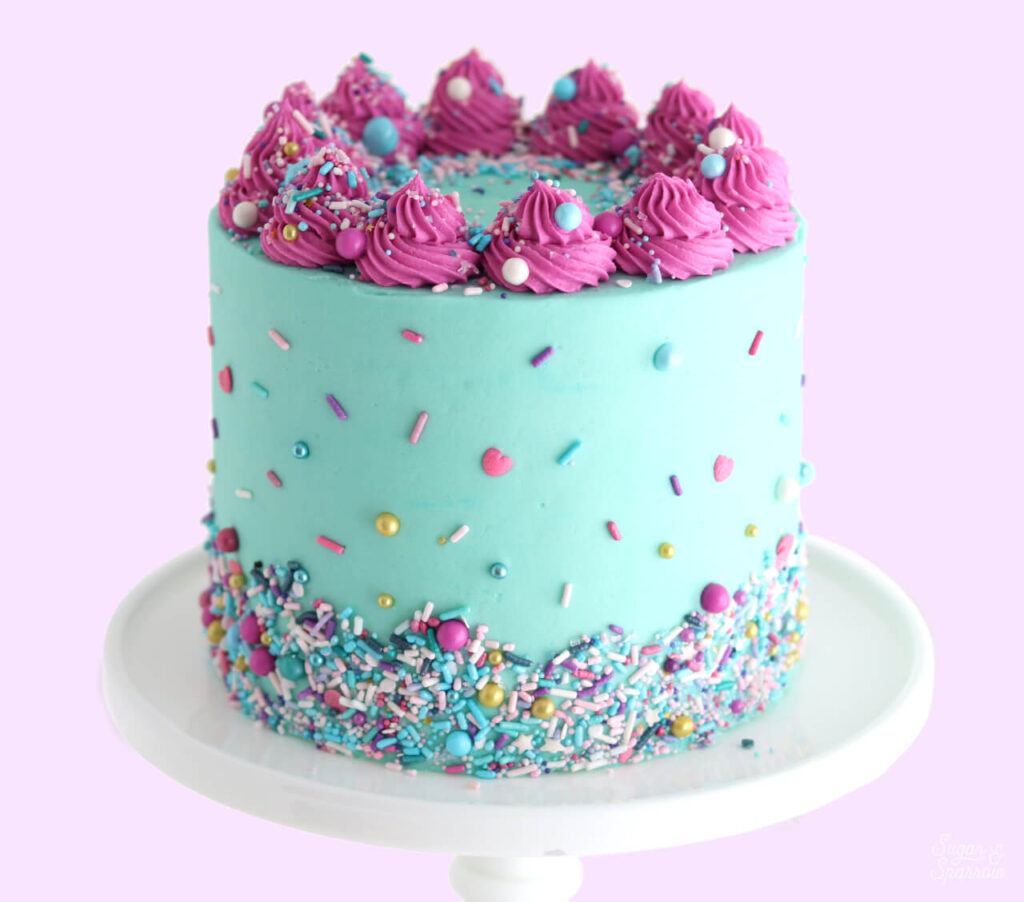
For this cake, I fitted a piping bag with Wilton Tip 4B and filled it with some buttercream frosting that I tinted with Americolor Fuchsia color gel. Then, I piped a series of swirls around the top edge.

decorating a cake with sprinkles

To finish the look, I added more sprinkles onto each of the fuchsia swirls. It’s important to do this immediately after swirling, while the buttercream is still fresh. If the buttercream has set, the sprinkles will just bounce off. 

blue and pink cake by sugar and sparrow

When you’re happy with your beautiful smooth and sprinkled buttercream cake, step back and marvel at your masterpiece! You did it! 

birthday cake with sprinkles by sugar and sparrow

Did you make this cake? I want to see how it turned out! Be sure to let me know in the comments or tag @Sugarandsparrowco on Instagram to show me. And if you want more Cake Basics, head here to see all of the posts and learn the methods of caking I’ve come to love over the years. I’m cheering you on every step of the way!

By: Whitney · In: Cake Basics, Tutorials · Tagged: cake basics, cake decorating, fancy sprinkles, hey sugar, how to add sprinkles to cake, sprinkle cake, sprinkle placement, sprinkle pop, sprinkles, sprinkles on cake, wilton tip 4b

you’ll also love

the best vanilla cupcakes recipeThe Perfect Vanilla Cupcake Recipe
pumpkin layer cake recipe by sugar and sparrowPerfect Pumpkin Layer Cake Recipe
oreo cookies and cream cakeOreo Layer Cake Recipe

Join the List

Stay up to date & receive the latest posts in your inbox.

Reader Interactions

Comments

  1. Petra says

    April 10, 2026 at 7:52 am

    Hi! I am not a baker but you’re so inspiring and I’ve learned so much from you. I’m planning on making an ice cream cake with whipped cream icing for my daughter’s 3rd birthday! Will the same sprinkle technique work for whipped cream frosting (with mascarpone)?

    Thank you for your guidance!!

    Reply
    • Whitney says

      April 10, 2026 at 10:00 am

      Hi Petra! I’m cheering you on and so happy you’ve been inspired! An ice cream cake sounds like the perfect birthday cake and yes, this sprinkle technique will totally work with mascarpone whipped cream frosting. Sounds delicious!

      Reply
  2. Jenna says

    October 5, 2025 at 5:04 pm

    Hi! This is so helpful, thank you! Any thoughts on how much you would need for a three layer 9” cake? Thanks!

    Reply
  3. Gidget Hall says

    March 29, 2023 at 9:41 am

    I’ve ordered a Nothing but Bundt cake for my son’s birthday. I want to add sprinkles to the top after I get it home. Is there a safe method to get the sprinkles to stick after all that frosting has set up?

    Reply
    • Whitney says

      April 3, 2023 at 8:51 am

      Hi Gidget! If the frosting/glaze is sticky then you can just sprinkle them right on and they should stick. If the frosting is set up you could probably still press them in, I’m not entirely sure because I’ve never had a Nothing Bundt Cake and don’t know what the frosting is like 🙂

      Reply
  4. Yvonne says

    October 16, 2022 at 8:56 am

    Hello! Where are your sprinkles from used on this cake?

    Reply
    • Whitney says

      October 17, 2022 at 1:21 pm

      Hi Yvonne! I used the “Hey Sugar” sprinkle mix by Sprinkle Pop: https://amzn.to/3ge8ZOS

      Reply
  5. Jess says

    August 25, 2022 at 9:29 pm

    This tutorial is so helpful!

    I have a major lack of time and want to cheat with store bought can frosting (Duncan Hines or pillsbury, etc). Will this work with those? If not ideal is there anything I can do to doctor those up to make it work? Thanks so much!

    Reply
    • Whitney says

      August 30, 2022 at 2:53 pm

      Yay, Jess! I think this tutorial will work with store bought frosting. My only thought is that store bought is a little more sticky than homemade buttercream, so if the frosting is too sticky you can always refrigerate it for about 10 min after frosting the cake to take away a little bit of the stickiness away (but still have it be sticky enough for the sprinkles to adhere). Hope that helps!

      Reply
  6. Holly says

    February 12, 2022 at 2:37 pm

    This is a beautiful cake! My question is about using sprinkles without the frosting. Do I have to have frosting? I want to put sprinkles on a quick bread.

    Reply
    • Whitney says

      February 15, 2022 at 12:14 pm

      Hi Holly! You can use sprinkles on pretty much anything, but if you want them to stick in a certain way they’ll need something to adhere them to the quick bread (like a frosting or glaze). If you’re just sprinkling them over the top you should be fine though!

      Reply
  7. Helen says

    November 17, 2021 at 11:28 am

    Hi Whitney, if you decide to add sprinkles once the final buttercream layer has been chilled, what’s the best way to get them to stick? Would it work to lightly dampen the buttercream in a band around the bottom to do this?

    Reply
    • Whitney says

      November 17, 2021 at 4:34 pm

      Hi Helen! You could add a super thin layer of fresh buttercream around the bottom of the cake and stick the sprinkles to that. I’ve done that with success before. Hope that helps!

      Reply
  8. Lil says

    November 11, 2021 at 1:19 pm

    Hello,

    I have a quick question about sprinkles. I am making pumpkin cupcakes with cream cheese frosting. I will decorate with fall colored sprinkles, the little balls. Can I add them to the cake and then refrigerate the cake? Will they bleed in the refrigerator? Or will they bleed when I remove the cake from the refrigerator? I’m taking this to a family dinner, I didn’t want the sprinkles to bleed into the frosting.

    Thank you

    Reply
    • Whitney says

      November 13, 2021 at 4:44 pm

      Hi Lil! The sprinkles shouldn’t bleed in the refrigerator or when taking the cake out of the refrigerator. I’ve never had that happen, even after storing a cake with sprinkles in the refrigerator for several days before a photoshoot. Hope that helps!

      Reply
  9. Madhu Webb says

    July 5, 2021 at 4:15 pm

    How far in advance of serving the cake can you put the sprinkles on without them getting soft? I have been tasked with making a wedding cake (will use your fault line cake design) and I will want to have the cake finished and fully decorated a day or two before the wedding day.

    Reply
    • Whitney says

      July 7, 2021 at 2:56 pm

      Hi Madhu! I have never had sprinkles get soft when making a cake ahead. What kind of sprinkles are you using? If you’re using SprinklePop or Fancy Sprinkles, in my experience I have been able to add sprinkles to a cake up to 3 days ahead and they’ve held their color and texture. Hope that helps!

      Reply
  10. Kelly Rose says

    April 15, 2021 at 10:31 am

    Can I add color/texture between layers by putting sprinkles in when I’m layering? Something not too hard, like jimmies or quins?

    Reply
    • Whitney says

      April 20, 2021 at 10:47 am

      You can totally add some sprinkles in with the filling between layers!

      Reply
  11. Jelly says

    March 21, 2021 at 7:05 am

    Hello Whitney, have you been successful using a cream cheese icing rather than a buttercream? My recipe is 1/2 cup cream cheese, 1/2 cup butter, 2 cups icing sugar and 1 tsp vanilla.
    Thank you for all your video’s, I believe they will take a lot of frustration from my cake decorating. Cheers, Jelly

    Reply
    • Whitney says

      March 21, 2021 at 10:19 am

      Hi Jelly! This technique totally works with cream cheese buttercream. As long as you can easily frost your cake smooth with it, you’ll be able to add sprinkles using this tutorial.

      Reply
  12. Brenda says

    March 4, 2021 at 9:18 pm

    Hi Whitney,
    I love your site. I have learned so much from you and appreciate all your detailed instructions.

    I have made two 6” cakes now and my buttercream seems to be so much thicker than yours. My cakes have not turned out nearly as smooth as your samples. I am using room temperature ingredients. Any idea what I am doing wrong?

    Thanks!
    Brenda

    Reply
    • Whitney says

      March 5, 2021 at 10:32 am

      Hi Brenda! If your buttercream is turning out too thick, it’s an easy fix – just add a little more liquid to the buttercream to thin it out. I would recommend starting with 1 Tbsp of extra milk and see if it needs more from there. Your cakes will be much easier to frost when the icing is thinner consistency 🙂 hope that helps!

      Reply
  13. Betty says

    February 19, 2021 at 7:09 am

    Hello! Any workaround for those of us with acrylic nails? I attempted this technique recently both with and without gloves and there were little crescent moon nail marks everywhere

    Reply
    • Whitney says

      February 19, 2021 at 8:57 am

      Hi Betty! You could try using tweezers instead. It will take more patience to place them but other than being extra slow/careful placing them by hand there really aren’t any other options I can think of.

      Reply
    • Dannie says

      May 17, 2021 at 3:44 am

      You can take a tiny piece of unflavored dental wax on the tip of a skewer to place the individual sprinkles.

      Reply
  14. Sadie says

    January 9, 2021 at 11:56 am

    How do you get the cake from turntable to cake drum or serving plate? Assume you have a thin board underneath it already??

    Looks beautiful!

    Reply
    • Whitney says

      January 12, 2021 at 9:11 pm

      Hi Sadie! I’m actually working on a Cake Basics post/video about this! First, make sure the cake is chilled for about 20-30 minutes on the turntable, then heat up an angled spatula under hot water and dry it with a towel. Run the spatula around the bottom edge of the cake to create a clean separation from the turntable, then slide it underneath the cake board and lift. From here you can slide a hand beneath the cake and balance it with the spatula to guide it to the serving plate. Hope that helps! I’ll have a video coming soon 🙂

      Reply
  15. Sally says

    November 11, 2020 at 5:12 pm

    Hi, would you put the cake back in the fridge after putting sprinkles (and ganache drip) on, or leave it on the benchtop? Thanks!

    Reply
    • Whitney says

      November 13, 2020 at 6:13 pm

      Hi Sally! If you’re serving it right away you can keep it out, but I usually store my decorated cakes in the refrigerator until about 1-2 hours before serving. Although refrigeration isn’t required, it does help preserve the decorating. Hope that helps!

      Reply
      • Kieren Bremner says

        February 12, 2021 at 1:46 am

        My sprinkles ran and went soggy after being in the fridge? Does the type of buttercream used make a difference?

        Reply
        • Whitney says

          February 14, 2021 at 8:14 pm

          Oh no, Kieren! The buttercream type shouldn’t matter, but the sprinkle type does. If the sprinkles don’t have a waxy coating (most do, but some don’t) you will risk the color running when they come into contact with moisture. What kind of sprinkles did you use?

          Reply
  16. Callie Hamilton says

    October 31, 2020 at 4:56 am

    I love all of your designs! What americolor tent is the base of this cake? Teal?

    Reply
    • Whitney says

      November 2, 2020 at 6:56 am

      Hi Callie! Thank you so much! The base color of this cake is Americolor Turquoise.

      Reply

Leave a Reply Cancel reply

Your email address will not be published. Required fields are marked *

Recipe Rating


Next Post >

Your Guide to Frosting a Cake with Smooth Buttercream

Primary Sidebar

Welcome to Sugar & Sparrow

Welcome to Sugar & Sparrow

Helping you whip up pretty desserts with confidence and creativity. And hopefully sharing a few laughs with you along the way!

Learn More

Connect

let’s bake!

Get my very best recipes, baking tips, and decorating tutorials sent to your inbox

Featured Posts

dia de los muertos cupcakes

Dia De Los Muertos Spiderweb Cupcakes

mini black velvet layer cake

Mini Black Velvet Cake Recipe

earl grey buttercream recipe

Earl Grey Buttercream

Search

Archives

Follow Along

@sugarandsparrowco

COFFEE BUTTERCREAM (recipe below)☕️ this frost COFFEE BUTTERCREAM (recipe below)☕️ this frosting has AMAZING coffee flavor, is so easy to decorate cakes with, and pairs beautifully with so many flavors (chocolate, vanilla, or any cake flavor you’d want to turn into a latte). 

All my cake pairing suggestions are linked in my bio or at https://sugarandsparrow.com/coffee-buttercream-recipe/ 

COFFEE BUTTERCREAM⁣
Yield: 2.5 Cups⁣

INGREDIENTS⁣
1 1/2 tsp instant coffee or espresso powder⁣
1 1/2 Tbsp whole milk, room temperature⁣
1 Cup (226g) unsalted butter, room temperature⁣
3 1/2 Cups (420g) powdered sugar⁣
2 tsp pure vanilla extract⁣
Pinch of salt⁣

INSTRUCTIONS⁣
1. Combine the instant espresso/coffee with the whole milk and set aside. In the bowl of a stand mixer, beat the butter on high until creamy and smooth (about 5 minutes), scraping down the bowl and paddle a few times in between.⁣
2. Turn the mixer to low and add the powdered sugar a few cups at a time, scraping down the bowl and paddle between intervals. Add the vanilla, the coffee/espresso milk mixture, and salt. Mix on low until fully incorporated, about one minute.⁣

#coffeebuttercream #buttercream #frosting #coffeecake
HUMMINGBIRD CAKE 🤎 after weeks of testing this HUMMINGBIRD CAKE 🤎 after weeks of testing this recipe I found that the KEY to taking this already delicious cake to the next level is: roasting the bananas!! It’s an optional step in this recipe BUT it adds unparalleled caramel notes and noticeable richness to the flavor 🙌🏼 Along with the crushed pineapple, toasted pecans, and tangy cream cheese buttercream, this cake is NEXT LEVEL delicious, ultra-moist, melts in your mouth, and will have everyone asking for the recipe. 

Full recipe (with cream cheese frosting) linked in my bio + at https://sugarandsparrow.com/hummingbird-cake-recipe/ 

#hummingbirdcake #creamcheesefrosting #bananacake #cakedecorating #cakerecipe
OREO CUPCAKES 🖤 (recipe below) I made these for OREO CUPCAKES 🖤 (recipe below) I made these for a fundraiser at @vancity.youth last weekend and was reminded of how delicious this recipe is! There’s black cocoa powder in the cupcake batter to give them the PERFECT Oreo cookie flavor profile + the most delicious cookies and cream buttercream I’d eat all on its own. 
 
Full recipe at https://sugarandsparrow.com/oreo-cupcakes-recipe/ 
 
OREO CUPCAKES 
1 Cup (132g) all purpose flour 
3/4 Cup (150g) granulated sugar 
1/3 Cup (38g) black cocoa powder 
1 tsp baking soda 
1/2 tsp baking powder 
1/4 tsp salt 
1/4 Cup (60ml) vegetable oil 
1 large egg, room temp 
1/2 tsp pure vanilla extract 
1/2 Cup (120ml) buttermilk, room temp 
1/2 Cup (120ml) hot coffee or hot water 
 
1. Preheat the oven to 350ºF/177ºC and line a cupcake pan with 12-15 liners. 
2. In a large bowl, whisk all of the dry ingredients together. Add the vegetable oil, eggs, vanilla, and buttermilk and whisk to combine. Whisk in the hot coffee (or hot water). 
3. Pour the batter into the prepared cupcake liners and bake for 14-18 minutes. 
 
OREO BUTTERCREAM 
1 Cup (226g) unsalted butter, room temperature 
3 Cups (360g) powdered sugar 
2 tsp pure vanilla extract 
2 Tbsp whole milk, room temperature 
pinch of salt, or to taste 
9 Oreo cookies (96g), finely ground 
 
1. Using a hand mixer or stand mixer, cream the butter on medium-high speed until it’s creamy and pale, 5 min. 
2. Add the powdered sugar a few cups at a time, mixing on low speed and scraping down bowl and paddle in between intervals. Keep the mixer on low and add the vanilla, milk, and salt. Mix until fully incorporated and uniform, 1-2 min. 
4. Mix in the Oreo cookie crumbs on low speed. 
 
#oreo #oreocupcakes #cookiesandcream #chocolatecupcakes #cupcakes
RASPBERRY CAKE FILLING (recipe below) ♥️ this RASPBERRY CAKE FILLING (recipe below) ♥️ this perfectly sweet/tart raspberry cake filling is beautifully thick, seedless, and so rewarding to make from scratch! It takes just a handful of ingredients and can be made with fresh OR frozen raspberries 🙌🏼 

Get the full recipe + cake pairing suggestions at the link in my bio or at https://sugarandsparrow.com/seedless-raspberry-cake-filling/

INGREDIENTS:
2 1/2 Cups (10oz, 315g) fresh or frozen raspberries
1/2 Cup (100g) granulated sugar
1 Tbsp lemon juice
1 tsp lemon zest
1 1/2 Tbsp (12g) cornstarch
1 1/2 Tbsp (22ml) water

INSTRUCTIONS: 
1. In a saucepan set over medium heat, add the raspberries, granulated sugar, lemon juice, and lemon zest. Cook until the mixture begins to boil, stirring occasionally. 
2. Once boiling, lower the heat and simmer for 10-15 minutes while you continue stirring occasionally. Then, remove from heat and use a fine mesh sieve to strain out the seeds over a medium bowl. After straining, you’ll be left with about 1/4 Cup of seedy pulp.
3. In a small separate bowl, combine the cornstarch and water until uniform. Return the strained raspberry filling to the saucepan (wipe it free of any remaining seeds if needed) and add the cornstarch/water mixture. Cook over medium heat until boiling, stirring constantly, then reduce to a simmer and cook for 1-3 minutes, until the filling has thickened slightly, is no longer cloudy, and coats the back of the spatula.
4. Pour into an airtight container and refrigerate for at least 4 hours and up to 1 week. It will be jello-like once set but after stirring it will become a thick, jammy consistency that’s perfect to use as a cake or cupcake filling!

#raspberrycake #cakefilling #cakedecorating #raspberries #baking
STRAWBERRY LEMON CAKE 🍓🍋 this cake is so lig STRAWBERRY LEMON CAKE 🍓🍋 this cake is so light and refreshing and bursting with all-natural flavors! It’s layers of my favorite extra fluffy lemon cake + the most delicious freeze-dried strawberry buttercream that ends up the prettiest natural pink color. I’ll never get over those little flecks of strawberry in the buttercream or the tiny chamomile flowers adding so much cheer! 

Grab the recipe at the link in my bio or at https://sugarandsparrow.com/strawberry-lemon-cake/

#strawberrylemon #lemoncake #strawberrycake #cakedecorating #strawberrybuttercream

Footer

On the Blog

  • Cake Basics
  • Recipes
  • Tutorials

Info

  • About
  • Privacy Policy & Disclosure

stay in the know

Copyright © 2026 · Theme by Sugar & Sparrow