Even though Easter isn’t all about colorful eggs, they became such an iconic symbol of the holiday. So much that when Wilton asked me to create a cake project for their Easter campaign, eggs were the first thing to come to mind! Imagine my delight when I browsed through Wilton’s online shop and found the perfect mold to make these Easter egg cake toppers. With a little painterly inspiration, some colorful Candy Melts, and a little cake pop filling, these cake toppers are so festive and fun to make!
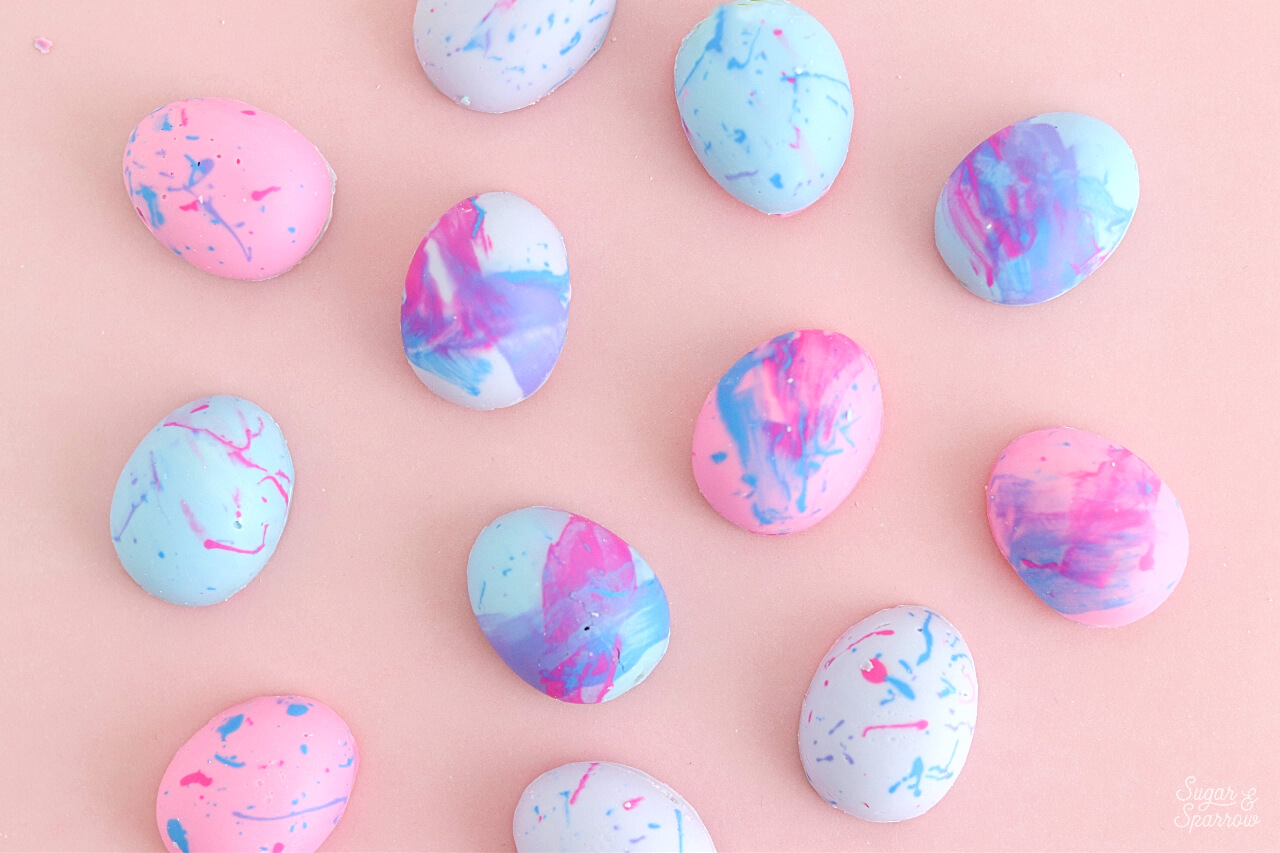
Aren’t they pretty? The cool thing about these Easter egg cake toppers is they are 100% edible. You basically create a Candy Melt “shell,” let it set, add the filling of your choice, and seal it with another layer of Candy Melts. After a quick trip to the refrigerator, they pop right out of the mold looking all beautiful and flawless! The mold is made of silicone for super easy release, so they literally do just pop right out. Love it!
UPDATE 2025: The Wilton silicone egg mold is no longer available, but this similar one works just the same.

My favorite thing about these Easter egg cake toppers is no two are alike. The process all starts by creating the colorful “shell” on the outside of the egg and you can get as creative as you want with decorating it. I ended up using Candy Melts to splatter paint and brushstroke the mold before pouring a solid color over it to create my shells. This technique made for a really seamless look, but you can feel free to be as creative as you want with your toppers. Save the splatter painting and brush stroking for the end to get a more textured look, swirl your Candy Melt Colors, or do whatever else you’re imagining!
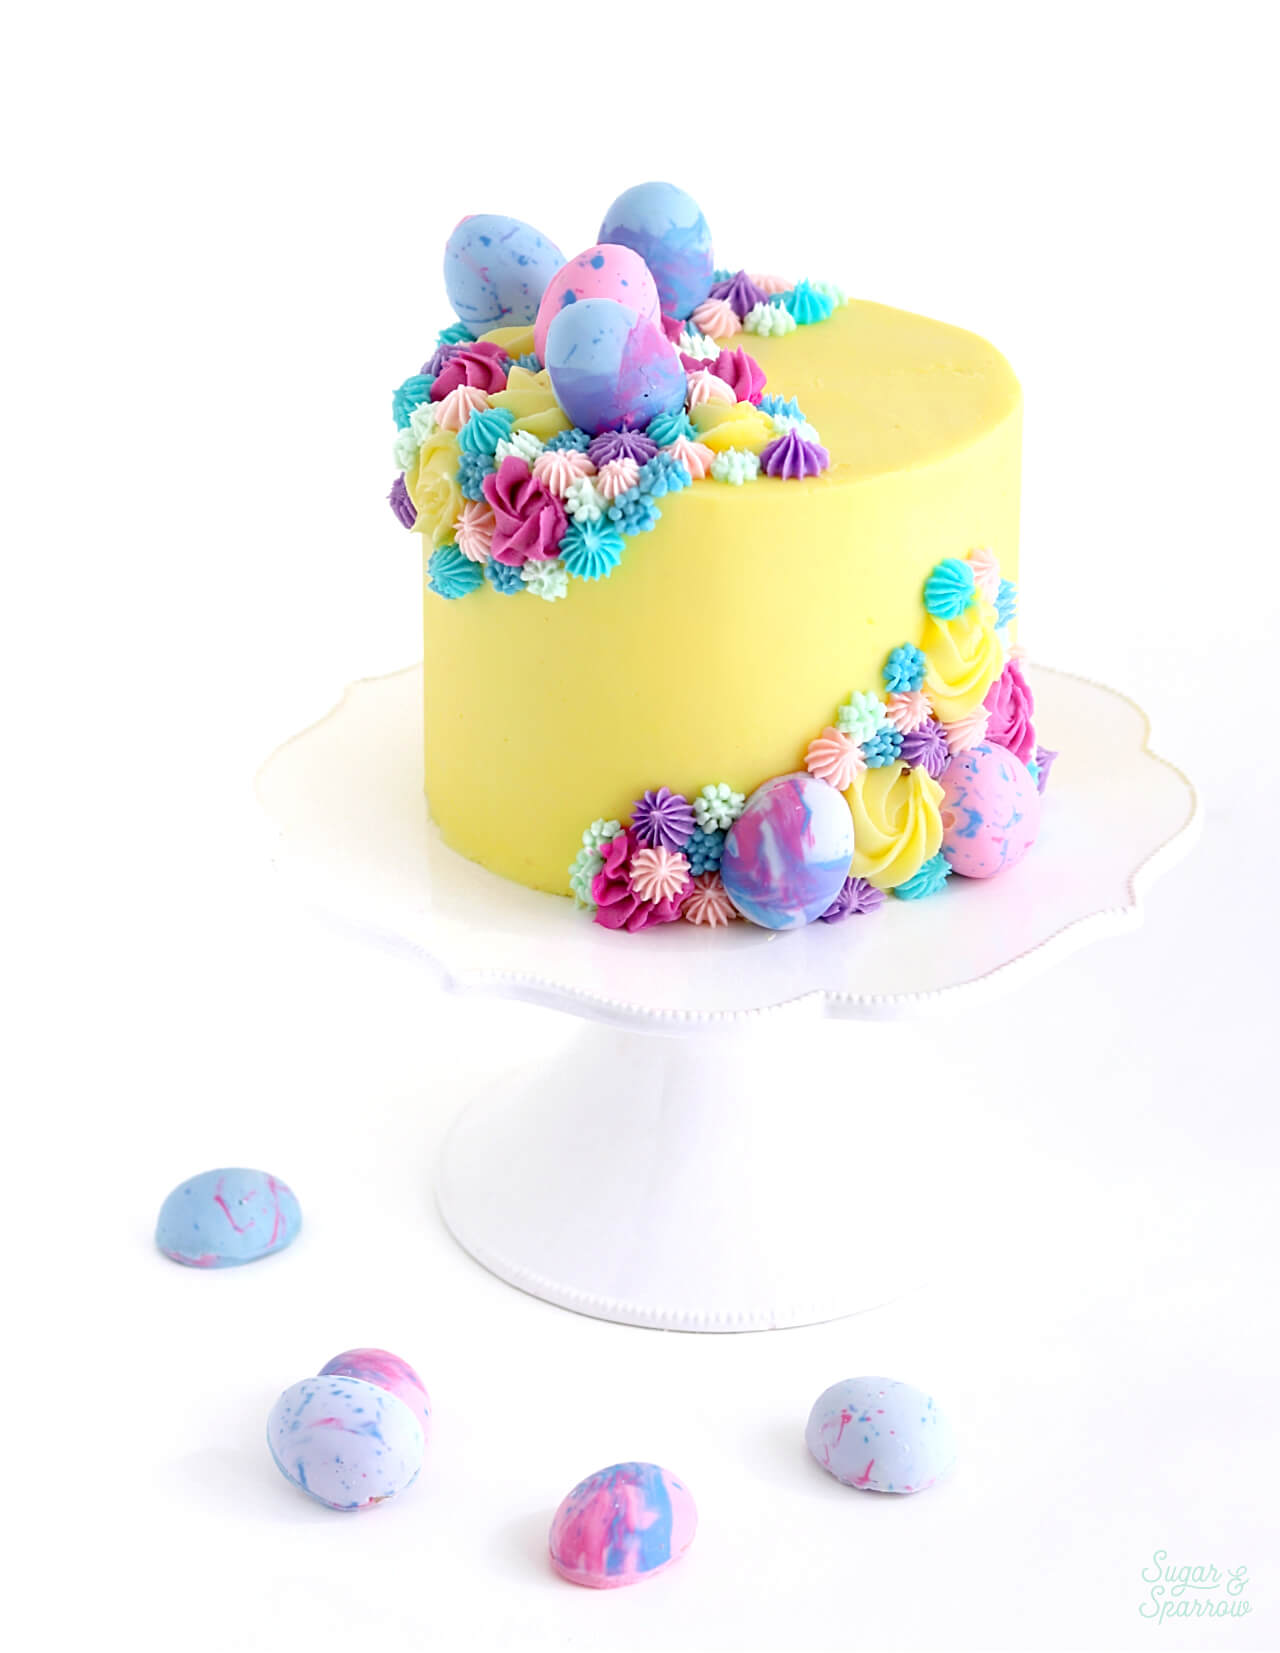
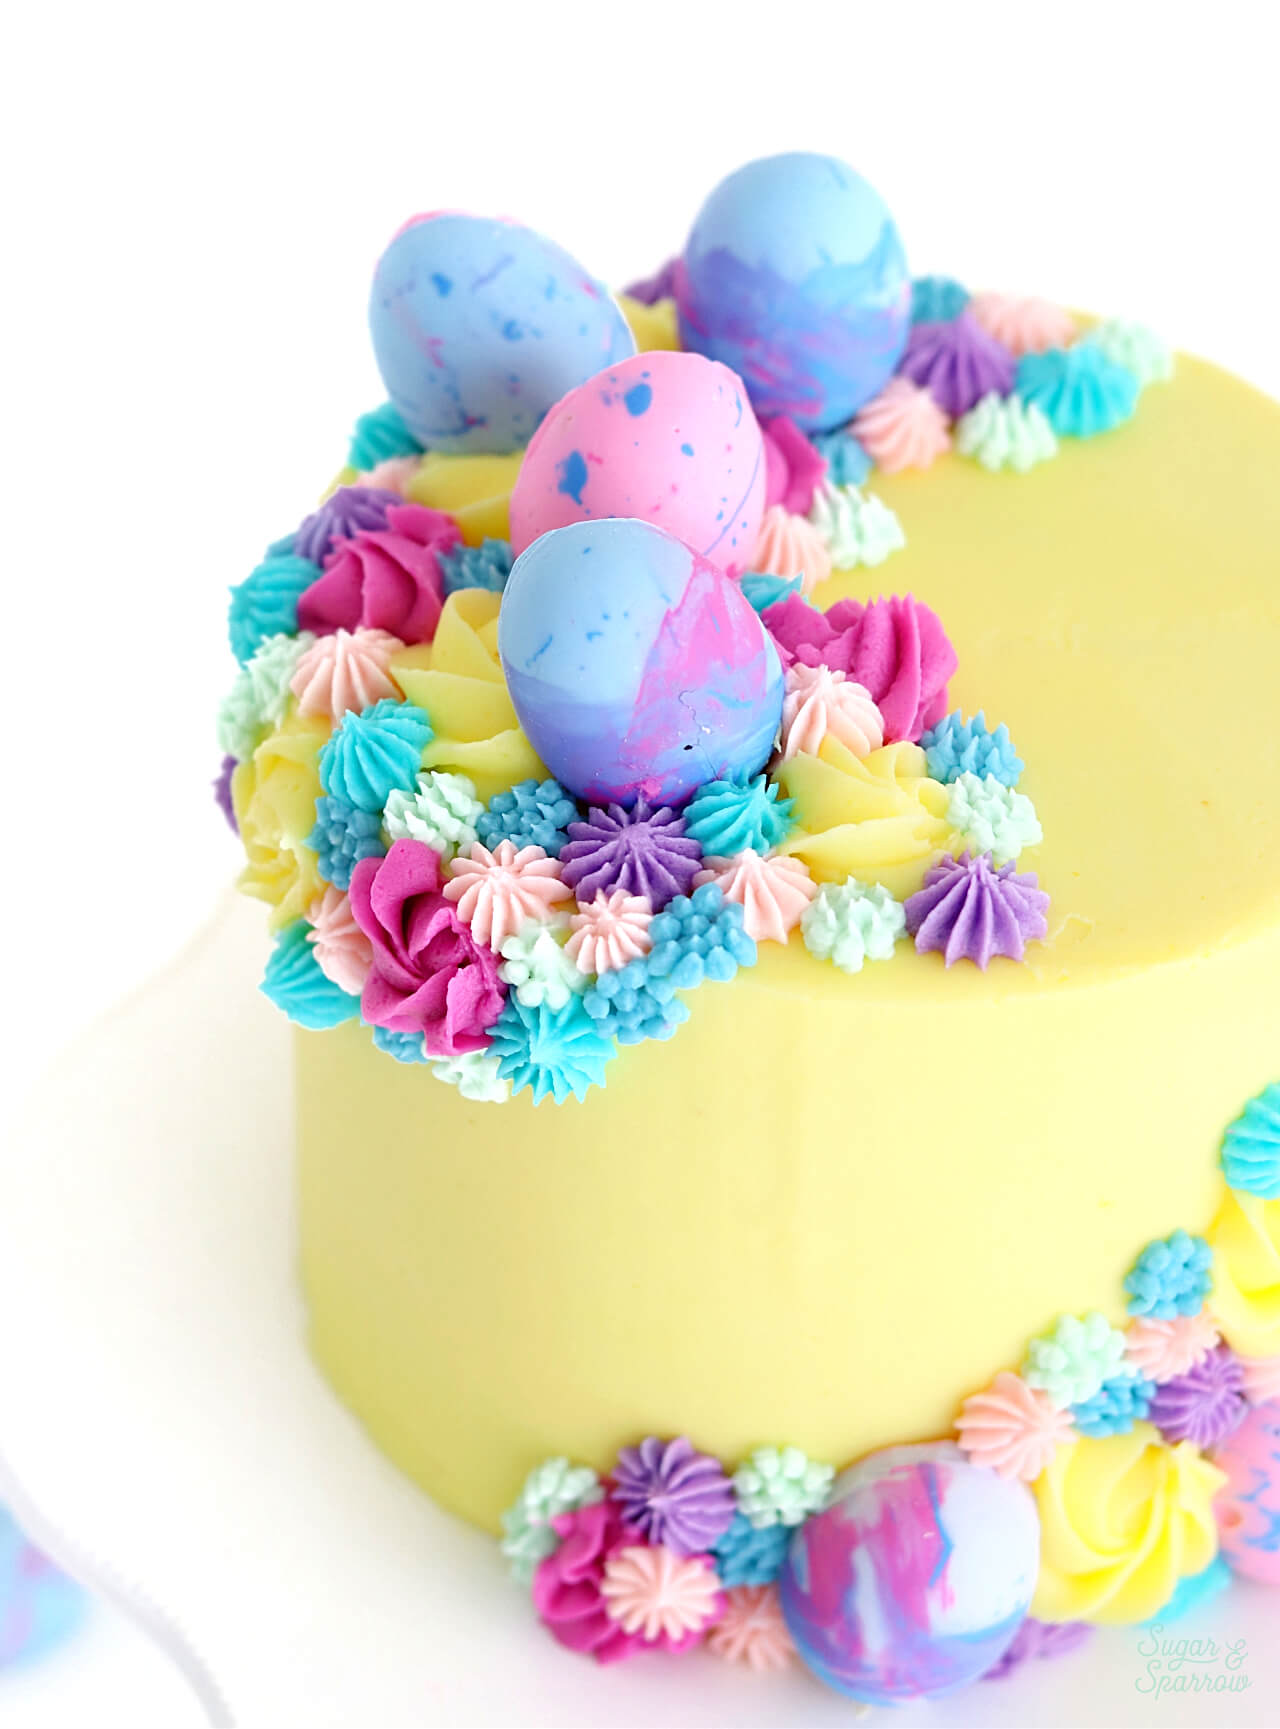
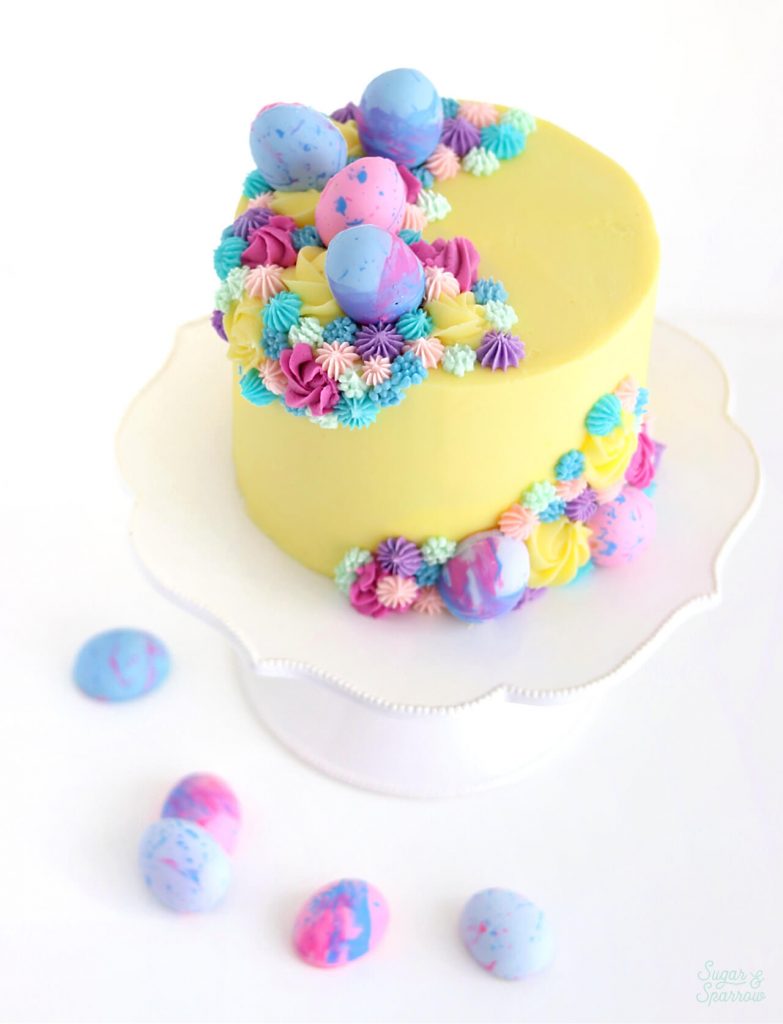
Once the eggs were made, I placed them on top of a yellow cake and piped more Easter-inspired colors all around them in a variety of textures. All of this gorgeous piping was made possible with just three of my favorite Wilton Tips: 1M (for the rosettes), 4B (for the stars), and 233 (for the dots of colorful grass). I paired these piping tips with six different buttercream colors and just piped away until I was satisfied. The textures are such a great match for these pretty Easter eggs!
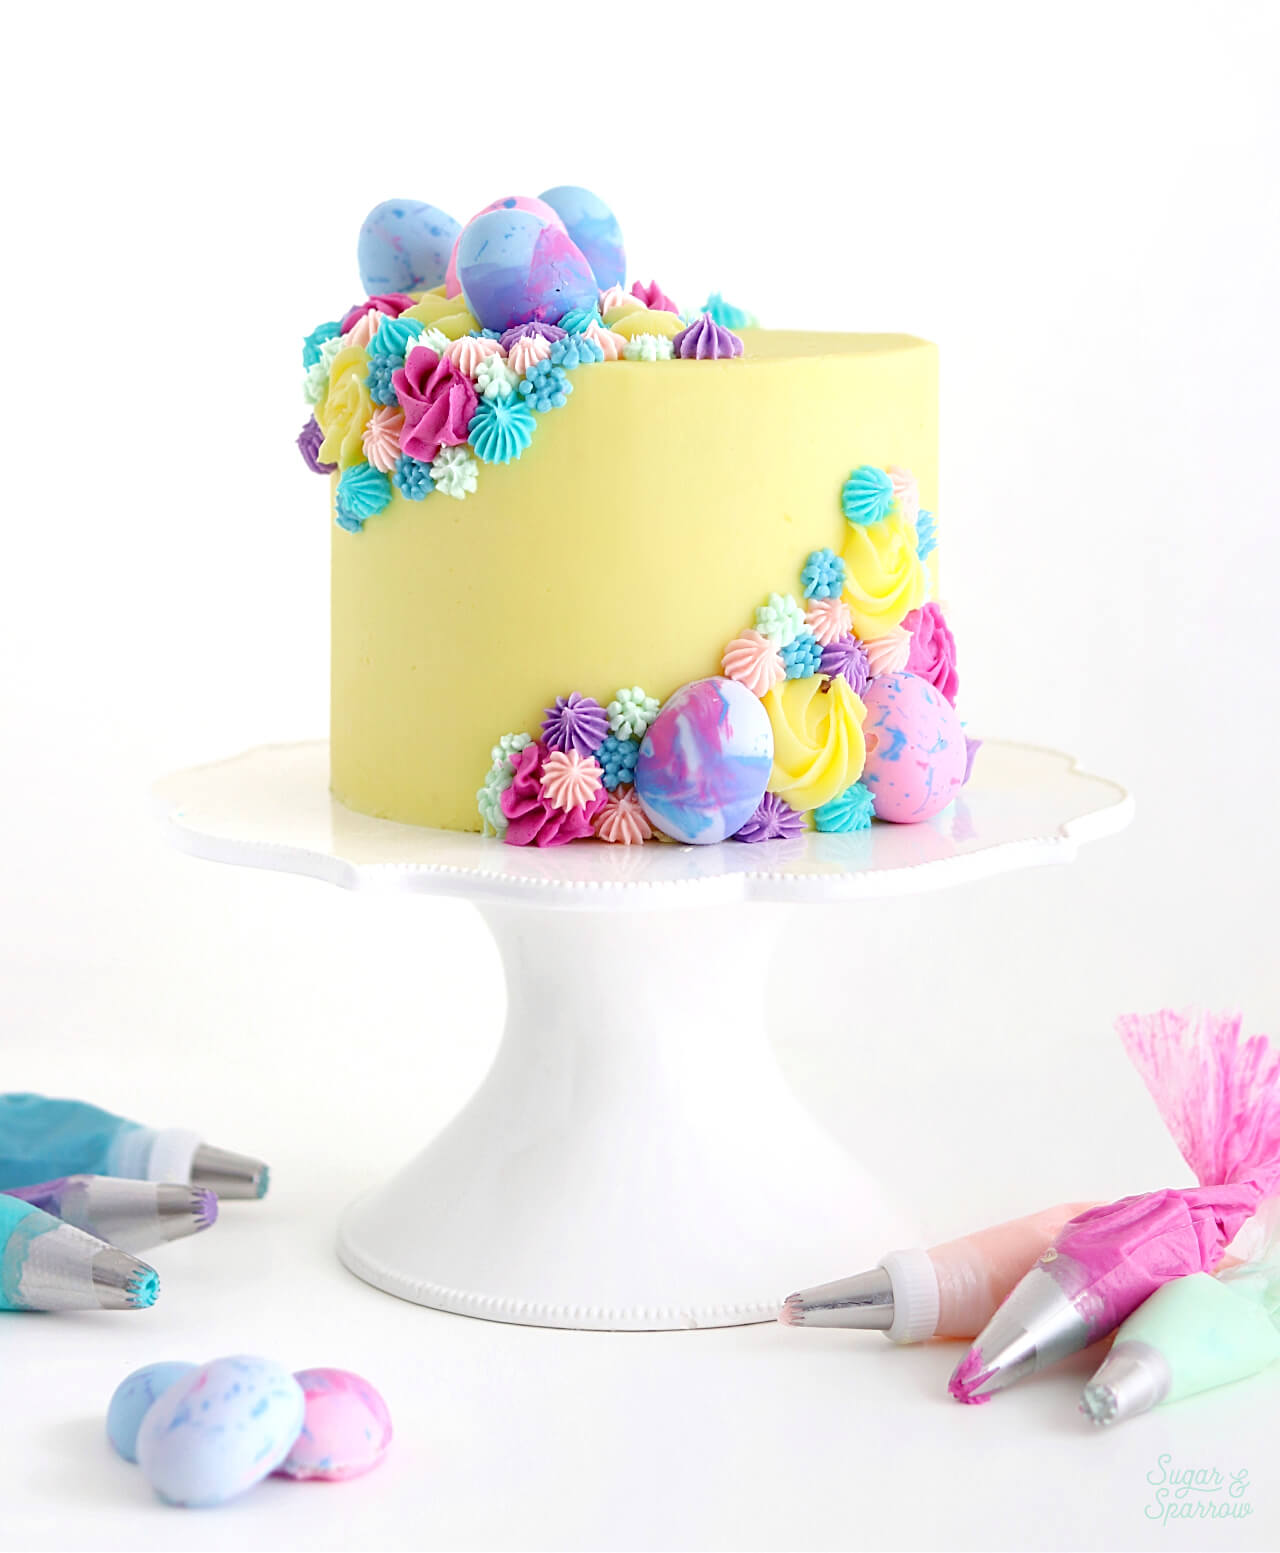
Here’s a quick video of the techniques I used to create these colorful Easter egg cake toppers, plus some footage of how I decorated the rest of the cake:
If you love videos like this one, be sure to check out my YouTube Channel! There are tons of cake decorating and recipe videos there to inspire you and I’m always rolling out new ones. If you click Subscribe you can rest assured that you’ll never miss a new video!
You Will Need
- A silicone Easter egg mold
- 12 oz. Wilton Candy Melts in Bright White
- Oil-based food color gels of your choice
- Bowls and spoons for color mixing
- Vegetable shortening
- 5 Piece Decorating Paint Brush Set
- Angled spatula
- ⅓ Cup filling of your choice (I went with cake pop filling)
Step 1: Melt and Tint the Candy Melts
Melt the according to the package instructions, then add them to six separate bowls. Color the first three bowls using oil-based food color gels. I custom mixed these colors below. You’ll want to make these first three colors bold and vibrant, since they’ll be the colors of the “paint” on the outside of the shells. Candy Melts do come in all sorts of colors, so feel free to use pre-colored ones for this part if you want!
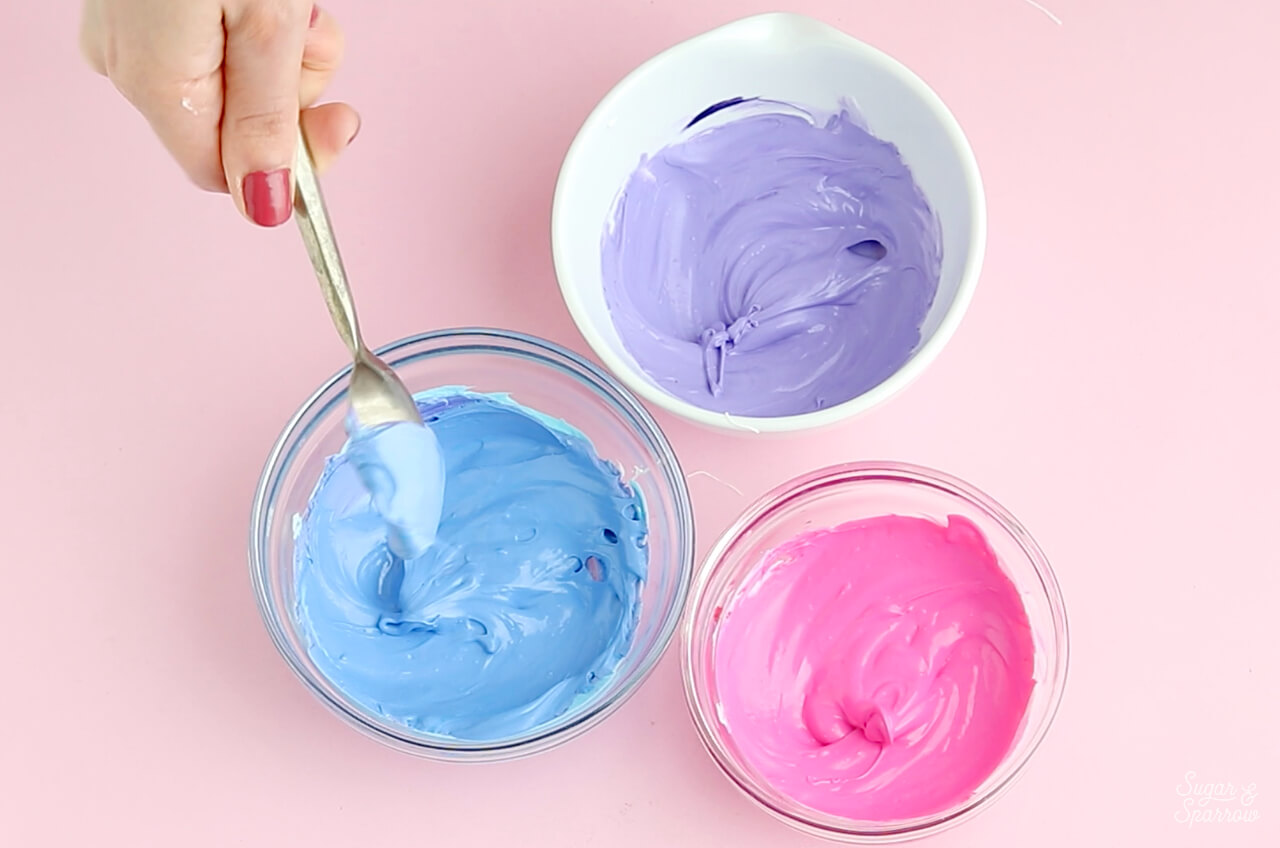
Use a little bit of the bold colors to tint the remaining three bowls and create pastel versions. These colors will be used as the shell behind the paint splatters and brushstrokes (we’ll get to those next!).
If at any point your Candy Melts seem too thick, try adding some vegetable shortening or heat in the microwave for an additional few seconds.
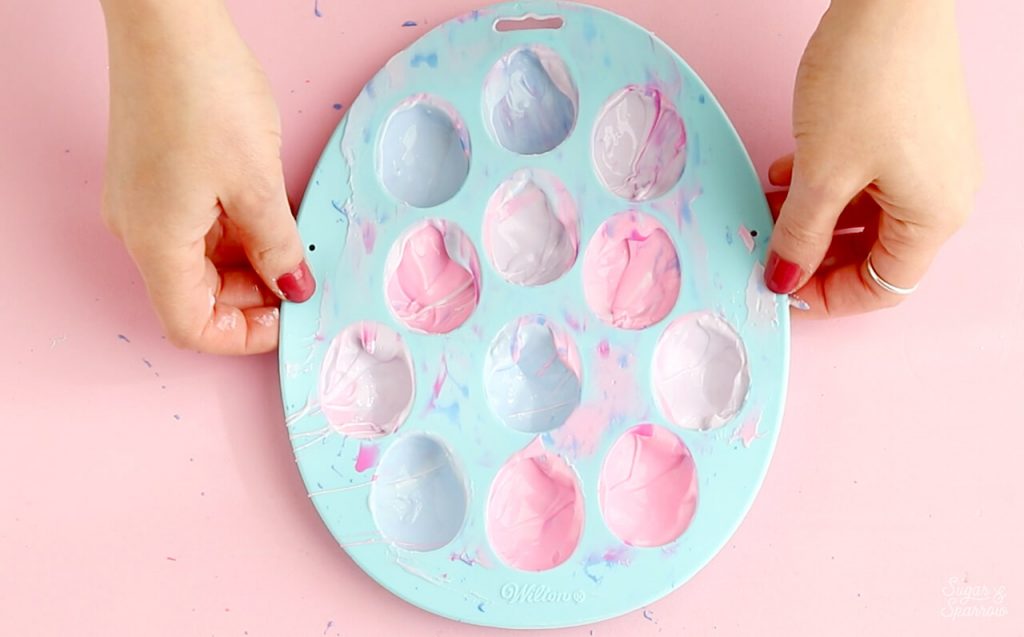
Step 2: Paint the Easter Egg Mold
Using the paint brush set, splatter paint and brushstroke the cavities of the Easter egg mold with the bold Candy Melt colors until you love the look.
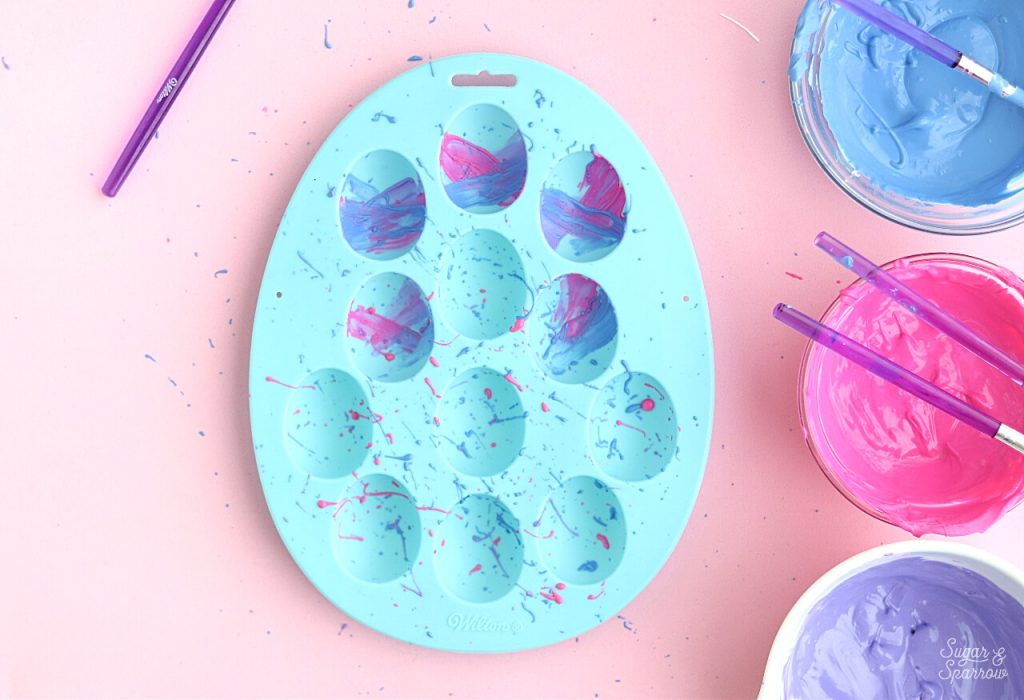
Let the painted mold set up at room temperature for 2-3 minutes before moving on to the next step.
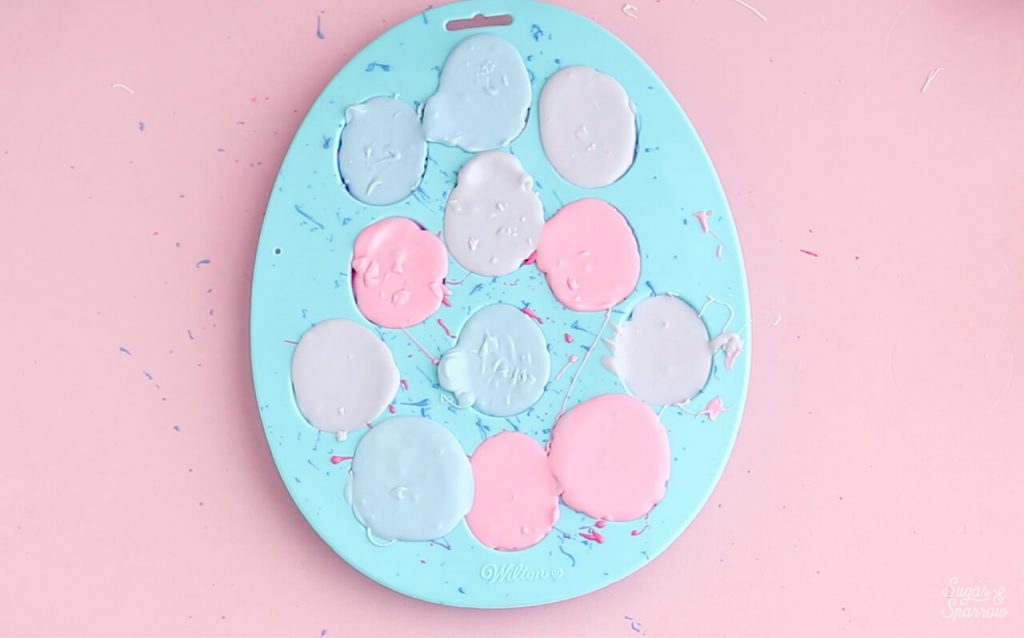
Step 3: Create the Easter Egg Shells
Fill each cavity in the with the pastel Candy Melts, right over the top of the painted designs. Gently tap the mold on a flat surface to make sure the entire cavity is covered evenly and let sit for about 3 minutes, or until a hard shell starts to form on the edges only.
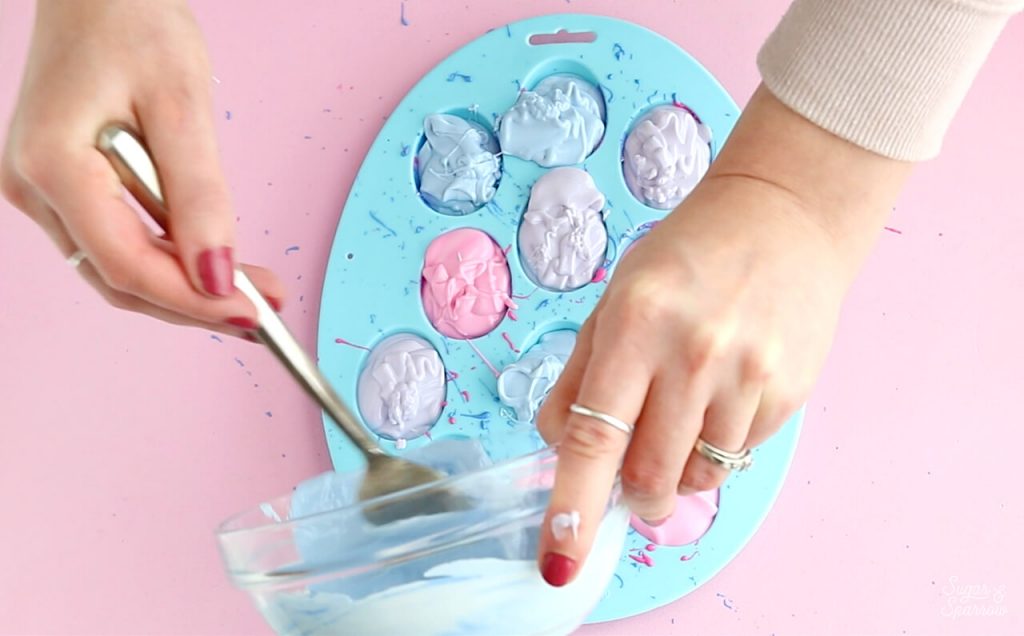
Turn the mold over and pour out the excess Candy Melts onto a piece of wax paper.
Then, take an angled spatula and swipe over the top of the mold to remove any excess Candy Melts.
Refrigerate for at least 10 minutes to let the shells firm up.
Step 4: Add the Filling
Using the filling of your choice (I used cake pop filling for these), fill each cavity about ⅔ full. Be sure to leave enough room for more Candy Melt on top.

If your filling requires setting (most do), place the mold back into the refrigerator until your filling is nice and set.
Step 5: Add More Candy Melts
Once the filling is set, add more of the melted pastel Candy Melts to the top (aka the back) of each egg.
Swipe off the excess with an angled spatula and place back into the refrigerator to set for at least 10 minutes.
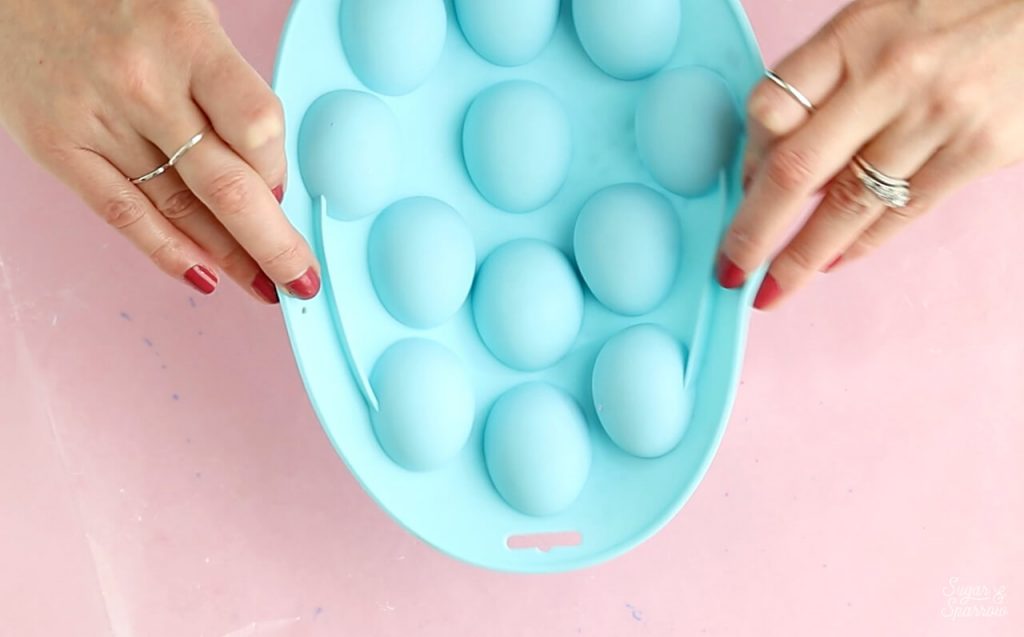
Step 6: Release
When your eggs are set, they’re so easy to remove from the silicone mold. They pop right out, and just look at how incredible the painterly designs show up!
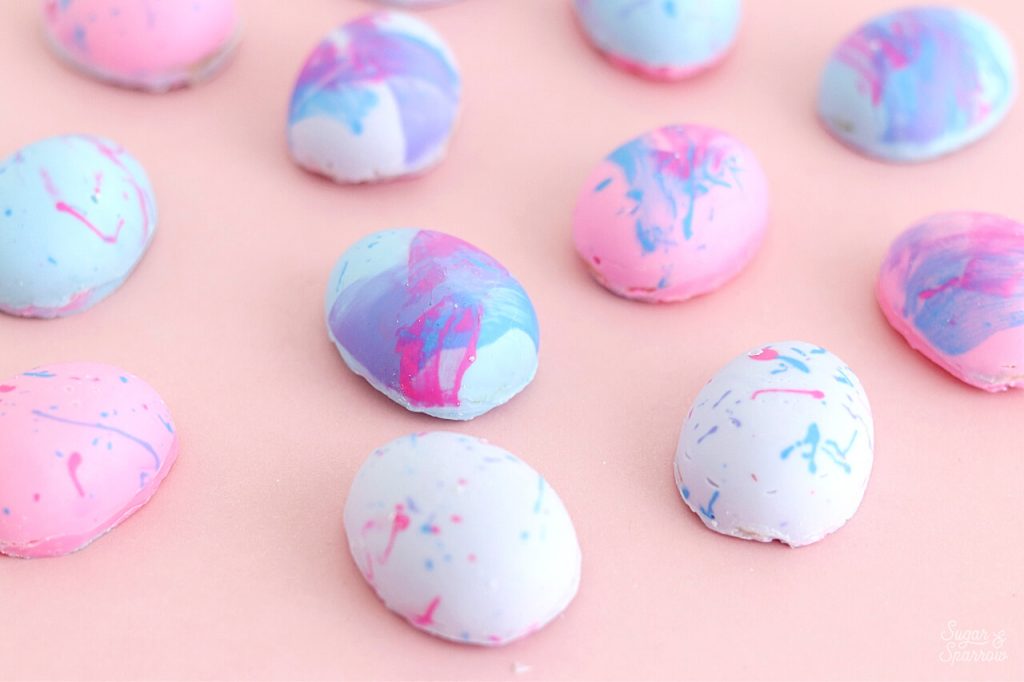
You can serve these edible Easter eggs as a dessert all on their own, use them in your next Easter cake design, or add them to any of your bakes for a festive pop of color. Can’t wait for you guys to try this technique. And be sure to check out for some super fun Easter themed baking supplies!
What kind of bakes are you making for Easter? Let me know in the comments below. And if you end up making these Easter eggs, be sure to tag @sugarandsparrowco on Instagram and show me!


Hi Whitney!
You mentioned in the Easter Egg topper tutorial that you used cake pop filling…Would you mind sharing your recipe for that? What would be some examples of other fillings? I love your website, book, and all things Whitney! Thank you for everything!
Andrea
Hi Andrea! I wish I had the recipe written down – I just crumbled some cake into a bowl and added frosting until it was moldable! I’ll work on adding a detailed recipe to my site but in the meantime I recommend this one: https://sallysbakingaddiction.com/homemade-cake-pops/
Hi Whitney
I adore the colours you’ve used for the buttercream piping on this gorgeous cake. Would you mind sharing which colours you used?
Thanks so much
Ps… your blog is so inspiring and your cake basic videos are indispensable for beginners like me! (I’m a mum with 3 girls who love a fancy birthday cake… certainly not a professional!)Thankyou thankyou!
Hi Anthea! For this cake, I actually used the Wilton Color Right Food Coloring System (its a box of primary colors you mix together to make the colors you need), so I don’t have exact color names or recipes unfortunately! I do love that food coloring system though, and it comes with instructions on how to make certain shades https://amzn.to/2QR1JMl
Hello, beautiful recipes and thoughtful suggestions and advise on all the recipe. Am going to make this egg cholate molds today. I would like to know if this needs to go in the fridge after the egg molds are done Or can stay out??? since Easter is over the weekend. Thank you
Hi Hemalatha! So excited for you to make these eggs! Once they’re set you can either store them at room temperature or in the refrigerator – basically store them the same as you would store a bar of chocolate.