• Cake
  • Frosting
  • YouTube
  • My Favorite Tools
  • Nav Social Icons

  • Skip to primary navigation
  • Skip to main content
  • Skip to primary sidebar
  • Skip to footer
  • Recipes
    • Cake
    • Cupcakes
    • Frosting
    • Ice Cream
    • Vegan
  • Cake Basics
  • Tutorials
  • Blog
  • About
  • Mobile Menu Widgets

    Connect

    Search

Sugar & Sparrow logo in script font

Sugar & Sparrow

Lifestyle and Cake from Portland Oregon

  • Cake Basics
  • Recipes
    • Cake
    • Cupcakes
    • Cookies & Bars
    • Filling
    • Frosting
    • Ice Cream
    • No-Bake
    • Small Batch
    • Vegan
  • Tutorials
  • Book
  • Blog
  • About

Easy Heart Shaped Cake Tutorial

February 10, 2023 · In: Featured, Seasonal, Tutorials, Valentines

Valentine’s Day is the perfect excuse to make something sweet from scratch. I’ve got lots of ideas here, but if you’re planning on making a layer cake for your loved ones, this heart-shaped cake tutorial will easily take it to the next level. The best part is, you don’t even need a heart-shaped pan! This can be done with two round cake layers of any size. And since most of my cake recipes are written to yield two 8-inch layers, you can use any of them with this tutorial! 

how to make a heart shaped cake

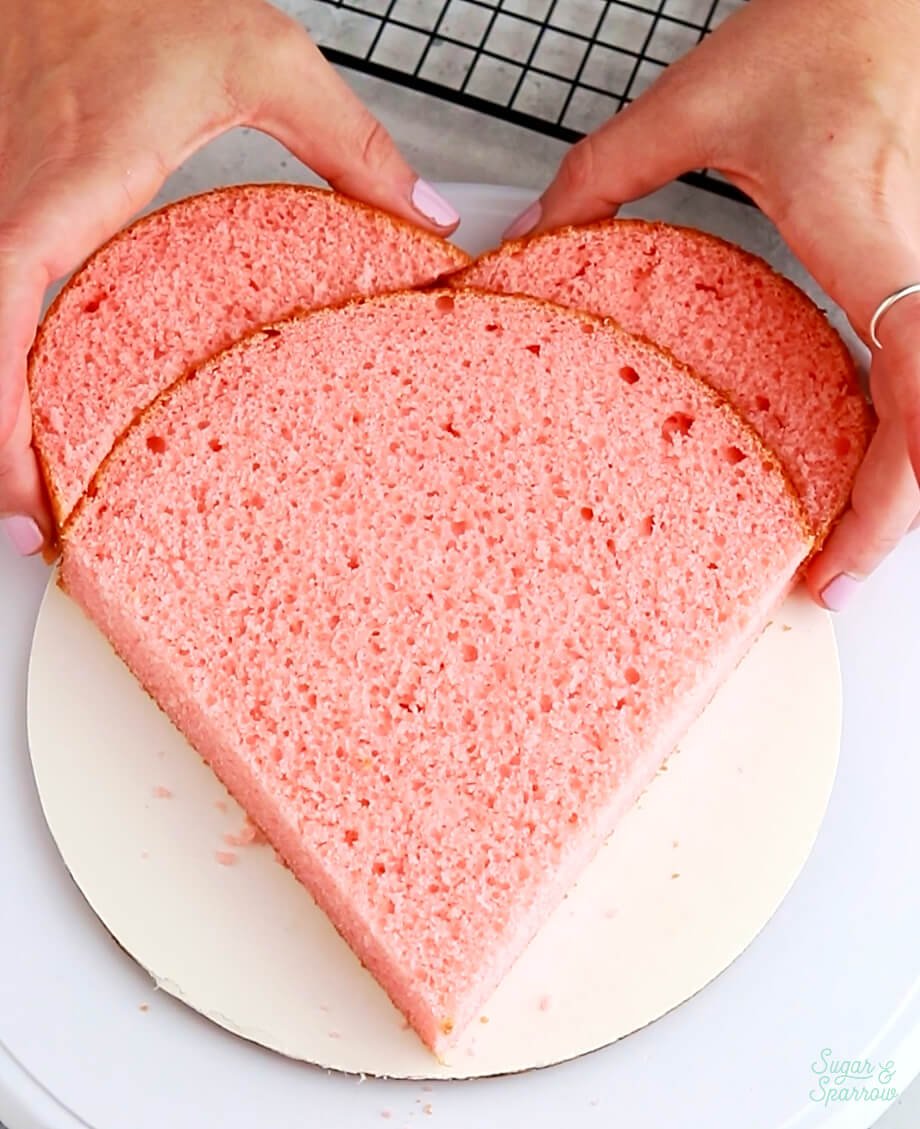
I was so happy to find this heart-shaped cake hack because I loathe having to store novelty cake pans and decorating tools that I only use (maybe) once a year. The vast majority of cake layers I bake are round, so I got so giddy when I realized how easy it was to turn a round cake layer into a heart shape. Simply use a serrated knife to make two clean cuts that form the bottom of the heart, then use the rounded cake trimmings for the top of the heart. They’ll glue on so easily with a little buttercream and once the cake is frosted, nobody will know you didn’t use a heart-shaped pan. 

how to decorate a heart shaped cake
heart valentines day cake

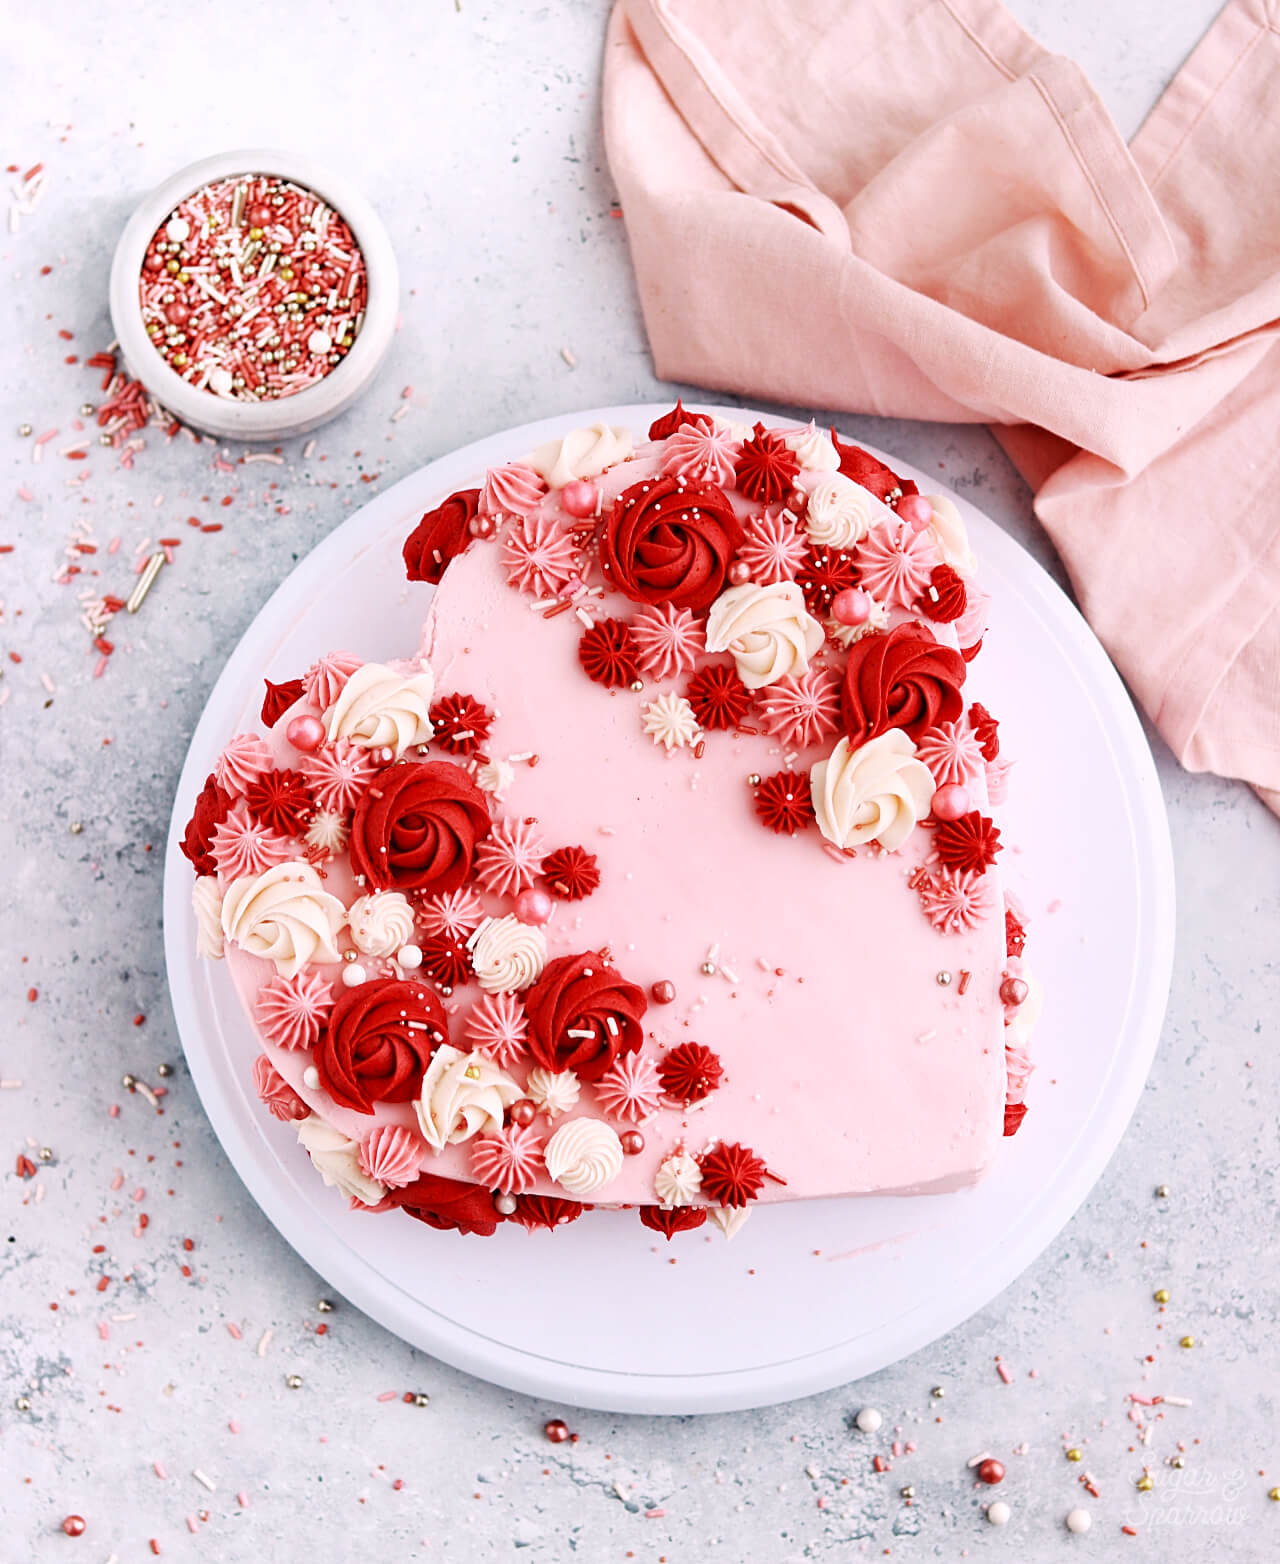
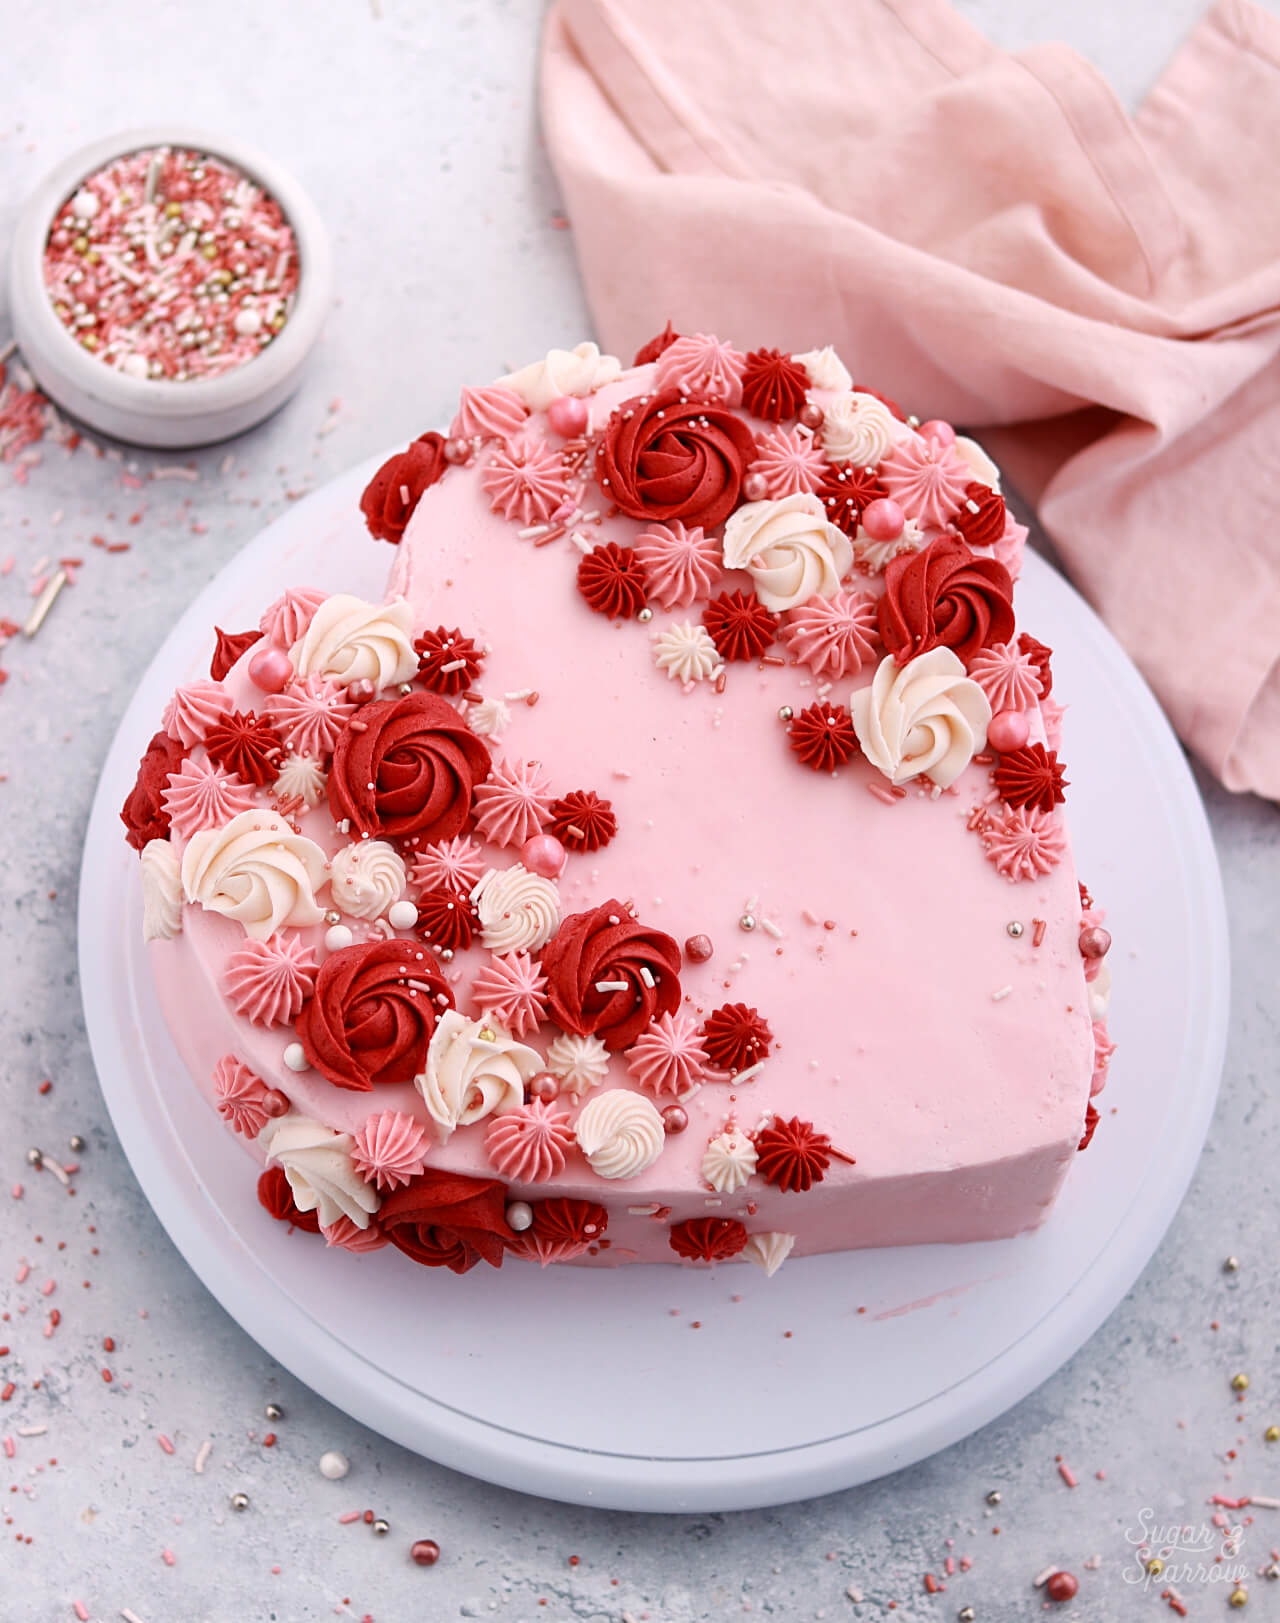
I chose to frost the cake with a light pink frosting (AmeriColor Soft Pink) and some pretty piped floral accents using Wilton Tips 1M for the rosettes, 4B for the stars, and 32 for some swirls and smaller stars. The color palette was a happy accident but I love how it turned out! I used AmeriColor Chili Pepper + Super Red in varying intensities for all three colors. This heart-shaped cake would also look amazing with lambeth style piping, and I really hope to try that soon!   

how to make a heart cake with round cake pans

You Will Need:

  • Two 8-inch cake layers, cooled and leveled 
  • Serrated knife
  • 8-inch cardboard circle
  • Cutting board 
  • 2 batches of vanilla buttercream (or any flavor)
  • Piping Bags 
  • Turntable 
  • Icing smoother
  • Small angled spatula
  • AmeriColor Soft Pink, Chili Pepper, and Super Red (optional)
  • Wilton Tips 1M, 4B, and 32 (optional)
  • Sprinkle Pop Vintage Rose Gold sprinkles (optional)

Step 1: Trim the Cake Layers

Place the first cake layer onto a cutting board. Use a serrated knife to make the two cuts that will end up being the pointed part of the heart. I usually just eyeball this. 

how to make a heart shaped cake with round cake layers
how to make a heart cake with round cake layers

Repeat this step with any additional cake layers. You can use the first cake layer you trimmed as a template to make things super easy. 

Unless you’re planning on serving the cake on the turntable after you decorate it, trim the 8-inch cardboard cake round in the same way you trimmed the cake layers. This will end up being the foundation of the heart-shaped cake and will make it much easier to transfer the cake off the turntable after you’re done decorating. 

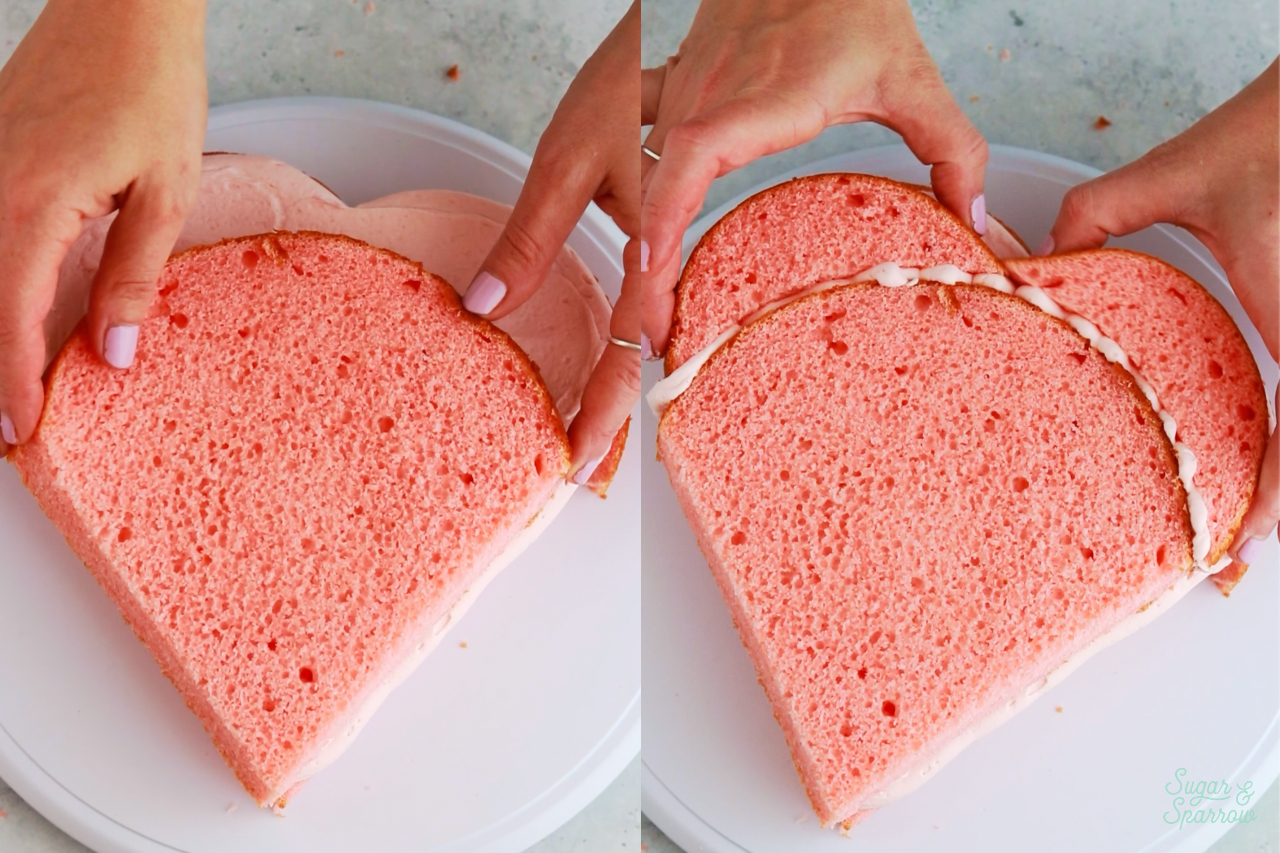
Step 2: Make the Heart Shape

Place the cardboard base you created in Step 1 onto the turntable. Spread a little buttercream onto it before adding the first cake layer on top. Position the two curved pieces that you cut off in Step 1 to be the top of the heart, then use some buttercream to adhere them.

heart cake tutorial by sugar and sparrow


Step 3: Fill and Crumb Coat

Add a layer of filling and then position the next layer of cake on top, adhering the curved pieces of the heart with buttercream like you did in the previous step. 

valentines day heart cake tutorial
heart cake assembly

Crumb coat the cake with a thin layer of buttercream to really emphasize the shape of the heart and lock in all the crumbs. Place the crumb coated cake into the refrigerator for at least 30 minutes to let the frosting firm up. 
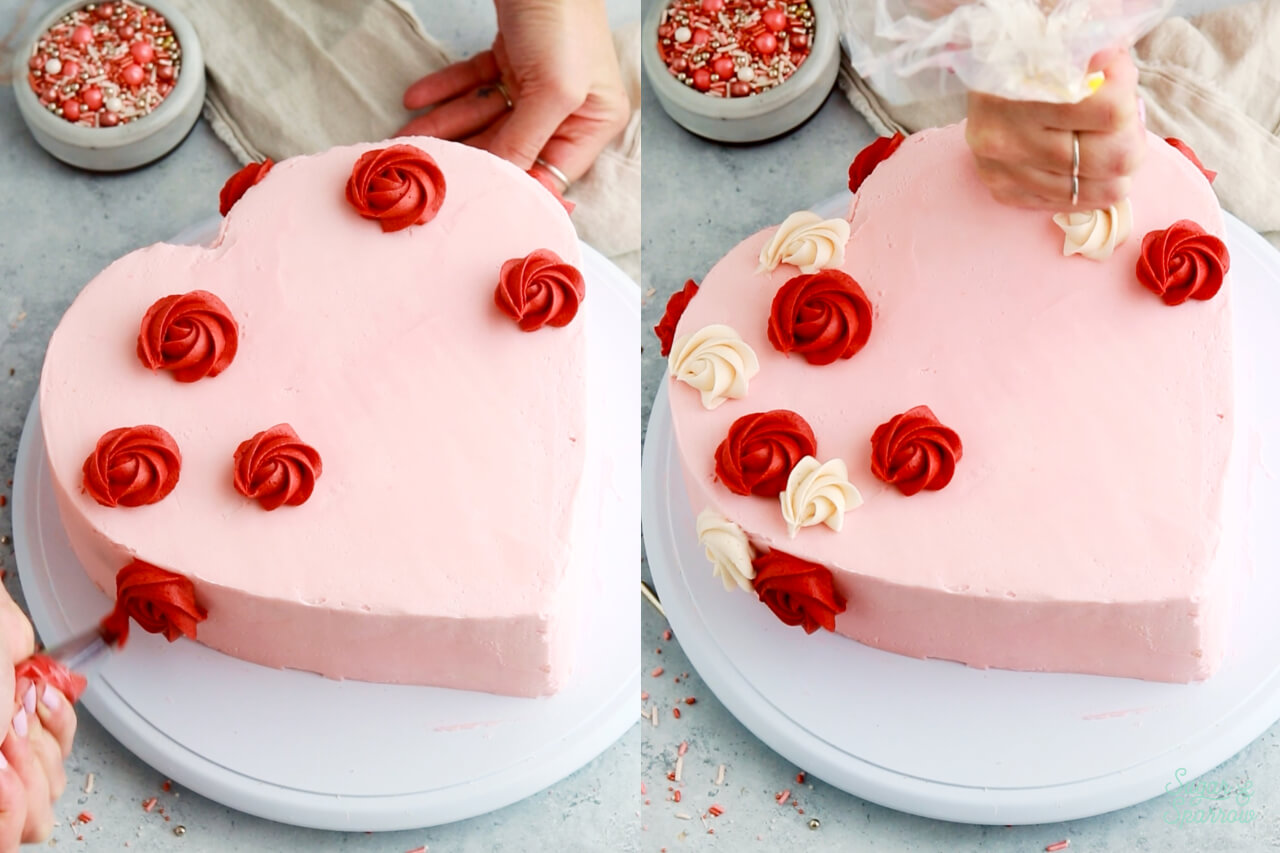
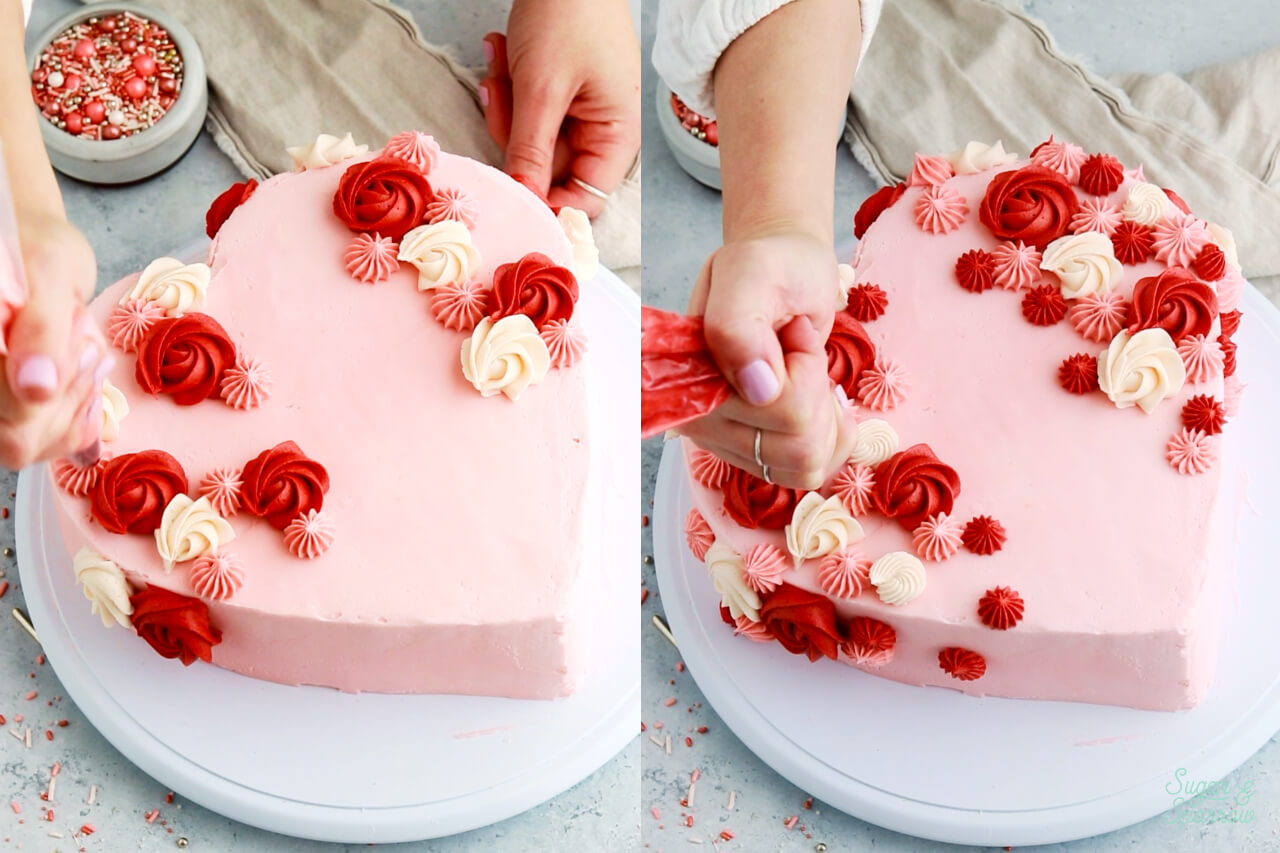
Step 3: Decorate 

There are so many ways to decorate this heart-shaped cake, so feel free to get creative! If you want to create the look pictured, start by frosting the cake with light pink buttercream (made with AmeriColor Soft Pink). Frosting a heart shape is similar to frosting a round cake (but maybe even easier!). Simply use an icing smoother to make the sides smooth and level

how to frost a heart shaped cake

Then use a small angled spatula to swipe frosting that accumulates around the top of the sides inward to create sharp edges. Refrigerate the frosted cake for at least 20 minutes while you prepare the rest of the buttercream. 

how to frost a heart cake

Divide the rest of the buttercream evenly between 3 bowls. Add a few drops of AmeriColor Chili Pepper and a few drops of Super Red to the first bowl and mix it until you get a nice deep shade of red. Mix in more coloring as needed. Scoop a few Tablespoons of the dark red buttercream into the second bowl and mix it in to create a mid-toned pink. Scoop about a teaspoon of the mid-toned buttercream into the last bowl and mix it in to create a pinkish cream. 

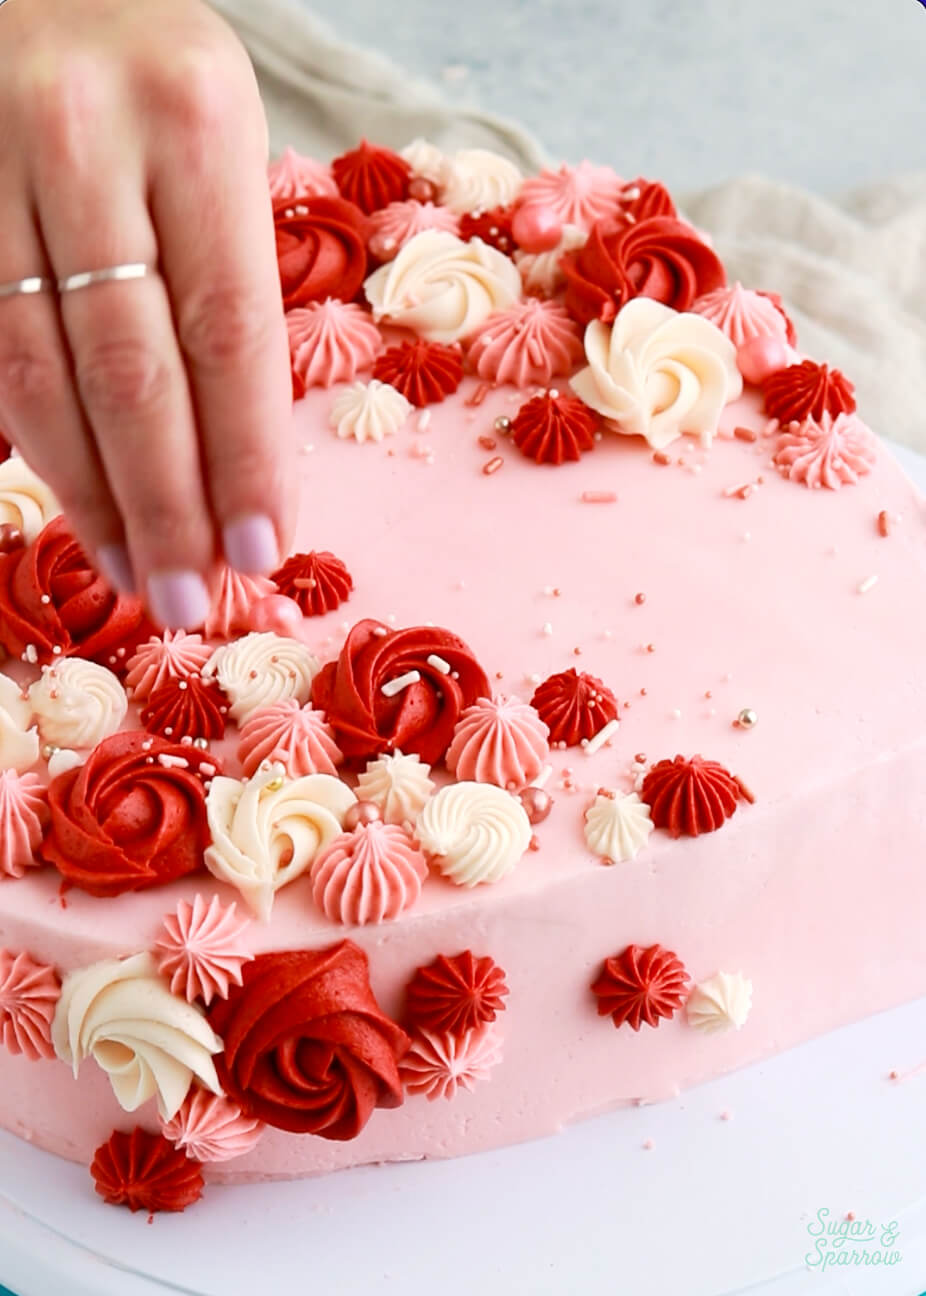
Use Wilton Tip 1M to pipe swirls onto the cake wherever you’d like. 

how to decorate a heart cake

Fill in some of the spaces in between by piping swirls with Wilton Tip 32 and stars with Tip 4B and 32. 

piped buttercream heart cake by sugar and sparrow

Finish the look with some pretty sprinkles. I used Sprinkle Pop Vintage Rose Gold sprinkles for this cake, which matched the buttercream color scheme perfectly. 

sprinkle pop vintage rose gold sprinkles

Isn’t this heart-shaped cake so perfect for Valentine’s Day? I am absolutely smitten with it!

pink heart cake by sugar and sparrow

I hope this tutorial saves you from buying a heart-shaped cake pan! Let me know in the comments and feel free to tag @sugarandsparrowco on Instagram to show me how you decorated it. I’d love to see what you create!

By: Whitney · In: Featured, Seasonal, Tutorials, Valentines · Tagged: heart cake, heart shaped cake, pink cake, sprinkle pop vintage rose gold sprinkles, v day cake, valentines day cake, wilton 1m, wilton 4b

you’ll also love

red velvet sheet cake recipe with natural food coloringRed Velvet Sheet Cake with Cream Cheese Frosting
chocolate strawberry cake recipe by sugar and sparrowChocolate Covered Strawberry Cake
flourless chocolate cake recipe by sugar and sparrowRich & Fudgy Flourless Chocolate Cake

Join the List

Stay up to date & receive the latest posts in your inbox.

Reader Interactions

Comments

  1. Sabs says

    February 28, 2025 at 1:28 am

    Could you please share the cake recipe you used for this one. Thank you!

    Reply
    • Whitney says

      February 28, 2025 at 8:34 am

      Hi there! I used my vanilla cake recipe and tinted it pink: https://sugarandsparrow.com/vanilla-cake-recipe/

      Reply
  2. Marisca says

    February 22, 2025 at 7:02 pm

    Such a clever way to make a heart shaped cake. !

    Reply
  3. April says

    February 13, 2024 at 1:00 pm

    Hello, you make a beautiful cake. Do you have any decorating ideas for beginners?

    Reply
    • Whitney says

      February 27, 2024 at 2:44 pm

      Thanks so much, April! For beginners, I recommend checking out my Cake Basics series here: https://sugarandsparrow.com/category/cakebasics/

      Reply
  4. Alice says

    January 7, 2024 at 8:16 am

    Great tutorial and my cake looked awesome. Thanks!

    Reply
    • Whitney says

      January 10, 2024 at 9:35 am

      Yay, Alice! I’m so happy to hear that!

      Reply
  5. Karen White says

    February 17, 2023 at 8:05 am

    This is such a clever hack and of course it’s a beautiful cake.

    Reply
    • Whitney says

      February 21, 2023 at 7:46 pm

      Thanks so much, Karen!

      Reply
  6. Jenny Fitzsimons says

    February 11, 2023 at 2:19 pm

    Wow, didn’t realise it was so easy to make a heart shaped cake. Thank you for the tutorial. I have been following your website here in New Zealand since you were having your first baby and love how easy you make it look with great pictures and videos and recipes. I have been trying to get a copy of your latest book but very difficult to get it posted to NZ. Lots of shipping company’s just cancel at checkout saying (shipping unavailable) But Will keep trying.

    Reply
    • Whitney says

      February 12, 2023 at 8:41 pm

      Thanks so much for your kind words, Jenny! I’m so happy you’ve found my tutorials and recipes helpful 🙂 I’m so sorry that it’s been difficult to pre-order my book in NZ! Have you tried Book Depository yet? They have free shipping to most countries, and I did see New Zealand on the list: https://www.bookdepository.com/Anyone-Can-Cake-Whitney-Depaoli/9781645676829?ref=grid-view&qid=1661195535143&sr=1-3

      Reply

Leave a Reply Cancel reply

Your email address will not be published. Required fields are marked *

Recipe Rating


Next Post >

Get a SIGNED Copy of My Book on TalkShopLive!

Primary Sidebar

Welcome to Sugar & Sparrow

Welcome to Sugar & Sparrow

Helping you whip up pretty desserts with confidence and creativity. And hopefully sharing a few laughs with you along the way!

Learn More

Connect

let’s bake!

Get my very best recipes, baking tips, and decorating tutorials sent to your inbox

Featured Posts

geode cupcake toppers by sugar and sparrow

Mini Geode Cupcake Toppers Tutorial

peppermint frosting recipe for cakes and cupcakes

Peppermint Buttercream

chocolate chip cookie dough cake recipe with edible cookie dough

Chocolate Chip Cookie Dough Cake

Search

Archives

Follow Along

@sugarandsparrowco

LEMON CUPCAKES 🍋 after about a dozen recipe tes LEMON CUPCAKES 🍋 after about a dozen recipe tests, this one is everything I could want in a lemon cupcake! Fluffy-yet-moist, bursting with natural lemon flavor, and absolutely irresistible topped with lemon cream cheese buttercream. 

Full recipe (with frosting) linked in my bio + at https://sugarandsparrow.com/homemade-lemon-cupcakes/

INGREDIENTS:
1 Cup (132g) all-purpose flour
1 tsp baking powder
1/4 tsp salt
1/4 Cup (60ml) whole milk, room temperature
3 Tbsp (45ml) lemon juice from 1 medium lemon
3/4 Cup (150g) granulated sugar
3 Tbsp (42g) unsalted butter, room temperature
2 Tbsp (30ml) vegetable oil
2 large eggs, room temperature
1 tsp pure vanilla extract

INSTRUCTIONS:
1. Preheat the oven to 350ºF (177ºF) and line a standard cupcake pan with 12 paper liners.
2. In a large bowl, whisk together the flour, baking powder, and salt. Set aside. 
3. In the bowl of a stand mixer fitted with the paddle attachment (or with a hand mixer and large bowl), add the lemon zest to the sugar and mix on low speed until fragrant and well combined, about 1 minute. Meanwhile, combine the lemon juice with the milk and set aside. 
4. Add the butter to the lemon-sugar mixture and cream on medium speed until and combined, about 2 minutes. Add the vegetable oil and beat until light and creamy, about 3 minutes. Scrape down the bowl and paddle as needed.
5. Mix in the eggs one at a time on low speed, then add the vanilla and turn the mixer to medium speed for one minute.
6. Turn the mixer off and add the flour mixture all at once. Mix on low speed until just combined, then slowly pour in the lemon-milk mixture. Mix until just combined, about 30 seconds.
7. Divide the batter equally between the liners and bake for 14-18 min. Cool, then top with frosting of your choice (link in bio for lemon cream cheese frosting)�
#lemoncupcakes #creamcheesefrosting #lemon #cupcakes #cupcakedecorating
April in my kitchen 🌸 I published 5 NEW recipes April in my kitchen 🌸 I published 5 NEW recipes on my site, baked my Oreo cupcake recipe for a fundraiser and found it was just as delicious as I remember, and filmed/photographed 3 recipes that will be on my blog in May (Lemon Cupcakes, Lemon Cream Cheese Buttercream, and No-Bake Marbled Strawberry Cheesecake) 🥰 

Comment “APRIL” to get all the available recipes and stay tuned for more! 

#bakersofinstagram #springbaking #cakedecorating #cupcakes #bakinglove
SHEET PAN COOKIE CAKE 🍪 slice it warm for a fud SHEET PAN COOKIE CAKE 🍪 slice it warm for a fudgy chocolate chip cookie OR let it settle into a moist and chewy cookie cake that’s perfect for decorating! My fave vanilla buttercream + sprinkles turn this giant chocolate chip cookie into the perfect birthday cake alternative at the end 🥳
⁣
Full recipe + decorating ideas at https://sugarandsparrow.com/sheet-pan-chocolate-chip-cookie-cake/
⁣
INGREDIENTS⁣
1 Cup (226g) unsalted butter, melted⁣
1 1/3 Cups (267g) packed light or dark brown sugar⁣
1/2 Cup (100g) granulated sugar⁣
3 large eggs⁣
1 Tbsp pure vanilla extract⁣
1 tsp baking soda⁣
1 tsp cornstarch⁣
1/2 tsp salt⁣
3 Cups (398g) all purpose flour⁣
2 Cups (350g) semi-sweet chocolate chips⁣
⁣
INSTRUCTIONS⁣
1. Preheat the oven to 350ºF (177ºC). Grease and line a 13×18 inch sheet pan.⁣
2. In a large bowl, add the brown sugar and granulated sugar. Melt the butter in the microwave and pour it over the top of the sugars. Whisk together until uniform. Add the eggs and vanilla, then continue whisking until uniform. Whisk in the baking soda, cornstarch, and salt.⁣
3. Add the flour and use a silicone spatula to fold it in until smooth cookie dough forms. Reserve 1/2 Cup of the chocolate chips and set them aside, then fold the remaining 1 1/2 Cups of chocolate chips into the cookie dough.⁣
4. Place the chocolate chip cookie dough onto the prepared sheet pan and use an offset spatula to spread it all the way to the edges in an even layer.⁣
5. Bake the cookie cake for 14-16 minutes, until it looks golden brown on the edges and set. 
6. Enjoy warm or let it cool and decorate with vanilla buttercream and sprinkles! ⁣
⁣
#cookiecake #chocolatechipcookies #sheetcake #birthdaycake #cakedecorating
STRAWBERRY CUPCAKES 🍓based on my beloved strawb STRAWBERRY CUPCAKES 🍓based on my beloved strawberry layer cake recipe, this cupcake version is just as moist yet fluffy and bursting with natural strawberry flavor! Between the mix of fresh strawberries in the cupcakes + freeze-dried strawberries in the frosting, the flavor is out of this world 🚀

Full recipe link in my bio (with strawberry buttercream) + at https://sugarandsparrow.com/strawberry-cupcakes/

STRAWBERRY CUPCAKES
Yield: 14 cupcakes

INGREDIENTS:
5 oz (143g) fresh or frozen strawberries
1/3 Cup (80ml) whole milk, room temp
1 1/2 Cups (158g) sifted cake flour
1 tsp baking powder
1/4 tsp baking soda
1/2 tsp salt
6 Tbsp (85g) unsalted butter, room temp
1 Cup (200g) granulated sugar
2 large eggs, room temp
3 Tbsp (45g) sour cream, room temp
1 tsp vanilla extract
1 drop pink food coloring (optional)

INSTRUCTIONS: 
1. Puree the strawberries using a food processor (you’ll have about 1/2 cup of puree), then place into a saucepan over medium-low heat. Bring to a simmer, then cook for 10-15 min, stirring occasionally, until you have 1/4 cup. Refrigerate until room temp.
2. Preheat oven to 350ºF (177ºC) and line a standard cupcake pan with liners.
3. Whisk together the sifted cake flour, baking powder, baking soda, and salt and set aside.
4. In a stand mixer w/ paddle attachment (or hand mixer + large bowl), whip the butter on high for 2 min. Add sugar and beat for 2 min, until light and fluffy. Turn the mixer to low and add the eggs one at a time, then add the vanilla and sour cream, turn the mixer to high and beat for 1 min. Meanwhile, whisk together the strawberry puree, whole milk, and food coloring (if using).
5. Turn the mixer off and add all of the dry ingredients at once. Mix on low until just combined, then add the strawberry milk mixture until just combined, about 30 seconds.
6. Fill the cupcake liners 2/3 full and bake for 14-18 minutes. Cool completely before topping with strawberry buttercream (full recipe linked above). 

#strawberrycupcakes #strawberrycake #pinkcupcakes #strawberry #cupcakes
COFFEE BUTTERCREAM (recipe below)☕️ this frost COFFEE BUTTERCREAM (recipe below)☕️ this frosting has AMAZING coffee flavor, is so easy to decorate cakes with, and pairs beautifully with so many flavors (chocolate, vanilla, or any cake flavor you’d want to turn into a latte). 

All my cake pairing suggestions are linked in my bio or at https://sugarandsparrow.com/coffee-buttercream-recipe/ 

COFFEE BUTTERCREAM⁣
Yield: 2.5 Cups⁣

INGREDIENTS⁣
1 1/2 tsp instant coffee or espresso powder⁣
1 1/2 Tbsp whole milk, room temperature⁣
1 Cup (226g) unsalted butter, room temperature⁣
3 1/2 Cups (420g) powdered sugar⁣
2 tsp pure vanilla extract⁣
Pinch of salt⁣

INSTRUCTIONS⁣
1. Combine the instant espresso/coffee with the whole milk and set aside. In the bowl of a stand mixer, beat the butter on high until creamy and smooth (about 5 minutes), scraping down the bowl and paddle a few times in between.⁣
2. Turn the mixer to low and add the powdered sugar a few cups at a time, scraping down the bowl and paddle between intervals. Add the vanilla, the coffee/espresso milk mixture, and salt. Mix on low until fully incorporated, about one minute.⁣

#coffeebuttercream #buttercream #frosting #coffeecake

Footer

On the Blog

  • Cake Basics
  • Recipes
  • Tutorials

Info

  • About
  • Privacy Policy & Disclosure

stay in the know

Copyright © 2026 · Theme by Sugar & Sparrow