Of all the years, 2020 has everyone ready to kick off the Holiday season earlier than ever. It almost feels like the last chance we have at a little magic and I am here for it. So much that as soon as I felt like I made it out of the newborn haze of maternity leave (and realized I could wear Bubs around the kitchen in my Solly Wrap), I got inspired to start testing all the Holiday cake recipes I’d been dying to try since last Christmas. First on the list: this tasty and festive Eggnog Cake!

Eggnog is a pretty crazy thing to drink when you think about it – basically cream, lots of sugar, spices, and raw eggs (and alcohol, if you’re into the spiked version). I can’t help but enjoy the heck out of it though, which is why this Eggnog Cake recipe is the first one on my list of must-writes for this Holiday season. As soon as I saw it at my local grocery store, I snatched up a carton and got right to work. It took me a few tries to nail down the right texture because Eggnog is so thick and already contains sugar and eggs, but I am so happy with the final results! There’s eggnog in the cake, buttercream, and even infused in the ganache, so you get a big hit of it with every bite.

Let’s talk about these cake layers. While it was easy to make them taste like eggnog by adding it in as the liquid, it was not easy to get the right texture. My first few tries ended up really dense, but by using cake flour, upping the baking powder, and adding in a little sour cream, this Eggnog Cake is nice and moist, ultra-flavorful, and has a soft crumb. Between the addition of eggnog, extra nutmeg, and cinnamon, the flavor is surprisingly spot-on in the cake layers alone. To make them super moist, the sour cream is a must. You can sub in some plain greek yogurt as a straight substitute for the sour cream, but just know that if you omit it, this cake will be a little on the dry side. Trust me on this one!


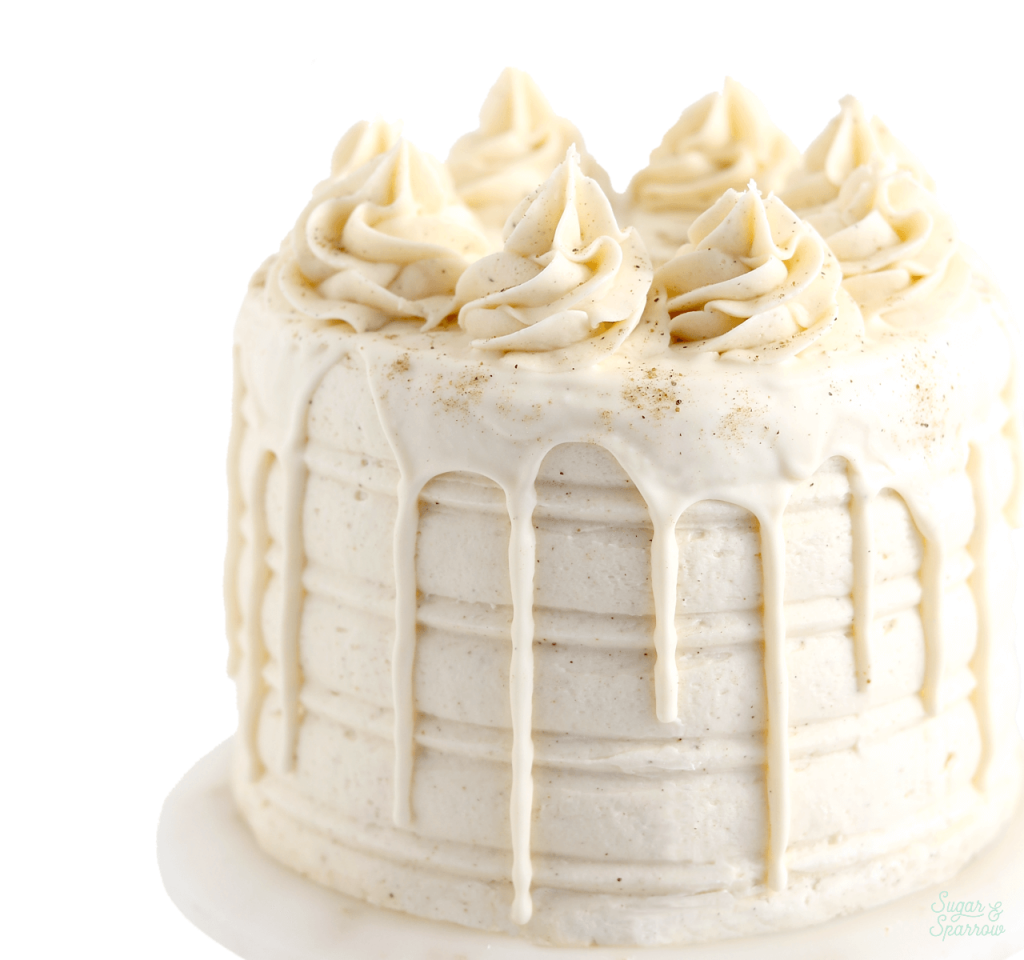
To really bump up the flavor, I filled and frosted these tasty cake layers with Eggnog Buttercream, which uses eggnog as the binding liquid and is spiced with additional nutmeg and cinnamon. I decided to give the buttercream finish a bit of texture by using a decorative comb from this Wilton Icing Comb Set and I love the way it turned out! Such an easy way to add intrigue without stressing over the cake decorating process. You basically frost your cake with a semi-thick layer of frosting and then drag the cake comb over the finish before it’s set. The comb does all the work for you!
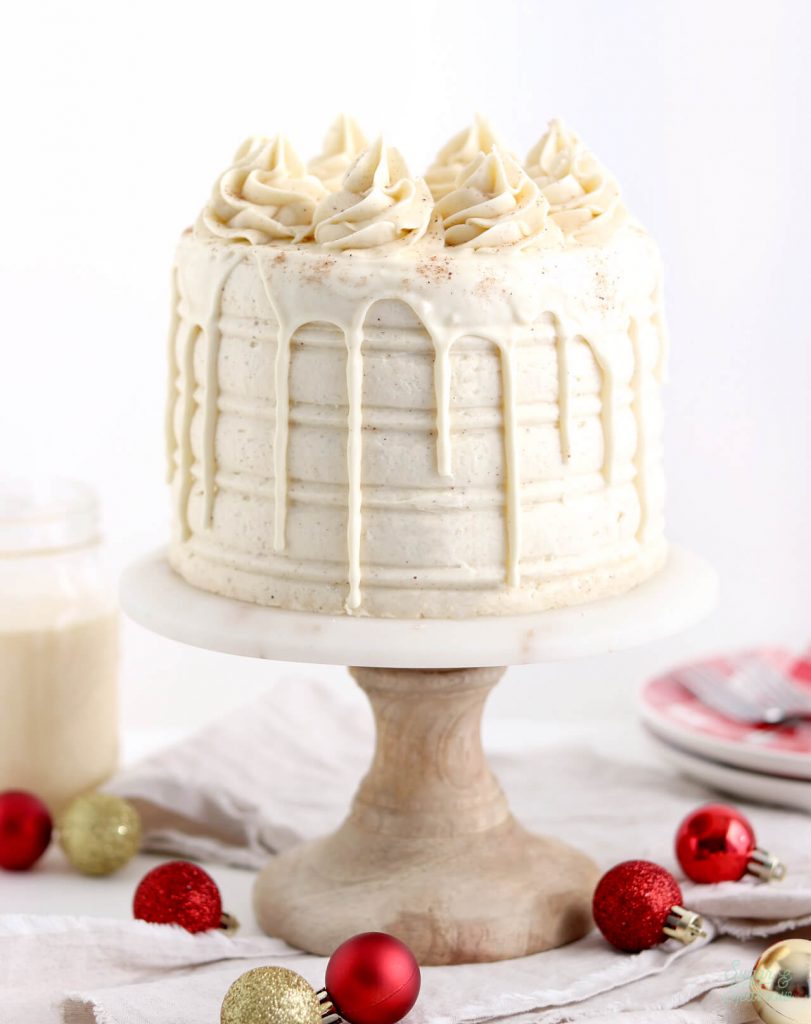
After creating that decorative buttercream finish, I dripped the cake with Eggnog White Chocolate Ganache – basically my white chocolate ganache recipe but with eggnog as the liquid! Getting the ratio right for this ganache took a couple tries but it ended up being the perfect consistency as a 4:1 ratio and it has the perfect hint of eggnog to keep with this flavor palette. Once the ganache drip was set (here are some instructions on how to drip a cake if you need them) I added some buttercream swirls around the top edge of the cake with Wilton Tip 1M and sprinkled some additional nutmeg over everything.
Keep in mind that if you want to create a boozier version of this Eggnog Cake, you totally can! I didn’t simply because I don’t drink, but after researching eggnog cake recipes it appears that you can spike your eggnog before using an equal amount as a substitute in this recipe. Whatever you decide, you’ll end up with a tasty Eggnog Cake that will make this Holiday season all the merrier. Enjoy!

Festive Eggnog Layer Cake
Ingredients
Eggnog Layer Cake
- 2 3/4 Cups (290g) cake flour, sifted before measuring
- 2 3/4 tsp baking powder
- 3/4 tsp ground nutmeg
- 1/2 tsp ground cinnamon
- 1 tsp salt
- 1 Cup (226g) unsalted butter, room temperature
- 1 3/4 Cups (360g) white granulated sugar
- 3 large eggs, room temperature
- 1 Tbsp pure vanilla extract
- 1/4 Cup (56g) sour cream, room temperature
- 1 1/2 Cups (355ml) eggnog, room temperature
Eggnog Buttercream
- 2 Cups (452g) unsalted butter, room temperature
- 7 Cups (840g) powdered sugar
- 1 tsp ground nutmeg
- 1/2 tsp ground cinnamon
- 4 tsp pure vanilla extract
- 1/3 Cup eggnog, room temperature
- 1/2 tsp salt, or to taste
Eggnog Ganache
- 1 Cup (180g) white chocolate chips, chopped into bits
- 1/4 Cup eggnog
- 1/2 tsp AmeriColor Bright White color gel, optional
Instructions
Make the Eggnog Layer Cake
- Preheat the oven to 350°F. Prepare three 6-inch or two 8-inch cake pans by spraying the sides with a cooking spray (Baker's Joy is my favorite) and a wax paper circle fitted to the bottom of the pan. Alternatively, you can grease and lightly flour the pans.
- Sift the cake flour and then measure by spooning and leveling it in your measuring cup. Add the cake flour, baking powder, ground nutmeg, ground cinnamon, and salt into a bowl and whisk to combine. Set aside.
- In the bowl of your stand mixer (a handheld mixer works fine too!), cream the butter for on high for two minutes until it's creamy. Add in sugar and continue to mix on high for another two minutes until light and fluffy, scraping down the bowl and paddle as needed. Turn the mixer to low and add the eggs one at a time. Add vanilla and sour cream and mix for one minute on high, scraping down the bowl and paddle once more.
- With the mixer on low speed, add in the dry ingredients and mix until just combined. Add the eggnog slowly and mix until just incorporated. Scrape down the sides and bottom of the bowl and give it a few stirs to make sure there are no lumps (without over-mixing). The batter will be slightly thick, but pourable.
- Pour batter evenly into prepared cake pans (no more than 2/3 of the way full) and bake for 35-40 minutes. They're done when they spring back to the touch and a toothpick inserted into the middle comes out clean. Let the cakes cool in the pan for five minutes before turning them out onto a wire rack for an additional few hours of cooling. Make sure they're entirely room temperature before applying any frosting.
Make the Eggnog Buttercream
- With a hand mixer or paddle attachment on your stand mixer, cream the butter on medium-high until it’s creamy and light (almost white) in color. About 7 minutes.
- In a large bowl, whisk together the powdered sugar, ground nutmeg, and ground cinnamon. With the mixer on low, add the spiced powdered sugar mixture a few cups at a time, scraping down after each addition and making sure each addition is fully incorporated before adding the next one.
- Add vanilla, eggnog, and salt and mix on low for another minute until fully incorporated.
Make the Eggnog Ganache
- Chop the white chocolate chips into smaller bits with a knife or food processor, then add them into a metal or glass bowl and set aside.
- In a saucepan over medium-high heat, warm the eggnog until it starts to simmer, stirring constantly to ensure it doesn't burn in the process. When you see that it’s just starting to boil, pour it over the white chocolate and let sit for about five seconds.
- Whisk it together until it’s uniform in consistency and there are no bits of chocolate left on your whisk. Whiten or color the ganache with the food color gel (optional), then cool ganache at room temperature for about 20-30 minutes, or until the ganache itself is about room temperature.
Assembly
- Once they've cooled completely, fill and frost the Eggnog Cake layers with the Eggnog Buttercream before dripping the cake with Eggnog Ganache. To create the look pictured, drag a cake comb over the sides of the buttercream right after frosting them (I used this one by Wilton), then refrigerate the cake for at least 30 minutes to chill the buttercream before dripping with Eggnog Ganache. Here are some tips for creating the perfect ganache drip cake. Finish the design by piping swirls of Eggnog Buttercream around the top edge of the cake with Wilton Tip 1M, then sprinkle with ground nutmeg.
Notes
- The Eggnog Cake layers can be made ahead and stored, wrapped in plastic wrap, at room temperature for up to two days. Alternatively, you can store the wrapped cake layers in the freezer for up to 2 months before thawing and frosting.
- The Eggnog Buttercream can be made ahead and stored in an airtight container in the refrigerator for up to two weeks. When you’re ready to use it, bring it back to room temperature and re-whip in your stand mixer to bring back to smooth buttercream consistency.
- The Eggnog Ganache can be made ahead and stored in an airtight container in the refrigerator for up to two weeks. When you’re ready to use it, gently reheat it in the microwave in 5-10 second intervals until it’s ideal drip consistency.
Did you make this recipe? I want to know what you think! Let me know in the comments below or tag me on Instagram. I love to see what you’re caking!

Hi Whitney! Greetings from Alberta, Canada. I got here via a link on Reddit. A baker with the username Cucumbers-pickling made this as an 8″ two layer cake. She tinted her white chocolate ganache turquoise, made to look like a pond, and then made 20 white fondant swans to place in it. It’s beautiful – especially as she said it was only the 4th cake she’d ever baked. This gives me hope!
She claimed she used 600g of icing sugar, yet it was equal in height to the cake layers when used as a filling. This confuses me.
Thoughts on this?
Having read this entire post, I noticed an “Oops!” in the instructions to make the ganache. You’ve said to pour the boiling eggnog over the white chocolate, and leave it sit for 5 seconds. I believe you really meant 5 minutes.
Keeping my fingers crossed that it’s not too much after the holiday season to buy eggnog, so that I, too, can bake this delectable looking cake!
Hi Terry! That sounds like such a fun cake design. I’m not sure what she meant by the filling being equal in height to the cake layers, that sounds like too much filling (I usually only use about 3/4 Cup of buttercream between cake layers). As far as the ganache, five seconds is correct. It’s a really small amount of eggnog, and I don’t let it sit for long before whisking because I don’t want it to cool too quickly and risk it not melting the chocolate. I do agree that five seconds seems like a silly amount of time, you’d probably be okay to just start whisking immediately. Hope this helps!
Thank you for all your delicious recipes and helpful advice on this website. I’m really excited to try this cake. How much should I scale up the recipe for three 8″ pans?
Hi Beth! Thanks for the kind words about my website 🙂 1.5x this recipe will be the perfect amount for three 8-inch cake cake layers (multiply each ingredient by 1.5). Enjoy!
Hi!!! how did you make the ridges on the cake?under the ganache
Hi Rivka! I used the decorative icing comb from this Wilton set: https://amzn.to/358JZk8
For the buttercream the recipe says you need 2 cups or 226 grams. 226 grams of butter is 1 cup so I just want to verify if I need 1 cup or 2.
Thanks!
Hi Jeannette! Great catch. It is supposed to be 452g of butter (2 cups)!
I am planning to make this cake for my family for christmas but my plan is to do it a day earlier and I don’t know if it has to be refrigerated or if it can be left out on the counter thank you Lucya
Hi Lucya! I’m excited for you to make this cake! I always like to refrigerate my cakes until an hour or two before serving them, just to keep all the decorations set. You can leave it out at room temperature overnight if you’d rather do that though. It will keep just fine!
Hi there, you go from 3-6″ pans to 2-9″ pans. Will I just get taller layers if I use 2-8″ pans? That’s all I have.
Hi Lindsay! Yes, that’s correct. You’ll want to fill the pans no more than 2/3 full so they don’t overflow, but 8 inch pans will make for taller layers. Enjoy!
Can I use a bundt pan ?
I’ve never tried it in a bundt pan before but that sounds so fun! I’m sure it would work, just not sure what the bake time would be. Feel free to give it a shot and report back if you try it!
What if I don’t have sour cream? What can I use instead?
Hi Shelby! The sour cream is an important part of the recipe because it’s what makes the cake extra moist, but if you have to substitute it the best alternative is plain greek yogurt. Hope that helps!
Hello Whitney, is it okay to color this buttercream and ganache to make it more festive?
Of course, Kwaevyonn! You can feel totally free to get creative with the colors and overall design of this cake 🙂
Wax paper on the bottom of the pan? Or parchment?
Hi Sam! You can use either. I like to use wax paper (mine says you can use it to line cake pans on the box) but you can also use parchment.
Very nice job on this one. So light and fluffy! Made it for my husband who loves eggnog, even though he was skeptical of the idea, and he really enjoyed it. Personally, I’m not much of an eggnog fan, and even I thought they were delightful. I accidentally doubled the amount of cinnamon in the cake, but that was maybe for the best since the nutmeg is what most turns me off about eggnog! Thank you for sharing 🙂
Yay, Aimee! So happy that this eggnog cake was a hit with you and your husband! Thanks for taking the time to let me know how it turned out 🙂
I also made the recipe as cupcakes and included a few in my Christmas goodie boxes for friends and neighbors, and everyone I’ve heard from has said how delicious they were!
Yay, Aimee! I’m so happy to hear that this recipe was a hit and what a fun idea to spread Christmas cheer to your friends and neighbors!
Appreciate the information Whitney, much appreciated! Will try that next time, everyone in my work loved this cake!! It was a home run !
Hi Whitney just wanted to say I made your Festive Eggnog cake and it came out delicious, The mistake I made was I went to close to the edge of the top of the cake when I did the piping, some of the piping slide right off but I was able to fix it, and my ganache came out a little too think, any suggestions on that? Thank you Gina
Hi Gina! So happy you love this recipe and glad you were able to fix the piping! It helps to chill the ganache for a few minutes before piping on top so it’s not so slippery. And for fixing thick ganache next time, either heat the ganache up a little more to thin it out (but make sure it’s not so hot that it will ruin the buttercream finish) or add about a tbsp of extra eggnog into the recipe. Hope that helps!