• Cake
  • Frosting
  • YouTube
  • My Favorite Tools
  • Nav Social Icons

  • Skip to primary navigation
  • Skip to main content
  • Skip to primary sidebar
  • Skip to footer
  • Recipes
    • Cake
    • Cupcakes
    • Frosting
    • Ice Cream
    • Vegan
  • Cake Basics
  • Tutorials
  • Blog
  • About
  • Mobile Menu Widgets

    Connect

    Search

Sugar & Sparrow logo in script font

Sugar & Sparrow

Lifestyle and Cake from Portland Oregon

  • Cake Basics
  • Recipes
    • Cake
    • Cupcakes
    • Cookies & Bars
    • Filling
    • Frosting
    • Ice Cream
    • No-Bake
    • Small Batch
    • Vegan
  • Tutorials
  • Book
  • Blog
  • About

Funfetti Buttercream Recipe

June 8, 2022 · In: Featured, Frosting, Recipes

Jump to Recipe

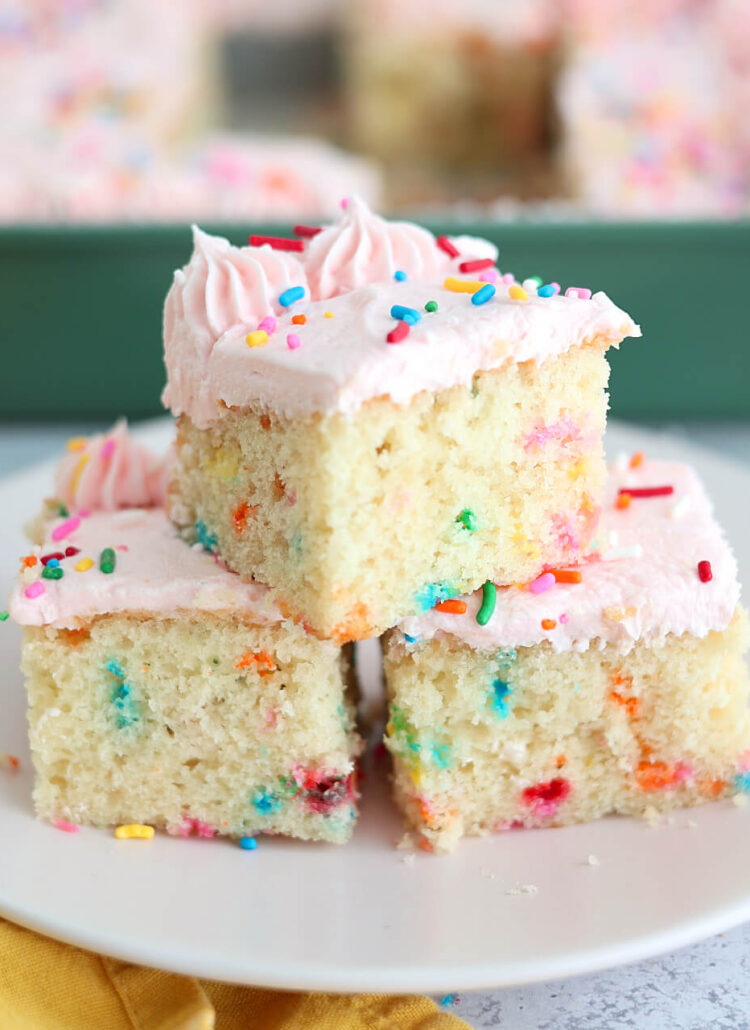
It’s my birthday week! And naturally, I decided to use it as an excuse to make my own birthday cake. Don’t worry, there are plenty of other desserts in store for this week (including my favorite Pip’s Doughnuts), plus a trip to the roller skating rink because it sounds like the most fun way to celebrate my birthday ever. For my birthday cake though, I made my Funfetti Cake recipe and topped it with this sprinkle-filled Funfetti Buttercream to make it extra festive! My heart is so happy. 

funfetti cake with funfetti buttercream recipe
how to frost a cake with funfetti buttercream

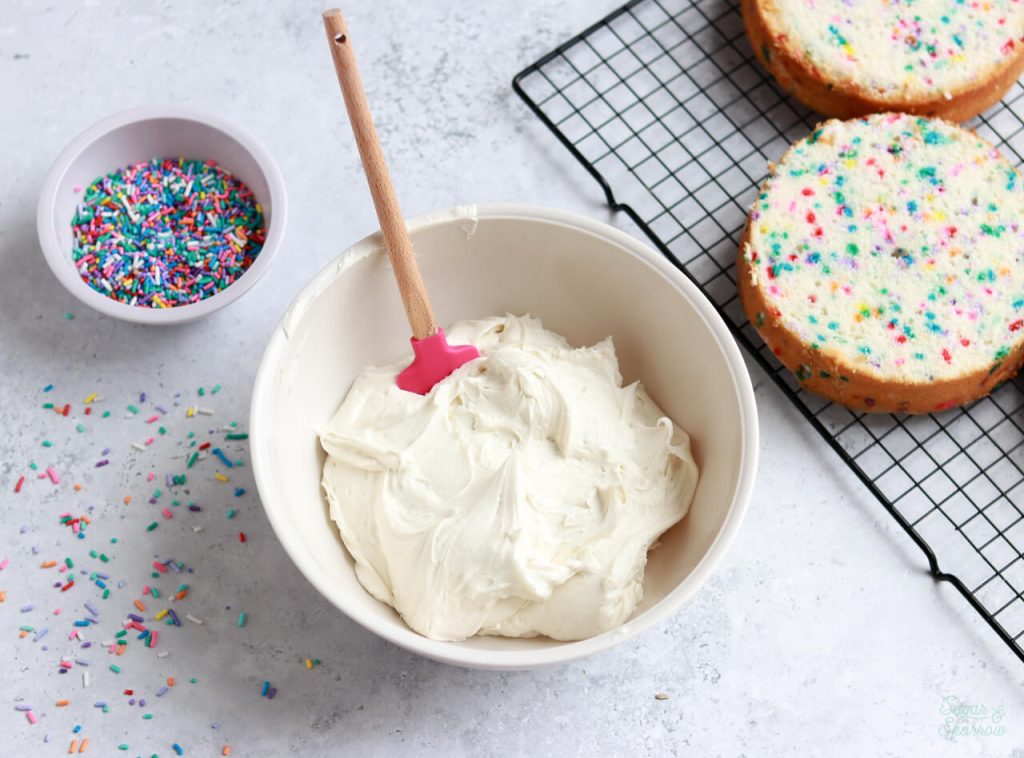
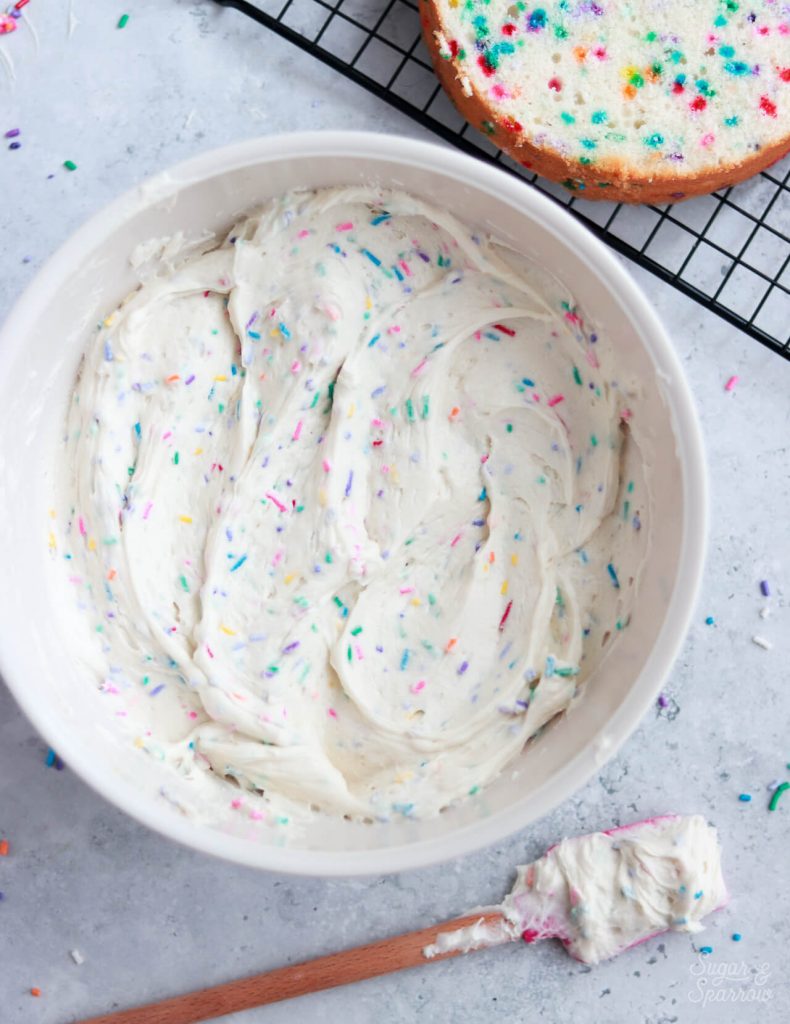
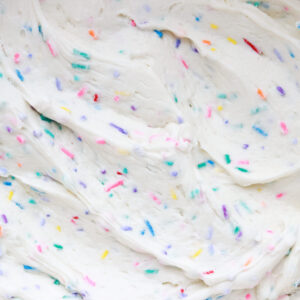
This Funfetti Buttercream uses my favorite Vanilla Buttercream recipe as a base and the added sprinkles make it so cute and fun! I will be honest, it can be a challenge to frost a smooth buttercream cake with it since the sprinkles will drag as you smooth. Luckily though, I’ve got a few tips to make it much less frustrating and help you get that perfectly smooth (and sprinkley!) buttercream finish. Be sure to look at the tutorial below the recipe for everything you need to know. 

how to make funfetti buttercream
funfetti frosting recipe

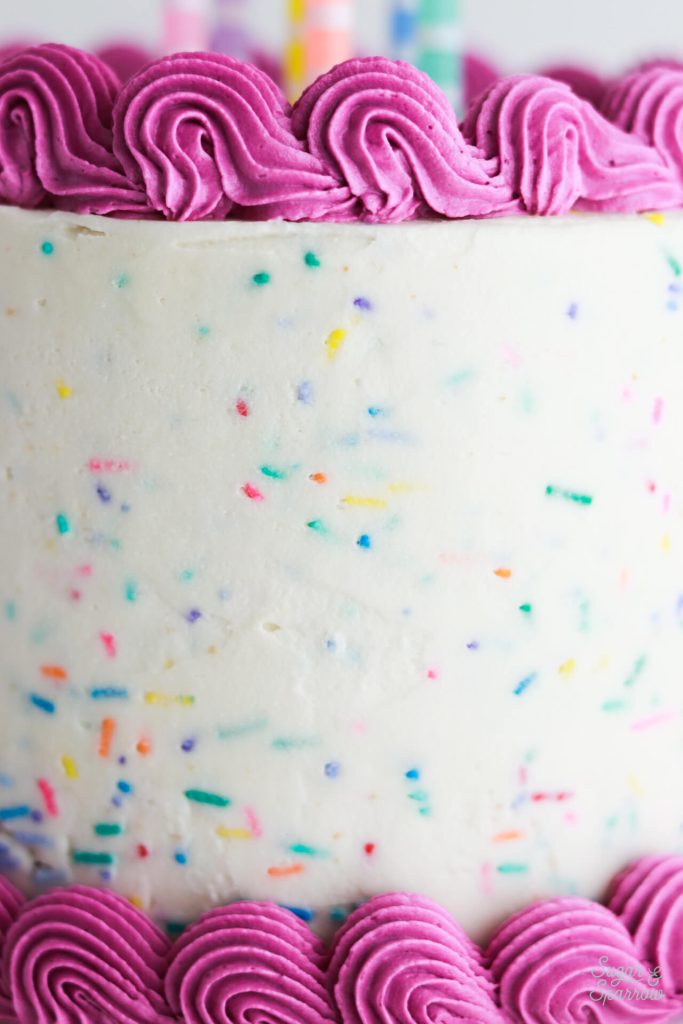
To top this sprinkle saturated cake, I went with a fuchsia colored shell border which I piped using Wilton Tip 4B. I’m starting to really love a shell border moment (here’s a post that will show you how to do it if you’re into it too). I also topped it with the cutest candles ever from Meri Meri because I just could not help myself. 

Here’s a quick video I whipped up to show you how to make this Funfetti Buttercream and frost a cake with it: 

PS: If you’re into cake decorating videos like this one, be sure to check out my YouTube Channel! Click the Subscribe button while you’re there so you never miss a new video. 

What Type of Sprinkles are Best for Funfetti 

There are few things more stressful than realizing your rainbow sprinkles are bleeding into your cake batter and buttercream. This is why it’s so important to choose the right sprinkles for the job. The best kind of rainbow sprinkles to use will be rod-shaped ones that don’t bleed color. Look for confectioner’s glaze in the ingredients list – this seems to be the secret ingredient that coats the rainbow sprinkles enough to where they shouldn’t bleed color. 

sprinkles that don't bleed color

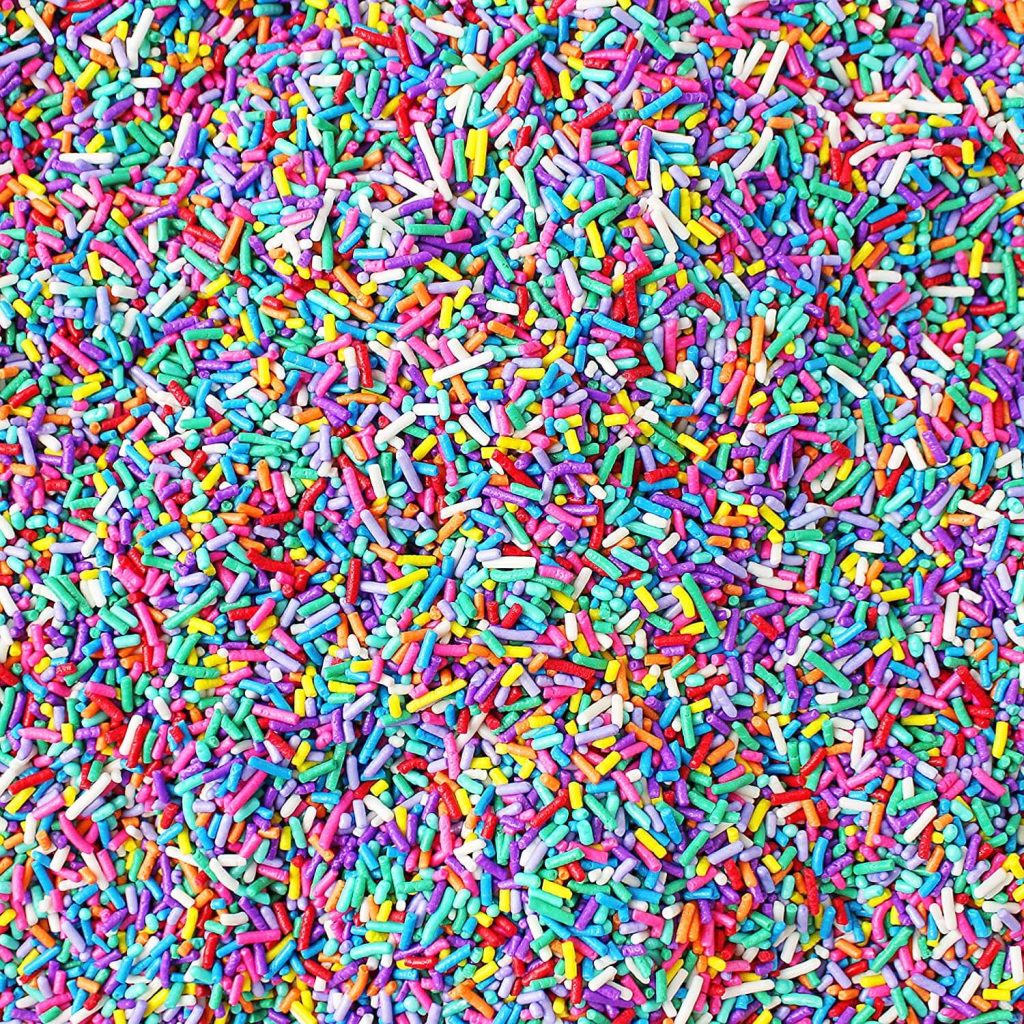
The sprinkles I love to use for funfetti are the Ultimate Rainbow Jimmies by Sprinkle Pop. They never bleed their color, even when suspended in cake batter, plus I love the cool-toned rainbow hues in the mix. I always stock up so that I can have these on hand for baking and cake decorating.

funfetti buttercream recipe by sugar and sparrow

Funfetti Buttercream

5 from 1 vote
The tastiest vanilla buttercream with sprinkles suspended throughout. Perfect for topping cupcakes, layer cakes, or any celebratory bake!
Print Recipe Pin Recipe
Prep Time:15 minutes mins
Servings: 2.5 Cups

Ingredients

  • 1 Cup (226g) unsalted butter, room temperature
  • 3 1/2 Cups (420g) powdered sugar
  • 2 tsp pure vanilla extract
  • 2 Tbsp whole milk, room temperature
  • 1/4 tsp salt, or to taste
  • 1/4 Cup (50g) rainbow sprinkles* see note

Instructions

  • With a hand mixer or stand mixer fitted with the paddle attachment, cream the butter on high until creamy and light (almost white) in color, about 7 minutes.
  • Turn the mixer to low speed and add the powdered sugar one cup at a time, scraping down the bowl and paddle after each addition and making sure each cup is fully incorporated before adding the next one.
  • Add the vanilla, milk, and salt and mix on low for another minute until fully incorporated and smooth. Fold in the rainbow sprinkles with a rubber spatula.

Notes

*The best kind of rainbow sprinkles to use will be rod-shaped ones that don’t bleed color. Look for confectioner’s glaze in the ingredients list – this seems to be the common denominator for sprinkles that hold their color in the baking process. I used Sprinkle Pop Ultimate Rainbow Jimmies.  
Yield: This buttercream makes enough to:
  • Frost 12-15 cupcakes with a piping bag
  • Fill and crumb coat a three-layer 6-inch cake or two-layer 8-inch cake. To have enough for frosting and decorating as well, double the recipe. 
Piping: If you’re using this buttercream to pipe onto cakes or cupcakes, be sure to use a piping tip with a wide enough opening for the sprinkles. If the sprinkles get lodged in the tip, simply poke a toothpick through the tip opening to dislodge the sprinkles that are stuck before continuing on. 
Make Ahead Tips: For best results, reserve adding the sprinkles right before you’re ready to use the buttercream. This buttercream (sans sprinkles) can be made ahead and stored in an airtight container in the refrigerator for up to two weeks. When you’re ready to use it, bring it back to room temperature and re-whip in your stand mixer to bring back to smooth buttercream consistency, then fold in the sprinkles. 

Tips for Frosting a Smooth Finish with Funfetti Buttercream 

With sprinkles suspended in this buttercream, it can be challenging (but certainly not impossible!) to get a super smooth finish. This is because the sprinkles tend to drag along with your smoother and create trenches in the buttercream. Even so, hopefully these tips help you easily frost your cake, sprinkles and all, into a smooth finish. 

Tip 1: Keep the icing smoother at a tight angle. The tighter you can hold the icing smoother, the easier it will be for the smoother to glide over the sprinkles instead of dragging them through the buttercream. It helps to hold the smoother at about a 5 to 10 degree angle. Even still, some sprinkles will definitely drag and create trenches, but not nearly as many as if you were to hold the smoother at a wider angle.

Tip 2: Fill In Trenches. When you do notice some trenches in your buttercream from the sprinkles dragging, don’t stress too much. Simply fill them in with more buttercream and keep smoothing at a tight angle instead of trying to smooth over them without adding any extra buttercream.

Tip 3: Add a Patchwork Layer. If you’re having a really hard time with those trenches, this tip should solve everything. Pop the frosted cake, imperfections and all, into the refrigerator to let the buttercream firm up for 20-30 minutes. Once it’s cold, you can fill in those trenches with buttercream and easily smooth them. You won’t even be able to see where the imperfections once were!

how to frost a cake with sprinkles

Did you make this Funfetti Buttercream? I want to know how it went! Leave a comment below and feel free to tag @sugarandsparrowco on Instagram to show me your creation. I love to see what you do with my recipes and tutorials!

By: Whitney · In: Featured, Frosting, Recipes · Tagged: funfetti, funfetti buttercream, funfetti frosting, sprinkle buttercream, sprinkle frosting

you’ll also love

funfetti sheet cake slices with pink frostingThe Best Funfetti Sheet Cake
small batch cake recipeSmall Batch Funfetti Cake
funfetti birthday cake recipeDouble Funfetti Birthday Cake

Join the List

Stay up to date & receive the latest posts in your inbox.

Reader Interactions

Comments

  1. LORI says

    November 8, 2024 at 11:58 am

    Can you leave the frosted cupcakes out on the counter or do they need to be refrigerated?
    Thanks, I love this frosting.

    Reply
    • Whitney says

      November 8, 2024 at 12:28 pm

      Hi Lori! You can leave the frosted cupcakes out on the counter for 3-5 days. They don’t need to be refrigerated. Enjoy!

      Reply
  2. Edith B. says

    June 15, 2022 at 3:18 am

    5 stars
    Another game-changing recipe from Sugar & Sparrow.

    I was honestly skeptical at first—I’ve always struggled to make a funfetti cake that didn’t either taste synthetic or bleed into bad tye-dye. That “confectioner glaze” tip was the ticket.

    Already getting requests to make this recipe again.

    Thank you and very happy birthday!

    Reply
    • Whitney says

      June 15, 2022 at 4:44 pm

      Yay, Edith! I’m so happy you loved this recipe and that the tip about the sprinkles was a game changer! Thank you for the birthday wishes 🙂

      Reply

Leave a Reply Cancel reply

Your email address will not be published. Required fields are marked *

Recipe Rating


Next Post >

Rainbow Arch Cake Topper Tutorial

Primary Sidebar

Welcome to Sugar & Sparrow

Welcome to Sugar & Sparrow

Helping you whip up pretty desserts with confidence and creativity. And hopefully sharing a few laughs with you along the way!

Learn More

Connect

let’s bake!

Get my very best recipes, baking tips, and decorating tutorials sent to your inbox

Featured Posts

semi naked cake tutorial

How To Frost A Flawless Semi-Naked Cake

pips chai cake

Pip’s “Heart of Gold” Coconut Chai Cake Recipe

Sugar and Sparrow best cake recipes of 2023

Best of 2023

Search

Archives

Follow Along

@sugarandsparrowco

COFFEE BUTTERCREAM (recipe below)☕️ this frost COFFEE BUTTERCREAM (recipe below)☕️ this frosting has AMAZING coffee flavor, is so easy to decorate cakes with, and pairs beautifully with so many flavors (chocolate, vanilla, or any cake flavor you’d want to turn into a latte). 

All my cake pairing suggestions are linked in my bio or at https://sugarandsparrow.com/coffee-buttercream-recipe/ 

COFFEE BUTTERCREAM⁣
Yield: 2.5 Cups⁣

INGREDIENTS⁣
1 1/2 tsp instant coffee or espresso powder⁣
1 1/2 Tbsp whole milk, room temperature⁣
1 Cup (226g) unsalted butter, room temperature⁣
3 1/2 Cups (420g) powdered sugar⁣
2 tsp pure vanilla extract⁣
Pinch of salt⁣

INSTRUCTIONS⁣
1. Combine the instant espresso/coffee with the whole milk and set aside. In the bowl of a stand mixer, beat the butter on high until creamy and smooth (about 5 minutes), scraping down the bowl and paddle a few times in between.⁣
2. Turn the mixer to low and add the powdered sugar a few cups at a time, scraping down the bowl and paddle between intervals. Add the vanilla, the coffee/espresso milk mixture, and salt. Mix on low until fully incorporated, about one minute.⁣

#coffeebuttercream #buttercream #frosting #coffeecake
HUMMINGBIRD CAKE 🤎 after weeks of testing this HUMMINGBIRD CAKE 🤎 after weeks of testing this recipe I found that the KEY to taking this already delicious cake to the next level is: roasting the bananas!! It’s an optional step in this recipe BUT it adds unparalleled caramel notes and noticeable richness to the flavor 🙌🏼 Along with the crushed pineapple, toasted pecans, and tangy cream cheese buttercream, this cake is NEXT LEVEL delicious, ultra-moist, melts in your mouth, and will have everyone asking for the recipe. 

Full recipe (with cream cheese frosting) linked in my bio + at https://sugarandsparrow.com/hummingbird-cake-recipe/ 

#hummingbirdcake #creamcheesefrosting #bananacake #cakedecorating #cakerecipe
OREO CUPCAKES 🖤 (recipe below) I made these for OREO CUPCAKES 🖤 (recipe below) I made these for a fundraiser at @vancity.youth last weekend and was reminded of how delicious this recipe is! There’s black cocoa powder in the cupcake batter to give them the PERFECT Oreo cookie flavor profile + the most delicious cookies and cream buttercream I’d eat all on its own. 
 
Full recipe at https://sugarandsparrow.com/oreo-cupcakes-recipe/ 
 
OREO CUPCAKES 
1 Cup (132g) all purpose flour 
3/4 Cup (150g) granulated sugar 
1/3 Cup (38g) black cocoa powder 
1 tsp baking soda 
1/2 tsp baking powder 
1/4 tsp salt 
1/4 Cup (60ml) vegetable oil 
1 large egg, room temp 
1/2 tsp pure vanilla extract 
1/2 Cup (120ml) buttermilk, room temp 
1/2 Cup (120ml) hot coffee or hot water 
 
1. Preheat the oven to 350ºF/177ºC and line a cupcake pan with 12-15 liners. 
2. In a large bowl, whisk all of the dry ingredients together. Add the vegetable oil, eggs, vanilla, and buttermilk and whisk to combine. Whisk in the hot coffee (or hot water). 
3. Pour the batter into the prepared cupcake liners and bake for 14-18 minutes. 
 
OREO BUTTERCREAM 
1 Cup (226g) unsalted butter, room temperature 
3 Cups (360g) powdered sugar 
2 tsp pure vanilla extract 
2 Tbsp whole milk, room temperature 
pinch of salt, or to taste 
9 Oreo cookies (96g), finely ground 
 
1. Using a hand mixer or stand mixer, cream the butter on medium-high speed until it’s creamy and pale, 5 min. 
2. Add the powdered sugar a few cups at a time, mixing on low speed and scraping down bowl and paddle in between intervals. Keep the mixer on low and add the vanilla, milk, and salt. Mix until fully incorporated and uniform, 1-2 min. 
4. Mix in the Oreo cookie crumbs on low speed. 
 
#oreo #oreocupcakes #cookiesandcream #chocolatecupcakes #cupcakes
RASPBERRY CAKE FILLING (recipe below) ♥️ this RASPBERRY CAKE FILLING (recipe below) ♥️ this perfectly sweet/tart raspberry cake filling is beautifully thick, seedless, and so rewarding to make from scratch! It takes just a handful of ingredients and can be made with fresh OR frozen raspberries 🙌🏼 

Get the full recipe + cake pairing suggestions at the link in my bio or at https://sugarandsparrow.com/seedless-raspberry-cake-filling/

INGREDIENTS:
2 1/2 Cups (10oz, 315g) fresh or frozen raspberries
1/2 Cup (100g) granulated sugar
1 Tbsp lemon juice
1 tsp lemon zest
1 1/2 Tbsp (12g) cornstarch
1 1/2 Tbsp (22ml) water

INSTRUCTIONS: 
1. In a saucepan set over medium heat, add the raspberries, granulated sugar, lemon juice, and lemon zest. Cook until the mixture begins to boil, stirring occasionally. 
2. Once boiling, lower the heat and simmer for 10-15 minutes while you continue stirring occasionally. Then, remove from heat and use a fine mesh sieve to strain out the seeds over a medium bowl. After straining, you’ll be left with about 1/4 Cup of seedy pulp.
3. In a small separate bowl, combine the cornstarch and water until uniform. Return the strained raspberry filling to the saucepan (wipe it free of any remaining seeds if needed) and add the cornstarch/water mixture. Cook over medium heat until boiling, stirring constantly, then reduce to a simmer and cook for 1-3 minutes, until the filling has thickened slightly, is no longer cloudy, and coats the back of the spatula.
4. Pour into an airtight container and refrigerate for at least 4 hours and up to 1 week. It will be jello-like once set but after stirring it will become a thick, jammy consistency that’s perfect to use as a cake or cupcake filling!

#raspberrycake #cakefilling #cakedecorating #raspberries #baking
STRAWBERRY LEMON CAKE 🍓🍋 this cake is so lig STRAWBERRY LEMON CAKE 🍓🍋 this cake is so light and refreshing and bursting with all-natural flavors! It’s layers of my favorite extra fluffy lemon cake + the most delicious freeze-dried strawberry buttercream that ends up the prettiest natural pink color. I’ll never get over those little flecks of strawberry in the buttercream or the tiny chamomile flowers adding so much cheer! 

Grab the recipe at the link in my bio or at https://sugarandsparrow.com/strawberry-lemon-cake/

#strawberrylemon #lemoncake #strawberrycake #cakedecorating #strawberrybuttercream

Footer

On the Blog

  • Cake Basics
  • Recipes
  • Tutorials

Info

  • About
  • Privacy Policy & Disclosure

stay in the know

Copyright © 2026 · Theme by Sugar & Sparrow