• Cake
  • Frosting
  • YouTube
  • My Favorite Tools
  • Nav Social Icons

  • Skip to primary navigation
  • Skip to main content
  • Skip to primary sidebar
  • Skip to footer
  • Recipes
    • Cake
    • Cupcakes
    • Frosting
    • Ice Cream
    • Vegan
  • Cake Basics
  • Tutorials
  • Blog
  • About
  • Mobile Menu Widgets

    Connect

    Search

Sugar & Sparrow logo in script font

Sugar & Sparrow

Lifestyle and Cake from Portland Oregon

  • Cake Basics
  • Recipes
    • Cake
    • Cupcakes
    • Cookies & Bars
    • Filling
    • Frosting
    • Ice Cream
    • No-Bake
    • Small Batch
    • Vegan
  • Tutorials
  • Book
  • Blog
  • About

Galaxy Cake Tutorial

September 11, 2019 · In: Tutorials

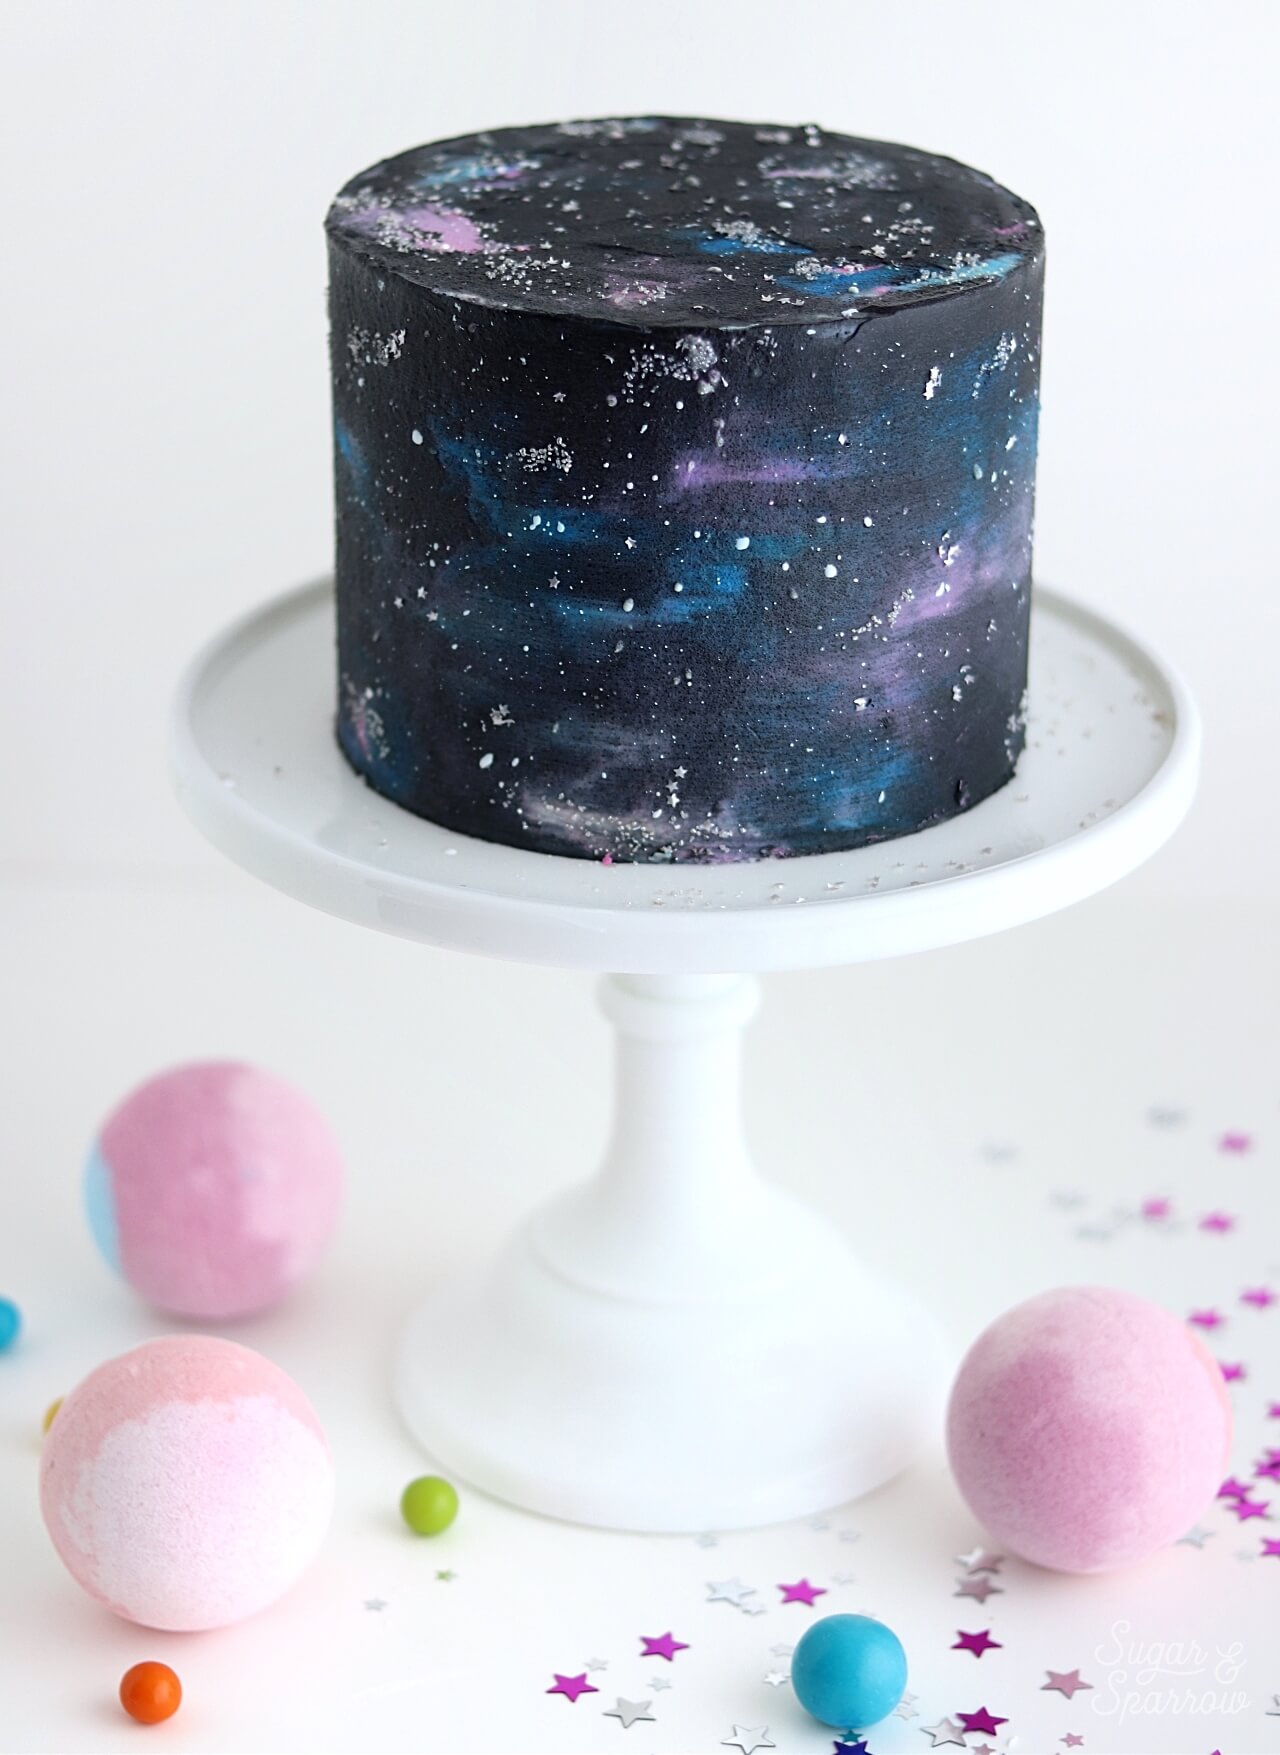
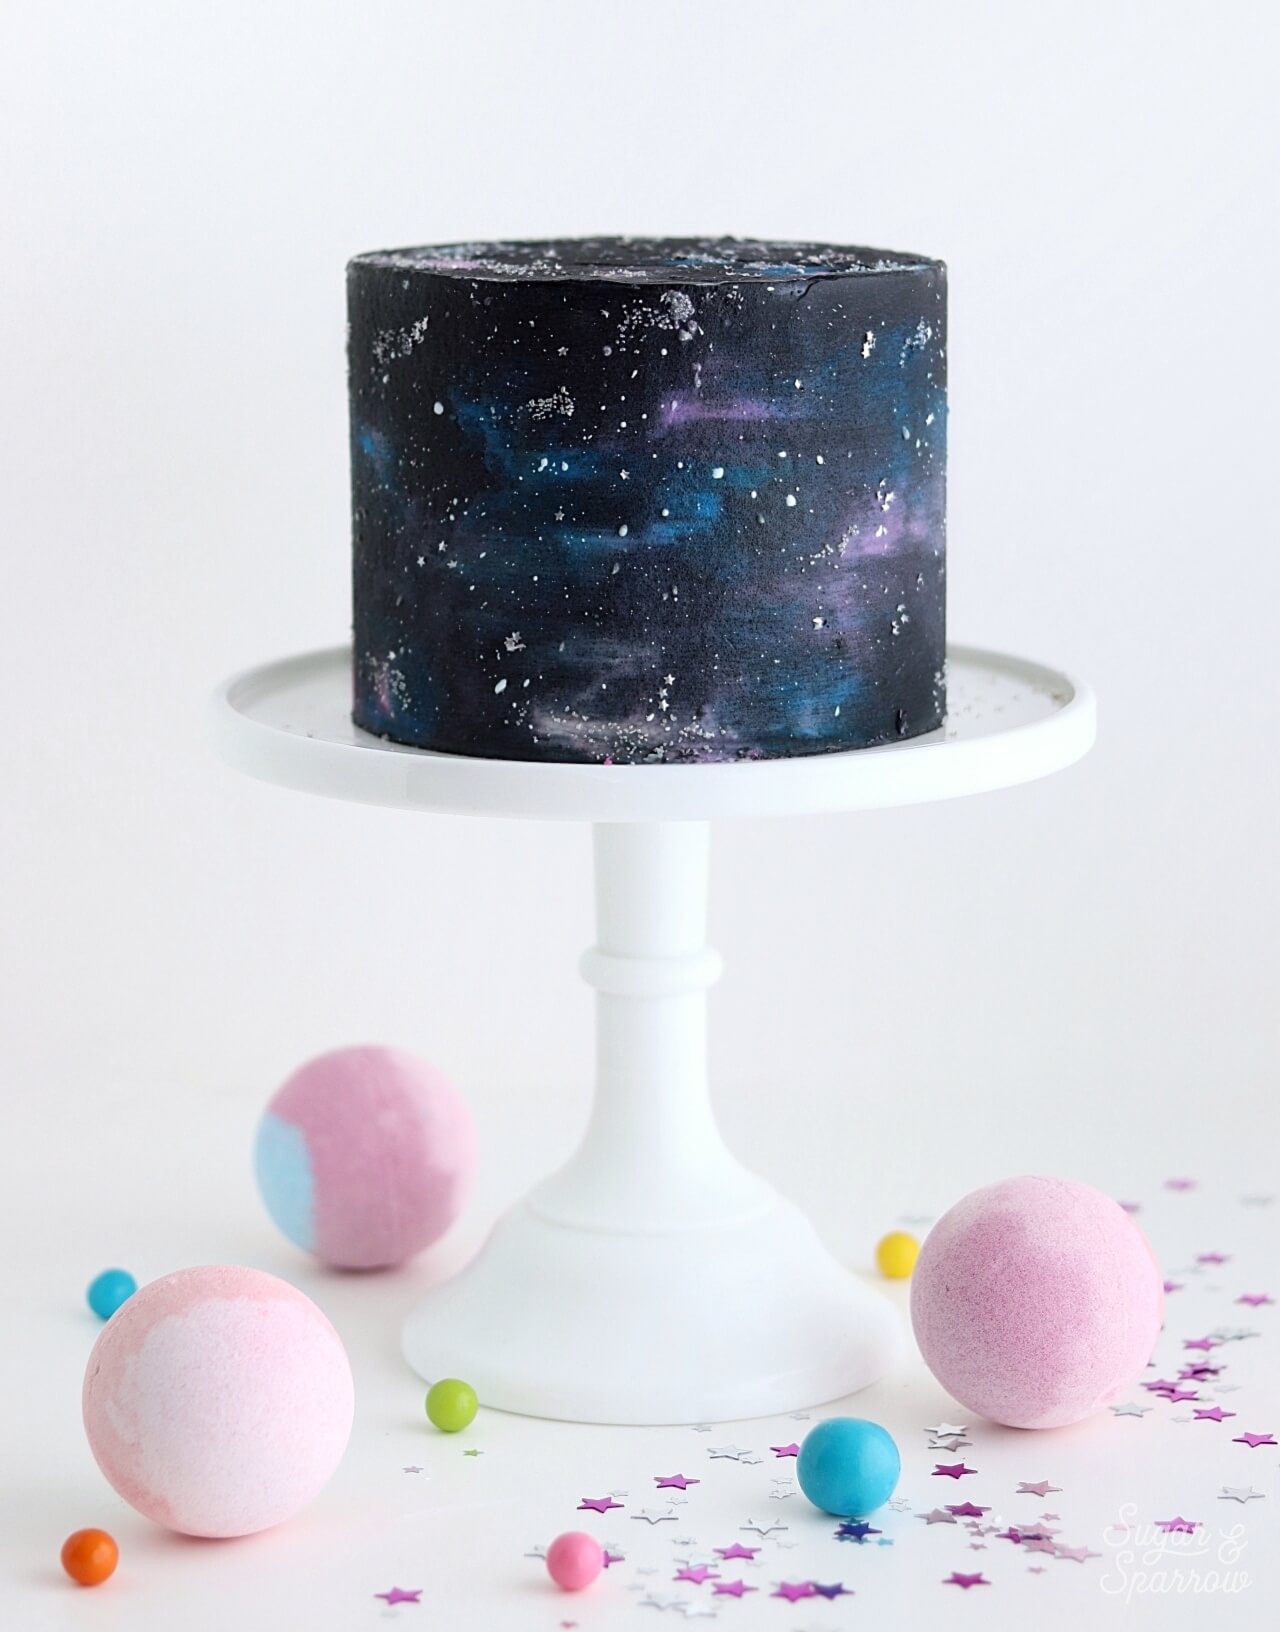
If you were offered a ticket to space, would you go? I totally would (even though I’d be terrified) because I have always been captivated by all things space. The planets, the stars, the crazy colors, the final frontier – it would all be worth floating around in a spaceship and eating weird food just so I could see it all up close! So far, the closest I can get is channeling my love for space into an out of this world Galaxy Cake!

buttercream galaxy cake tutorial

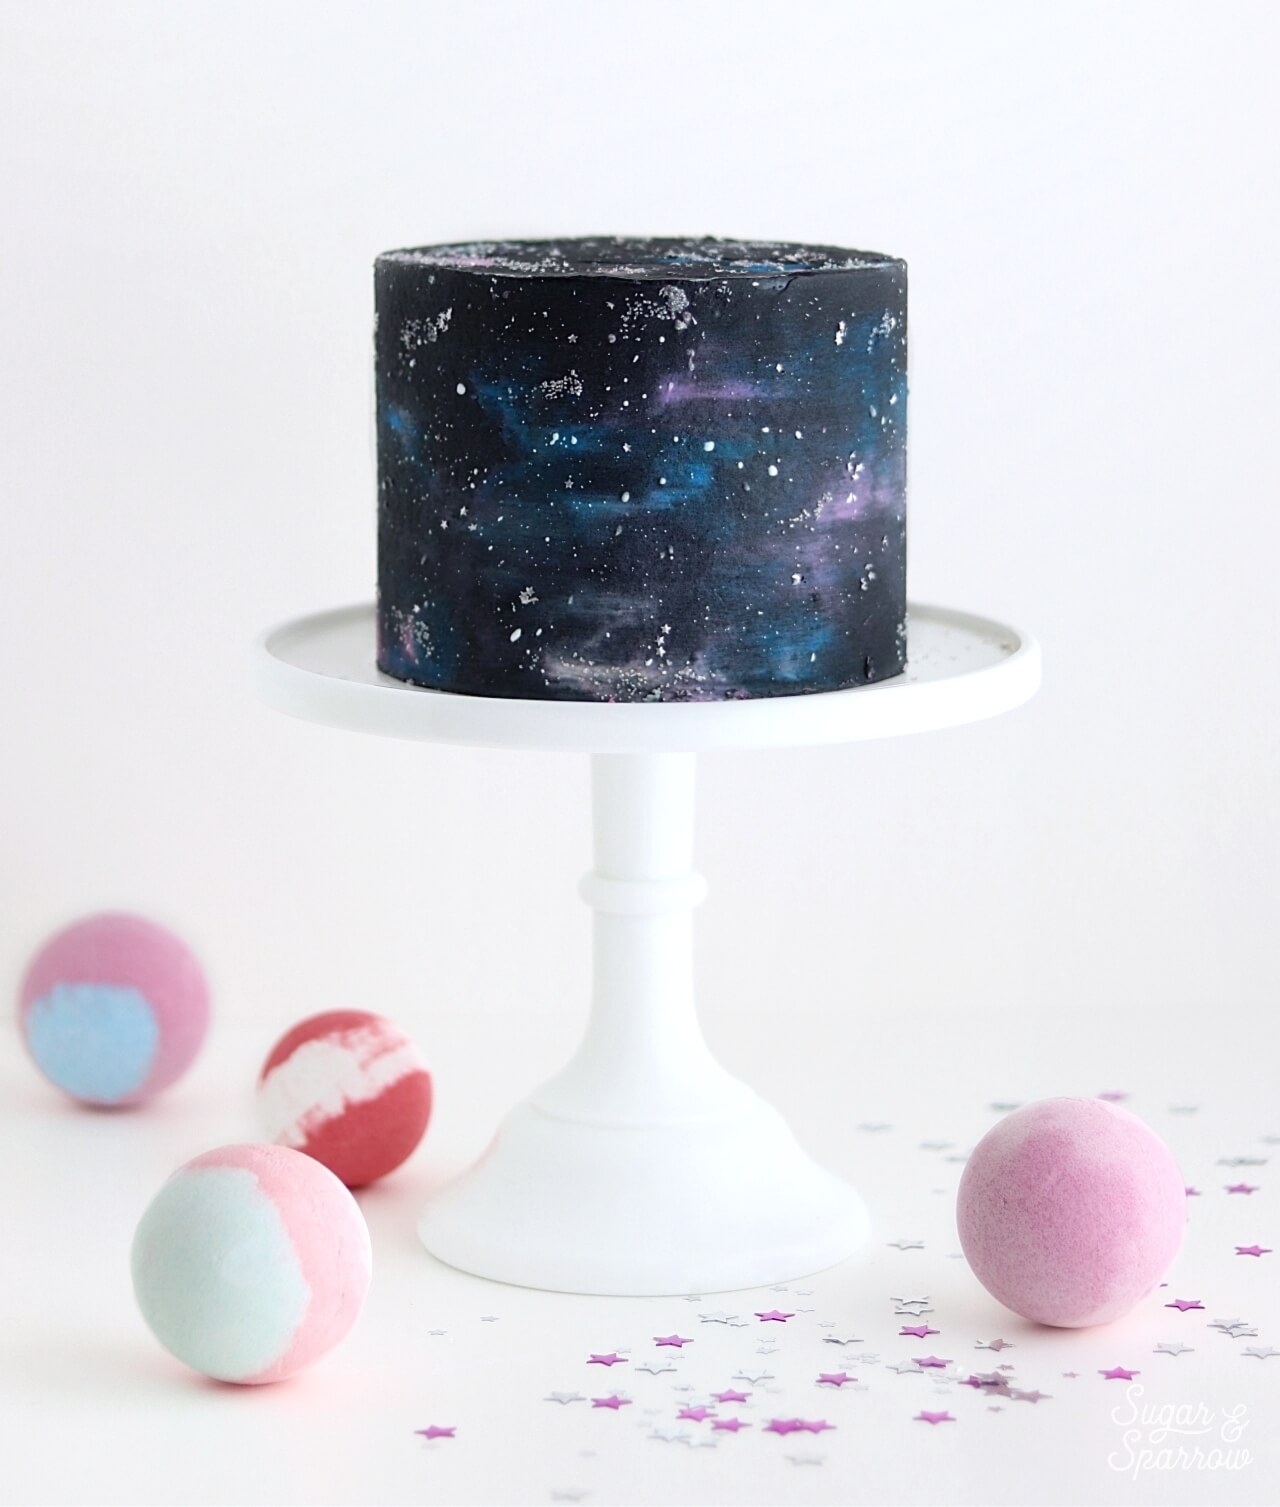
Cool, right?! Whether you’re needing a buttercream backdrop for your next Star Wars cake or other space-themed creation, this technique was so quick and easy with a few supplies I picked up at my local JOANN store. From the space-colored buttercream to the star textures and sprinkle accents, I found everything I needed to get the look in a one-stop shop!

UPDATE 2025: JOANN has (sadly!!) gone out of business, so I have slightly changed these product links.

space cake by sugar and sparrow

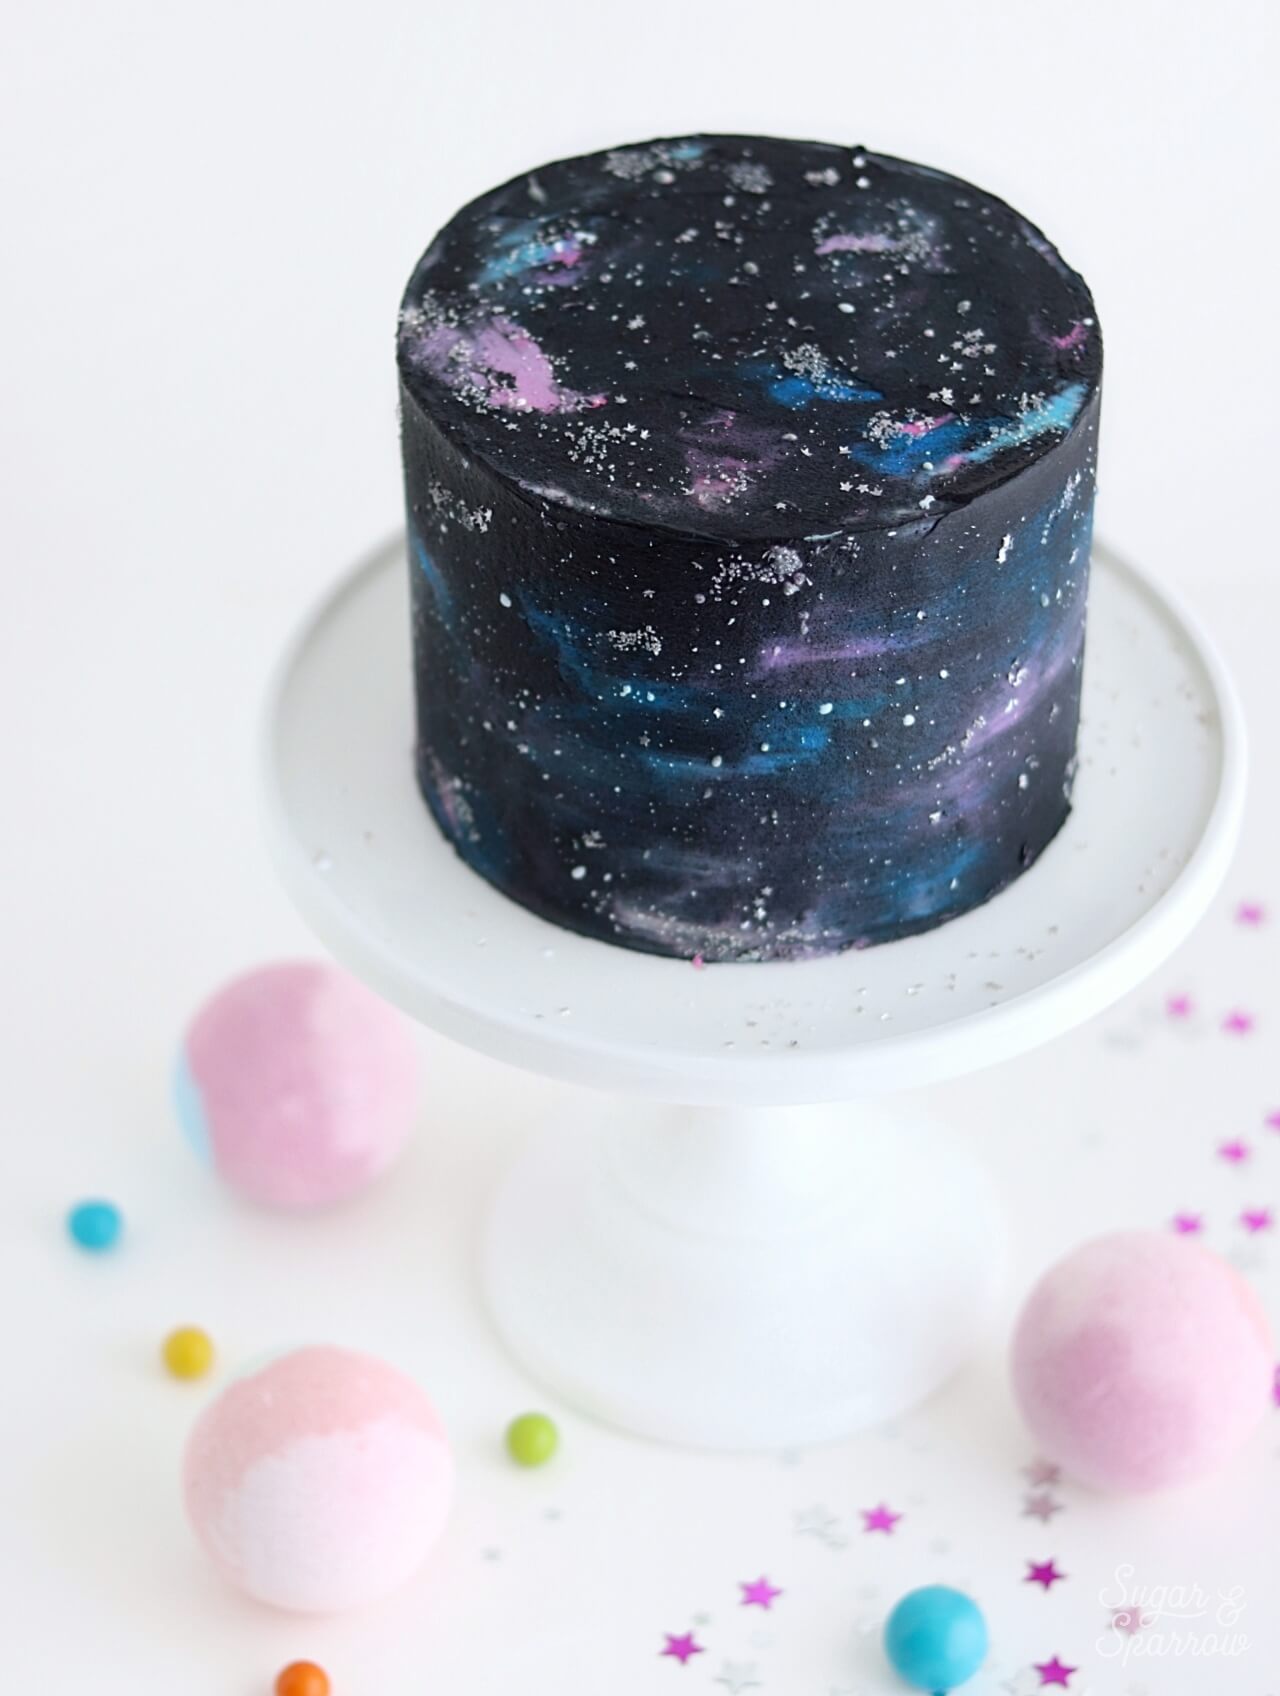
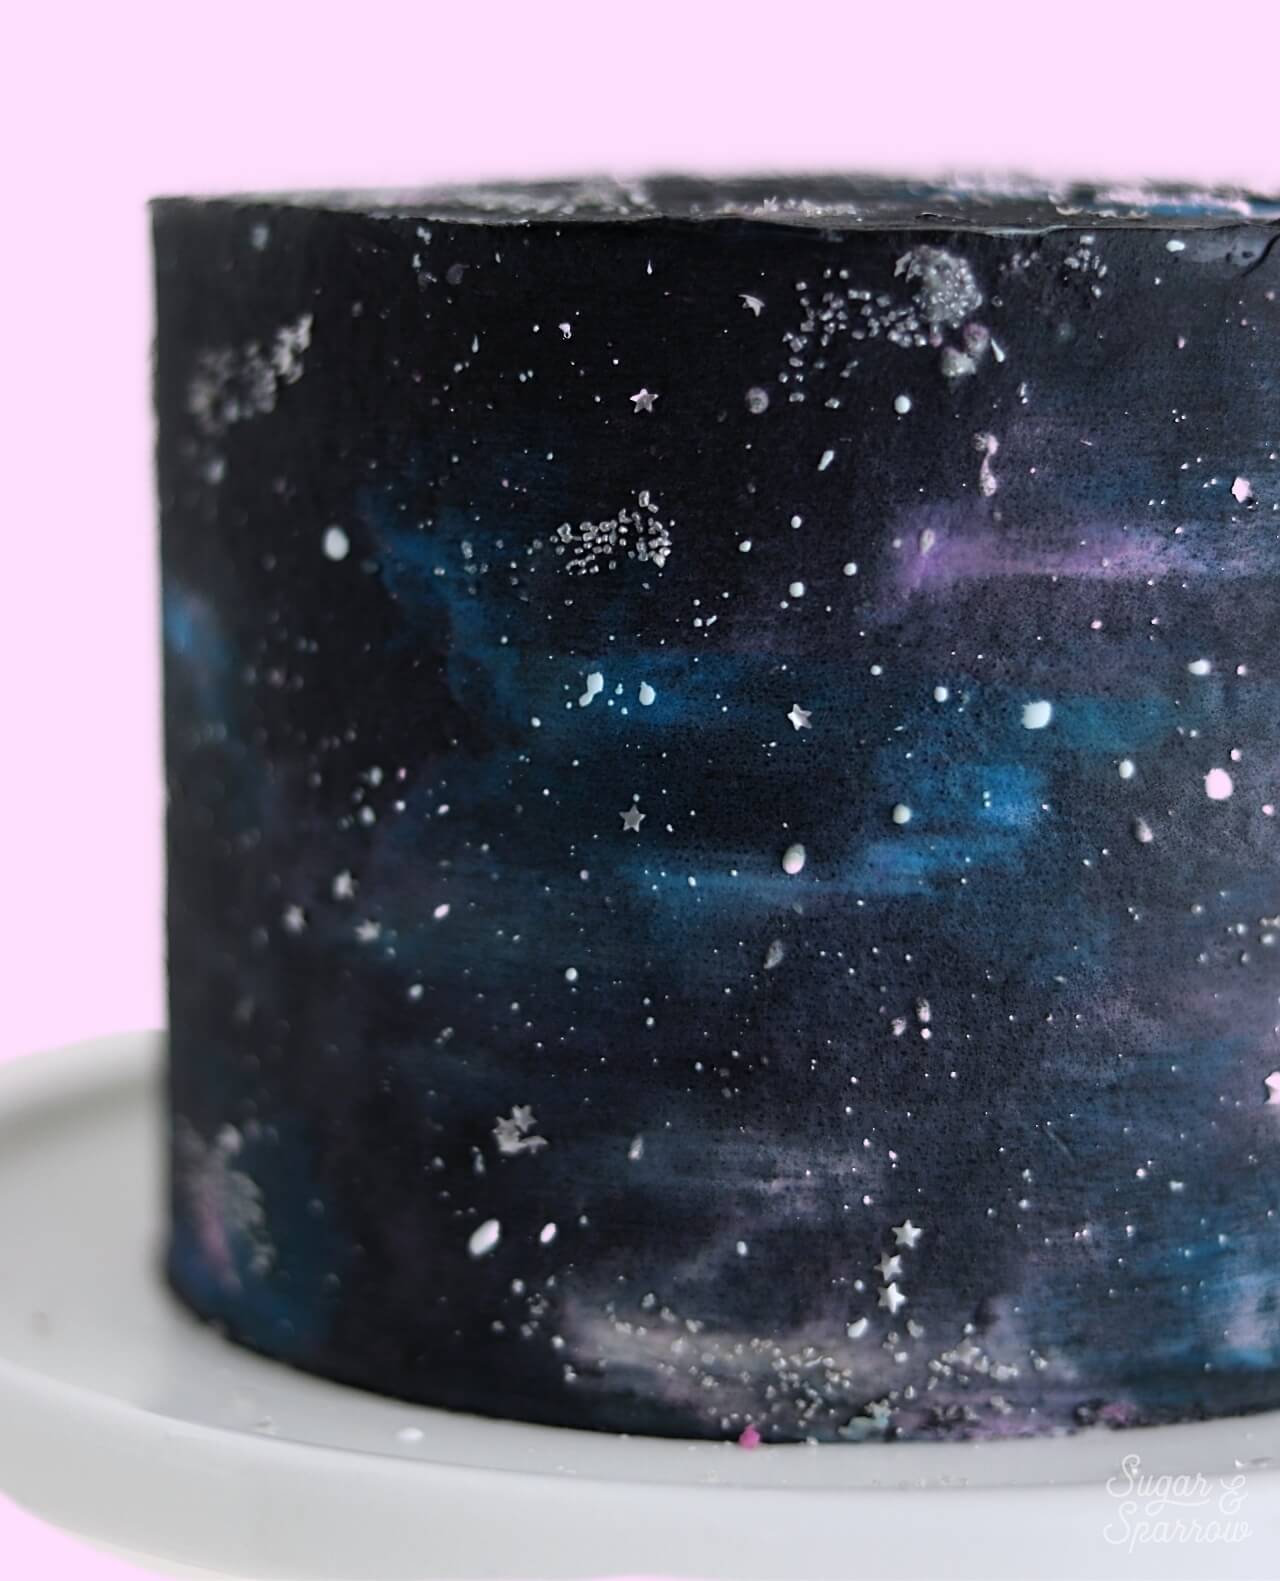
This Galaxy Cake all starts with a watercolor buttercream technique in a spacey colored palette: pink, blue, purple, and black. I first frost the pink, blue, and purple colors before adding the black over the top, which makes it so that you (surprisingly!) don’t need to use a lot of black frosting. In fact, it’s only about 1/2 Cup of black frosting that you can make with either a few drops of black food color gel or black cocoa powder if you don’t mind a little chocolate flavor.

To really enhance the look of a star-filled galaxy, I splatter painted the cake with diluted vanilla buttercream, added these gorgeous Silver Edible Glitter Stars, and topped it all off with a few clusters of these Silver Sprinkles. It turned out so galactic!

buttercream galaxy cake
black buttercream galaxy cake

Here’s a quick video of the process so you can see all of the techniques in action before you read all about it below:

If you love tutorial videos like this one, be sure to check out my YouTube channel! I’ve got a growing collection of cake recipes, decorating tutorials, and Cake Basics over there. Hit the subscribe button on my page so you never miss a new video.

You Will Need:

  • A 6-inch round cake that’s been crumb coated and chilled
  • Cake turntable 
  • 1.5 batches of vanilla buttercream
  • Food color gels in pink, purple, blue, and black (or black cocoa powder)
  • Bowls and spoons for color mixing
  • Angled Spatula
  • Icing Smoother
  • Food-Grade Paint Brush
  • Wilton Silver Edible Glitter Stars
  • Wilton Silver Sprinkles
  • AmeriColor Bright White color gel

Step 1: Frost The Cake

With your crumb coated and chilled cake on the turntable, frost a thin layer of vanilla buttercream onto the top of the cake and smooth it down with your angled spatula.

how to frost a smooth buttercream cake

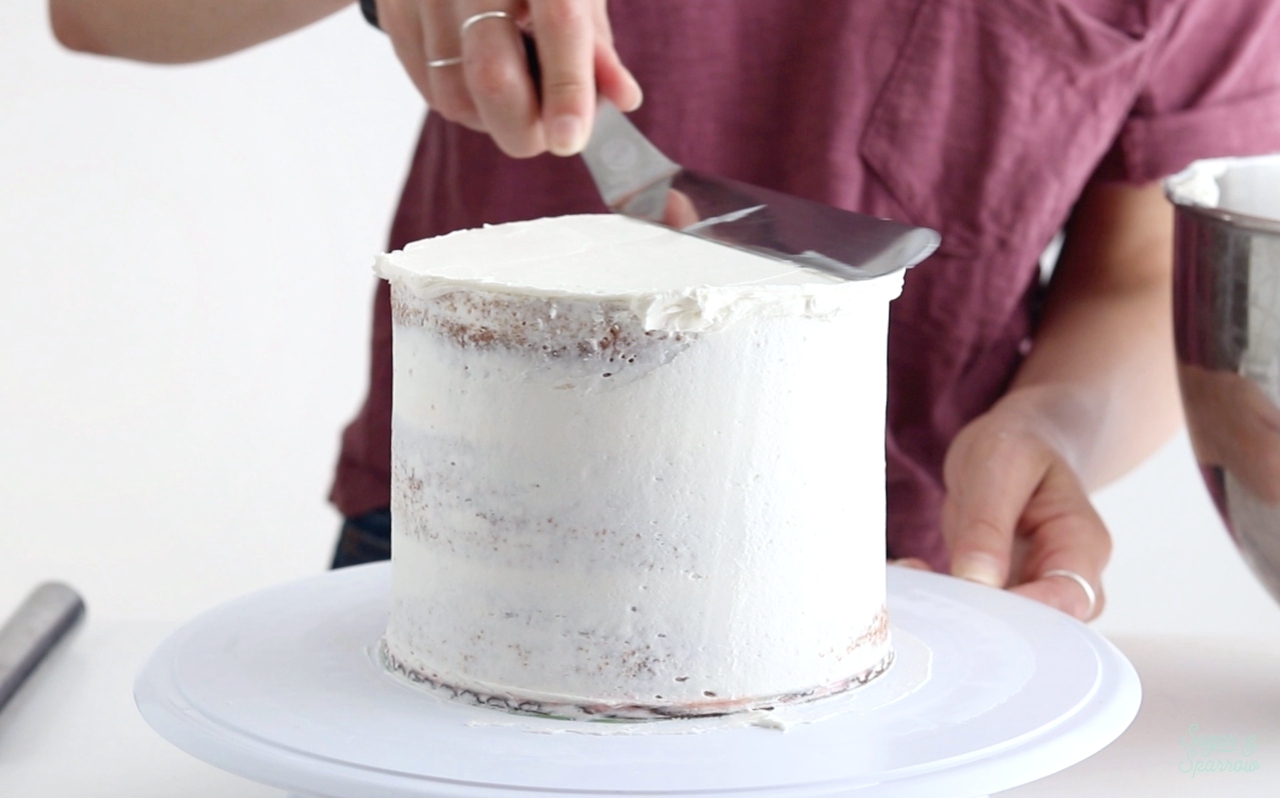
Add a thin layer of vanilla buttercream to the sides of the cake and smooth it with your icing scraper until the sides are smooth and even. Then, swipe the crown of buttercream that appears around the top edges of the cake inward to create sharp edges.

frosting smooth buttercream sides
sharp buttercream edges

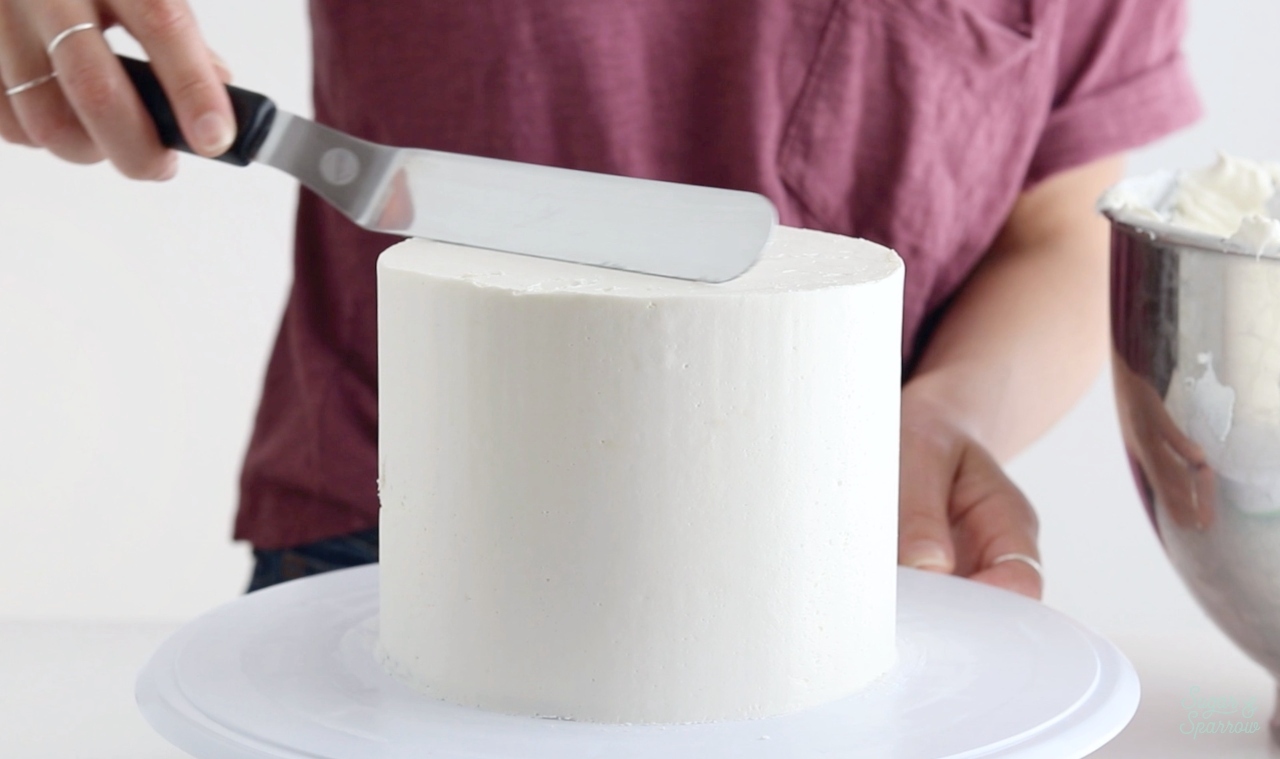
At this point, I like to chill the frosted cake for about 20 minutes to let the buttercream set up. Frosting white buttercream underneath the galaxy finish saves on the amount of black buttercream you’ll need to use to cover it. Aka, no black stained teeth once you get to eat it!

Step 2: Color The Buttercream 

While the frosted cake is chilling in the refrigerator, it’s time to mix up your space-themed color palette. Divide the remaining buttercream into four separate bowls.

buttercream colors for galaxy cake

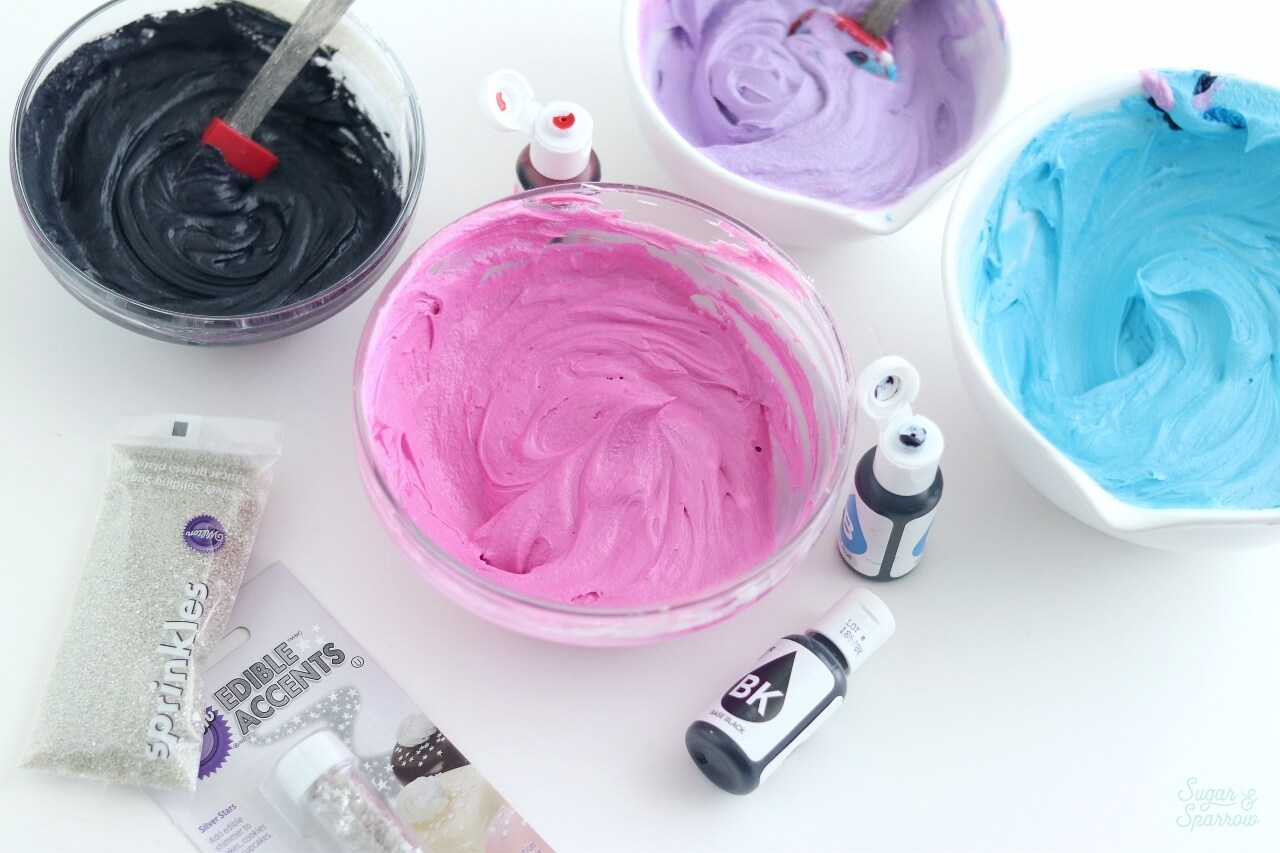
Using the mix a little pink food color gel into one bowl, a little blue into another, and purple into the third bowl. In the last bowl, add a few drops of black food color gel or black cocoa powder and mix it up until you’ve got a deep black tone.

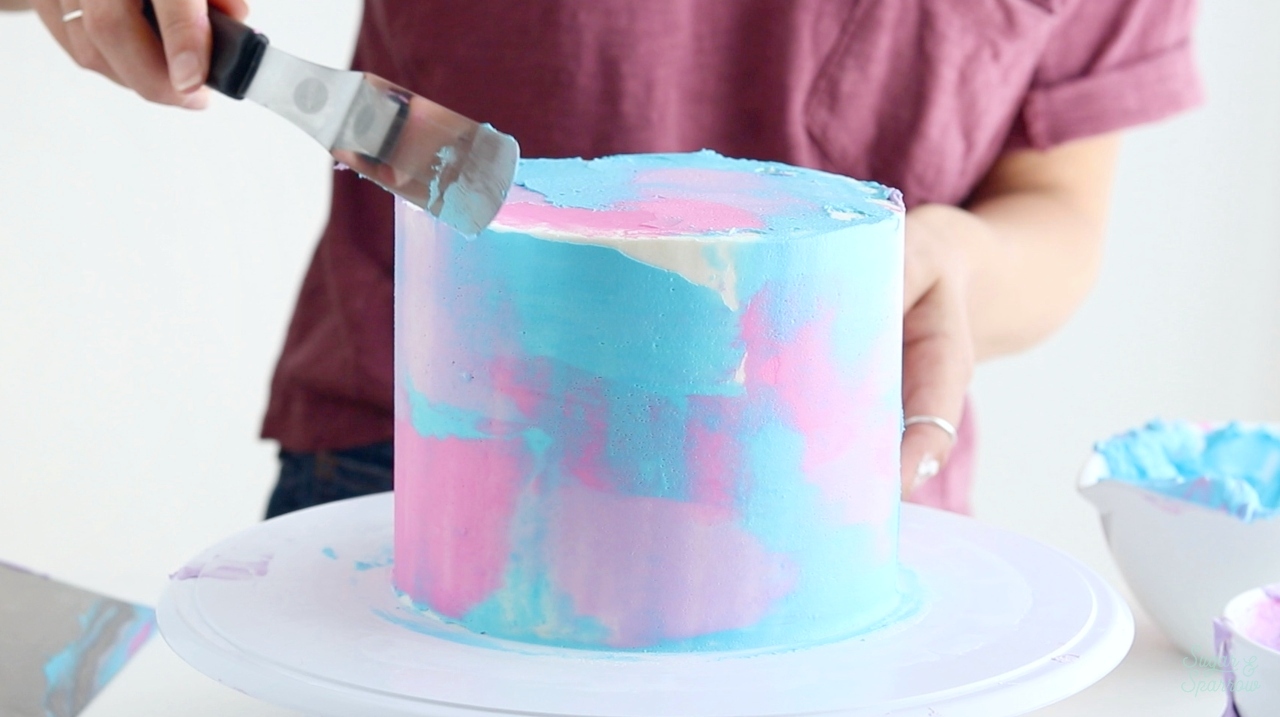
Step 3: Create The Galaxy Buttercream Finish

On your frosted and chilled cake, add a few dabs of the pink buttercream to the sides and top of the cake with your angled spatula, then smooth it all with your icing scraper.

watercolor buttercream tutorial
watercolor buttercream pink

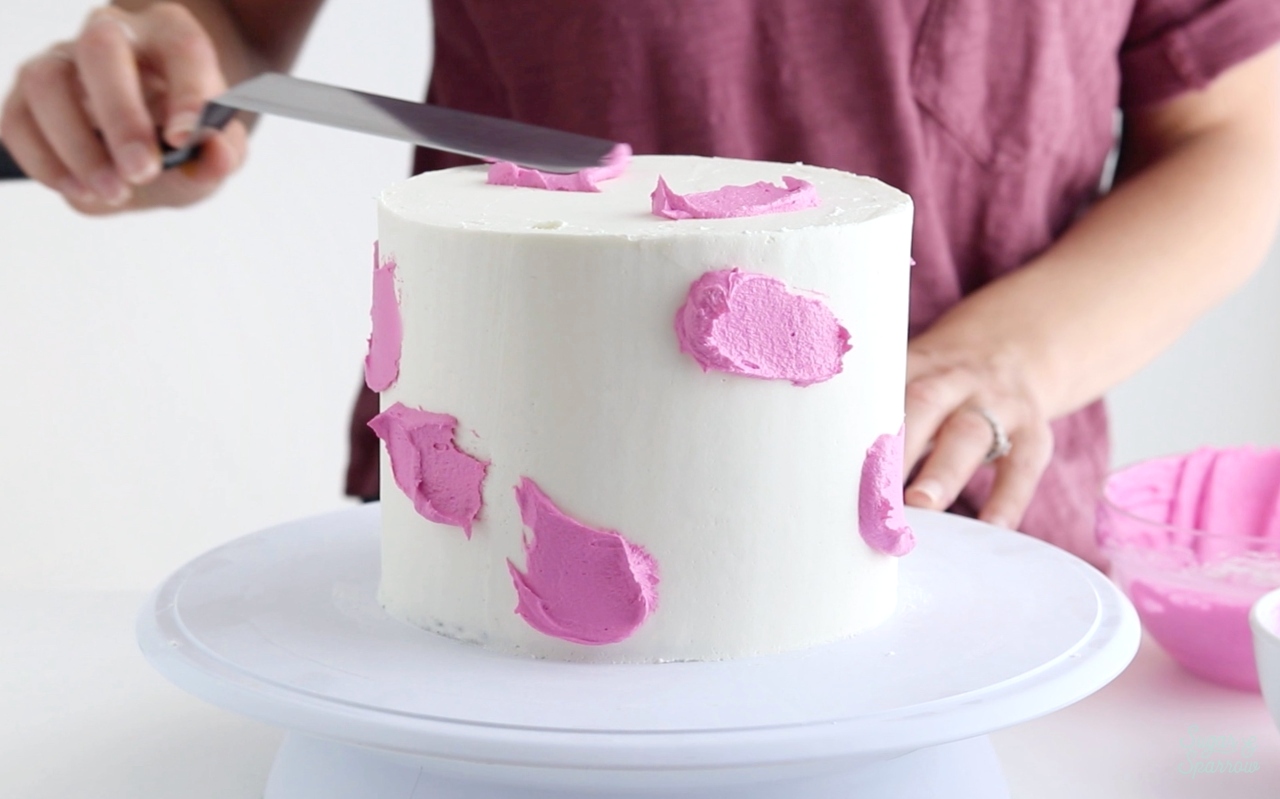
Next, add a few dabs of purple buttercream to the sides and top of the cake and smooth it with your icing scraper. Repeat this process with the blue buttercream until you’ve got a nice watercolor finish on your cake. No need to refrigerate these colors in between applications – we want them to blend together a little.

galaxy cake buttercream tutorial

Finally, add the black buttercream over the top of everything and smooth it with your icing scraper. Continue to add and smooth the black buttercream until the colors underneath peek through just a little.

how to make a galaxy cake
how to make a buttercream galaxy cake
how to frost a galaxy cake

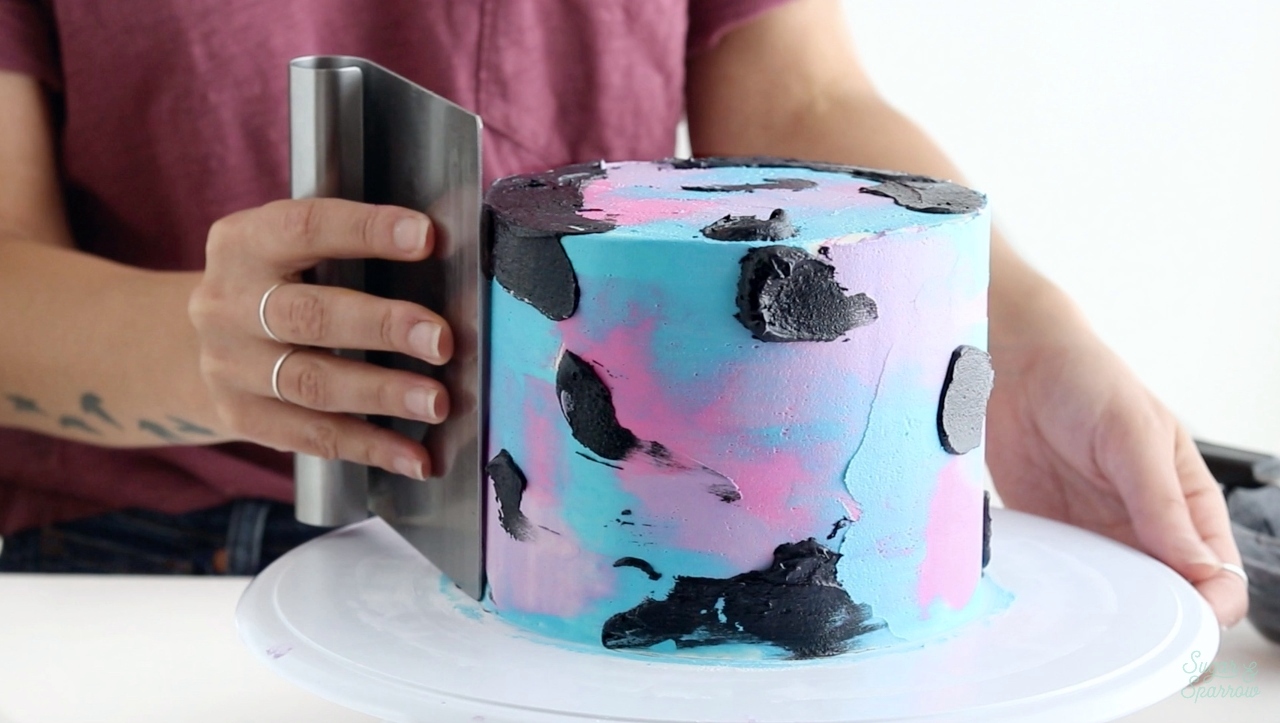
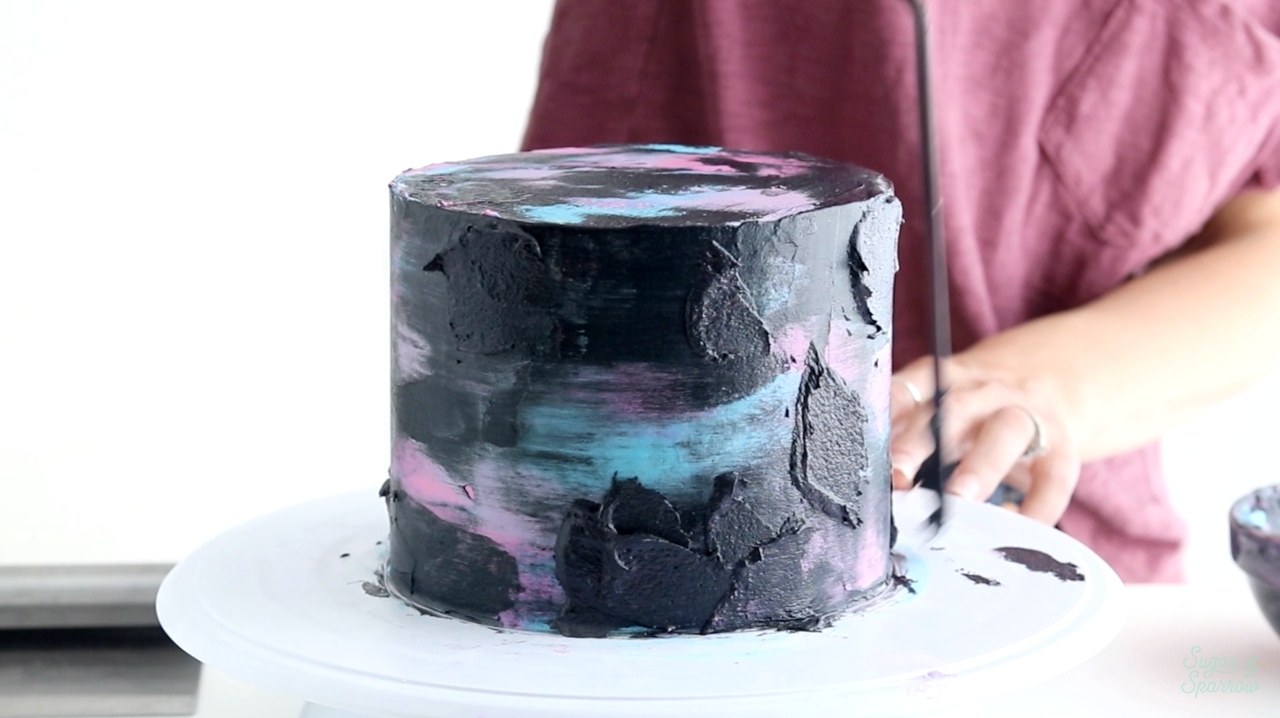
When you’re finished, pop the cake back into the refrigerator for another 15 minutes to let everything set up. 

Step 4: Splatter Paint The Stars

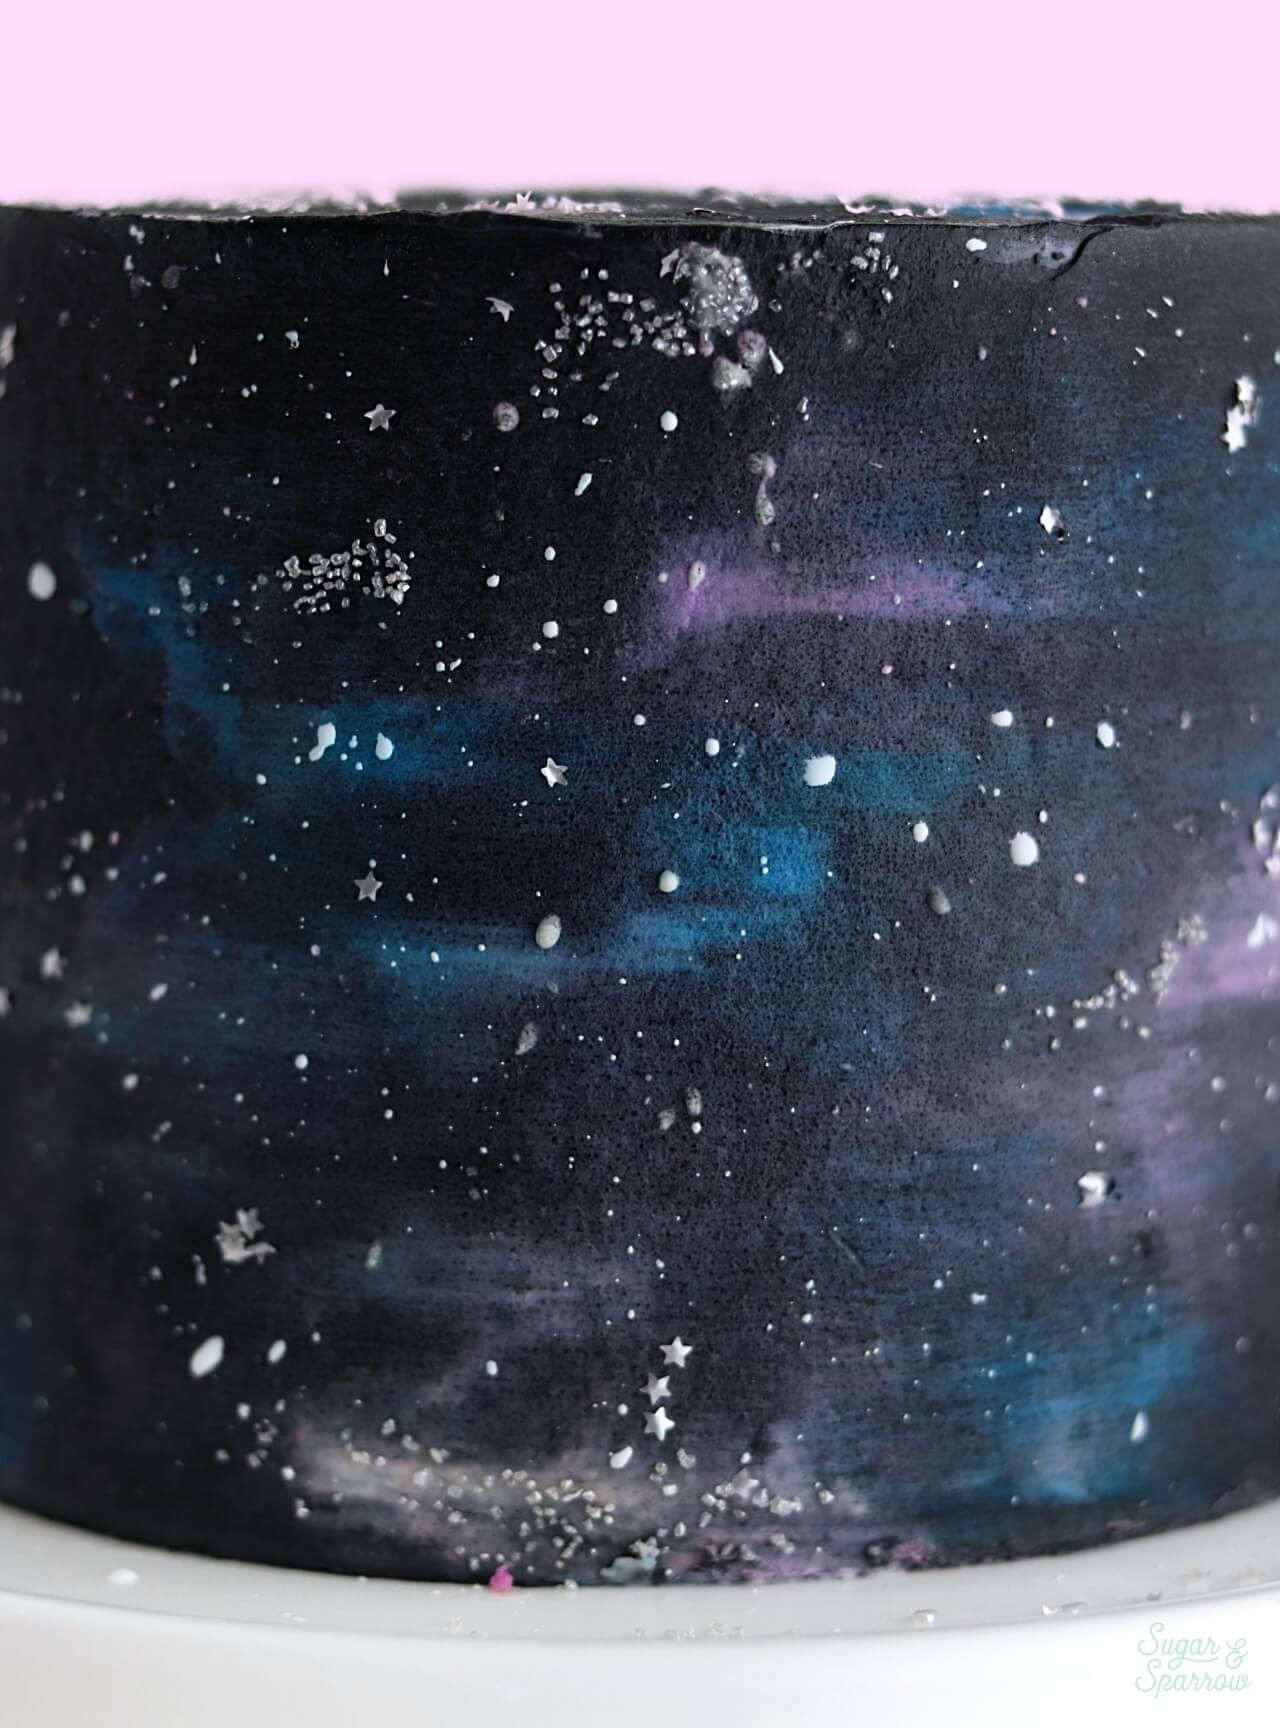
In a small bowl, add about 1/2 teaspoon of AmeriColor Bright White or other liquid icing whitener. Dip your food grade paintbrush into it and use it to splatter paint it all over the cake to create the look of stars. 

splatter painted galaxy cake

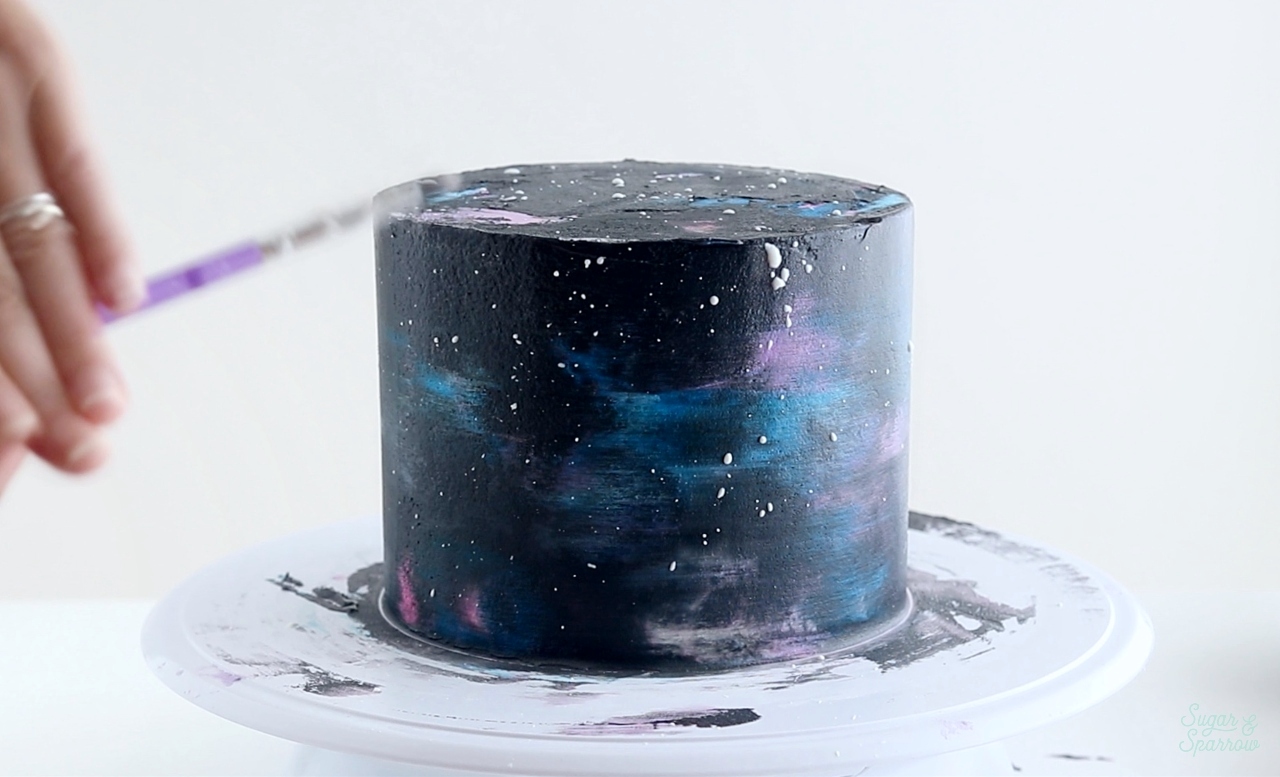
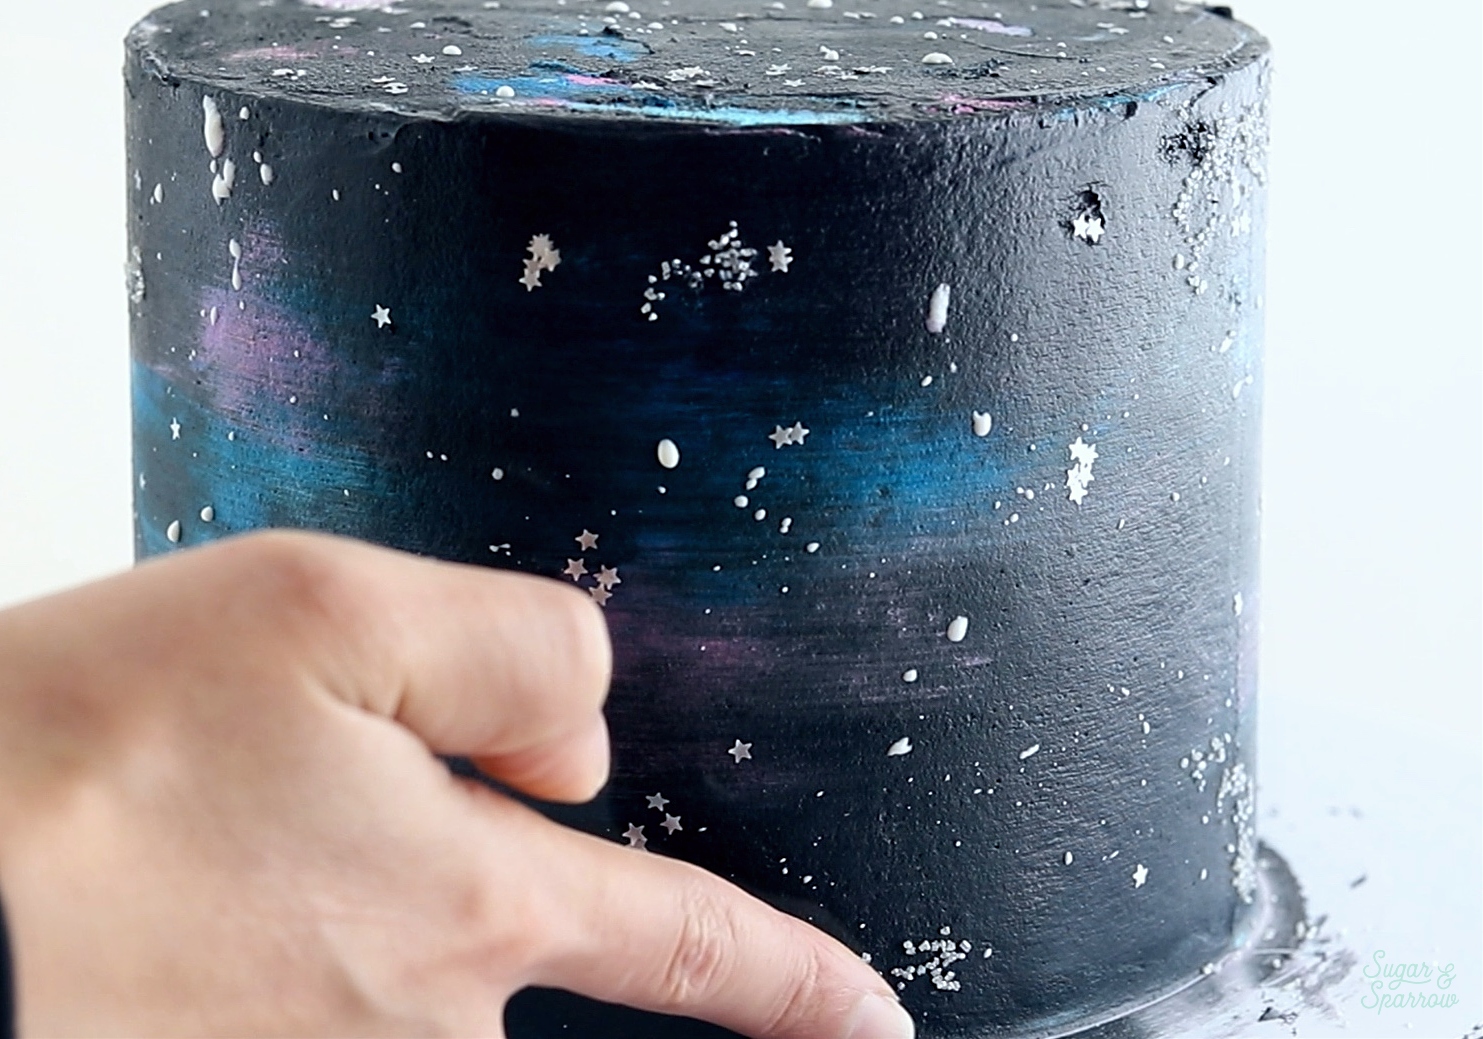
Step 5: Add Glitter Stars And Sprinkles 

Finally, add some Glitter Stars wherever your heart desires in your galaxy. It’s best to place a few on your finger and gently press them onto the cake. Use that same technique to add some clusters of Silver Sprinkles to your galaxy cake. Simply dip your finger into the sprinkles to get a nice finger-full, then gently press them onto the cake.

adding sprinkle stars to galaxy cake

And there you have it! When you’re all done with your Galaxy Cake, feel free to turn on “Intergalactic” by Beastie Boys and dance around the kitchen. It’s only fitting!

galaxy cake with stars
galaxy cake finish with silver star sprinkles

Disclaimer: I was compensated by JOANN for my work of creating this project, styling, filming, photographing, and writing about their products. As always, all opinions are honest and my own. Thank you for supporting brands that support Sugar & Sparrow.

By: Whitney · In: Tutorials · Tagged: black buttercream, cake ideas, cake tutorial, galaxy buttercream, galaxy cake, galaxy cake tutorial, JOANN, space buttercream, space cake, space cake tutorial, star sprinkles, star wars cake, watercolor cake

you’ll also love

black velvet cake plant basedVegan Black Velvet Cake (Dye-Free!)
black velvet cupcake recipe by sugar and sparrowBlack Velvet Cupcakes
dye free black buttercream easy recipeEASY Dye-Free Black Buttercream Recipe

Join the List

Stay up to date & receive the latest posts in your inbox.

Reader Interactions

Comments

  1. Jason frank says

    September 28, 2025 at 5:27 am

    I appreciate you sharing this valuable information. Great Recipe.

    Reply
  2. Jen W says

    December 31, 2024 at 11:50 am

    Debating to try this for a kids outerspace themed birthday. How many can this size cake feed?

    Reply
    • Whitney says

      December 31, 2024 at 7:10 pm

      Hi Jen! This is a 3 layer 6-inch cake which feeds 15-20.

      Reply
    • Aahil says

      January 8, 2025 at 6:02 am

      This post was an absolute pleasure to read! Your writing style is so engaging and informative, making even the most intricate topics feel accessible. I particularly enjoyed the practical examples you provided—they made the content feel relatable and actionable. Your passion for sharing valuable insights really shines through, and it’s one of the reasons I keep coming back to your blog. Thank you for taking the time to create such thoughtful and high-quality content. It’s always a delight to learn from you, and I can’t wait to see what you write about next!

      Reply
  3. Katie says

    September 23, 2024 at 10:57 am

    Thank you so much for this!!!!! I made a tiered cake following this technique for a friend’s space-themed birthday. It came out excellent and I added edible glitter. Worked so well (and I was happy about not using so much black dye).

    Reply
  4. Typhon says

    March 15, 2024 at 2:39 am

    Thankyou for this tutorial! Easy to follow, even with my usual winging of the buttercream recipe and the terrible hot weather meaning I had to keep chilling the cake so it would behave. Came out lovely and my kid loved it 🙂
    I used just a mixture of sprinkles and shimmer dust instead of flecking with thinned icing, made it a little more fiddly to place the “stars” but also gave me more control over where I put them. Nice option for when you have time (and a bunch of edible decorations) but less confidence!

    Reply
    • Whitney says

      March 20, 2024 at 8:02 pm

      Yay, Typhon! I’m so happy this design was a hit. And sorry about the hot weather, that can be so stressful!

      Reply
    • Sioned Coates says

      July 11, 2024 at 6:28 am

      Hello Whitney,
      This cake looks amazing
      I am hoping mine looks just as good for my sons party on the weekend.
      I have been reading up on 3 layer cakes and they recommended to use dowels to make the cake more sturdy. Did you use them on yours? I’ve never used them before but curious if I have to more than anything. I will be doing a chocolate sponge rather than vanilla.
      Thank you very much for sharing your wonderful recipe with us.
      Sioned

      Reply
      • Whitney says

        July 11, 2024 at 11:07 am

        Hi Sioned! I never use dowels for cakes unless they’re 5 layers or more (at which point I would use the double barrel method). You’ll be totally fine doing a 3 layer cake without dowels 🙂 excited for you to make this cake!

        Reply
  5. Cathy Mueller says

    February 28, 2024 at 5:35 pm

    Thank you so much for the tutorial! I made this for my grandson’s third birthday, and it was amazing!

    Reply
    • Whitney says

      March 5, 2024 at 10:13 am

      Yay, Cathy! I’m so happy to hear that!

      Reply
  6. Kim says

    February 9, 2024 at 11:38 am

    Hi Whitney – WHOA! This cake looks almost too perfect to eat! My nephew has a birthday coming up, and he’d absolutely flip for this. I just hope I have the skills to make it come out as pretty as yours. Thanks so much for sharing the tutorial!

    Reply
  7. Kathy Settles says

    November 4, 2023 at 5:12 am

    I’m wanting to do this frosting on a 9×13 cake. Any tips on how to do that?

    Reply
    • Whitney says

      November 21, 2023 at 10:25 pm

      Hi Kathy! That sounds so fun! I would add all the colors to the sheet cake and smooth them down with an angled spatula or icing smoother, then add the black color on top. Basically, just like you’d do with a round cake, only on a flat surface. Hope that helps!

      Reply
  8. Deb says

    December 3, 2022 at 8:27 pm

    Thank you for the wonderful recipe and structured video, your instructions were easy to follow and the cake I decorated suited my 5 year old’s solar system party perfectly.

    Reply
    • Whitney says

      December 4, 2022 at 2:32 pm

      Yay, Deb! I’m so happy to hear that!

      Reply
  9. Kim says

    November 25, 2022 at 11:39 am

    Hi, I am not getting black colored icing – gray at best and now it’s way too soft. How do I fix this? Thanks!

    Reply
    • Whitney says

      November 27, 2022 at 9:41 pm

      Hi Kim! The icing will look dark grey at first but after about 30 min or so in the refrigerator it darkens to black. It just takes a little time for the color to develop. To fix it, you can add a little more powdered sugar or cocoa powder to thicken it back up. Hope that helps!

      Reply
  10. Gretchen says

    August 14, 2022 at 4:48 pm

    I’m using a standardized whipped cream icing with cream cheese in it..will it still work not being buttercream,..an also doing it on top of a sheet cake for my kiddos 8th bday.

    Reply
    • Whitney says

      August 14, 2022 at 8:16 pm

      Hi Gretchen! As long as you can achieve these colors with that icing this technique should work great!

      Reply
      • Gretchen says

        August 15, 2022 at 7:05 pm

        Thanks so much for feed back!! Hopefully I can get it down

        Reply
  11. Tess Carlson says

    May 16, 2022 at 4:36 pm

    Hi!
    This is incredible! Just finished the final colored frosting. Was intimidated to commit to the coloring, but once you’re in it, it’s kinda hard to mess up! So cool and beautiful.

    My question: my buttercream splatter seems yellow/cream and not a nice white. Any tips?

    Thank you!!

    Reply
    • Whitney says

      May 21, 2022 at 4:28 pm

      Yay, Tess! I’m so happy this tutorial was a hit! If the buttercream you’re using for the splatter isn’t white enough, I would recommend using an icing whitener to make the buttercream white before splattering. I love AmeriColor Bright White for this: https://amzn.to/3GbmIPl

      Reply
  12. Caitlin Mock Wilson says

    April 4, 2022 at 9:05 pm

    Hi! I’m making this for my daughter’s 3rd birthday this weekend. I’m doing a six layer cake filled with galactic sprinkles (I made her a rainbow explosion cake for her 2nd birthday and now I’ll probably need to fill every cake I make with sprinkles for the rest of my life or everyone will be sad ha!). What size angled spatula are using? 9”? Thank you!

    Reply
    • Whitney says

      April 8, 2022 at 9:39 pm

      Hi Caitlin! That birthday cake sounds incredible! Your daughter is one lucky girl. The angled spatula I’m using in this tutorial is 13-inches (this one: https://amzn.to/3uqlVpH) but you can use any size for this look.

      Reply
  13. Christina Berry says

    March 20, 2022 at 12:49 pm

    We just did a Star Wars party for our 7 year old yesterday! We did a sheet cake in this style and then topped it with a Millennium Falcon! It was EPIC!!!! I wish I could share a picture here! It was our first attempt ever at making a cake that was more than slapping on some store bought frosting from a jar. Thank you!!!!

    Reply
    • Whitney says

      March 22, 2022 at 7:05 pm

      That’s amazing, Christina! I want to try a galaxy sheet cake now!! So happy to hear you had a great time with this one and that it was a hit!

      Reply
  14. Natalie says

    February 23, 2022 at 4:18 pm

    I followed this decorating tutorial today to make a galaxy cake. Love it and so easy to do

    I decorated a no egg, soya or dairy chocolate sponge.

    Reply
    • Whitney says

      February 25, 2022 at 8:30 am

      Yay, Natalie! I’m so happy you had fun making this galaxy cake!

      Reply
  15. Vanessa says

    November 6, 2021 at 3:57 am

    Bonjour Withney merci pour ce tutoriel sauf que j’ai voulu le faire avec une chantilly mascarpone car la crème au beurre n’est pas apprécié par mes convives et le résultat n’est pas top en tout cas pas aussi beau qu’avec la crème au beurre mais il est bon, j’ai également acheter des colorants en gel mais malheureusement ça tache

    Merci en tout cas pour ce tutoriel qui m’a tout de même été utile

    Reply
    • Whitney says

      November 7, 2021 at 11:10 am

      So happy this technique worked with chantilly marscapone whipped cream frosting, Vanessa! Thanks for letting me know. That frosting sounds delicious!

      Reply
  16. Kerry says

    October 17, 2021 at 7:54 pm

    Thank you so much for your recipes and tutorial. I made this galaxy cake for my son’s 2nd birthday and it came out amazing! Your tutorials for perfect one bowl chocolate cake, vanilla buttercream frosting and decorating the galaxy cake were awesome and so helpful.
    Excited to try more of your recipes =]

    Reply
    • Whitney says

      October 19, 2021 at 10:37 am

      Yay, Kerry! That makes me so happy to hear!! Thanks so much for taking the time to tell me and I’m so glad your little one loved his cake 🙂

      Reply
  17. Michelle says

    August 12, 2021 at 10:02 pm

    Do you think instead of coloring the frosting, I could paint the black food coloring onto the cake with a brush? I was thinking something similar to when you paint gold edible paint onto cakes.

    Reply
    • Whitney says

      August 15, 2021 at 9:29 am

      Hi Michelle! I don’t think that would work because it would a) be a real mess/streaky and b) ruin the flavor of the frosting. Instead, if you’d rather paint on the color I would try this Edible Art Paint: https://amzn.to/3iNLn2z

      Reply
  18. Mina says

    August 11, 2021 at 10:49 am

    Hi! I used this tutorial and your chocolate cake to make my son’s first birthday cake. I couldn’t get the black color to come out so it turned out a lot more purple but I’m happy with how it looked. Thanks for the recipes! I’m linking a picture if you’re interested. 🙂 https://i.imgur.com/MCpDprX.jpg

    Reply
    • Whitney says

      August 11, 2021 at 3:30 pm

      It looks beautiful, Mina! I’m so happy this tutorial was helpful and I think the colors look amazing!

      Reply
    • Jessica Farmer-Gustafson says

      November 16, 2025 at 11:14 am

      I LOVE how your purple galaxy cake turned out, it’s gorgeous. Purple is my favorite color so I may try doing this cake that way instead of the black.

      Reply
  19. Just Nic says

    July 3, 2021 at 10:36 am

    I never could get my frosting black. It was more a dark gray. The frosting had a strange flavor due to all the black I added. But, otherwise a good cake. The other colors were vibrant and the color chart was very easy to use. My son and I enjoyed decorating his birthday cake. I also love the Vanilla Buttercream Frosting recipe. I have never made a decent tasting vanilla frosting before. Your tutorials seem pretty easy to follow.

    Reply
    • Whitney says

      July 7, 2021 at 2:50 pm

      Hi there! I’m sorry your frosting ended up tasting weird and didn’t turn completely black. Sometimes it takes awhile (30+ minutes) for the black color to intensify – it starts out a concrete gray color and then deepens. Next time you can also try adding a little bit of cocoa powder to the buttercream you want to tint black, that way you don’t have to add as much (it’s easier to go from brown to black than from white to black). So happy you love the vanilla buttercream recipe!

      Reply
  20. Charlotte earl says

    June 12, 2021 at 5:28 am

    Hi, This cake looks fab. I am planning on making it for my daughters 2nd birthday and have Enright apart from the gel colors. Apart from the black which specific colors did you use for the pink and blue? I currently have dusky pink, pink and royal blue

    Reply
    • Whitney says

      June 12, 2021 at 9:37 am

      Yay, Charlotte! I used the Wilton Color Right Food Coloring System for the pink and blue colors. It’s a set that you use to custom mix colors, and I believe I used the pink + a tiny bit of blue to create a fuchsia color and then just used the blue for the blue color. You can use any pink and blue for those colors though!

      Reply
  21. Claire says

    May 6, 2021 at 7:18 am

    Hello! I am very excited to try this for my brother’s 30th birthday surprise space-themed party. However, I have a cake recipe in mind that has a delicious cream cheese frosting I want to use. Do you think that would work okay for this frosting technique? Any tips or things to watch out for?

    Thank you! The cake is beautiful!

    Reply
    • Whitney says

      May 9, 2021 at 8:15 pm

      Hi Claire! Cream cheese frosting should work totally fine with this tutorial! As long as it’s easy to frost a cake with and you’re able to tint it to get the color palette you should be totally good.

      Reply
  22. Petra says

    April 11, 2021 at 12:48 pm

    Hi Whitney thank you so much for sharing this tutorial. The cake looks amazing my daughter has asked for a galaxy cake for her birthday and I’m really nervous about making it because I don’t have a lot of experience frosting a cake. My frosting always seems a bit stiff for some reason anyway her favourite cake is Chocolate Fudge cake, do you think this would work also? And how much frosting would I need for a 2 layer 8″ cake please?
    Thank you so much for your time

    Reply
    • Whitney says

      April 12, 2021 at 9:01 pm

      Yay, Petra! Excited for you to try this cake for your daughter. Any layer cake recipe will work with this tutorial and I do have my favorite vanilla buttercream recipe here (which is what I use in this tutorial) in case you need one that will frost easily: https://sugarandsparrow.com/vanilla-buttercream-recipe you’ll need to double the recipe if you want to use it as filling as well as frosting, but if you’re just frosting the outside of the cake you can make the recipe as-is. This galaxy technique is super forgiving, so I hope you have fun with it! Enjoy!

      Reply
      • Petra says

        April 20, 2021 at 2:35 pm

        Hey Whitney,
        Thank you so much for the reply. Oh I will have a look at the vanilla buttercream recipe. I tried the rasberry buttercream on your rasberry chocolate cake at the weekend and it was amazing so can’t wait to try it.
        Just out of curiosity could you fill and frost this cake with coloured ganache too? And if so do you have a recipe?
        Sorry to bother you again
        Thank you

        Reply
  23. Dominique says

    March 5, 2021 at 8:57 am

    Hi, this looks like a great tutorial. I can’t wait to try it next week for my daughter’s 10th birthday. Would whipped icing work too? Thanks!

    Reply
    • Whitney says

      March 5, 2021 at 10:28 am

      Yay, Dominique! Excited for you to make this for your daughter’s birthday! As long as you’re able to achieve the colors with whipped icing and it’s what you would normally frost a cake with, it should work.

      Reply
  24. Melody says

    January 30, 2021 at 8:19 am

    I love your cake!! Can you do it with fondant? 🙂

    Reply
    • Whitney says

      January 31, 2021 at 10:28 am

      Hi Melody! You could certainly do a galaxy finish with fondant, though the technique will be quite different. I don’t specialize in fondant finishes, so I would look for a galaxy cake tutorial that uses fondant if you want to get the look with it!

      Reply
  25. Brenda says

    January 20, 2021 at 6:59 pm

    Thank you. I used the technique on a half spear cake and it turned out really good and easier than a I thought.

    Reply
    • Whitney says

      January 22, 2021 at 10:51 am

      I bet this technique looked amazing on a half sphere cake! What a great idea, Brenda!

      Reply
  26. Louise Bird says

    January 20, 2021 at 2:32 pm

    Hello! I’m planning to make this cake this weekend for a birthday party. I had planned to use boxed cake mix just to save time on that end, and because, why not, but I’m concerned that it might be too soft of a cake to hold up to the work that the frosting entails. Can you tell me if you know if it needs to be a denser type of cake, such as homemade? Thank you.

    Reply
    • Whitney says

      January 20, 2021 at 3:47 pm

      Hi Louise! A boxed cake mix is absolutely fine to use with this tutorial. I actually use box mixes quite often when creating decorating tutorials (because making a cake from scratch takes a lot of extra time and ingredients!) and I have not run into any problems with the cake being too soft. Go for it!

      Reply
  27. Bhavna says

    December 17, 2020 at 10:20 pm

    Instead of buttercream, would white ganache (with the different colors) work to get a similar effect?

    Reply
    • Whitney says

      December 21, 2020 at 9:53 am

      Hi Bhavna! I think you could create this look using ganache that is frosting consistency. I’ve never tried it before, so I’m not entirely sure, but I think it’s worth a try!

      Reply
  28. Michelle Jacobs says

    November 17, 2020 at 9:42 am

    I want to make this for my son’s 2nd birthday, but am being warned that the black icing (and any icing that is on the darker side) will stain teeth and have an artificial taste. I know you said that you took steps to avoid that with your process, but how concerned should I really be?

    Reply
    • Whitney says

      November 19, 2020 at 2:45 pm

      Hi Michelle! Yes, large amounts of black buttercream will temporarily turn your tongue purple. The gel I use to make the black buttercream in this tutorial is tasteless and since you really don’t need to make a lot of black buttercream for this cake, the taste should not be an issue at all. If you are concerned about a temporary purple tongue though, I would look into Black Cocoa Powder for making black buttercream. I’ve never used it before, but I hear it helps make a deep black color without turning mouths purple!

      Reply
  29. Rameen says

    November 8, 2020 at 11:32 am

    Hello! I want to make a fault line cake with a strip of pictures in the middle. I thought it would be really cool to have galaxy themed buttercream coating the top and bottom rather than a solid colour. I’m not sure if this will make things too complicated (I’m a home baker)

    Do you think I should add the coloured buttercream and smooth each colour individually as you’ve done here or will adding the different colours in one go and smoothing it work?

    Thank you! Your cake looks amazing.

    Reply
    • Whitney says

      November 9, 2020 at 10:01 pm

      Hi Rameen! I think a fault line galaxy cake will look AMAZING! If I were doing a cake like that I would add all the vibrant colors in one go and smooth them down first, then add the black on top. You can certainly try adding everything at once but I’m not sure if the colors would get too muddy. I’m excited for you to try this though, tag me on Instagram to show me if you end up making it!

      Reply
  30. Jenni says

    October 15, 2020 at 7:52 pm

    How do you move the cake from the turntable without messing up the frosting?

    Reply
    • Whitney says

      October 16, 2020 at 8:43 am

      Hi Jenni! I am actually working on a Cake Basics tutorial on this topic. Basically I heat up an angled spatula and run it around the bottom edge of the cake (make sure the cake is refrigerated for at least 30 min first). Then I slide the spatula underneath the cake and slip my hand under to hold the bottom and transfer it that way. There will be a video to come but I hope that helps in the meantime!

      Reply
  31. Meagan Payne says

    October 11, 2020 at 6:22 pm

    Tried this for my niece’s birthday and it came out great! Thank you!!!

    Reply
    • Whitney says

      October 12, 2020 at 7:27 am

      Yay, Meagan! So happy to hear the cake was a hit and happy birthday to your niece!

      Reply
  32. Rochelle says

    October 9, 2020 at 7:56 am

    Hi there! Attempting this today/today for my son’s 1st birthday (and first cake ever too!). I’ve made the 1.5 batches of buttercream frosting in advance however, did you use some of that 1.5 batches to crumb coat your cake too? I’m nervous that if I crumb coat using some of the 1.5 batches, I won’t have enough left for the cake itself. If the 1.5 batches did NOT include the crumb coating, would I be able to use another frosting rather than having to make more buttercream?

    Reply
    • Whitney says

      October 9, 2020 at 5:01 pm

      Hi Rochelle! So excited for you to make your very first cake and celebrate your son! I started with a chilled and crumb coated cake for this tutorial, but you should have enough for a crumb coat within the 1.5 batches of vanilla buttercream. If you’re super worried about it feel free to use a different frosting for the crumb coat, chill the cake, and use the vanilla buttercream as the tutorial instructs. Hope that helps!

      Reply
  33. Coreen says

    September 13, 2020 at 4:01 pm

    Curious is that 3 layers of a 6 inch cake pan?
    Thanks

    Reply
    • Whitney says

      September 13, 2020 at 4:10 pm

      Hi Coreen! Yes, it is three 6-inch layers.

      Reply
  34. Anna Parmley says

    September 4, 2020 at 9:58 pm

    This may sound silly, but it looks like this has many layers of cake? How many 6 inch round cakes are needed?

    Reply
    • Whitney says

      September 6, 2020 at 5:29 pm

      Hi Anna! This cake has three 6-inch layers

      Reply
    • Katie Francis says

      February 7, 2021 at 1:09 pm

      Could I do the coloured buttercream on top of a black fondant base?

      Reply
      • Whitney says

        February 8, 2021 at 8:46 am

        You certainly could, Katie!

        Reply
  35. Stephanie says

    September 4, 2020 at 6:51 am

    Can I use your white chocolate frosting recipe instead of buttercream to make this galaxy decorative cake? Can’t wait to try it!

    Reply
    • Whitney says

      September 6, 2020 at 5:45 pm

      Hi Stephanie! You can totally use the white chocolate buttercream recipe with this tutorial.

      Reply
  36. Ghazala Malik says

    September 1, 2020 at 2:37 pm

    I don’t really care for the sweetness of Buttercream can I use the same method with Swiss Meringue frosting?

    Reply
    • Whitney says

      September 2, 2020 at 12:14 pm

      Hi Ghazala! This method will work with swiss meringue just fine, as long as you can achieve those deep colors.

      Reply
    • sharon says

      September 29, 2020 at 4:08 pm

      I used chocolate cream cheese buttercream. Not as sweet and easy to colour it black.

      Reply
  37. Rebecca says

    July 26, 2020 at 2:59 pm

    This was my first attempt at this cake. I made it for my grandson’s Star Wars party. It turned out really well! When you mess up, easy to fix! Thanks for the tutorial!

    Reply
    • Whitney says

      July 27, 2020 at 8:52 pm

      I am so happy this tutorial was helpful, Rebecca! I bet your grandson loved it!!

      Reply
  38. Rebecca says

    July 5, 2020 at 7:25 am

    My first galaxy cake and I was pleased with the results. Once I got the hang of it, it went pretty well. The nice thing about this cake is, if you mess up, it’s easy to fix.

    Reply
    • Whitney says

      July 6, 2020 at 3:56 pm

      Yay, Rebecca! So happy this tutorial was helpful!

      Reply
  39. Jenna says

    April 30, 2020 at 5:15 pm

    Hi! I am going to be attempting this cake for my stepson’s birthday, and I had a question! I am going to make the cake with the crumb coating the day before I do the icing. About how much of the 1.5x icing recipe goes toward the colored icing? Thanks!

    Reply
    • Whitney says

      May 1, 2020 at 5:27 pm

      Hi Jenna! The 1.5x buttercream recipe makes about 4.5 cups of frosting, and about 1.5 Cups of that goes toward the colored icing. Hope that helps!

      Reply
      • Jenna says

        May 1, 2020 at 7:43 pm

        I kinda just ended up guesstimating, and it worked out! For this being my first really big decorated cake (I know, probably could have started with something a little simpler ), I’m pretty pleased with how it turned out! Thank you!

        Reply
        • Whitney says

          May 3, 2020 at 10:22 pm

          So happy to hear that it worked out!!

          Reply
  40. Valyncia says

    April 9, 2020 at 11:42 am

    This is a lovely tutorial. I wanted to get your thoughts on modifying this for a cookie cake. My daughter wants a galaxy cookie cake for her 9th birthday.

    Reply
    • Whitney says

      April 10, 2020 at 8:45 am

      A cookie cake sounds so tasty, Valyncia! I have never decorated one before, but if you’re wanting flat icing on top of the cookie you can use this same technique where you smooth the colors onto the cookie first, then put some black icing over the top and smooth it all down to reveal some of the colors showing through (then splatter paint for the stars, etc). Since it’s a flat surface you can use an offset spatula for the whole thing and it really helps to have a turntable to spin the cookie cake while you’re smoothing. Hope that helps!

      Reply
  41. carolina says

    January 22, 2020 at 11:17 am

    Thank you so much for sharing!
    I got some tips on how to splatter the buttercream. Great idea!

    Reply
    • Whitney says

      January 22, 2020 at 3:47 pm

      Yay! Excited for you to try the splatter technique, Carolina!

      Reply
  42. Paula says

    January 22, 2020 at 10:25 am

    Hi, am hoping to make this for a friend’s daughter so had a little go at watering down the buttercream to ‘splatter’ with the brush, did not work at all! Buttercream wouldn’t thin, just went lumpy and horrid. What did I do wrong? Thanks.

    Reply
    • Whitney says

      January 22, 2020 at 3:51 pm

      Hi Paula, buttercream should always thin when liquid is added. When I thin the buttercream for splattering this way, there are some small lumps in the buttercream and it’s almost the consistency of a thin yogurt. I would add room temp water or milk until you achieve that consistency, then try splattering on a small plate to test the consistency. If you need it thinner, keep adding liquid a little at a time. If it’s too thin, add more buttercream and stir. As an alternative, I’ve also had great success splattering with this Americolor Bright White color gel: https://amzn.to/2uo2ilp

      Reply
      • Paula Harding says

        January 23, 2020 at 4:35 am

        Thanks so much for replying, I’ve had another go this morning using slightly warm water and it was fine. I used cold before (didn’t give it a thought!), so perhaps that is what made the difference. Tested on black card and flicked really well. Thanks again, Paula.

        Reply
        • Whitney says

          January 23, 2020 at 8:31 pm

          Yay, Paula! So happy to hear that it worked with warmer water! The butter in the buttercream tends to curdle when cold liquid is added so that must have been it.

          Reply
  43. Ms Megibson says

    December 14, 2019 at 2:43 pm

    Thanks so much for the tutorial. I’ve just made a fabulous galaxy cake for my daughter’s 7th birthday. I used navy and black icing on top of purple, turquoise and fuchsia. And then some pearlescent paint and edible glitter sprinkled. It’s so beautiful and I wouldn’t have had the first clue without your fab tutorial. Thank you!

    Reply
    • Whitney says

      December 16, 2019 at 10:25 am

      Yay! Glad the tutorial helped and I’m so happy you were able to make such a beautiful galaxy cake for your daughter!

      Reply
  44. SophiaP says

    September 15, 2019 at 10:44 pm

    Thank you very much for your video and detailed instructions about how to make the Galaxy cake. I gave it a go and it worked beautifully the first time. It’s wonderful that you’re willing to share your skills and knowledge so that other Cakers could improve as well, thank you once again. I’ve tagged you on Instagram

    Reply
    • Whitney says

      September 16, 2019 at 9:33 am

      Hi Sophia! I’m so happy the tutorial was helpful and your galaxy cake turned out beautifully! So excited to check it out on Instagram 🙂

      Reply

Trackbacks

  1. COL-E is 3!!! » Wayfarer Family says:
    September 9, 2020 at 5:48 pm

    […] chocolate birthday cake, so I whipped up my go to recipe, and then tried a cookie dough filling and vanilla frosting. I followed this tutorial to make a galaxy cake, and for a first attempt, decorated in a kitchen […]

    Reply

Leave a Reply Cancel reply

Your email address will not be published. Required fields are marked *

Recipe Rating


Next Post >

A Cactus Cake With Major Desert Vibes

Primary Sidebar

Welcome to Sugar & Sparrow

Welcome to Sugar & Sparrow

Helping you whip up pretty desserts with confidence and creativity. And hopefully sharing a few laughs with you along the way!

Learn More

Connect

let’s bake!

Get my very best recipes, baking tips, and decorating tutorials sent to your inbox

Featured Posts

geode cupcake toppers by sugar and sparrow

Mini Geode Cupcake Toppers Tutorial

favorite things fall 2024

A Few of My Favorite Things (Fall 2024)

strawberry cupcakes recipe with strawberry frosting

Strawberry Cupcakes

Search

Archives

Follow Along

@sugarandsparrowco

LEMON BLUEBERRY CAKE 🍋🫐 so soft and fluffy, LEMON BLUEBERRY CAKE 🍋🫐 so soft and fluffy, packed with zesty lemon flavor, blueberries in every bite, and absolutely scrumptious with lemon cream cheese buttercream. It’s Spring in cake form and I saw someone pair these cake layers with actual cheesecake filling last week and now I NEED TO TRY IT 💛 
⁣
Full recipe linked in my bio or at https://sugarandsparrow.com/lemon-blueberry-layer-cake/ 
⁣
#lemonblueberrycake #lemoncake #lemonblueberry #creamcheesefrosting #cakedecorating
Finally cracked the code on this marbled strawberr Finally cracked the code on this marbled strawberry no-bake cheesecake!! 🍓it’s a classic tangy no-bake cheesecake marbled with strawberry reduction on top of a buttery graham cracker crust. The key is mixing some of the cheesecake filling with the jammy strawberry reduction before swirling the two flavors together, then refrigerate overnight and the filling is velvety and mousse-like with the perfect pops of strawberry flavor.

Recipe is linked in my bio + at https://sugarandsparrow.com/no-bake-marbled-strawberry-cheesecake/

#nobakecheesecake #strawberrycheesecake #strawberry #cakedecorating #nobakedessert
STRAWBERRY SHORTCAKE ICE CREAM CAKE 🍓if Strawbe STRAWBERRY SHORTCAKE ICE CREAM CAKE 🍓if Strawberry Shortcake Ice Cream Bars make you nostalgic for your childhood ice cream truck days, you’re going to LOVE this easy ice cream cake version - no ice cream maker needed 🙌🏼 

Full recipe on my blog at https://sugarandsparrow.com/strawberry-shortcake-ice-cream-cake/

STRAWBERRY CRUNCH 
24 whole (280g) Golden Oreos, finely ground
3 Oz box strawberry jello
4 Tbsp unsalted butter, melted

ICE CREAM LAYERS
1/2 Cup (15g) freeze-dried strawberries
2 Cups heavy whipping cream, cold
1 Tbsp pure vanilla extract, divided
14 Oz sweetened condensed milk
1 1/2 tsp strawberry jam or preserves

1. Combine the strawberry crunch ingredients and bake on a lined cookie sheet at 350ºF for 4 min.
2. For the crust, combine 1 Cup of the strawberry crunch with 2 Tbsp melted butter. Press into the bottom of a 6-inch springform pan and line with an acetate collar. Place in the freezer while you move on.
3. Using a food processor, grind the freeze-dried strawberries into a fine powder. Set aside.
4. Add the heavy whipping cream and 2 tsp of vanilla extract into a chilled bowl, then whip it with a hand mixer to stiff peaks. Place in the refrigerator.
5. Divide the condensed milk between two medium bowls. To one bowl, add 1 teaspoon of vanilla. To the second bowl, add the finely strawberry powder and the jam/preserves. Whisk the ingredients together within each individual bowl.
6. Divide the whipping cream evenly between each of the two bowls you created in the previous step. Fold each sweetened condensed milk mixture together with the divided whipped cream to create the vanilla ice cream and strawberry ice cream.
7. Layer half of each of the ice creams on top of the strawberry crunch crust, sprinkle a layer of strawberry crunch on top, then repeat. Freeze for 6 hours and serve. 
#icecreamcake #strawberryshortcake #nochurnicecream #icecreamlover #strawberry
LEMON CUPCAKES 🍋 after about a dozen recipe tes LEMON CUPCAKES 🍋 after about a dozen recipe tests, this one is everything I could want in a lemon cupcake! Fluffy-yet-moist, bursting with natural lemon flavor, and absolutely irresistible topped with lemon cream cheese buttercream. 

Full recipe (with frosting) linked in my bio + at https://sugarandsparrow.com/homemade-lemon-cupcakes/

INGREDIENTS:
1 Cup (132g) all-purpose flour
1 tsp baking powder
1/4 tsp salt
1/4 Cup (60ml) whole milk, room temperature
3 Tbsp (45ml) lemon juice from 1 medium lemon
3/4 Cup (150g) granulated sugar
3 Tbsp (42g) unsalted butter, room temperature
2 Tbsp (30ml) vegetable oil
2 large eggs, room temperature
1 tsp pure vanilla extract

INSTRUCTIONS:
1. Preheat the oven to 350ºF (177ºF) and line a standard cupcake pan with 12 paper liners.
2. In a large bowl, whisk together the flour, baking powder, and salt. Set aside. 
3. In the bowl of a stand mixer fitted with the paddle attachment (or with a hand mixer and large bowl), add the lemon zest to the sugar and mix on low speed until fragrant and well combined, about 1 minute. Meanwhile, combine the lemon juice with the milk and set aside. 
4. Add the butter to the lemon-sugar mixture and cream on medium speed until and combined, about 2 minutes. Add the vegetable oil and beat until light and creamy, about 3 minutes. Scrape down the bowl and paddle as needed.
5. Mix in the eggs one at a time on low speed, then add the vanilla and turn the mixer to medium speed for one minute.
6. Turn the mixer off and add the flour mixture all at once. Mix on low speed until just combined, then slowly pour in the lemon-milk mixture. Mix until just combined, about 30 seconds.
7. Divide the batter equally between the liners and bake for 14-18 min. Cool, then top with frosting of your choice (link in bio for lemon cream cheese frosting)�
#lemoncupcakes #creamcheesefrosting #lemon #cupcakes #cupcakedecorating
April in my kitchen 🌸 I published 5 NEW recipes April in my kitchen 🌸 I published 5 NEW recipes on my site, baked my Oreo cupcake recipe for a fundraiser and found it was just as delicious as I remember, and filmed/photographed 3 recipes that will be on my blog in May (Lemon Cupcakes, Lemon Cream Cheese Buttercream, and No-Bake Marbled Strawberry Cheesecake) 🥰 

Comment “APRIL” to get all the available recipes and stay tuned for more! 

#bakersofinstagram #springbaking #cakedecorating #cupcakes #bakinglove

Footer

On the Blog

  • Cake Basics
  • Recipes
  • Tutorials

Info

  • About
  • Privacy Policy & Disclosure

stay in the know

Copyright © 2026 · Theme by Sugar & Sparrow