• Cake
  • Frosting
  • YouTube
  • My Favorite Tools
  • Nav Social Icons

  • Skip to primary navigation
  • Skip to main content
  • Skip to primary sidebar
  • Skip to footer
  • Recipes
    • Cake
    • Cupcakes
    • Frosting
    • Ice Cream
    • Vegan
  • Cake Basics
  • Tutorials
  • Blog
  • About
  • Mobile Menu Widgets

    Connect

    Search

Sugar & Sparrow logo in script font

Sugar & Sparrow

Lifestyle and Cake from Portland Oregon

  • Cake Basics
  • Recipes
    • Cake
    • Cupcakes
    • Cookies & Bars
    • Filling
    • Frosting
    • Ice Cream
    • No-Bake
    • Small Batch
    • Vegan
  • Tutorials
  • Book
  • Blog
  • About

Sprinkle Filled Gender Reveal Cupcakes

September 7, 2018 · In: Featured, Tutorials

This was originally a guest post that I wrote for SprinklePop’s blog. It’s too good not to re-share over here, because these cupcakes are just so fun and and my favorite gender reveal idea ever.

A few weeks ago, I got to help celebrate a super special moment in my friend’s life: revealing the gender of her sweet little baby to come! I can’t tell you how exciting it was to help celebrate and be part of the big surprise. Gender reveal parties are so much fun and I’ve seen tons of creative ways to make the big reveal even more spectacular. I wanted to translate that excitement into cupcake form, and lucky for me, SprinklePop just released a new line of Solid Sprinkle Mixes that were the perfect color to represent either gender!

Solid Sprinkle mixes by SprinklePop

how to decorate gender reveal cupcakes

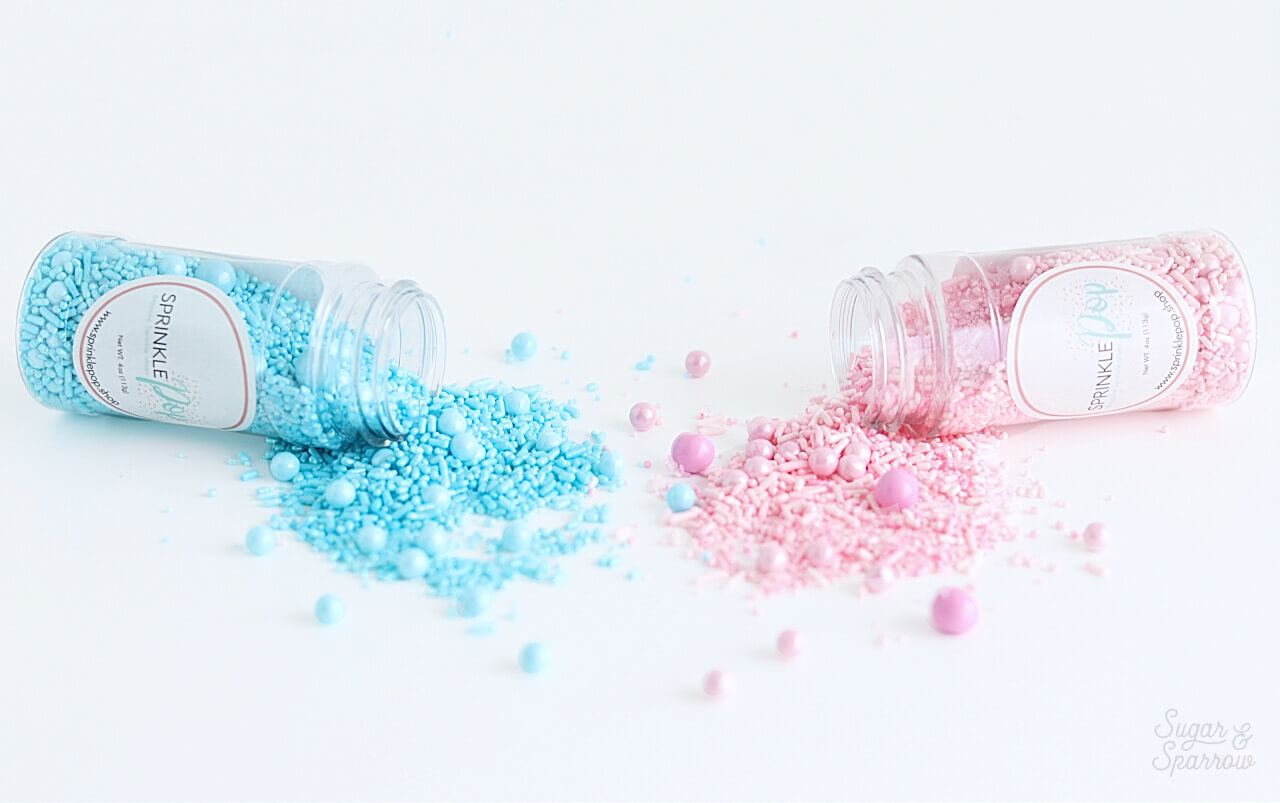
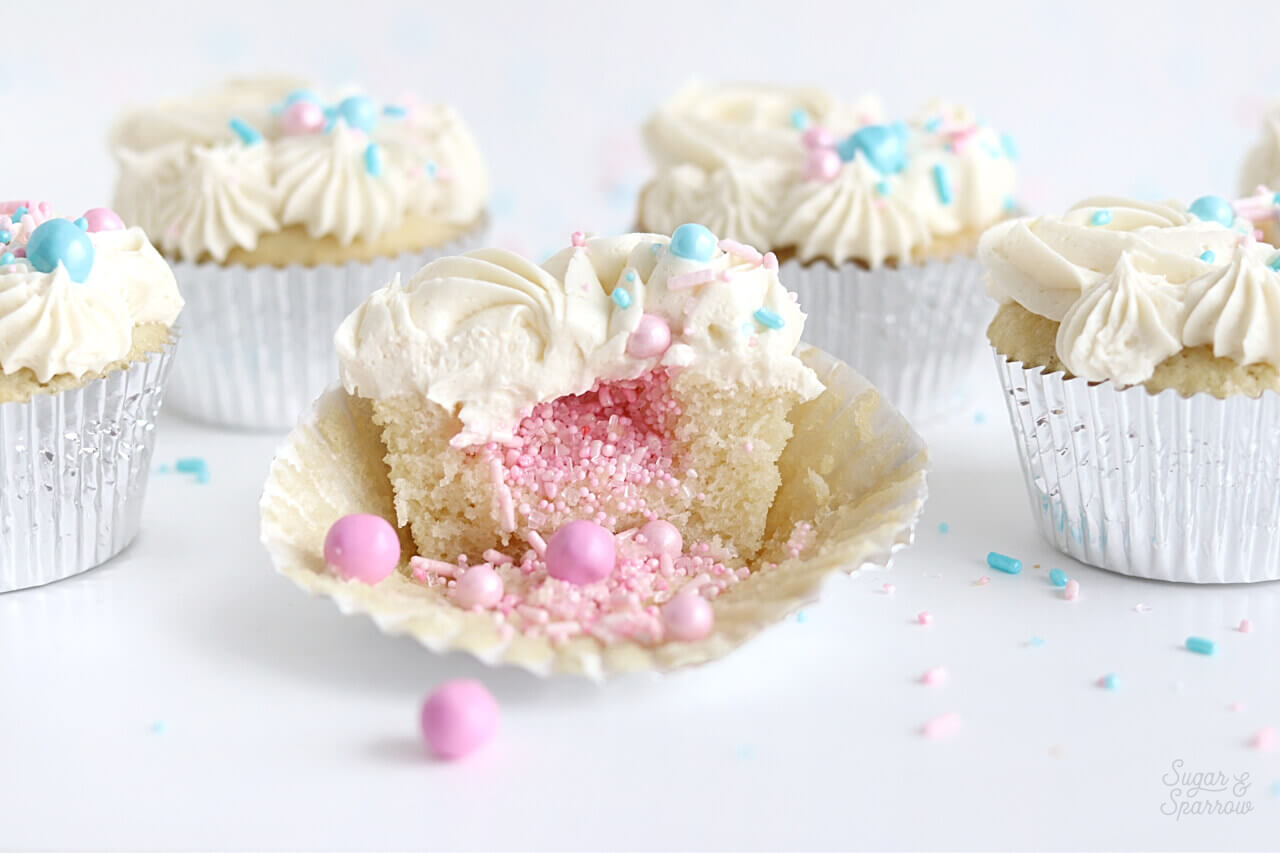
In anticipation of the email I was going to get regarding which color to fill these cupcakes with, I ordered both the Light Pink and Light Blue sprinkle mixes. I got to use the Light Pink (it’s a girl!) inside the cupcakes, but ended up topping them with both colors.  

gender reveal ideas

Side note: SprinklePop’s Solid Sprinkle Mixes come in 22 different colors! They’re all super beautiful and I can’t wait to order some of the other hues. Each mix contains a few different sprinkle shapes, so you get really cool texture in a monochromatic color palette. Gorgeous.

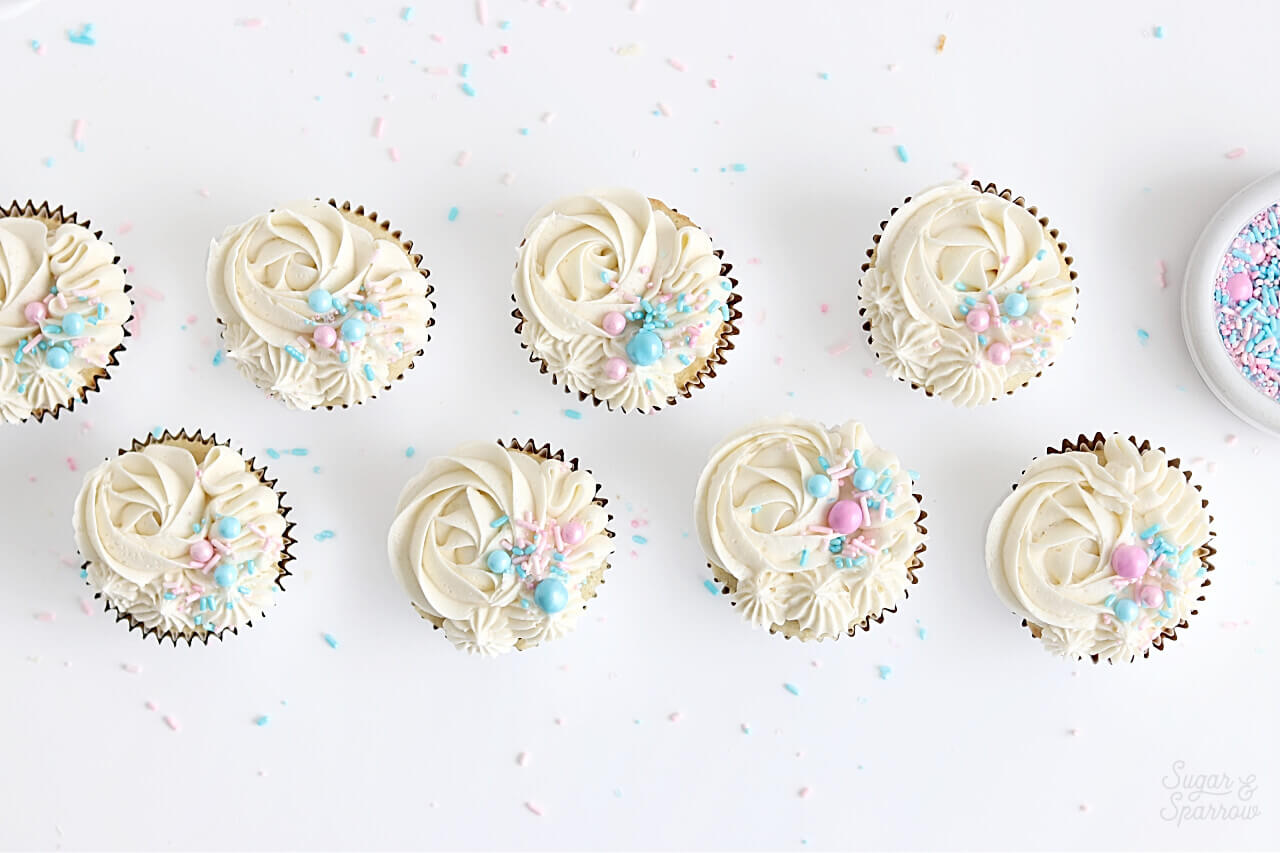
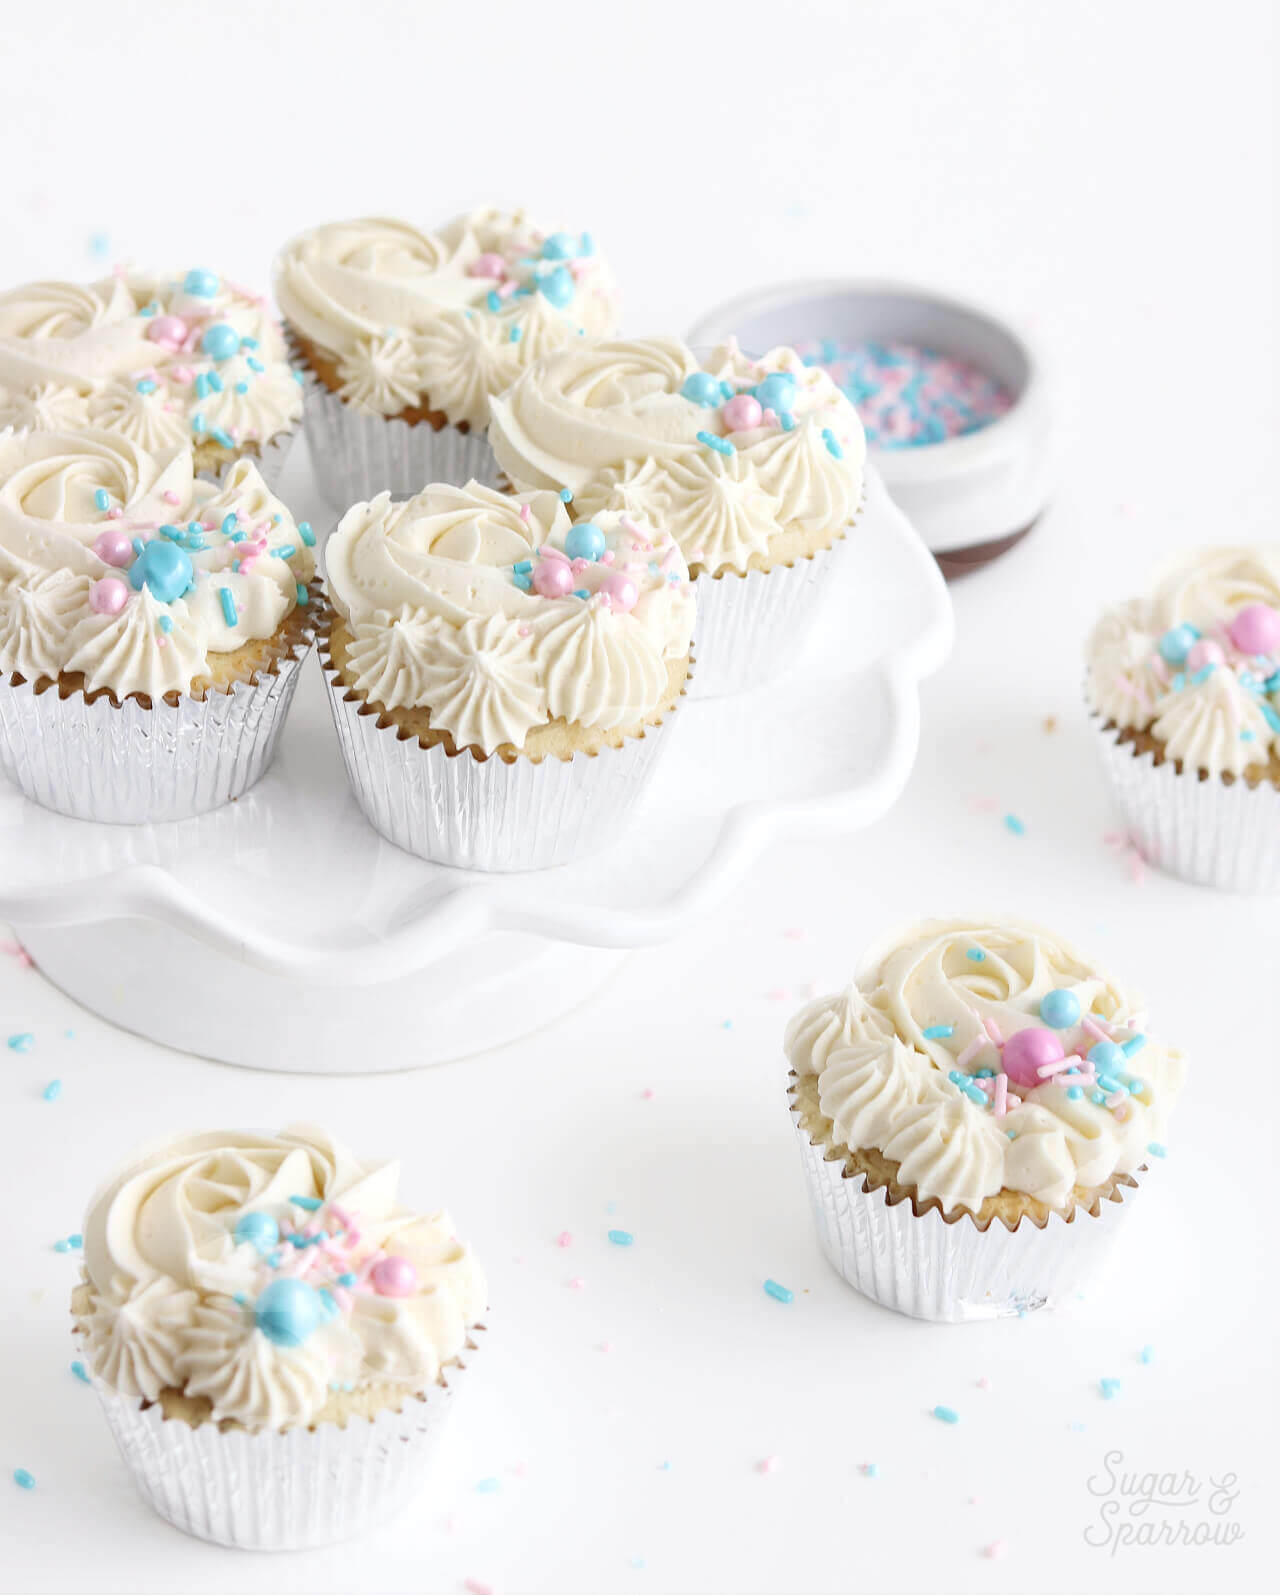
After filling the cupcakes with these pretty pink sprinkles, I topped them with some vanilla buttercream piping and a few sprinkles from each bottle. They definitely look like a mystery on the outside, and when cut open the pink (or blue!) sprinkles tumble out like a pinata. So much fun!

gender reveal cupcakes filled with sprinkles

I’ve seen other ways to create gender reveal cupcakes (tinting buttercream filling or baking the color into the cupcake itself), but the sprinkle approach is hands-down my favorite! The best part about SprinklePop sprinkles is they actually taste good. If you’re gonna have a mouth full of sprinkles, they’ve got to be yummy!

You Will Need

  • Baked cupcakes
  • Piping tip or other circular device to cut a hole in the cupcake
  • SprinklePop sprinkles in Light Pink or Light Blue
  • Neutral-colored buttercream for frosting the cupcakes.
  • Wilton piping tips: 1M, 4B, and 104 (optional)

Step 1: Make Room For Your Sprinkles

In order to fill the cupcakes with sprinkles, you’ll need to create some space within your baked cupcakes. To do so, I use the bottom of a large piping tip. You can use anything with a sharp, circular opening that’s about an inch in diameter.

how to fill cupcakes with sprinkles

Press the piping tip (bottom first) into the cupcake and the middle should come right out. You now have a nice cavity within the cupcake for filling with sprinkles!

Step 2: Fill With Sprinkles

Choose either pink or blue SprinklePop sprinkles to fill the center of the cupcake with, and pour them in until they’re flush with the top.

cupcakes filled with sprinkles by SprinklePop

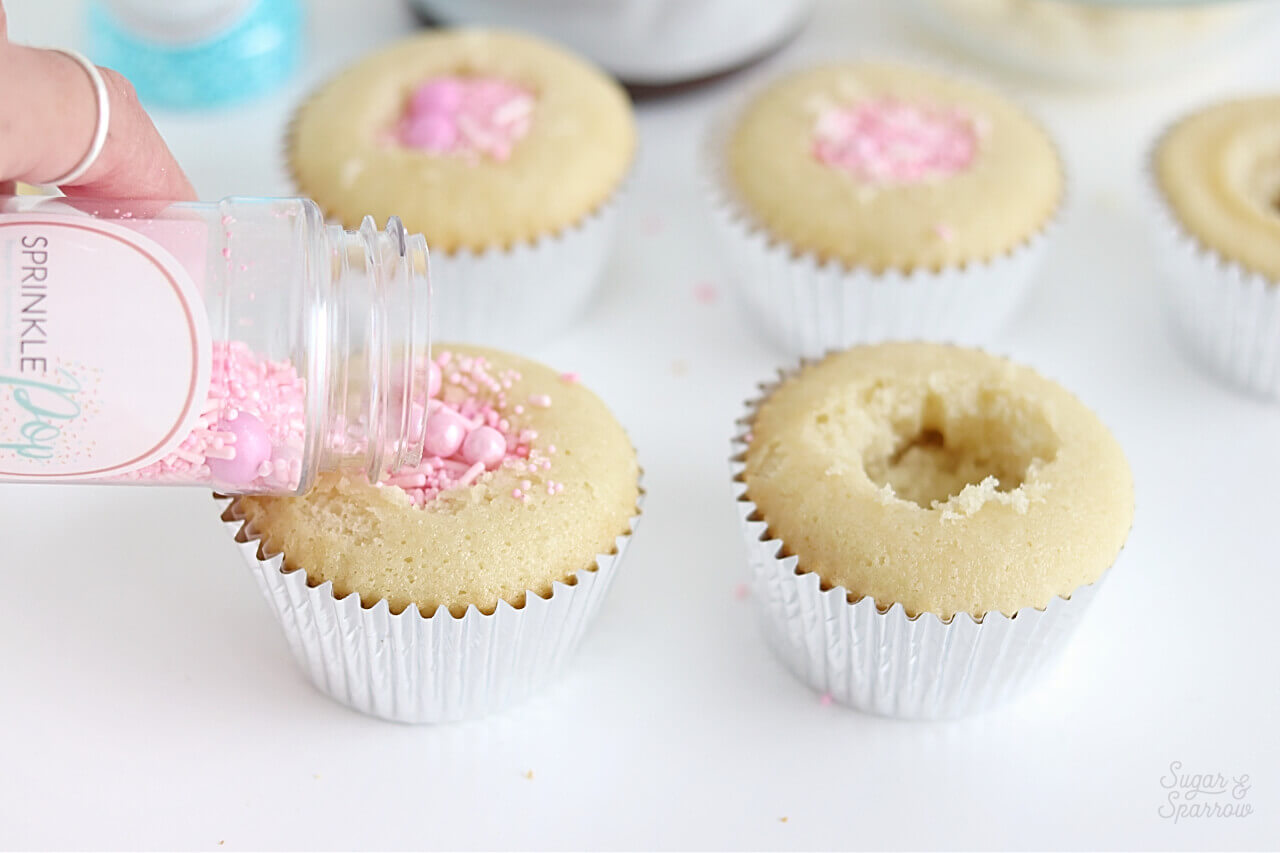
Continue until all of the cupcakes are filled.

Step 3: Frost The Cupcakes

Using a neutral-colored buttercream (I’ve gone with this classic vanilla buttercream recipe), frost the tops of the cupcakes to cover up your sprinkle cavity. The design I’ve created involves piping an off-centered rosette with Wilton tip 1M, then piping a squiggle (for lack of a better word!) with Wilton tip 104 next to the rosette. For the remainder of the cupcake, I’ve piped a few open stars with Wilton Tip 4B.

gender reveal cake ideas by sugar and sparrow

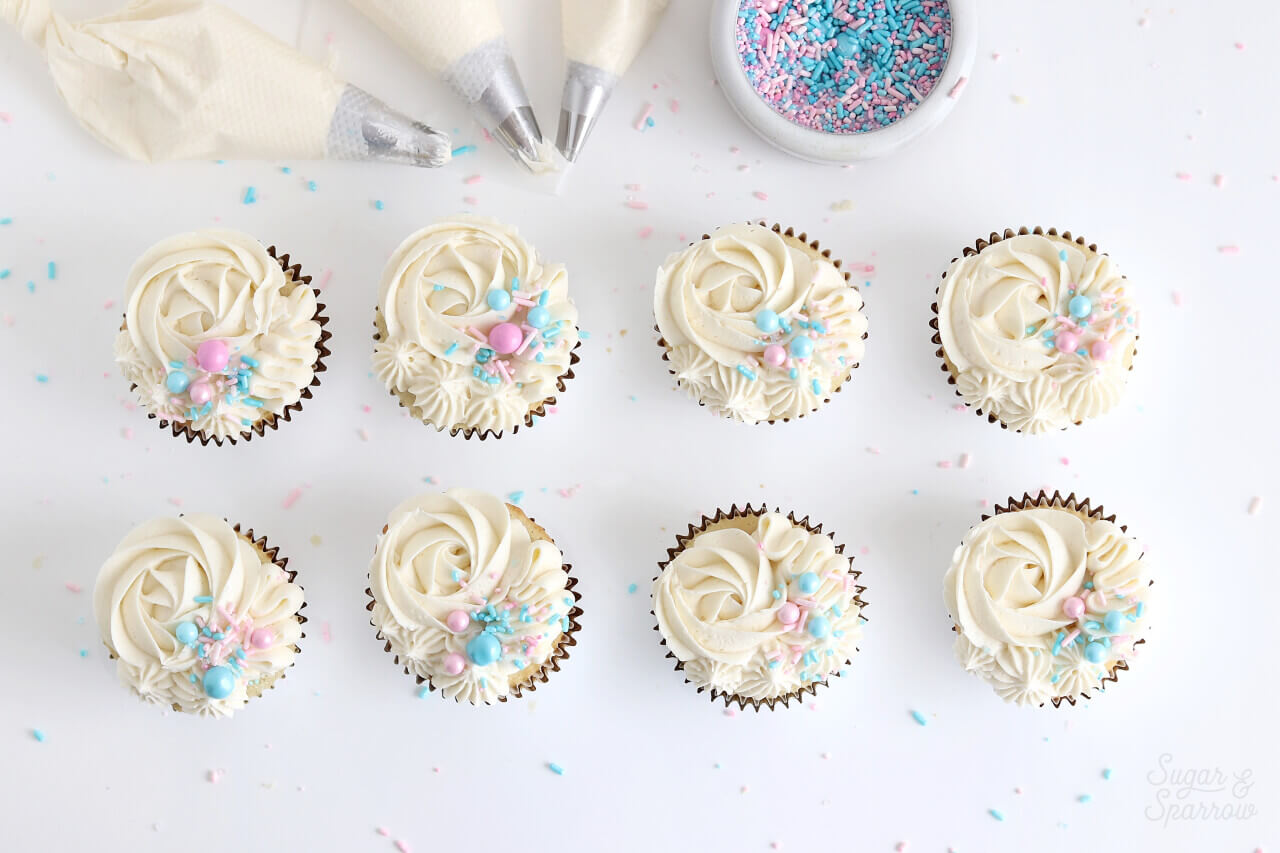
I finished the cupcake design with a few sprinkles in each color (to keep it a big surprise!), but you can decorate your cupcakes any way you like. As long as you go with a gender neutral design on top, you’re good to go! Now all that’s left to do is prepare yourself to be part of one of the most special moments ever.

By: Whitney · In: Featured, Tutorials · Tagged: cake decorating, cupcake decorating, cupcake design, cupcakes with sprinkles, filled with sprinkles, gender reveal, gender reveal cupcakes, gender reveal ideas, gender reveal party, piping tips, sprinklepop, sprinkles

you’ll also love

the best vanilla cupcakes recipeThe Perfect Vanilla Cupcake Recipe
pumpkin layer cake recipe by sugar and sparrowPerfect Pumpkin Layer Cake Recipe
oreo cookies and cream cakeOreo Layer Cake Recipe

Join the List

Stay up to date & receive the latest posts in your inbox.

Reader Interactions

Leave a Reply Cancel reply

Your email address will not be published. Required fields are marked *

Recipe Rating


Next Post >

Sky High Cookies & Cream Ice Cream Cake

Primary Sidebar

Welcome to Sugar & Sparrow

Welcome to Sugar & Sparrow

Helping you whip up pretty desserts with confidence and creativity. And hopefully sharing a few laughs with you along the way!

Learn More

Connect

let’s bake!

Get my very best recipes, baking tips, and decorating tutorials sent to your inbox

Featured Posts

buttercream daisy cake tutorial by sugar and sparrow

Daisy Cake Tutorial

I’m Filming My First Cake Course.. In Spain!

strawberry sheet cake recipe

Strawberry Sheet Cake Recipe

Search

Archives

Follow Along

@sugarandsparrowco

Everything I baked in June☀️I was so motivated to Everything I baked in June☀️I was so motivated to bake this month (summer flavors had me INSPIRED!) and could barely keep up with myself but I ended up publishing 7 new recipes on my website + finalized 5 more that will be up ASAP! 

Comment “JUNE” to get all the recipes that are available now:

-Cookie Dough Ice Cream Cake
-Rocky Road Cupcakes (w/ homemade marshmallow creme filling!)
-Blackberry Lavender Cake
-Homemade Blackberry Filling
-Whipped Cream Cheese Frosting
-Strawberry Shortcake Cookie Bars
-Berries & Cream Sheet Cake

https://sugarandsparrow.com/everything-i-baked-in-june
 
#cake #bakersofinstagram #baking #bakinglove #cakedecorating
WHIPPED CREAM CHEESE FROSTING ☁️ this easy 4-ingre WHIPPED CREAM CHEESE FROSTING ☁️ this easy 4-ingredient whipped cream frosting is deliciously light, comes together SO easily, and is stabilized with cream cheese to make it the perfect thick consistency for filling and frosting cakes and cupcakes!! It’s so good with my strawberry shortcake sheet cake and berries & cream cake and I have a feeling I’m going to be whipping it up for many more summer cakes😍

Full recipe with cake pairing suggestions at https://sugarandsparrow.com/whipped-cream-cheese-frosting/ 

INGREDIENTS 
1 Cup (8oz, 226g) full-fat brick-style cream cheese, cold
1 Cup (120g) powdered sugar
1 tsp pure vanilla extract
2 1/2 Cups (600ml) heavy whipping cream, cold

INSTRUCTIONS
1. Chill the bowl of your stand mixer (or the large bowl you’ll be using with your hand mixer) into the refrigerator for 20 minutes.
2. Into the cold mixing bowl, add the cream cheese and beat on medium speed with the whisk attachment until creamy, 2 min. Add the powdered sugar and mix on low speed until mostly incorporated, then turn the mixer to medium-high speed and mix for 1 min.
3. Add the vanilla extract, then turn the mixer to medium-high speed and slowly pour in the heavy whipping cream (down the side of the bowl so it doesn’t fly everywhere). Once all the cream is added, continue mixing on medium-high for just about 30 seconds longer, keeping a close eye on the mixing bowl to watch it thicken. It should come together into a thick, silky frosting consistency at this point, where you can dip the whisk into the frosting and it holds a slight peak when you hold it upright.
4. Use the frosting immediately to decorate cakes and/or cupcakes for best results!

#whippedcreamfrosting #creamcheesefrosting #cakedecorating #whippedcream #frosting
TOP 10 4TH OF JULY DESSERTS 🎆 These are just a few TOP 10 4TH OF JULY DESSERTS 🎆 These are just a few of my favorite summer dessert recipes that will disappear at any Fourth of July celebration.

Comment “JULY” and I’ll send you all 20+ of my favorite 4th of July dessert ideas – naturally red white and blue desserts like my berries and cream cake, easy no-bake desserts, no-churn ice cream, strawberry shortcake inspired recipes, and all the treats that will go FAST at any barbecue.

https://sugarandsparrow.com/4th-of-july-desserts/

#fourthofjuly #4thofjuly #summerdessert #partycake #dessertideas
STRAWBERRY SHORTCAKE COOKIE BARS 🍓my hot take: str STRAWBERRY SHORTCAKE COOKIE BARS 🍓my hot take: strawberry shortcake toppings on a buttery, soft sugar cookie base is WAY BETTER than traditional strawberry shortcake. I topped my favorite sugar cookie bar recipe with silky whipped cream cheese frosting + homemade strawberry sauce and now I’m ruined 😵

Full recipe is linked in my bio + at https://sugarandsparrow.com/strawberry-shortcake-cookie-bars/ 

SOFT SUGAR COOKIE BARS
2 Cups + 2 Tbsp (283g) all purpose flour
1 tsp baking powder
1/2 tsp baking soda
1/2 tsp salt
3/4 Cup (170g) unsalted butter, room temp
1 Cup (200g) granulated sugar
1 large egg
1 large egg yolk
1 1/2 tsp pure vanilla extract

1. Preheat the oven to 350ºF (177ºC). Grease and line an 8-inch square baking pan with parchment paper, leaving a slight overhang for easy release.
2. Whisk together the flour, baking powder, baking soda, and salt. Set aside.
3. Using a stand mixer with the paddle attachment (or hand mixer) cream together the butter and sugar on high speed until pale and fluffy, 2-3 min.
4. Turn the mixer to medium and add the egg, egg yolk, and vanilla. Mix until combined, then add the flour mixture and mix on low speed until a uniform cookie dough forms.
5. Press the cookie dough into the prepared pan in an even layer, all the way to the edges. Bake for 18-20 minutes, until the edges are just starting to brown. 
6. Cool the sugar cookie bars in the pan for 30 minutes, then transfer to a wire rack to cool completely. Top with whipped cream cheese frosting and strawberry sauce (full recipe linked in my bio!)

#strawberryshortcake #strawberries #whippedcreamfrosting #cookiebars #sugarcookies
BLACK FOREST CAKE 🍒 this is my favorite thing to m BLACK FOREST CAKE 🍒 this is my favorite thing to make during cherry season! My version is decadent chocolate cake soaked with homemade cherry syrup, fresh cherry filling, and whipped cream frosting. Top it with a chocolate ganache drip if you want to go the extra mile! 

Full recipe + decorating tutorial is linked in my bio + at https://sugarandsparrow.com/black-forest-cake-recipe/

PS I’m working on a sheet cake version of this recipe that’s even easier! Stay tuned.

#blackforestcake #cherrycake #chocolatecake #cherries #cakedecorating

Footer

On the Blog

  • Cake Basics
  • Recipes
  • Tutorials

Info

  • About
  • Privacy Policy & Disclosure

stay in the know

Copyright © 2026 · Theme by Sugar & Sparrow