It’s that time of year when all the coffee shops start selling lattes with festive flavors. Anytime I see a Holiday drink menu roll out I can’t help but get inspired to translate those flavors into cake form (see also: my Peppermint Mocha Cake and Hot Cocoa Cake recipes). I thought it was about time for a delicious Gingerbread Latte Cake and to my complete satisfaction (and after lots of recipe testing), this one checks all the boxes!
The recipe starts with a moist, heavenly Gingerbread Cake that will have your kitchen smelling like Holiday cheer. Between the spices, the brown sugar, and the sticky sweet molasses, this Gingerbread Cake tastes like the real deal. It’s got a decadent crumb and is packed with delightful gingerbread flavor. I love using cake flour in most of my recipes to make my cakes as light as possible, but in the recipe testing sessions for this one, I did learn that all purpose flour makes the best structure. The texture turned out perfect in the end!
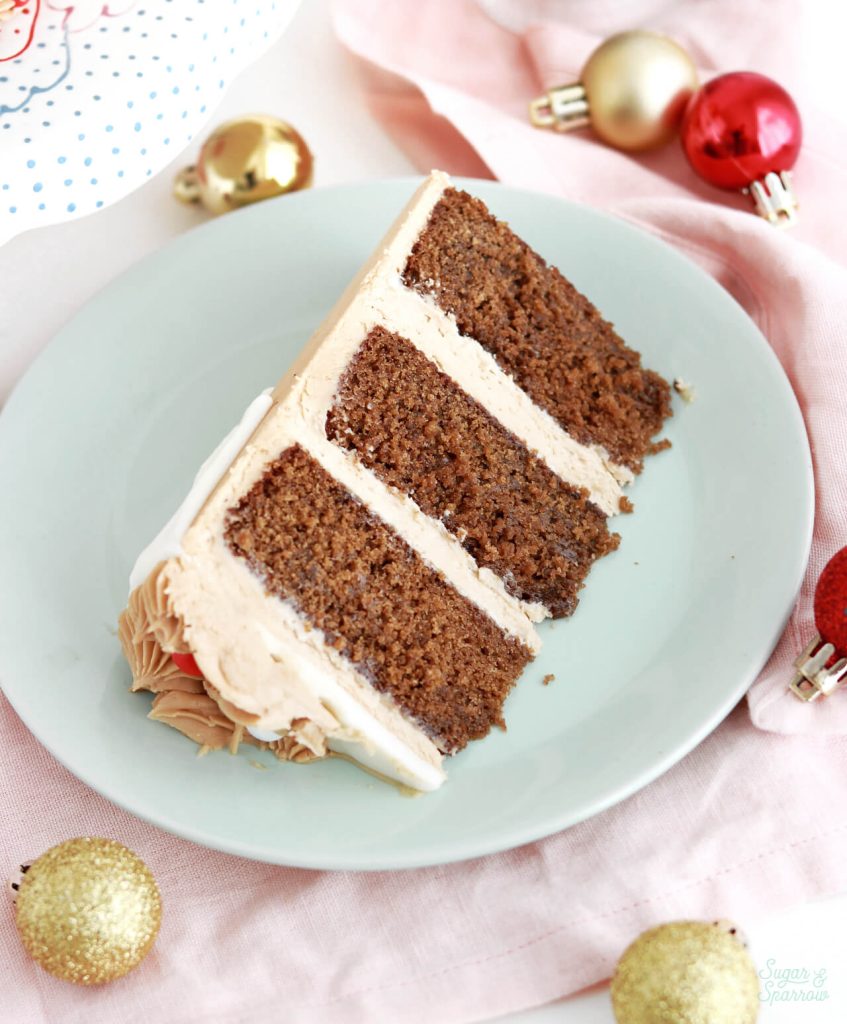
The spiced gingerbread flavor in this cake pairs so perfectly with the richness of the Coffee Buttercream and tastes so reminiscent of a gingerbread latte. I was in Holiday cake heaven eating all the scraps as I decorated. The buttercream is so easy to whip up and uses instant coffee (espresso powder works too!) mixed with milk to add flavor. It’s so silky smooth and perfect for filling, frosting, and piping.
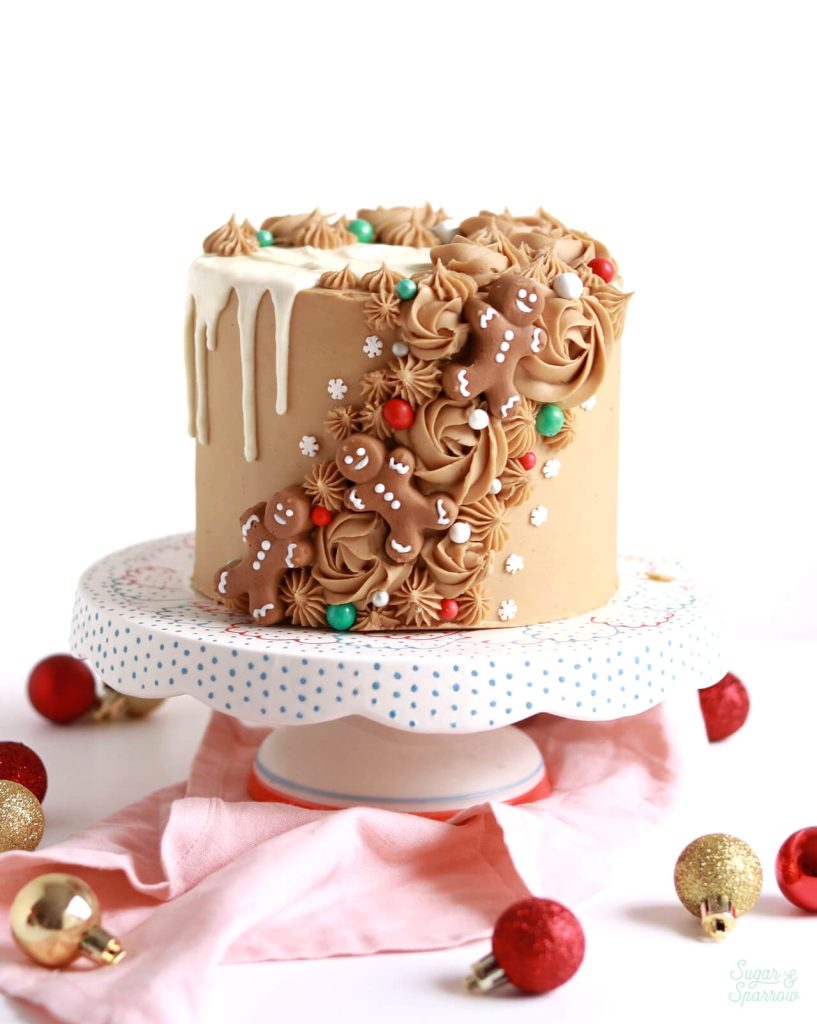
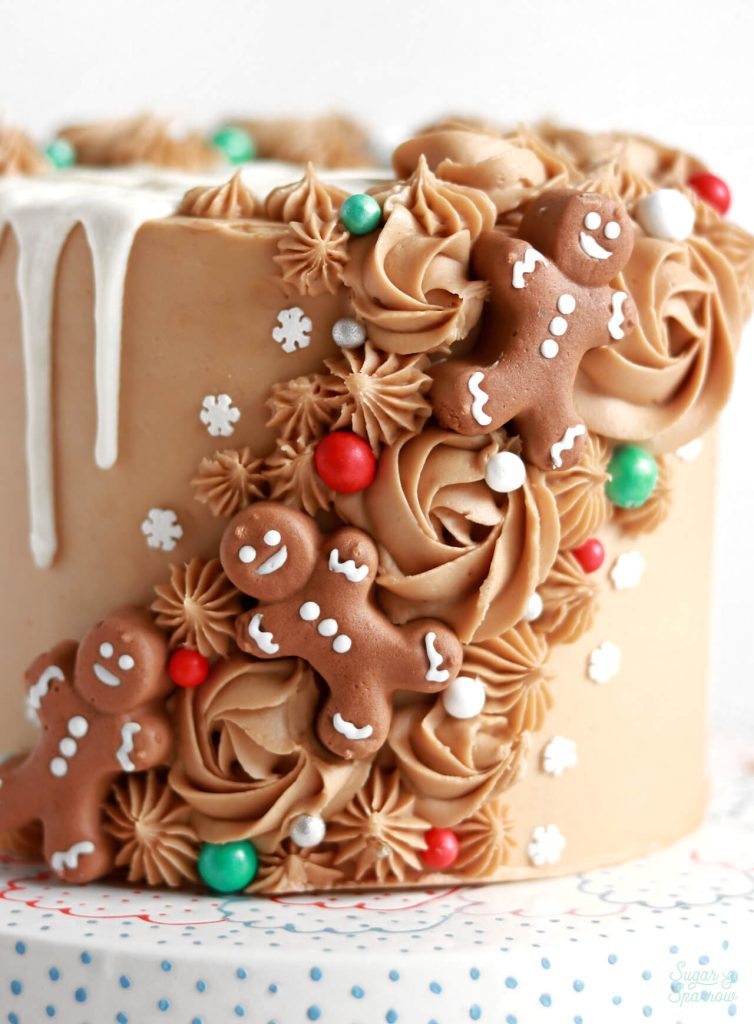
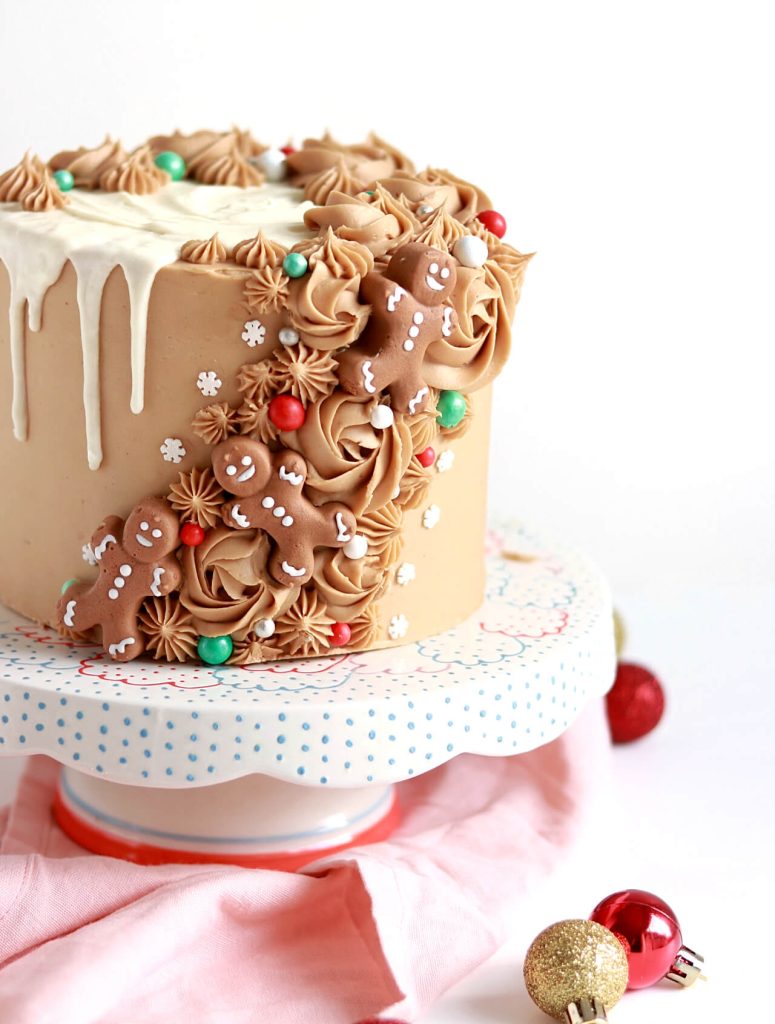
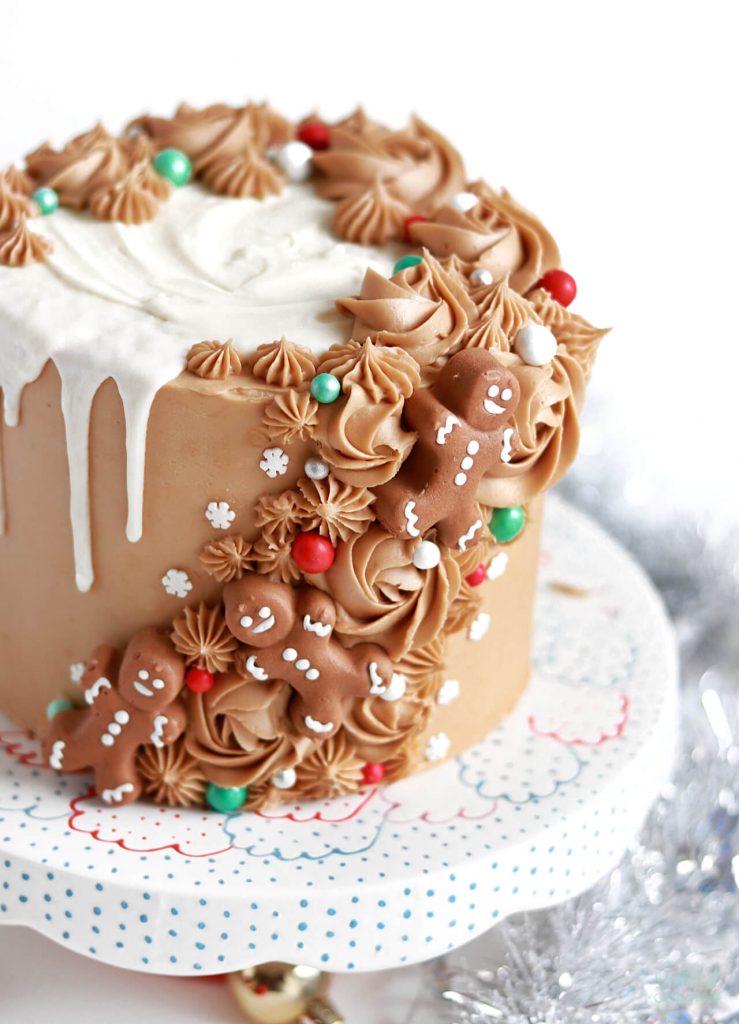
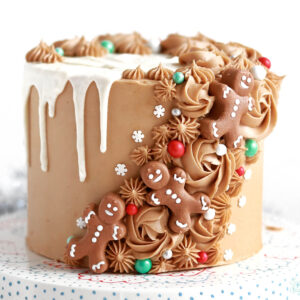
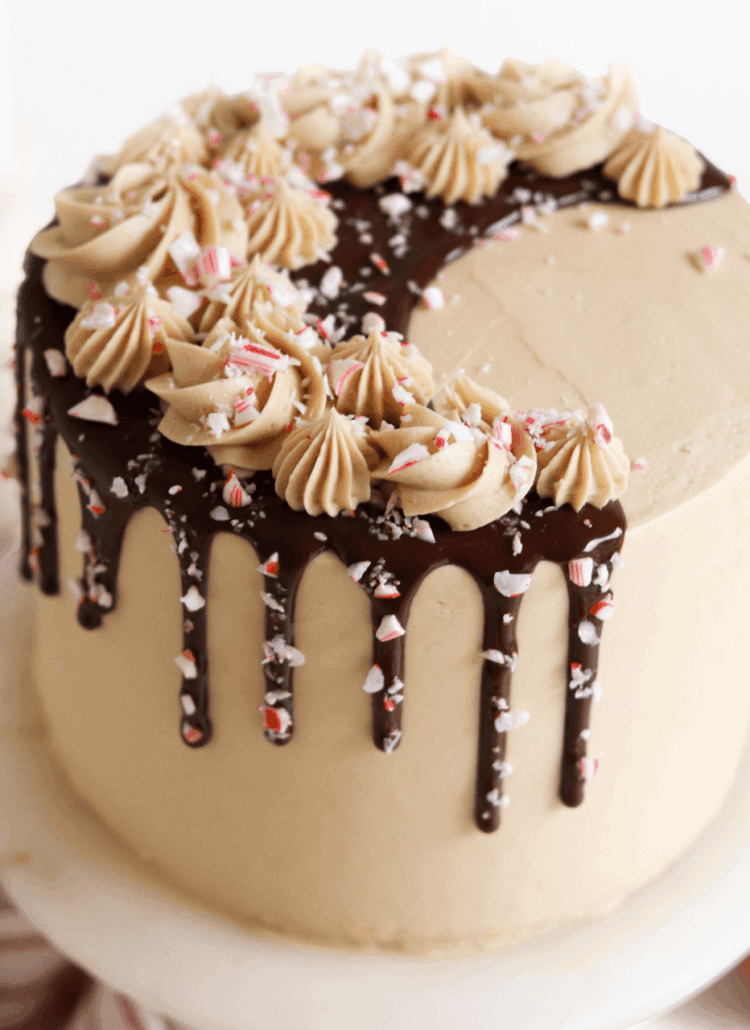
I’ve really been in the Christmas spirit this year, so I decided to go super festive with the cake decorating on this one. The design may look a little complex, but I promise it’s super easy with the right tools. I started by frosting the cake smooth and adding a White Chocolate Ganache Drip on half of the cake. I piped coffee buttercream rosettes with Wilton Tip 1M in a cascading pattern up the side of the cake and around the top (really similar to this technique). Then, I added some gingerbread man marshmallows that I found at my local Fred Meyer (here are similar ones), piped coffee buttercream stars with Wilton Tips 4B and 32, and finished off the look with some pretty Holiday sprinkles.
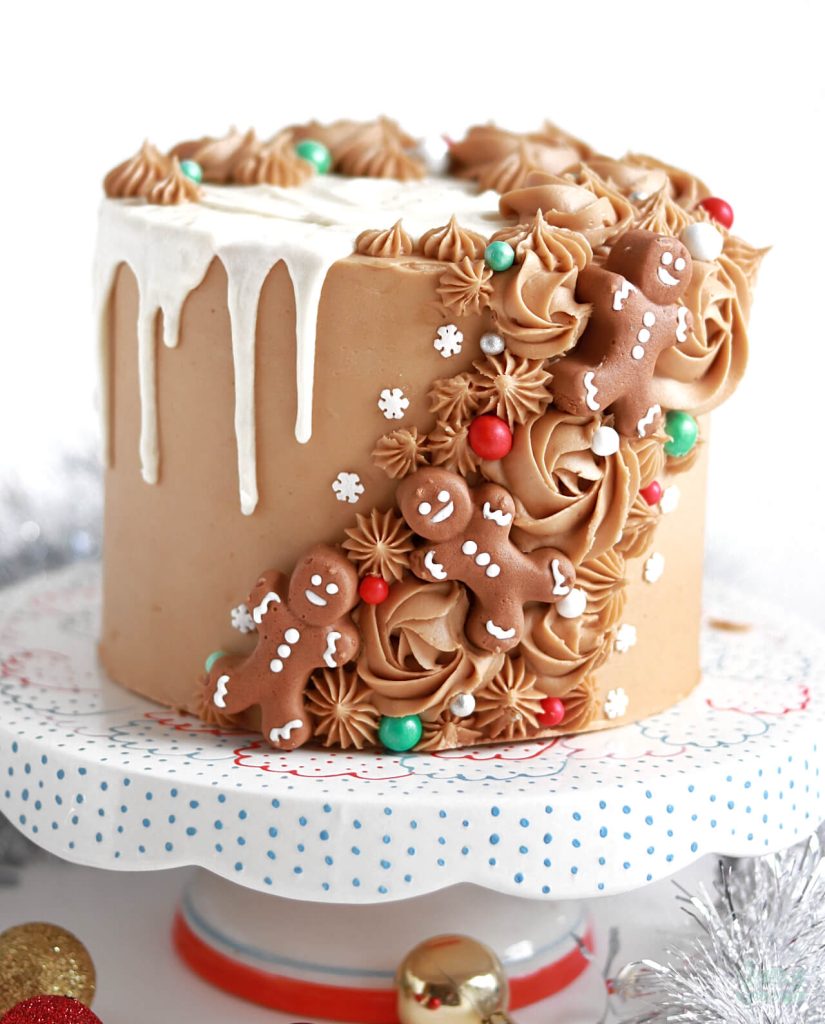
No matter how you choose to decorate, this cake is so delicious whether you’re a gingerbread latte fan already or simply love all Holiday flavors. Here’s a quick video of the cake decorating process I used in case you’re inspired:
If you’re into cake decorating videos like this one, be sure to check out my YouTube channel! You’ll find tons of decorating tutorials, recipe videos, and my Cake Basics series in video format. I’m always adding new videos there, so be sure to hit the subscribe button and be in the know when I post a new one.
Gingerbread Latte Cake Recipe
Ingredients
Gingerbread Cake
- 2 3/4 Cups (360g) all purpose flour
- 1 1/2 tsp baking powder
- 1/2 tsp baking soda
- 1/2 tsp salt
- 2 tsp ground ginger
- 1 1/2 tsp ground cinnamon
- 1/2 tsp ground nutmeg
- 1/2 tsp ground cloves
- 1 Cup (226g) unsalted butter, room temperature
- 3/4 Cup (150g) white granulated sugar
- 1/2 Cup (95g) packed brown sugar
- 3 large eggs, room temperature
- 2 tsp pure vanilla extract
- 3/4 Cup (180ml) molasses
- 1 Cup (240ml) full fat buttermilk* DIY recipe in notes
Coffee Buttercream
- 1 Tbsp instant coffee powder or espresso powder
- 3 Tbsp whole milk, room temperature
- 2 Cups (452g) unsalted butter, room temperature
- 7 Cups (840g) powdered sugar
- 4 tsp pure vanilla extract
- 1/4 tsp salt, or to taste
Decorations
- gingerbread man marshmallows link to similar ones below
- white chocolate ganache drip link to recipe below
- holiday sprinkles link below
Instructions
Make the Gingerbread Cake
- Preheat the oven to 350°F. Prepare three 6-inch or two 8-inch cake pans by spraying the sides with a cooking spray (Baker's Joy is my favorite) and a parchment or wax paper circle fitted to the bottom of the pan. Alternatively, you can grease and lightly flour the pans.
- Add the flour, baking powder, baking soda, salt, ginger, cinnamon, nutmeg, and cloves into a bowl. Whisk to combine and set aside.
- In the bowl of your stand mixer (a handheld mixer works fine too!), cream the butter on medium-high for two minutes. Add in the white and brown sugars and cream on medium-high for another two minutes until light and fluffy, scraping down the bowl and paddle as needed. Turn the mixer to low and add the eggs one at a time. Add the vanilla and molasses, turn the mixer to high, and beat for one full minute.
- With the mixer on low speed, alternate adding the flour mixture and the buttermilk, beginning and ending with the flour mixture. Mix until just incorporated. Scrape down the sides and bottom of the bowl and give it a few stirs to make sure there are no lumps. Batter will be thick, but pourable.
- Pour the batter into prepared cake pans (no more than 2/3 of the way full) and bake for 30-35 minutes. They’re done when they spring back to the touch and a toothpick inserted into the middle comes out clean. Let the cakes cool in the pan for five minutes before turning them out onto a wire rack for an additional few hours of cooling. Make sure they’re entirely room temperature before applying any frosting.
Make the Coffee Buttercream
- Combine the instant coffee powder (or espresso powder) with the whole milk and set aside. In the bowl of a stand mixer, cream the butter on med-high until light and fluffy (about 5 minutes), scraping down the bowl and paddle a few times in between.
- Add powdered sugar a few cups at a time, scraping down the bowl and paddle between intervals. Then add the vanilla, the coffee/espresso milk mixture, and salt. Mix on low until fully incorporated, about one minute.
Assembly
- Once the Gingerbread Cakes have cooled completely, level and torte each layer to your desired height. Fill and crumb coat the cake layers with Coffee Buttercream. Place the crumb coated cake into the refrigerator for at least 20 minutes to firm up before moving on.
- To create the cake design pictured, frost a smooth layer of Coffee Buttercream around the cake and place it back into the refrigerator for at least 30 minutes, then create drips on half of the cake with White Chocolate Ganache.
- Fit one piping bag with Wilton tip 1M, a second piping bag with Wilton tip 4B, and a third with Wilton tip 32. Divide the remaining Coffee Buttercream amongst the three bags. Pipe rosettes with Wilton tip 1M in a diagonal direction up the side of the cake, continuing halfway around the top rim. Place gingerbread men marshmallows decoratively between the rosettes. Pipe stars with Wilton tips 4B and 32 around the rosettes and marshmallows, continuing up the side of the cake and halfway around the top edge. Here is a similar technique for the piping. Finish the look with Holiday sprinkles.
Notes
- The Gingerbread Cake can be made ahead and stored at room temperature, covered tightly in plastic wrap, for up to two days. Alternatively, you can cover with plastic wrap and store in the freezer for up to two months before thawing to room temperature.
- The Coffee Buttercream can be made ahead and stored in an airtight container in the refrigerator for up to two weeks. When you’re ready to use it, bring it back to room temperature and re-whip in your stand mixer to bring back to smooth buttercream consistency.
Did you make this Gingerbread Latte Cake recipe? I want to know how it went! Let me know in the comments below and feel free to tag @sugarandsparrowco on Instagram and show me! I love to see what you create.

This cake tastes fantastic and the coffee buttercream is to die for. I kept eating it. Surprisingly, some of it made it on the cake lol. I did overtake it just slightly but my bad because I added 5 more minutes since I live in Florida. Anyway, fantastic
Just wanted to let you know. I baked your cake for the contact center Bake Off…. And I won!!
Everyone loved it!
Thank you, for sharing your creation!
Oh my gosh that makes me so happy!! Congratulations, Vanessa!!
This looks amazing…Where i live i cant get molasses is there any possible substitution? Im sure the flavor will change slightly but I want to get close as I can, i was afraid just leaving it out would change the texture too?
Hi Nicole! You should be able to find molasses in the baking aisle at your grocery store. It’s essential to gingerbread for both flavor and texture and I don’t recommend substituting it for anything.
I love it so much make it my holiday traditions.
Hi there
How would this be with half oil and butter or just oil?
Thankyou:)
Hi Zahara! I have never tried that before so it would be a total experiment. I think it could work, but I’m not entirely sure. Let me know if you try it though!
Hi Whitney,
Yes, I finished my second bake using 95 g of brown sugar. It was a cake I was taking to the school where I used to work…and they absolutely loved it!
Phew. I’m so happy it was redeemed!