• Cake
  • Frosting
  • YouTube
  • My Favorite Tools
  • Nav Social Icons

  • Skip to primary navigation
  • Skip to main content
  • Skip to primary sidebar
  • Skip to footer
  • Recipes
    • Cake
    • Cupcakes
    • Frosting
    • Ice Cream
    • Vegan
  • Cake Basics
  • Tutorials
  • Blog
  • About
  • Mobile Menu Widgets

    Connect

    Search

Sugar & Sparrow logo in script font

Sugar & Sparrow

Lifestyle and Cake from Portland Oregon

  • Cake Basics
  • Recipes
    • Cake
    • Cupcakes
    • Cookies & Bars
    • Filling
    • Frosting
    • Ice Cream
    • No-Bake
    • Small Batch
    • Vegan
  • Tutorials
  • Book
  • Blog
  • About

Spooky Black Buttercream Halloween Cake

October 1, 2019 · In: Featured, Halloween, Seasonal, Tutorials

This was originally a guest post that I wrote for SprinklePop’s blog. It’s too good not to re-share over here, because this Halloween cake is such a fun and easy showstopper to create. Enjoy! 

Halloween is one of my favorite holidays. I’m one of those people who starts making big plans for costume ideas months ahead of time and watches all the scary movies as soon as they hit Netflix. So when I saw some sneak peeks of SprinklePop’s Halloween sprinkle lineup, I couldn’t help my brain from bursting with spooky cake ideas! I got my hands on the Monster Mashup sprinkle mix as soon as it hit the shelves and got right to work on planning the ultimate Halloween cake.

Halloween sprinkles cake

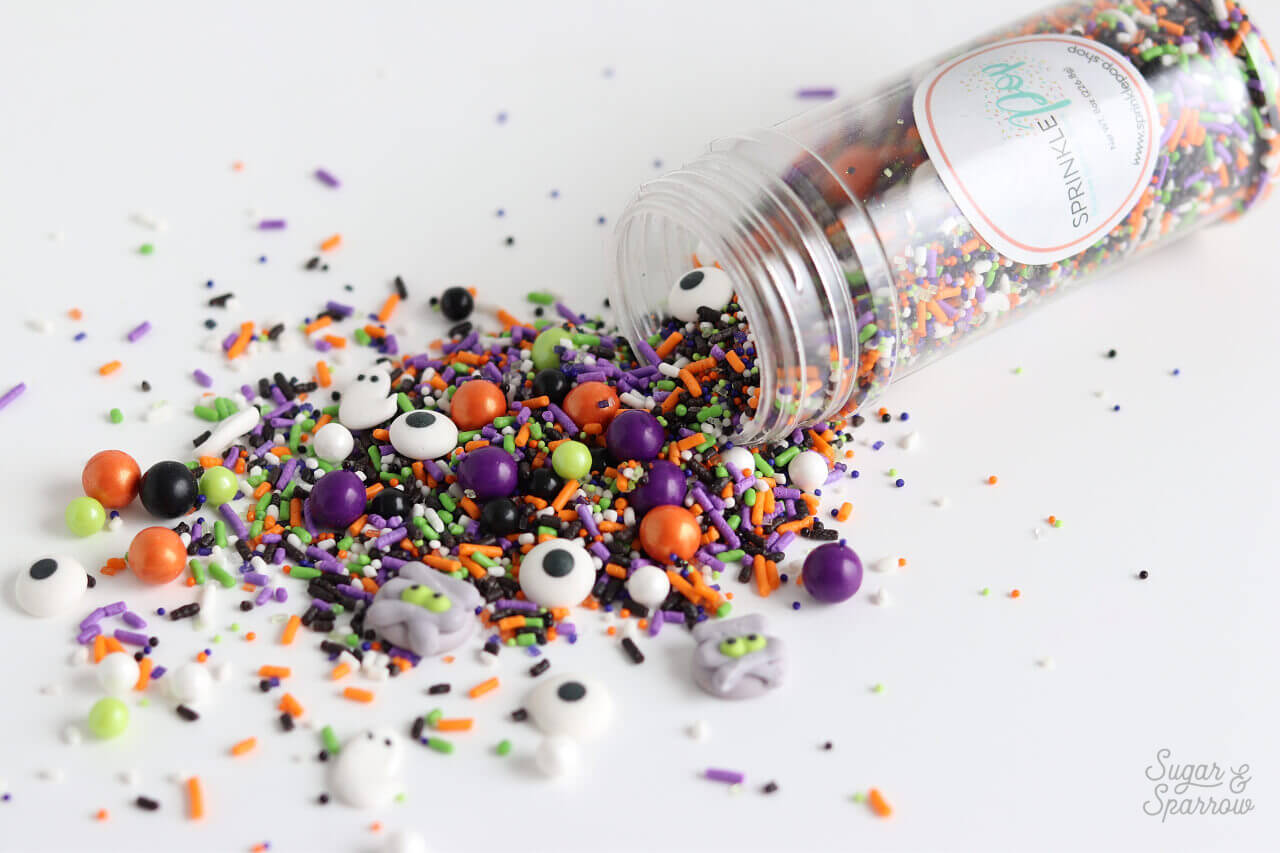
The Monster Mashup sprinkle mix is just what it sounds like: a fun collection of monster-esque sprinkles mixed up with some pretty Halloween colored awesomeness. It’s well-saturated with cute candy mummies, googly eyes, and ghosts. Just look at the variety of shapes and colors you get:

Monster Mashup Sprinkles by SprinklePop

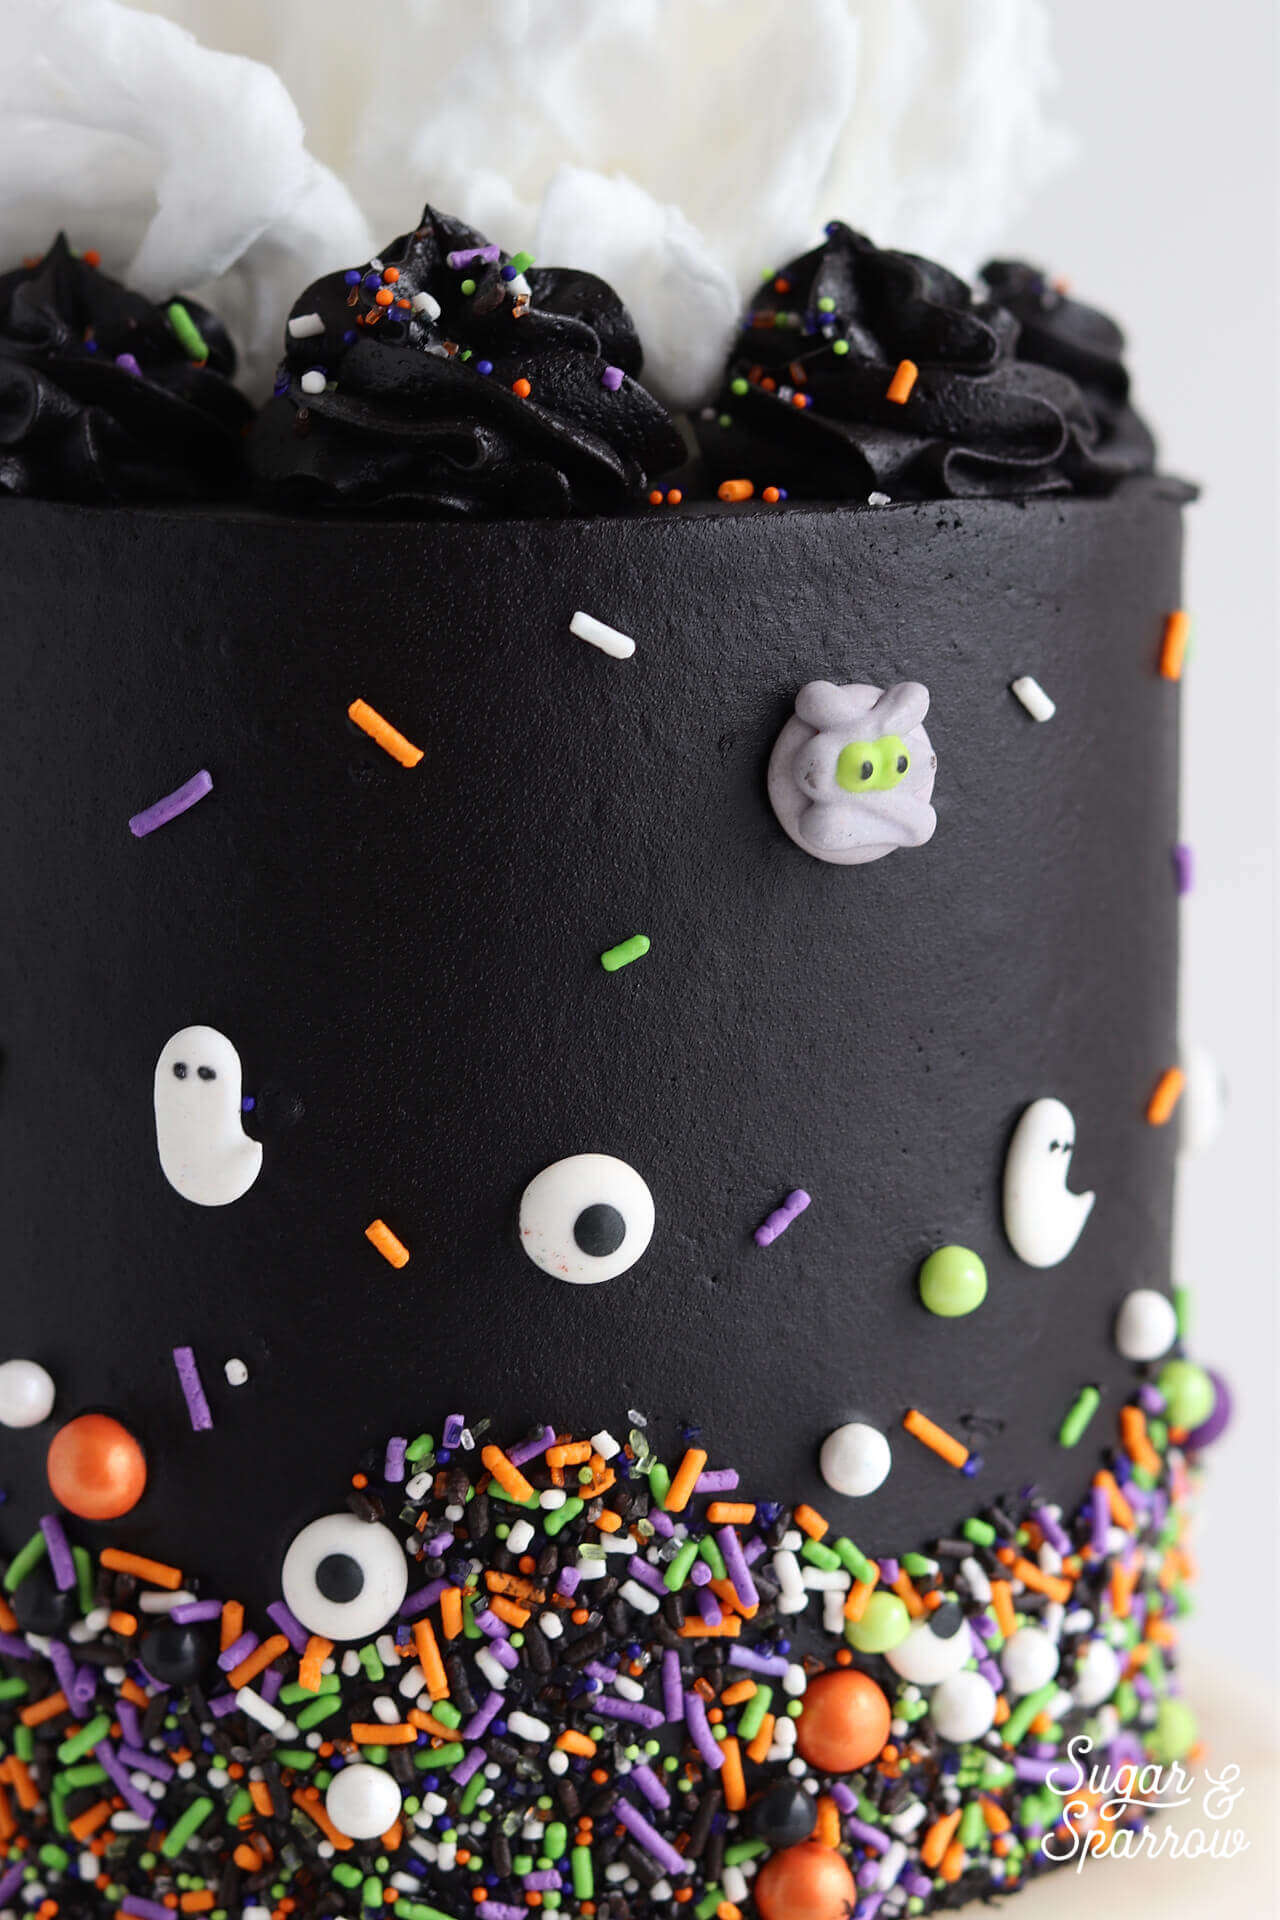
In the spirit of Halloween, I decided that the perfect backdrop for these Monster Mashup sprinkles is black buttercream. Pitch black buttercream to be exact. Using a floating technique for placing the sprinkles, it almost looks like those googly eyes, mummies, and ghosts are levitating in the dark! To add to the spook-factor, I’ve also topped the cake with some white cotton candy that’s reminiscent of cauldron smoke.

halloween cake with black buttercream and sprinkles

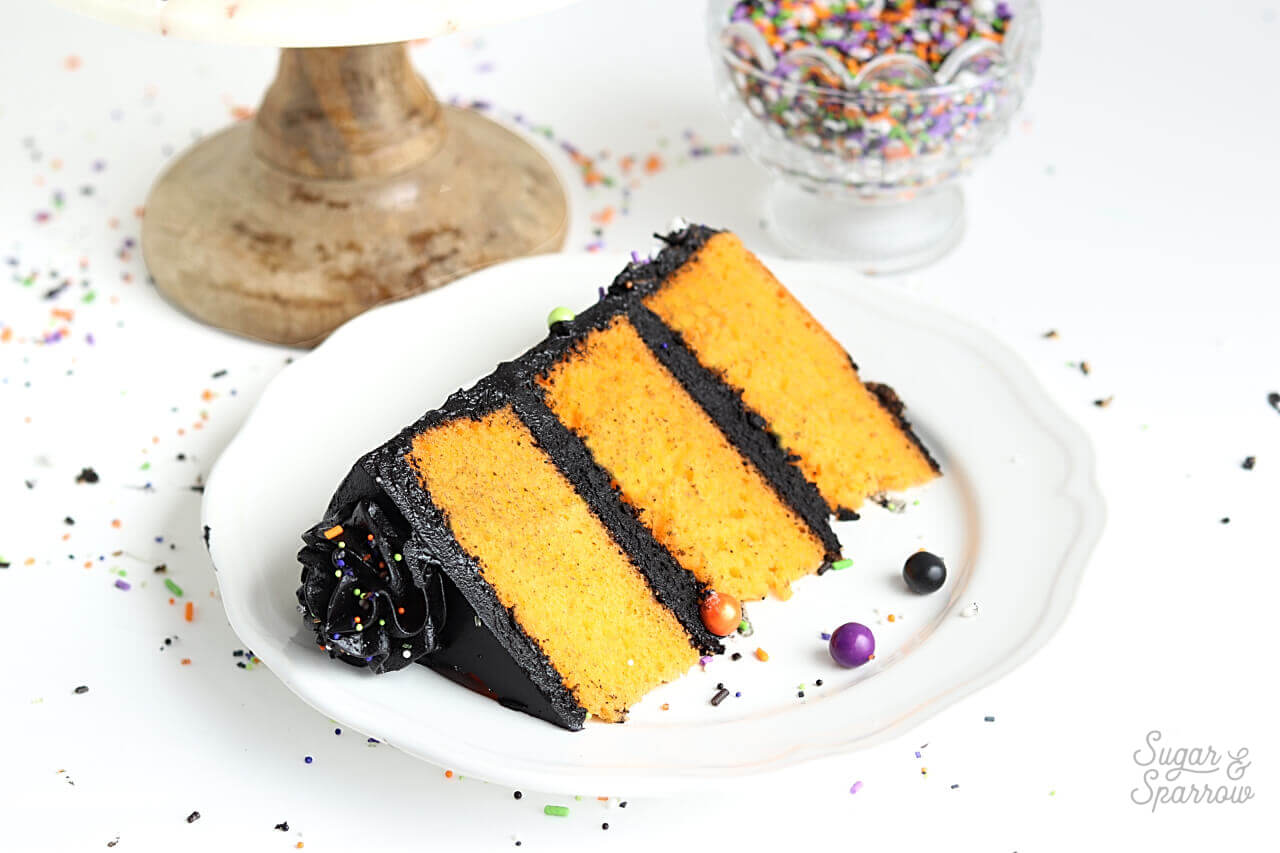
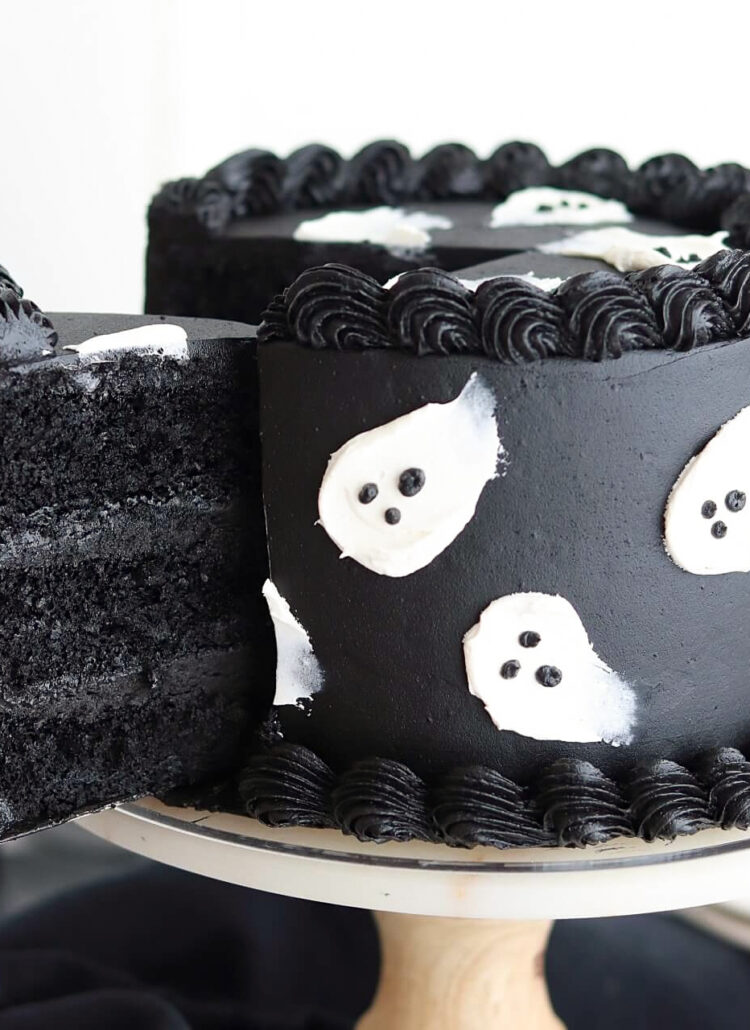
And because I’m an ultra Halloween nerd, I also tinted the vanilla cake with orange food color gel underneath it all. Everyone knows orange and black are the signature colors of this horrifying holiday. Muah ha ha ha.

orange cake with black frosting for halloween

I’ve included a full written tutorial below for how to make and assemble this cake, from achieving pitch black buttercream to perfectly placing your Monster Mashup sprinkles. First, here’s a behind-the-scenes look at the decorating process: 

Whether you’re in need of a Halloween party showstopper or you just want to make something for the love of spooky cakes, this one’s for you!

You Will Need:

  • Chocolate buttercream (here’s the recipe I use)
  • 2 tsp Americolor Super Black food color gel
  • A great vanilla cake recipe
  • A few drops of orange food color gel, optional
  • Icing spatula and scraper
  • SprinklePop Monster Mashup Sprinkles
  • Piping Bag
  • Wilton Piping Tip 1M (or another favorite piping tip)
  • White cotton candy

Step 1: Make The Chocolate Buttercream

Going from large amounts of white buttercream to black is near impossible. I’ve successfully tinted small quantities before, but in my experience, the easiest way to turn large amounts of buttercream pitch black is to start with your favorite chocolate buttercream recipe. Since brown is not far from black on the color wheel, you won’t have to use a ton of food coloring to get there.

chocolate buttercream recipe by sugar and sparrow

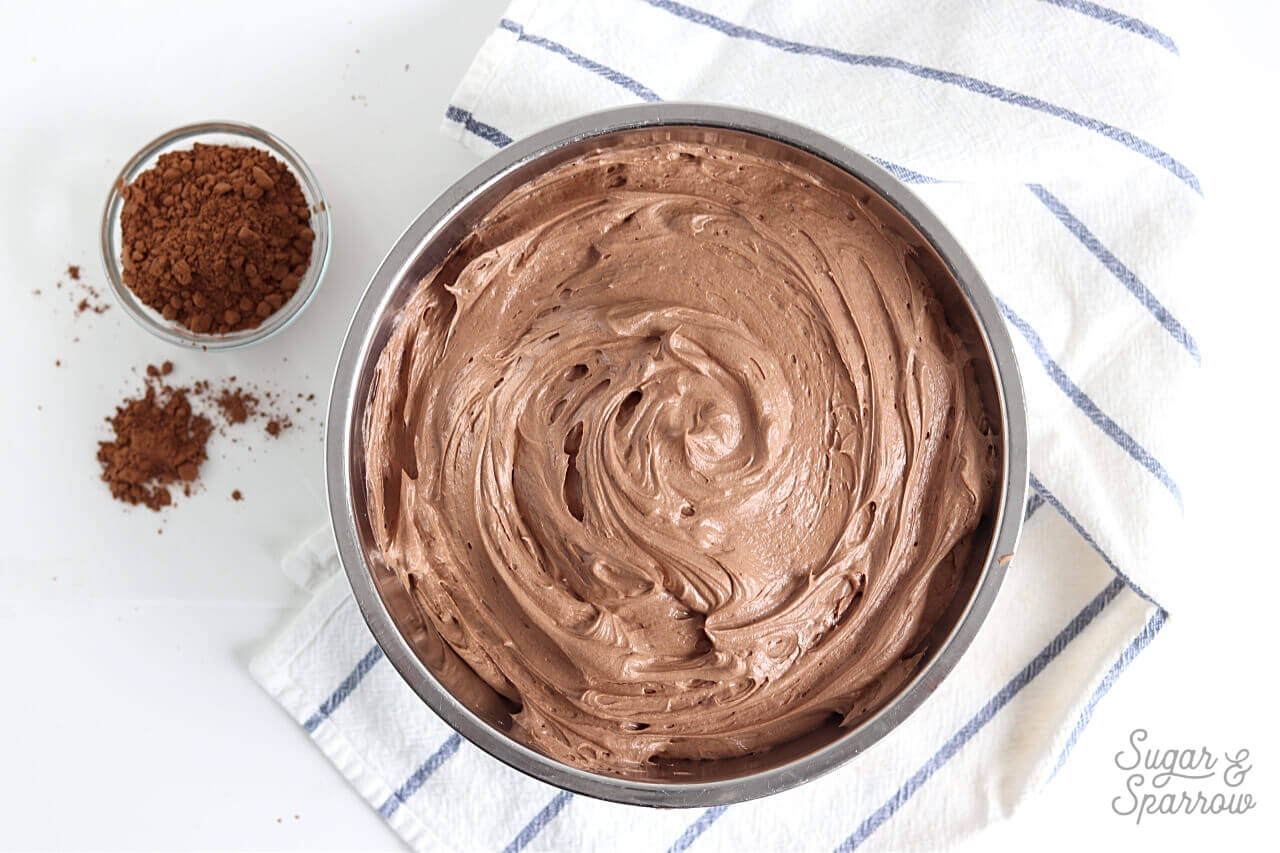
If you don’t yet have a favorite chocolate buttercream recipe, I’ve got a great one for you here! You’ll want to double that recipe to have enough for filling and frosting this cake.

Step 2: Tint The Chocolate Buttercream Black

To get the best consistency of black buttercream, you need a food color gel that’s so concentrated you don’t need to use the entire bottle. My absolute favorite food color gel for the job is Americolor Super Black. It’s a water-based gel and is so powerful you’ll only need a little bit of color! And best of all, it doesn’t affect the taste of your buttercream at all. Not even a little bit.

americolor super black buttercream

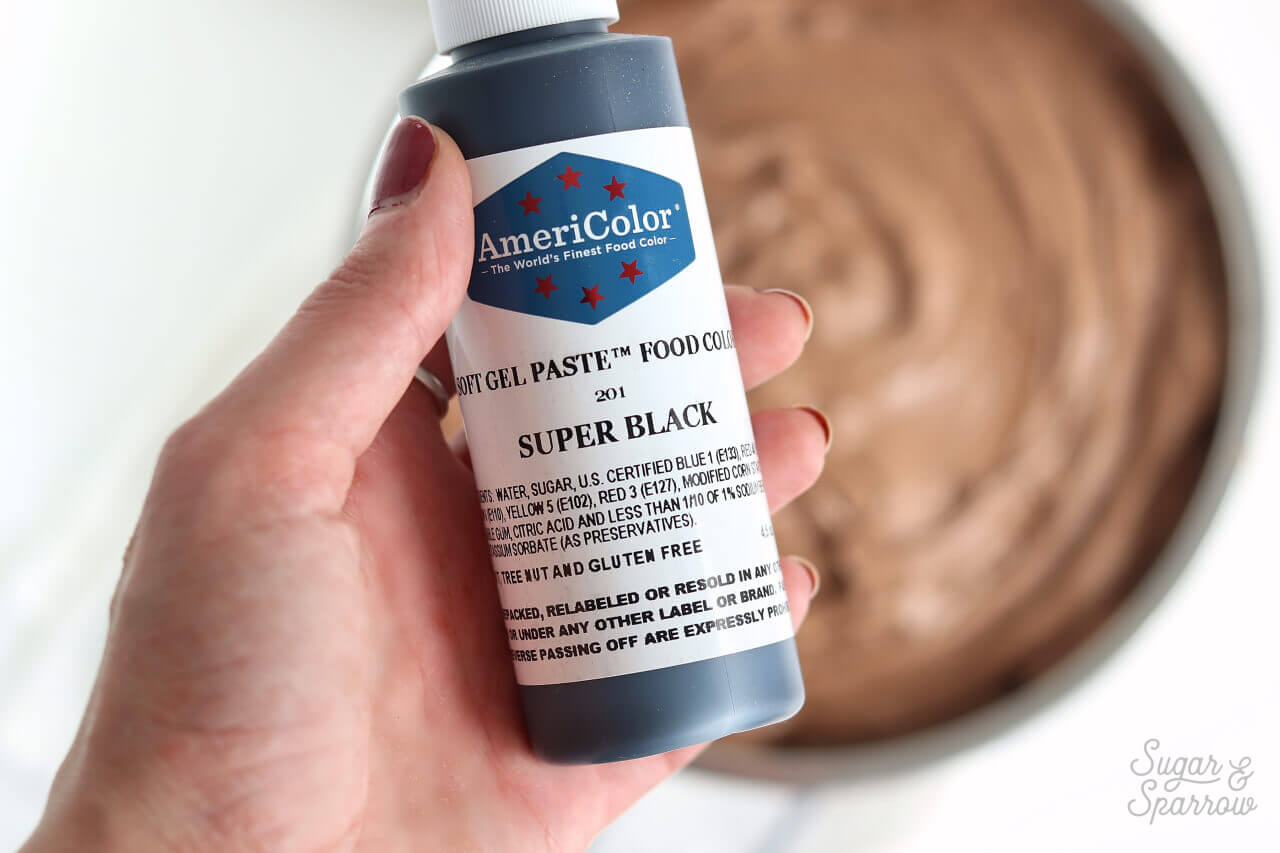
Once you’ve made your chocolate buttercream, add 2 tsp of Americolor Super Black and make sure it’s fully incorporated. I add it at the end while my buttercream is still in the stand mixer and let the paddle attachment do all the hard work for me.

Step 3: Let The Buttercream Set Overnight

After adding your food color gel, note that your chocolate buttercream won’t be pitch black right away. It’ll probably look a bit like dark concrete. The missing ingredient here is time. In order to let that food color gel work it’s magic, you’ll need to add your buttercream to an airtight container and stick it in the fridge overnight.

how to go from grey to black buttercream

In the morning, bring it back to room temperature and whip it all back up in your stand mixer.

how to make black buttercream

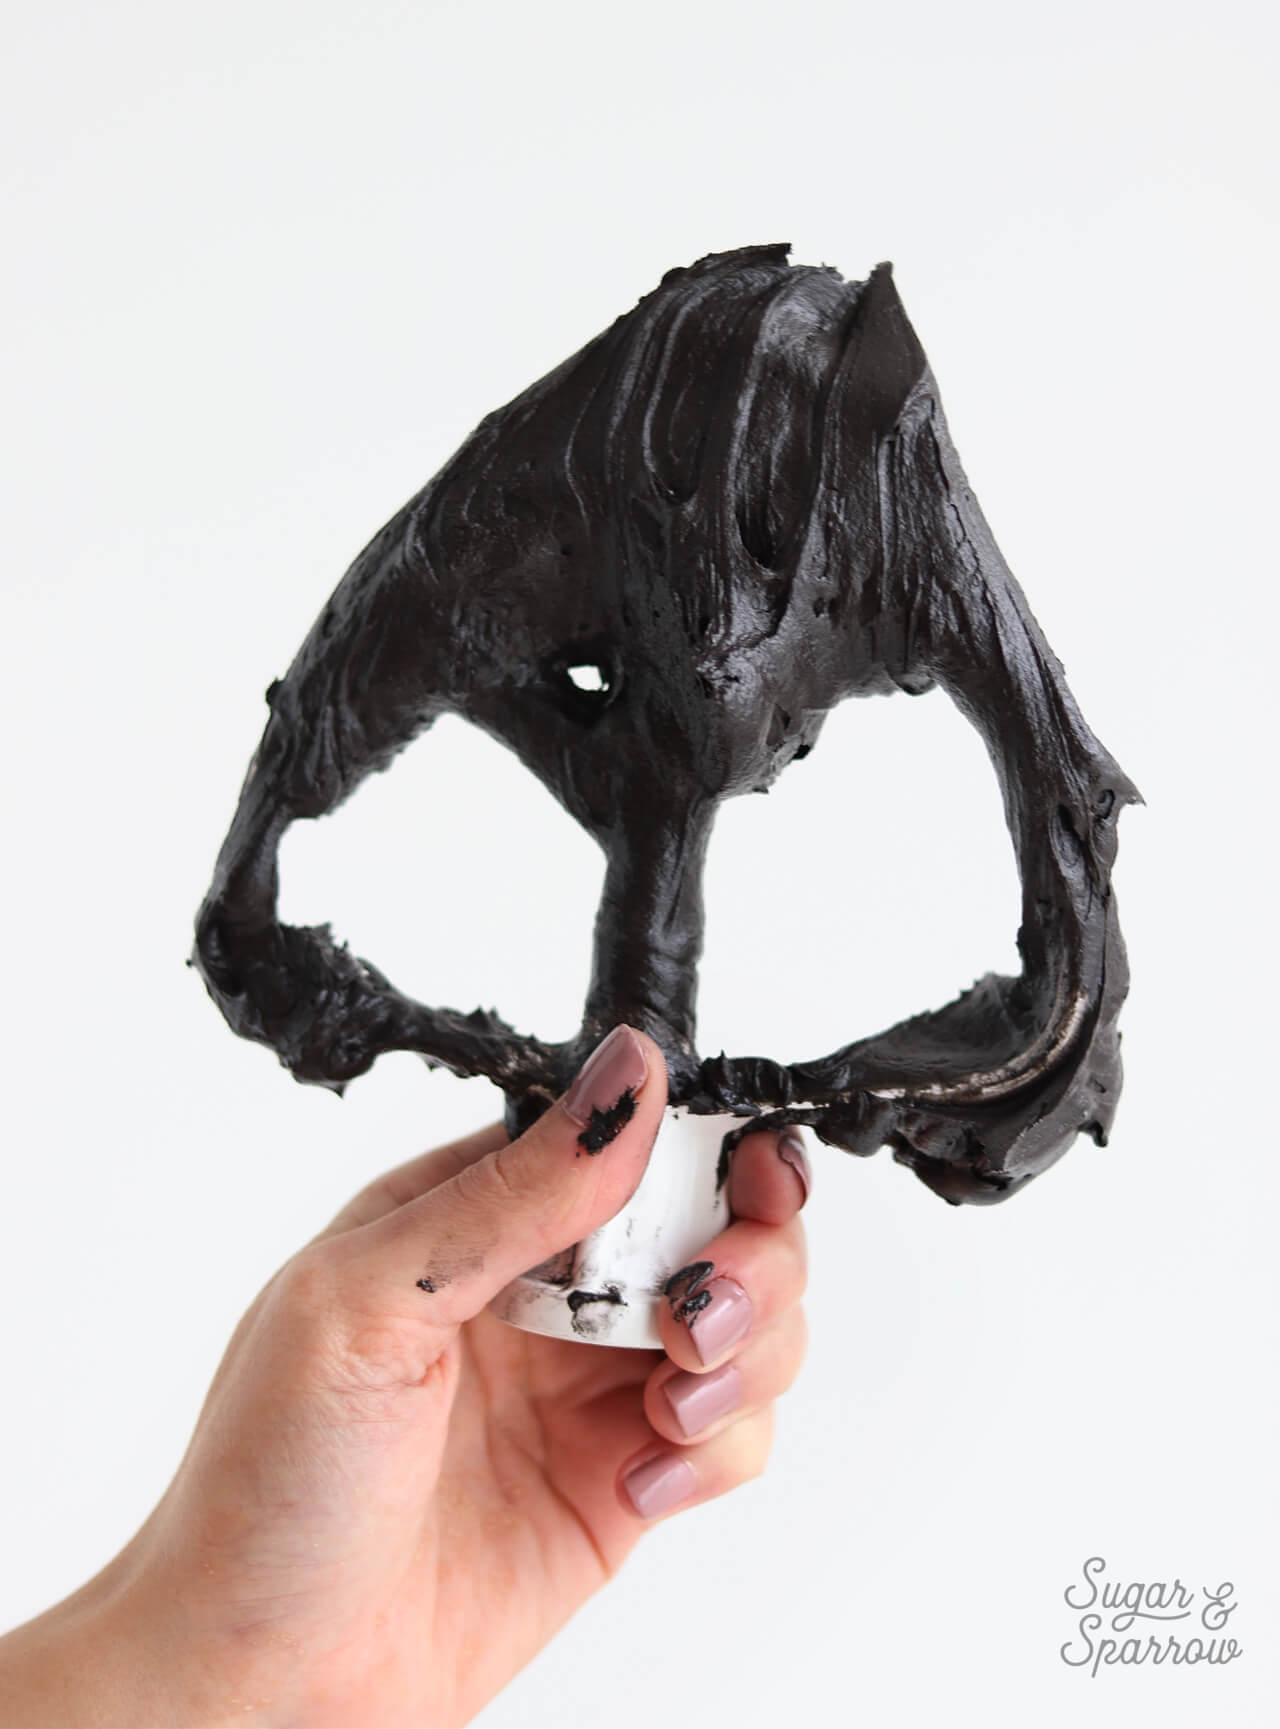
What you’ll end up with is pitch black buttercream magic!

Step 4: Bake And Cool The Cakes

While your buttercream is setting in the fridge, whip up your favorite vanilla cake recipe and add a few drops of orange food color gel at the end to tint the cakes.

how to color cake batter

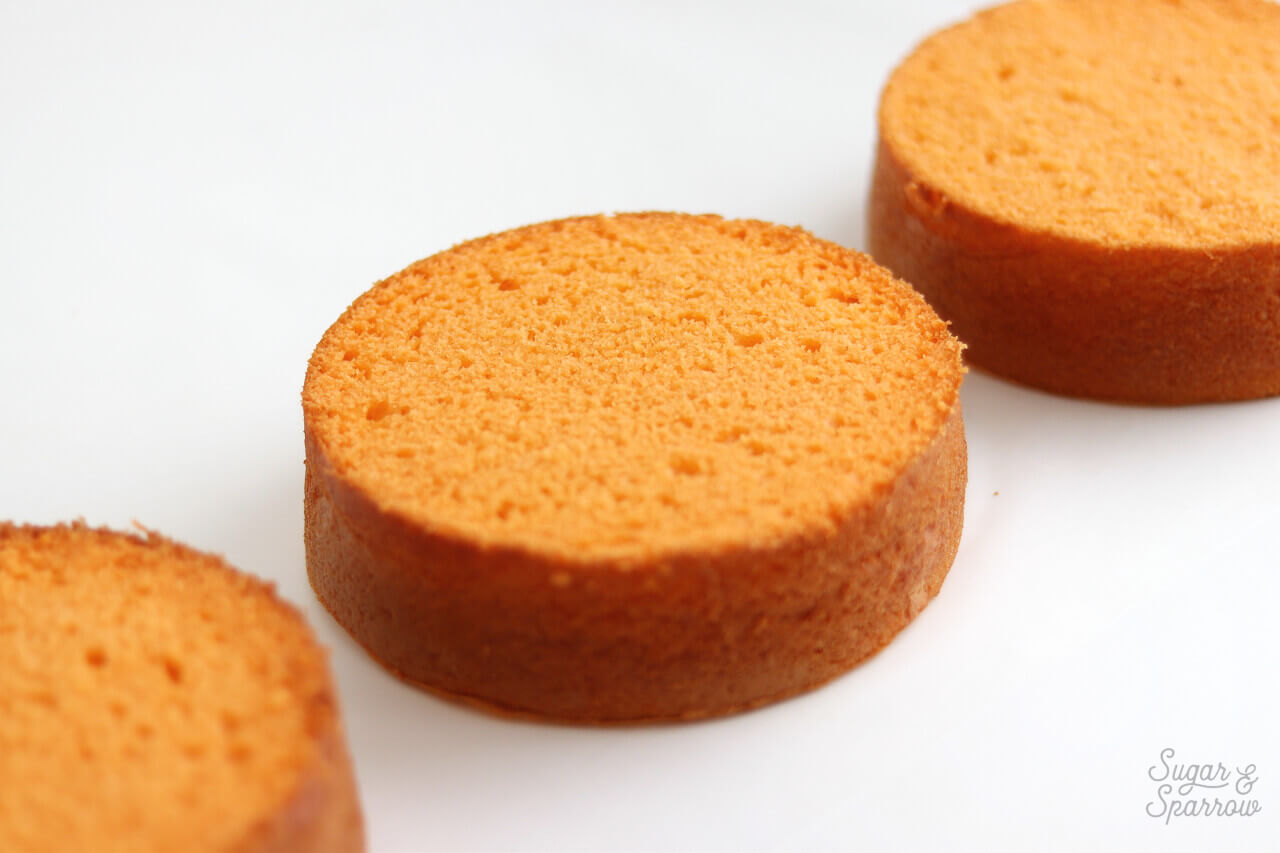
Bake the cakes according to your recipe instructions and let them cool completely before torting the layers to your desired height.

Step 5: Fill And Frost With Black Buttercream

Once your cakes are completely cool and leveled, fill and frost them with your black buttercream. I’ve created a smooth black buttercream finish as the backdrop for my sprinkles.

how to frost a cake smooth buttercream

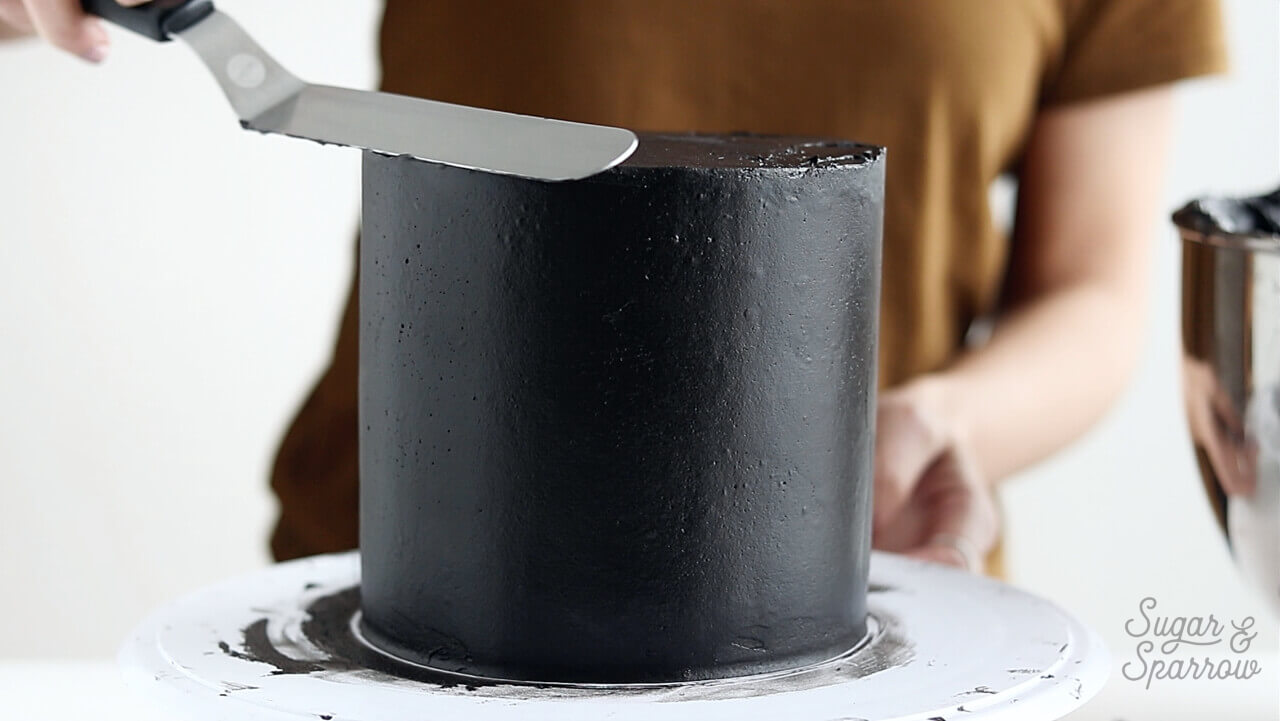
I use an offset icing spatula and bench scraper to achieve the perfect smooth buttercream finish, and if you need additional tips on how to create this look, you can check out this blog post on how to get the smoothest finish ever.

Step 6: Apply The Monster Mashup Sprinkles

Now for the fun part: adding the sprinkles! To achieve the floating monster sprinkle look, reserve some of the googly eyes, mummies, and ghosts from your Monster Mashup sprinkle mix and set them aside. While the buttercream is still soft enough for the sprinkles to adhere, pour a handful of the Halloween colored sprinkles into your hand and place them around the bottom of the cake.

how to add sprinkles to cake

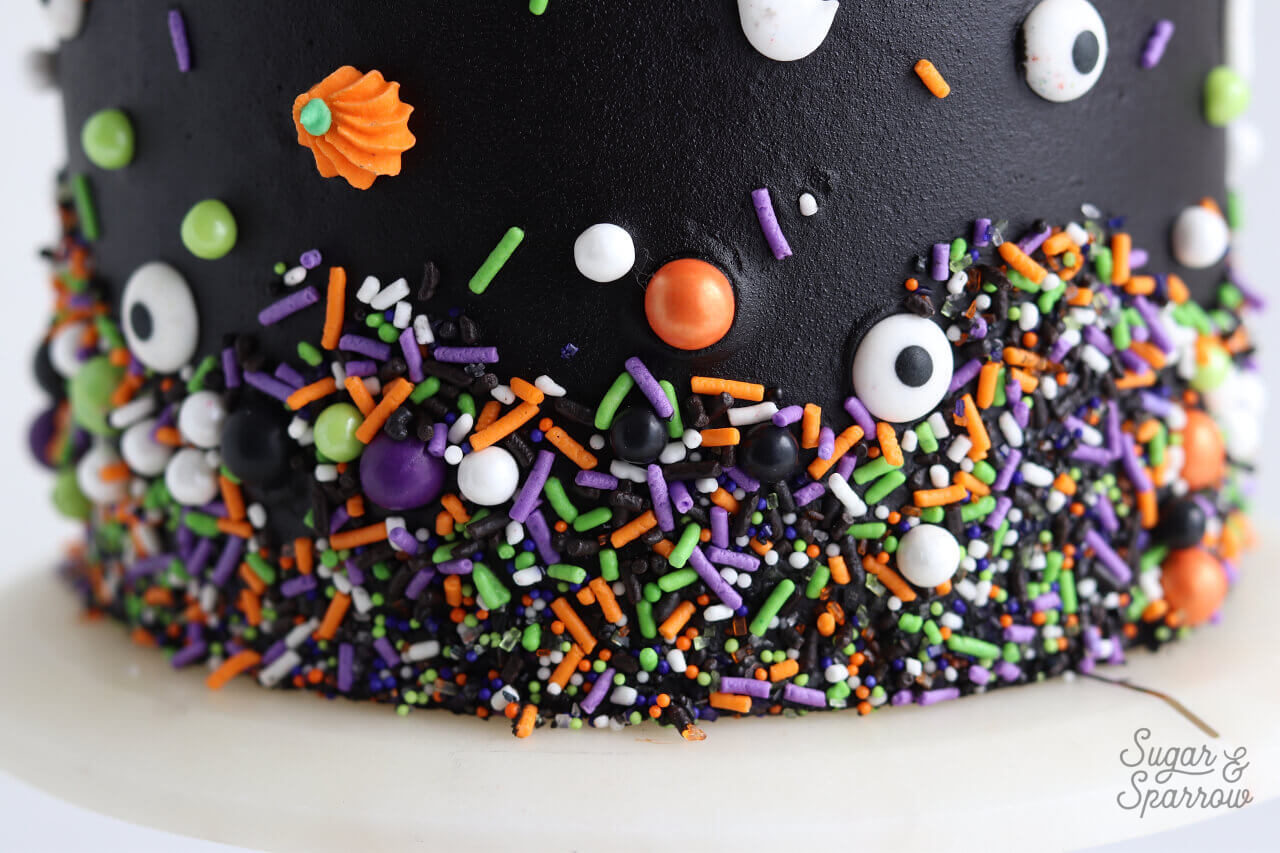
Cover the entire bottom third of the cake this way, making the top edge of the sprinkle border slightly uneven as you go around.

how to arrange sprinkles on cake

Once your sprinkle border is complete, take the monster sprinkles you’ve reserved and place them one by one around the top two thirds of the cake. It looks best when there are more monsters toward the bottom and less toward the top. I’ve also chosen to add some of the colored jimmies one by one to fill in some of the blank spaces.

Step 7: Decorate The Top Of The Cake

When your spooky Monster Mashup sprinkle placement is complete, prepare a piping bag by fitting it with Wilton Tip 1M or another favorite piping tip of yours. Fill the piping bag with black buttercream and pipe a border around the top of the cake. I’ve chosen to pipe a few swirls around the top of the cake and sprinkle with more Monster Mashup sprinkles.

cake topped with cotton candy

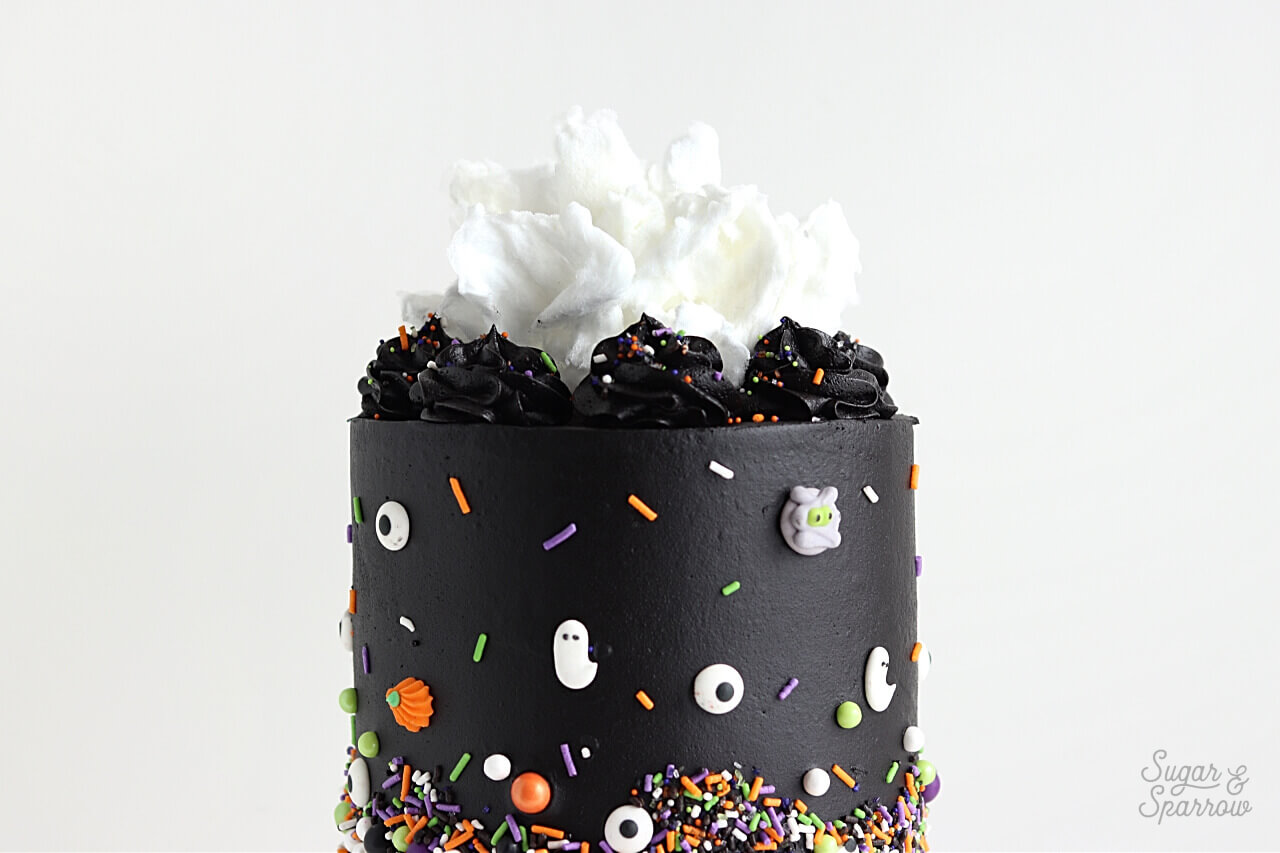
Stretch out the white cotton candy so it looks a little more like cauldron smoke and less like a clump of cotton, then place it on the top of your cake.

cake with cotton candy and sprinkles

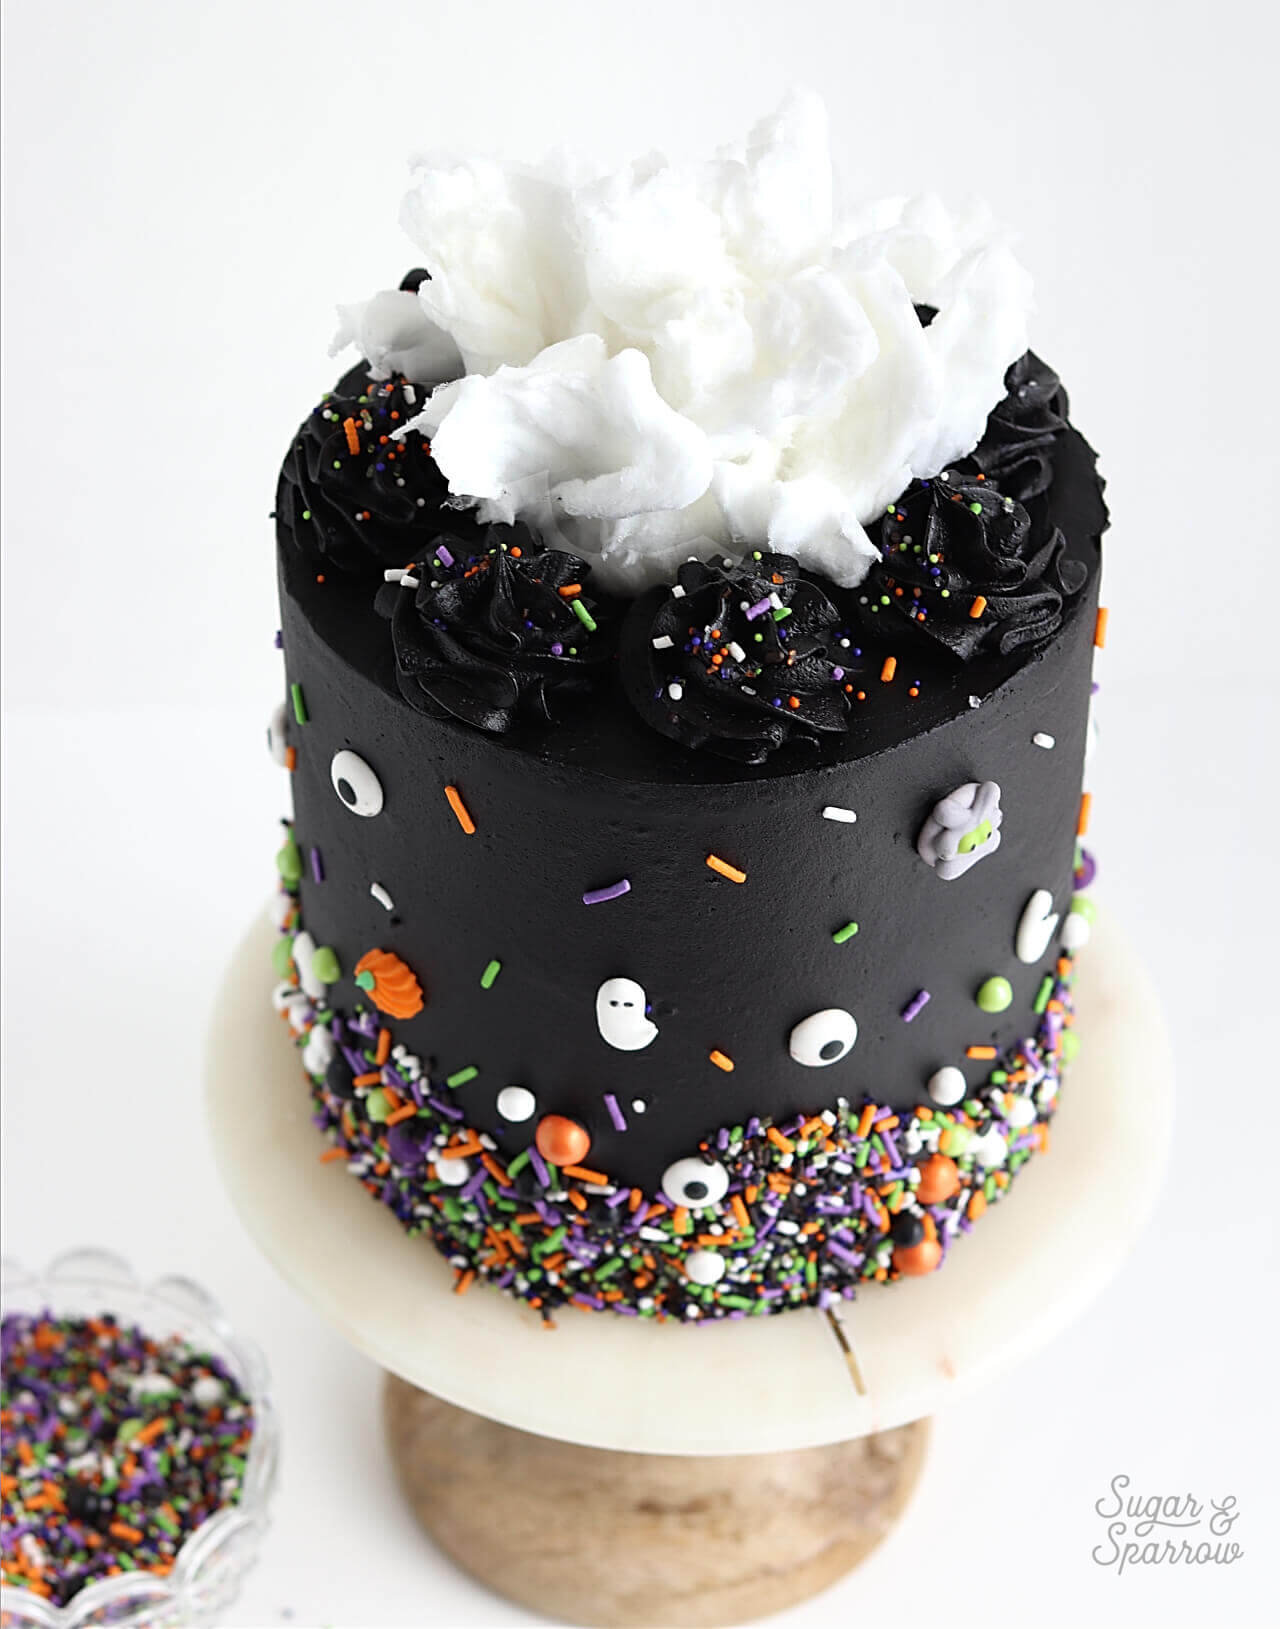
How cool is this cake? Definitely a showstopper for your Halloween festivities! This design will work with any of SprinklePop’s Halloween sprinkles, but I think the Monster Mashup does the trick quite well. Happy Halloween month to all!

By: Whitney · In: Featured, Halloween, Seasonal, Tutorials · Tagged: americolor, americolor super black, black buttercream, cake decorating, cake decorating tutorial, cake tutorial, chocolate buttercream recipe, cotton candy, fall, halloween, halloween cake, monster mashup sprinkles, sprinklepop, sprinkles, vanilla cake recipe

you’ll also love

the best vanilla cupcakes recipeThe Perfect Vanilla Cupcake Recipe
black velvet cake plant basedVegan Black Velvet Cake (Dye-Free!)
halloween jack o lantern candy bucket cake tutorialJack O Lantern Candy Bucket Cake Tutorial

Join the List

Stay up to date & receive the latest posts in your inbox.

Reader Interactions

Comments

  1. Willow says

    June 24, 2021 at 7:51 pm

    Hi! I made the butter cream tonight and used everything you listed and it has a bitter taste?! What did I do wrong?

    Reply
    • Whitney says

      June 27, 2021 at 9:14 pm

      Oh no, Willow! If you started with my chocolate buttercream recipe and added AmeriColor Super Black, I’m not sure what went wrong. Mine usually just tastes like chocolate buttercream in the end.

      Reply
  2. Sarah says

    October 22, 2020 at 3:56 pm

    What size cake did you use for this? Thank you!

    Reply
    • Whitney says

      October 23, 2020 at 6:56 am

      Hi Sarah! I used 6 inch cake pans for these layers.

      Reply
  3. Lindsey M. says

    September 8, 2020 at 7:33 pm

    Hi! How many containers of sprinkles did you need to achieve this look? I just ordered 1, 8oz bottle, but wondering if I needed more. Thank you!

    Reply
    • Whitney says

      September 9, 2020 at 2:20 pm

      Hi Lindsey! An 8oz bottle will be perfect because you’ll have plenty of the bigger shapes. You’ll probably only use half of the bottle but it’s better to have extra in my opinion!

      Reply
  4. Sandrabee says

    July 28, 2020 at 6:28 pm

    Can this work with other dark colors? Like dark green? Dark blue? And may I use melted chocolate instead of cocoa powder?

    Reply
    • Whitney says

      July 28, 2020 at 8:48 pm

      Hi Sandra! For those other dark colors, I would start with vanilla buttercream instead of chocolate (unless you want a brown tinted green or brown tinted blue). Since black is darker than brown, it cancels out the brown color whereas the green or blue would only get muddied when mixed. For deep, rich colors like a dark green or blue, I have had success with Americolor gels + my vanilla buttercream recipe. The smaller the amount of buttercream, the easier it will be to achieve a dark color.

      And I’m not sure about subbing melted chocolate in my chocolate buttercream recipe since I’ve never tried that before and I’m not sure how much to add. Instead, I would look for a chocolate buttercream recipe that uses melted chocolate and start with that.

      Reply
  5. Bere says

    June 5, 2020 at 10:49 am

    Love it!!! I can’t wait to try!!!

    Love from Mexico

    Reply
    • Whitney says

      June 5, 2020 at 5:19 pm

      Yay! Can’t wait for you to try this, Bere!

      Reply
  6. Ketia says

    April 22, 2020 at 7:41 pm

    This looks easy. Can’t wait to try it out

    Reply
    • Whitney says

      April 22, 2020 at 8:39 pm

      Yess! Excited for you to try this, Ketia!

      Reply
  7. MD says

    November 23, 2019 at 6:32 am

    Where could I find the wood/marble cake stand?

    Reply
    • Whitney says

      November 25, 2019 at 8:54 am

      Hi there! The cake stand was a gift from my sis in law. There is a similar one on Amazon here: https://amzn.to/2OhraD0

      Reply
  8. Victor says

    November 30, 2018 at 8:06 am

    You can make a Swiss meringue buttercream and place the cocoa and the americolor coloring. thank you very much

    Reply
  9. Grace Dib says

    October 25, 2018 at 5:09 pm

    Hi! Just a quick question about the black buttercream. I’m a bit apprehensive about whether or not I will be able to achieve the pure dark black I am hoping for. Do you find you have ever had troubles in achieving this colour?
    Do you have any other brands of Black food gel you could suggest?

    Reply
    • Whitney says

      October 25, 2018 at 9:17 pm

      Hi Grace! I used to have trouble with black buttercream but never with the Americolor Super Black gel. I’ve tried a few other brands and I don’t know of a color gel that’s quite as concentrated. As long as you use a highly concentrated color gel like that, plus allow enough time for the color to darken (I always allow it to set overnight), you shouldn’t have trouble at all.

      Reply
      • Jerelyn says

        June 13, 2022 at 2:43 am

        Hi there, came across your post while trying to make black buttercream. Have tried your method and many other methods, but somehow I still can’t get black black. It’s still dark brown any possible suggestions?

        Reply
        • Whitney says

          June 14, 2022 at 7:14 pm

          Hi Jerelyn! Did you give the buttercream 24 hours to darken? Mine always ends up being dark brown/concrete color until I wait a full 24 hours.

          Reply
  10. veronica de mexico says

    October 1, 2018 at 10:32 am

    hermoso intentare hacerlo haber si me queda tan hermoso como el tuyo love it

    Reply
    • Whitney says

      October 2, 2018 at 8:46 pm

      Hi Veronica! I can’t wait to see what you create and I’m sure it will be beautiful!

      Reply

Trackbacks

  1. 10 Spooktacular Halloween Cakes - Find Your Cake Inspiration says:
    October 25, 2018 at 8:55 pm

    […] the black buttercream and Halloween festive sprinkles! Head over to Sugar and Sparrow for the […]

    Reply

Leave a Reply Cancel reply

Your email address will not be published. Required fields are marked *

Recipe Rating


Next Post >

Spiced Vanilla Chai Cake Recipe

Primary Sidebar

Welcome to Sugar & Sparrow

Welcome to Sugar & Sparrow

Helping you whip up pretty desserts with confidence and creativity. And hopefully sharing a few laughs with you along the way!

Learn More

Connect

let’s bake!

Get my very best recipes, baking tips, and decorating tutorials sent to your inbox

Featured Posts

small batch red velvet cake recipe

Small Batch Red Velvet Cake

ruby chocolate cake recipe by sugar and sparrow

Ruby Chocolate Cake Recipe

blackberry lavender no churn ice cream

No-Churn Blackberry Lavender Ice Cream

Search

Archives

Follow Along

@sugarandsparrowco

RASPBERRY CAKE FILLING (recipe below) ♥️ this RASPBERRY CAKE FILLING (recipe below) ♥️ this perfectly sweet/tart raspberry cake filling is beautifully thick, seedless, and so rewarding to make from scratch! It takes just a handful of ingredients and can be made with fresh OR frozen raspberries 🙌🏼 

Get the full recipe + cake pairing suggestions at the link in my bio or at https://sugarandsparrow.com/seedless-raspberry-cake-filling/

INGREDIENTS:
2 1/2 Cups (10oz, 315g) fresh or frozen raspberries
1/2 Cup (100g) granulated sugar
1 Tbsp lemon juice
1 tsp lemon zest
1 1/2 Tbsp (12g) cornstarch
1 1/2 Tbsp (22ml) water

INSTRUCTIONS: 
1. In a saucepan set over medium heat, add the raspberries, granulated sugar, lemon juice, and lemon zest. Cook until the mixture begins to boil, stirring occasionally. 
2. Once boiling, lower the heat and simmer for 10-15 minutes while you continue stirring occasionally. Then, remove from heat and use a fine mesh sieve to strain out the seeds over a medium bowl. After straining, you’ll be left with about 1/4 Cup of seedy pulp.
3. In a small separate bowl, combine the cornstarch and water until uniform. Return the strained raspberry filling to the saucepan (wipe it free of any remaining seeds if needed) and add the cornstarch/water mixture. Cook over medium heat until boiling, stirring constantly, then reduce to a simmer and cook for 1-3 minutes, until the filling has thickened slightly, is no longer cloudy, and coats the back of the spatula.
4. Pour into an airtight container and refrigerate for at least 4 hours and up to 1 week. It will be jello-like once set but after stirring it will become a thick, jammy consistency that’s perfect to use as a cake or cupcake filling!

#raspberrycake #cakefilling #cakedecorating #raspberries #baking
STRAWBERRY LEMON CAKE 🍓🍋 this cake is so lig STRAWBERRY LEMON CAKE 🍓🍋 this cake is so light and refreshing and bursting with all-natural flavors! It’s layers of my favorite extra fluffy lemon cake + the most delicious freeze-dried strawberry buttercream that ends up the prettiest natural pink color. I’ll never get over those little flecks of strawberry in the buttercream or the tiny chamomile flowers adding so much cheer! 

Grab the recipe at the link in my bio or at https://sugarandsparrow.com/strawberry-lemon-cake/

#strawberrylemon #lemoncake #strawberrycake #cakedecorating #strawberrybuttercream
CHOCOLATE SHEET CAKE (recipe below) 🍫 🥳 this CHOCOLATE SHEET CAKE (recipe below) 🍫 🥳 this is everything I want in a chocolate cake: rich and decadent, stick-to-your-fork fudgy, ultra-chocolatey, shareable, and EASY! Like box mix easy but from-scratch and a MUST try if you’re in need of a good chocolate cake recipe to feed a crowd👩🏽‍🍳⁣ 
 
Get the full recipe (with chocolate frosting) at the link in my bio or at https://sugarandsparrow.com/chocolate-sheet-cake/ ✨⁣ 
⁣ 
CHOCOLATE SHEET CAKE
2 Cups (265g) all purpose flour⁣ 
1 2/3 Cups (340g) white granulated sugar⁣ 
2/3 Cup (60g) unsweetened natural cocoa powder⁣ 
2 tsp baking soda⁣ 
1 tsp baking powder⁣ 
1/2 tsp kosher salt⁣ 
1/2 Cup (120ml) vegetable oil⁣ 
2 eggs, room temperature⁣ 
1 1/2 tsp pure vanilla extract⁣ 
1 Cup (240ml) full-fat buttermilk⁣ 
1 Cup (240ml) hot coffee OR hot water⁣ 
⁣ 
INSTRUCTIONS⁣ 
1. Preheat the oven to 325ºF. Grease and line a 9x13 inch cake pan. ⁣ 
2. Place all of the dry ingredients into the bowl of a stand mixer (or use a large bowl with a hand mixer) and mix on low to combine. Add the vegetable oil, eggs, vanilla, and buttermilk and mix on low until combined. With the mixer still on low, add the hot coffee or hot water in a slow stream, then turn the mixer to medium and beat until smooth, about 2 minutes. The batter will be very thin. ⁣ 
3. Pour the batter into the prepared pan and bake for 35-40 minutes, until a toothpick inserted comes out clean.⁣ Full recipe (with frosting) link in my bio.
⁣ 
#chocolatecake #chocolate #sheetcake #chocolatelover #birthdaycake
VANILLA RASPBERRY LAYER CAKE ♥️ between the na VANILLA RASPBERRY LAYER CAKE ♥️ between the naturally pink raspberry buttercream, jammy homemade raspberry filling, and soft vanilla cake layers, this is the perfect cake for Spring!! It’s has amazing, authentic raspberry flavor in every bite from fresh (or frozen) raspberries in the filling + freeze-dried raspberries in the frosting 😋

Get the full recipe link in my bio or find it at https://sugarandsparrow.com/vanilla-raspberry-layer-cake/ 

#raspberrycake #raspberries #vanillacake #cakedecorating #pinkcake
SMALL BATCH VANILLA CAKE 🎂🥳 this mini vanill SMALL BATCH VANILLA CAKE 🎂🥳 this mini vanilla cake recipe makes the PERFECT amount for 2-4 people and can be baked as a tiny 4-inch layer cake or a single layer 6-inch cake. It goes with any frosting flavor but vanilla buttercream keeps it classic for date night, a small gathering, a smash cake, or satisfying a cake craving. 
⁣
✨Full recipe (with frosting) linked in my bio + at https://sugarandsparrow.com/small-batch-vanilla-cake/ 
⁣⁣⁣⁣
SMALL BATCH VANILLA CAKE⁣⁣⁣⁣
⁣⁣⁣⁣
INGREDIENTS⁣⁣⁣⁣
3/4 Cups (79g) sifted cake flour⁣⁣⁣
1 tsp baking powder⁣⁣⁣
1/4 tsp salt⁣⁣⁣
1/4 Cup (57g) unsalted butter, room temperature⁣⁣⁣
1/2 Cup (100g) granulated sugar⁣⁣⁣
1 large egg, room temperature⁣⁣⁣
2 Tbsp (30g) sour cream, room temperature⁣⁣⁣
1 tsp pure vanilla extract⁣⁣⁣
1/3 Cup (80ml) whole milk, room temperature⁣⁣⁣
⁣⁣⁣⁣
INSTRUCTIONS ⁣⁣⁣⁣
1. Preheat the oven to 350ºF. Grease and line three 4-inch or one 6-inch cake pan.⁣⁣⁣
2. In the bowl of your stand mixer (a handheld mixer works fine too!), cream together the butter and sugar on medium-high until light and fluffy, 3 min. Turn the mixer to low and add the egg, mixing until just combined. Add the vanilla and sour cream, turn the mixer to high, and beat for 1 min. ⁣⁣⁣
3. Turn the mixer to low speed and add the dry ingredients all at once. Mix until just combined, then slowly pour in the milk. Continue to mix on low speed until just combined, about 30 seconds. ⁣⁣⁣
4. Pour the batter evenly between the prepared cake 4-inch pans (or all into one 6-inch cake pan). If using 4-inch cake pans, bake for 18-22 minutes. If using a 6-inch cake pan bake for 24-28 minutes. The cake is done when it springs back to the touch and a toothpick inserted comes out with a few moist crumbs. ⁣⁣⁣
⁣⁣⁣⁣
#vanillacake #cakes #vanilla #minicake #cakedecorating

Footer

On the Blog

  • Cake Basics
  • Recipes
  • Tutorials

Info

  • About
  • Privacy Policy & Disclosure

stay in the know

Copyright © 2026 · Theme by Sugar & Sparrow