• Cake
  • Frosting
  • YouTube
  • My Favorite Tools
  • Nav Social Icons

  • Skip to primary navigation
  • Skip to main content
  • Skip to primary sidebar
  • Skip to footer
  • Recipes
    • Cake
    • Cupcakes
    • Frosting
    • Ice Cream
    • Vegan
  • Cake Basics
  • Tutorials
  • Blog
  • About
  • Mobile Menu Widgets

    Connect

    Search

Sugar & Sparrow logo in script font

Sugar & Sparrow

Lifestyle and Cake from Portland Oregon

  • Cake Basics
  • Recipes
    • Cake
    • Cupcakes
    • Cookies & Bars
    • Filling
    • Frosting
    • Ice Cream
    • No-Bake
    • Small Batch
    • Vegan
  • Tutorials
  • Book
  • Blog
  • About

DIY Candy Melt Honeycomb For A Bee Cake

June 20, 2019 · In: Featured, Seasonal, Spring, Summer, Tutorials

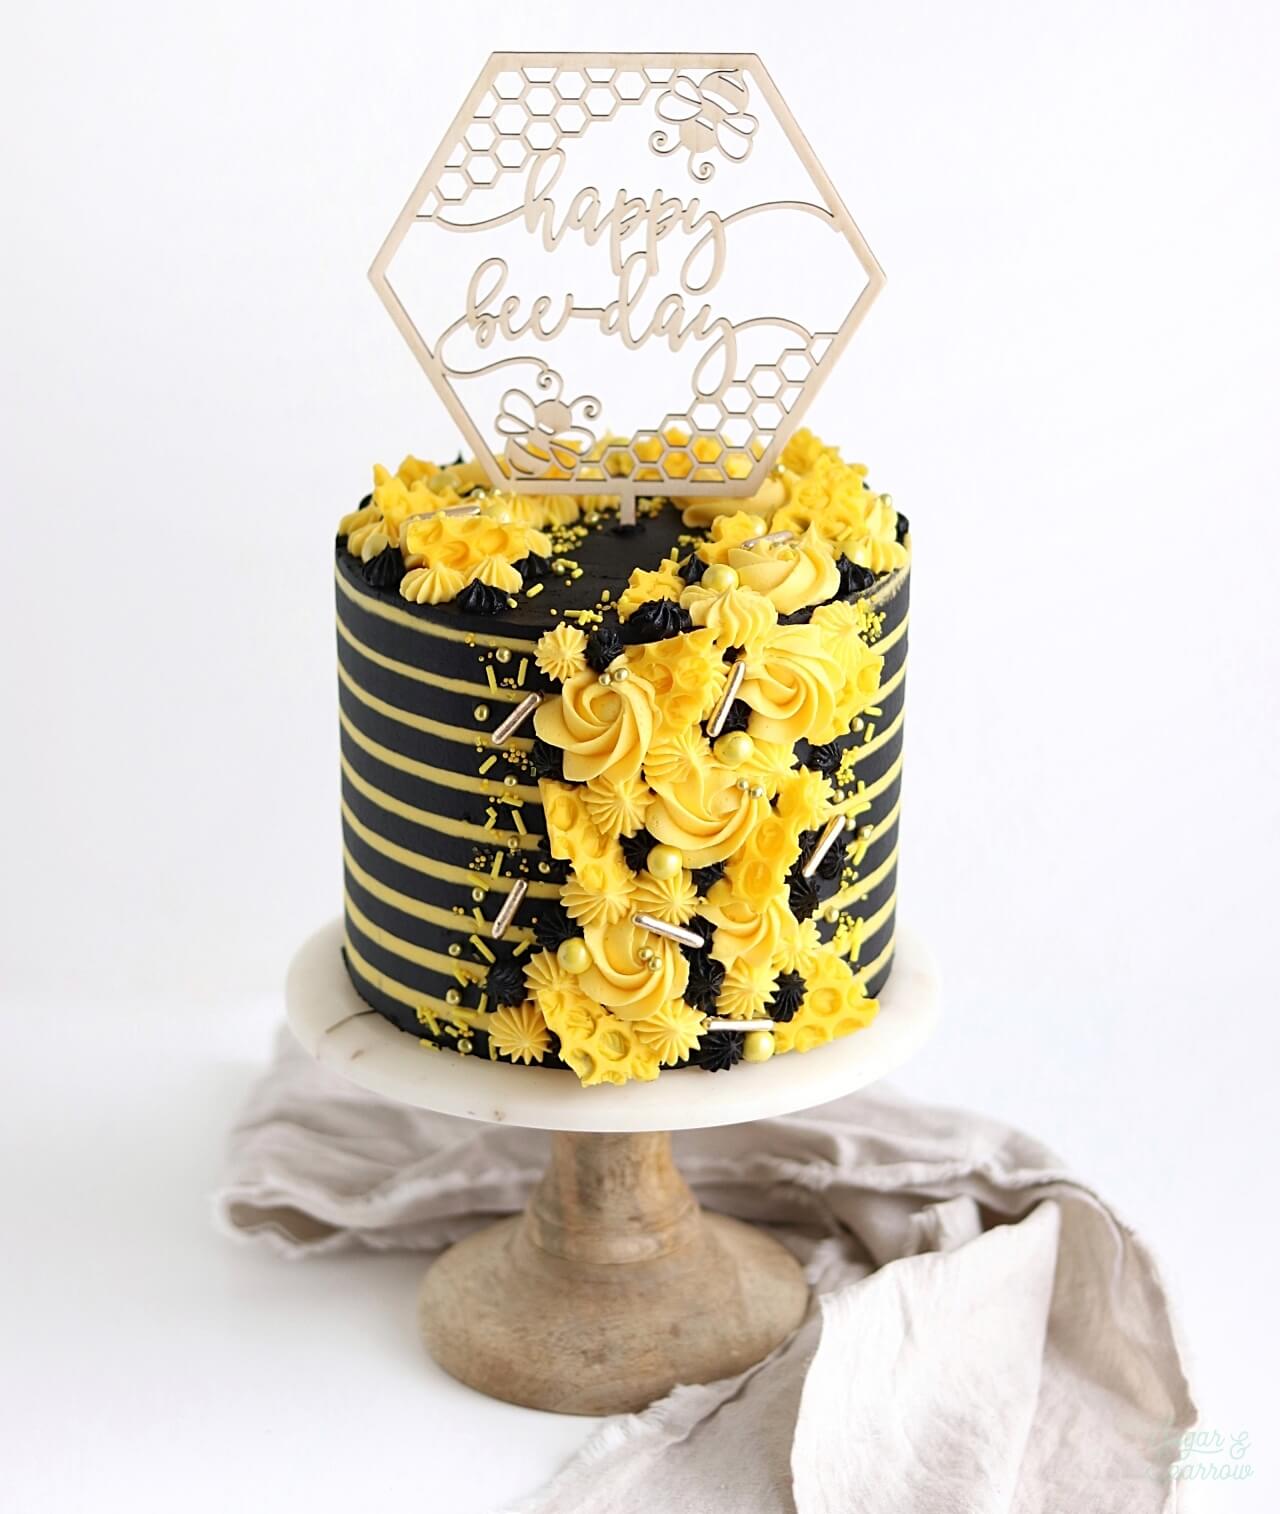
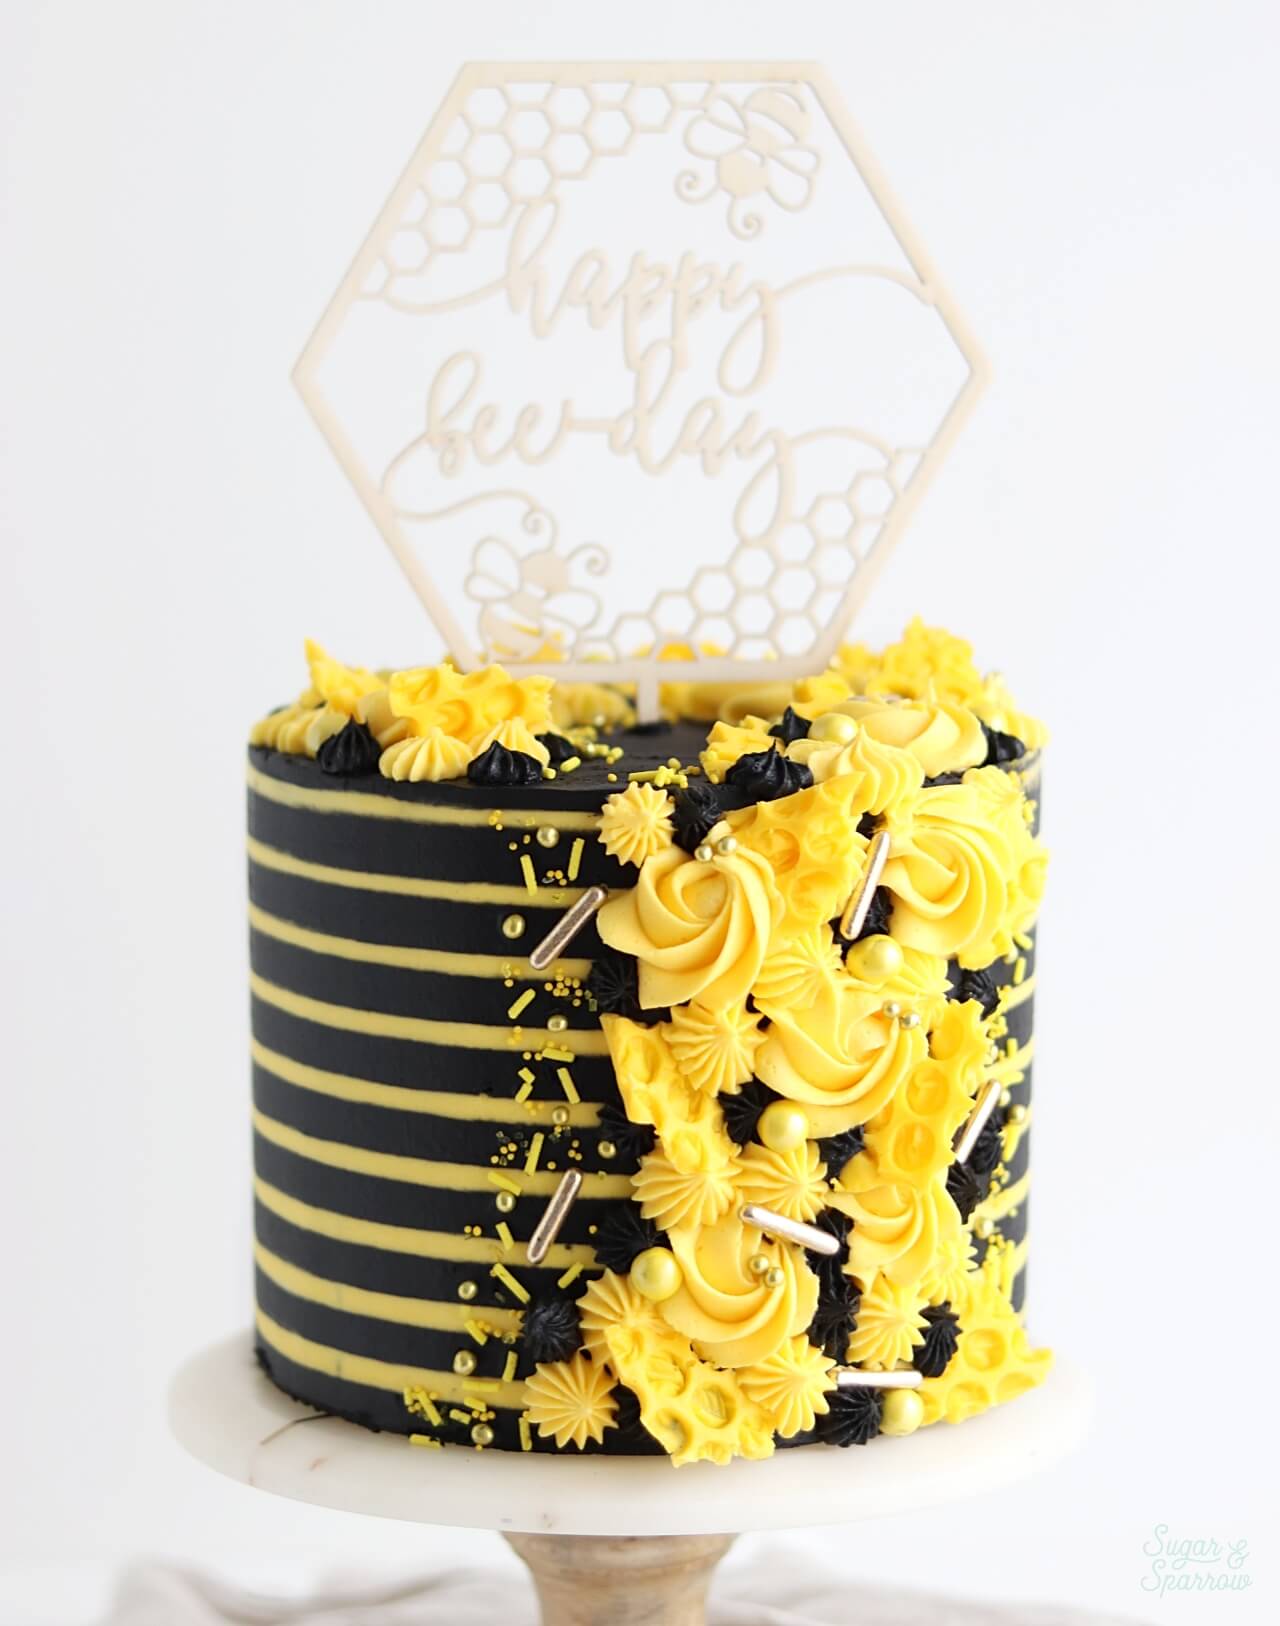
I recently had the opportunity to create this bee-themed cake for Thistle & Lace, and as I was during the design planning process I knew I had to incorporate honeycomb in some way. The black and yellow buttercream stripes were a given, but adding the texture of honeycomb really made the cake come alive. There’s a really quick way to make DIY “honeycomb” for cake decorating, and I want to share the technique with you in this super quick tutorial (especially if you’re planning a bee-themed cake of your own!).

bee cake tutorial
honeycomb bee cake tutorial

The best thing about this technique is that it’s super fast and only requires a few materials. I used Wilton Candy Melts to get that rich yellow color, but the process will work with any sort of chocolate you want. Whatever you’re using, follow the steps below for honeycomb perfection.

Watch this quick video (above) of the process to show you how it works before you read all about it below. If you’re into cake decorating videos like these, be sure to follow along on my YouTube channel – there are tons of videos there to inspire you!

You Will Need:

  • Wilton Candy Melts in yellow
  • Bubble wrap
  • Small icing spatula

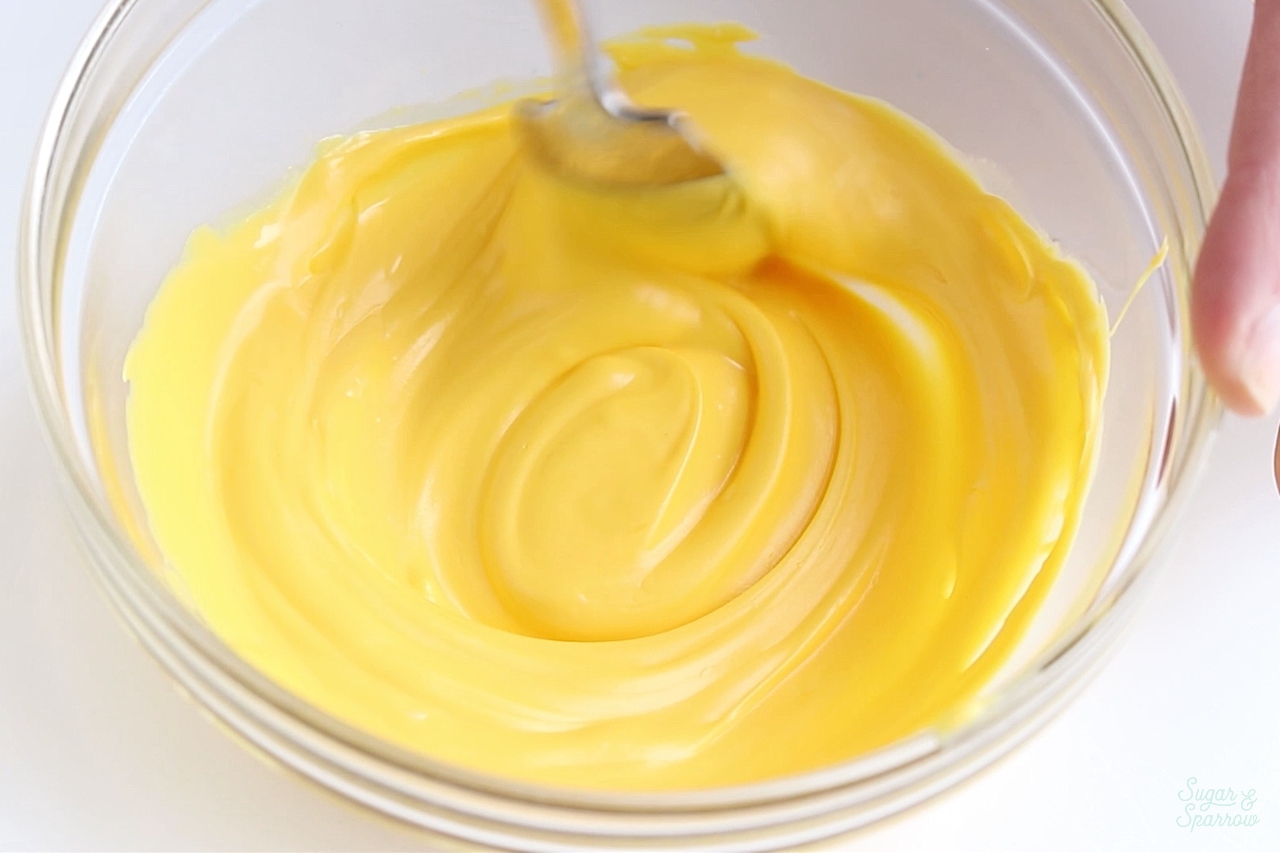
Step 1: Melt The Candy Melts

In a microwave-safe bowl, melt the Candy Melts according to the instructions on the package and stir until uniform in consistency.

melting wilton candy melts

If you’re using white chocolate chips (or any other kind of chocolate), follow Step 1 of this tutorial to get perfectly tempered chocolate.

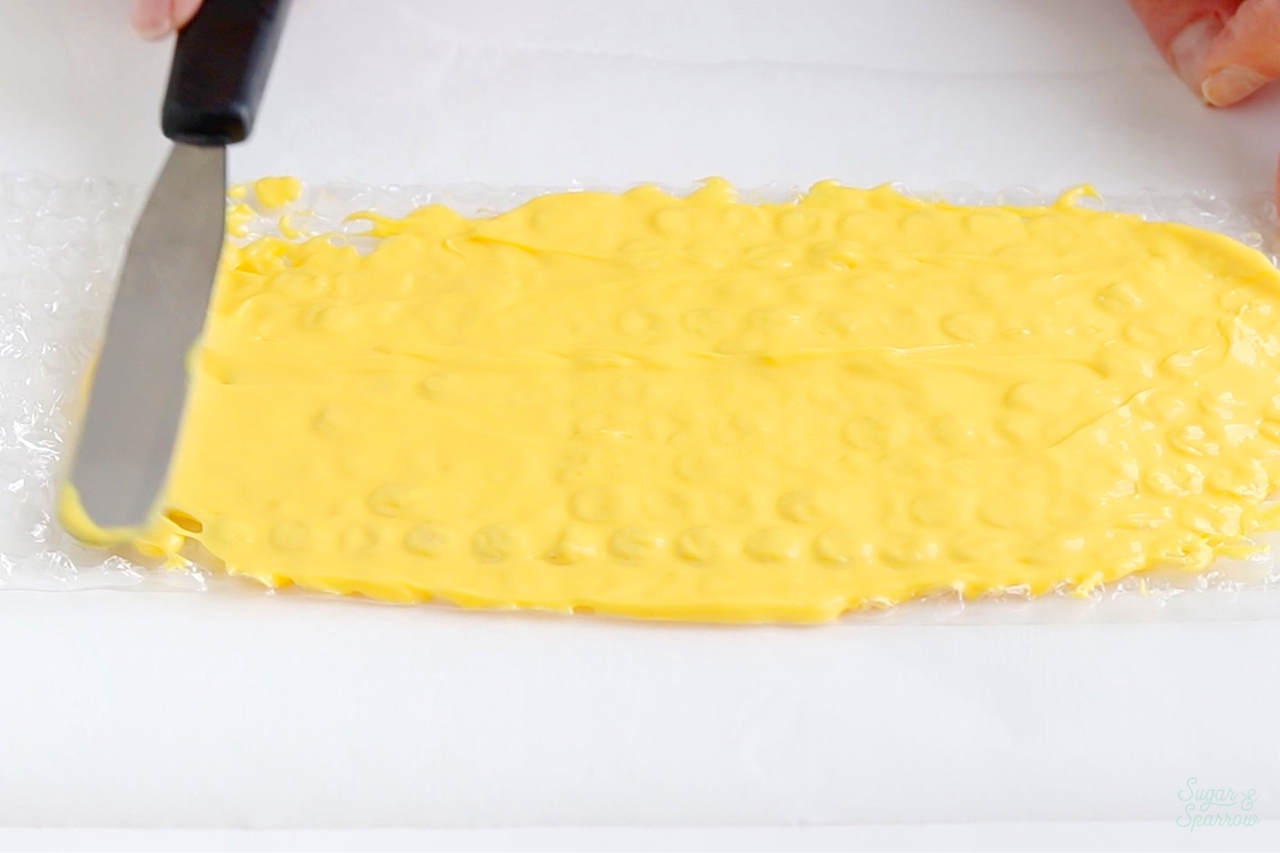
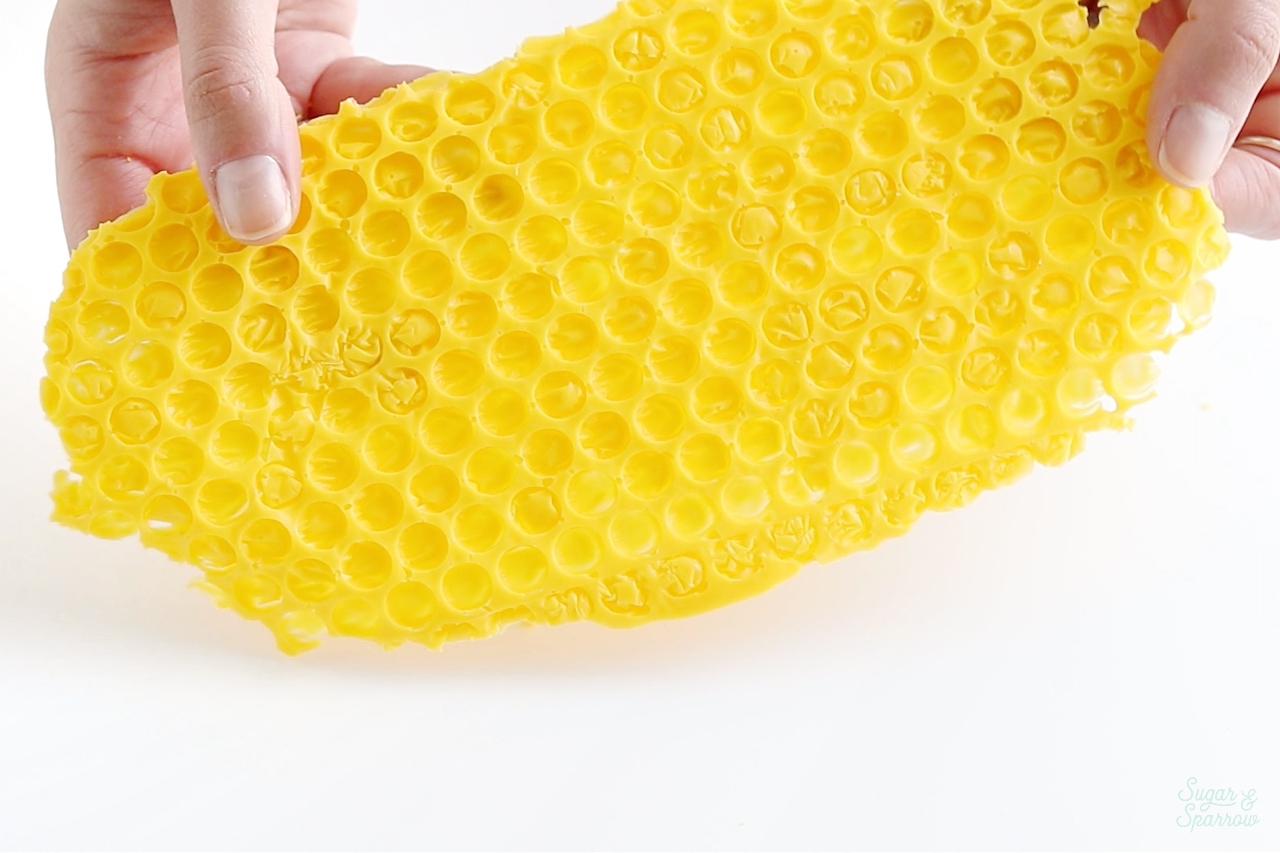
Step 2: Spread onto Bubble Wrap

Place a piece of bubble wrap onto a sheet of wax paper, bubbles side up. Then, spread a layer of melted Candy Melts over the top of it using a small icing spatula.

honeycomb cake decorations tutorial

When the surface of your bubble wrap is covered, place it in the refrigerator for about 10 minutes to let it firm up.

Step 3: Release

Once the Candy Melts are nice and firm, remove the bubble wrap. It should release nice and easy.

honeycomb tutorial for bee cake

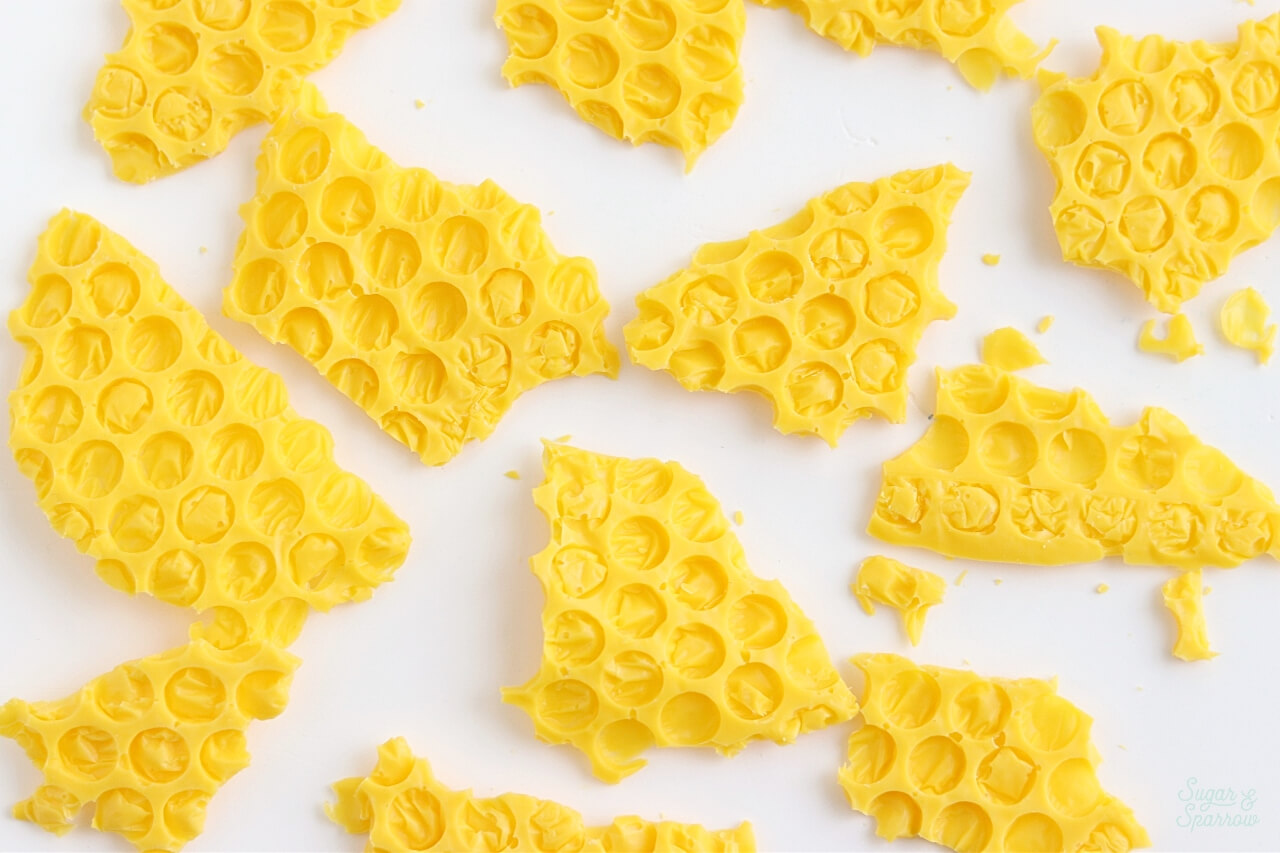
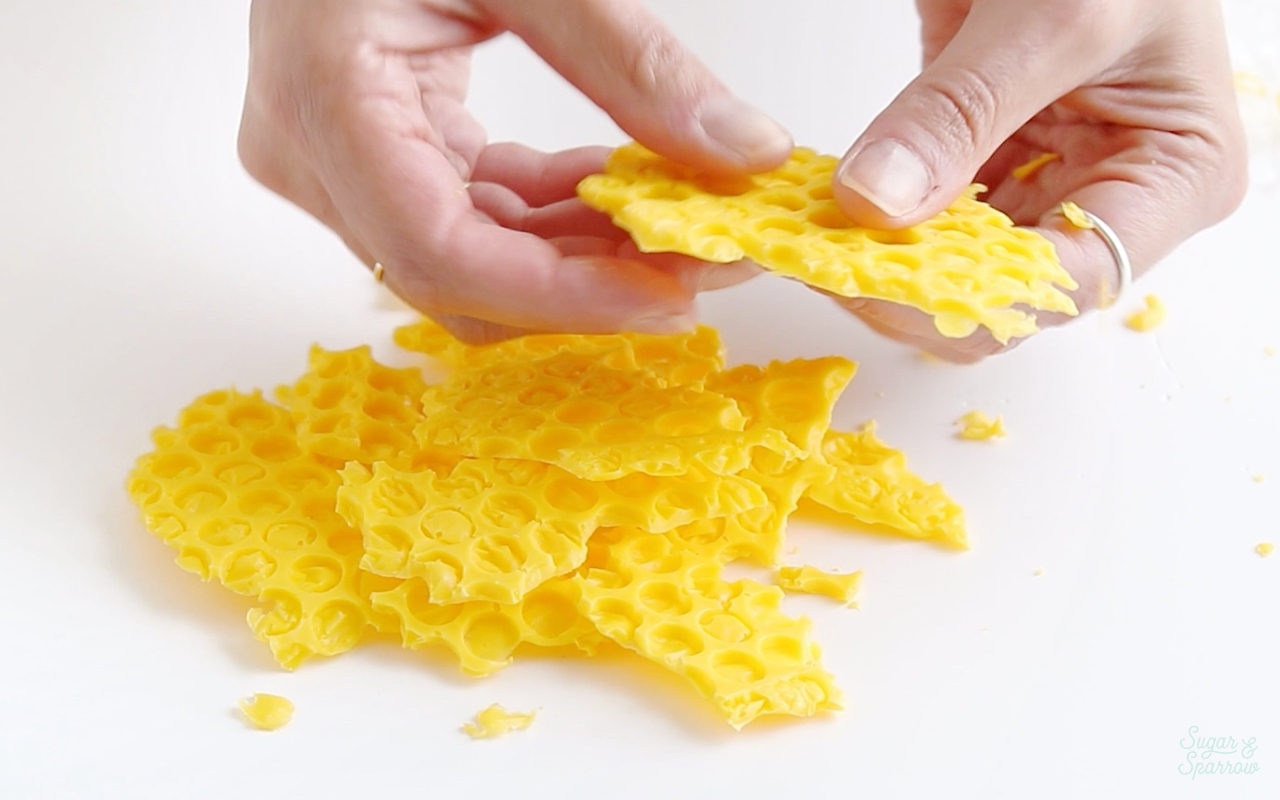
From here, you can break up the piece of “honeycomb” into smaller pieces for placing on your cake.

honeycomb cake decorating tutorial

If you end up making some honeycomb for your next bee-themed cake (or otherwise!) be sure to let me know how it went in the comments below! And you can always tag @sugarandsparrowco on Instagram so I can see your creations. Happy honeycomb making, friends!

By: Whitney · In: Featured, Seasonal, Spring, Summer, Tutorials · Tagged: bee cake, bee cake tutorial, cake decorating, cake tutorial, candy melt honeycomb, candy melts, chocolate, chocolate honeycomb, diy honeycomb, honeycomb, honeycomb bee cake, honeycomb cake decorations, honeycomb tutorial

you’ll also love

the best vanilla cupcakes recipeThe Perfect Vanilla Cupcake Recipe
pumpkin layer cake recipe by sugar and sparrowPerfect Pumpkin Layer Cake Recipe
oreo cookies and cream cakeOreo Layer Cake Recipe

Join the List

Stay up to date & receive the latest posts in your inbox.

Reader Interactions

Leave a Reply Cancel reply

Your email address will not be published. Required fields are marked *

Recipe Rating


Next Post >

Floral Sheet Cake Tutorial

Primary Sidebar

Welcome to Sugar & Sparrow

Welcome to Sugar & Sparrow

Helping you whip up pretty desserts with confidence and creativity. And hopefully sharing a few laughs with you along the way!

Learn More

Connect

let’s bake!

Get my very best recipes, baking tips, and decorating tutorials sent to your inbox

Featured Posts

vegan vanilla buttercream recipe by sugar and sparrow

Vegan Vanilla Buttercream Recipe

yellow cake recipe with chocolate frosting and rainbow sprinkles

Yellow Cake with Chocolate Frosting (Classic Birthday Cake)

spatula painted cupcakes tutorial

Spatula Painted Cupcakes Tutorial

Search

Archives

Follow Along

@sugarandsparrowco

Everything I baked in June☀️I was so motivated to Everything I baked in June☀️I was so motivated to bake this month (summer flavors had me INSPIRED!) and could barely keep up with myself but I ended up publishing 7 new recipes on my website + finalized 5 more that will be up ASAP! 

Comment “JUNE” to get all the recipes that are available now:

-Cookie Dough Ice Cream Cake
-Rocky Road Cupcakes (w/ homemade marshmallow creme filling!)
-Blackberry Lavender Cake
-Homemade Blackberry Filling
-Whipped Cream Cheese Frosting
-Strawberry Shortcake Cookie Bars
-Berries & Cream Sheet Cake

https://sugarandsparrow.com/everything-i-baked-in-june
 
#cake #bakersofinstagram #baking #bakinglove #cakedecorating
WHIPPED CREAM CHEESE FROSTING ☁️ this easy 4-ingre WHIPPED CREAM CHEESE FROSTING ☁️ this easy 4-ingredient whipped cream frosting is deliciously light, comes together SO easily, and is stabilized with cream cheese to make it the perfect thick consistency for filling and frosting cakes and cupcakes!! It’s so good with my strawberry shortcake sheet cake and berries & cream cake and I have a feeling I’m going to be whipping it up for many more summer cakes😍

Full recipe with cake pairing suggestions at https://sugarandsparrow.com/whipped-cream-cheese-frosting/ 

INGREDIENTS 
1 Cup (8oz, 226g) full-fat brick-style cream cheese, cold
1 Cup (120g) powdered sugar
1 tsp pure vanilla extract
2 1/2 Cups (600ml) heavy whipping cream, cold

INSTRUCTIONS
1. Chill the bowl of your stand mixer (or the large bowl you’ll be using with your hand mixer) into the refrigerator for 20 minutes.
2. Into the cold mixing bowl, add the cream cheese and beat on medium speed with the whisk attachment until creamy, 2 min. Add the powdered sugar and mix on low speed until mostly incorporated, then turn the mixer to medium-high speed and mix for 1 min.
3. Add the vanilla extract, then turn the mixer to medium-high speed and slowly pour in the heavy whipping cream (down the side of the bowl so it doesn’t fly everywhere). Once all the cream is added, continue mixing on medium-high for just about 30 seconds longer, keeping a close eye on the mixing bowl to watch it thicken. It should come together into a thick, silky frosting consistency at this point, where you can dip the whisk into the frosting and it holds a slight peak when you hold it upright.
4. Use the frosting immediately to decorate cakes and/or cupcakes for best results!

#whippedcreamfrosting #creamcheesefrosting #cakedecorating #whippedcream #frosting
TOP 10 4TH OF JULY DESSERTS 🎆 These are just a few TOP 10 4TH OF JULY DESSERTS 🎆 These are just a few of my favorite summer dessert recipes that will disappear at any Fourth of July celebration.

Comment “JULY” and I’ll send you all 20+ of my favorite 4th of July dessert ideas – naturally red white and blue desserts like my berries and cream cake, easy no-bake desserts, no-churn ice cream, strawberry shortcake inspired recipes, and all the treats that will go FAST at any barbecue.

https://sugarandsparrow.com/4th-of-july-desserts/

#fourthofjuly #4thofjuly #summerdessert #partycake #dessertideas
STRAWBERRY SHORTCAKE COOKIE BARS 🍓my hot take: str STRAWBERRY SHORTCAKE COOKIE BARS 🍓my hot take: strawberry shortcake toppings on a buttery, soft sugar cookie base is WAY BETTER than traditional strawberry shortcake. I topped my favorite sugar cookie bar recipe with silky whipped cream cheese frosting + homemade strawberry sauce and now I’m ruined 😵

Full recipe is linked in my bio + at https://sugarandsparrow.com/strawberry-shortcake-cookie-bars/ 

SOFT SUGAR COOKIE BARS
2 Cups + 2 Tbsp (283g) all purpose flour
1 tsp baking powder
1/2 tsp baking soda
1/2 tsp salt
3/4 Cup (170g) unsalted butter, room temp
1 Cup (200g) granulated sugar
1 large egg
1 large egg yolk
1 1/2 tsp pure vanilla extract

1. Preheat the oven to 350ºF (177ºC). Grease and line an 8-inch square baking pan with parchment paper, leaving a slight overhang for easy release.
2. Whisk together the flour, baking powder, baking soda, and salt. Set aside.
3. Using a stand mixer with the paddle attachment (or hand mixer) cream together the butter and sugar on high speed until pale and fluffy, 2-3 min.
4. Turn the mixer to medium and add the egg, egg yolk, and vanilla. Mix until combined, then add the flour mixture and mix on low speed until a uniform cookie dough forms.
5. Press the cookie dough into the prepared pan in an even layer, all the way to the edges. Bake for 18-20 minutes, until the edges are just starting to brown. 
6. Cool the sugar cookie bars in the pan for 30 minutes, then transfer to a wire rack to cool completely. Top with whipped cream cheese frosting and strawberry sauce (full recipe linked in my bio!)

#strawberryshortcake #strawberries #whippedcreamfrosting #cookiebars #sugarcookies
BLACK FOREST CAKE 🍒 this is my favorite thing to m BLACK FOREST CAKE 🍒 this is my favorite thing to make during cherry season! My version is decadent chocolate cake soaked with homemade cherry syrup, fresh cherry filling, and whipped cream frosting. Top it with a chocolate ganache drip if you want to go the extra mile! 

Full recipe + decorating tutorial is linked in my bio + at https://sugarandsparrow.com/black-forest-cake-recipe/

PS I’m working on a sheet cake version of this recipe that’s even easier! Stay tuned.

#blackforestcake #cherrycake #chocolatecake #cherries #cakedecorating

Footer

On the Blog

  • Cake Basics
  • Recipes
  • Tutorials

Info

  • About
  • Privacy Policy & Disclosure

stay in the know

Copyright © 2026 · Theme by Sugar & Sparrow