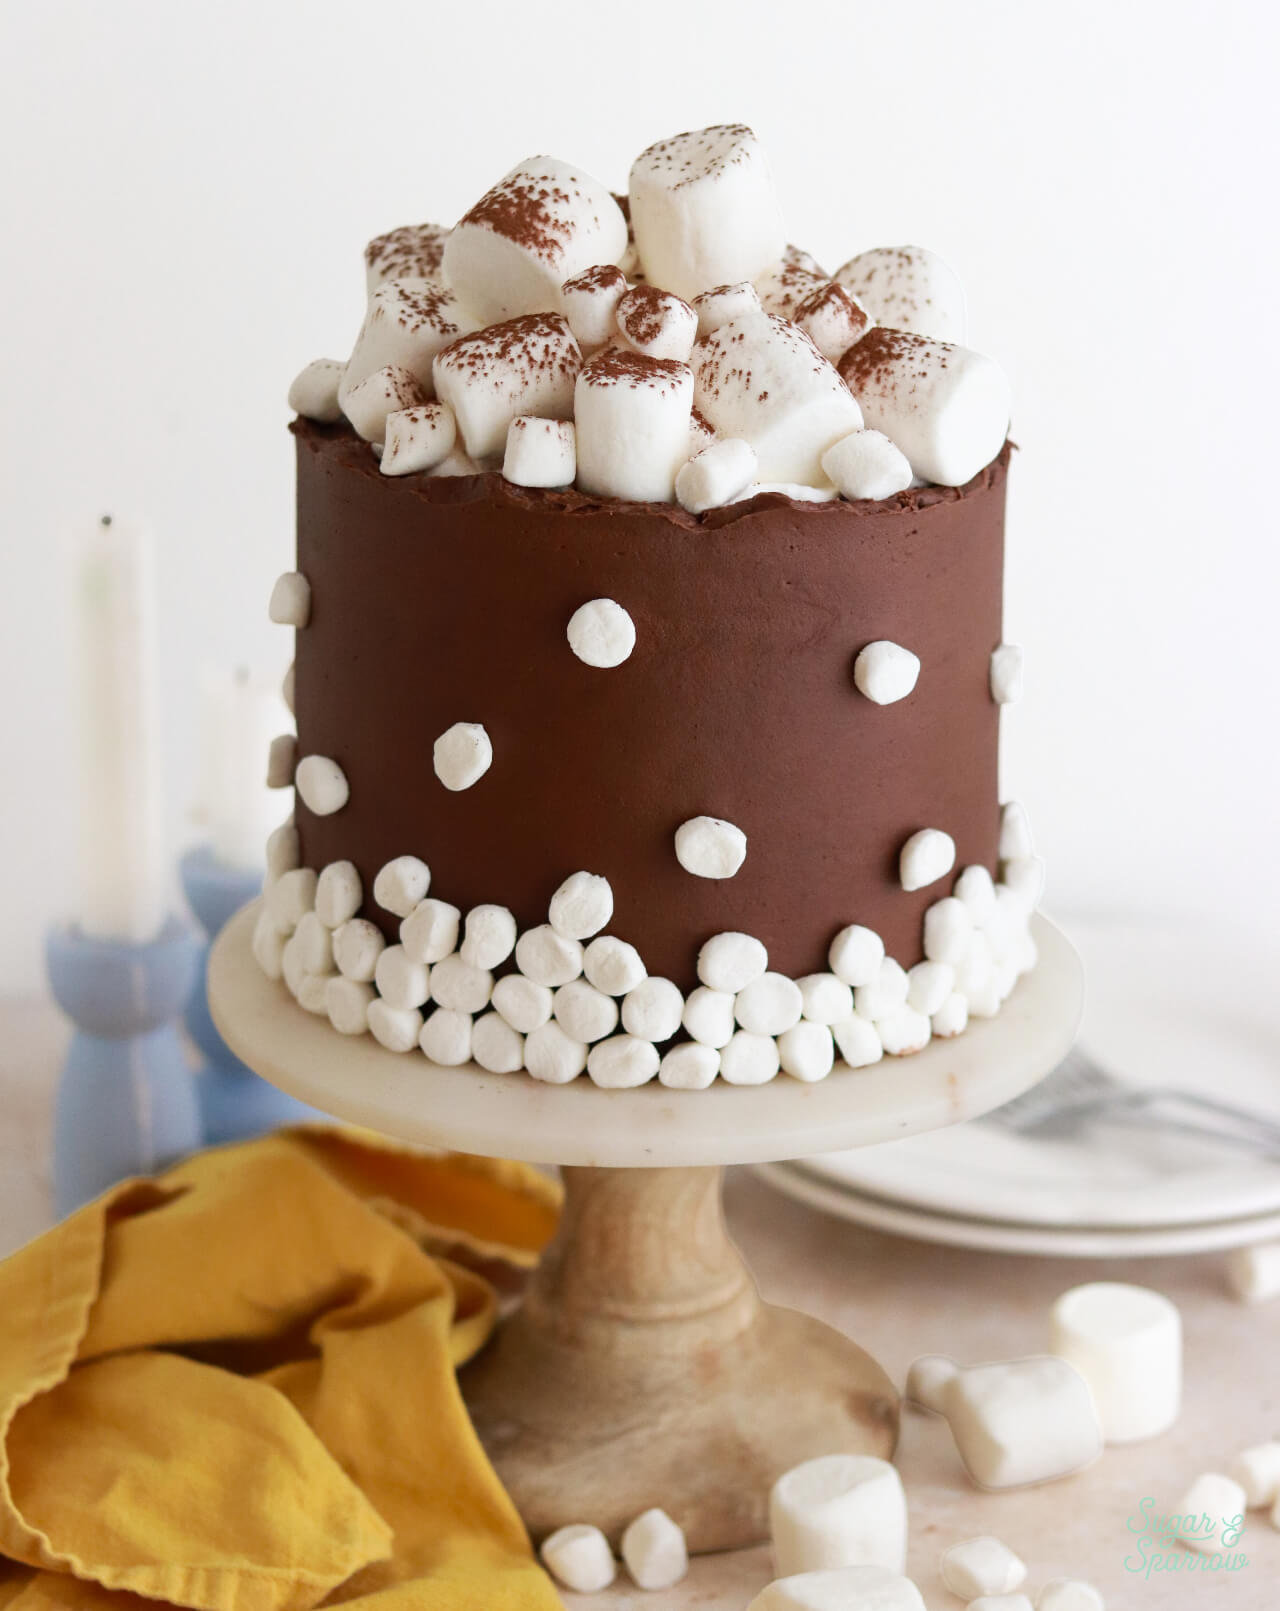
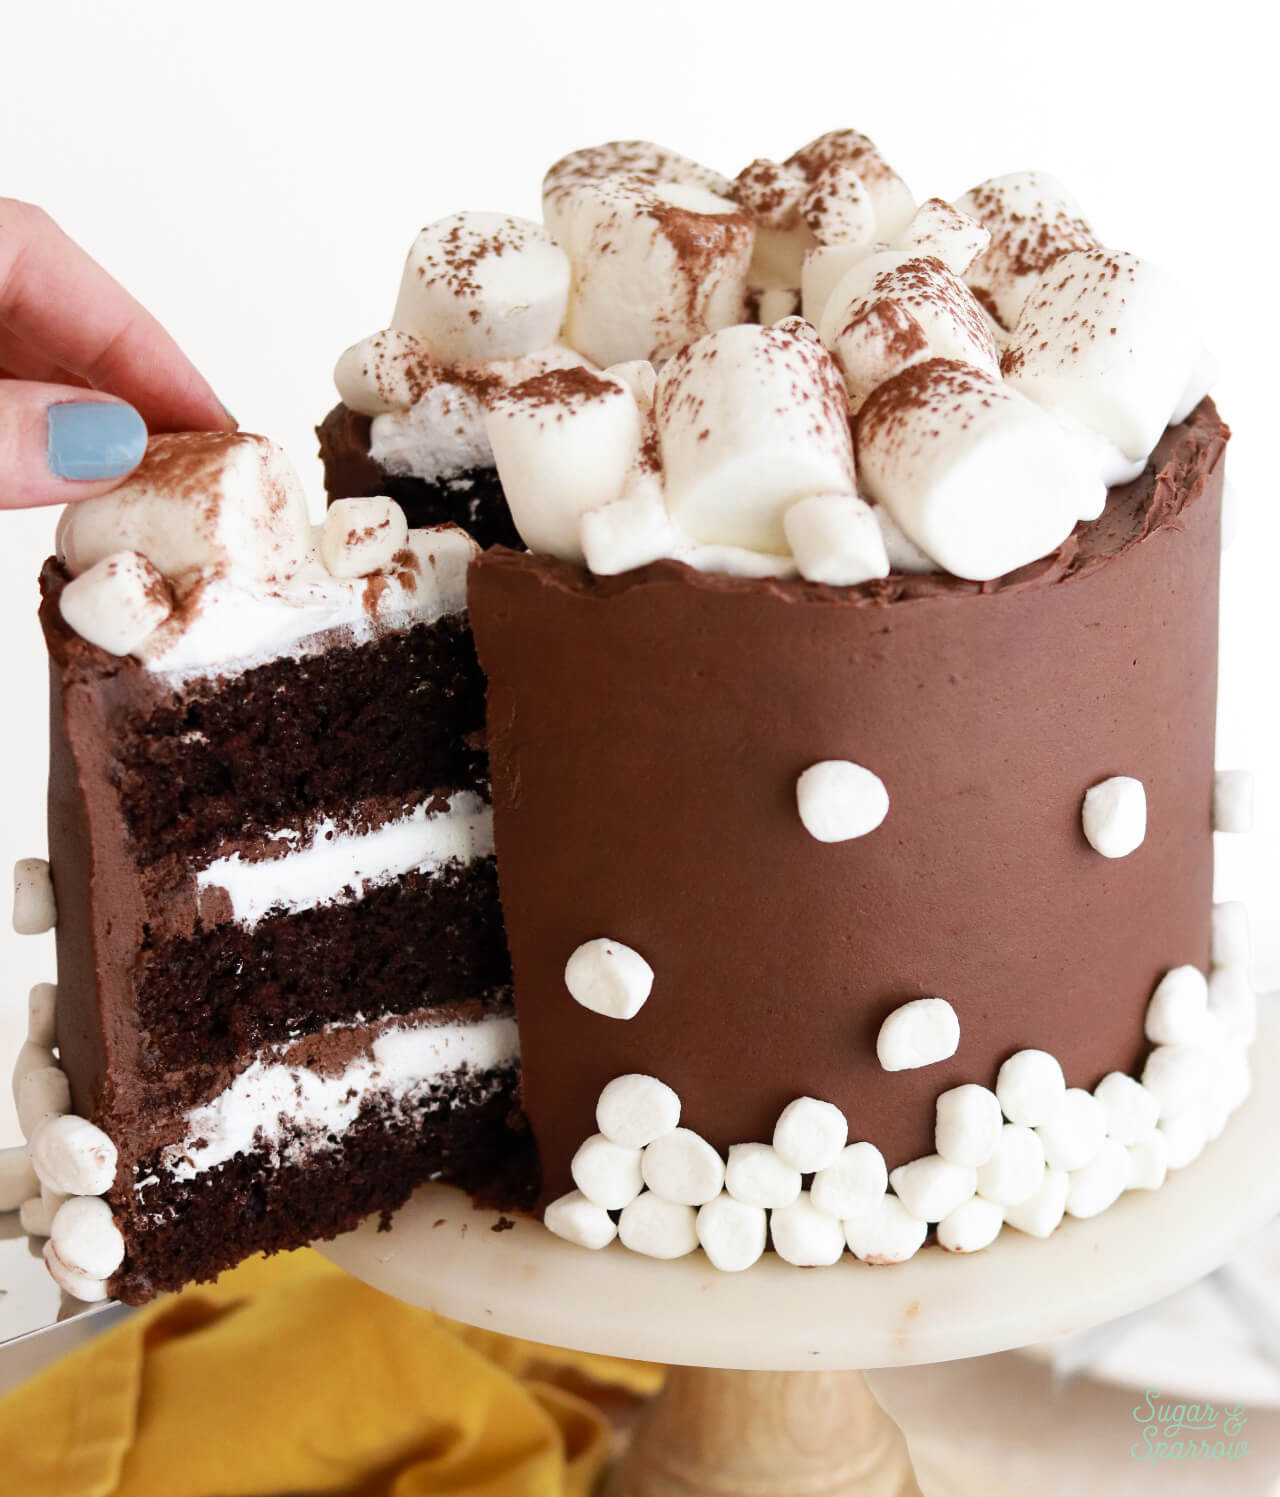
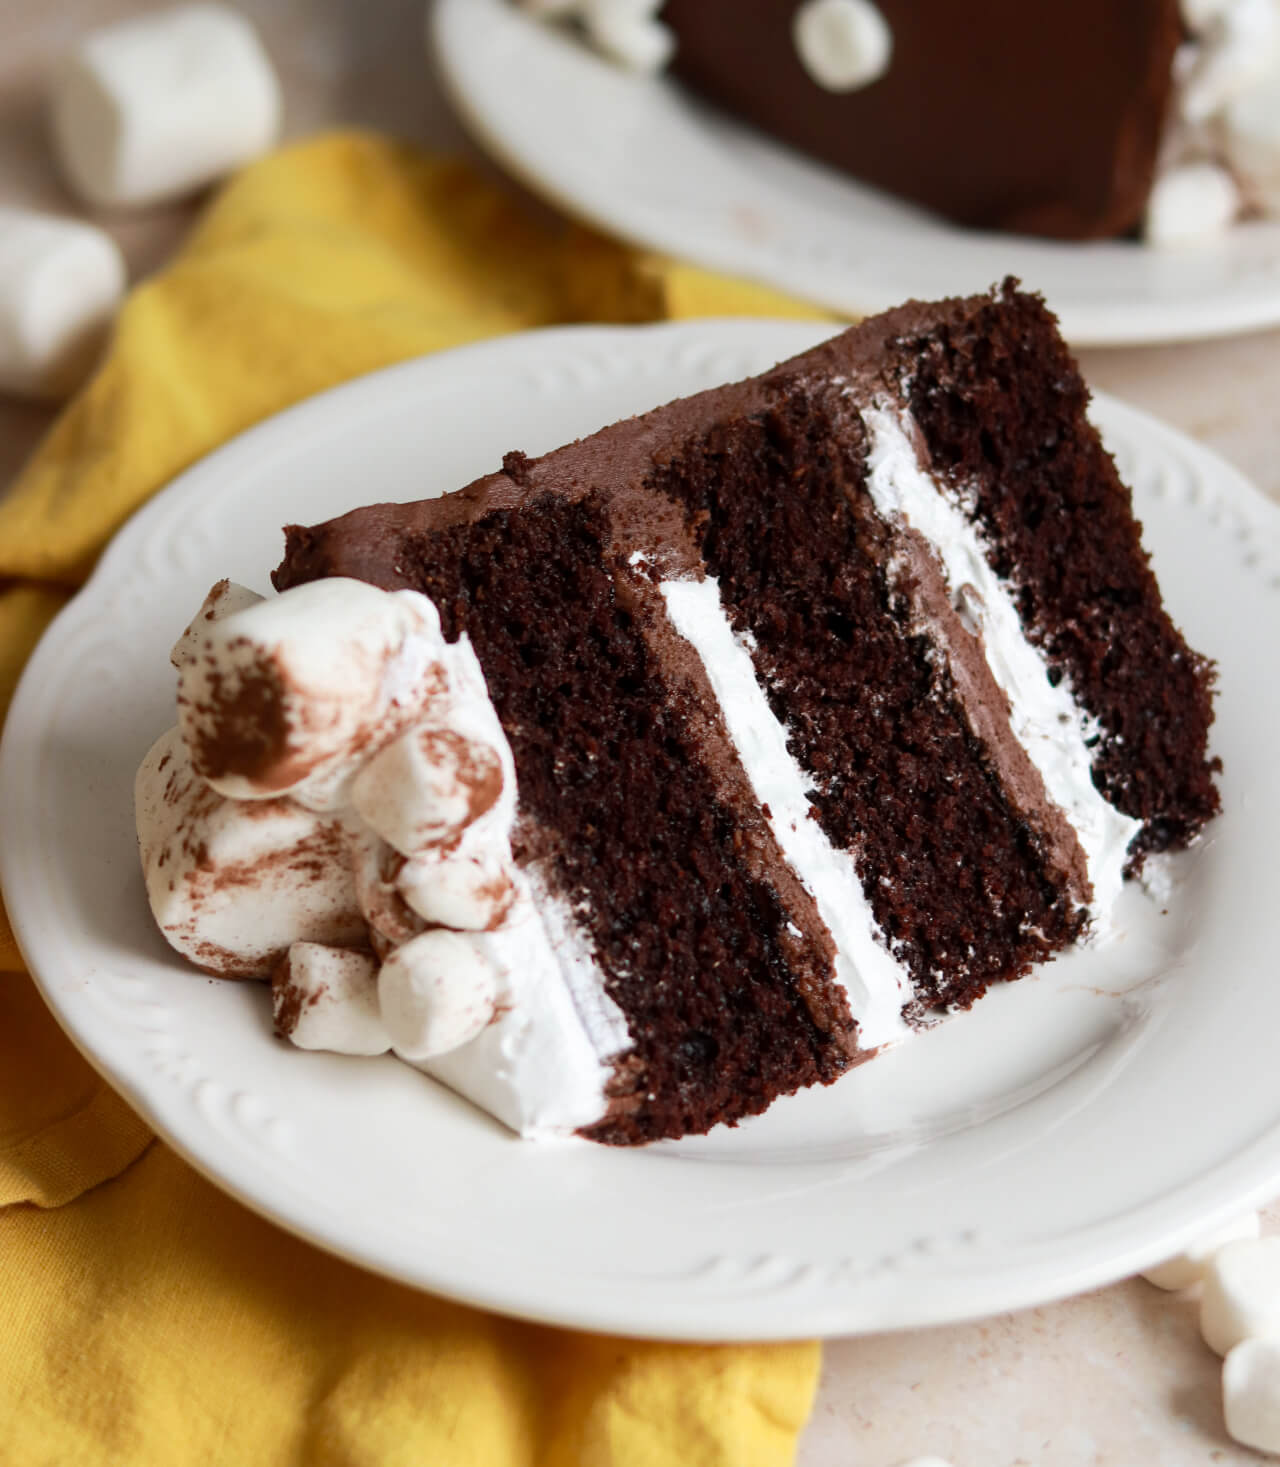
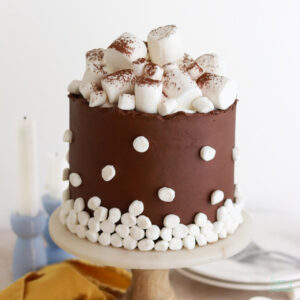
I know I’m not alone in saying that a mug of hot cocoa with marshmallows on top is downright nostalgic. This cake captures that warm feeling and will satisfy any chocolate cake lover! It’s layers of decadent chocolate cake infused with hot cocoa, hot cocoa flavored buttercream, and homemade marshmallow creme filling that is perfectly gooey. It’s truly a crowd favorite with all ages and is so fun to decorate with lots of marshmallows piled on top, just like a cup of cocoa.
Why You’ll Love This Hot Cocoa Cake
- Perfect Hot Cocoa Flavor. This recipe begins with simmering your favorite hot cocoa mix in milk, which then gets added to the cake batter and the buttercream. The cake and buttercream are chocolatey as-is, but the addition of the hot cocoa gives it that nostalgic cup of cocoa flavor.
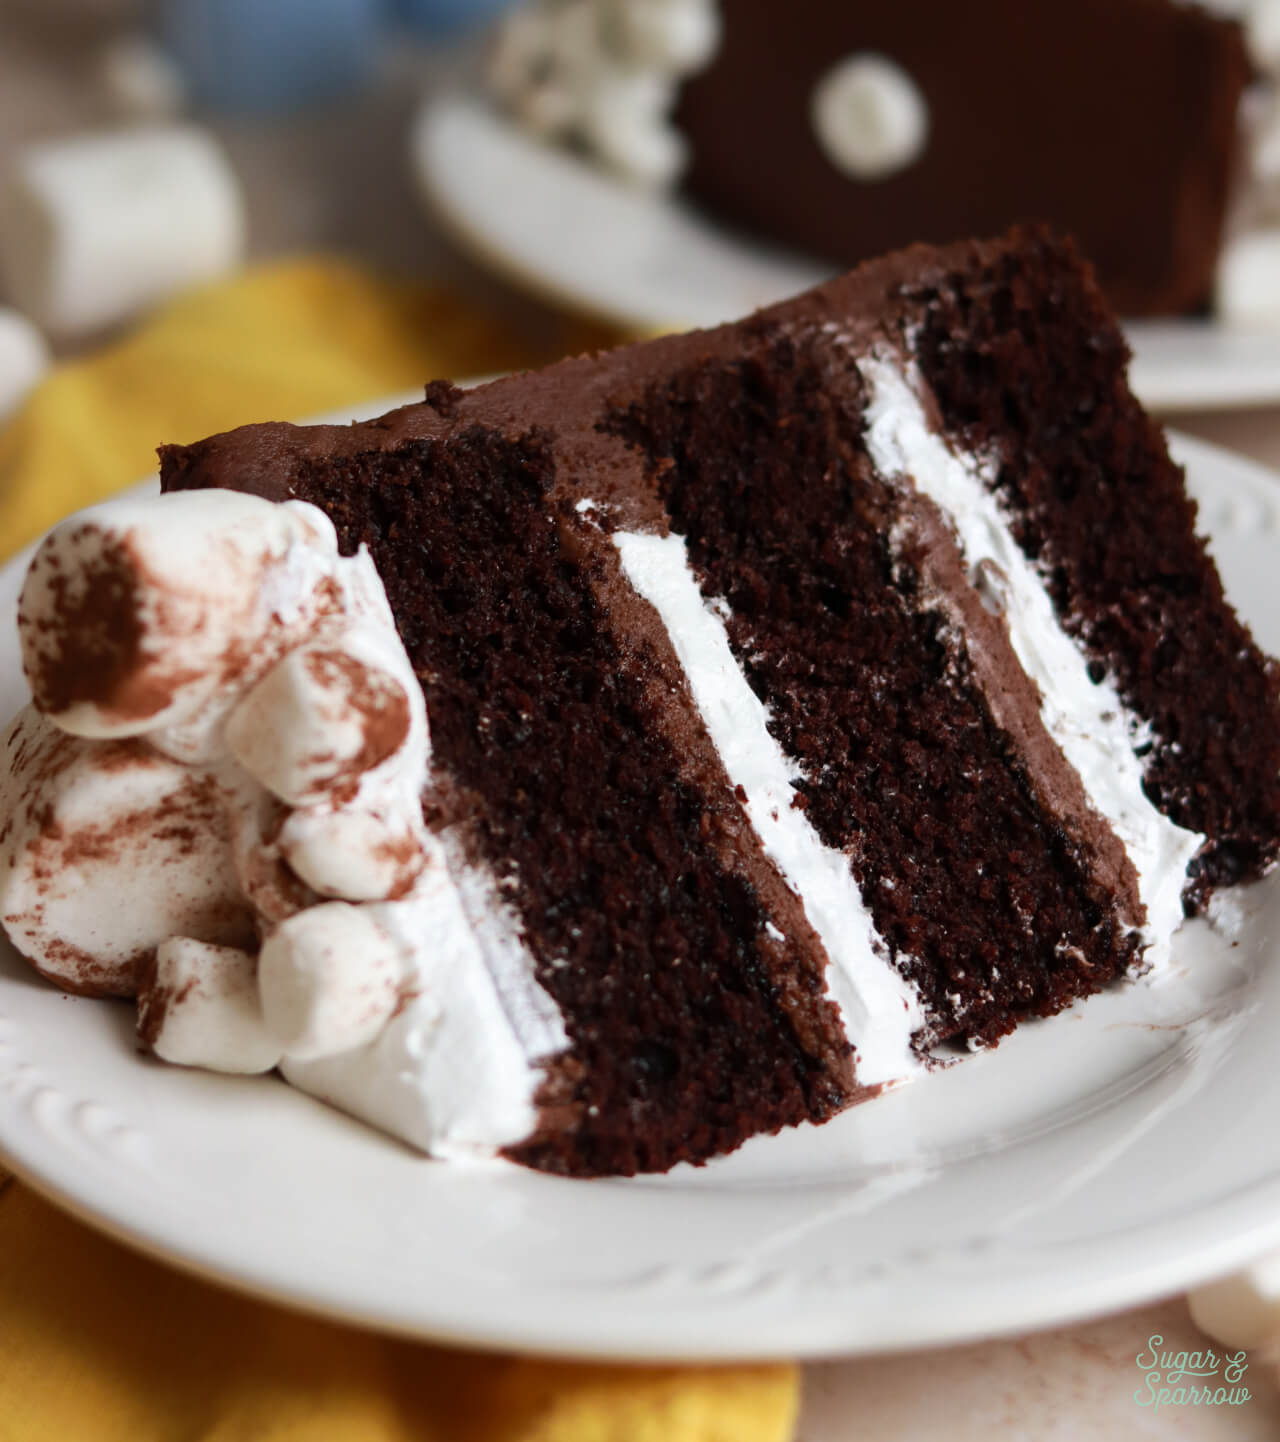
- Gooey Marshmallow Filling. The marshmallow meringue is made with just 4 ingredients and a simple technique that turns them into gooey homemade marshmallow creme filling. It’s arguably better than store bought marshmallow creme, not too sweet, and holds its shape well when you cut the cake into slices.
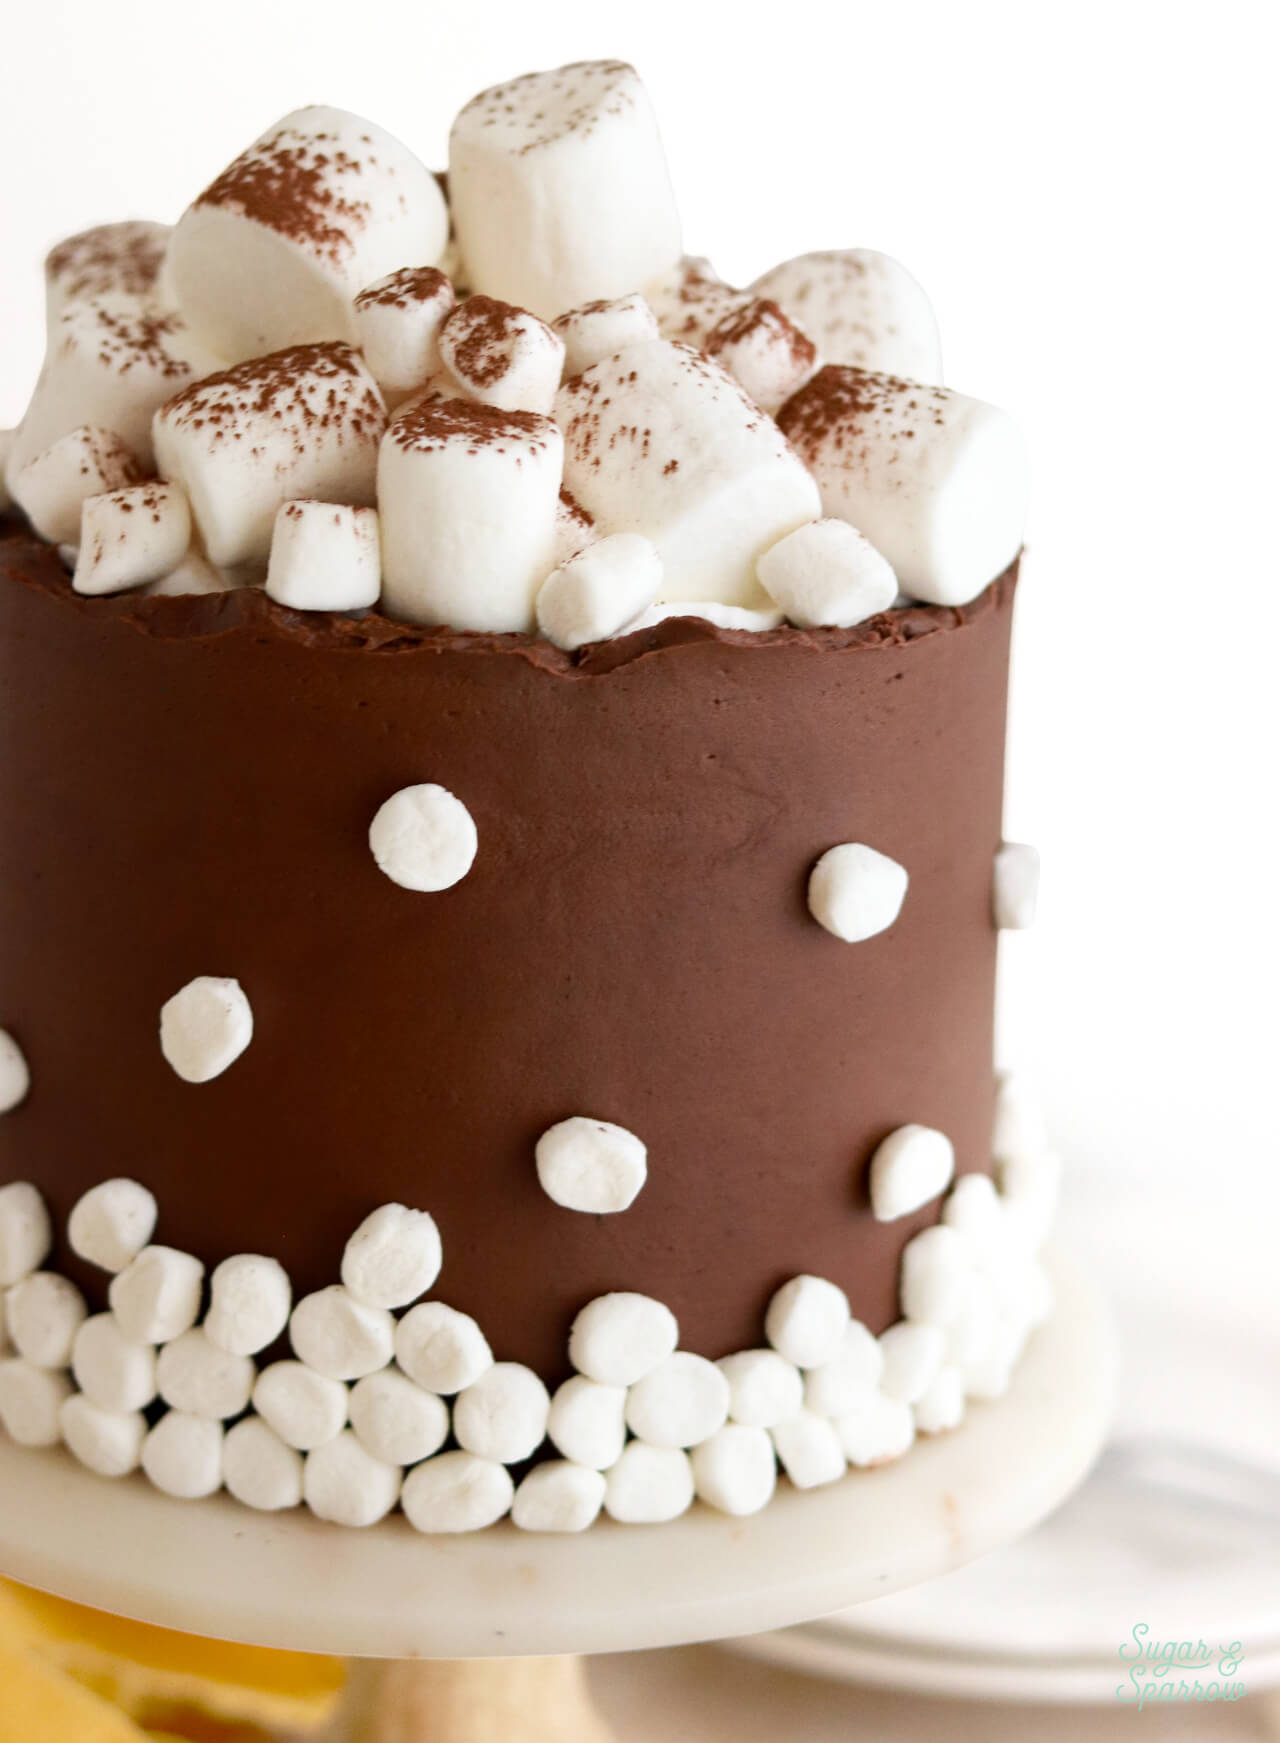
- Fun to Decorate. Although you can decorate this cake however you want, I love decorating this cake with lots of marshmallows. They’re so fun to stick on the sides of the cake and pile on top!
- Always a Crowd Favorite. Between the decadent chocolate cake, hot cocoa buttercream, and all the marshmallow elements, this cake is a hit wherever it goes!
Moist & Decadent Hot Cocoa Cake
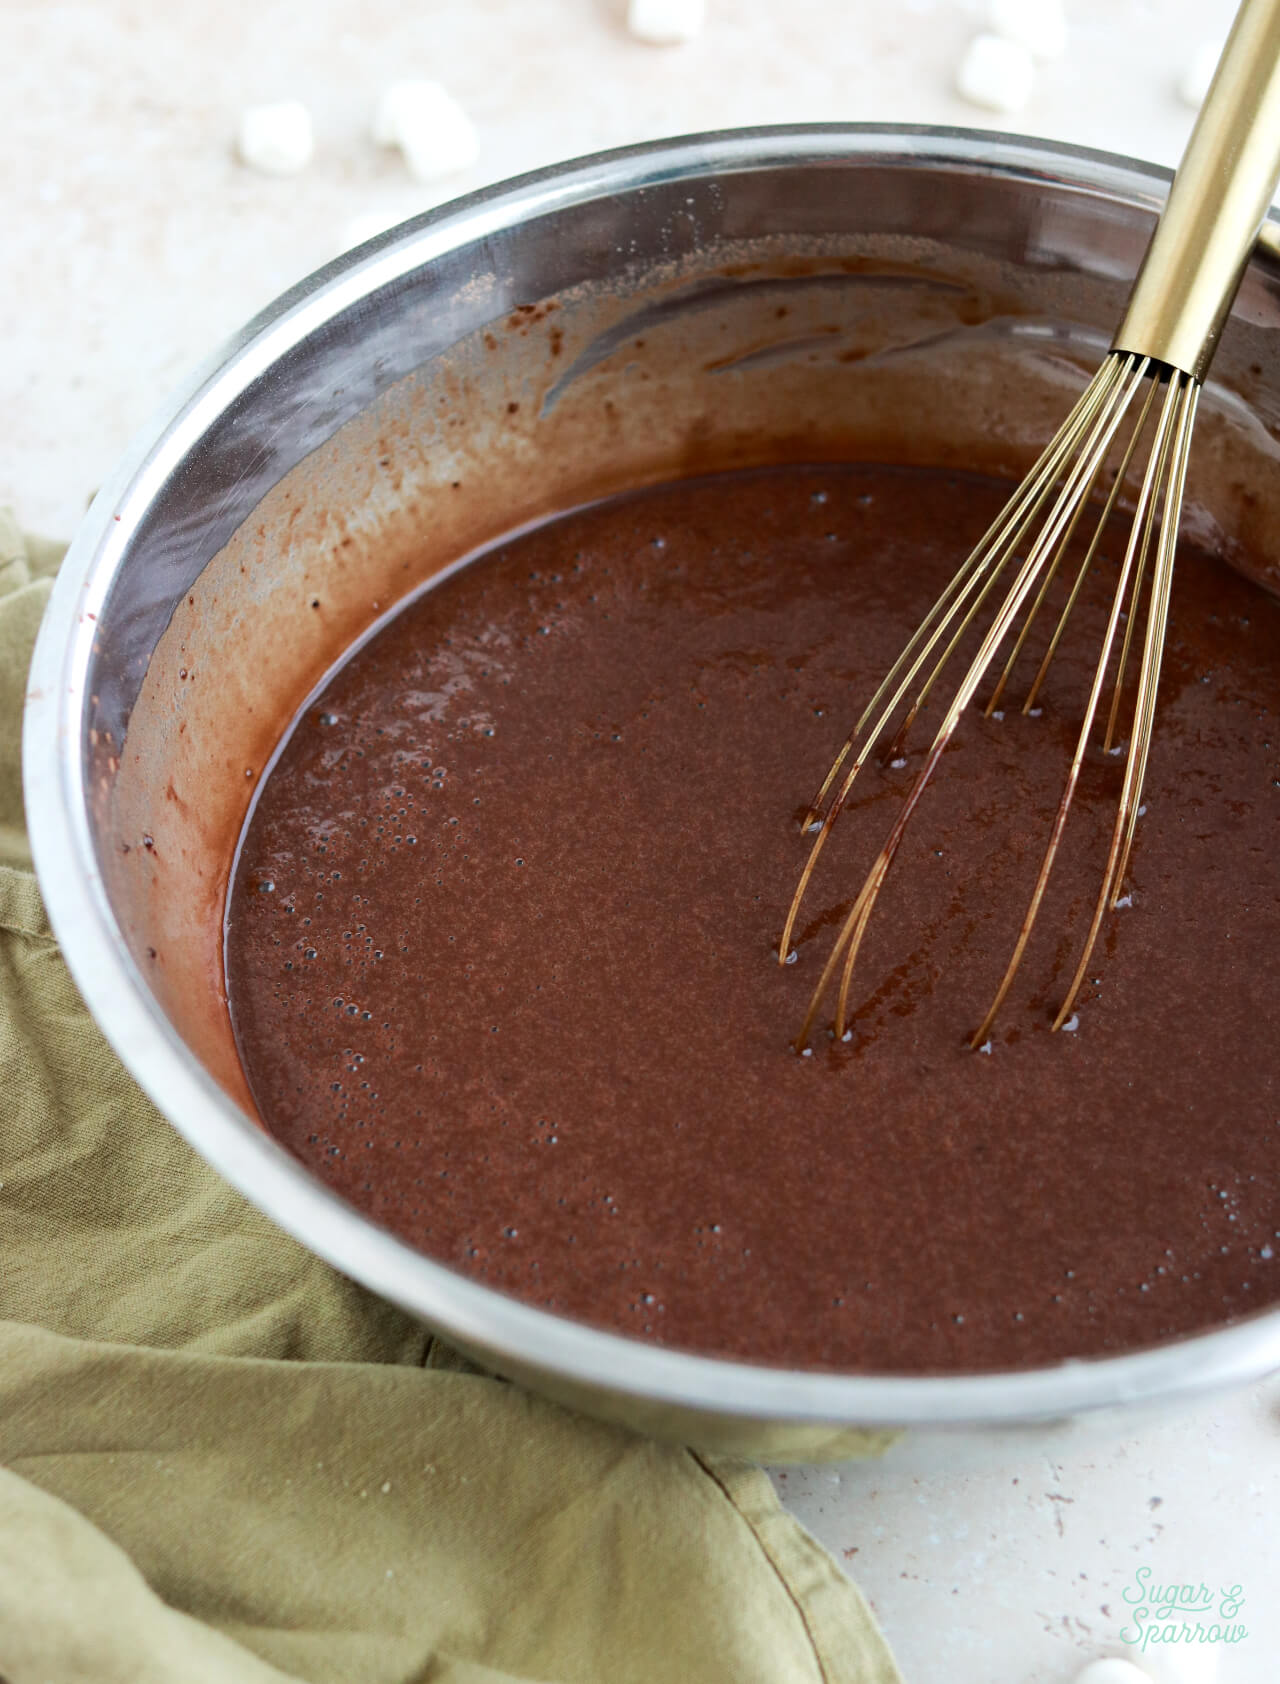
For the cake layers, I knew I wanted to start with my one-bowl chocolate cake recipe because it’s so easy to make, extra moist, and beautifully chocolatey as-is. To achieve more of a hot cocoa flavor profile, I whisked together some hot cocoa mix with whole milk and simmered it together to create actual hot cocoa. Then, I cooled it down to room temperature before adding it to the cake batter.
I reserved a little of the hot cocoa for the buttercream as well. And in case you’re wondering what kind of cocoa mix I used, it was this Swiss Miss Hot Cocoa Mix I usually have on hand in my pantry. You can absolutely use any hot cocoa mix that you prefer.
Hot Cocoa Flavored Buttercream
I really wanted to nail that hot cocoa flavor profile, so instead of just adding the hot cocoa mixture to the cake batter, I also added some to the buttercream. This frosting starts with my favorite chocolate buttercream recipe, but I swapped the milk in that recipe for a few tablespoons of the hot cocoa mixture. The result captures that cup-of-hot-cocoa flavor profile perfectly, and it really enhances the overall flavor of the cake.
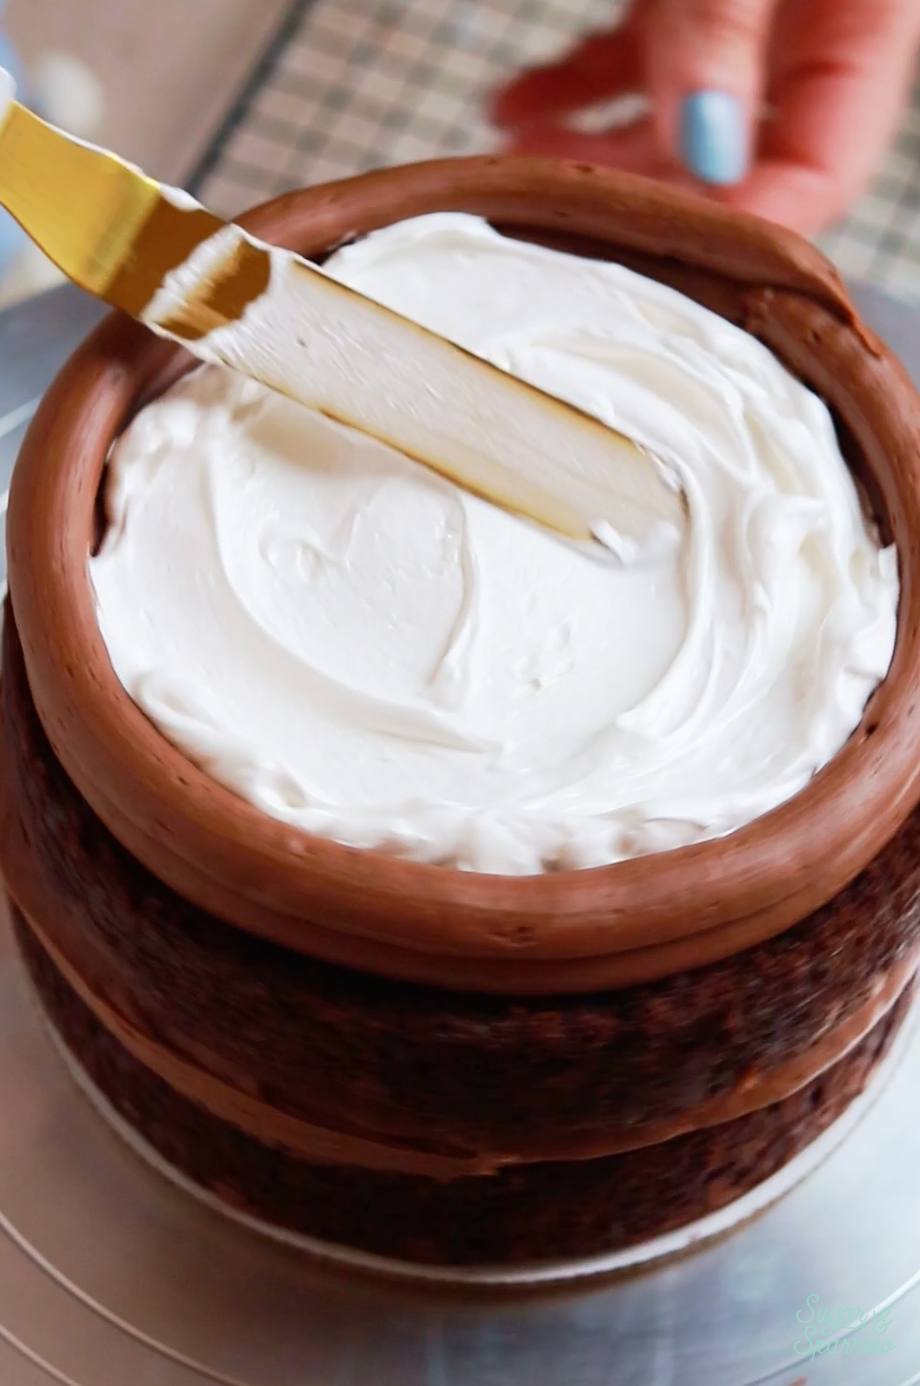
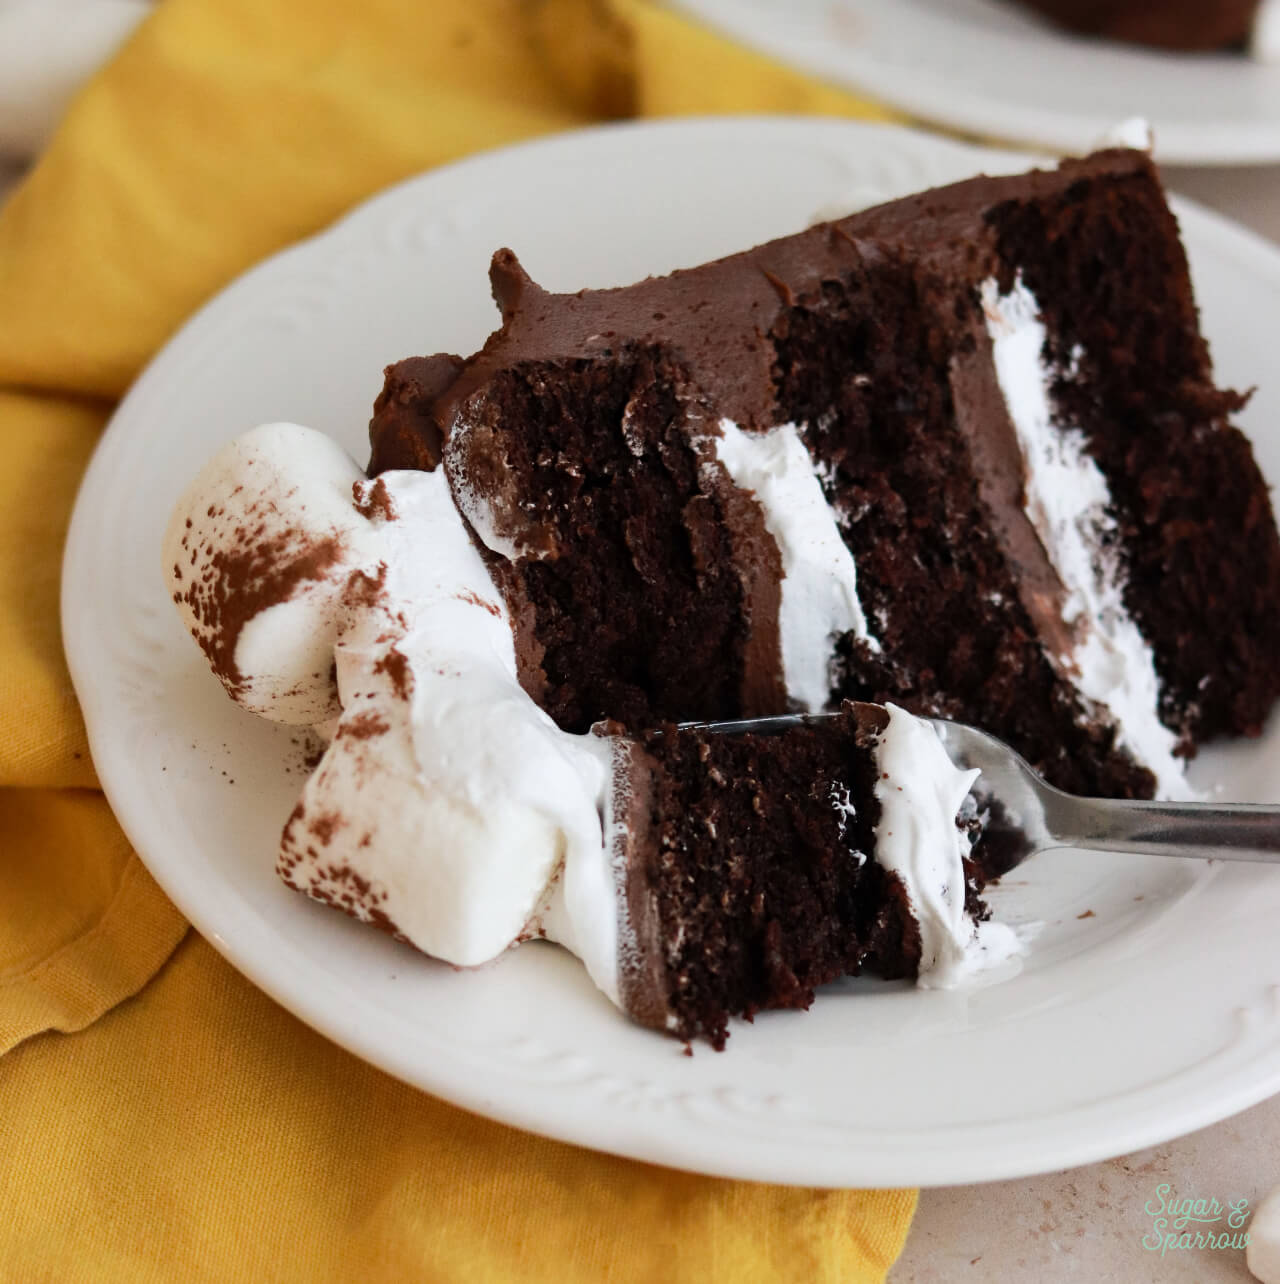
I thought about filling this cake with just the homemade marshmallow filling that I’ll talk about next, but the hot cocoa buttercream was just too delicious to keep on the outside of the cake. I had to add a little layer of hot cocoa buttercream between each cake layer and it was honestly the right choice. Not only does it help keep that gooey marshmallow filling contained, it’s just delightful to have more of that hot cocoa flavor.
Homemade Marshmallow Creme Filling
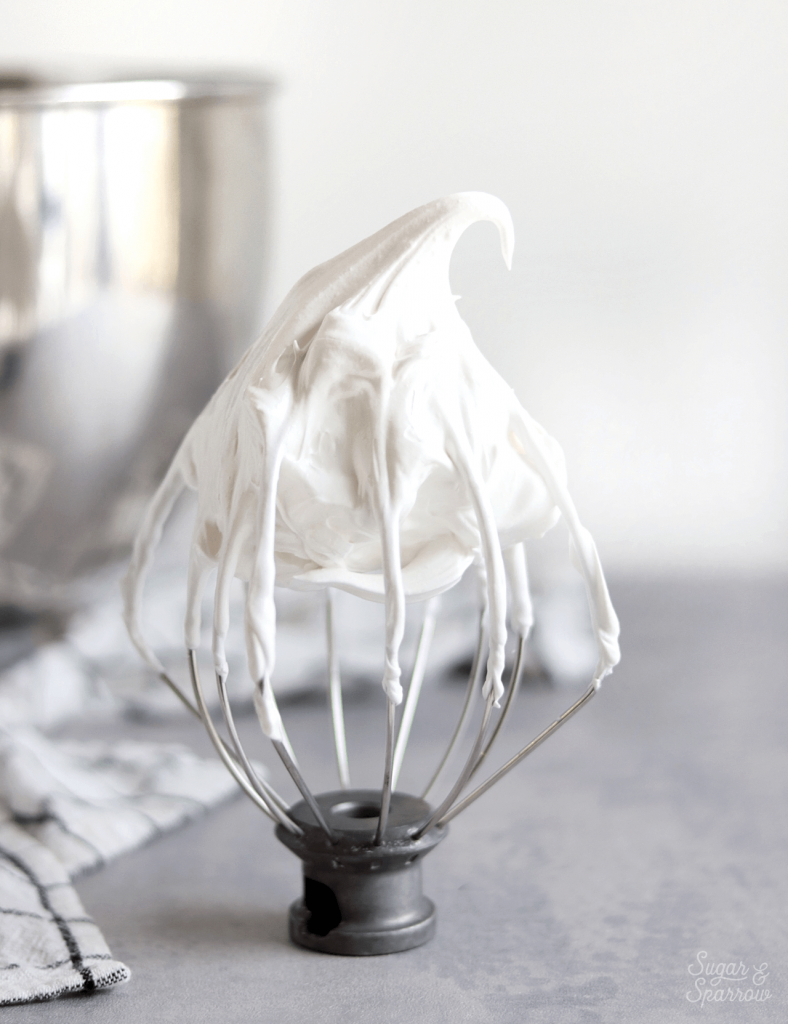
The original recipe for this hot cocoa cake (published in 2020) used store bought marshmallow creme as the marshmallow filling layer. You can absolutely do that if you want, but I promise that this homemade marshmallow creme filling is so much better! It only uses four ingredients – egg whites, granulated sugar, cream of tartar, and vanilla. You’ll basically cook the first three ingredients together over a double boiler (or in a metal bowl over a pot of simmering water) until the sugar dissolves, then add the vanilla and whip the mixture until you have a billowy, glossy marshmallow creme. It’s so easy and so delicious!
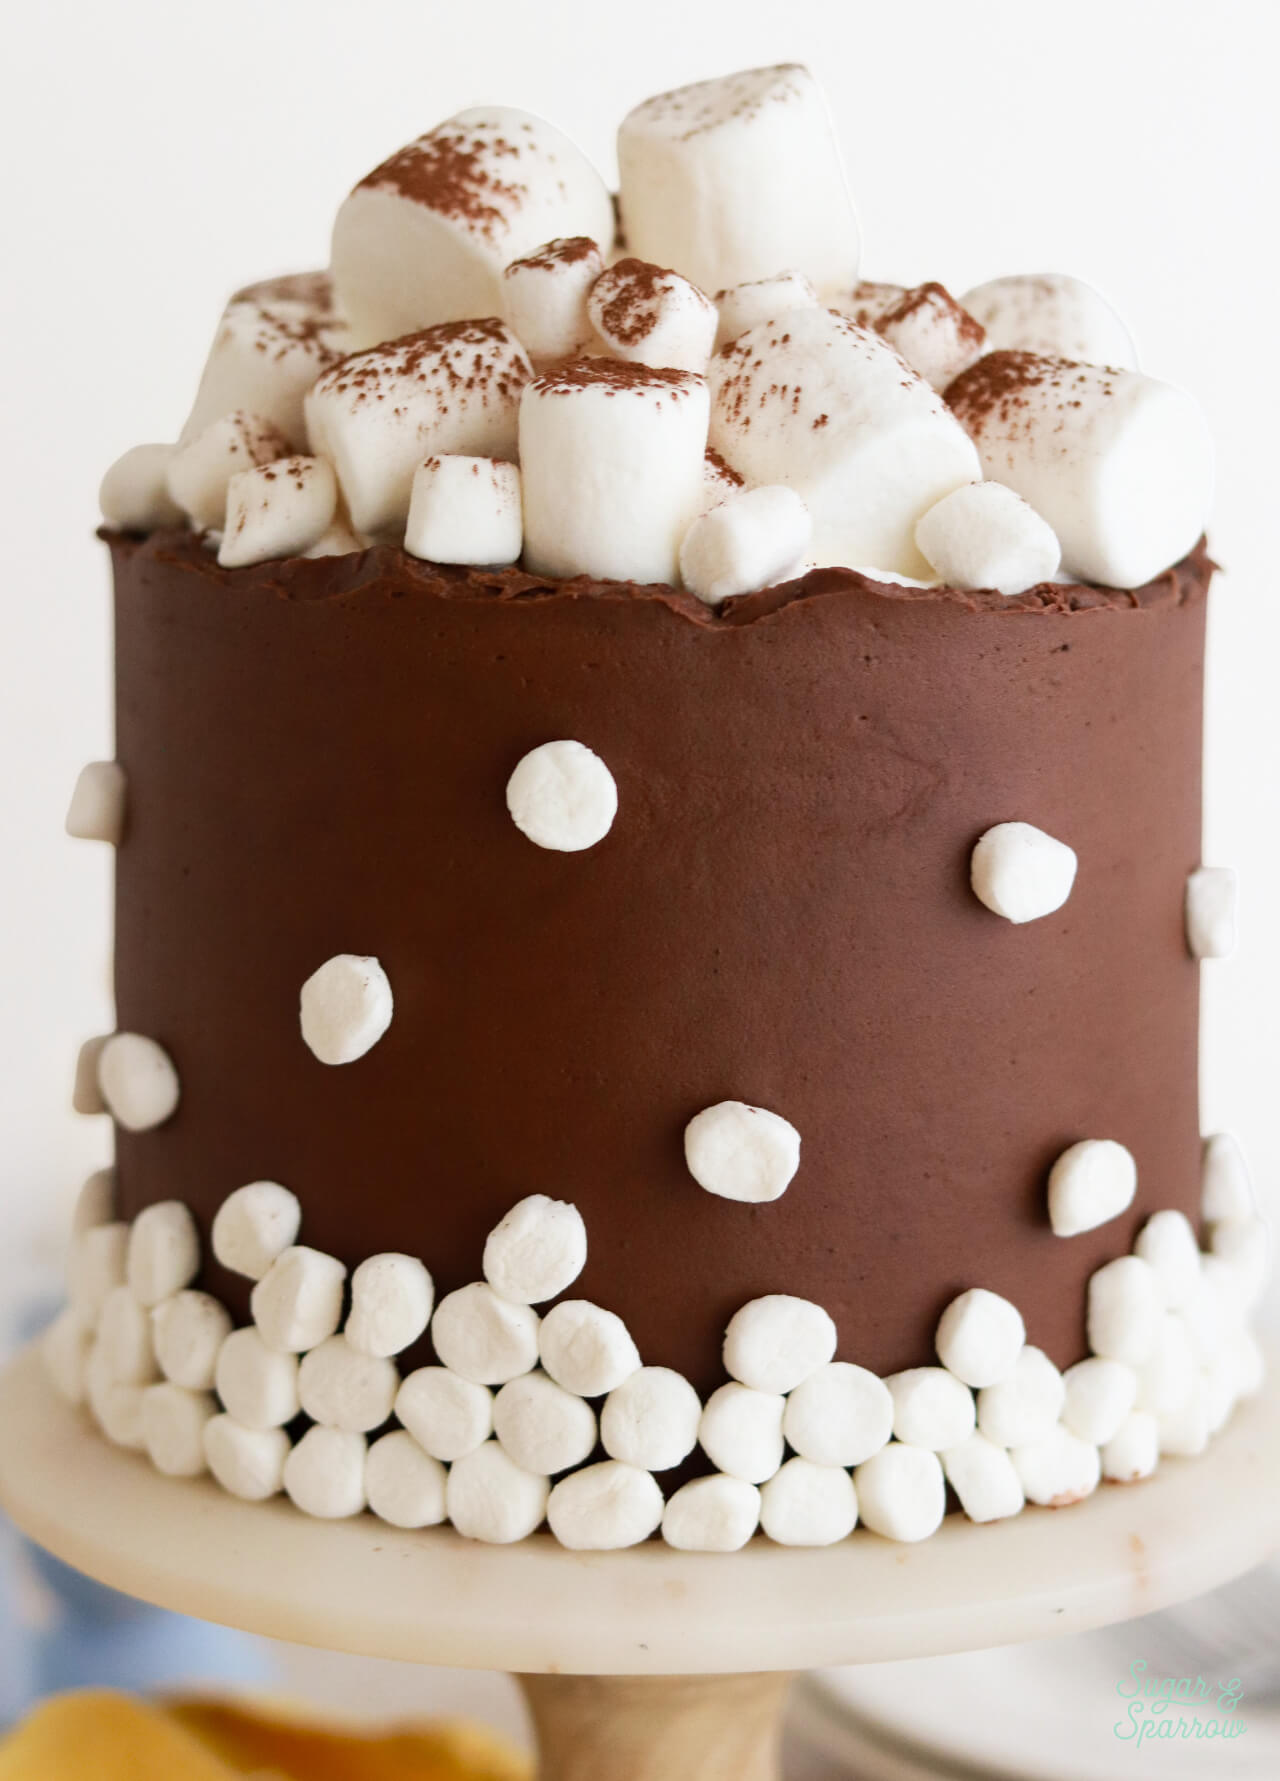
The marshmallow creme filling is perfectly soft and gooey, yet holds its shape when sliced. The store bought stuff tends to ooze out from between the layers once you start slicing the cake, but this homemade stuff keeps the cake together. I had a little left over after filling and stacking the cake, so I added it on the top and used it as a glue for the pile of marshmallows! More is more with the homemade marshmallow creme.
How to Decorate a Hot Cocoa Cake with Marshmallows
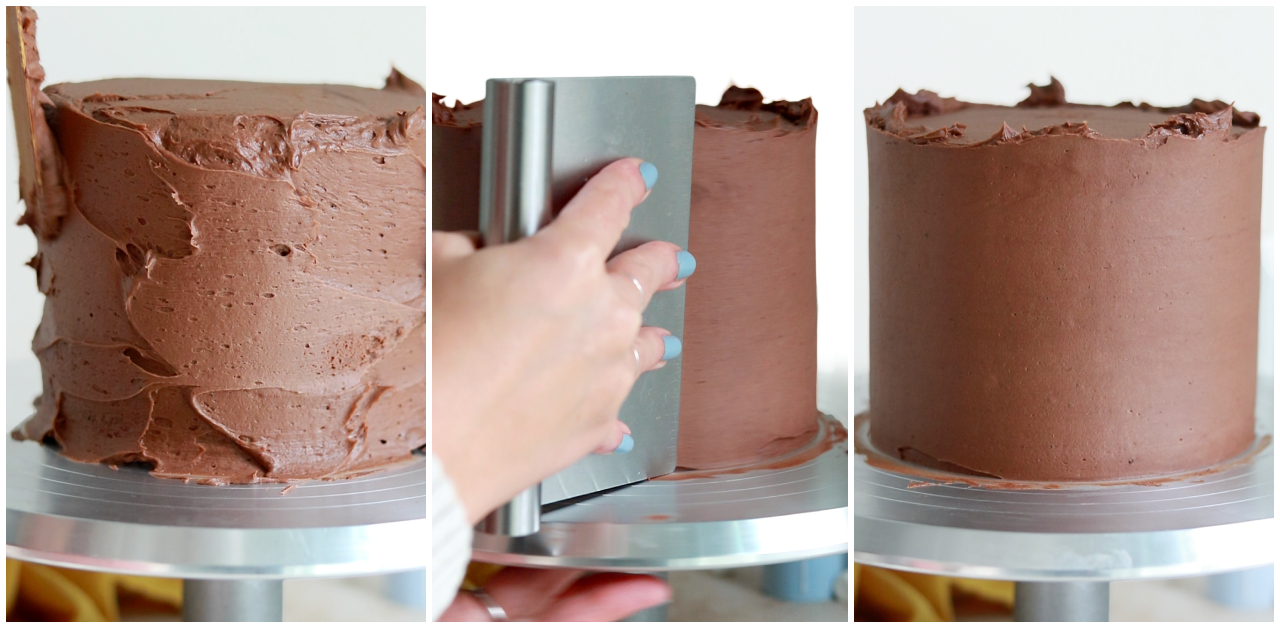
Decorating this hot cocoa cake is so much fun! After filling and stacking the cake layers, I frosted the cake with the rest of the hot cocoa buttercream to create a smooth buttercream finish. I left the top edge “unfinished,” aka I didn’t swipe the buttercream on top of the cake to make sharp edges. I like that an unfinished edge creates the look of movement, and it reminded me of a sloshy cup of hot cocoa.
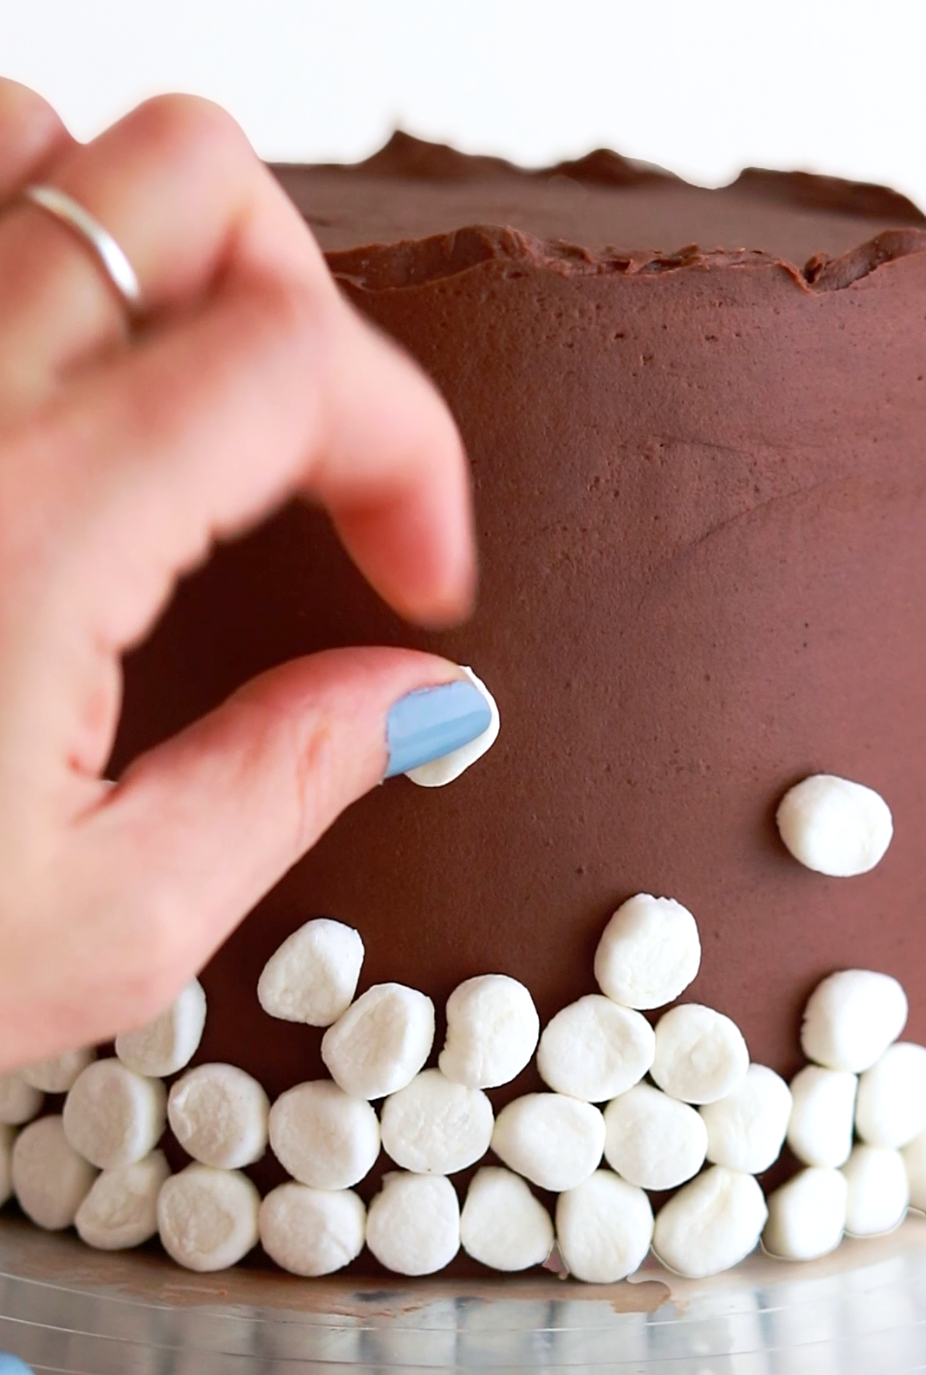
For the marshmallow decorations, I cut some mini marshmallows in half with a pair of kitchen scissors and just stuck them onto the sides of the cake in an ombrè layout. When you cut them in half, the cut side is quite sticky and adheres perfectly to the buttercream.
I added the rest of the homemade marshmallow creme on top of the cake and then piled some large marshmallows and mini marshmallows onto it. Finally, I dusted the whole thing with a little cocoa powder. I can’t get over how cute it is! So reminiscent of a mug of cocoa.
More Winter Cake Recipes You’ll Love
If you’re loving this hot cocoa cake recipe, here are some similar cakes that are perfect for the winter season:
- Peppermint Mocha Cake
- London Fog Cake
- Gingerbread Latte Cake
- Spiced Vanilla Chai Cake
- Fudgy Chocolate Nutella Cake
I hope you love this hot cocoa cake as much as I do! Let me know if you make it in the comments below and feel free to tag @sugarandsparrowco on Instagram to show me if you post a photo. I love to see what you create with my recipes!
Hot Cocoa Cake Recipe
Ingredients
Hot Cocoa
- 1 1/3 Cups (320ml) whole milk
- 4 Tbsp hot cocoa mix
Hot Cocoa Cake
- 2 Cups (265g) all purpose flour
- 1 1/2 Cups (300g) white granulated sugar
- 2/3 Cup (60g) unsweetened natural cocoa powder (not Dutch Process)
- 2 tsp baking soda
- 1 tsp baking powder
- 1/2 tsp salt
- 1/2 Cup (120ml) vegetable oil
- 2 whole eggs, room temperature
- 1 1/2 tsp pure vanilla extract
- 1 Cup (240ml) hot cocoa made with whole milk, room temperature recipe above
- 1 Cup (240ml) hot water
Hot Cocoa Buttercream
- 1 1/2 Cups (339g) unsalted butter, room temperature
- 4 1/2 Cups (540g) powdered sugar
- 1/2 Cup (45g) cocoa powder
- 1/4 Cup (60g) hot cocoa made with whole milk, room temperature recipe above
- 2 tsp pure vanilla extract
- 1/4 tsp salt
Homemade Marshmallow Creme Filling*
- 2 large egg whites
- 1/2 Cup (100g) granulated sugar
- 1/4 tsp cream of tartar
- 1/2 tsp pure vanilla extract
Toppings
- Mini and Large marshmallows for decoration
Instructions
Make the Hot Cocoa
- In a small saucepan over medium heat, whisk together the milk and hot cocoa mix. Bring to a simmer, then set aside and cool to room temperature before continuing on with this recipe.
Make the Hot Cocoa Cake
- Preheat the oven to 350ºF (177ºC) and prepare three 6-inch or two 8-inch cake pans by spraying the sides with baking spray and fitting the bottoms with a parchment cake circle.
- Place all of the dry ingredients into the bowl of a stand mixer fitted with the paddle attachment and stir on low for 30 seconds to fully combine them. Add the vegetable oil, eggs, vanilla, and hot cocoa and mix on low until just combined. Ensure that the hot water has been heated to a simmer, then with the mixer still on low, add the hot water in a slow stream. Turn the mixer to medium and beat until smooth, about 2 minutes. The batter will be very thin.
- Pour into prepared cake pans no more than 2/3 full and bake for 32-36 minutes, or until a wooden toothpick inserted comes out clean. Cool completely before frosting.
Make the Hot Cocoa Buttercream
- In a stand mixer fitted with a paddle attachment, whip butter on medium speed until creamy and light in color, about 5 minutes. Scrape down the bowl and paddle and add half of the powdered sugar, then mix on low speed until combined. Add the rest of the powdered sugar, cocoa powder, hot cocoa, vanilla, and salt. Mix on low speed until combined and smooth, scraping down the bowl and paddle as needed.
Make the Marshmallow Creme Filling
- Fill a medium saucepan with an inch or two of water and bring it to a simmer over medium heat. Whisk together the egg whites, granulated sugar, and cream of tartar in a heatproof bowl, then place it on top of the simmering saucepan. Make sure that the bottom of the bowl does not touch the water. Alternatively, you can use a double boiler for this part.
- Whisk the egg white mixture continuously until the sugar and cream of tartar are dissolved, 3-4 minutes. It will thin out and be very frothy on top.
- Remove the mixture from the heat and add it to a stand mixer fitted with the whisk attachment (you can use a hand mixer for this part as well). Add the vanilla, then beat on high speed until stiff, glossy peaks form, about 3-5 minutes. To test it, dip your whisk attachment into the meringue and make sure the peak holds.
Assembly
- Once the cake layers are completely cool, level them to your desired height. Pipe a ring of hot cocoa buttercream around the edge of the first cake layer, then fill the middle halfway with marshmallow creme filling before filling the rest of the space with hot cocoa buttercream (here's a tutorial on this filling method). Add the next cake layer on top and repeat the filling process before adding the final cake layer on top, upside down so that the bottom of the cake is facing up. Crumb coat with the hot cocoa buttercream and refrigerate for 20 minutes.
- To create the look pictured, use the rest of the hot cocoa buttercream to frost a smooth buttercream finish, keeping the top edge "unfinished" (aka don't swipe the top edges inward to make them sharp). Use clean kitchen scissors or a paring knife to slice the mini marshmallows in half and place them onto the buttercream finish in an ombrè layout. The cut side of the marshmallow should be sticky enough to press onto the side of the cake and adhere, but if you need to, brush on a little water to make it stickier. Finish the design by adding the rest of the marshmallow creme on top, then piling marshmallows of various sizes onto it and dusting with cocoa powder.
Notes
- The hot cocoa cake layers can be made ahead and stored, wrapped in plastic wrap, at room temperature for up to two days. Alternatively, you can store the wrapped cake layers in the freezer for up to 2 months before thawing and frosting.
- The hot cocoa buttercream can be made ahead and stored in an airtight container in the refrigerator for up to two weeks. When you’re ready to use it, bring it back to room temperature and re-whip in your stand mixer to bring back to smooth buttercream consistency.
- The marshmallow creme filling is best used right away, but if you need to you can store it in an airtight container at room temperature for up to 6 hours or in the refrigerator for up to 2 days. It may deflate slightly when stored in the refrigerator.
Did you make this recipe? I want to know what you think! Let me know in the comments below or tag me on Instagram. I love to see what you’re caking!

Hello there
I was planning to make this cake a few days before the event. I had a question.
I was reading your ‘notes’ and it says about the cake storage instructions in room temperature and freezer .
I wanted to know if I can store the cake wrapped tightly in the refrigerator and for how long?
Hi Christina! I don’t usually store my cake layers in the refrigerator because I’ve heard it dries out the cake unless frosted, but if you wrap them tightly with plastic wrap I think they should be fine for up to 2 days in the fridge.
Hi! Is there a trick to keep the marshmallows fresh, if making ahead of time? I’m worried they will dry out and become stale. Thanks!
Hi Rachel! I don’t think the marshmallows taste too dry/stale when making the cake a day or so ahead, but if you’re concerned about that the only thing you can really do is to save that part of the decorating for the day of. Hope that helps!
Do you think going Swiss Miss (classic) or ghiradelli hot cocoa would be better? I know Swiss miss is more of a classic mist people are aware of and use that one. I wonder if ghiradelli would give it a more rich premium taste though? Hmm, decisions lol
I think this would be alright to do, but just wanted to check. Could I make the hot cocoa and milk mixture for the cake a day before I actually make the cake, then just bring it up to room temperature before mixing it in to the cake batter? Can’t wait to make this. All your cakes have been winners that I’ve made.
Yes, Jennifer! It will absolutely work to make the hot cocoa mixture a day ahead and bring it to room temp when you mix up the batter. I’m so happy you’ve been loving my recipes!
What brand of unsweet cocoa did you use? Could you sub cacao?
Hi Kelly! I used Hershey’s cocoa powder which is 100% cacao powder, so you could definitely sub any brand of 100% cacao powder. Enjoy!
Was a big hit when we had friends over! I am personally not a huge chocolate cake fan, but this cake was had more flavor and tasted amazing! Thank you for another great recipe, Whitney!
That’s amazing, Chloe! I’m so happy to hear that!
Hi! I’m planning to make this for my daughter’s birthday next weekend – it looks and sounds amazing! Do you make your own marshmallow fluff or use storebought? I’m planning to make my own marshmallows for the top but wondered what you did for the cake-filling layer. Thanks!
Yay, Holly! What a fun birthday cake! I just used store-bought marshmallow fluff but you could totally use a homemade recipe as an alternative if you’ve got one. That’s so ambitious making your own marshmallows for the top!
I this is cake and it didn’t came out the same color as pictured. I believe or it looks like you used chocolate Dutch processed instead of the hot cocoa mix
Hi Shanda! What color did your cake turn out? This cake and frosting both call for cocoa powder and hot cocoa mix. Maybe you missed the cocoa powder in the cake or the buttercream?
I did not use Dutch
process in mine came out like colors as well
Hi Kelly! What color did your cake turn out?
Wondering if you’ve ever added peppermint to make a minty hot cocoa cake…
Hi Katrina! I have been working on a Peppermint Hot Cocoa Cake recipe that I’ll be launching next week! I’ll be sure to comment here when I share it to let you know 🙂
I’m accustomed to everyone I know, calling any hot chocolate drink, “hot chocolate” or “hot cocoa”, regardless of the actual flavor.
Is this actually “hot cocoa” flavor? Or the sweeter kid-friendly “hot chocolate”?
Yes, I’m surrounded by this daily!!
Thanks!
Hi Ashley! It is flavored with hot cocoa, but I’ve never known there to be a difference between hot cocoa and hot chocolate.
My sister in law made me this cake for an early birthday treat and I think I died and went to heaven. SO GOOD.
Yay, Megan! I am so happy to hear that the recipe was such a hit and happy birthday to you!!
can is store in refrigerator ?
Hi Kathy! Yes, you can store the decorated cake in the refrigerator for up to four days. Keep in mind that the sooner you serve it the fresher it will be. I also have instructions for making elements of this cake ahead of time in the notes section of the recipe. Hope that helps!
This cake is delicious! The cake was so moist and the buttercream was just perfect!
Yay, Ashley! I’m so happy to hear that this cake was a hit! Thanks so much for taking the time to let me know how it turned out 🙂
Just made cupcakes and buttercream, omg amazing!
Yay!! So happy to hear that you love this recipe, Angela!