• Cake
  • Frosting
  • YouTube
  • My Favorite Tools
  • Nav Social Icons

  • Skip to primary navigation
  • Skip to main content
  • Skip to primary sidebar
  • Skip to footer
  • Recipes
    • Cake
    • Cupcakes
    • Frosting
    • Ice Cream
    • Vegan
  • Cake Basics
  • Tutorials
  • Blog
  • About
  • Mobile Menu Widgets

    Connect

    Search

Sugar & Sparrow logo in script font

Sugar & Sparrow

Lifestyle and Cake from Portland Oregon

  • Cake Basics
  • Recipes
    • Cake
    • Cupcakes
    • Cookies & Bars
    • Filling
    • Frosting
    • Ice Cream
    • No-Bake
    • Small Batch
    • Vegan
  • Tutorials
  • Book
  • Blog
  • About

Marbled Candy Melt Chocolate Sail Tutorial

April 11, 2019 · In: Decorations & Garnishes, Featured, Recipes, Tutorials

I’ve been an admirer of cakes topped with colorful chocolate sails for years, but it wasn’t until just recently that I tried my hand at making my own! I’m so excited to share this tutorial with you, because it could not be easier to do with the right materials. Mainly, some colorful Wilton Candy Melts I found at my local JOANN store. There are so many colors to choose from, you’ll find a color (or combination of colors!) for every look.

UPDATE 2025: JOANN is (sadly!!) out of business, so I have slightly changed these product links.

Wilton Candy Melts
marbled chocolate sail tutorial

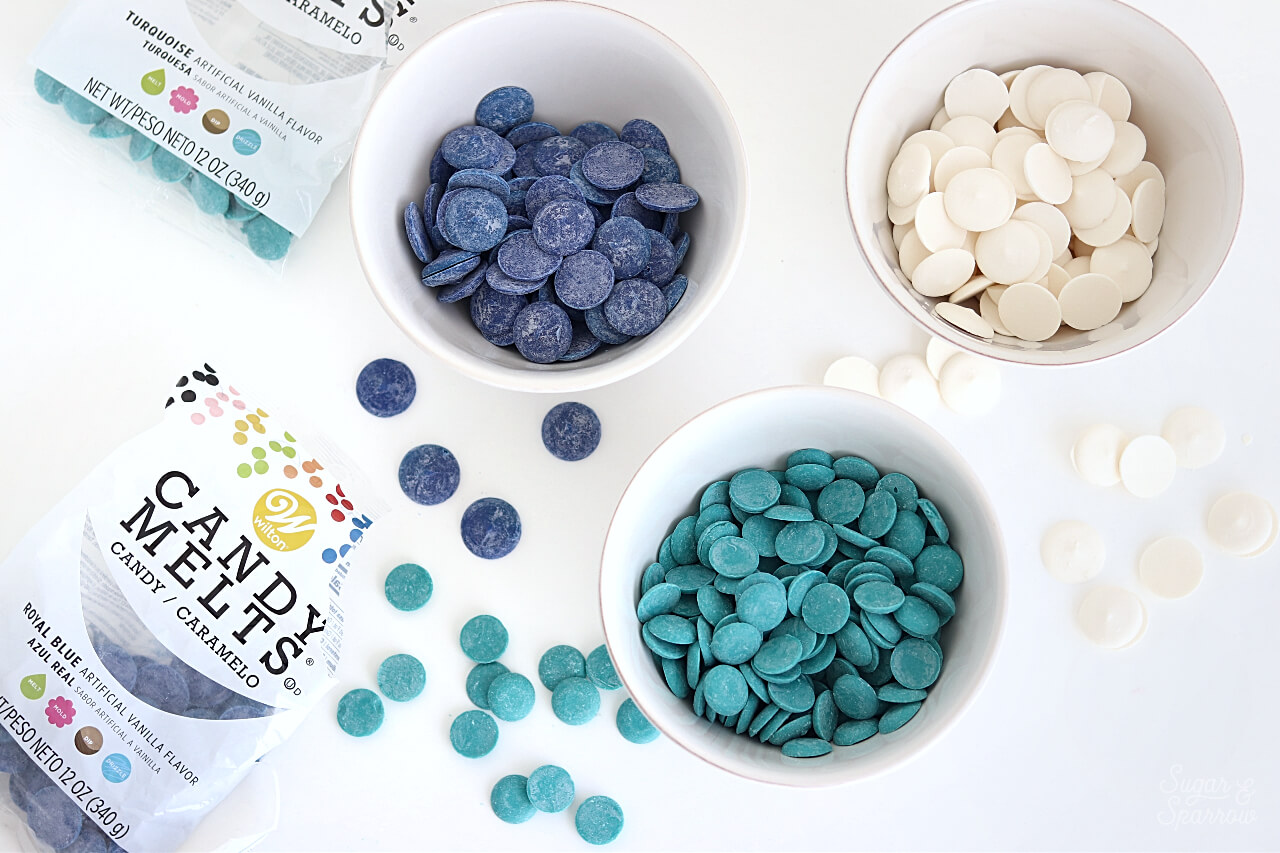
The best things about using Candy Melts for creating sails is there’s no tempering necessary and the colors are already so vibrant. While they have the look and consistency of chocolate, Candy Melts aren’t a true chocolate and are designed in such a way that they can be melted down without having to worry about tempering. And with such a wide range of colors, you never have to worry about adding food coloring. In the past, I’ve had problems with white chocolate seizing when adding food color gel, but it’s so nice to not have to add a drop of that to Candy Melts.

chocolate sail cake by Sugar and Sparrow

It was so hard to decide what colors to choose for my sail, but in the end I decided on Royal Blue, Turquoise, and Bright White. I wanted to create a marbled effect, and these three colors paired so well together. I’m sure this chocolate sail technique will work with so many color combinations, but you could also just use one color if you don’t want the marbled look. Either way, here’s a quick video of the technique so you can see how it works before you read all about it below:

You Will Need:

  • 8 oz of Candy Melts (I used a combination of Royal Blue, Turquoise, and Bright White)
  • Bowls for and spoons for melting and mixing
  • A microwave (a double boiler will work as an alternative)
  • Parchment paper
  • Binder clips or clothespins

Step 1: Melt The Candy Melts

Divide the Candy Melts into separate bowls and microwave one at a time according to the instructions on the package: one minute on high, stir, microwave for 30-second intervals and stir after each round until fully melted. In my experience, it took two 30-second intervals (after the one minute) to fully melt the Candy Melts.

colorful candy melts by Wilton

Alternatively, there are instructions on the Candy Melts package for melting them in a double boiler if you don’t have a microwave.

Step 2: Spoon Onto Parchment Paper

Spread out a sheet of parchment paper on a moveable flat surface (like a baking sheet). Then, spoon a little bit of each Candy Melt color onto the parchment paper.

how to make marbled white chocolate

The more you add, the larger your sail will end up being, so it’s best to just eyeball how much you’re adding.

Step 3: Create The Marbled Effect

Once the Candy Melts have been added, grab the edges of the parchment paper and gently rotate it around at different angles to help it spread and marble.

how to make marbled chocolate sail

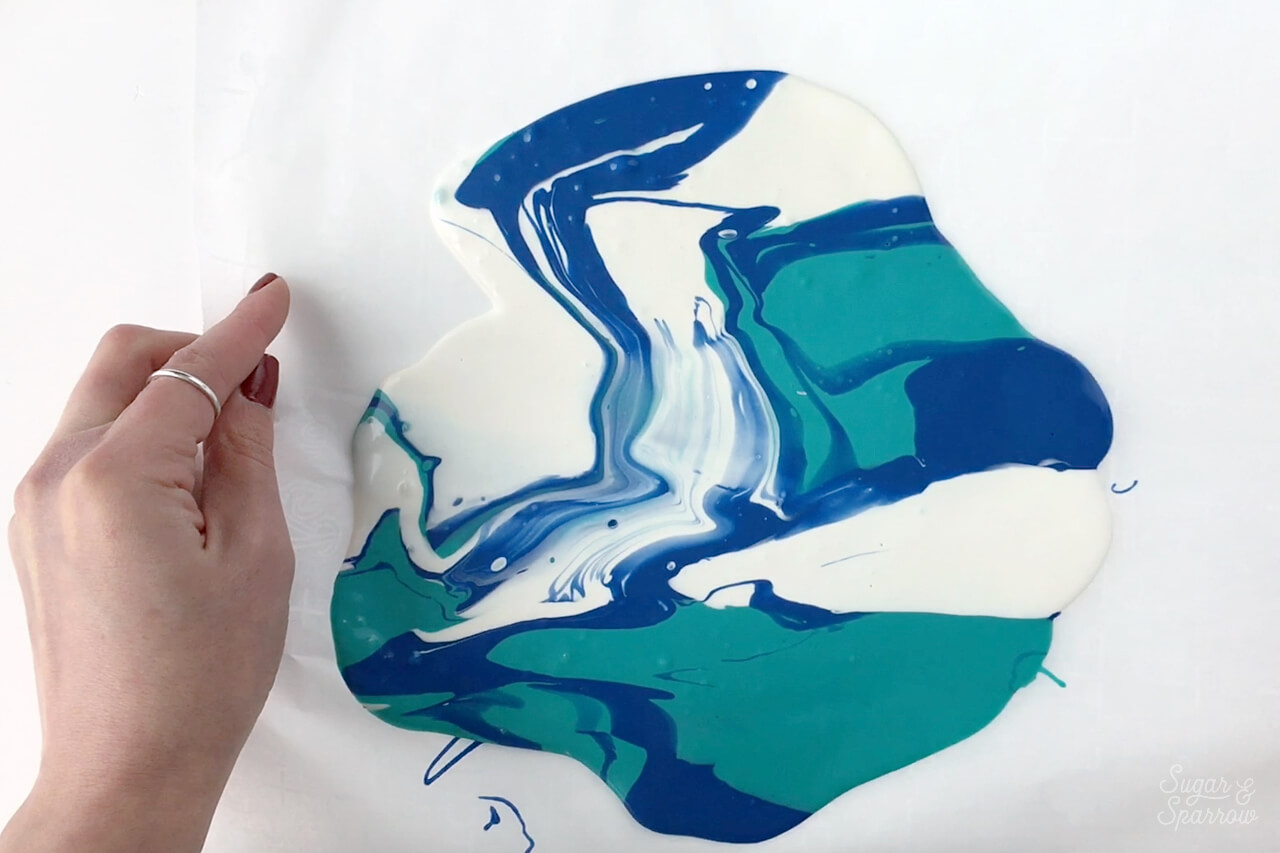
You’ll want it to be about ¼ inch thick before shaping, but you might end up with thicker areas once you shape it and that’s ok!

chocolate sail cake tutorial

You can also tap the baking sheet on a hard surface to flatten out the Candy Melts on top.

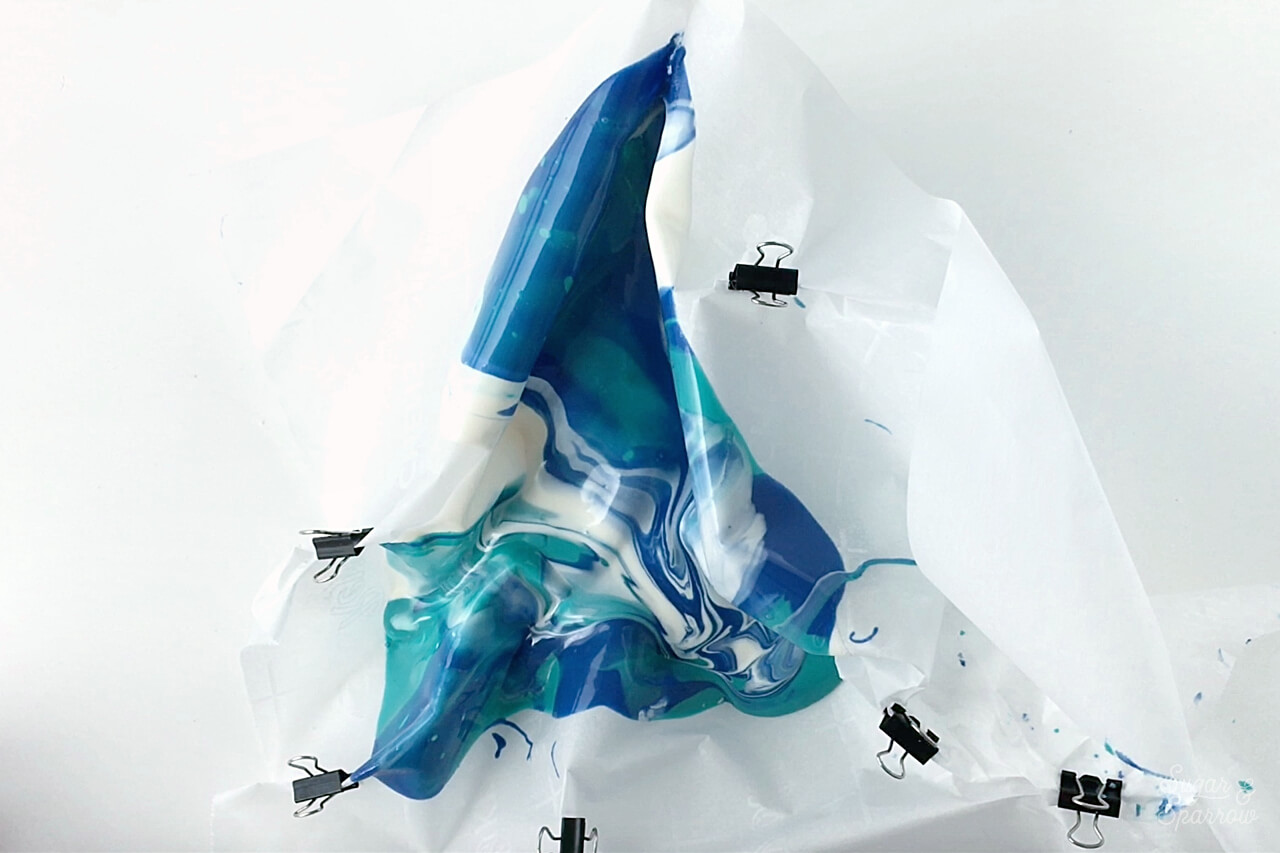
Step 4: Shape The Sail

When you’re happy with the marbled effect, use some binder clips or clothespins to crinkle and pin the parchment paper together, shaping your sail as you go. There’s no right or wrong here, and you can feel free to use things like small rolling pins and bowls to place underneath your sail to shape it.

chocolate sail cake tutorial

I didn’t really have an end shape in mind when I set out to create this Candy Melt sail, I just kindof went with the flow and kept shaping until I liked what I saw.

how to shape chocolate

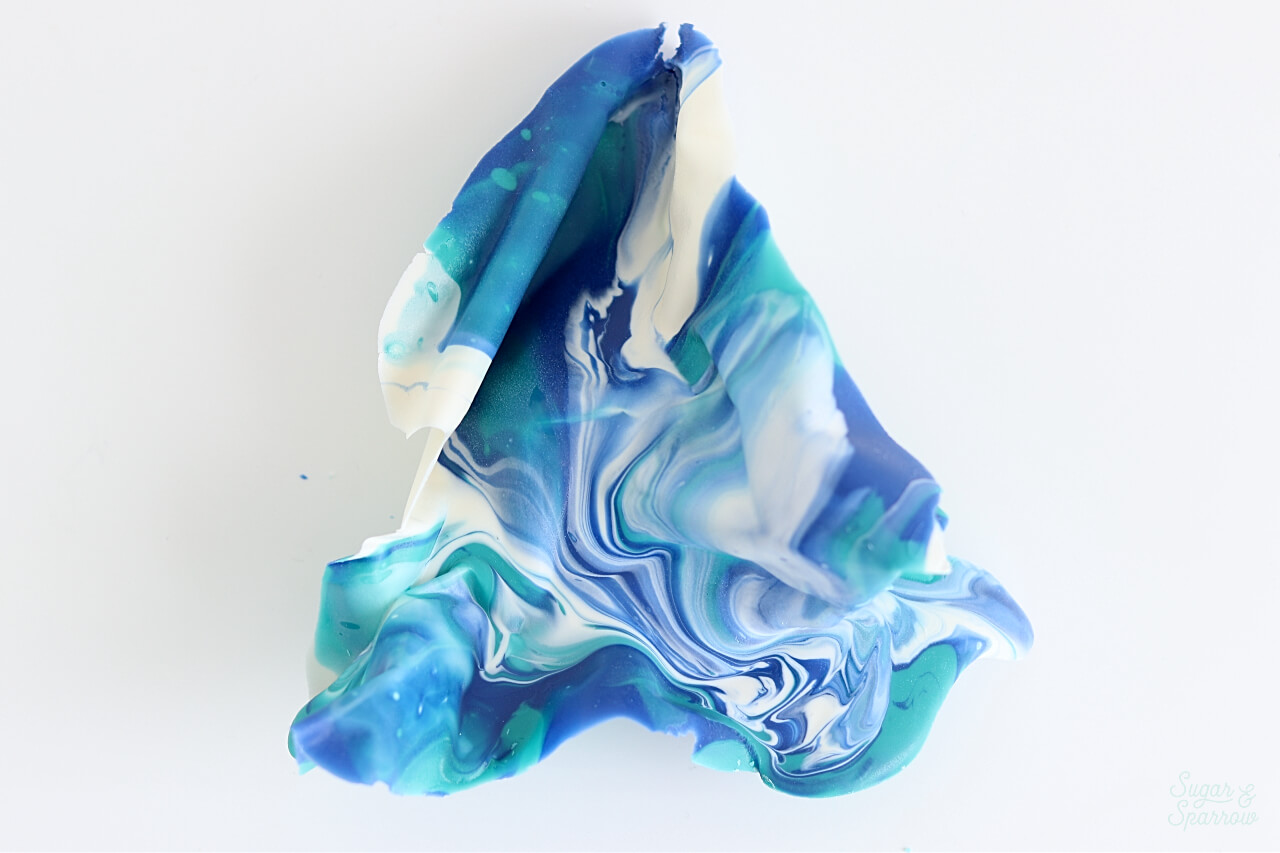
Step 5: Refrigerate and Remove The Parchment

Once your Candy Melt sail is looking perfectly shaped, place it in the refrigerator for about 20 minutes, or until it’s really firm to the touch. After your sail has set in the refrigerator, carefully remove the parchment paper backing and marvel at your creation.

colorful chocolate sail

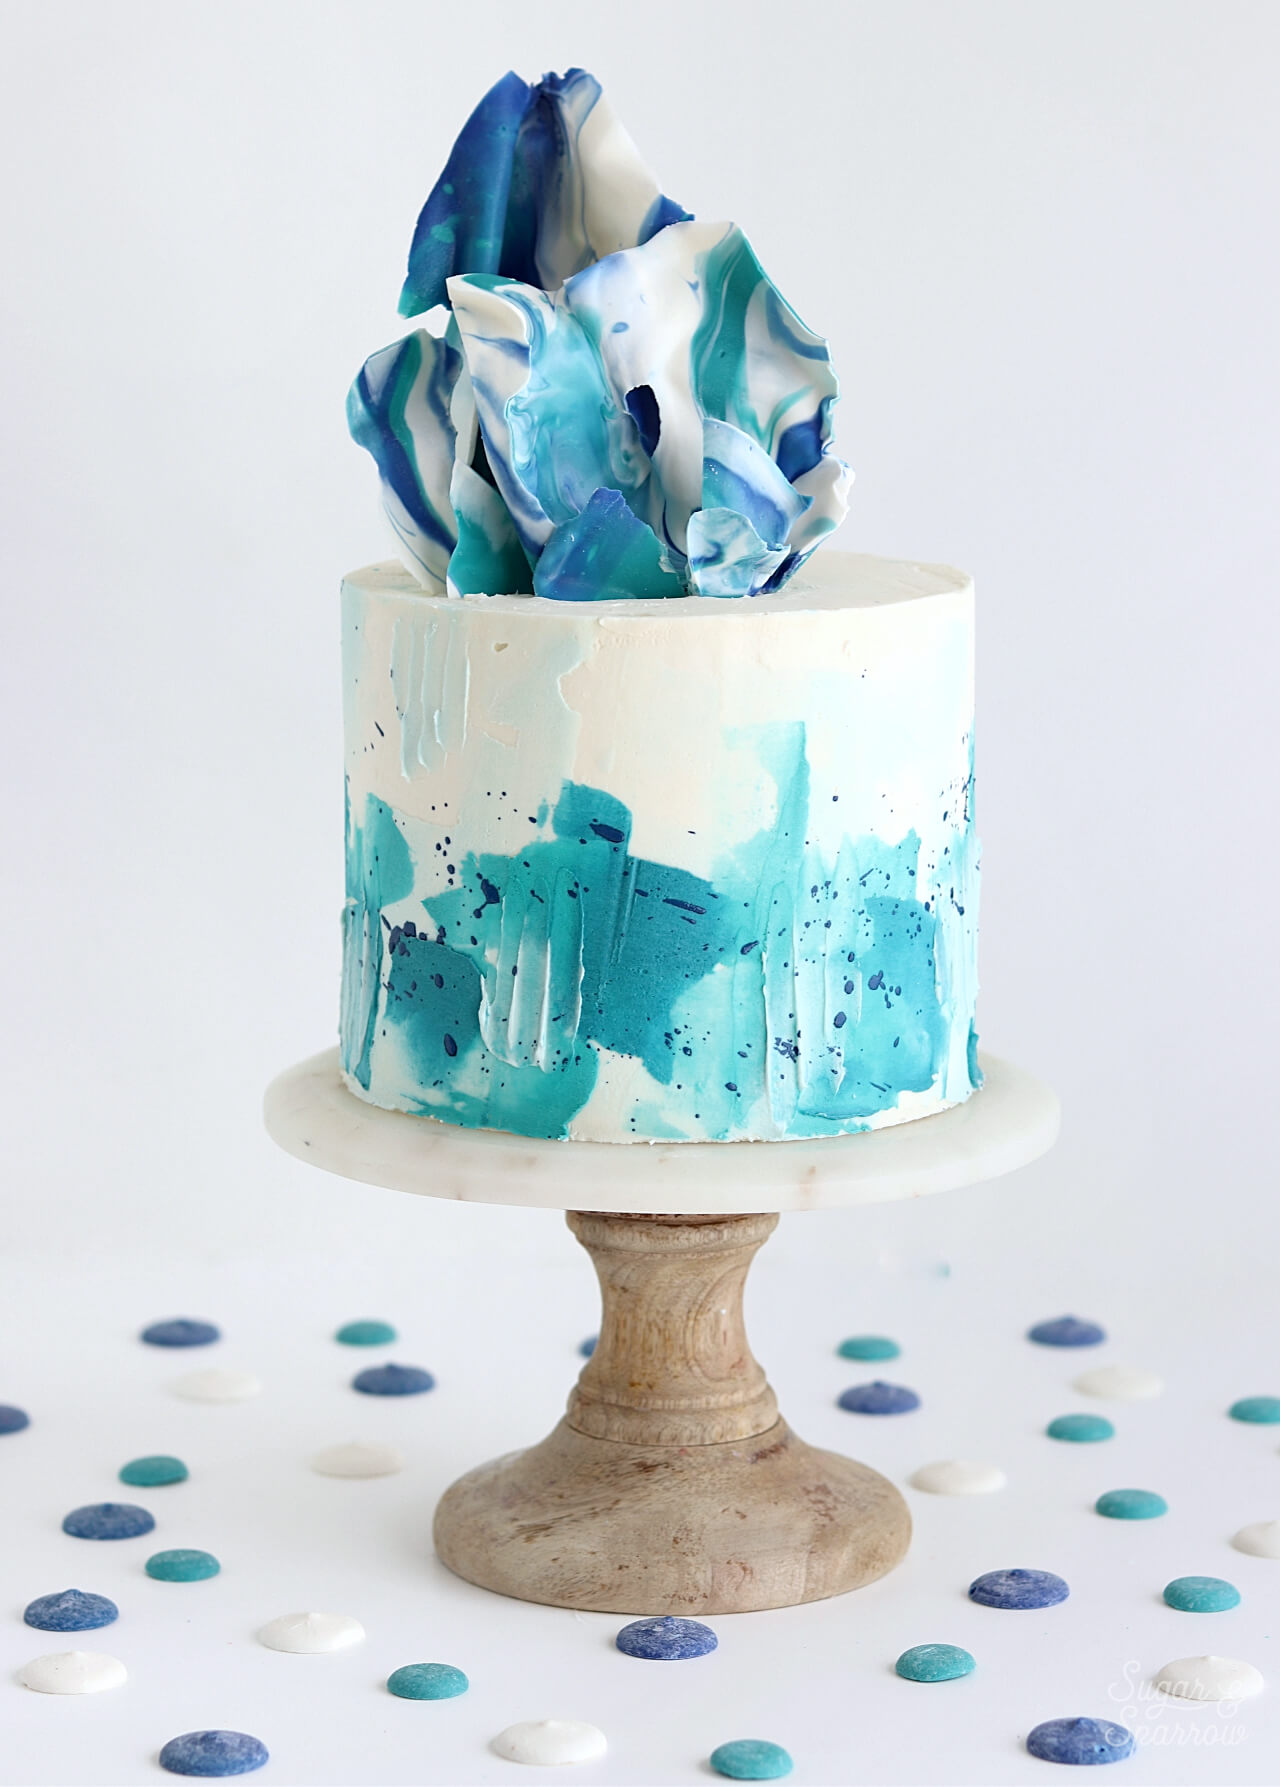
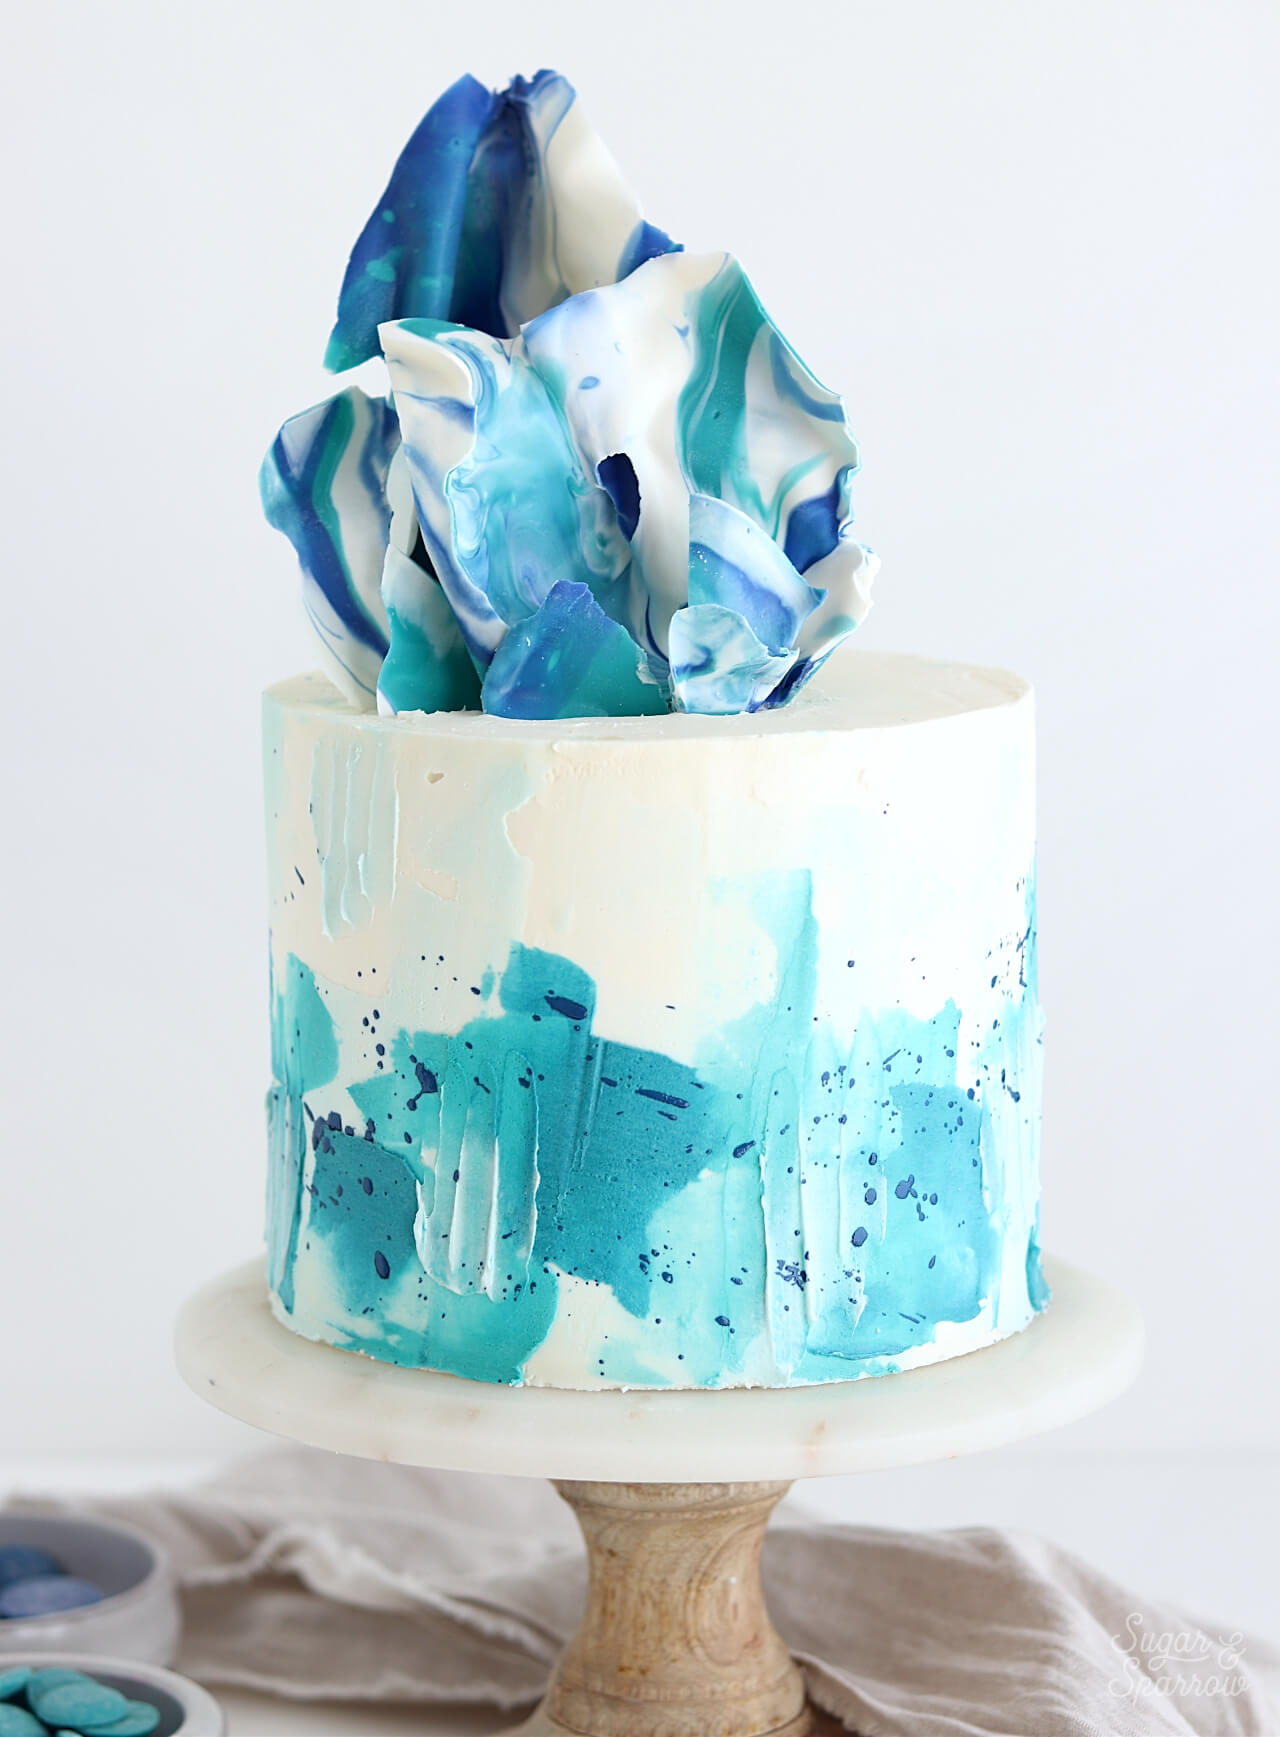
I ended up breaking the sail apart to create some added dimension before placing the sails on top of my cake, so feel free to get creative with that part. You can leave it as one sail or create a series of smaller ones. Either way, adding them to your cake is as simple and carefully placing them into the buttercream on top.

how to color white chocolate

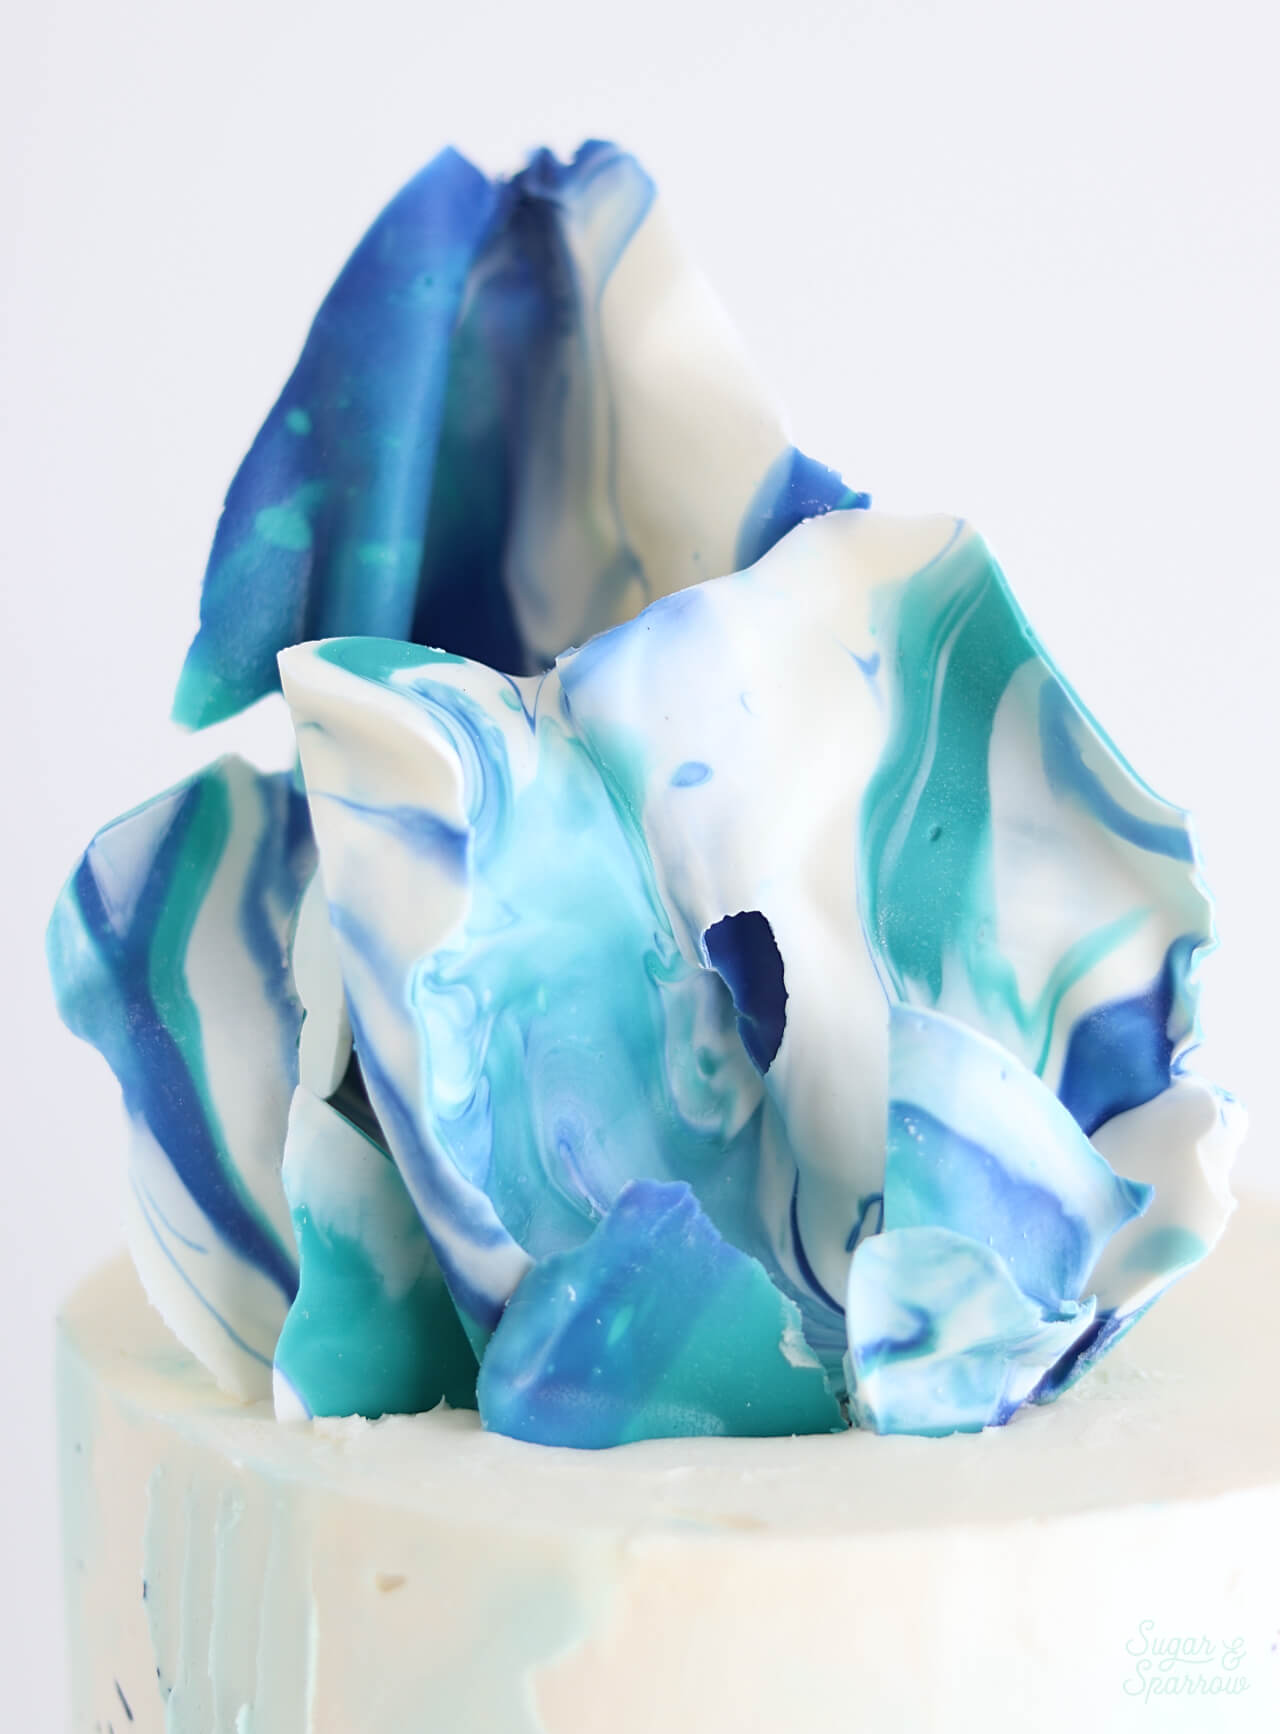
And there you have it! A beautiful cake topper made with marbled Candy Melt sails.

white chocolate sail cake by sugar and sparrow


Disclaimer: I was compensated by JOANN for my work of creating this project, styling, filming, photographing, and writing about their products. As always, all opinions are honest and my own. Thank you for supporting brands that support Sugar & Sparrow.

By: Whitney · In: Decorations & Garnishes, Featured, Recipes, Tutorials · Tagged: cake, cake decorating, cake decorating tutorial, cake sail, cake topper, cake topper tutorial, cake tutorial, candy melt sail, candy melts, chocolate sail, JOANN, joann stores, marbled chocolate sail, wilton

you’ll also love

the best vanilla cupcakes recipeThe Perfect Vanilla Cupcake Recipe
pumpkin layer cake recipe by sugar and sparrowPerfect Pumpkin Layer Cake Recipe
oreo cookies and cream cakeOreo Layer Cake Recipe

Join the List

Stay up to date & receive the latest posts in your inbox.

Reader Interactions

Comments

  1. Zaria says

    May 20, 2022 at 4:17 am

    Hello, just wondering if there is a recipe for this cake?

    Reply
    • Whitney says

      May 21, 2022 at 4:40 pm

      Hi Zaria! I don’t have a recipe for this specific cake, but you can really use any recipe as the cake. For the buttercream, I used my favorite vanilla buttercream: https://sugarandsparrow.com/vanilla-buttercream-recipe/ and a combination of these two cake decorating techniques: ombre watercolor – https://sugarandsparrow.com/watercolor-buttercream-tutorial/ and the spatula textures from this tutorial – https://sugarandsparrow.com/painted-buttercream-cake-tutorial/ hope that helps!

      Reply
      • Zaria says

        June 3, 2022 at 12:53 am

        Thankyou so much!
        Yes it does:)

        Reply
  2. Patrycja Stecz says

    July 22, 2021 at 6:38 am

    Hello! Did you use same chocolate to decorate all cake? I’m wondering if the colours around cake are made frome melted chocolate ☺️

    Reply
    • Whitney says

      July 27, 2021 at 9:15 am

      Hi Patrycja! The colors around the side of the cake are made from buttercream mixed with gel pastes. Hope that helps!

      Reply
  3. Cynthia says

    September 11, 2020 at 4:27 am

    Hi, please how do you place it on the cake for it to stay firm, mine keeps falling out especially for sugar sails

    Reply
    • Whitney says

      September 11, 2020 at 4:43 pm

      Hi Cynthia! I usually will puncture the top of the cake with a knife to make a place for the sail to go into, then press the sail in. If you need extra supports, you can always place a wooden skewer behind the sail as well.

      Reply
  4. Timmy says

    August 25, 2020 at 12:11 pm

    Hi..For how long would it stay in the refrigerator ?

    Reply
    • Whitney says

      August 26, 2020 at 8:16 pm

      Hi Timmy! This will keep in the refrigerator for several weeks. You can also store it in a cool dark place (like your pantry), just like you would any kind of chocolate. Just make sure to place it in an airtight container if you plan on storing it for more than a day or two.

      Reply
  5. Abi says

    July 15, 2020 at 12:21 pm

    Hi
    Will it melt after an hour? Can you use baking chocolate? Thank you

    Reply
    • Whitney says

      July 15, 2020 at 7:57 pm

      Hi Abi! It shouldn’t melt unless it’s in direct sunlight or in an environment hotter than melting point for a prolonged period of time. I have never tried this technique with baking chocolate but you can certainly try! I would just research how to temper baking chocolate so that when it dries it will be shiny and not dull. The reason I love using Candy Melts is you don’t have to temper them.

      Reply
      • Abi says

        July 19, 2020 at 1:46 pm

        Thank you

        Reply

Leave a Reply Cancel reply

Your email address will not be published. Required fields are marked *

Recipe Rating


Next Post >

White Chocolate Buttercream Recipe

Primary Sidebar

Welcome to Sugar & Sparrow

Welcome to Sugar & Sparrow

Helping you whip up pretty desserts with confidence and creativity. And hopefully sharing a few laughs with you along the way!

Learn More

Connect

let’s bake!

Get my very best recipes, baking tips, and decorating tutorials sent to your inbox

Featured Posts

green velvet cake recipe for st patricks day dessert

Green Velvet Cake with Rainbow Frosting

cotton candy layer cake recipe

Whimsical Cotton Candy Cake Recipe

smores ice cream cake recipe by sugar and sparrow

The Ultimate S’mores Ice Cream Cake

Search

Archives

Follow Along

@sugarandsparrowco

STRAWBERRY SHORTCAKE ICE CREAM CAKE 🍓if Strawbe STRAWBERRY SHORTCAKE ICE CREAM CAKE 🍓if Strawberry Shortcake Ice Cream Bars make you nostalgic for your childhood ice cream truck days, you’re going to LOVE this easy ice cream cake version - no ice cream maker needed 🙌🏼 

Full recipe on my blog at https://sugarandsparrow.com/strawberry-shortcake-ice-cream-cake/

STRAWBERRY CRUNCH 
24 whole (280g) Golden Oreos, finely ground
3 Oz box strawberry jello
4 Tbsp unsalted butter, melted

ICE CREAM LAYERS
1/2 Cup (15g) freeze-dried strawberries
2 Cups heavy whipping cream, cold
1 Tbsp pure vanilla extract, divided
14 Oz sweetened condensed milk
1 1/2 tsp strawberry jam or preserves

1. Combine the strawberry crunch ingredients and bake on a lined cookie sheet at 350ºF for 4 min.
2. For the crust, combine 1 Cup of the strawberry crunch with 2 Tbsp melted butter. Press into the bottom of a 6-inch springform pan and line with an acetate collar. Place in the freezer while you move on.
3. Using a food processor, grind the freeze-dried strawberries into a fine powder. Set aside.
4. Add the heavy whipping cream and 2 tsp of vanilla extract into a chilled bowl, then whip it with a hand mixer to stiff peaks. Place in the refrigerator.
5. Divide the condensed milk between two medium bowls. To one bowl, add 1 teaspoon of vanilla. To the second bowl, add the finely strawberry powder and the jam/preserves. Whisk the ingredients together within each individual bowl.
6. Divide the whipping cream evenly between each of the two bowls you created in the previous step. Fold each sweetened condensed milk mixture together with the divided whipped cream to create the vanilla ice cream and strawberry ice cream.
7. Layer half of each of the ice creams on top of the strawberry crunch crust, sprinkle a layer of strawberry crunch on top, then repeat. Freeze for 6 hours and serve. 
#icecreamcake #strawberryshortcake #nochurnicecream #icecreamlover #strawberry
LEMON CUPCAKES 🍋 after about a dozen recipe tes LEMON CUPCAKES 🍋 after about a dozen recipe tests, this one is everything I could want in a lemon cupcake! Fluffy-yet-moist, bursting with natural lemon flavor, and absolutely irresistible topped with lemon cream cheese buttercream. 

Full recipe (with frosting) linked in my bio + at https://sugarandsparrow.com/homemade-lemon-cupcakes/

INGREDIENTS:
1 Cup (132g) all-purpose flour
1 tsp baking powder
1/4 tsp salt
1/4 Cup (60ml) whole milk, room temperature
3 Tbsp (45ml) lemon juice from 1 medium lemon
3/4 Cup (150g) granulated sugar
3 Tbsp (42g) unsalted butter, room temperature
2 Tbsp (30ml) vegetable oil
2 large eggs, room temperature
1 tsp pure vanilla extract

INSTRUCTIONS:
1. Preheat the oven to 350ºF (177ºF) and line a standard cupcake pan with 12 paper liners.
2. In a large bowl, whisk together the flour, baking powder, and salt. Set aside. 
3. In the bowl of a stand mixer fitted with the paddle attachment (or with a hand mixer and large bowl), add the lemon zest to the sugar and mix on low speed until fragrant and well combined, about 1 minute. Meanwhile, combine the lemon juice with the milk and set aside. 
4. Add the butter to the lemon-sugar mixture and cream on medium speed until and combined, about 2 minutes. Add the vegetable oil and beat until light and creamy, about 3 minutes. Scrape down the bowl and paddle as needed.
5. Mix in the eggs one at a time on low speed, then add the vanilla and turn the mixer to medium speed for one minute.
6. Turn the mixer off and add the flour mixture all at once. Mix on low speed until just combined, then slowly pour in the lemon-milk mixture. Mix until just combined, about 30 seconds.
7. Divide the batter equally between the liners and bake for 14-18 min. Cool, then top with frosting of your choice (link in bio for lemon cream cheese frosting)�
#lemoncupcakes #creamcheesefrosting #lemon #cupcakes #cupcakedecorating
April in my kitchen 🌸 I published 5 NEW recipes April in my kitchen 🌸 I published 5 NEW recipes on my site, baked my Oreo cupcake recipe for a fundraiser and found it was just as delicious as I remember, and filmed/photographed 3 recipes that will be on my blog in May (Lemon Cupcakes, Lemon Cream Cheese Buttercream, and No-Bake Marbled Strawberry Cheesecake) 🥰 

Comment “APRIL” to get all the available recipes and stay tuned for more! 

#bakersofinstagram #springbaking #cakedecorating #cupcakes #bakinglove
SHEET PAN COOKIE CAKE 🍪 slice it warm for a fud SHEET PAN COOKIE CAKE 🍪 slice it warm for a fudgy chocolate chip cookie OR let it settle into a moist and chewy cookie cake that’s perfect for decorating! My fave vanilla buttercream + sprinkles turn this giant chocolate chip cookie into the perfect birthday cake alternative at the end 🥳
⁣
Full recipe + decorating ideas at https://sugarandsparrow.com/sheet-pan-chocolate-chip-cookie-cake/
⁣
INGREDIENTS⁣
1 Cup (226g) unsalted butter, melted⁣
1 1/3 Cups (267g) packed light or dark brown sugar⁣
1/2 Cup (100g) granulated sugar⁣
3 large eggs⁣
1 Tbsp pure vanilla extract⁣
1 tsp baking soda⁣
1 tsp cornstarch⁣
1/2 tsp salt⁣
3 Cups (398g) all purpose flour⁣
2 Cups (350g) semi-sweet chocolate chips⁣
⁣
INSTRUCTIONS⁣
1. Preheat the oven to 350ºF (177ºC). Grease and line a 13×18 inch sheet pan.⁣
2. In a large bowl, add the brown sugar and granulated sugar. Melt the butter in the microwave and pour it over the top of the sugars. Whisk together until uniform. Add the eggs and vanilla, then continue whisking until uniform. Whisk in the baking soda, cornstarch, and salt.⁣
3. Add the flour and use a silicone spatula to fold it in until smooth cookie dough forms. Reserve 1/2 Cup of the chocolate chips and set them aside, then fold the remaining 1 1/2 Cups of chocolate chips into the cookie dough.⁣
4. Place the chocolate chip cookie dough onto the prepared sheet pan and use an offset spatula to spread it all the way to the edges in an even layer.⁣
5. Bake the cookie cake for 14-16 minutes, until it looks golden brown on the edges and set. 
6. Enjoy warm or let it cool and decorate with vanilla buttercream and sprinkles! ⁣
⁣
#cookiecake #chocolatechipcookies #sheetcake #birthdaycake #cakedecorating
STRAWBERRY CUPCAKES 🍓based on my beloved strawb STRAWBERRY CUPCAKES 🍓based on my beloved strawberry layer cake recipe, this cupcake version is just as moist yet fluffy and bursting with natural strawberry flavor! Between the mix of fresh strawberries in the cupcakes + freeze-dried strawberries in the frosting, the flavor is out of this world 🚀

Full recipe link in my bio (with strawberry buttercream) + at https://sugarandsparrow.com/strawberry-cupcakes/

STRAWBERRY CUPCAKES
Yield: 14 cupcakes

INGREDIENTS:
5 oz (143g) fresh or frozen strawberries
1/3 Cup (80ml) whole milk, room temp
1 1/2 Cups (158g) sifted cake flour
1 tsp baking powder
1/4 tsp baking soda
1/2 tsp salt
6 Tbsp (85g) unsalted butter, room temp
1 Cup (200g) granulated sugar
2 large eggs, room temp
3 Tbsp (45g) sour cream, room temp
1 tsp vanilla extract
1 drop pink food coloring (optional)

INSTRUCTIONS: 
1. Puree the strawberries using a food processor (you’ll have about 1/2 cup of puree), then place into a saucepan over medium-low heat. Bring to a simmer, then cook for 10-15 min, stirring occasionally, until you have 1/4 cup. Refrigerate until room temp.
2. Preheat oven to 350ºF (177ºC) and line a standard cupcake pan with liners.
3. Whisk together the sifted cake flour, baking powder, baking soda, and salt and set aside.
4. In a stand mixer w/ paddle attachment (or hand mixer + large bowl), whip the butter on high for 2 min. Add sugar and beat for 2 min, until light and fluffy. Turn the mixer to low and add the eggs one at a time, then add the vanilla and sour cream, turn the mixer to high and beat for 1 min. Meanwhile, whisk together the strawberry puree, whole milk, and food coloring (if using).
5. Turn the mixer off and add all of the dry ingredients at once. Mix on low until just combined, then add the strawberry milk mixture until just combined, about 30 seconds.
6. Fill the cupcake liners 2/3 full and bake for 14-18 minutes. Cool completely before topping with strawberry buttercream (full recipe linked above). 

#strawberrycupcakes #strawberrycake #pinkcupcakes #strawberry #cupcakes

Footer

On the Blog

  • Cake Basics
  • Recipes
  • Tutorials

Info

  • About
  • Privacy Policy & Disclosure

stay in the know

Copyright © 2026 · Theme by Sugar & Sparrow