• Cake
  • Frosting
  • YouTube
  • My Favorite Tools
  • Nav Social Icons

  • Skip to primary navigation
  • Skip to main content
  • Skip to primary sidebar
  • Skip to footer
  • Recipes
    • Cake
    • Cupcakes
    • Frosting
    • Ice Cream
    • Vegan
  • Cake Basics
  • Tutorials
  • Blog
  • About
  • Mobile Menu Widgets

    Connect

    Search

Sugar & Sparrow logo in script font

Sugar & Sparrow

Lifestyle and Cake from Portland Oregon

  • Cake Basics
  • Recipes
    • Cake
    • Cupcakes
    • Cookies & Bars
    • Filling
    • Frosting
    • Ice Cream
    • No-Bake
    • Small Batch
    • Vegan
  • Tutorials
  • Book
  • Blog
  • About

Mini Geode Cupcake Toppers Tutorial

May 13, 2019 · In: Decorations & Garnishes, Featured, Recipes, Tutorials

I’m really dazzled by geodes (who isn’t?!) and have been dying to make some sort of geode-inspired edible creation for quite some time now. So when JOANN sent me these rock candies in the prettiest jewel-toned colors, I considered it the perfect opportunity to bring my creative vision to life! After some experimentation, I found an easy way to whip up these tasty mini geode cupcake toppers and I couldn’t be more happy with how they turned out. Just look at these gorgeous little toppers!

UPDATE 2025: JOANN is (sadly!!) no longer in business, so I have slightly changed these product links.

geode cupcakes by Sugar & Sparrow

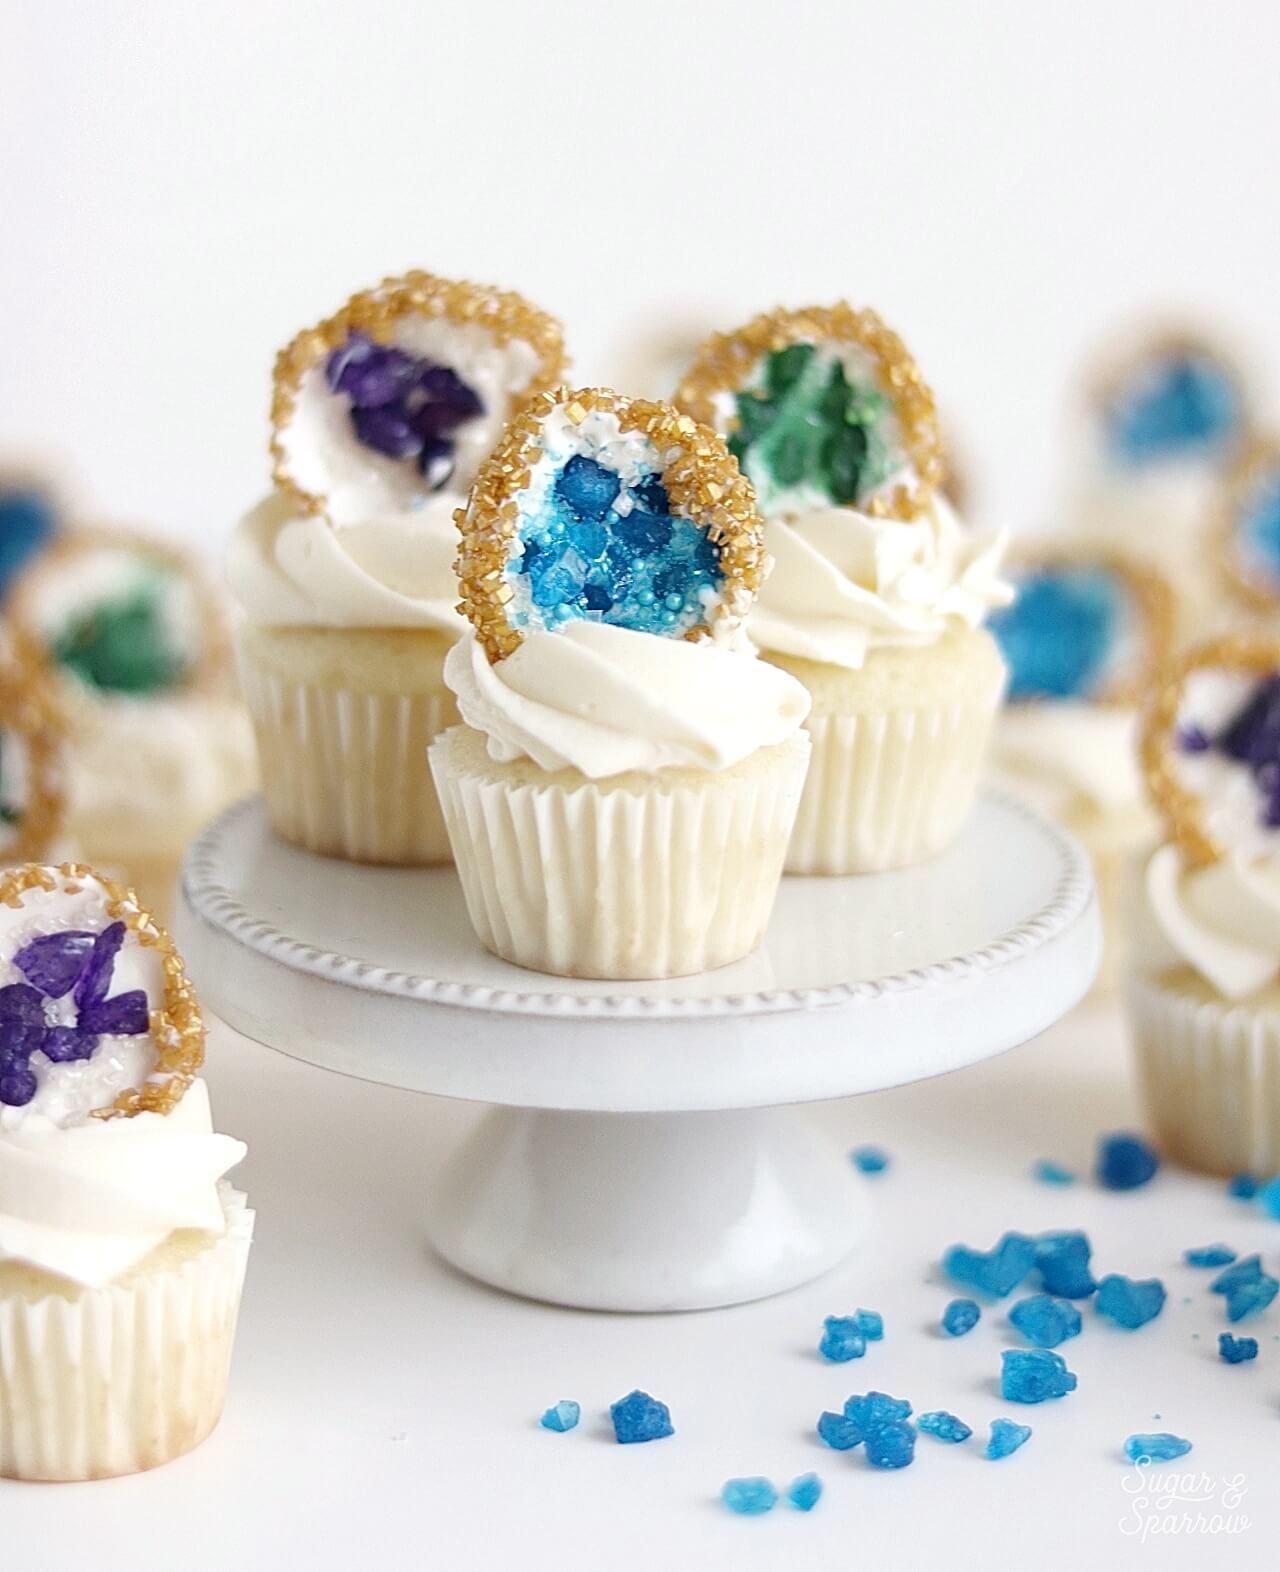
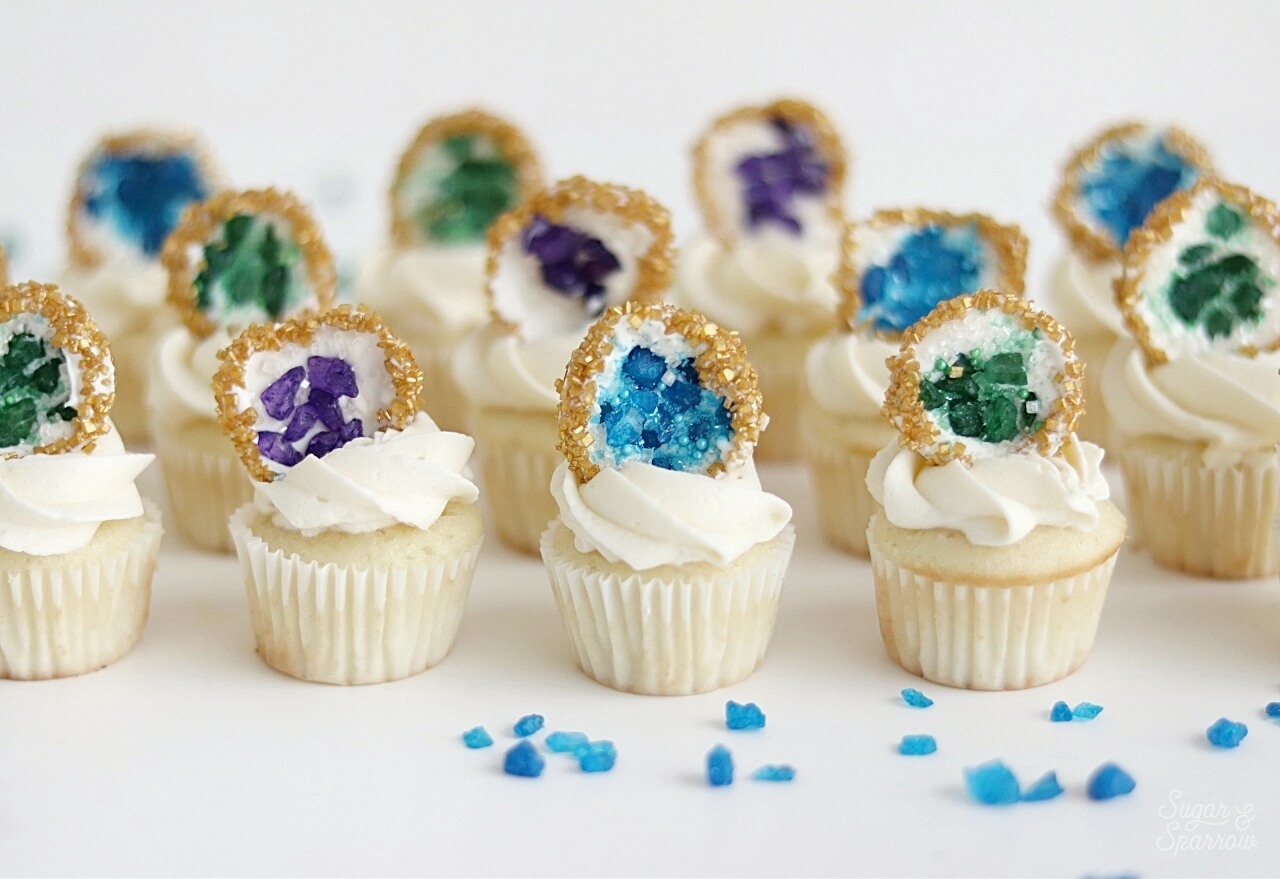
Are you dazzled? I am. The coolest thing is that these geodes are 100% edible and incredibly easy to make! They’re made of Wilton Candy Melts, tasty rock candy, and some pearlized sugar sprinkles to tie the look together. And did I mention that they only take about ten minutes from start to finish? It’s the perfect project for any skill level and the results are phenomenal.

geode cupcakes topper tutorial

To make these geodes in mini-form, I used some plastic paint palettes as a mold. The cavities are the perfect size for making mini cupcake toppers, but if you’re wanting larger geodes, you can use any size half-sphere mold and follow the steps below to get the same results.

how to make edible geodes for cupcakes

If you’re more of a visual learner, here’s a quick video of how to create these mini geodes from start to finish:

If you love tutorial videos like this one, be sure to check out my YouTube channel! I’ve got a growing collection of cake recipes, decorating tutorials, and Cake Basics over there. Hit the subscribe button on my page so you never miss a new video.
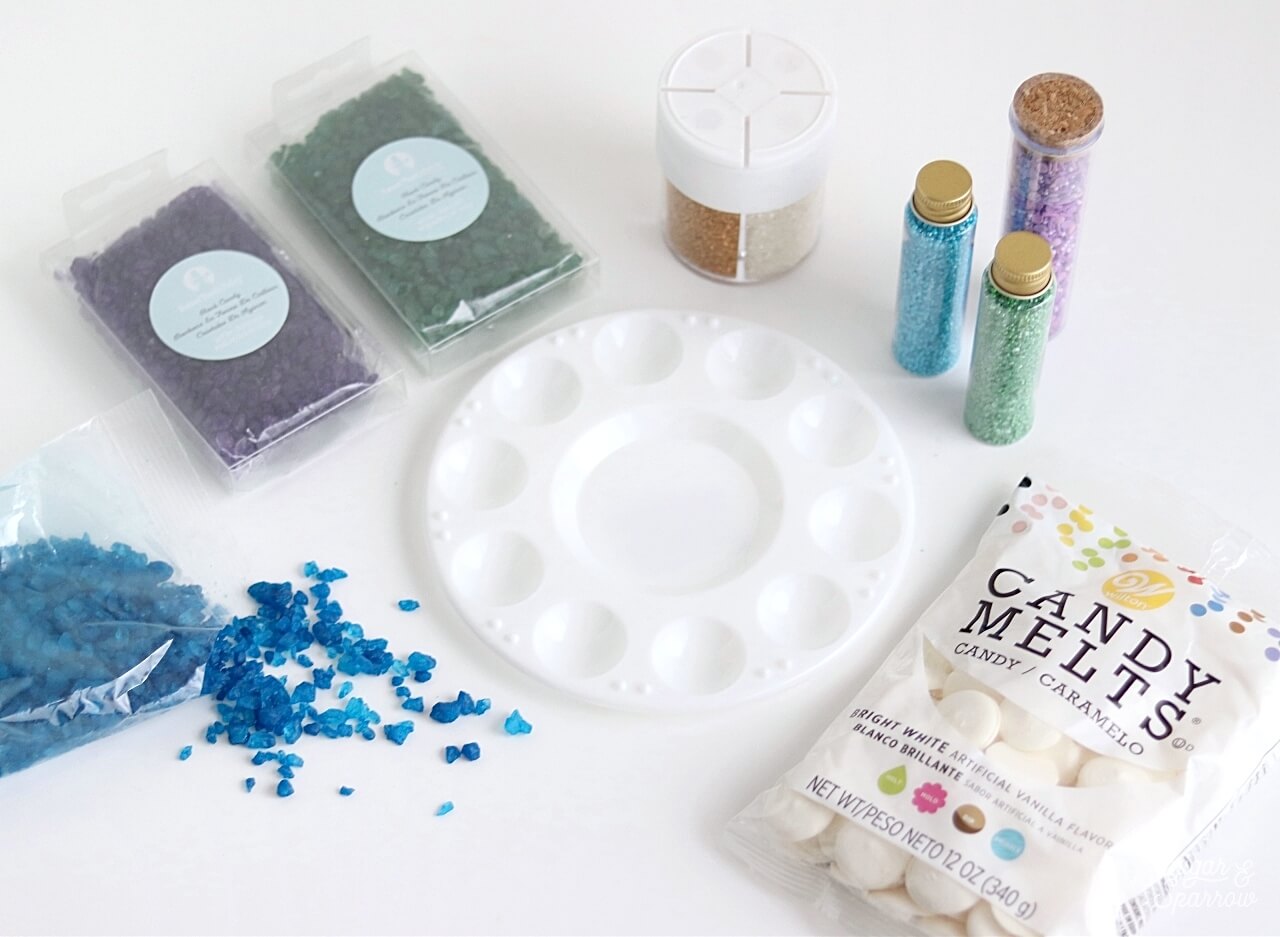
You Will Need:

  • Plastic paint palettes
  • 12 oz. Wilton Candy Melts in Bright White
  • A small microwaveable bowl and spoon for mixing
  • Rock candy in any color
  • Sugar sprinkles in a lighter shade of the same color you’re using for rock candy
  • Wilton Pearlized Sprinkles in the gold mix (comes with both gold and white sugar sprinkles)
  • A small plate
  • Wax paper

Step 1: Melt The Candy Melts

Following the instructions on the package, melt the ¾ of the Candy Melts in the microwave until they’re uniform in consistency.

Wilton candy melts

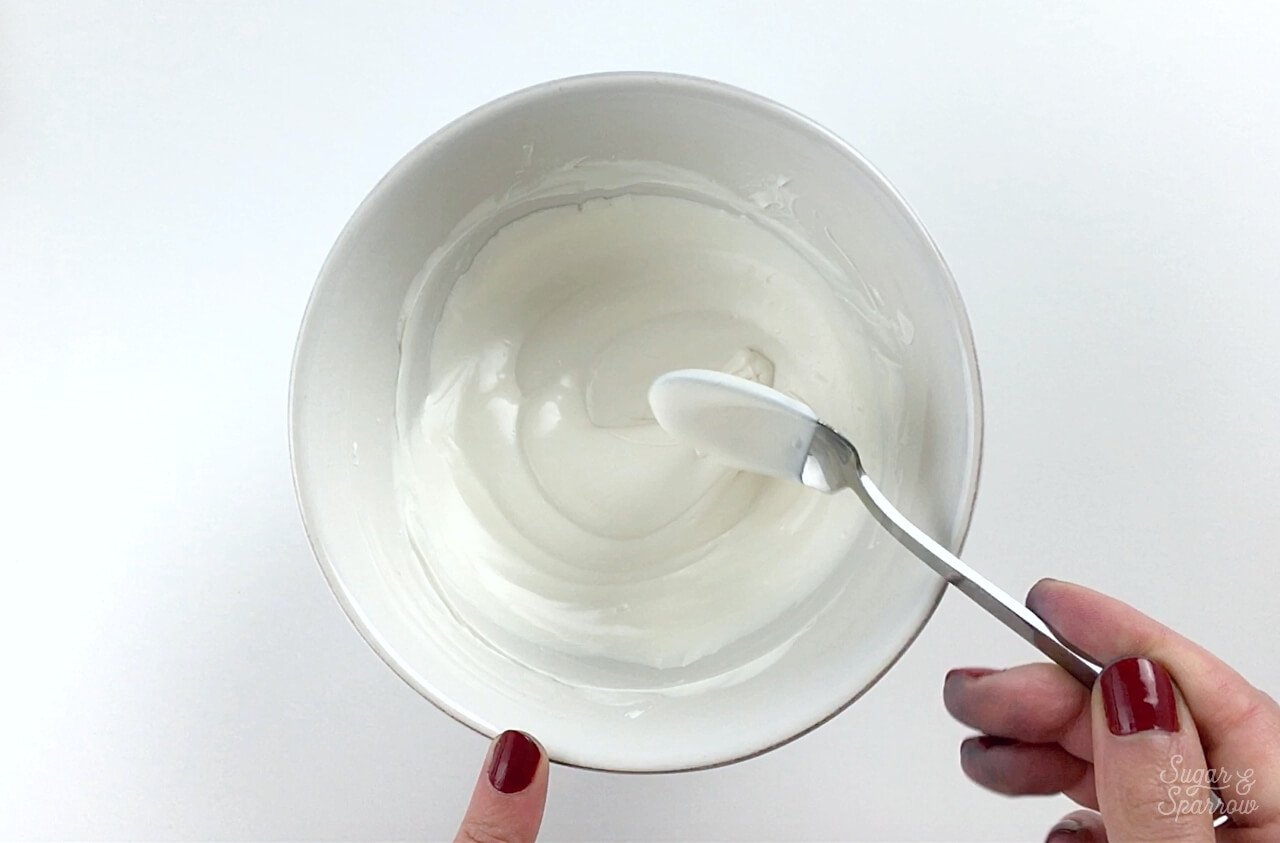
You’ll want to reserve about ¼ of the Candy Melts for Step 5.

Step 2: Fill The Molds

Using a spoon, fill each cavity of the plastic paint palette with Candy Melts about halfway full.

candy melts in mold

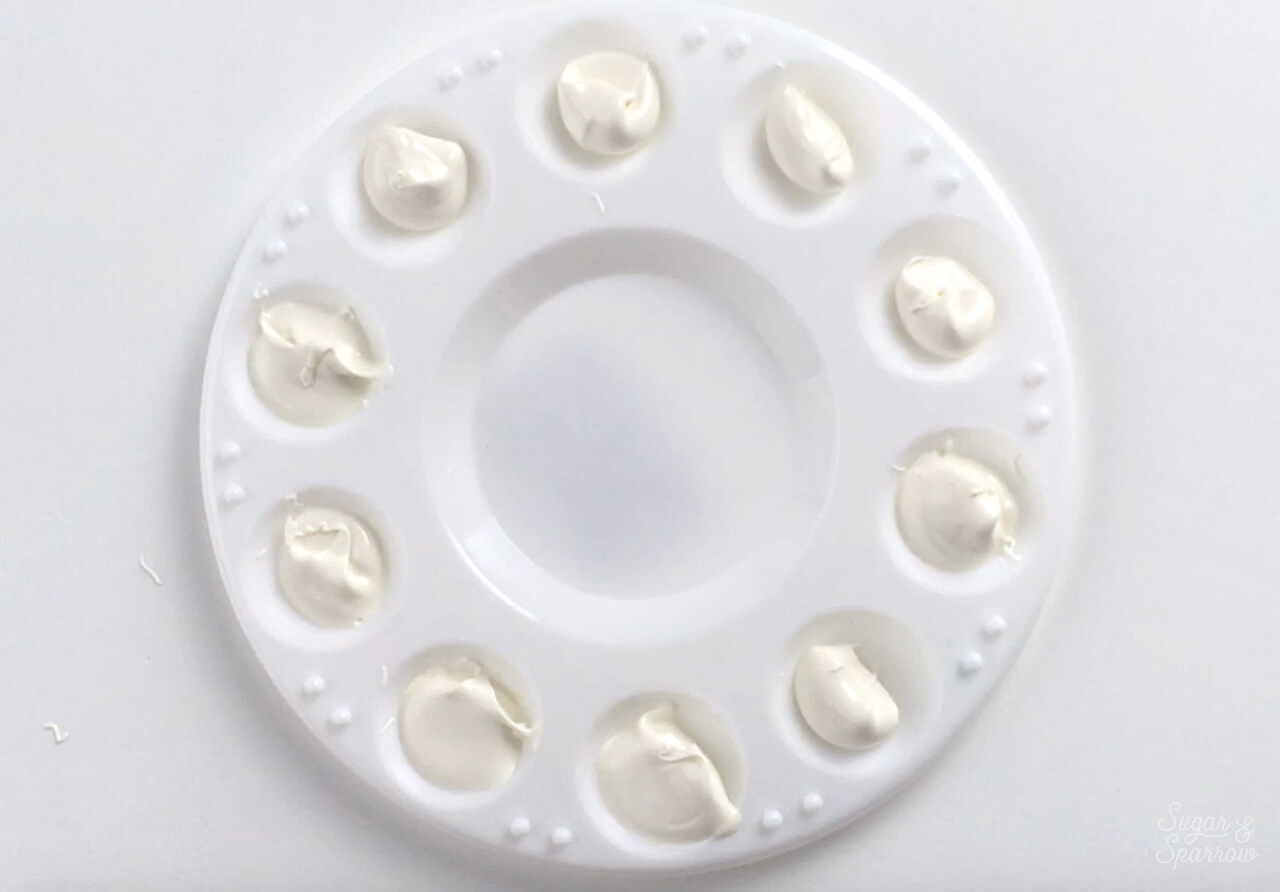
Then, slowly rotate the paint palette to ensure the sides of each cavity are covered.

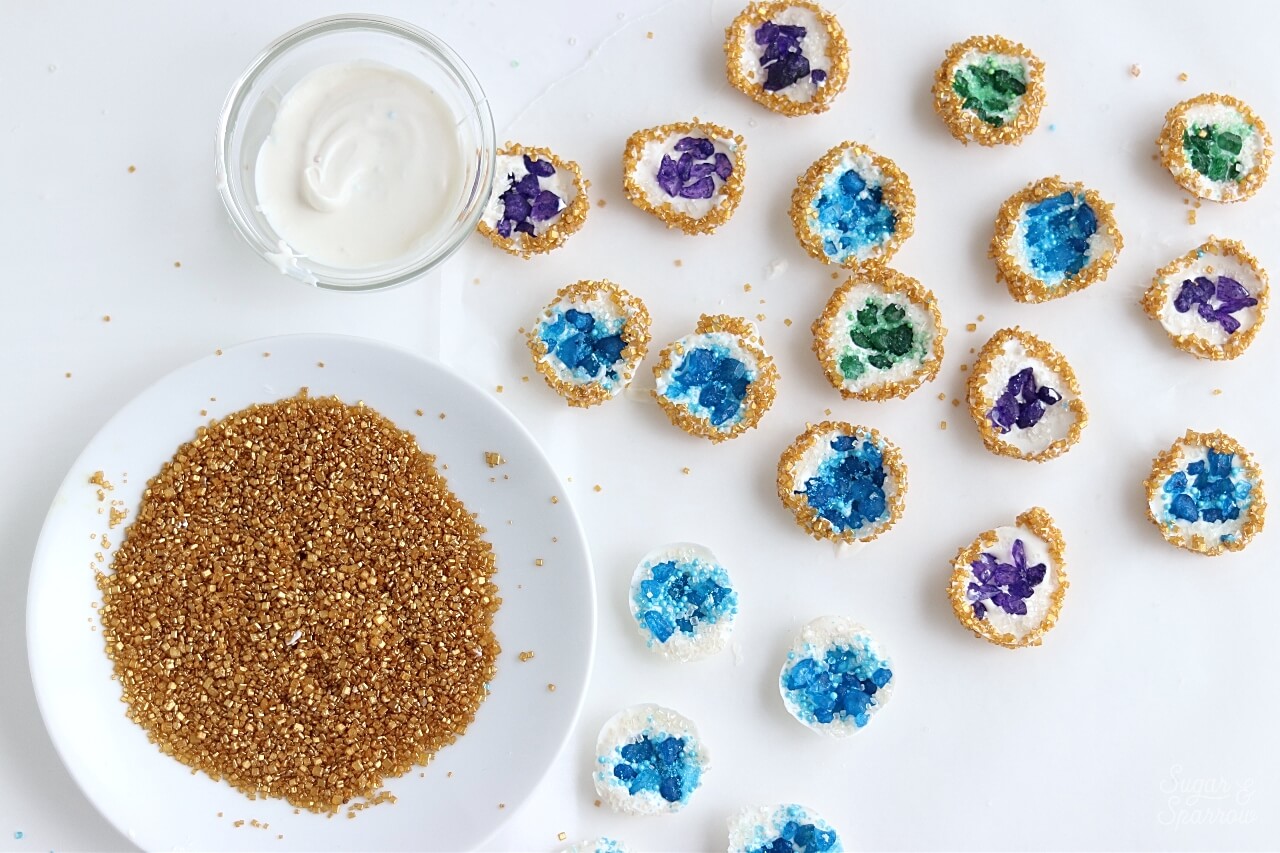
Step 3: Place The Rock Candies and Sugar Sprinkles

Place a few rock candies in the center of each cavity and press them in so that they stick into the Candy melts.

mini geode tutorial

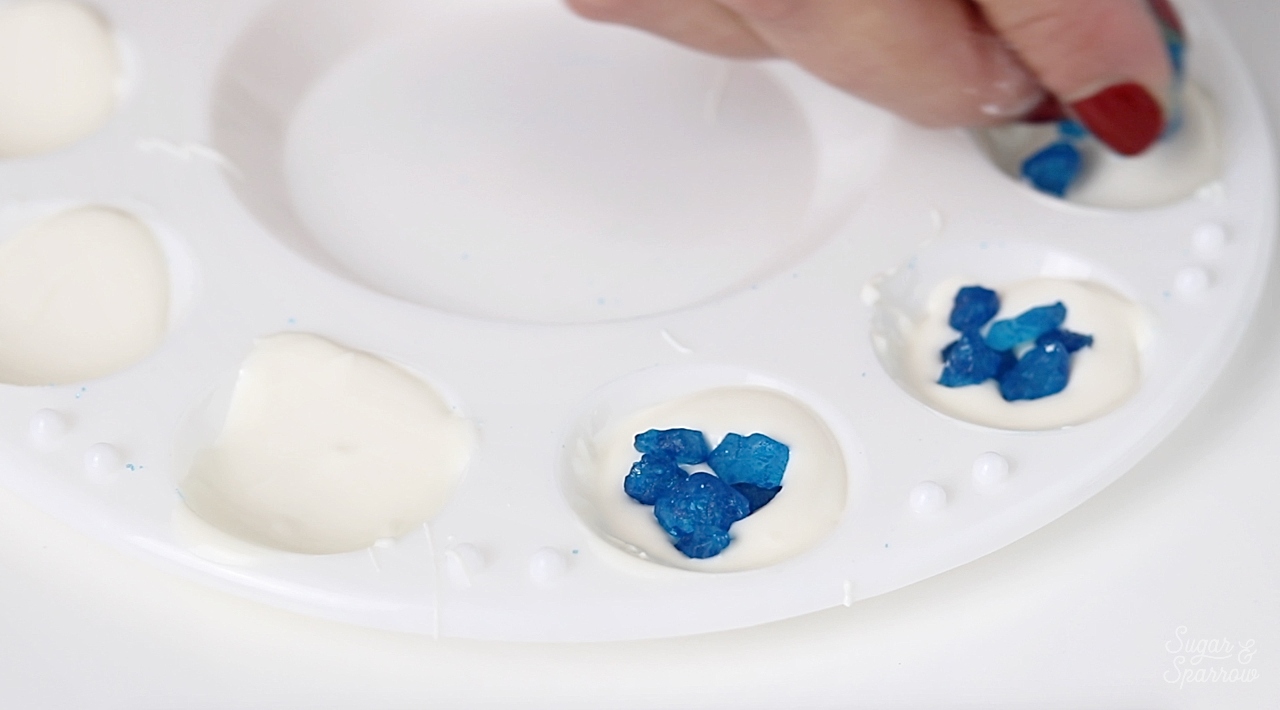
Next, place a lighter color of sugar sprinkles on top of the rock candies to fill in the gaps, making sure you leave enough room for a white sprinkled edge.

geode cupcake toppers

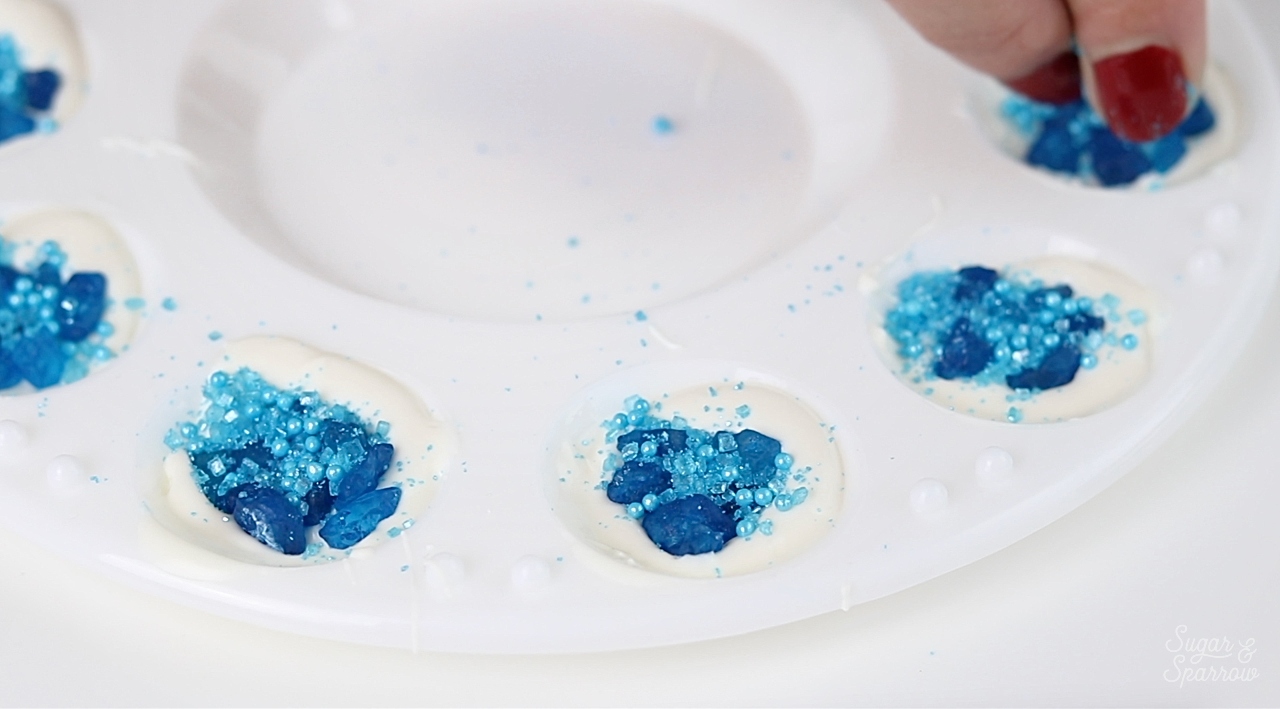
Finally, place the white sugar sprinkles around the edge of each geode.

geode cake tutorial

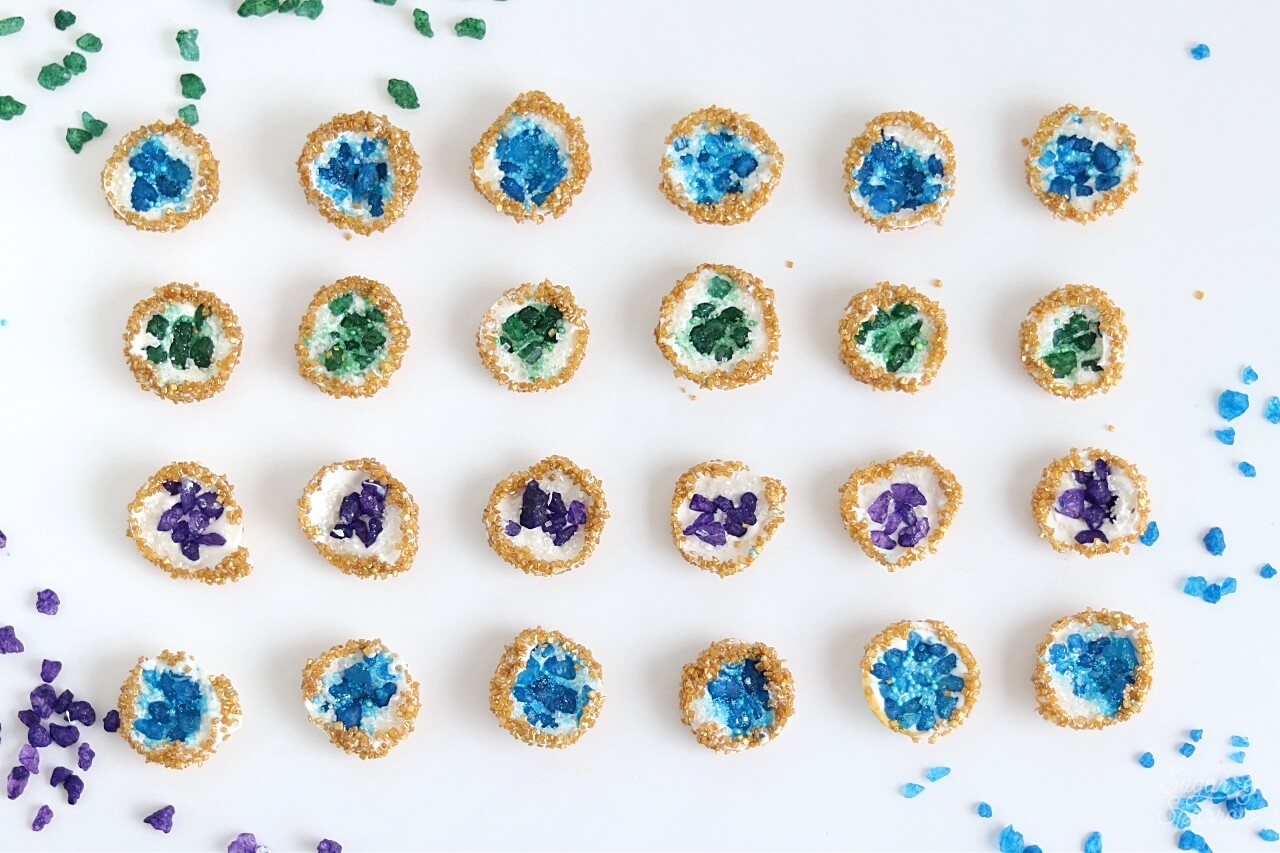
You’ve now got a multi-dimensional look, just like a real geode!

Step 4: Refrigerate

Place the entire paint palette in the refrigerator so your geodes can firm up. The geodes will be firm enough for releasing from the paint palette after just five minutes in the refrigerator.

how to make geodes

When five minutes is up, gently release the geodes from the paint palette just like you would release ice cubes from an ice tray. They should be pretty sturdy and release easily from the molds.

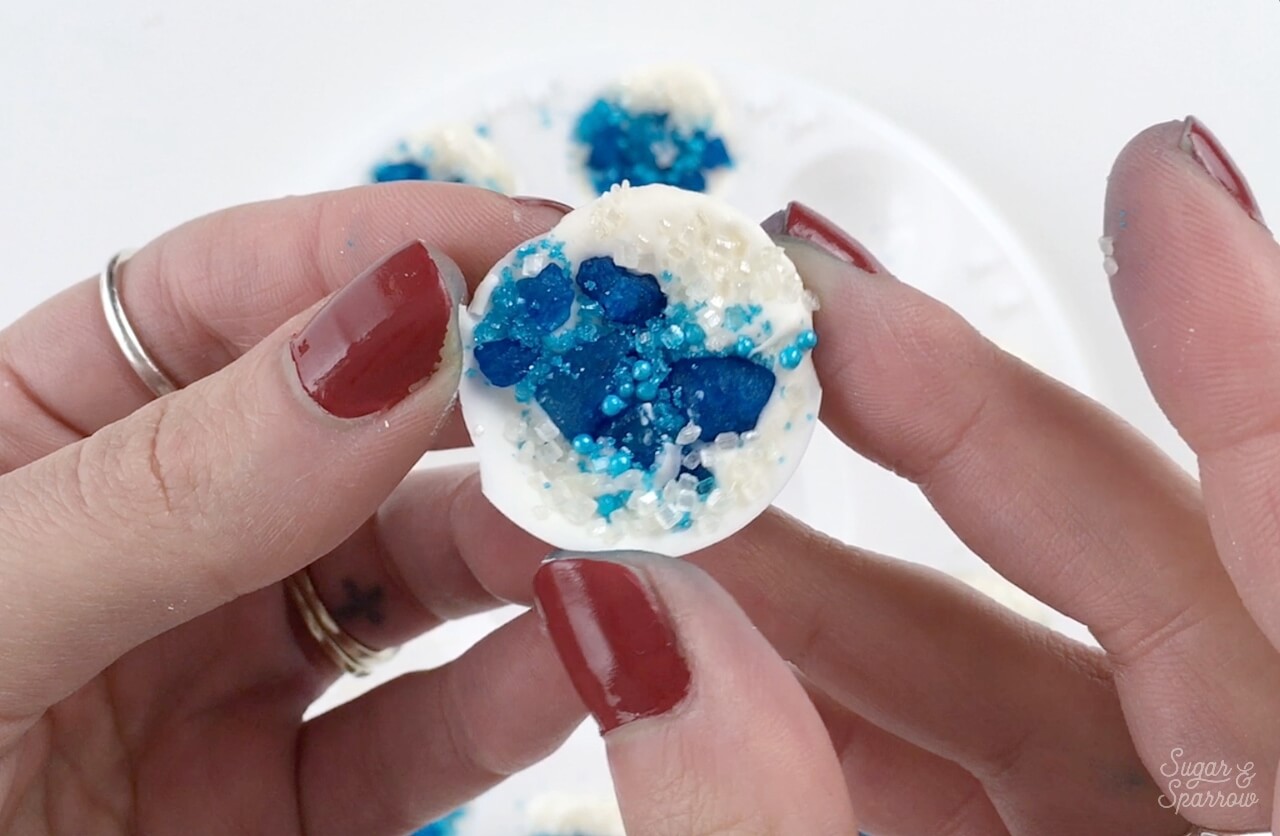
Step 5: Create The Sprinkled Edges

Melt the additional ¼ of the Candy Melts in the microwave according to the package instructions. Pour the gold Wilton Pearlized Sprinkles onto a small plate. One by one, carefully dip the edges of each geode into the melted Candy Melts, then roll the edges in the gold sprinkles. Set the finished geodes onto wax paper and let them set up at room temperature for ten minutes before adding them to your cupcakes.

how to make geode cupcakes

And there you have it – the most stunning mini geodes for topping your cupcakes!

geodes for cupcakes by sugar and sparrow

Disclaimer: I was compensated by JOANN for my work of creating this project, styling, filming, photographing, and writing about their products. As always, all opinions are honest and my own. Thank you for supporting brands that support Sugar & Sparrow.

By: Whitney · In: Decorations & Garnishes, Featured, Recipes, Tutorials · Tagged: cake decorating, cake ideas, candy melts, cupcake decorating, diy cupcake topper, diy geodes, edible geodes, geode cupcake toppers, geode cupcakes, geode tutorial, JOANN, mini cupcakes, mini geodes, rock candy, sprinkles, wilton

you’ll also love

the best vanilla cupcakes recipeThe Perfect Vanilla Cupcake Recipe
pumpkin layer cake recipe by sugar and sparrowPerfect Pumpkin Layer Cake Recipe
oreo cookies and cream cakeOreo Layer Cake Recipe

Join the List

Stay up to date & receive the latest posts in your inbox.

Reader Interactions

Comments

  1. Heather says

    October 24, 2024 at 5:48 pm

    They are beautiful! How far in advance could you make the toppers?

    Reply
    • Whitney says

      October 25, 2024 at 9:41 am

      Hi Heather! You can make these up to a month in advance and keep them in an airtight container in a cool, dark place (like a pantry) or the refrigerator.

      Reply
  2. Jenny Janssen says

    April 11, 2021 at 8:32 pm

    My daughter is a geology major and I am SO making these for her to pass out to her fellow geology club members as well as her professors (small department so the students are on a first name basis with most professors)! These will be a hit for sure!

    Reply
    • Whitney says

      April 12, 2021 at 8:50 pm

      Yes!! The perfect idea, Jenny!

      Reply
  3. MR says

    August 23, 2019 at 8:07 am

    Thanks for this tutorial…looks perfect for my geode loving little one’s birthday. How long will these keep if I make them in advance? And how should they be stored?

    Reply
    • Whitney says

      August 23, 2019 at 11:32 am

      Hi there! These will be perfect for your little geode lover! You can make these up to two weeks in advance and store them in an airtight container. Excited for you to try this technique!

      Reply
  4. Gill says

    August 9, 2019 at 8:29 pm

    Beautiful, but where can I get these SPRINKLES & what are they called in the UK please?
    Many thanks
    Gill

    Reply
    • Whitney says

      August 12, 2019 at 10:27 am

      Hi Gill! I’m not sure if Rock Candy is called something else in the UK, but the Rock Candy Sprinkles I’m using in this tutorial can be found on Amazon: https://amzn.to/31w4Hpq

      Reply

Leave a Reply Cancel reply

Your email address will not be published. Required fields are marked *

Recipe Rating


Next Post >

Lemon Layer Cake With Blueberry Buttercream

Primary Sidebar

Welcome to Sugar & Sparrow

Welcome to Sugar & Sparrow

Helping you whip up pretty desserts with confidence and creativity. And hopefully sharing a few laughs with you along the way!

Learn More

Connect

let’s bake!

Get my very best recipes, baking tips, and decorating tutorials sent to your inbox

Featured Posts

fondant decorations for cake by sugar and sparrow

3 Ways to Make Fondant Decorations with a Tasty by Wilton Kit

geode cupcake toppers by sugar and sparrow

Mini Geode Cupcake Toppers Tutorial

strawberry cake recipe by sugar and sparrow

The Tastiest Strawberry Cake Recipe

Search

Archives

Follow Along

@sugarandsparrowco

LEMON CREAM CHEESE BUTTERCREAM 🍋 if you love th LEMON CREAM CHEESE BUTTERCREAM 🍋 if you love the tang of cream cheese frosting, you’re going to be obsessed with this lemon variation!! It’s light and refreshing, tangy and complex, and perfect consistency for cake decorating. I particularly love it on my lemon blueberry cake and lemon cupcakes 💛 

INGREDIENTS:
1/2 Cup (113g) unsalted butter, room temp
8 Oz (226g) full-fat brick-style cream cheese, room temp
4 Cups (480g) powdered sugar
1 1/2 tsp lemon juice
Pinch of salt, or to taste

INSTRUCTIONS:
1. In the bowl of a stand mixer fitted with the paddle attachment, beat the butter and cream cheese together on medium-high speed until light and creamy (no lumps), about 5 minutes, scraping down the bowl and paddle as needed.
2. Add the powdered sugar a few cups at a time and mix on low speed until combined, scraping down the bowl and paddle between additions. Add the lemon juice and salt and continue mixing on low speed until fully combined and smooth.
⁣
Full recipe + cake pairing suggestions linked in my bio and at https://sugarandsparrow.com/lemon-cream-cheese-buttercream/
⁣
#lemoncake #creamcheesefrosting #cakedecorating #buttercream #lemon
LEMON BLUEBERRY CAKE 🍋🫐 so soft and fluffy, LEMON BLUEBERRY CAKE 🍋🫐 so soft and fluffy, packed with zesty lemon flavor, blueberries in every bite, and absolutely scrumptious with lemon cream cheese buttercream. It’s Spring in cake form and I saw someone pair these cake layers with actual cheesecake filling last week and now I NEED TO TRY IT 💛 
⁣
Full recipe linked in my bio or at https://sugarandsparrow.com/lemon-blueberry-layer-cake/ 
⁣
#lemonblueberrycake #lemoncake #lemonblueberry #creamcheesefrosting #cakedecorating
Finally cracked the code on this marbled strawberr Finally cracked the code on this marbled strawberry no-bake cheesecake!! 🍓it’s a classic tangy no-bake cheesecake marbled with strawberry reduction on top of a buttery graham cracker crust. The key is mixing some of the cheesecake filling with the jammy strawberry reduction before swirling the two flavors together, then refrigerate overnight and the filling is velvety and mousse-like with the perfect pops of strawberry flavor.

Recipe is linked in my bio + at https://sugarandsparrow.com/no-bake-marbled-strawberry-cheesecake/

#nobakecheesecake #strawberrycheesecake #strawberry #cakedecorating #nobakedessert
STRAWBERRY SHORTCAKE ICE CREAM CAKE 🍓if Strawbe STRAWBERRY SHORTCAKE ICE CREAM CAKE 🍓if Strawberry Shortcake Ice Cream Bars make you nostalgic for your childhood ice cream truck days, you’re going to LOVE this easy ice cream cake version - no ice cream maker needed 🙌🏼 

Full recipe on my blog at https://sugarandsparrow.com/strawberry-shortcake-ice-cream-cake/

STRAWBERRY CRUNCH 
24 whole (280g) Golden Oreos, finely ground
3 Oz box strawberry jello
4 Tbsp unsalted butter, melted

ICE CREAM LAYERS
1/2 Cup (15g) freeze-dried strawberries
2 Cups heavy whipping cream, cold
1 Tbsp pure vanilla extract, divided
14 Oz sweetened condensed milk
1 1/2 tsp strawberry jam or preserves

1. Combine the strawberry crunch ingredients and bake on a lined cookie sheet at 350ºF for 4 min.
2. For the crust, combine 1 Cup of the strawberry crunch with 2 Tbsp melted butter. Press into the bottom of a 6-inch springform pan and line with an acetate collar. Place in the freezer while you move on.
3. Using a food processor, grind the freeze-dried strawberries into a fine powder. Set aside.
4. Add the heavy whipping cream and 2 tsp of vanilla extract into a chilled bowl, then whip it with a hand mixer to stiff peaks. Place in the refrigerator.
5. Divide the condensed milk between two medium bowls. To one bowl, add 1 teaspoon of vanilla. To the second bowl, add the finely strawberry powder and the jam/preserves. Whisk the ingredients together within each individual bowl.
6. Divide the whipping cream evenly between each of the two bowls you created in the previous step. Fold each sweetened condensed milk mixture together with the divided whipped cream to create the vanilla ice cream and strawberry ice cream.
7. Layer half of each of the ice creams on top of the strawberry crunch crust, sprinkle a layer of strawberry crunch on top, then repeat. Freeze for 6 hours and serve. 
#icecreamcake #strawberryshortcake #nochurnicecream #icecreamlover #strawberry
LEMON CUPCAKES 🍋 after about a dozen recipe tes LEMON CUPCAKES 🍋 after about a dozen recipe tests, this one is everything I could want in a lemon cupcake! Fluffy-yet-moist, bursting with natural lemon flavor, and absolutely irresistible topped with lemon cream cheese buttercream. 

Full recipe (with frosting) linked in my bio + at https://sugarandsparrow.com/homemade-lemon-cupcakes/

INGREDIENTS:
1 Cup (132g) all-purpose flour
1 tsp baking powder
1/4 tsp salt
1/4 Cup (60ml) whole milk, room temperature
3 Tbsp (45ml) lemon juice from 1 medium lemon
3/4 Cup (150g) granulated sugar
3 Tbsp (42g) unsalted butter, room temperature
2 Tbsp (30ml) vegetable oil
2 large eggs, room temperature
1 tsp pure vanilla extract

INSTRUCTIONS:
1. Preheat the oven to 350ºF (177ºF) and line a standard cupcake pan with 12 paper liners.
2. In a large bowl, whisk together the flour, baking powder, and salt. Set aside. 
3. In the bowl of a stand mixer fitted with the paddle attachment (or with a hand mixer and large bowl), add the lemon zest to the sugar and mix on low speed until fragrant and well combined, about 1 minute. Meanwhile, combine the lemon juice with the milk and set aside. 
4. Add the butter to the lemon-sugar mixture and cream on medium speed until and combined, about 2 minutes. Add the vegetable oil and beat until light and creamy, about 3 minutes. Scrape down the bowl and paddle as needed.
5. Mix in the eggs one at a time on low speed, then add the vanilla and turn the mixer to medium speed for one minute.
6. Turn the mixer off and add the flour mixture all at once. Mix on low speed until just combined, then slowly pour in the lemon-milk mixture. Mix until just combined, about 30 seconds.
7. Divide the batter equally between the liners and bake for 14-18 min. Cool, then top with frosting of your choice (link in bio for lemon cream cheese frosting)�
#lemoncupcakes #creamcheesefrosting #lemon #cupcakes #cupcakedecorating

Footer

On the Blog

  • Cake Basics
  • Recipes
  • Tutorials

Info

  • About
  • Privacy Policy & Disclosure

stay in the know

Copyright © 2026 · Theme by Sugar & Sparrow