After I started experimenting with no-churn ice cream this summer, my husband casually mentioned that I should try making a neapolitan ice cream cake. I will admit, I was skeptical at first because my only memories of eating neapolitan ice cream as a kid involved eating just the chocolate part. I went along with the ice cream cake idea to appease him and also I thought it would be a fun little project. Lo and behold, I have come out the other side a complete neapolitan ice cream fan. The chocolate-vanilla-strawberry flavors are perfect together and I can’t believe it took me this long to realize it!
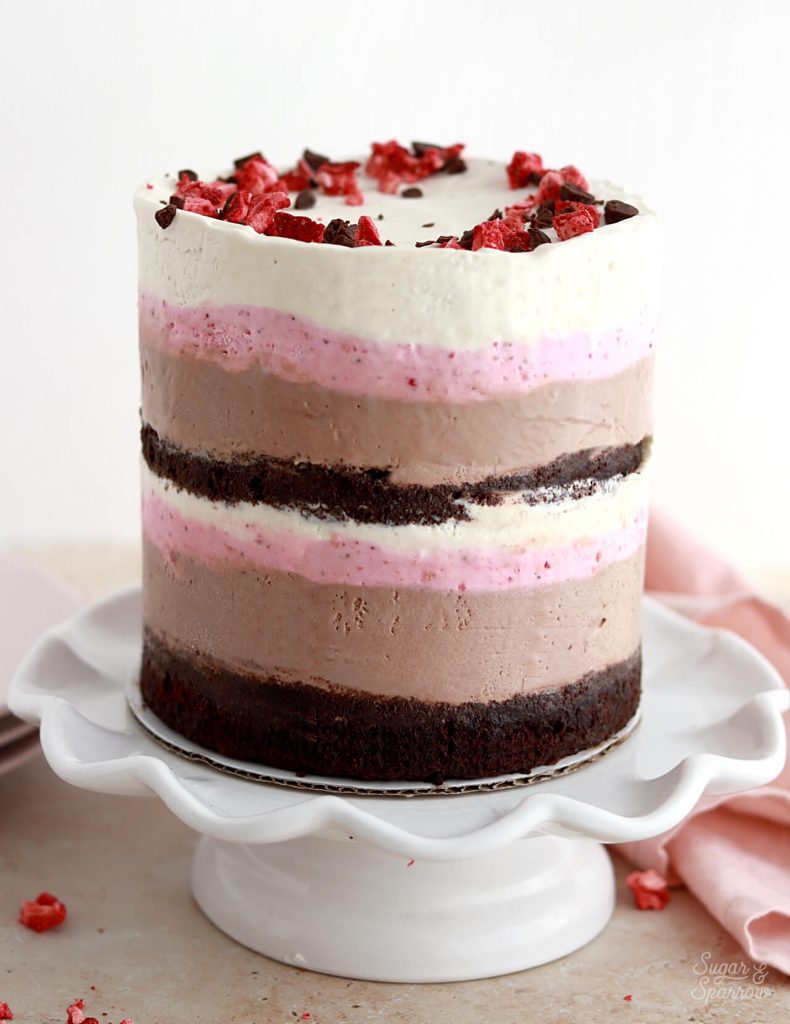
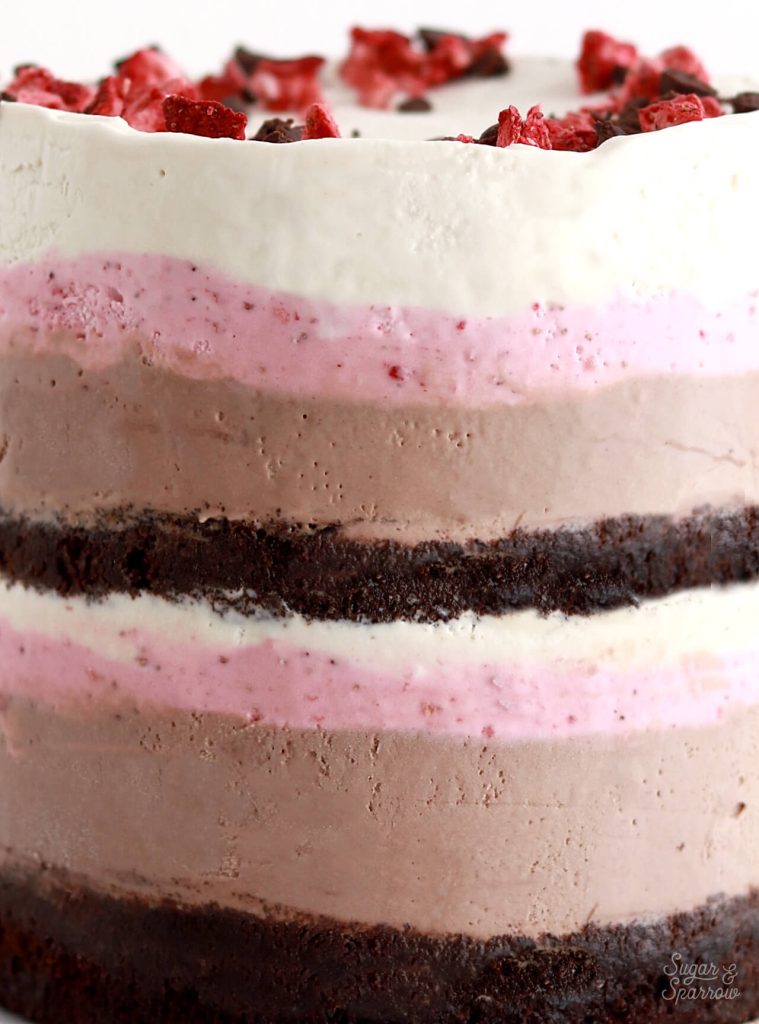
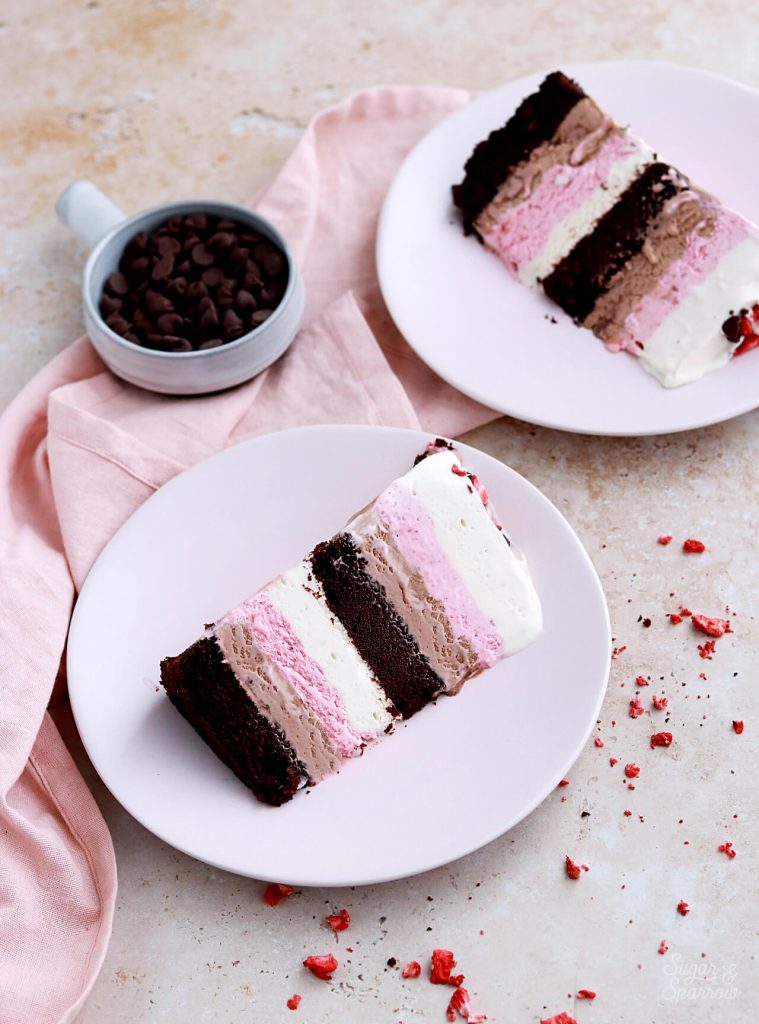
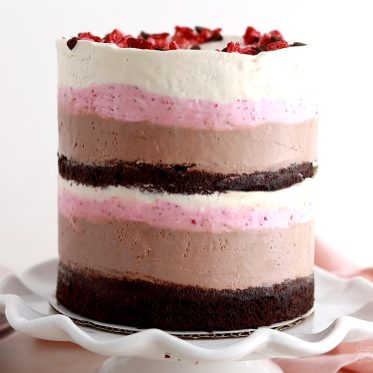
This neapolitan ice cream cake features delicious layers of decadent chocolate cake, chocolate ice cream, strawberry ice cream, and vanilla ice cream. All three of the ice cream flavors are made from one big batch of no-churn ice cream! You’ll simply divide it up into thirds and create each flavor separately, then layer them together with the cake layers in an acetate lined cake pan. The finished cake ended up being about 6 inches tall, which makes it the perfect party cake!

The best part about the no-churn method is that it’s incredibly easy to whip up without an ice cream maker. Even though it’s a simple recipe, the texture of the ice cream ends up absolutely perfect and the flavors are incredible. It’s a whipped cream and sweetened condensed milk base, and the three flavors are created using pure vanilla extract, freeze dried strawberries, and melted semi-sweet chocolate chips. If this is your first time trying no-churn ice cream, it will change your life! I am borderline obsessed with it at the moment.

My one and only regret with this neapolitan ice cream cake is not taking the time to make sure the acetate collar was super tight around the bottom cake layer. Since there was a slight gap, some of the chocolate ice cream ended up oozing out around the bottom cake layer. I was actually considering redoing the cake for prettier photos until I unwrapped the acetate and saw that all the layers inside still looked amazing. My advice to you is to make sure that acetate collar is nice and tight around that bottom layer!
If you’ve never made a cake in an acetate collar before, here is a great post that explains how to do it. I used this 6-inch acetate for the collar and this 6-inch springform pan for structure. Once the cake is layered inside, all you have to do is pop it into the freezer for at least 6 hours to let everything set up. Aside from the crushed freeze-dried strawberries and chocolate chips on top, there isn’t any additional cake decorating you’ll need to do. The best part is you can easily make this cake ahead, store it in the freezer, and have it ready to roll when you are – up to a month ahead of time!
With such a nostalgic flavor palette, this neapolitan ice cream cake is so perfect for a summer party. The layers make it such a showstopper! It was a huge hit with my husband and our friends, and I hope it’s a hit at your house too. Enjoy!
Neapolitan Ice Cream Cake
Ingredients
Chocolate Cake
- 1 Cup (132g) all purpose flour
- 3/4 Cup (150g) granulated sugar
- 1/3 Cup (30g) natural unsweetened cocoa powder
- 1 tsp baking soda
- 1/2 tsp baking powder
- 1/4 tsp salt
- 1/4 Cup (60ml) vegetable oil
- 1 large egg, room temperature
- 1/2 tsp pure vanilla extract
- 1/2 Cup (120ml) buttermilk*, room temperature
- 1/2 Cup (120ml) hot coffee or hot water
No-Churn Neapolitan Ice Cream Layers
- 3 Cups (720ml) heavy whipping cream, cold
- 21 Oz sweetened condensed milk, divided
- 1 Tbsp pure vanilla extract, divided
- 1/2 Cup (3oz) semi-sweet chocolate chips, melted and cooled
- 1 Cup (30g) freeze dried strawberries, finely ground
- 1 Tbsp strawberry jam
- 1 drop pink food coloring, optional
Instructions
Make the Chocolate Cake
- Preheat the oven to 350ºF/177ºC and prepare two 6-inch cake pans by spraying the sides with baking spray and fitting a parchment paper circle to the bottom of each pan.
- Whisk all of the dry ingredients together in a large bowl to fully combine them. Add the vegetable oil, eggs, vanilla, and buttermilk and mix on low with either a hand mixer, the paddle attachment on your stand mixer, or by hand until combined. Add the hot coffee (or hot water) in a slow stream. Continue mixing on low until fully combined and smooth, 1-2 minutes. The batter will be very thin.
- Divide the batter evenly between the two prepared cake pans and bake for 20-24 minutes, until a wooden toothpick inserted comes out clean. Cool completely before layering with ice cream.
Make the No-Churn Neapolitan Ice Cream
- Wait to make the ice cream layers until right before you're ready to assemble the cake. Place a large metal or glass bowl into the refrigerator for at least 20 minutes to chill before you get started.
- Add the heavy whipping cream and 2 teaspoons of the vanilla extract into the chilled bowl, then whip it with a hand mixer on high speed until stiff peaks form, 3-4 minutes. You can alternatively use a stand mixer with the whisk attachment for this part. Place the whipped cream into the refrigerator while you move on to the next step.
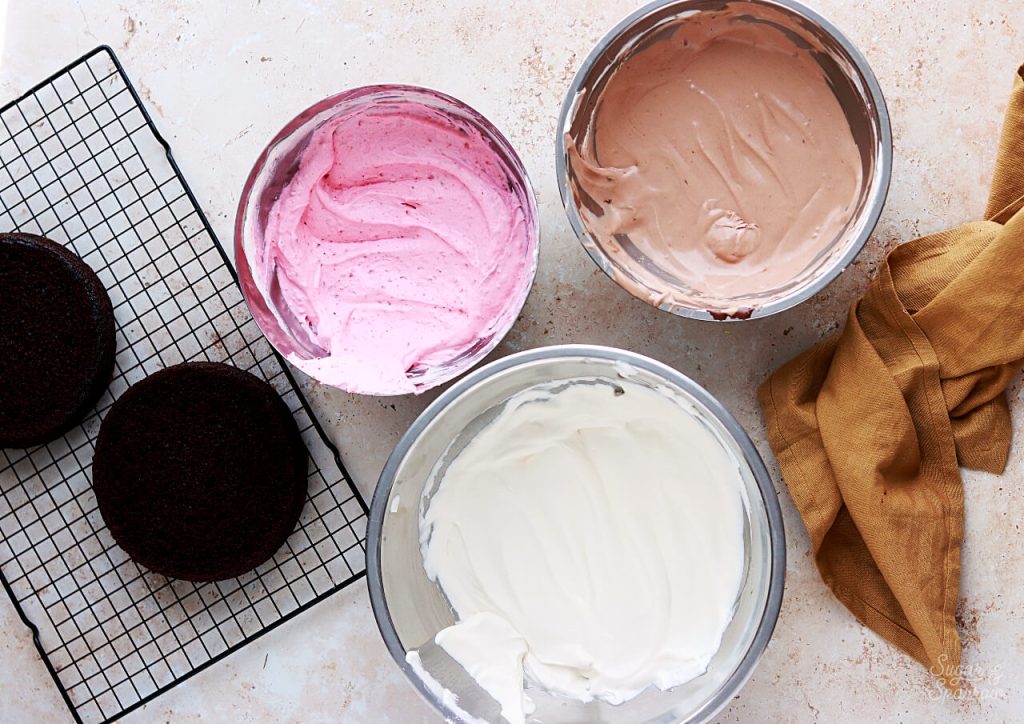
- Divide the sweetened condensed milk evenly between three medium bowls. To one bowl, add 1 teaspoon of vanilla. To the second bowl, add the finely ground freeze dried strawberry powder and strawberry jam. To the last bowl, add the melted and cooled semi-sweet chocolate. Whisk the ingredients together within each individual bowl to create the three different flavor bases.
- Divide the whipping cream evenly between each of the three bowls you created in the previous step. Fold each sweetened condensed milk mixture together with the divided whipped cream to create vanilla ice cream, strawberry ice cream, and chocolate ice cream.
Assembly
- Once the chocolate cake layers are cooled completely, level them to about 1/2 inch tall. Place a 6-inch cardboard cake circle into the bottom of a 6-inch springform pan, then place the first cake layer on top. Wrap a sheet of acetate around the cake layer and tape it together once it's the same diameter as the cake layer. Here are more detailed instructions on how to prepare the acetate collar.
- Add half of the chocolate ice cream mixture on top of the chocolate cake layer and smooth it with a spoon or spatula until it reaches the acetate. Add half of the strawberry ice cream mixture on top of that and smooth it down, then add half of the vanilla ice cream mixture and smooth it down. Place the second cake layer on top and continue the layering process with the remaining ice cream.
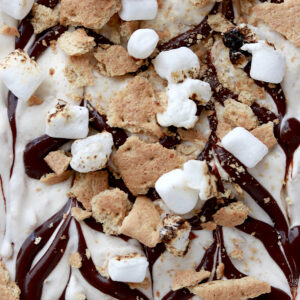
- Freeze the ice cream cake for at least 6 hours. When you're ready to serve it, remove the cake from the springform pan and unwrap the acetate. Garnish with a crown of crushed freeze dried strawberries and chopped chocolate.
Notes
- The chocolate cake layers can be made ahead and stored at room temperature, covered tightly in plastic wrap, for up to two days. Alternatively, you can cover with plastic wrap and store in the freezer for up to two months before thawing to room temperature.
- The no-churn ice cream must be made right before assembling the cake and cannot be made ahead.
- The assembled cake or leftovers can be stored in the freezer, wrapped in acetate or plastic wrap, for up to two months.
Did you make this neapolitan ice cream cake recipe? I want to know what you think! Tell me about it in the comments below and feel free to tag @sugarandsparrowco on Instagram to show me. I love to see what you create with my recipes!
LOVED this cake! I adapted it to be gluten free/dairy free and it turned out amazing. I made it for a friends birthday and everyone absolutely loved it. The first thing my boyfriend said as we were leaving the party was, “so are you going to make more of that cake?” Thanks for the great recipe! Also, I wanted to note that I waited too long to order acetate and couldn’t find it anywhere in town so I used parchment paper and doubled it to make it thicker and made a makeshift cake collar. It honestly turned out great to my surprise. Although, i’ve ordered the acetate for the next hundred ill make just to make it THAT much prettier hehe. Thanks again!!
I’m SO happy you loved this recipe, Carly!! And thrilled to hear that it worked as a gf/dairy-free dessert! Thanks so much for letting me know it was a hit 🙂
I’ve made the three flavors of ice cream as a trial run and the family loved it! Planning to make the cake for my daughter’s upcoming 3rd birthday. A few questions however…the link to the acetate collar shows a 6” collar but seems with all the layers it would need to be taller, do you recommend an 8” or 12” collar instead (or the 12×12” sheets from Joann’s from another post)? Also there will be 18 people there. I see the recipe is for 20 slices but I just bought the 6” pans and they seem quit small. Think I’ll be ok or should I add 1/3 to the recipe and make this an 8” cake? Appreciate your input!
So happy the ice cream was a hit! I don’t remember this cake being taller than 6 inches but to be on the safe side you could definitely go with an 8 inch collar. It definitely won’t be taller than that. And as for the servings, this cake serves up to 20 people because of the height. I would cut it into slices, then cut the slices in half. Hope that helps!
I made the cake a few days ahead and placed the layers in the freezer. The day before I intended to serve, I made the ice cream and my only issue was my strawberry ice cream was very thick, but I got more comments about the incredible taste of that flavor, so no complaints there. I assembled the cake and froze it overnight. When I took off the clear acrylic holding it together it looked beautiful. I added some chocolate shavings, a bit of dried strawberry bits, and a strawberry, and my family was wide eyed. Everyone loved it! They couldn’t stop commenting on how creamy the ice cream was. This was a success. Thank you so much for another great recipe!
Yay, Giggi! I am so happy this recipe was such a hit!! Thanks so much for taking the time to let me know 🙂
Hey,
I tried this recipe today but unfortunately my layers sank into each other . I was making this for my daughter’s birthday so trying to fix it. Any ideas ?
I had made your mint and chocolate ice cream cake before and had that came out beautifully
Hi Aakanxa! I’m so sorry the layers sank! My only thought is that the acetate wasn’t tight enough around the cake layers and caused the ice cream layers to ooze out/not be able to support the cake layers. Does that sound like it could have been the culprit?
This looks beautiful! How would you suggest adding any whipped cream frosting to the cake layers?
Thanks so much, Michelle! Do you mean frosting the outside of the cake? If so, I would assemble the cake according to the instructions and let the cake set in the freezer overnight so it’s extra firm. Then, remove the acetate and frost the outside with whipped cream frosting. You can then store the cake in the freezer until you’re ready to serve.