• Cake
  • Frosting
  • YouTube
  • My Favorite Tools
  • Nav Social Icons

  • Skip to primary navigation
  • Skip to main content
  • Skip to primary sidebar
  • Skip to footer
  • Recipes
    • Cake
    • Cupcakes
    • Frosting
    • Ice Cream
    • Vegan
  • Cake Basics
  • Tutorials
  • Blog
  • About
  • Mobile Menu Widgets

    Connect

    Search

Sugar & Sparrow logo in script font

Sugar & Sparrow

Lifestyle and Cake from Portland Oregon

  • Cake Basics
  • Recipes
    • Cake
    • Cupcakes
    • Sheet Cakes
    • Cookies & Bars
    • Filling
    • Frosting
    • Ice Cream
    • No-Bake
    • Small Batch
    • Vegan
  • Tutorials
  • Book
  • Blog
  • About

Dreamy No-Bake Oreo Cheesecake

October 16, 2023 · In: Cake, Featured, No-Bake, Recipes

Jump to Recipe

As of the date on this blog post, I still have not ever baked a cheesecake. It’s still on my list of things to try, but ever since I discovered the no-bake method of making cheesecake I’m a bit obsessed with how easy and delicious it is! The texture is so creamy and almost mousse-like that I cannot stop thinking about making it in all sorts of flavors. So when Amoretti sent me their French Vanilla Compound I thought it was the perfect excuse to make another one. 

This post may contain affiliate links. For more information, see our disclosure policy.

no bake oreo cheesecake

The idea for this dreamy no-bake Oreo cheesecake originally started as a french vanilla cheesecake on an Oreo crust. Then I tasted the French Vanilla Compound and it reminded me of the filling inside of an Oreo cookie (delicious)! I decided I couldn’t NOT put crushed up cookies in the filling and turn it into a cookies and cream lover’s dream cheesecake. It’s my favorite flavor yet! 

no-bake oreo cheesecake recipe by sugar and sparrow

You can use any vanilla flavoring in this no-bake cheesecake, but I thought it was incredible with this Amoretti French Vanilla Compound. Similar to the ice cream flavor, this French Vanilla Compound has a deep vanilla flavor with notes of butterscotch and caramel. It was absolutely delicious! 

If you want to give this or any of the other Amoretti flavors a go, you can get FREE SHIPPING at checkout by using my code SPARROWCOFREESHIP. 

Easy Oreo cheesecake recipe with Oreo crust
no bake cheesecake method with Oreos

Let’s talk about this no-bake cheesecake method. You’ll basically whip most of the ingredients together to combine them, gently fold in some whipped cream, and mix in a generous helping of chopped Oreo cookies before pouring it into an Oreo crust. Once refrigerated, the filling sets into a thick mousse-like consistency – rich and creamy yet easily holds its shape when cut into slices. I love the no-bake method because it’s so fail-proof and yields such a delicious result with minimal effort! 

Another thing I really love about this no-bake cheesecake is you can make it ahead! After you add the filling into your Oreo cookie crust, you’ll place it in the refrigerator to set up for at least 6-8 hours (but overnight is best). You can make it up to two days in advance and go about life at a leisurely pace from there. 

Oreo cheesecake recipe by sugar and sparrow
No-bake Oreo cheesecake recipe

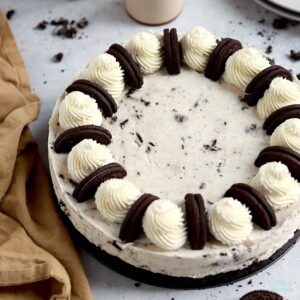
I decided to make an easy homemade whipped cream and spiked it with a little more Amoretti French Vanilla Compound to use for decorating and it did not disappoint! After the no-bake cheesecake was set, I used Wilton Tip 4B to pipe swirls around the edges, spaced about ½ inch apart. I chopped some more Oreo cookies in half and placed them in between each swirl. So simple and so effective with that cute cookies and cream backdrop! 

oreo cheesecake with homemade whipped cream recipe

However you decorate, I hope you love this recipe as much as I do! I was planning on giving some of it away to my friends and neighbors (as I often do with my bakes), but it was actually too delicious to give up. My husband and toddler helped some, but I’m not ashamed to say that I had a big slice every night until it was all gone. I’ll try harder to share when I make it again!  
4th of july desserts no bake

No-Bake Oreo Cheesecake

5 from 1 vote
The dreamiest cookies and cream cheesecake made without any baking! Rich and creamy French Vanilla filling studded with Oreo cookies on a delicious Oreo crust.
Print Recipe Pin Recipe
Prep Time:30 minutes mins
Refrigeration:8 hours hrs
Total Time:8 hours hrs 30 minutes mins
Course: Dessert
Cuisine: American
Servings: 12 slices

Equipment

  • 9-inch springform pan

Ingredients

Oreo Crust

  • 22 (250g) Oreo cookies
  • 5 Tbsp (72g) unsalted butter, melted

Oreo Cheesecake Filling

  • 1 1/4 Cups (300ml) heavy whipping cream, cold
  • 24 Oz (678g) full-fat brick-style cream cheese, room temperature not the spread
  • 1/2 Cup (100g) granulated sugar
  • 2 Tbsp powdered sugar
  • 1/4 Cup (60g) sour cream, room temperature
  • 2 tsp Amoretti French Vanilla Compound or 1 tsp pure vanilla extract
  • 16 (182g) Oreo cookies, chopped

Homemade Whipped Cream

  • 1/2 Cup (120ml) heavy whipping cream
  • 2 Tbsp powdered sugar
  • 1/4 tsp pure vanilla extract

Garnish

  • 6 Oreo cookies, cut in half

Instructions

Make the Oreo Cookie Crust

  • Using a food processor, grind the Oreo cookies into a fine crumb. Add the cookie crumbs into a medium bowl and pour the melted butter on top. Mix until uniform, then press the mixture into the bottom and up the sides of a 9-inch springform pan or 10-inch springform pan. Use a round glass or jar to pack the crust as tightly as possible (this helps keep it together when you cut the cheesecake slices later). Freeze the Oreo cookie crust in the pan for 10-20 minutes while you prepare the Oreo cheesecake filling.

Make the Oreo Cheesecake Filling

  • Using a hand mixer with a medium bowl or a stand mixer fitted with a whisk attachment, whip the cold heavy cream on medium-high speed until stiff peaks form, about 4–5 minutes. Set aside.
  • In another large bowl (either with a hand mixer or stand mixer), beat the cream cheese and granulated sugar together on medium until creamy. Scrape down the bowl and paddle as needed. Add the powdered sugar, sour cream, and Amoretti French Vanilla Compound (or vanilla extract). Beat on medium-high speed until smooth and combined (no lumps), about 2–3 minutes.
  • Use a rubber spatula to gently fold the whipped cream into the cheesecake filling until combined. Then, fold in the chopped Oreos.
  • Remove the Oreo crust from the freezer and add the Oreo cheesecake filling into it. Spread the filling to the edges of the crust and smooth the top using an angled spatula, then cover it tightly with plastic wrap or aluminum foil. Refrigerate for at least 8 hours and up to 2 days. For best results, chill the cheesecake overnight. This will yield the most set filling.

Make the Homemade Whipped Cream

  • Make sure the no-bake Oreo cheesecake filling is set before making the homemade whipped cream. Put the metal bowl of a stand mixer or a large metal mixing bowl into the refrigerator to chill for at least 15-30 minutes.
  • Add the heavy whipping cream, powdered sugar, and vanilla extract into the chilled bowl. Using a whisk attachment on your stand mixer or a hand mixer, beat the ingredients together on high speed until stiff peaks form, 1-2 minutes.

Assembly

  • When you’re ready to serve the no-bake Oreo cheesecake, remove the rim from the springform pan. Garnish with whipped cream and more Oreos.

Notes

Make Ahead Tips:
  1. After making and freezing the Oreo cookie crust, it can be covered and stored in the refrigerator until you add the filling (1-2 days ahead is best for the freshest flavor).
  2. You can make and assemble the no-bake Oreo cheesecake up to 2 days in advance, stored in the refrigerator and covered in aluminum foil or plastic wrap. You can alternatively freeze the cheesecake for up to 3 months after it’s set in the refrigerator. Be sure to cover well if freezing. I recommend one layer of plastic wrap and one layer of aluminum foil. 
Leftovers: Store leftovers (covered well) in the refrigerator for up to 5 days or in the freezer for up to 3 months. 

Disclaimer: I was compensated by Amoretti for my work of creating this recipe, styling, filming, photographing, and writing about their products. As always, all opinions are honest and my own. Thank you for supporting brands that support Sugar & Sparrow.

By: Whitney · In: Cake, Featured, No-Bake, Recipes · Tagged: amoretti, french vanilla compound, homemade whipped cream, no bake cheesecake, oreo cheesecake, oreo cookie crust, oreo cookies, oreo crust

you’ll also love

cookies and cream ice cream cake recipeCookies & Cream Ice Cream Cake
no-churn cookie dough ice cream cake recipe by sugar and sparrowThe BEST Cookie Dough Ice Cream Cake
oreo cookies and cream cakeOreo Layer Cake Recipe

Join the List

Stay up to date & receive the latest posts in your inbox.

Reader Interactions

Comments

  1. Brenda Hamrick says

    December 16, 2024 at 2:28 pm

    5 stars
    I usually make baked cheesecake, but saw this recipe for no bake oreo cheesecake, and decided to try it. The only change I made was to use Mexican vanilla flavoring. I made this for my church Christmas banquet. It was amazing how many wonderful comments I received. I was told that it was the hit of the party. I didn’t even get a piece for myself. It was all gone and not a bite left. My boyfriend, who is diabetic, even had a small piece, and loved it. Great recipe!! Thank you.

    Reply

Leave a Reply Cancel reply

Your email address will not be published. Required fields are marked *

Recipe Rating


Next Post >

EASY Dye-Free Black Buttercream Recipe

Primary Sidebar

Welcome to Sugar & Sparrow

Welcome to Sugar & Sparrow

Helping you whip up pretty desserts with confidence and creativity. And hopefully sharing a few laughs with you along the way!

Learn More

Connect

let’s bake!

Get my very best recipes, baking tips, and decorating tutorials sent to your inbox

Featured Posts

Anyone Can Cake giveaway with Wilton

Anyone Can Cake x Wilton GIVEAWAY!

what to do in san francisco

San Francisco Favorites: What To Do

Rainbow layer cake with rainbow frosting

The Ultimate Rainbow Cake (Inside and Out!)

Search

Archives

Follow Along

@sugarandsparrowco

ALMOND JOY CAKE 🤎🥥 this tastes just like an Almond ALMOND JOY CAKE 🤎🥥 this tastes just like an Almond Joy candy bar in cake form: layers of soft, fluffy coconut cake with silky chocolate ganache, sliced almonds, and the dreamiest coconut-almond buttercream! 

Comment RECIPE and I’ll send it on over! Or find it linked in my bio + at https://sugarandsparrow.com/almond-joy-cake-recipe/

#almondjoy #coconutcake #almondcake #cakedecorating #candycake
You butter believe I made myself the Halloween cos You butter believe I made myself the Halloween costume of my dreams!! 🧈 

#diyhalloweencostume
#foodcostume #halloweencostume #handmadecostume #bakerlife
MELTED CANDLE CUPCAKES 🖤🕯give me a few cupcakes, s MELTED CANDLE CUPCAKES 🖤🕯give me a few cupcakes, some dye-free black buttercream, and black chocolate ganache and watch me transform them into the spookiest edible centerpiece! 

Full tutorial is linked in my bio + at https://sugarandsparrow.com/melting-candle-cupcakes/ but I have a condensed version below: 
 
SUPPLIES: ⁣ 
-9 cupcakes⁣  (made these with my small batch black velvet cake recipe!) 
-1 batch of dye-free black buttercream 
-boba straws or skewers (for stabilizing the taller candles) ⁣ 
-icing smoother + turntable ⁣ 
-black ganache for dripping⁣ 
-3 birthday cake candles⁣ 
-matches ⁣ to light them
⁣ 
INSTRUCTIONS: ⁣ 
1. Fill and stack the cupcakes: one stack of 2 cupcakes, one stack of 3 cupcakes, and one stack of 4 cupcakes. For the two taller cupcakes I inserted a boba straw through the middle to stabilize the stack for frosting. ⁣ 
2. Frost the stacked cupcakes with smooth buttercream and keep the top edge raw. Refrigerate for 20 minutes to let the frosting firm up. ⁣ 
3. Transfer the frosted cupcake candles  onto a small plate and pipe ganache around the edges and tops to look like melted wax. ⁣ 
4. Insert a birthday cake candle into each cake candle (keep the wick about 1/4 inch from the cake surface) and light! ⁣ 
⁣ 
#candlecake #halloweencake #cupcakes #blackvelvetcake #blackbuttercream
BISCOFF COOKIE BUTTERCREAM 🤎 this delicious frosti BISCOFF COOKIE BUTTERCREAM 🤎 this delicious frosting is flavored with Biscoff cookie butter and goes with literally ANY Fall cake recipe 🙌🏼 So far my favorite cake flavors to pair it with are pumpkin cake, banana cake, chocolate cake, coffee cake, and spice cake, but I am also testing a full-on Biscoff cake this week!! 

Full recipe + my favorite cake pairing suggestions are at https://sugarandsparrow.com/biscoff-buttercream/ 
⁣⁣ 
INGREDIENTS⁣⁣ 
1 Cups (226g) unsalted butter, room temperature⁣⁣ 
1/2 Cup (94g) Biscoff cookie butter⁣⁣ or spread
3 Cups (360g) powdered sugar⁣⁣ 
1 tsp pure vanilla extract⁣⁣ 
2 Tbsp whole milk, room temperature⁣⁣ 
1/4 tsp salt, or to taste⁣⁣ 
⁣⁣ 
INSTRUCTIONS⁣⁣ 
1. Cream the butter and Biscoff cookie butter together in the bowl of a stand mixer fitted with the paddle attachment (or you can use a hand mixer and large bowl). Mix on medium-high until creamy and well combined, about 5 minutes, scraping down the bowl and paddle as needed.⁣⁣ 
2. Turn the mixer to low speed and add the powdered sugar a few cups at a time, scraping down the bowl and paddle after mixing in each addition. Add the vanilla, milk, and salt and continue mixing on low speed until smooth and combined, 1-2 minutes.⁣ 
⁣⁣ 
#biscoffcake #biscoff #buttercream #frosting #cakedecorating
DYE-FREE BLACK VELVET CUPCAKES 🖤 These all black c DYE-FREE BLACK VELVET CUPCAKES 🖤 These all black cupcakes use black cocoa powder (and NO food coloring!) to achieve that rich black color for the cupcakes + black buttercream. That means they won’t turn anyone’s mouth black AND they taste like Oreo cookies in deliciously moist cupcake form 👻

✨Full recipe (with dye-free black buttercream) is linked in my bio + at https://sugarandsparrow.com/black-velvet-cupcakes/ 

BLACK VELVET CUPCAKES
Yield: 14 cupcakes

1 Cup (132g) all purpose flour
3/4 Cup (150g) granulated sugar
1/3 Cup (38g) black cocoa powder
1 tsp baking soda
1/2 tsp baking powder
1/4 tsp salt
1/4 Cup (60ml) vegetable oil
1 large egg, room temperature
1/2 tsp pure vanilla extract
1/2 Cup (120ml) full-fat buttermilk*
1/2 Cup (120ml) hot coffee or hot water

INSTRUCTIONS:
1. Preheat the oven to 350°F (177°C). Line a muffin pan with cupcake liners and set aside.
2. Place all of the dry ingredients into a large bowl and whisk together to combine. Add the vegetable oil, eggs, vanilla, and buttermilk and whisk until combined. With the mixer still on low, add the hot coffee (or hot water) and whisk until smooth, about 2 minutes. The batter will be very thin. 
3. Pour the batter into the prepared cupcake liners (no more than ⅔ full) and bake for 15-18 minutes, until a toothpick inserted comes out with just a few moist crumbs on it. Cool completely before frosting with dye-free black buttercream (full recipe linked in my bio).

*If you don’t have buttermilk on hand (I rarely do!), use 1/2 Cup whole milk mixed with 1 1/2 tsp vinegar or lemon juice. 

#blackcupcakes #blackbuttercream #blackcocoapowder #halloweencupcakes #halloweenbaking

Footer

On the Blog

  • Cake Basics
  • Recipes
  • Tutorials

Info

  • About
  • Privacy Policy & Disclosure

stay in the know

Copyright © 2026 · Theme by Sugar & Sparrow