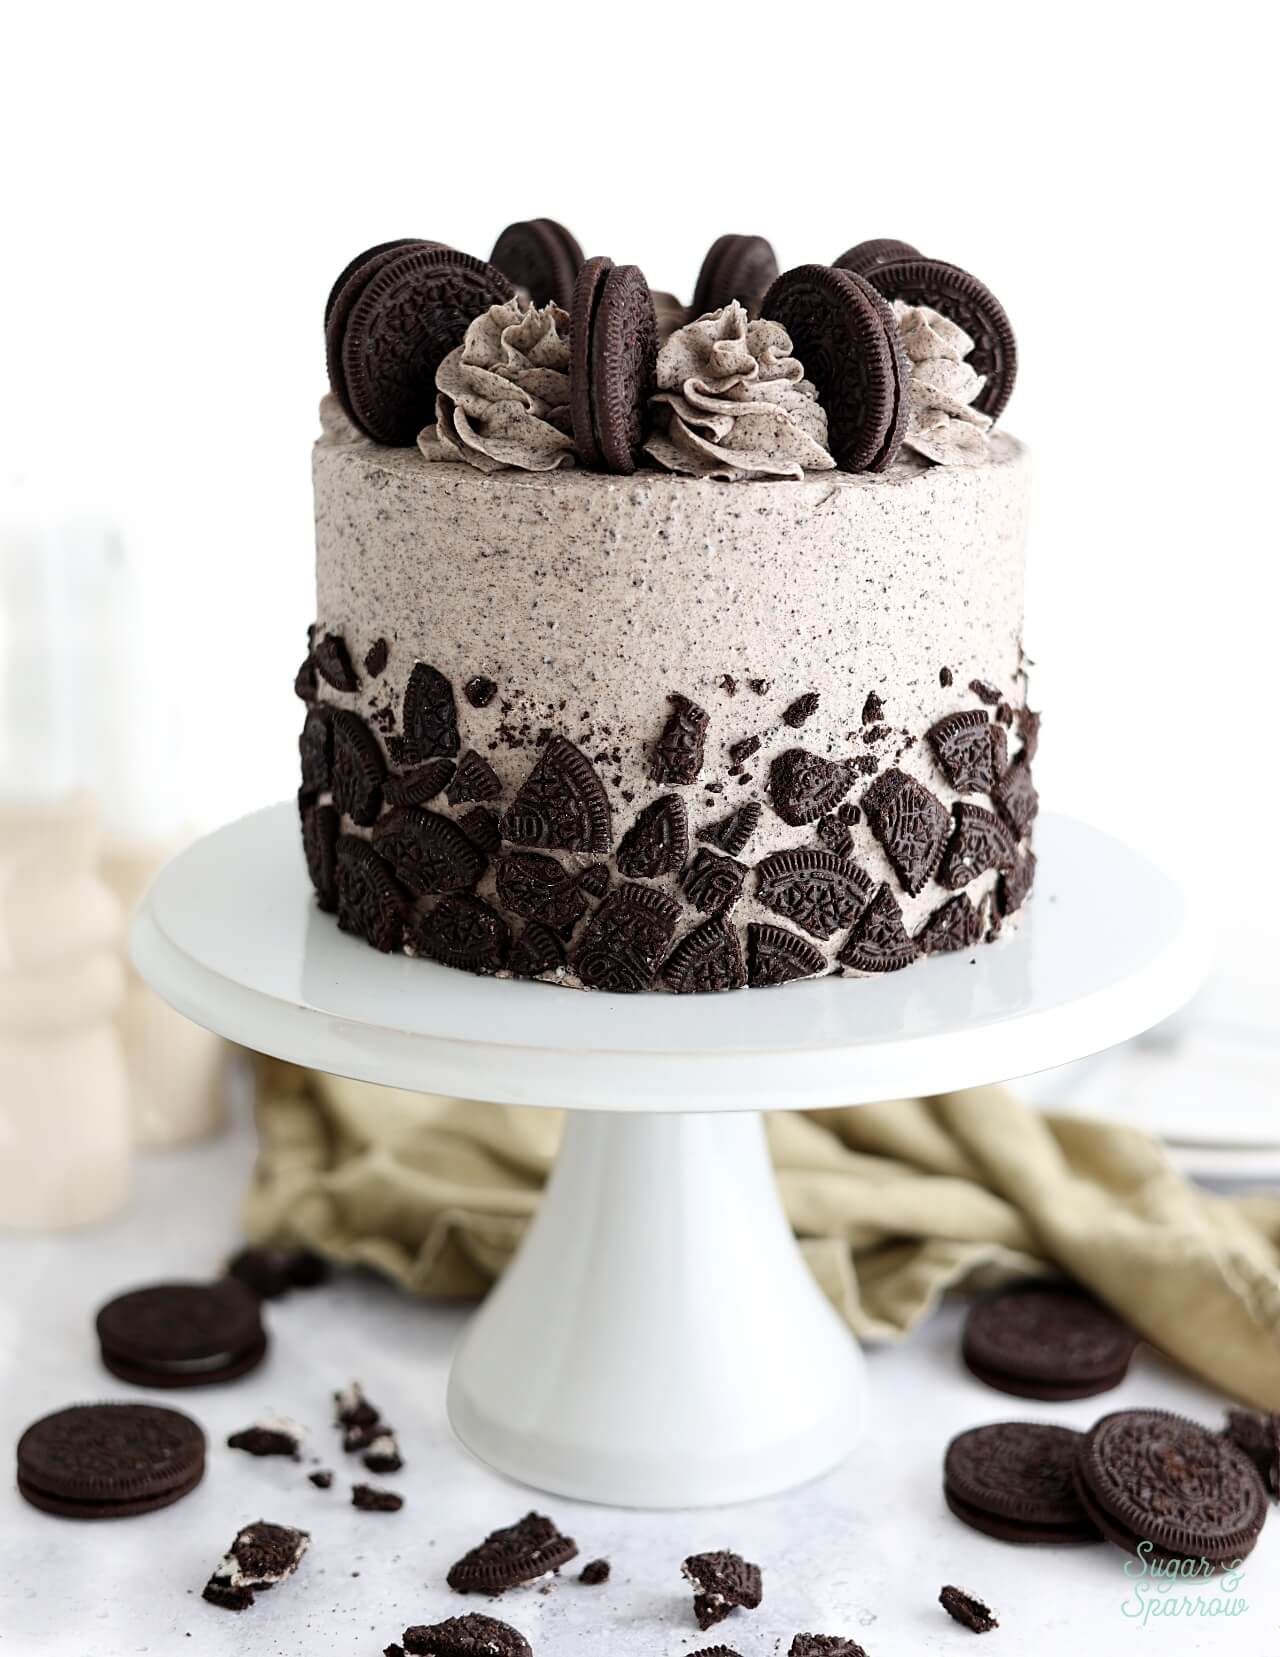
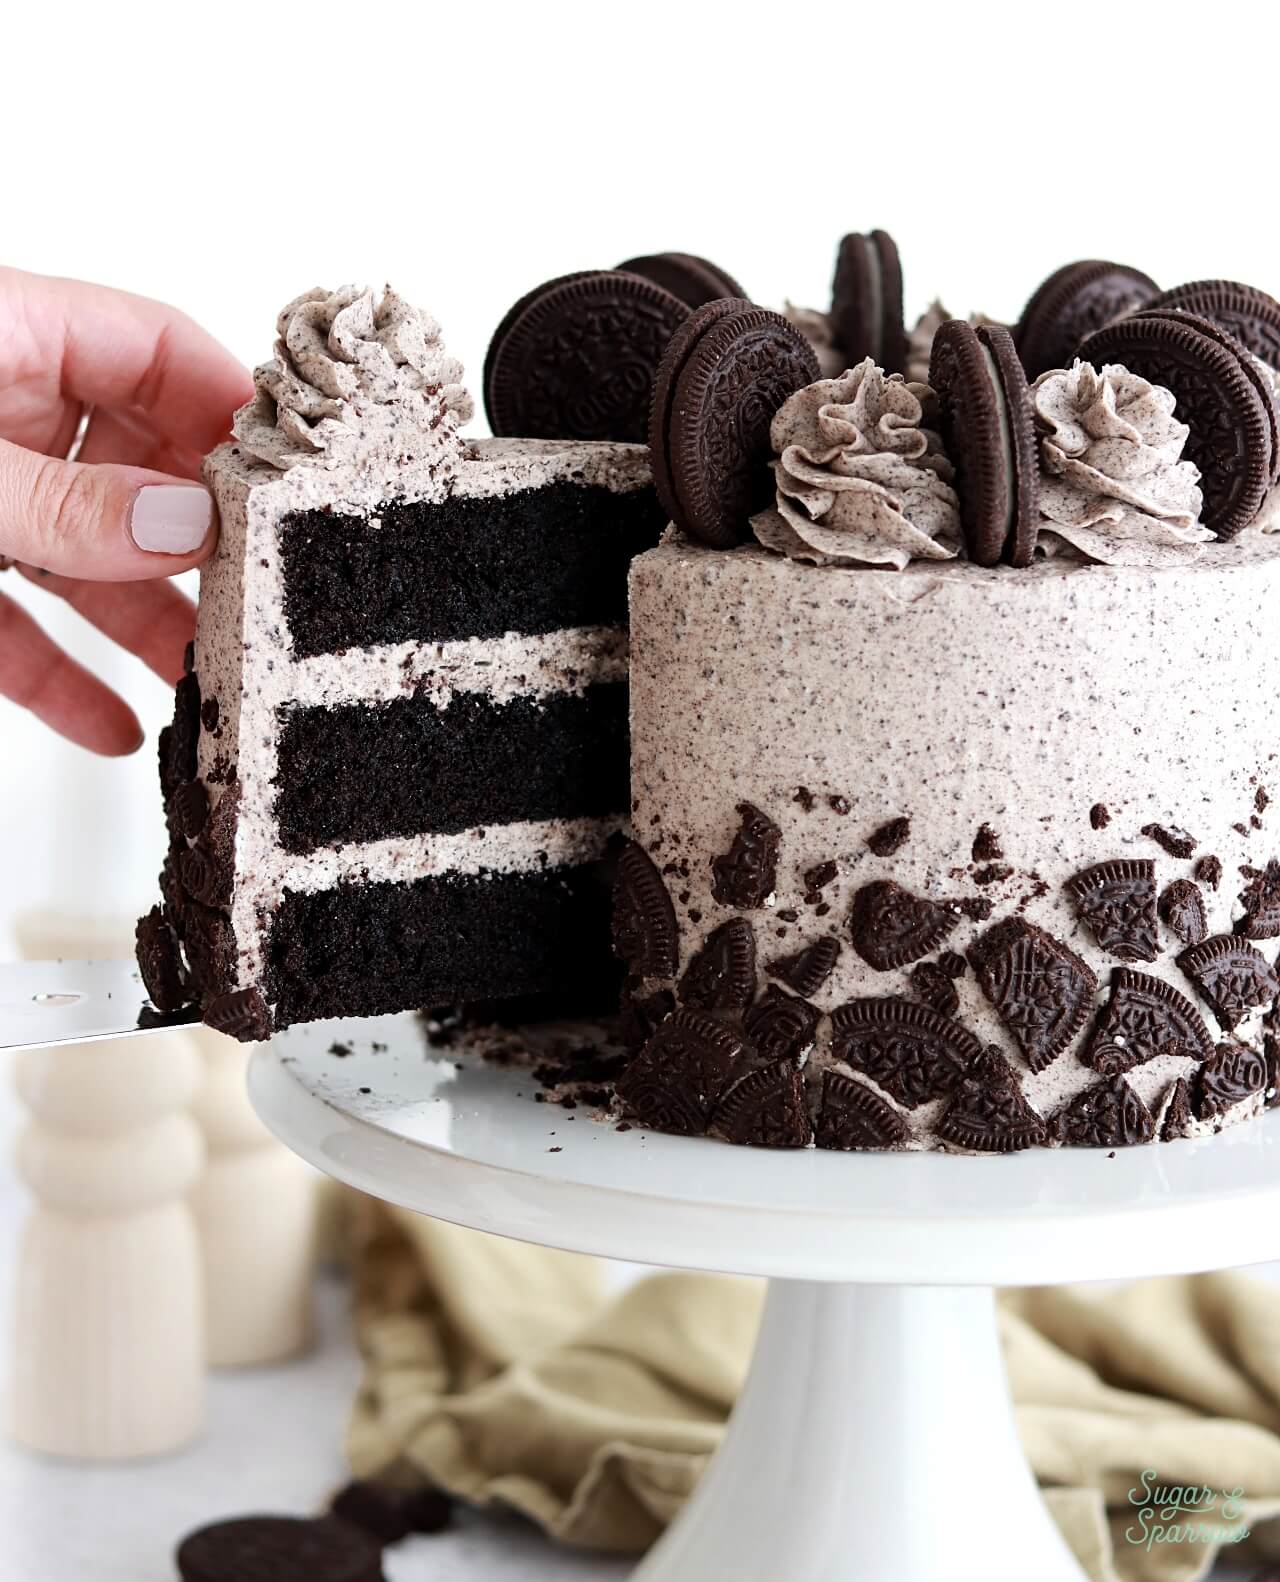
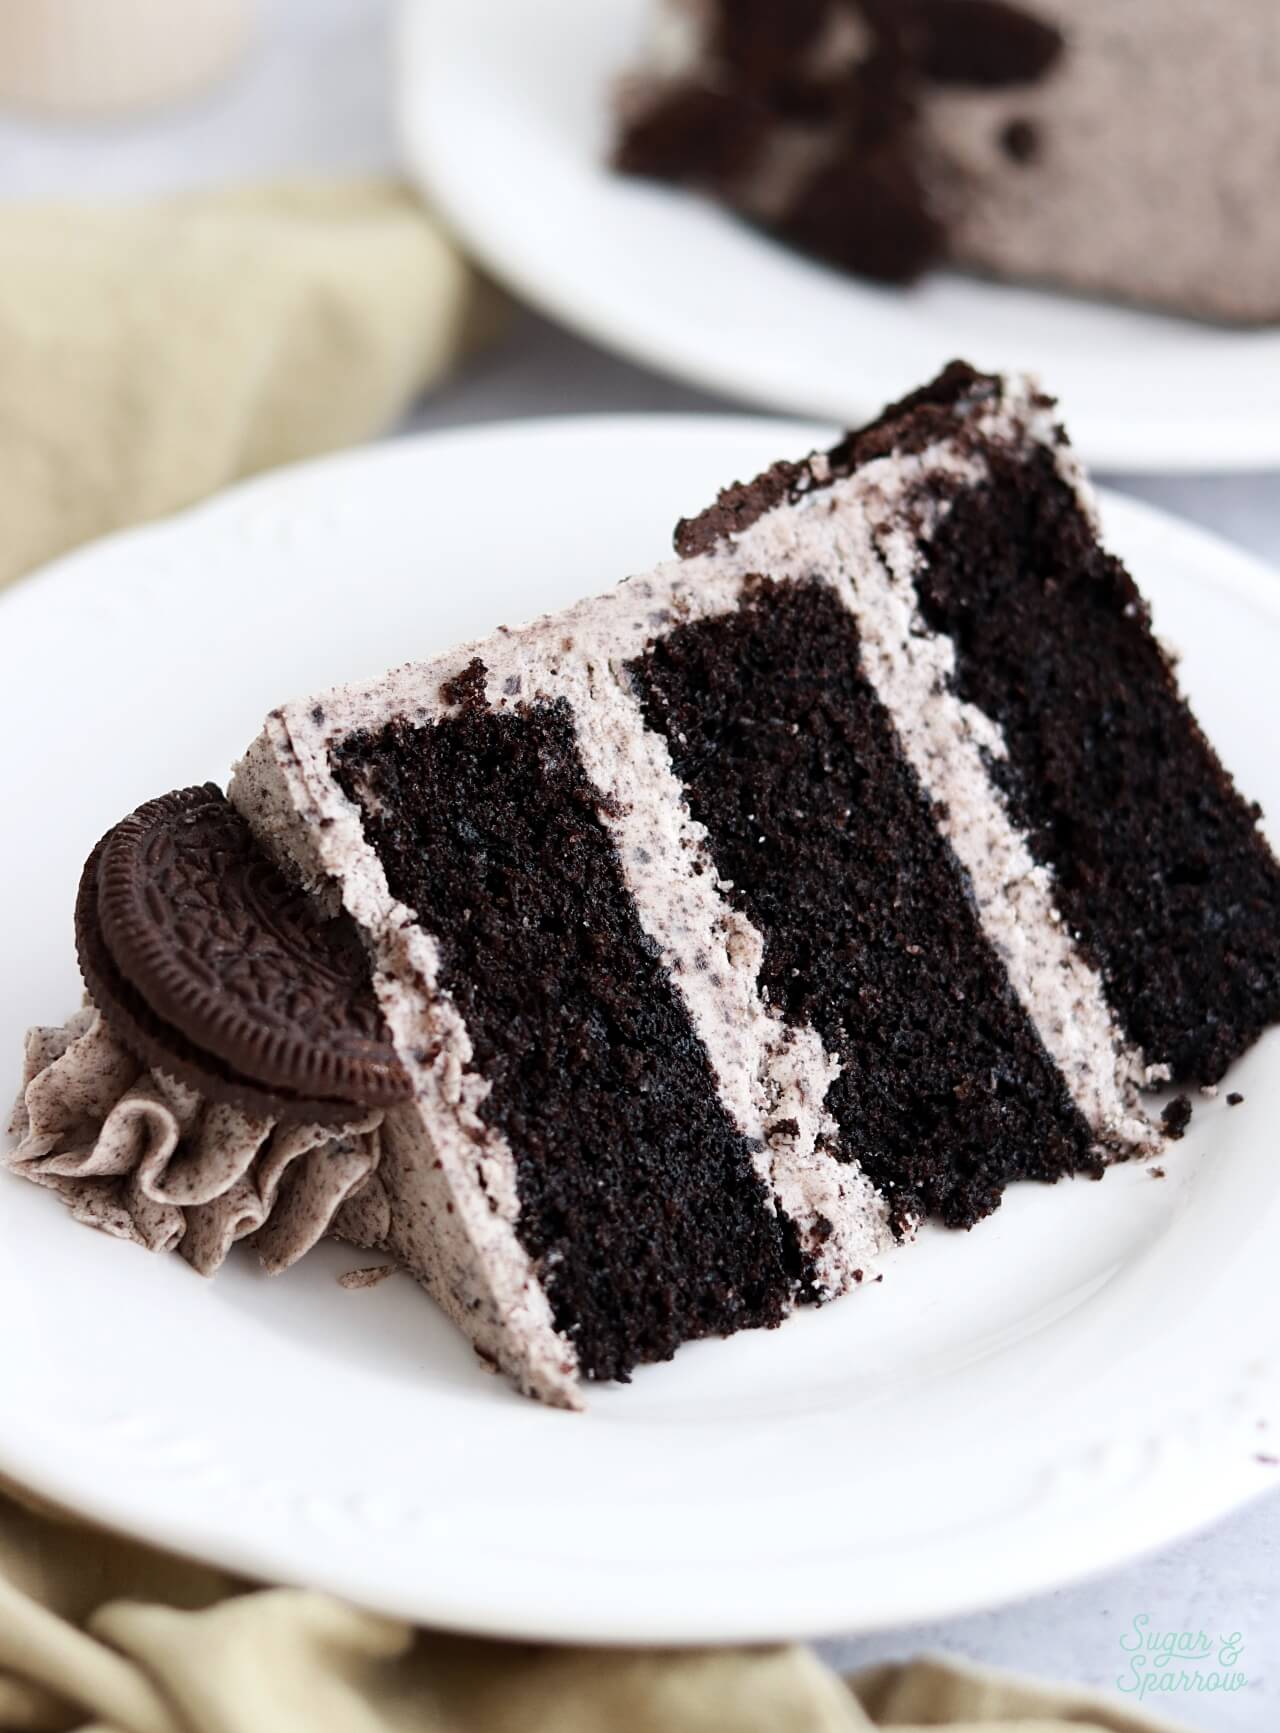
I absolutely LOVE Oreo cookies, so I made sure this cake has the best Oreo flavor in every way. It starts with layers of soft and moist black velvet cake made with black cocoa powder – the same ingredient responsible for the color and flavor of Oreo cookie shells. Those cake layers are filled and frosted with cookies and cream buttercream that’s speckled with delicious Oreo cookie crumbs, then decorated with more cookies. It tastes just like a cakey version of an Oreo in the very best way and it’s so easy to make!
One Reader, Cynthia, Says: “This cake is fantastic! It was so moist and delicious. Even after putting it in the fridge, it was still very soft and moist. And the frosting, oh my gosh! This one is a keeper for sure.” ★★★★★
Oreo Cake Ingredients & Substitutions
This cake is extra soft and moist with the perfect Oreo flavor thanks to black cocoa powder in the cake layers + cookie crumbs in the buttercream. Here are some of the key ingredients and substitutions you can make:
- Black Cocoa Powder. Adds a deep black color and the most authentic Oreo flavor to this cake. If you don’t have it on hand, it’s easy to find on Amazon OR you can use an equal amount of Hershey’s Special Dark Cocoa Powder or any Dutch-processed cocoa powder instead. Either of those should be easy to find at your local grocery store.
- All Purpose Flour. Otherwise known as plain flour, this creates gluten and helps build structure for the cake. I know that most of my other cake recipes call for cake flour, but I like to use all-purpose flour for my chocolate based cakes. It yields the best texture.
- Granulated Sugar. Not only sweetens the cake but helps soften the overall cake texture.
- Baking Soda + Baking Powder. The leavening agents that help this cake rise.
- Vegetable Oil. Provides a good amount of moisture for this cake. I like to use plain vegetable oil, but you can use any clear cooking oil that you prefer. Just keep in mind that whatever you use might flavor the cake, so choose something you love and are used to baking with.
- Large Eggs. To bind all of the ingredients together and give the cake structure.
- Pure Vanilla Extract. Adds dimension to the Oreo flavor of this cake.
- Full-Fat Buttermilk. Provides tons of moisture while binding the ingredients together. If you don’t have buttermilk on-hand, see the notes section of the recipe card for an easy DIY version using whole milk + vinegar or lemon juice!
- Hot Coffee. This helps bring all of the ingredients together into a cohesive batter at the end of the recipe, and the heat of the coffee blooms the cocoa powder to bring out the beautiful chocolate notes. You won’t end up tasting coffee in the final baked cake, but if you’d rather not use coffee, you can use an equal amount of hot water instead. And if you’re using instant coffee or espresso powder, just follow the instructions on the container to make 1 Cup (8oz) of coffee. It’s usually one heaping teaspoon per 8 oz of water.
- Oreo Cookies. It wouldn’t be an Oreo cake without these! I grind Oreo cookies into fine crumbs and fold them into the buttercream, plus decorate the cake with them!

Delicious Cookies & Cream Buttercream
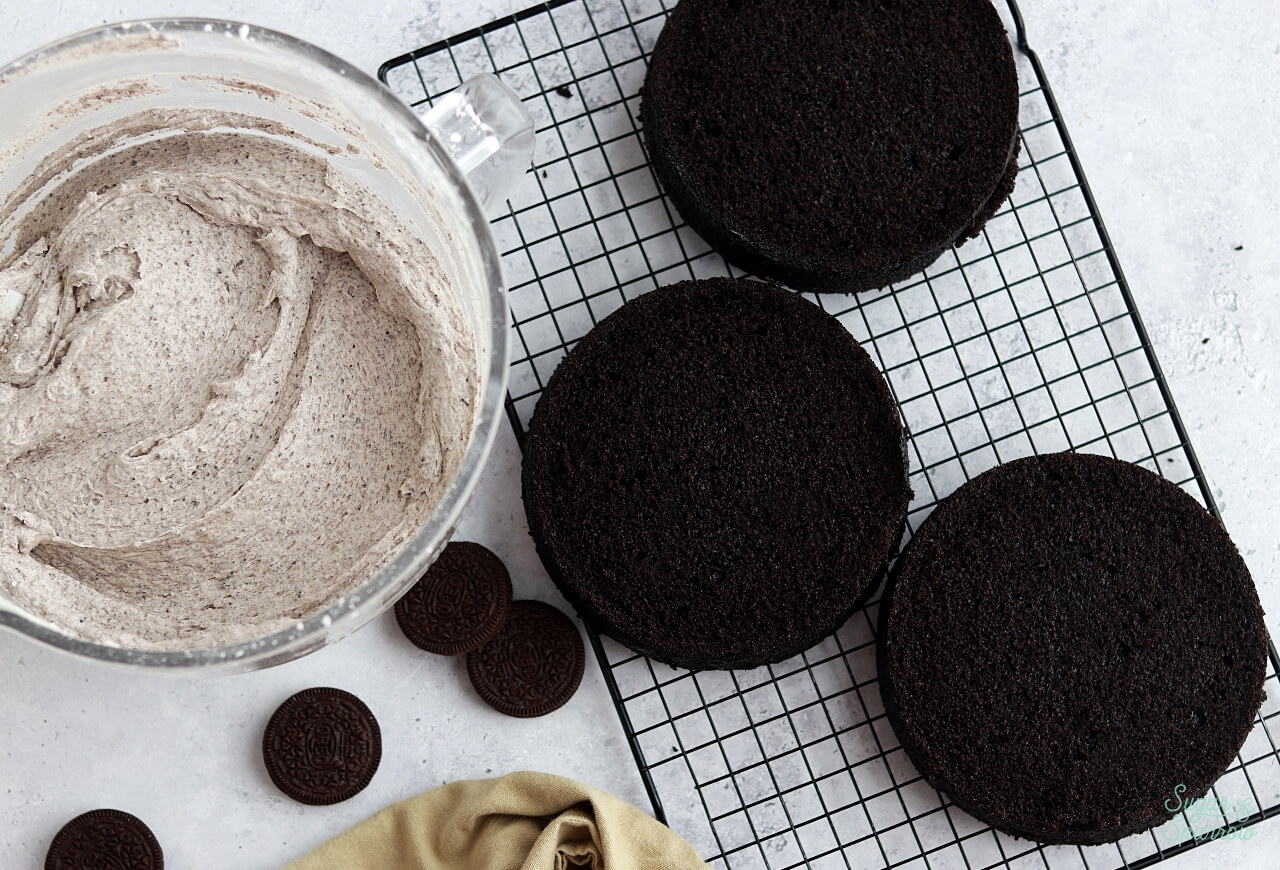
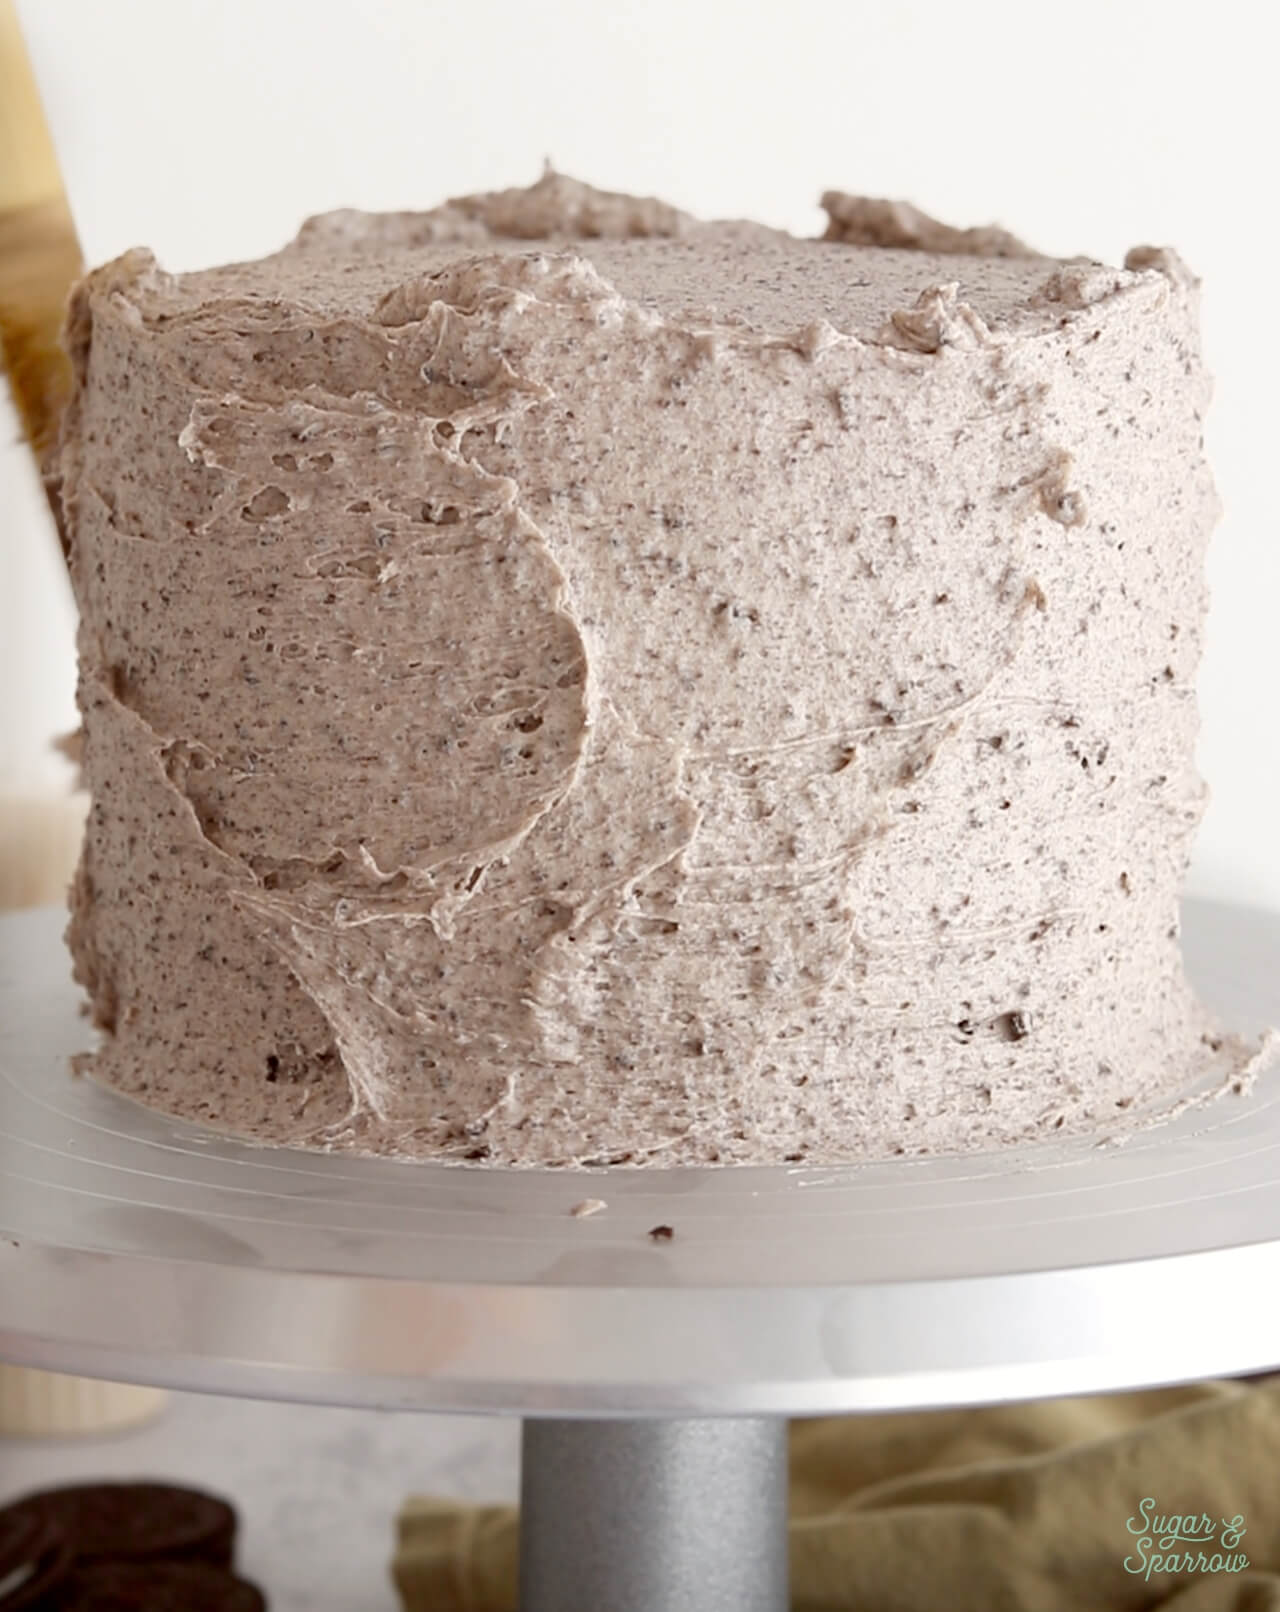
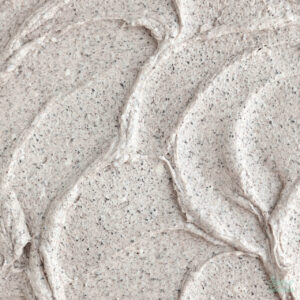
This starts by making my favorite vanilla buttercream recipe, then grinding Oreo cookies into fine crumbs and mixing them in until you have a beautifully speckled buttercream! The flavor and texture are out of this world. The vanilla buttercream essentially becomes the cream filling element for the Oreo cookie crumbs and it’s so easy to work with as a filling and frosting. And just look how pretty the Oreo flecks are:
My one bit of advice is to grind those cookie crumbs very finely with a food processor if you plan on piping swirls on top of the cake. If you have any large cookie bits in the buttercream, they could end up clogging the piping tip and make things frustrating! If this happens, you can usually dig the piece out with a toothpick, but save yourself the stress and grind those crumbs as small as you can.
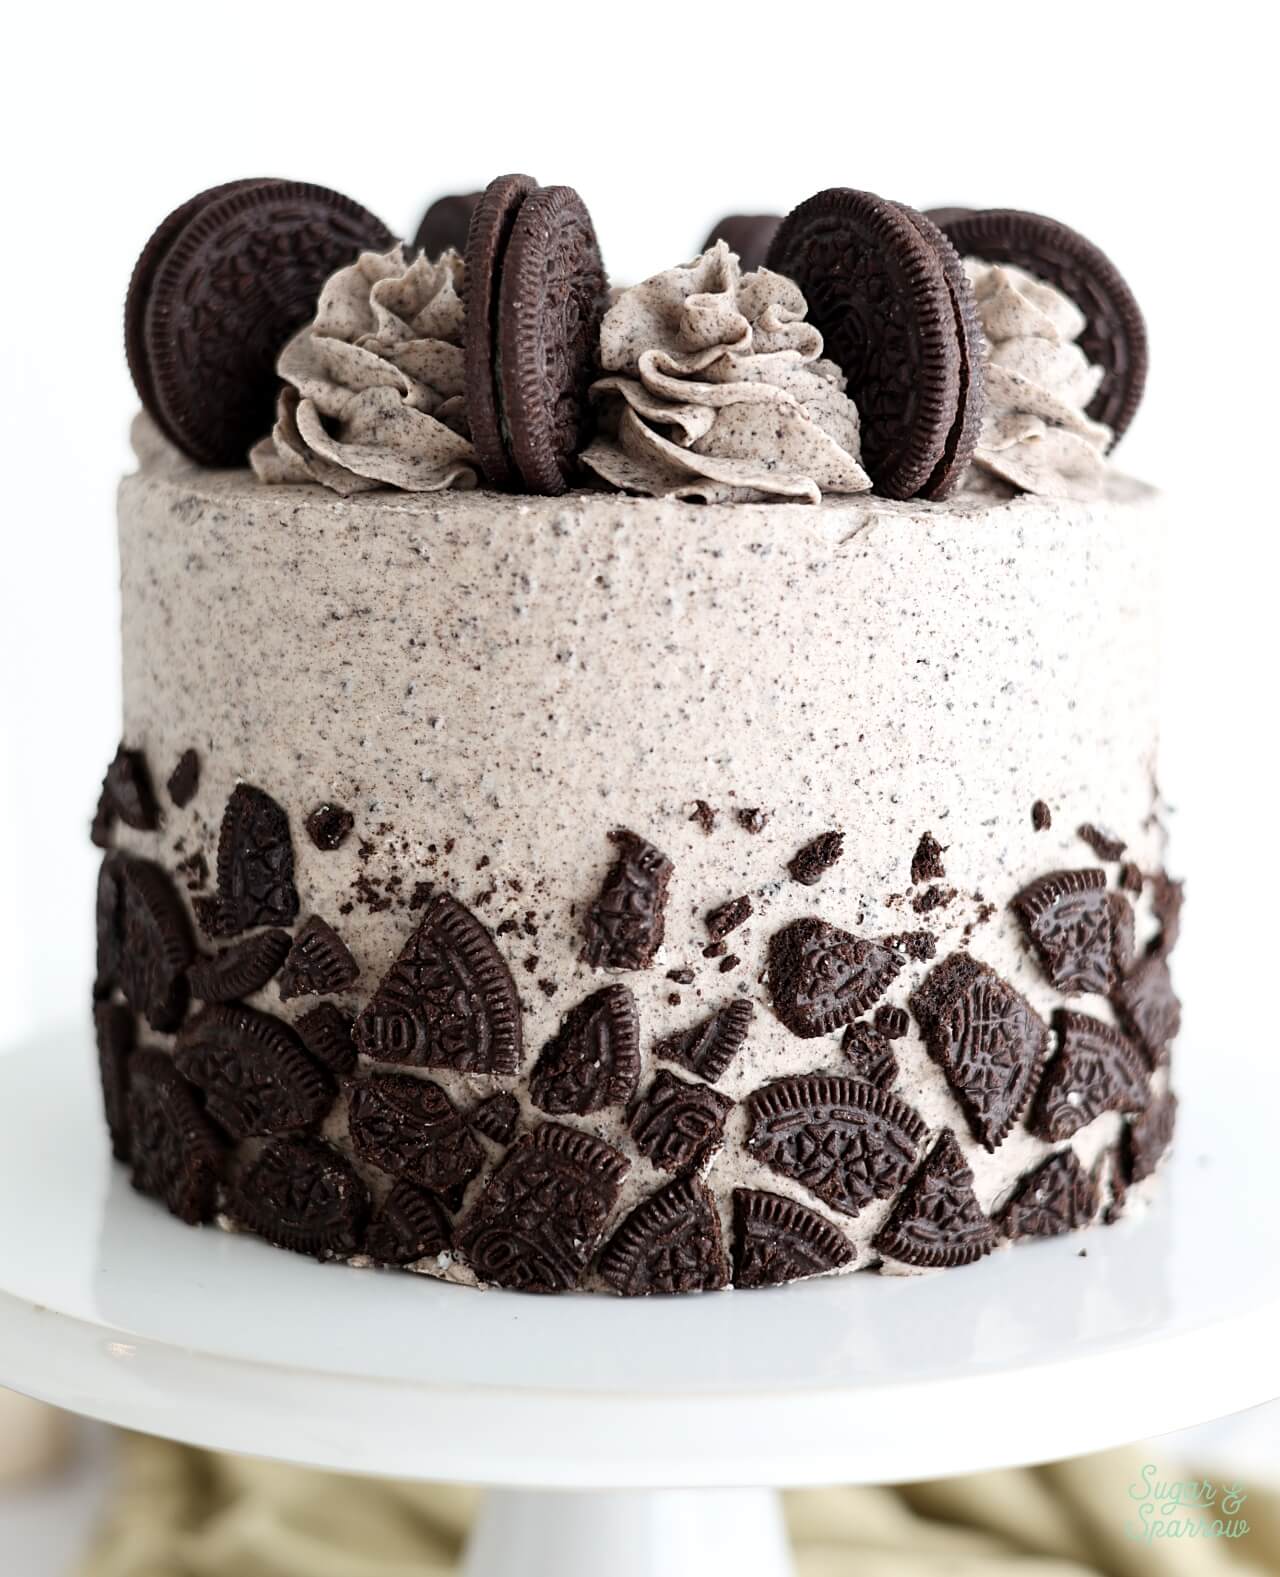
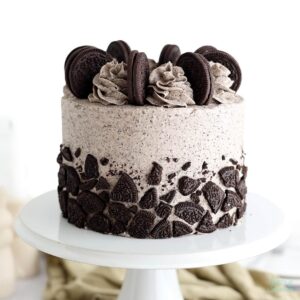
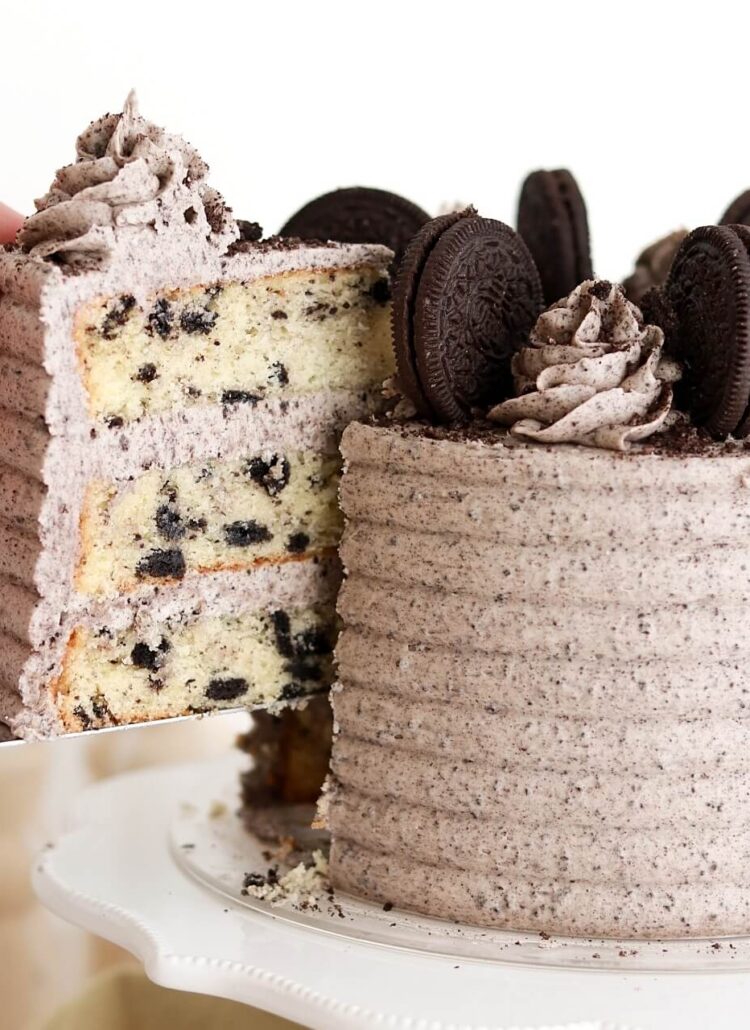
How to Decorate an Oreo Layer Cake
There are so many fun ways you can decorate this cake. In the past I’ve added a chocolate ganache drip to the design pictured, and added colorful sprinkles to the swirls in this vegan chocolate Oreo cake. Feel free to use either of those ideas as inspiration or follow the tutorial below to create the look you see here:
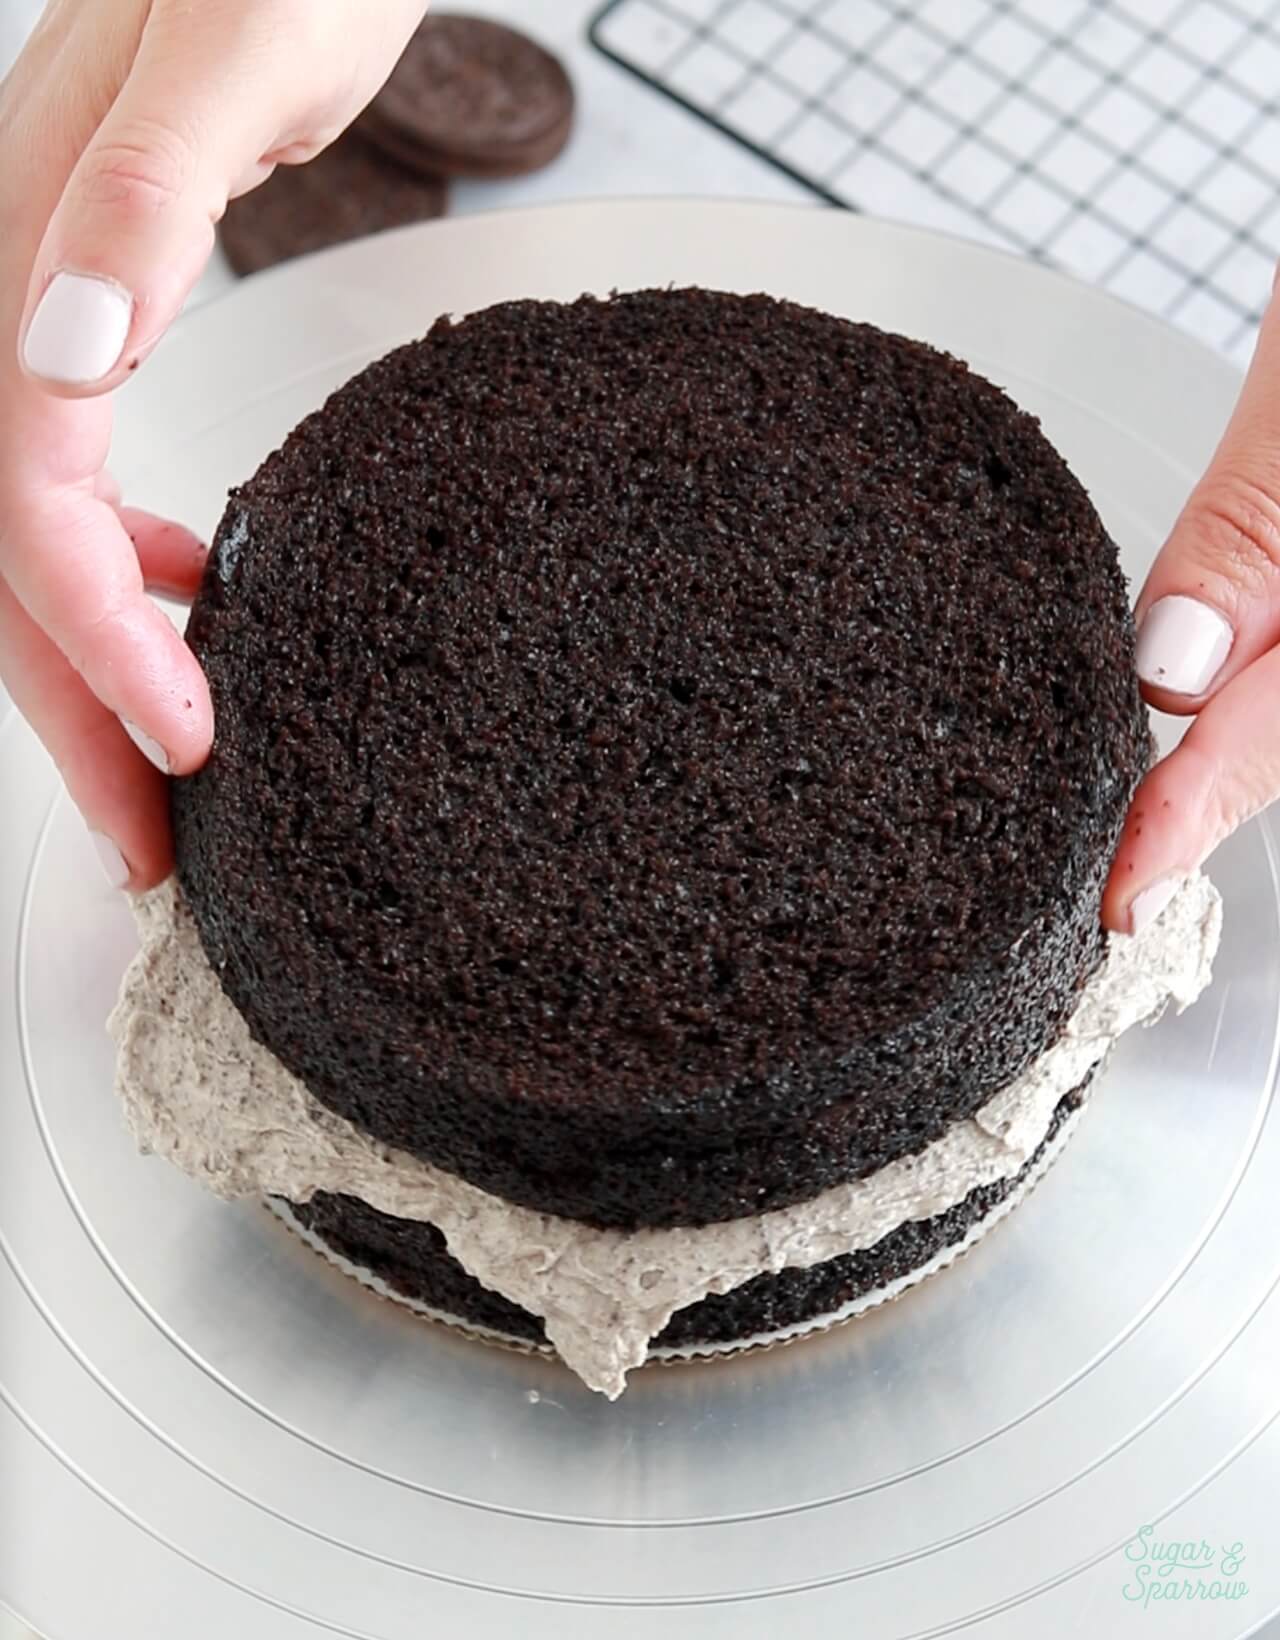
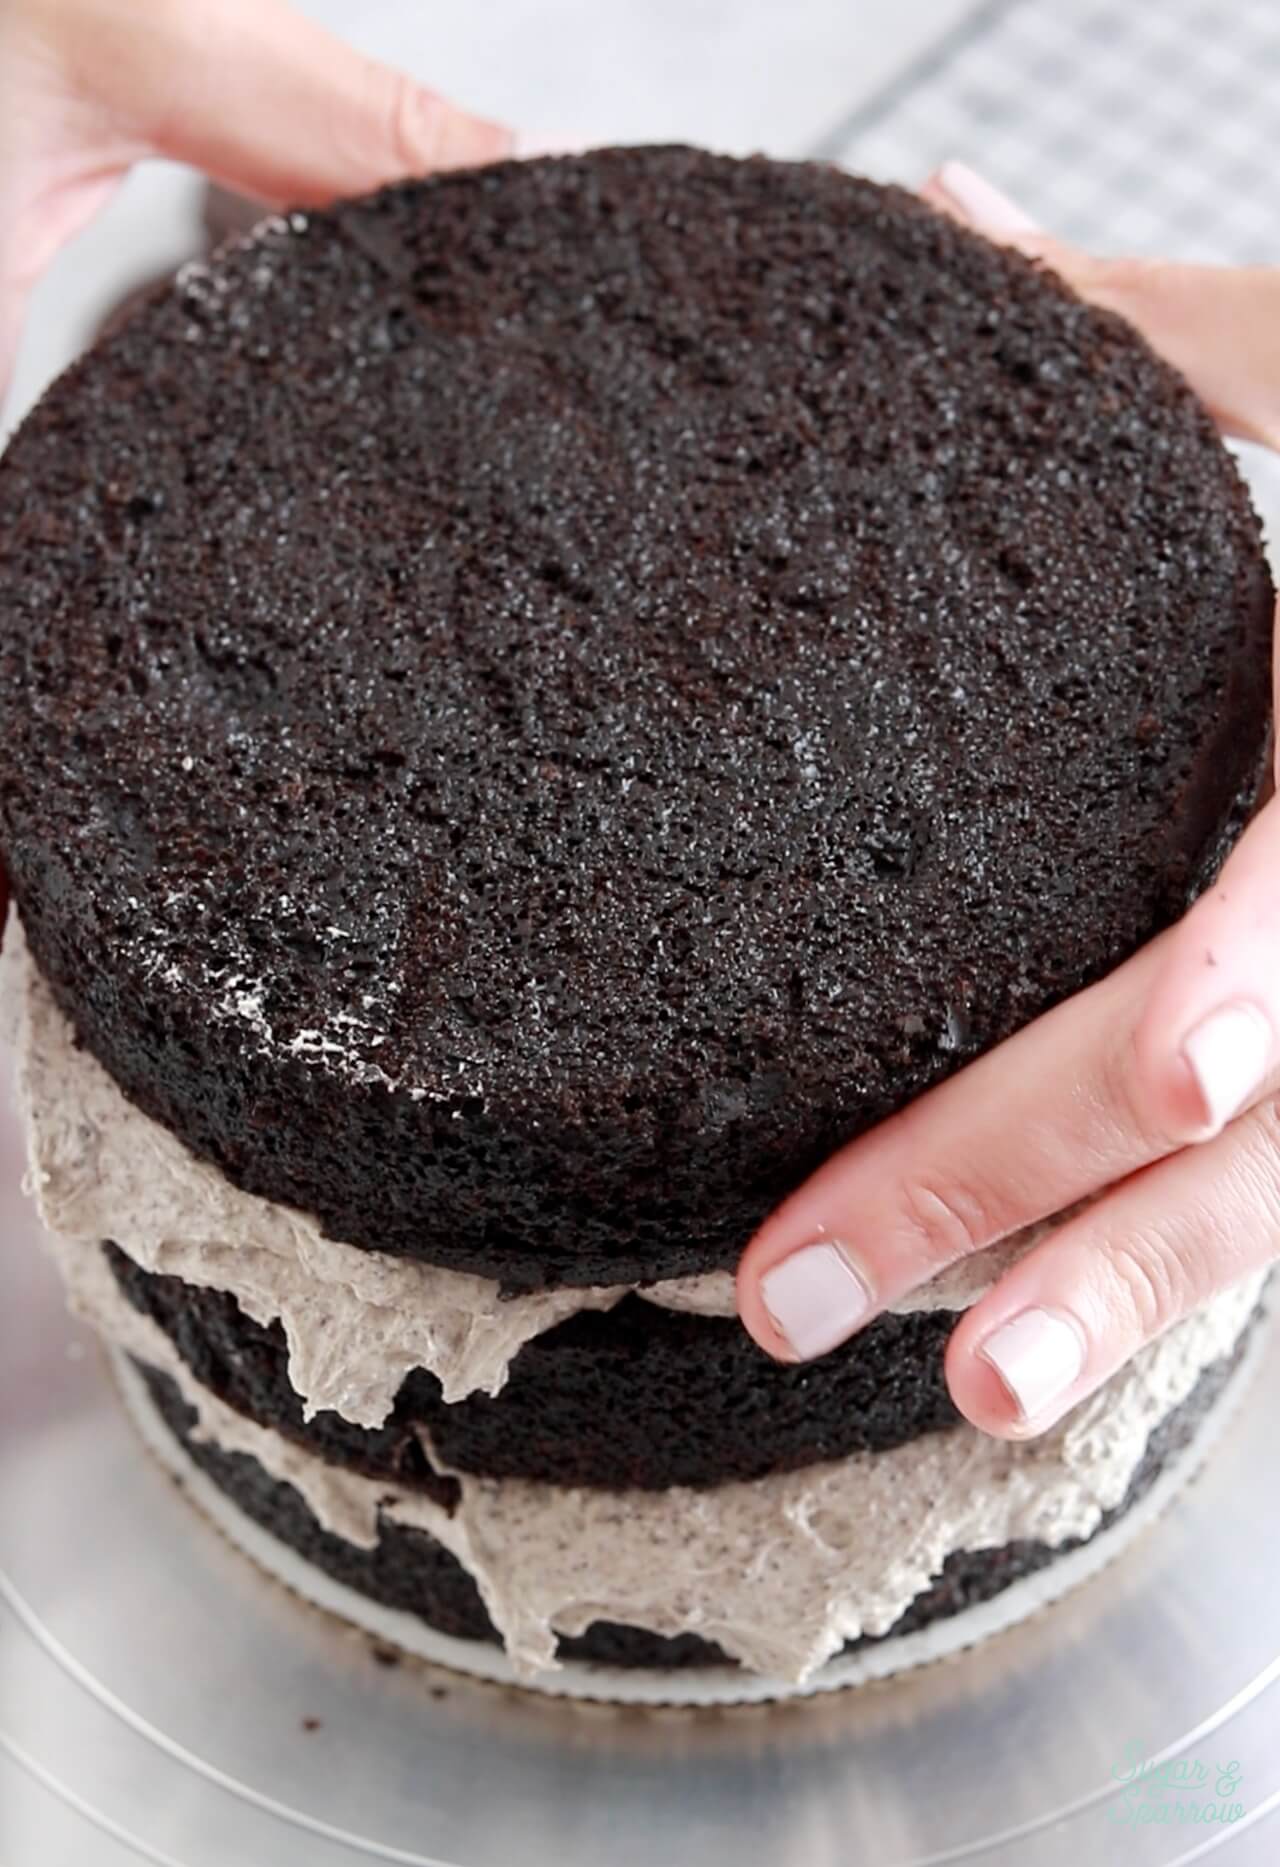
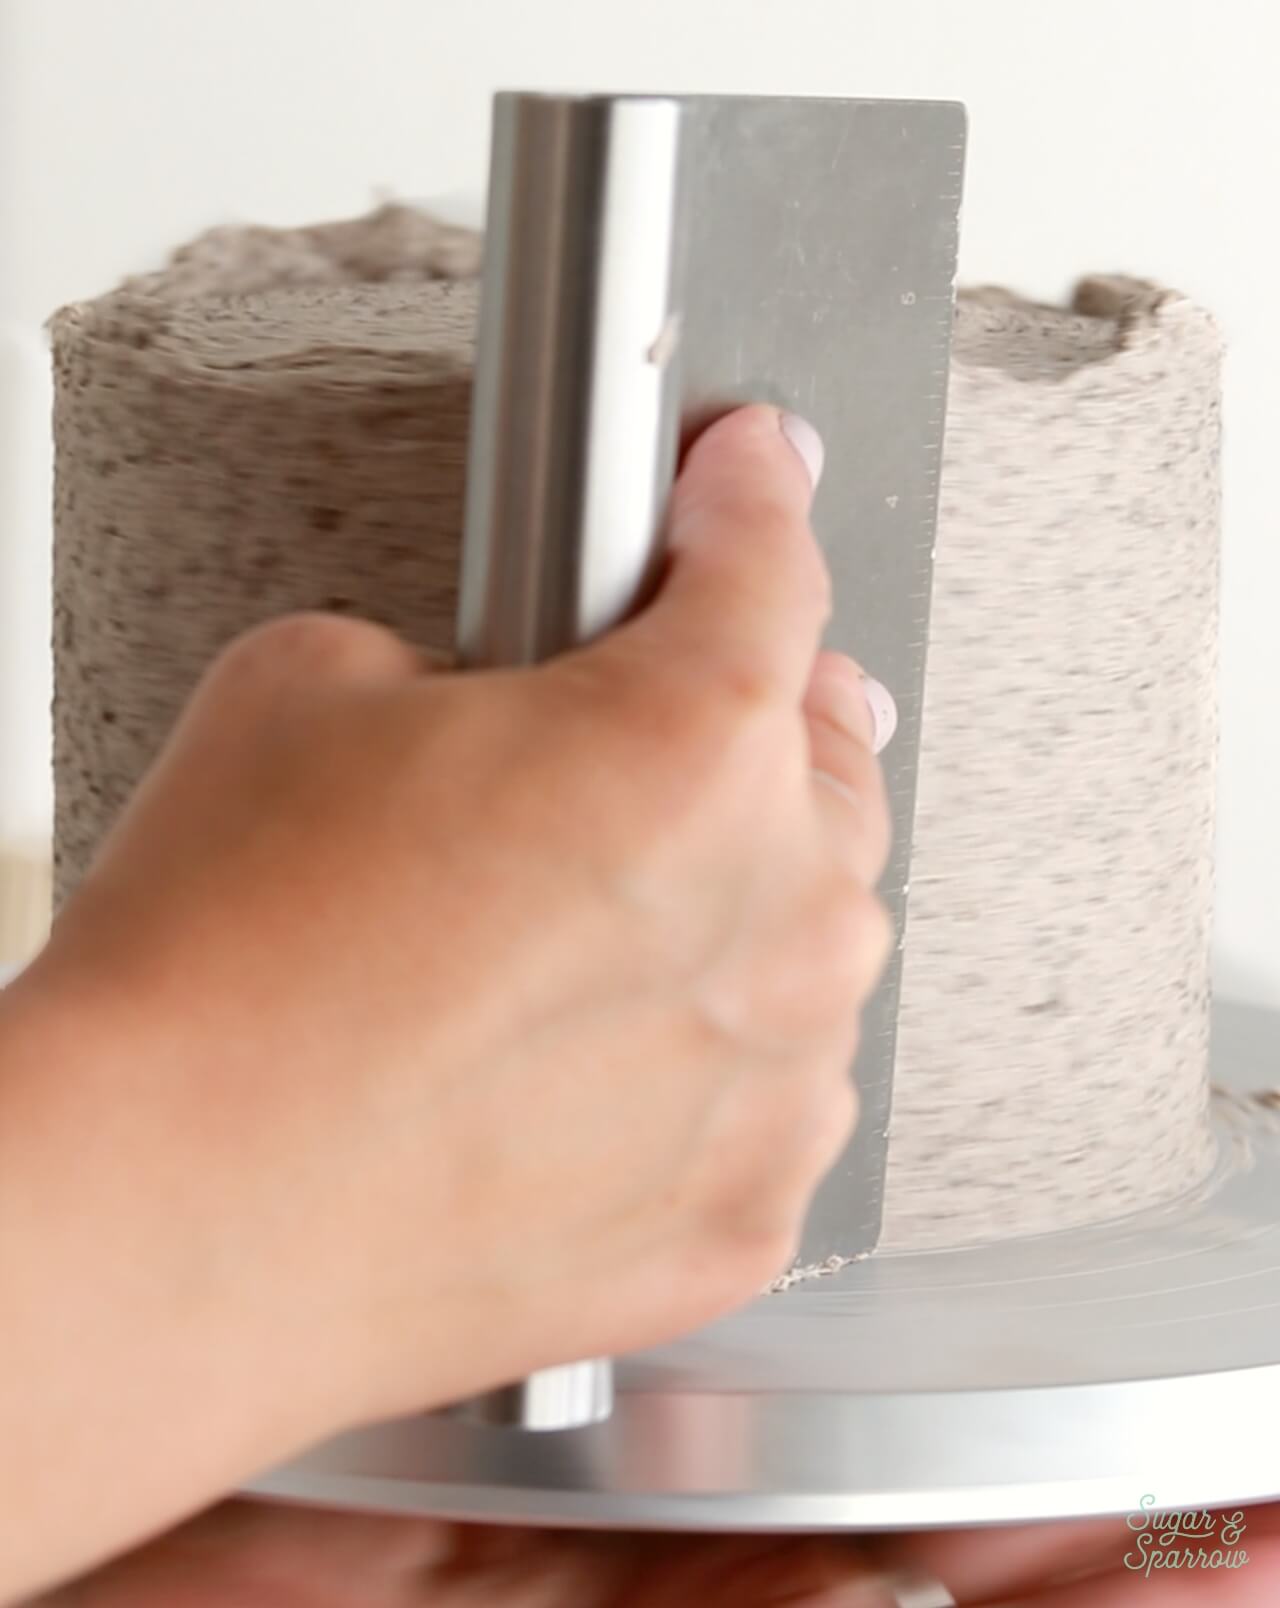
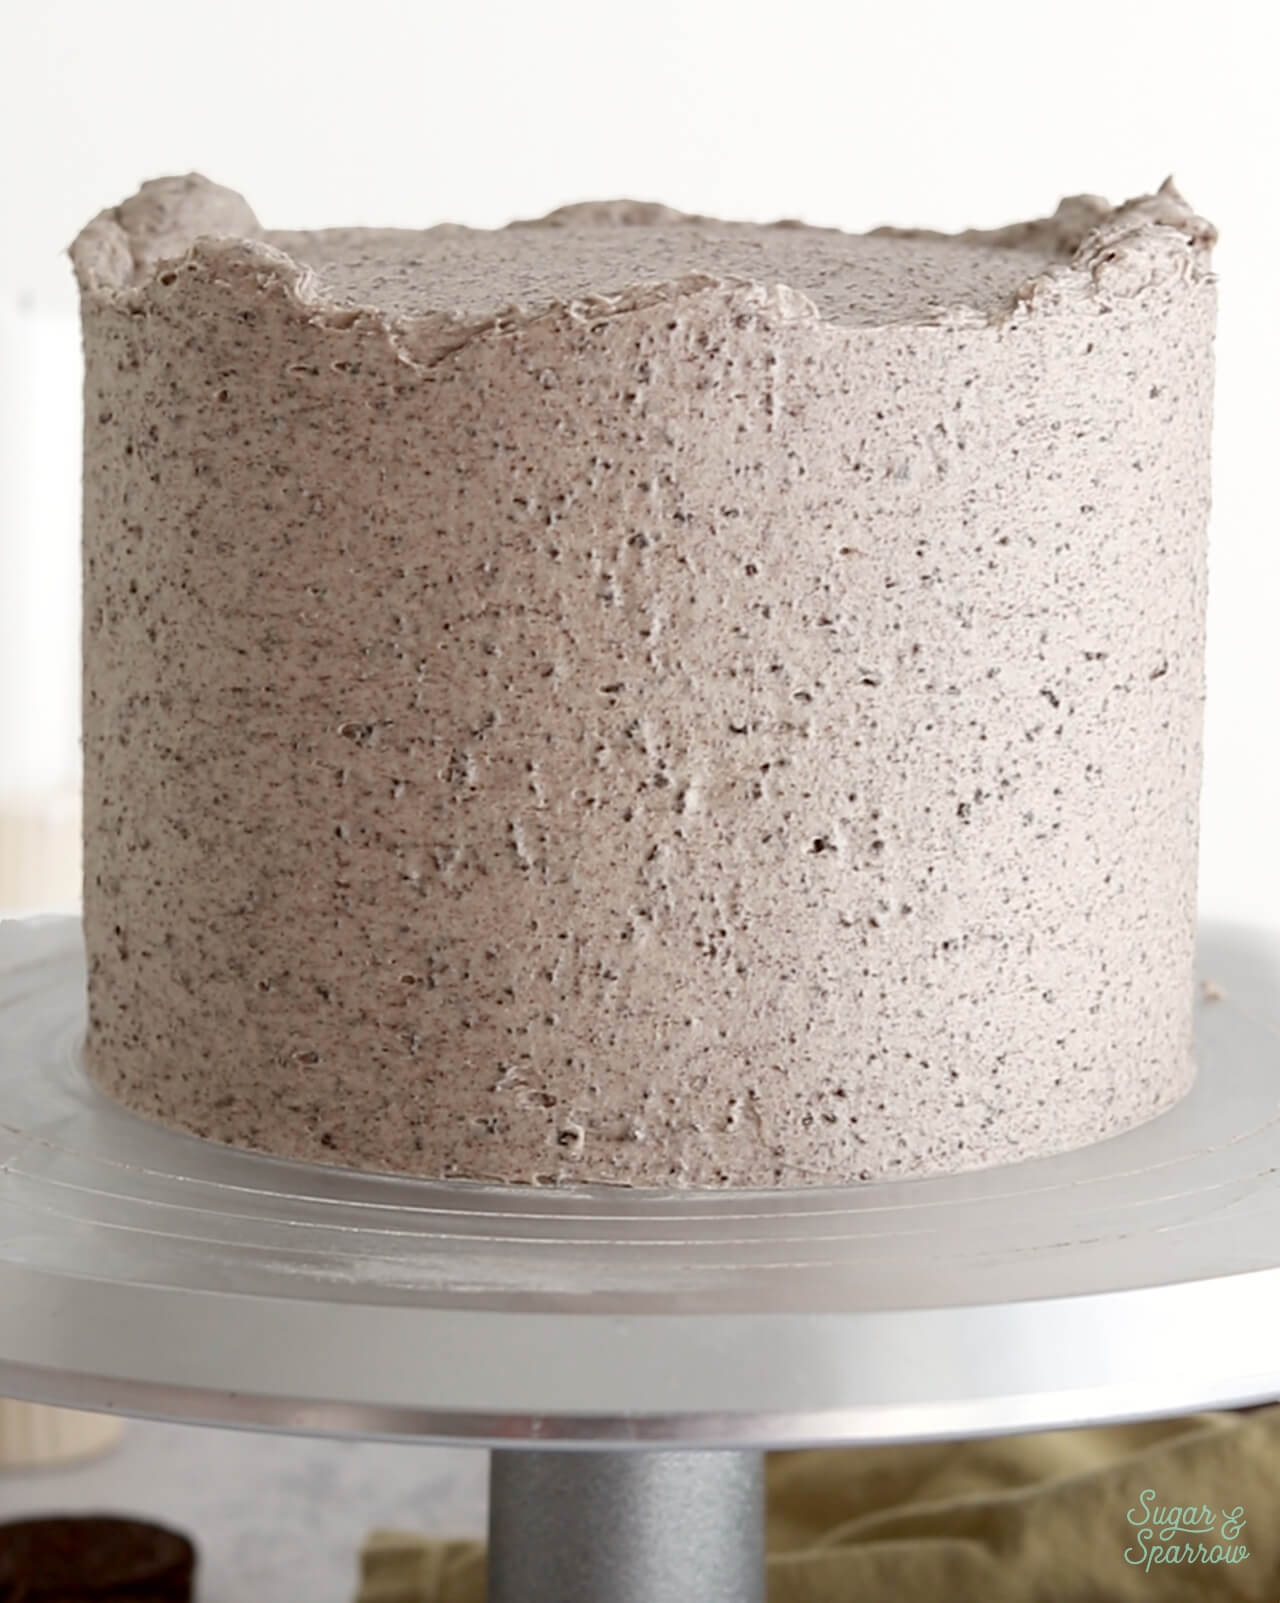
Step 1: Fill and Stack the Cake. Use the cookies and cream buttercream to fill and stack the black velvet cake layers, then crumb coat the cake. Chill the crumb coated cake in the refrigerator for about 20 minutes to lock in the perfect shape before frosting.
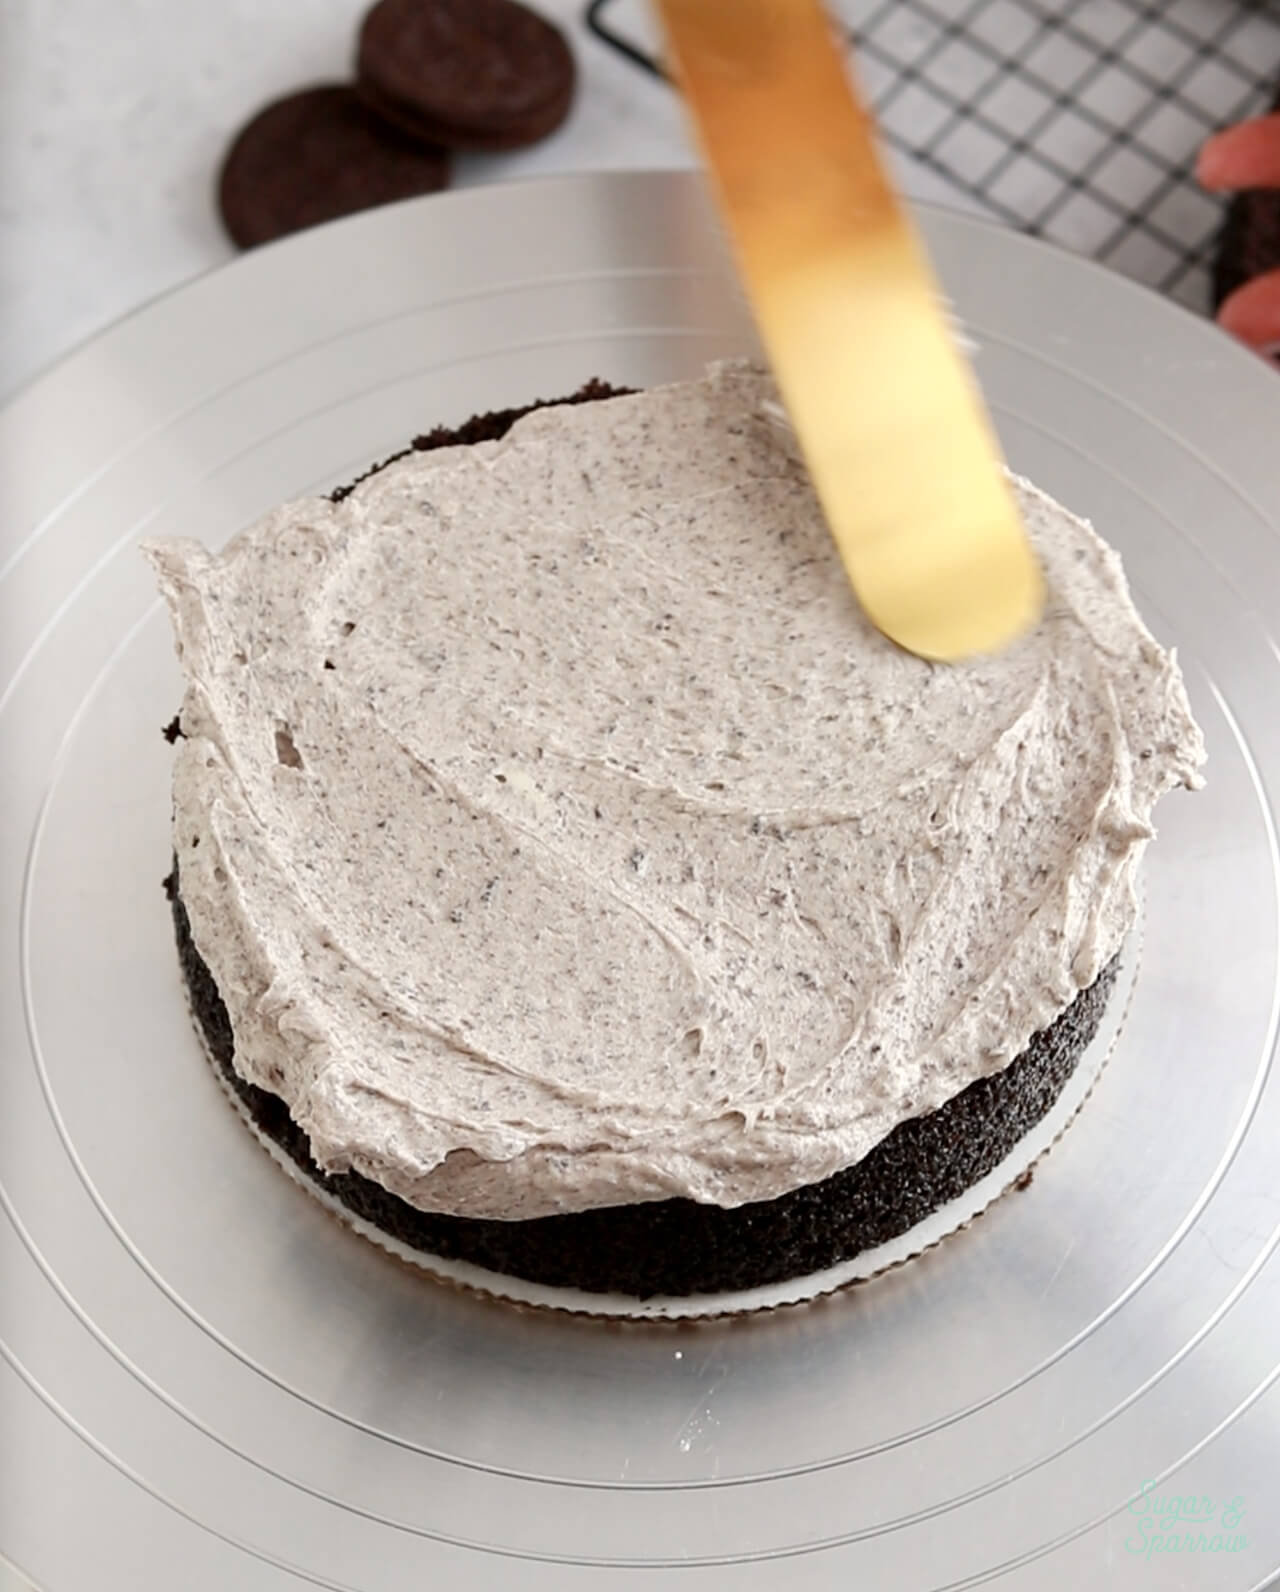
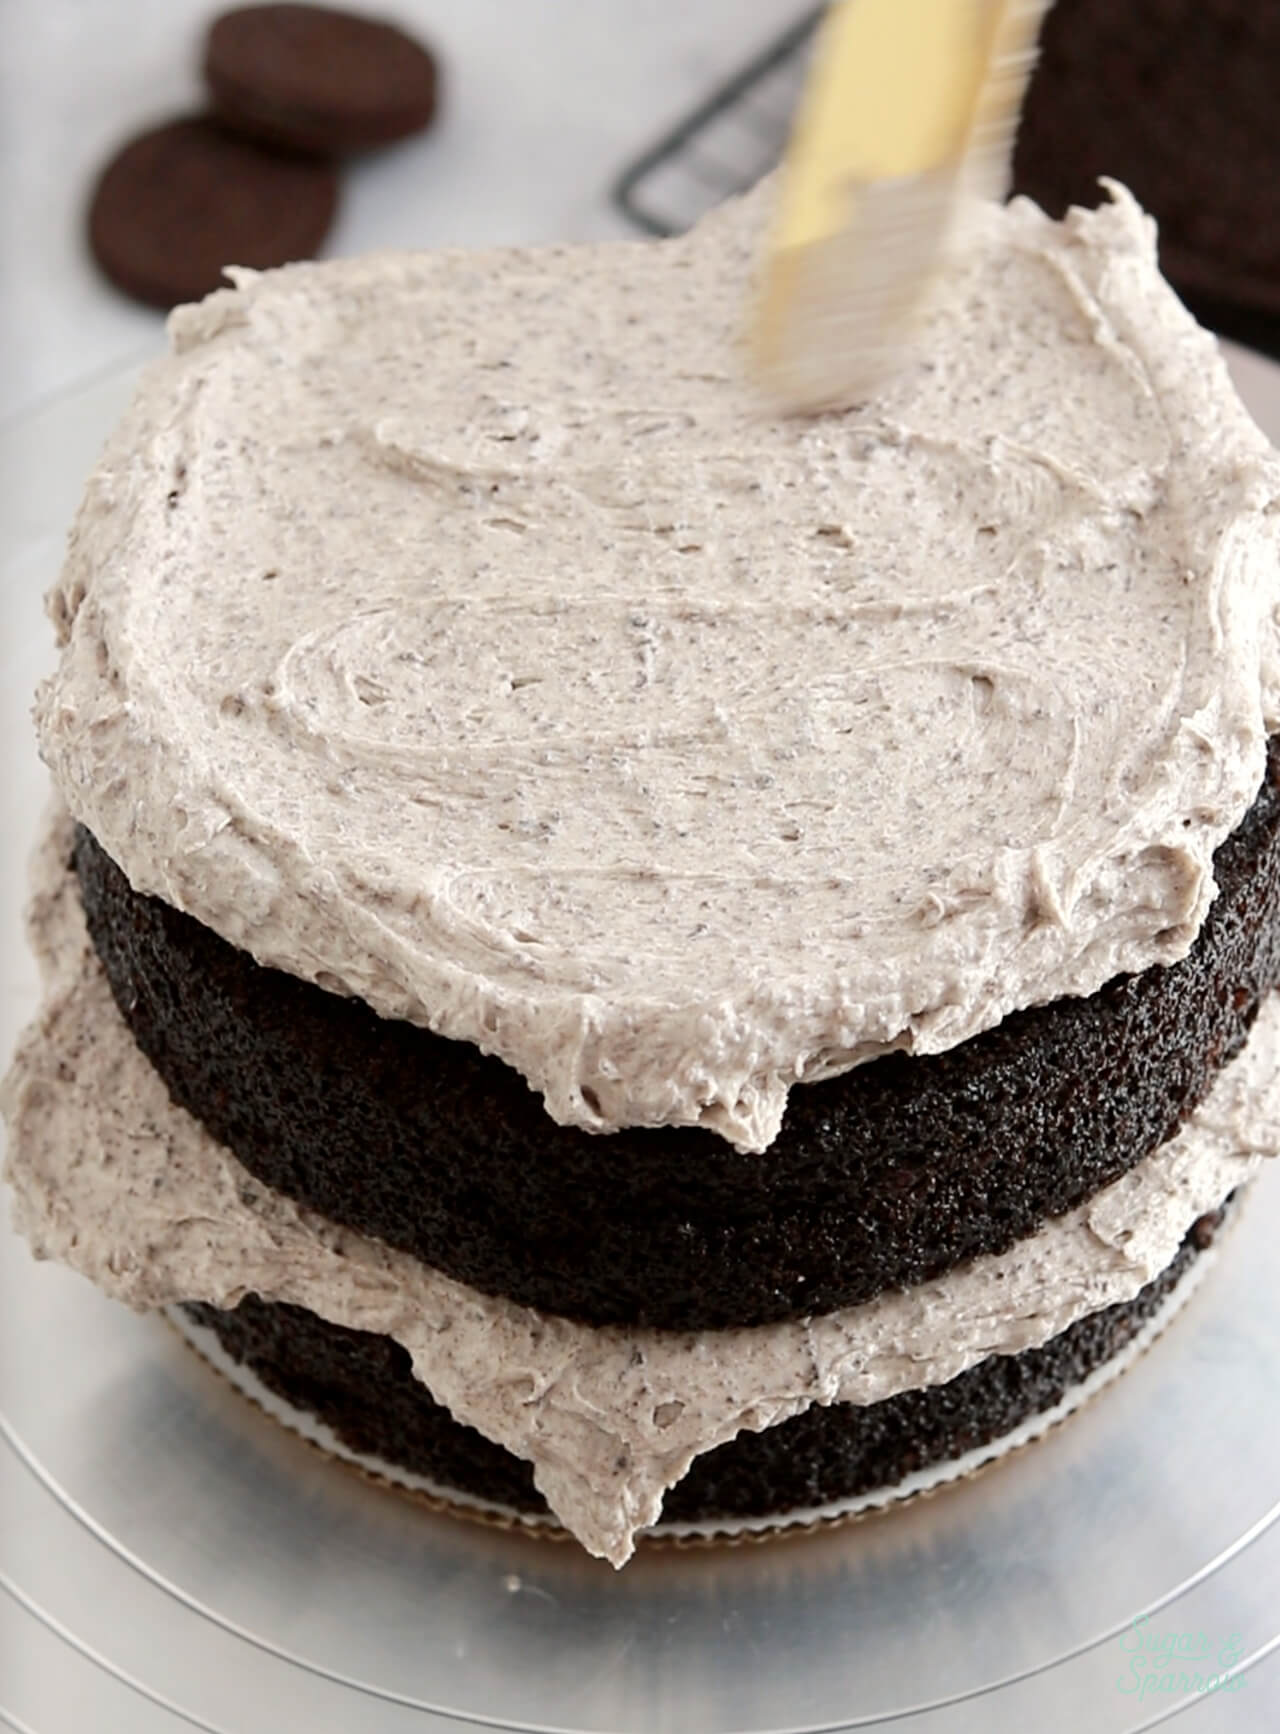
Step 2: Frost the Cake. Use an icing smoother to frost a smooth buttercream finish with cookies and cream buttercream. The cookie crumbs somehow make it really easy to frost smooth!
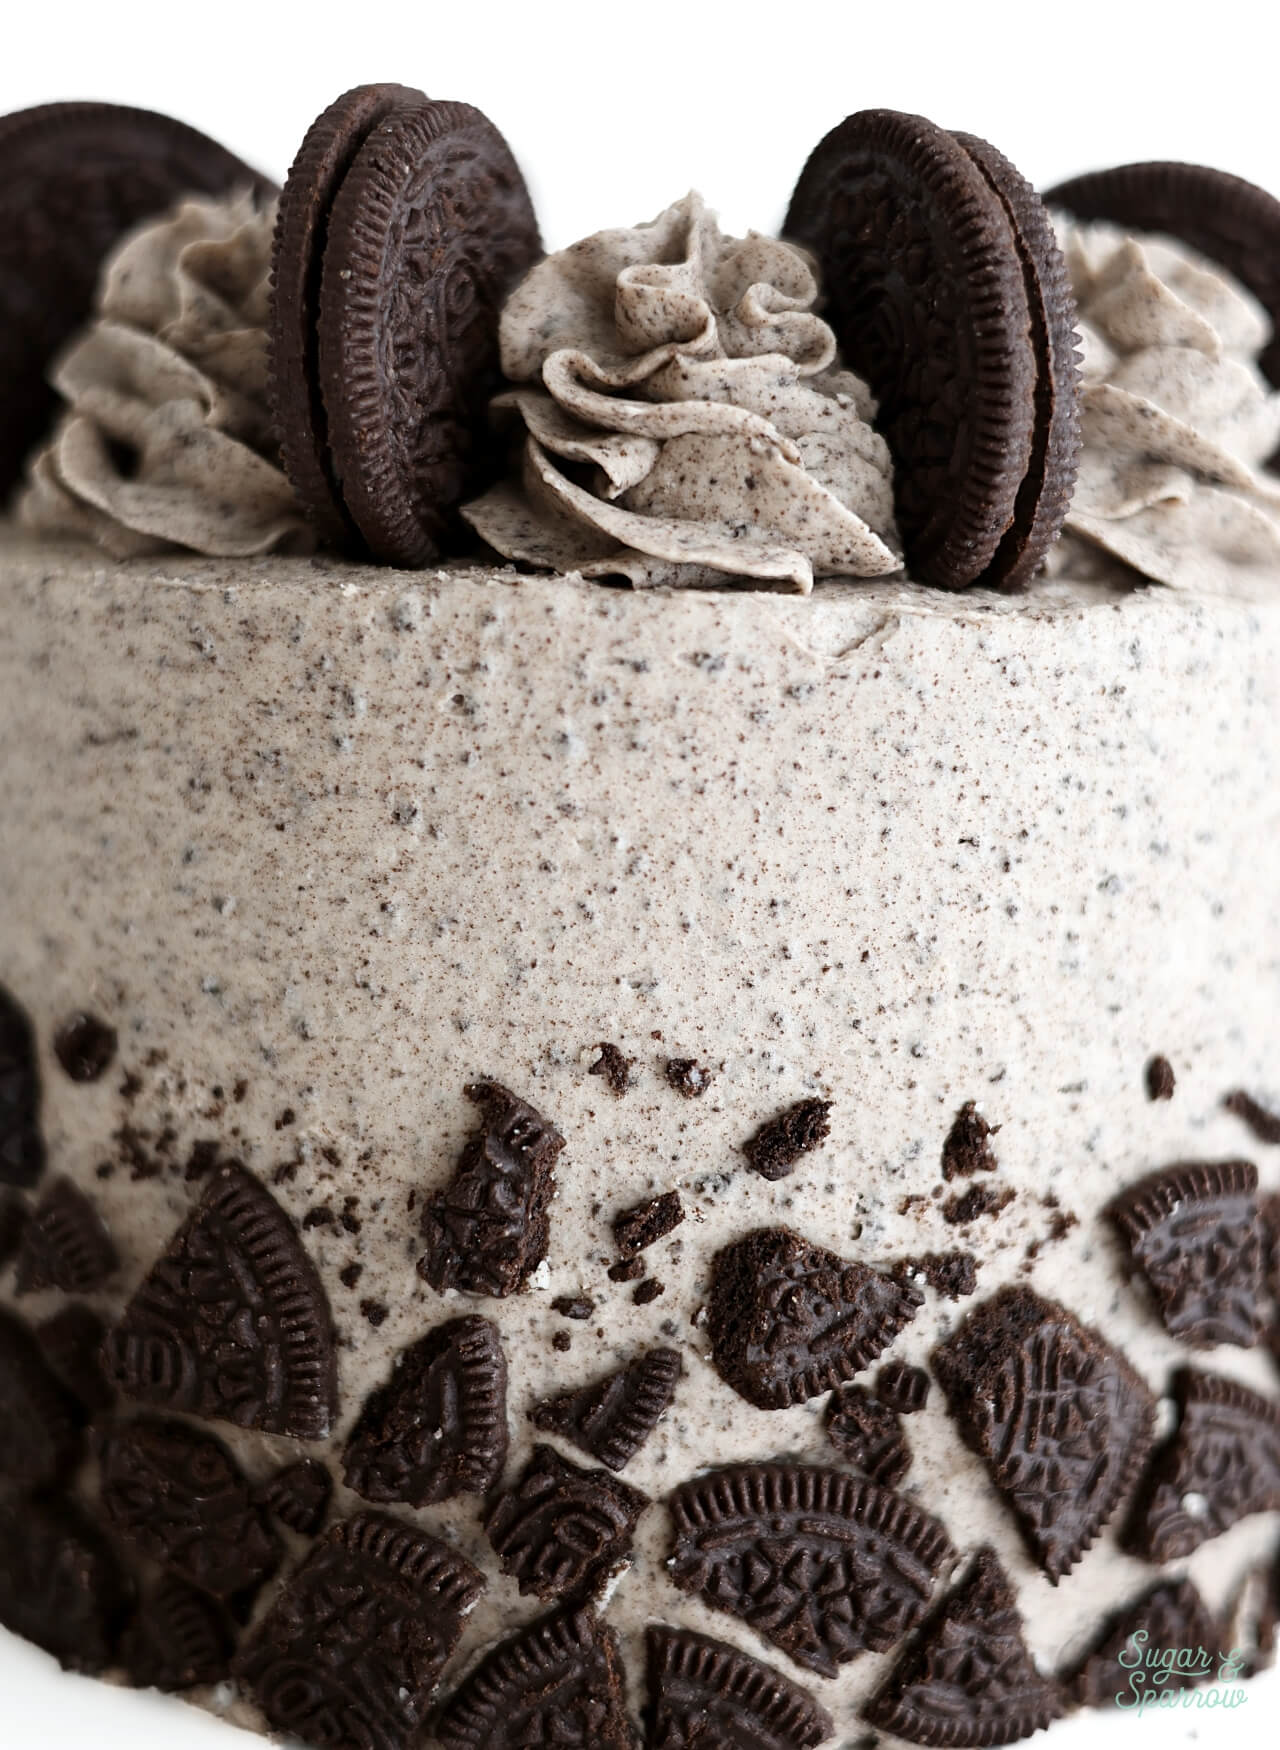
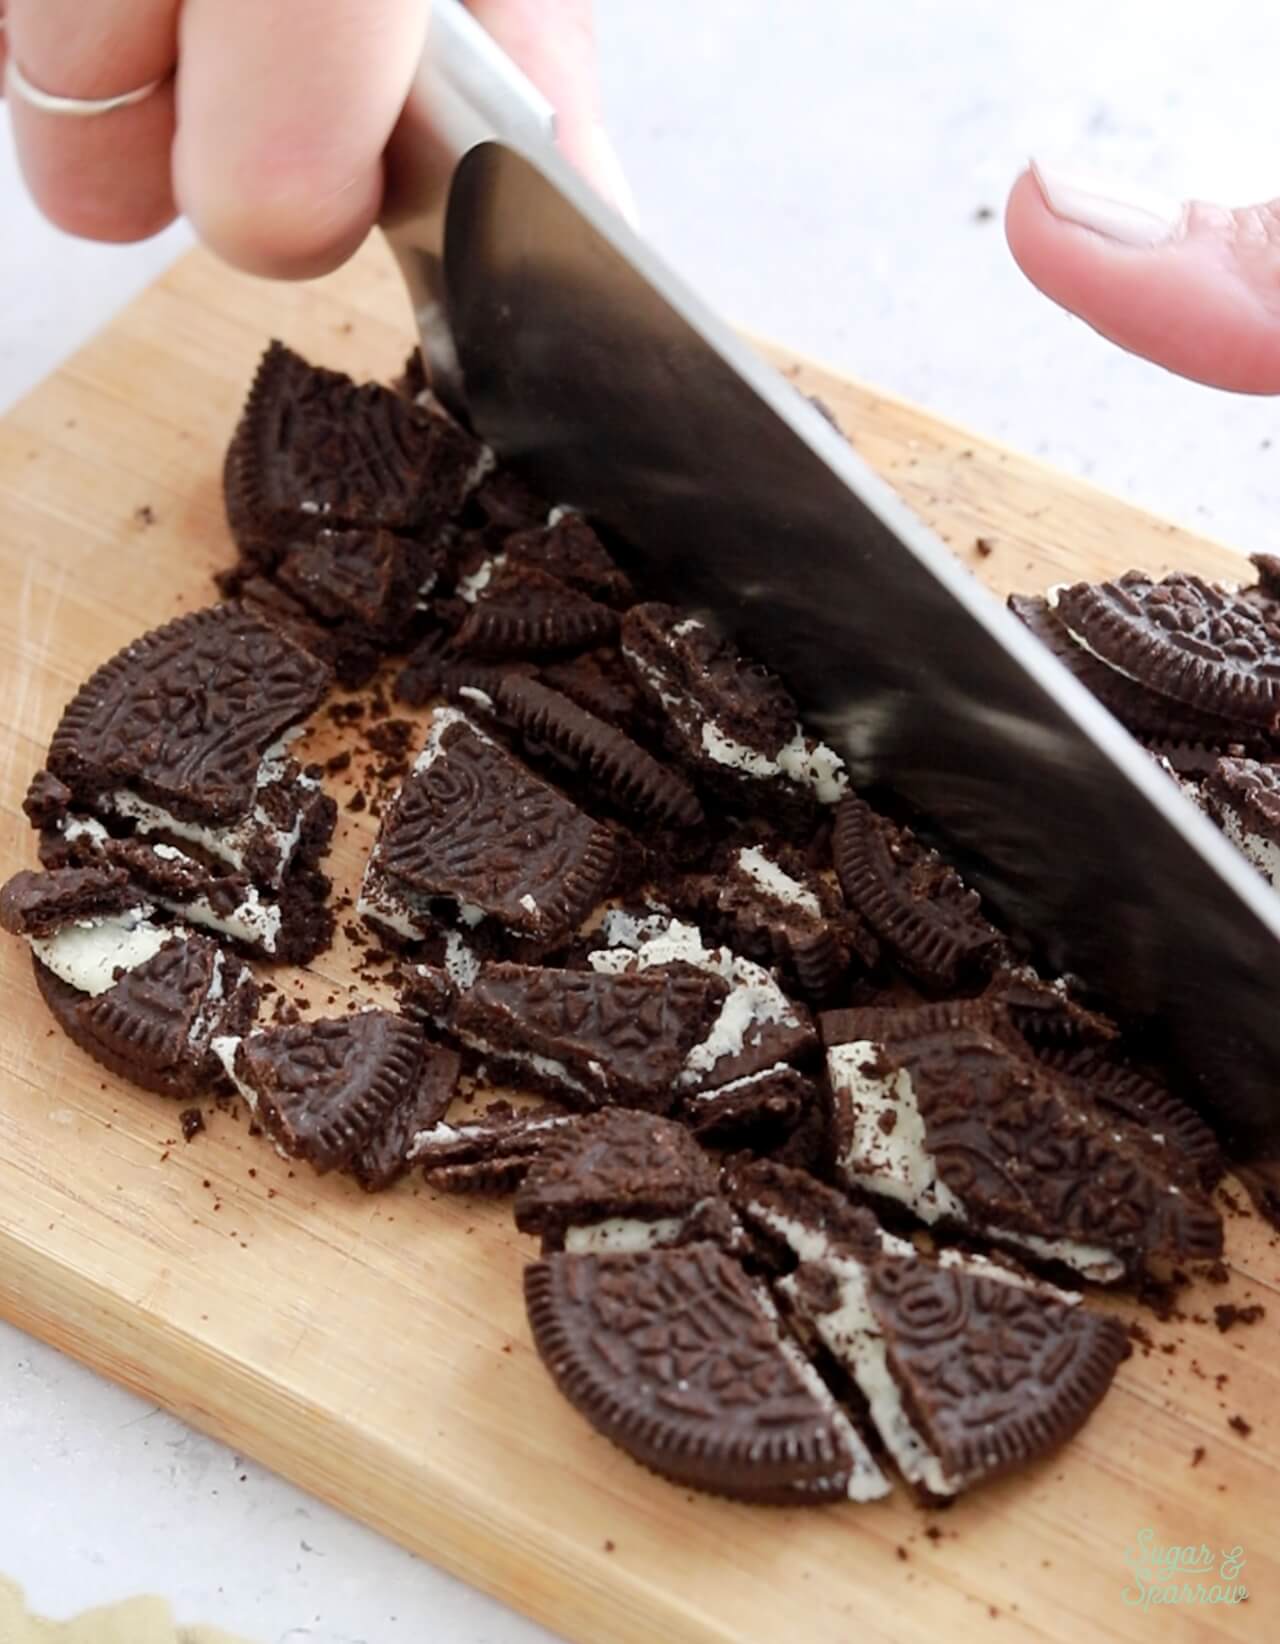
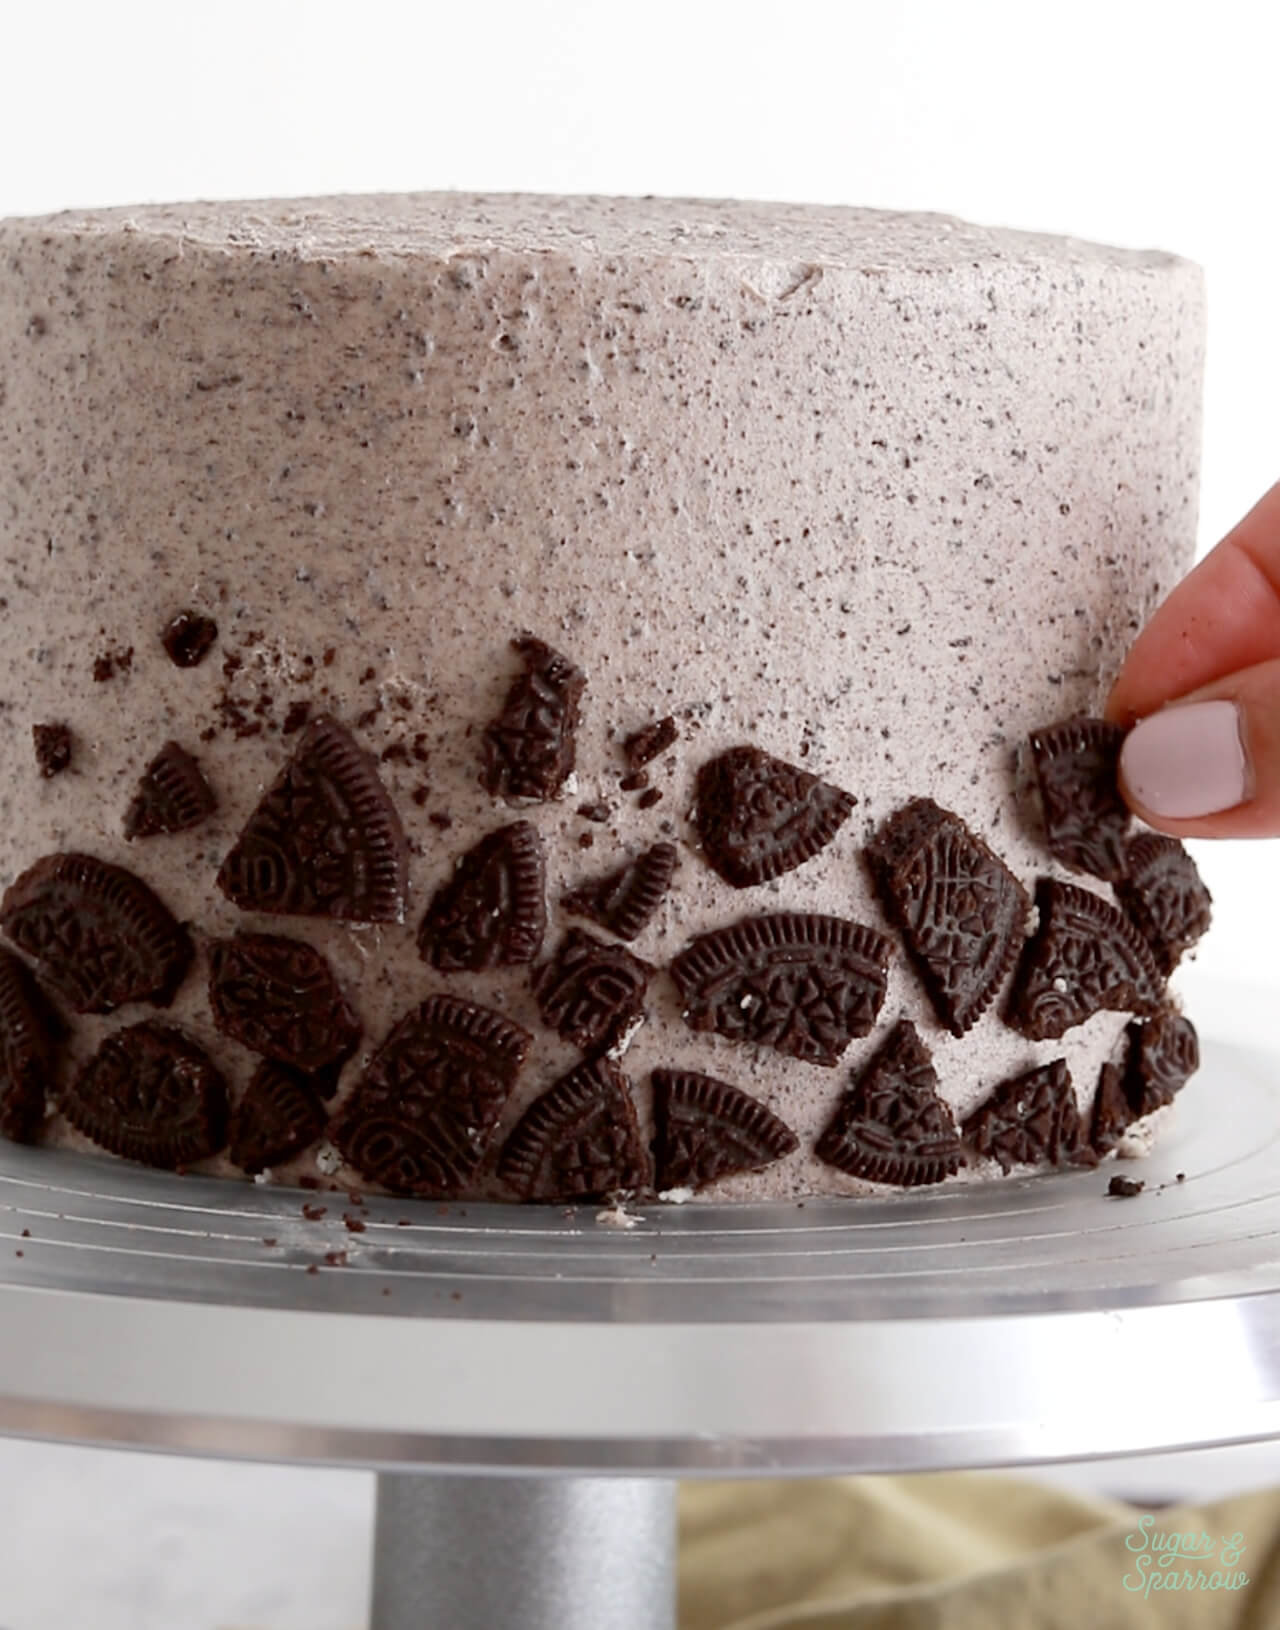
Step 3: Create the Oreo Cookie Mosaic. Chop up some Oreo cookies into randomly sized pieces and place them along the bottom third of the cake in a mosaic pattern. I spaced mine about ⅛ to ¼ inch apart. I also placed some of the smaller pieces and crumbs toward the top of the mosaic.
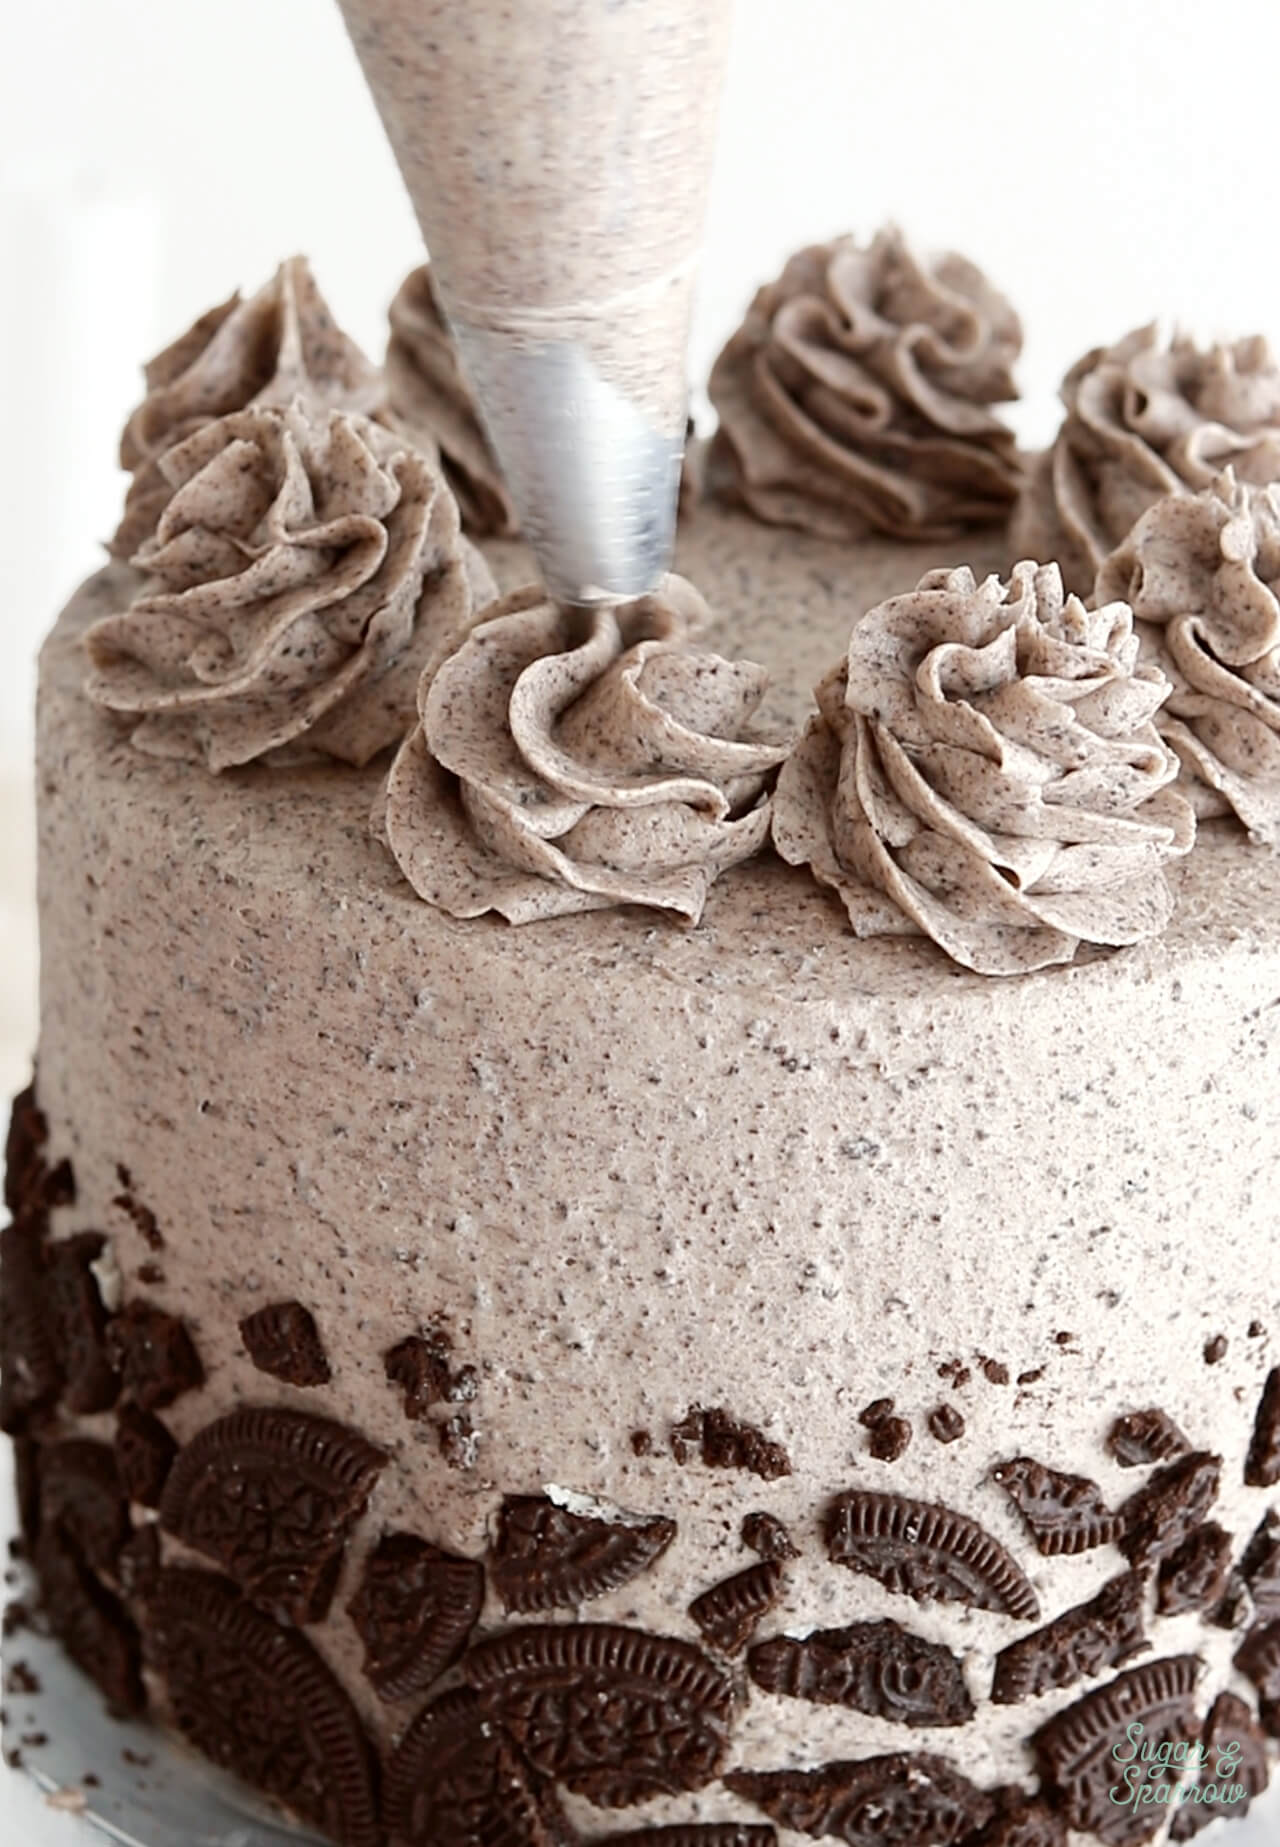
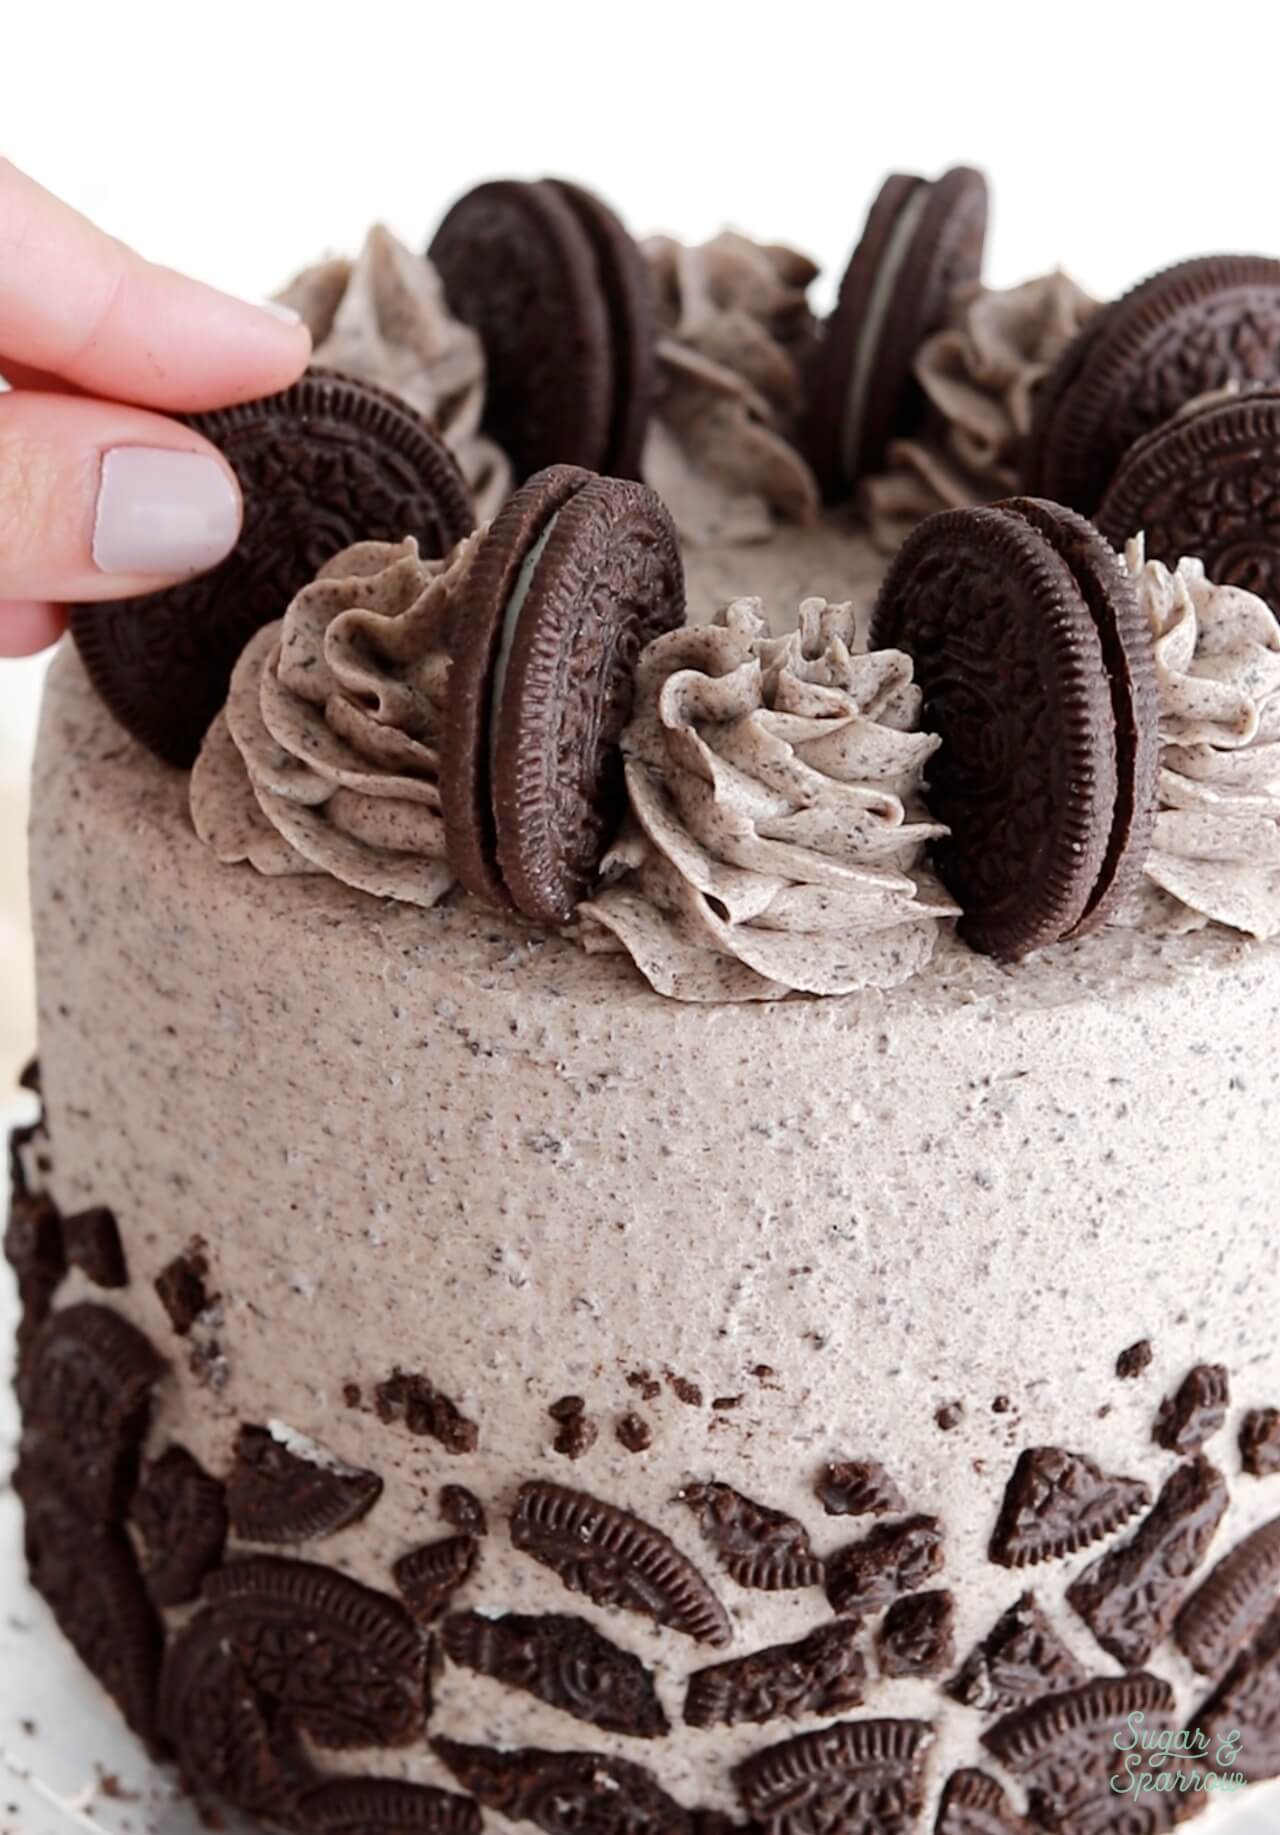
Step 4: Pipe Swirls and Top with Oreo Cookies. Fit a piping bag with Wilton Tip 1M (or other piping tip of your choice) and fill it with the remaining cookies and cream buttercream. Pipe swirls on top of the cake spaced about ¼ inch apart, then place a whole Oreo cookie between each swirl.
More Oreo Recipes You’ll Love
If you love Oreos as much as I do, you’ll want to add these recipes to your baking list:
- Oreo Cupcakes
- Easy Oreo Icebox Cake
- No-Bake Oreo Cheesecake
- 4-Ingredient Oreo Truffles
- Vegan Chocolate Oreo Cake
- Mint Chocolate Chip Ice Cream Cake (with Mint Oreos!)
Let me know if you make this chocolate Oreo cake in the comments below! And feel free to tag @sugarandsparrowco on Instagram to show me a photo. I love to see what you create with my recipes!
Oreo Layer Cake Recipe
Ingredients
Black Velvet Cake
- 2 Cups (265g) all purpose flour
- 1 2/3 Cups (340g) white granulated sugar
- 2/3 Cup (60g) black cocoa powder* or Dutch-processed cocoa powder
- 2 tsp baking soda
- 1 tsp baking powder
- 1/2 tsp salt
- 1/2 Cup (120ml) vegetable oil
- 2 large eggs, room temperature
- 1 1/2 tsp pure vanilla extract
- 1 Cup (240ml) full-fat buttermilk*, room temperature DIY recipe in the notes
- 1 Cup (240ml) hot coffee or hot water
Cookies & Cream Buttercream
- 13 Oreo cookies (139g)
- 1 1/2 Cups (339g) unsalted butter, room temperature
- 4 1/2 Cups (540g) powdered sugar
- 3 tsp vanilla extract
- 3 Tbsp whole milk, room temperature
- pinch of salt, or to taste
Garnish (Optional)
- 12 Oreo cookies
Instructions
Make The Black Velvet Cake
- Preheat the oven to 350ºF (177ºC) and prepare three 6-inch or two 8-inch cake pans by spraying the sides with cooking spray and fitting the bottoms with a wax paper or parchment cake circle.
- Place all of the dry ingredients into the bowl of a stand mixer and stir on low for 30 seconds to fully combine them. Add the vegetable oil, eggs, vanilla, and buttermilk and mix on low until just combined. With the mixer still on low, add the hot coffee (or hot water) in a slow stream, then turn the mixer to medium and beat until smooth, about 2 minutes. The batter will be very thin.
- Pour into prepared cake pans no more than 2/3 full and bake for 32-36 minutes, until a wooden toothpick inserted comes out clean. Cool completely.
Make The Cookies & Cream Buttercream
- Place the Oreo cookies into a food processor and grind them into fine crumbs. It's important to get the crumbs as small as possible without over-grinding (which can turn them into an Oreo paste).
- In the bowl of a stand mixer fitted with the paddle attachment (or with a large bowl and hand mixer), cream the butter on medium-high speed until it's creamy and pale in color, about 5 minutes. Scrape down the bowl and paddle as needed.
- Add the powdered sugar a few cups at a time, mixing on low speed and scraping down bowl and paddle in between intervals. Keep the mixer on low speed and add the vanilla, milk, and salt. Mix until fully incorporated and uniform, 1-2 minutes, scraping down the bowl and paddle as needed.
- Mix in the Oreo cookie crumbs on low speed until uniform and well-dispersed.
Assembly
- Once the black velvet cake layers are completely cooled, level them to your desired height. Add a swipe of cookies and cream buttercream onto a cardboard cake circle and place the first cake layer on top. Fill and stack the cake with cookies and cream buttercream, then crumb coat the cake. Refrigerate the cake for 15-20 minutes to let the crumb coat firm up before frosting the cake with the rest of the cookies and cream buttercream.
- To create the look pictures, frost a smooth buttercream finish onto the cake. Reserve 8 Oreo cookies for the top of the cake, then chop the rest into pieces of various size and shape. Press the chopped cookies onto the bottom third of the cake in a mosaic pattern. Place the remaining cookies & cream buttercream into a piping bag fitted with Wilton Tip 1M and pipe swirls around the top of the cake, spaced about 1/4 inch apart. Place an Oreo cookie in between each swirl.
Notes
- The black velvet cake layers can be made ahead and stored at room temperature, covered tightly in plastic wrap, for up to two days. Alternatively, you can cover with plastic wrap and store in the freezer for up to two months before thawing to room temperature.
- The cookies & cream buttercream can be made ahead and stored at room temperature in an airtight container for up to one day. Alternatively, you can store it in an airtight container in the refrigerator for up to two weeks. When you’re ready to use it, bring it back to room temperature and re-whip with your stand mixer to bring it back to frosting consistency.


Delicious cake, it was the moistest, darkest chocolate cake I have made. I used your ganache recipe as I ran out of icing for the top of the cake. I used the black cocoa I ordered from Amazon and followed your recipe. The icing is not as white as yours in the photo, did you use clear vanilla?
Hi Sharon! I’m so happy you loved this recipe. I use pure vanilla extract in the frosting (not clear). To make the frosting extra white I whip the butter for a long time at the beginning of the recipe, until it’s almost white in color. This works best with butter that’s already naturally light in color – some butters (like grass-fed) are naturally more yellow in color and won’t lighten as much when whipped. Another thing you can do is add a little bit of icing whitener before mixing in the oreo crumbs. I love this one: https://amzn.to/4puRkSA hope that helps for next time!
hey whitney, I’m trying to bake this cake right now but something feels not right about the recipe, it says that 2 cups of flour is needed and written 265g in the brackets and 1 2/3 cups of sugar and 340g in brackets which doesn’t make sense at all 2 cups is more than 1 2/3 cups and 265g is less than 340g i know you probably won’t reply in time but i’d still like to know and thank you
Hi Alice! Different ingredients weigh different amounts by volume. For example, 1 Cup of granulated sugar (200 grams) is going to weigh more than 1 Cup of all purpose flour (132 grams). Sugar is just more dense and heavy in comparison. I always bake by weight using the gram measurements in the brackets, so these metric measurements are accurate and trustworthy. I hope this helps explain!
Such a good, easy to follow recipe! I added a chocolate ganache and it looks so beautiful!!
Yay, Sharon! I’m so happy you loved this recipe. A ganache drip sounds perfect!!
Hello! I’d like to make this cake this weekend for my daughter’s 13th (!!) birthday, but I was hoping to use three 9″ pans. Could I please ask what adjustment I’d need to make to the recipe? Would a 1.5x do it, or would I need to double it? Thank you!!!
Hi Chelsea! 1.5x the recipe will be the perfect amount. Use the same oven temp and start checking for doneness around the 30 minute mark. Enjoy!
Hi! Wondering if you have this recipe for a mini cake version? Like your funfetti one 🙂
Hi Suzette! I don’t have an official mini cake version BUT you could easily halve the Oreo frosting recipe from this recipe and pair it with my small batch black velvet cake: https://sugarandsparrow.com/mini-black-velvet-cake-recipe/
Hi Whitney! Thanks for this recipe. I plan on making it this weekend! Any advice on storage of this cake or how long it can be kept on the counter? Should it be room temperature prior to serving or straight from the fridge? Thanks!
Hi Holly! Excited for you to make this cake. Once decorated, I usually store this cake in the refrigerator until about 2 hours before serving. It tastes best at room temperature. It can technically be kept on the counter (covered) for a few days since the sugar content helps preserve what little dairy is in the buttercream. Hope that helps!
Thanks Whitney for your fast response! Is this recipe for the frosting enough to just crumb coat or also for decorations? Will decorate tomorrow!
Sorry Whitney, I see the answer below!
It was a success Whitney! My family absolutely loved it! Thank you so much!! The cake was so moist and fluffy at the same time. Will definitely be saving this recipe. Thank you again!
Yay, Holly! I’m so happy to hear that!! Thanks for letting me know 🙂
Hi. I’m going to make this cake tomorrow and I have a couple of questions.
When you grind up the Oreo cookies for the buttercream, is it just the cookies or the cream as well? If it’s just the cookies, is it 13 halves of an Oreo cookie or both chocolate halves of 13 Oreos(26 halves/pieces)?
Does it matter if I use regular Oreos or Double Stuff Oreos?
Thanks!
Hi Suzanne! I’m excited for you to make this cake! I have made the frosting both ways – scraping the filling out before grinding the cookie pieces, and leaving the filling in and grinding the whole cookie. I didn’t notice much of a difference between the two methods, so for the sake of ease these days I usually just grind up 13 whole cookies. I haven’t tried it with Double Stuff Oreos but they should work just fine!
Hi, I have some leftover full fat sour cream. I mix 1/2 cup sour cream and 1/2 cup whole milk to sub for 1 cup buttermilk in pancakes. Do you think O can do the same for the Oreo cake recipe? Thank you so much! I went out today to get a 3rd 6×3 pan just to make this cake. 🙂
Hi JJ! Yes, you can absolutely do that substitution for the buttermilk in this recipe. Enjoy!!
This cake is wonderful! I got my black cocoa powder off Amazon since I couldn’t find it at my local market. I went with the three layer 6 inch cake. You guys! The cake is fantastic! It was so moist and delicious. Even with putting it in the fridge, it was still very soft and moist. The frosting, oh my gosh! So so good!!! The recipe if made to the last detail with the frosting you’ll have enough to do your cake, I had a little bit leftover. I made my cake the same as in the photos. This one’s a keeper for sure!!!
I’m so happy you loved this recipe, Cynthia! Thanks so much for letting me know!
Hi! Would it be possible to make this recipe eggless?
Hi Genesis! I haven’t tried an eggless version of this recipe but you could sub the cake layers for this eggless chocolate cake recipe and have a delicious chocolate oreo cake: https://sugarandsparrow.com/eggless-chocolate-cake-recipe/
Hello! I’m hoping you can help! I need to convert this to a recipe that I can use with Dutch process cocoa.
Unfortunately, there is no natural cocoa available in my area right now. I’ve looked everywhere with no luck and the prices on Amazon are through the roof ($30 for 8 oz!).
I can’t seem to wrap my brain around the science of converting it – any help you can offer would be greatly appreciated!!
I’ve relied in your recipes for a few years now (they’re all so perfectly amazing!) and your tutorials/cake basics lessons have been so helpful! Thanks for all your work and content you put out!
Hi Ryan-Michelle! This recipe actually can be made with Dutch process cocoa powder. When I originally wrote this recipe in 2019 I hadn’t tested it with Dutch process cocoa and was under the impression that it wouldn’t work, but I’ve made it tons of times with Dutch process cocoa with great success. I’ve updated the recipe to reflect that it can be made with both. Enjoy!
I made this for my sister in laws birthday and it was a BIG HIT! Even family who say they don’t like chocolate loved it. I’m wondering if I can make this into cupcakes. How much would the batter yield (I only need 12), and how long to bake at what temperature? Thanks for the great recipes!
Yay, Julie! I’m so happy this was such a hit! This recipe makes great cupcakes, but it will make quite a lot of them (about 28). You can half the recipe to make about 14 cupcakes. Fill the tins no more than 2/3 full and bake at 350F for 14-18 minutes. Enjoy!
Hi, hoping to make this cake for an order I have the weekend! The temp of your oven so that for fan assisted? X
Hi Jasmine! The temperature specified in this recipe is for a conventional oven, you’ll need to lower it for a fan assisted oven. Here’s some more info I found about how to convert the temperature: https://www.marthastewart.com/8071049/convection-oven-recipe-conversion
I’m planning on making this cake this weekend for my birthday. How long should I bake 2 8in pans?
Hi Andrea! 8-inch pans are ready in about 30-35 minutes. Enjoy and happy birthday!