• Cake
  • Frosting
  • YouTube
  • My Favorite Tools
  • Nav Social Icons

  • Skip to primary navigation
  • Skip to main content
  • Skip to primary sidebar
  • Skip to footer
  • Recipes
    • Cake
    • Cupcakes
    • Frosting
    • Ice Cream
    • Vegan
  • Cake Basics
  • Tutorials
  • Blog
  • About
  • Mobile Menu Widgets

    Connect

    Search

Sugar & Sparrow logo in script font

Sugar & Sparrow

Lifestyle and Cake from Portland Oregon

  • Cake Basics
  • Recipes
    • Cake
    • Cupcakes
    • Cookies & Bars
    • Filling
    • Frosting
    • Ice Cream
    • No-Bake
    • Small Batch
    • Vegan
  • Tutorials
  • Book
  • Blog
  • About

Painted Buttercream Cake Tutorial

January 6, 2020 · In: Featured, Seasonal, Spring, Tutorials, Valentines

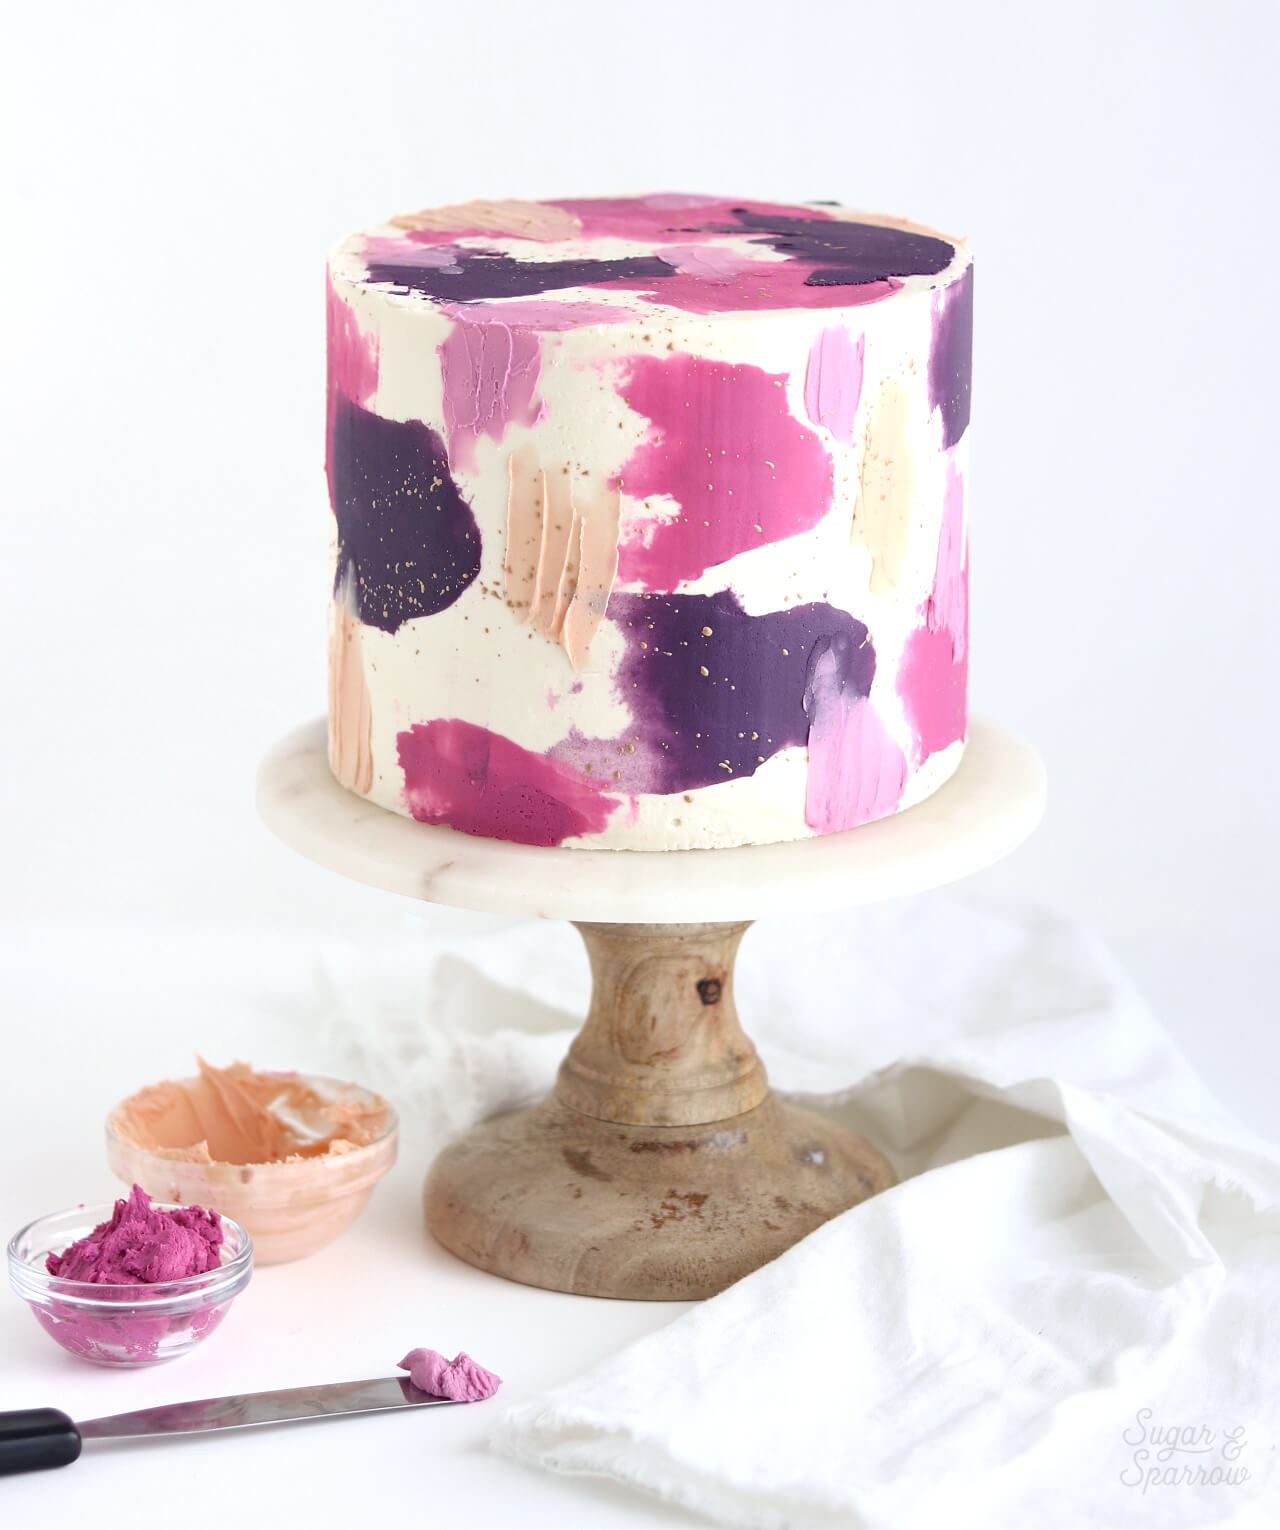
Let me tell you about the most freeing cake project I’ve ever created: I had a smooth, frosted cake on the turntable as my blank canvas, a pretty buttercream color palette set before me, and absolutely no vision of what the cake would look like in the end. The only thing I was sure of was that I was going to play with some bold buttercream colors. With a great album on in the background to keep me company, I started by adding a big color swatch onto the cake, then a few more, then spatula painted the buttercream wherever I felt like, and ended it all with a good splatter painting sesh. It was the first time I truly let myself go in a cake decorating session with no real expectations or rules, and that’s exactly why I want to share the process with you!

spatula painted cake by sugar and sparrow

I first created a cake with this approach for New Years Eve and the process was so freeing that I knew I had to try it again. It’s basically edible art therapy! After posting it on Instagram I got so many requests for a video that I decided to film this one, and I hope it’s as therapeutic to watch as it was to create. If you’re more of a visual learner, this video shows the techniques in action for you to reference as you create one yourself:

The only real decision that’s important to make before you start decorating is choosing your color palette. Each time I’ve used this technique to decorate a cake, I’ve chosen four different colors to make it come to life. I usually start by mixing up one bold mid-toned color, make a darker color to contrast it, then pair those with two lighter pastel colors to use for the spatula painted portions.

buttercream painted cake tutorial

It will work with any color palette, so just choose four colors that you’re crazy about and run with it!

You Will Need:

  • A frosted cake that’s been chilled
  • ½ batch of vanilla buttercream (or other light colored buttercream)
  • Food color gels of your choice
  • Bowls and spoons for color mixing
  • A cake smoother or bench scraper
  • A small icing spatula
  • Edible Art Paint in Glamorous Gold (optional)
  • Food-grade paintbrush (optional)

Step 1: Mix Up A Color Palette

Divide the buttercream into four different bowls, reserving a bit of white buttercream just in case you need to lighten a color. Then, use your food color gels to create the color palette of your choice.

mixing buttercream colors

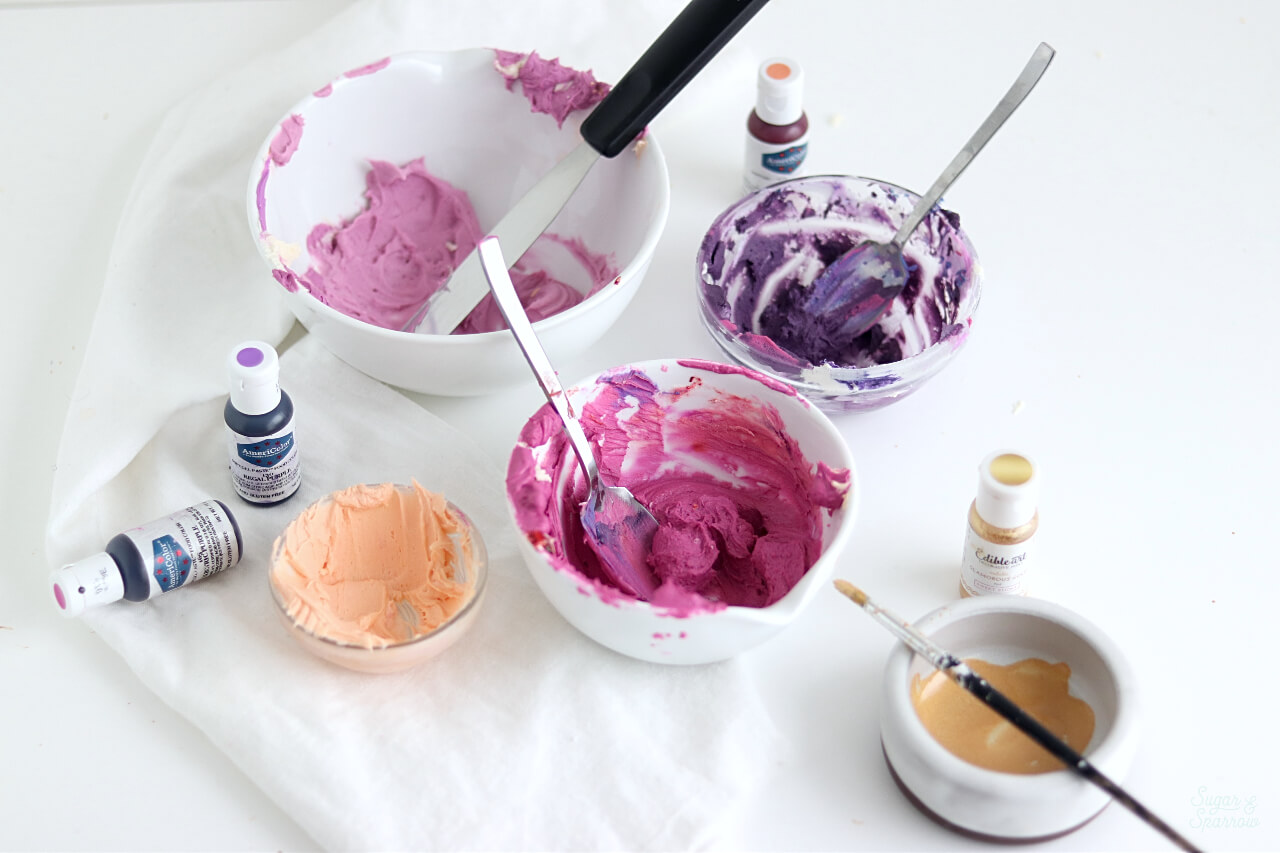
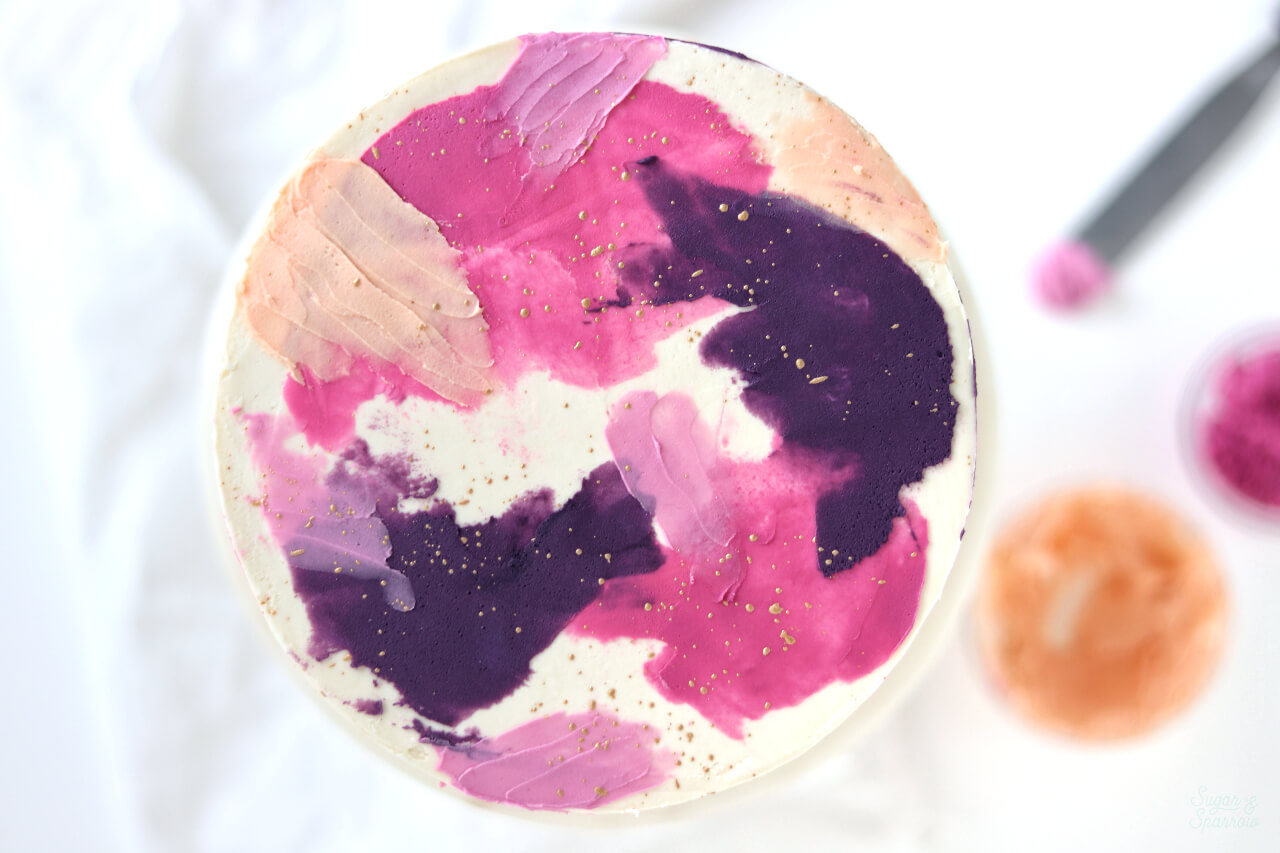
The color gels I used for this specific color palette are all Americolor: Eggplant mixed with Regal Purple for the darkest color, Fuschia for the mid-toned color, Peach and Lilac for the lightest colors.

buttercream color palette

Step 2: Create Bold Color Swatches

Make sure your cake has been chilled for at least 30 minutes and is firm to the touch before starting the painting process (aka where the fun begins!). Choose two different colors to use as your big, bold swatch colors. I always pick the darkest color and the mid-toned color, but you can use any colors you feel would be the most fitting. One by one, use your small icing spatula to apply color wherever you want on the cake, then use your bench scraper to scrape off the excess and create smooth color swatches.

watercolor buttercream tutorial
how to make a watercolor buttercream cake

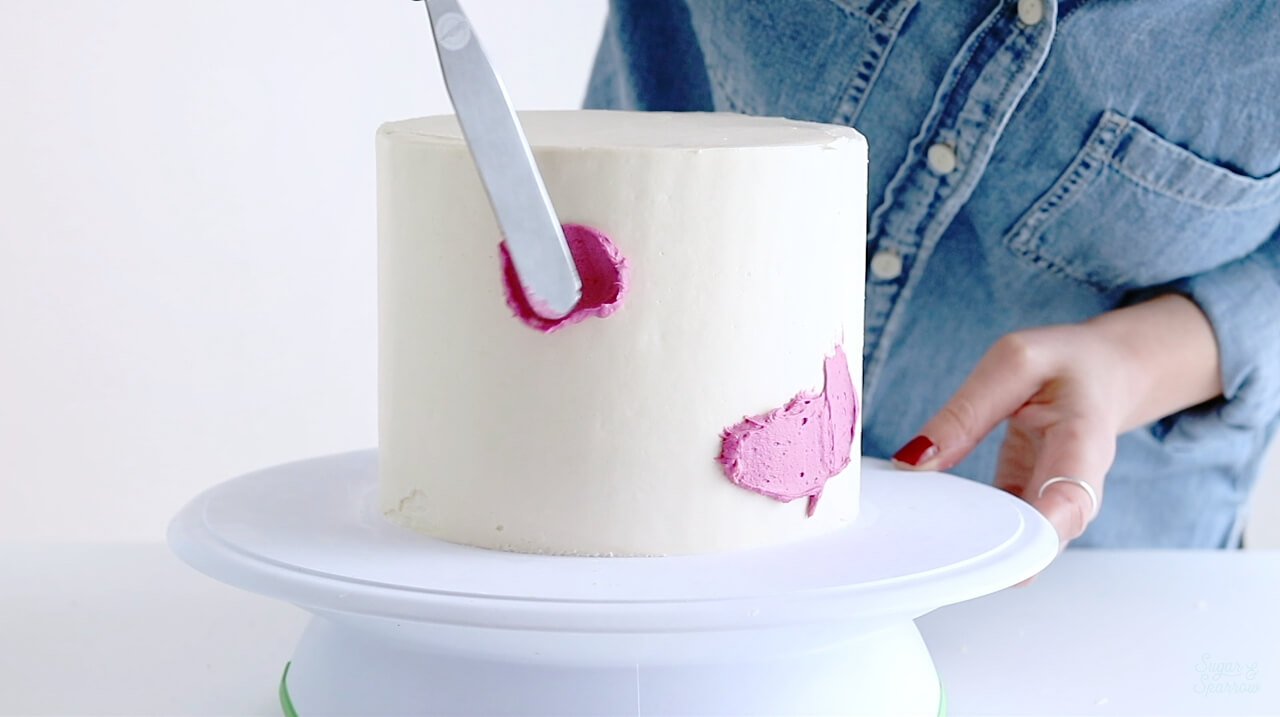
It’s best to have a few paper towels handy throughout the process, because you’ll need to clean your bench scraper every time you smooth out a color to get a clean finish.

watercolor buttercream cake by sugar and sparrow

Repeat the process until you’re happy with how many swatches are on your cake, remembering to leave enough blank space for spatula painting.

Step 3: Spatula Paint

Wherever you feel like, use your icing spatula to apply the final two colors, spatula painting them on in strokes. There’s no right or wrong here, so feel free to overlap your color swatches and go with the flow on how long or short your spatula painted strokes end up.

spatula painted buttercream tutorial

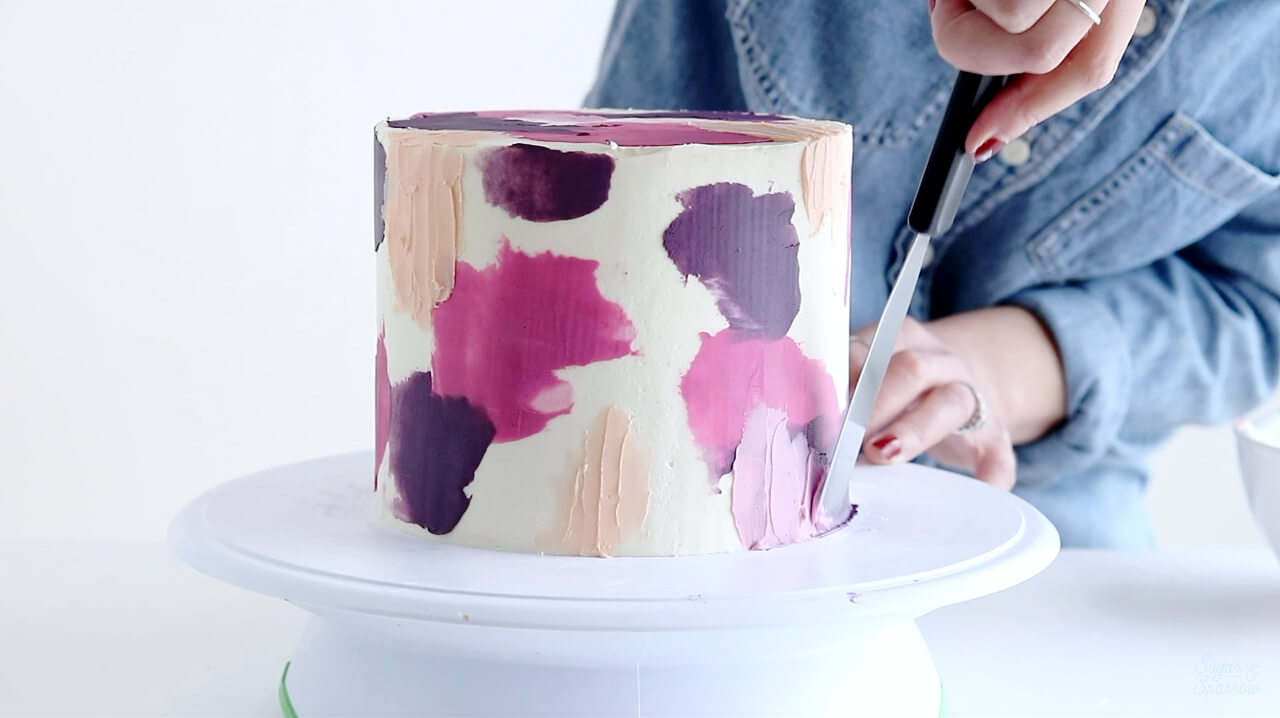
Make sure you clean your icing spatula when switching colors, unless you want the strokes to end up with colors mixed together.

Step 4: Splatter Paint

I absolutely love splatter painting cakes, so I chose to finish the design by splattering some Edible Art Paint in Glamorous Gold all over my colors. You can use any kind of edible paint or luster dust mixed with alcohol for this part, but I love Edible Art Paint because it’s already pre-mixed and ready to go. Just pour a little bit into a bowl, dip a food-grade paintbrush into it, and splatter until you love what you see.

splatter painted cake by sugar and sparrow

And that’s it! Three different cake decorating techniques combined to make art. The best part is that every cake design you create with this approach will look totally unique, and it’s so easy that you can just relax and enjoy the creative process. I hope painting with buttercream is as therapeutic for you as it is for me!

colorful buttercream cake by sugar and sparrow

If you create a cake with this tutorial, I’d LOVE to see your artwork. Be sure to tag me on Instagram to show me!

Disclosure: this post does contain some affiliate links, meaning I may receive a small commission if you click them and purchase items I’ve recommended. Clicking these links won’t cost you any extra money, but they do help to keep Sugar & Sparrow up and running. Thank you for your support!  

By: Whitney · In: Featured, Seasonal, Spring, Tutorials, Valentines · Tagged: artsy cake, buttercream cake, buttercream techniques, cake art, cake decorating, cake tutorial, colorful cakes, painted buttercream cake, painted cake, spatula painted cake, splatter paint cake, sugar and sparrow, watercolor cake

you’ll also love

the best vanilla cupcakes recipeThe Perfect Vanilla Cupcake Recipe
pumpkin layer cake recipe by sugar and sparrowPerfect Pumpkin Layer Cake Recipe
oreo cookies and cream cakeOreo Layer Cake Recipe

Join the List

Stay up to date & receive the latest posts in your inbox.

Reader Interactions

Comments

  1. Rivka says

    November 26, 2024 at 10:03 am

    how do i freeze the cake after decorating it?

    Reply
    • Rivka says

      November 27, 2024 at 10:54 am

      also can i use whisks to beat the buttercream?

      Reply
  2. Rivka says

    November 25, 2024 at 9:04 am

    does the cake have to be chilled before painting it?

    Reply
    • Whitney says

      November 25, 2024 at 7:07 pm

      Yes it does. The chilled buttercream will provide the most stable canvas for the painted textures.

      Reply
  3. Krystal says

    April 3, 2023 at 2:30 pm

    Thank you so much for the decorating tutorial! I used it this morning and was very happy with the result. 🙂

    Reply
    • Whitney says

      April 4, 2023 at 9:36 pm

      Yay, Krystal! I’m so happy to hear that!

      Reply
  4. Tina says

    November 28, 2022 at 6:45 pm

    Hello I need to make these colors for my cake can you tell me how many drops should I use. These are the colors that I have
    Super Red. Sunset Red
    Deep Pink. Royal Blue
    Lemon Yellow. Fruit Green
    Cocal Black. Sunset Yellow and
    Chococlate Brown. Grape Violet
    please get back thank you

    Reply
    • Whitney says

      December 4, 2022 at 2:43 pm

      Hi Tina! I’m not sure how to generate color recipes for you since I usually don’t write down how many drops of each color I use (I always eyeball it!). I think the grape violet will be great for the deep purple color, the deep pink + a little grape violet should help make a fuchsia color and also the lighter pink color, and the lemon yellow + sunset red will work for the peach (use very little of each color to keep it pastel). Hope that helps!

      Reply
  5. Bruce Nicely says

    March 5, 2022 at 12:18 pm

    My cake turned out looking truly like an impressionist painting! Thanks for the instructions, and I’ll try to tag you on Ig with a pic!

    Reply
    • Whitney says

      March 6, 2022 at 3:03 pm

      Yay, Bruce! I’m so happy this tutorial was helpful!

      Reply
  6. Sol says

    March 25, 2021 at 2:19 pm

    Hi. Can o do this on a cake that has been covered with ganache?

    Reply
    • Whitney says

      March 28, 2021 at 11:15 am

      Hi Sol! In my experience, I have piped buttercream onto a ganache covered cake and it worked well, so I am assuming that painting buttercream onto a ganache covered cake would work just fine!

      Reply
  7. Dani says

    March 4, 2021 at 8:02 am

    hii, what size cake pan did you use for the cake?

    Reply
    • Whitney says

      March 5, 2021 at 10:34 am

      Hi Dani! I used three layers of 6 inch cake.

      Reply
  8. Trish says

    December 16, 2020 at 11:20 pm

    Thank you for the fantastic tutorial! Appreciate your spirit of generosity in sharing your design process. The cake is stunning and your instructions are super easy to follow. I will try this technique next week when my vacation starts!

    Also, (and entirely unrelated to your cake) your website design is everything! Love the pale robin’s egg blue paired with vermilion when you highlight text!

    Reply
    • Whitney says

      December 21, 2020 at 9:28 am

      Of course, Trish! So happy to hear that the tutorial is helpful and I can’t wait for you to try this cake design! Also, thank you so much for the kind words about my website 🙂 my husband designed it, so I will pass along the compliments to him!

      Reply
  9. Gabriella says

    May 23, 2020 at 2:50 pm

    How many batches of buttercream did you use to frost & decorate the cake?

    Reply
    • Whitney says

      May 24, 2020 at 2:00 pm

      Hi Gabriella! If you’re starting with a filled/crumb-coated cake, you can use 1 batch of my vanilla buttercream recipe to frost and decorate. If you need to fill and crumb coat the cake as well, doubling the recipe will be enough.

      Reply
  10. Frances says

    May 18, 2020 at 11:45 am

    What if person wants the whole cake to be gold…do you use same technique

    Reply
    • Whitney says

      May 18, 2020 at 2:17 pm

      Hi Frances! If you’re wanting an entirely gold cake, I recommend using one of these FDA approved metallic cake finishes and painting it onto chilled buttercream with a food grade paintbrush: https://sugarandsparrow.com/metallic-gold-buttercream/

      Reply
  11. Andrea says

    November 7, 2019 at 12:21 pm

    Is the “paint” a little bit thicker consistency than the buttercream used to coat the cake?

    Reply
    • Whitney says

      November 7, 2019 at 1:11 pm

      Hi Andrea! It’s the same buttercream consistency as what’s used beneath (from the same batch). I just colored it with a little food color gel before painting it on.

      Reply
  12. crumbsmakecake says

    August 29, 2019 at 2:55 am

    lovely tutorial and you’re absolutely right about painting being therapeutic, I absolutely enjoyed making my first spatula painted cake and will be posting the picture on my Instagram account soon . thanks a ton for inspiration .

    Reply
    • Whitney says

      August 29, 2019 at 8:54 am

      Thank you so much for the kind words! I’m so happy to hear that you’re finding painting with buttercream therapeutic and can’t wait to see your spatula painted cake. Be sure to tag me on Instagram so I can see!

      Reply

Leave a Reply Cancel reply

Your email address will not be published. Required fields are marked *

Recipe Rating


Next Post >

Sprinkled Ombrè Valentine’s Day Cupcakes

Primary Sidebar

Welcome to Sugar & Sparrow

Welcome to Sugar & Sparrow

Helping you whip up pretty desserts with confidence and creativity. And hopefully sharing a few laughs with you along the way!

Learn More

Connect

let’s bake!

Get my very best recipes, baking tips, and decorating tutorials sent to your inbox

Featured Posts

berry crisp recipe with vanilla ice cream

Mixed Berry Crisp Recipe

using a kitchen scale

Baking With The Metric System: My New OXO Kitchen Scale

Peach Crisp Cake with Brown Butter Frosting

Search

Archives

Follow Along

@sugarandsparrowco

TOP 10 BIRTHDAY CAKES 🥳 These are just a few of my TOP 10 BIRTHDAY CAKES 🥳 These are just a few of my favorite birthday cake recipes that will make anyone feel special! 

Comment “BIRTHDAY” and I’ll send you all 24+ of my favorite birthday cake ideas –  classics like funfetti cake and yellow cake with chocolate frosting, plus ice cream cakes, sheet cakes, and more complex flavor combos like Snickers cake and Millionaire cake. 

https://sugarandsparrow.com/best-birthday-cake-recipes/

#birthdaycake #partycake #birthdaycakeideas #cakeinspiration #cakeideas
BERRIES & CREAM SHEET CAKE 🍓🫐 deliciously light, n BERRIES & CREAM SHEET CAKE 🍓🫐 deliciously light, naturally stunning, and the easiest cake you’ll want to make all Summer long!! It’s my favorite bakery-style vanilla sheet cake that’s so soft and moist, topped with silky whipped cream cheese frosting and fresh berries. I love how quickly this cake comes together with simple ingredients + doesn’t require any fancy cake decorating techniques to make it a showstopper✨

Grab the recipe link in my bio or find it at https://sugarandsparrow.com/berries-and-cream-sheet-cake/

#berrycake #berriesandcream #sheetcake #whippedcreamfrosting #cakedecorating
ROCKY ROAD CUPCAKES ✨ inspired by the classic ice ROCKY ROAD CUPCAKES ✨ inspired by the classic ice cream flavor: moist and decadent chocolate cupcakes filled with homemade marshmallow creme, then topped with fudgy chocolate buttercream, mini marshmallows, and chopped almonds. The marshmallow creme filling comes together in minutes and is SO MUCH BETTER than the store bought stuff – perfectly creamy yet fluffy and the best surprise when you bite into these cupcakes. 

Full recipe is linked in my bio + at https://sugarandsparrow.com/rocky-road-cupcakes/
 
#chocolatecupcakes #rockyroad #marshmallow #chocolatemarshmallow #cupcakes
FUNFETTI SHEET CAKE 🥳 the most celebratory flavor FUNFETTI SHEET CAKE 🥳 the most celebratory flavor of all and so perfect for a crowd. It’s extra soft and moist vanilla cake speckled with rainbow sprinkles + captures that box mix texture but it’s 100% homemade and EASY! Top it with vanilla buttercream and rainbow sprinkles for the perfect party cake 🎉
 
Full recipe (w/ frosting) at the link in my bio or at https://sugarandsparrow.com/funfetti-sheet-cake/ 

INGREDIENTS 
2 1/2 Cups (265g) sifted cake flour 
2 tsp baking powder 
1/2 tsp baking soda 
1 tsp salt 
3/4 Cup (170g) unsalted butter, room temp 
1 3/4 Cup (340g) granulated white sugar 
3 large eggs, room temp 
1/2 Cup (120g) sour cream, room temp 
1 Tbsp pure vanilla extract 
1 Cup (240ml) whole milk, room temp 
1/3 Cup (60g) rainbow sprinkles, coated in 1 tsp flour 
 
INSTRUCTIONS 
1. Preheat the oven to 325°F (163ºC). Grease and line a 9×13 baking pan. 
2. In a medium bowl, whisk together the sifted cake flour, baking powder, baking soda, and salt. Set aside.  
3. In the bowl of your stand mixer fitted with the paddle attachment (or with a large bowl and hand mixer), beat the butter and sugar on medium-high speed until light and fluffy, 4 min. Add the eggs one at a time, then add the vanilla and sour cream and mix for one minute on high speed. 
4. Turn the mixer off and add the dry ingredients all at once. Mix on low speed until just combined, then add the milk and mix until just incorporated.  
5. Coat the rainbow sprinkles in 1 teaspoon of flour, then gently fold them into the cake batter. Pour the batter into the prepared baking pan and bake for 30-35 minutes, or until the cake springs back to the touch and a toothpick inserted into the middle comes out clean. Let the cake cool in the baking dish until room temperature, then decorate with vanilla buttercream + rainbow sprinkles (full recipe link in bio!) 
 
#funfetti #funfetticake #sheetcake #cake #birthdaycake
COOKIE DOUGH ICE CREAM CAKE 🍪🍦this is the birthday COOKIE DOUGH ICE CREAM CAKE 🍪🍦this is the birthday cake of my DREAMS and I’m so excited to share the recipe with you!! It’s chocolate and vanilla no-churn ice creams with homemade cookie dough chunks in every bite, swirled together and set on a delicious Oreo cookie crust 😍 easy, perfectly sliceable, and ideal for making ahead! I’m already dreaming about when I can make it again ✨

Get the recipe link in my bio + at https://sugarandsparrow.com/chocolate-chip-cookie-dough-ice-cream-cake/

#birthdaycake #icecreamcake #cakedecorating #nochurnicecream #icecreamlover

Footer

On the Blog

  • Cake Basics
  • Recipes
  • Tutorials

Info

  • About
  • Privacy Policy & Disclosure

stay in the know

Copyright © 2026 · Theme by Sugar & Sparrow