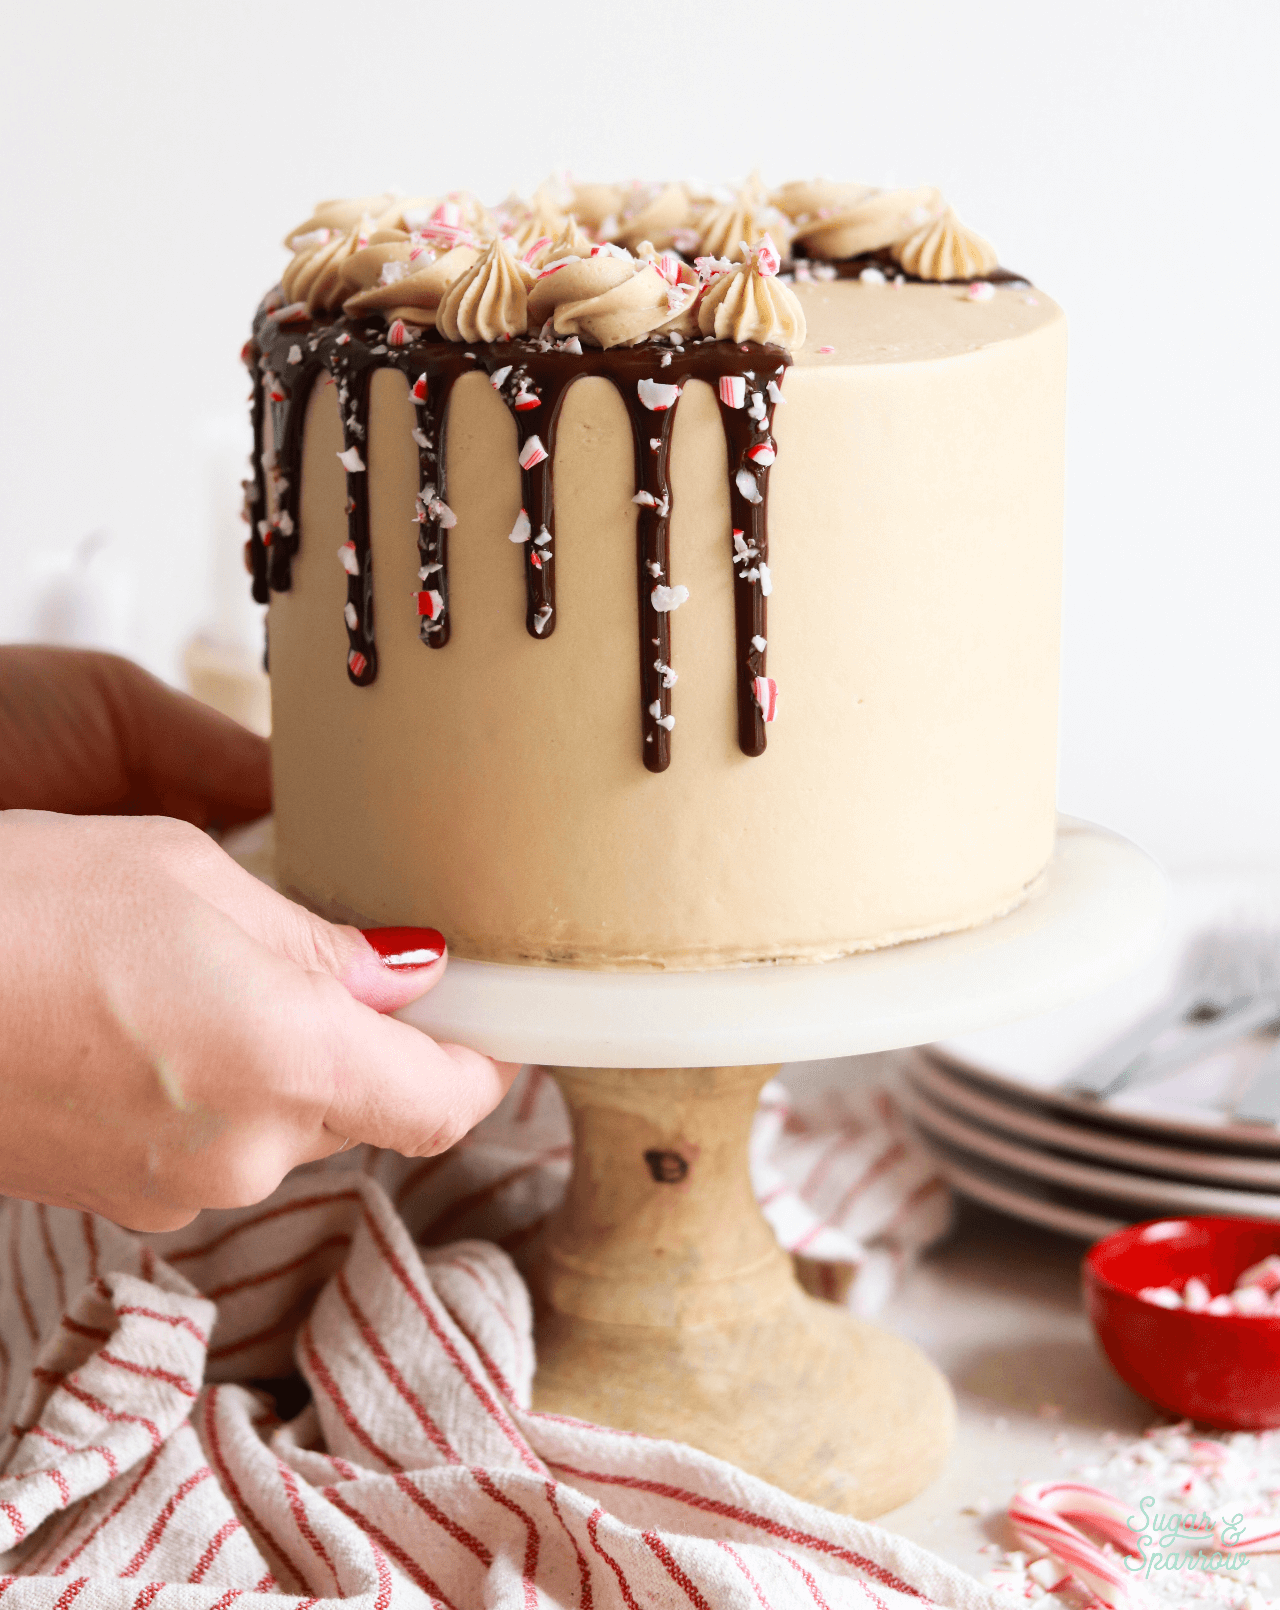
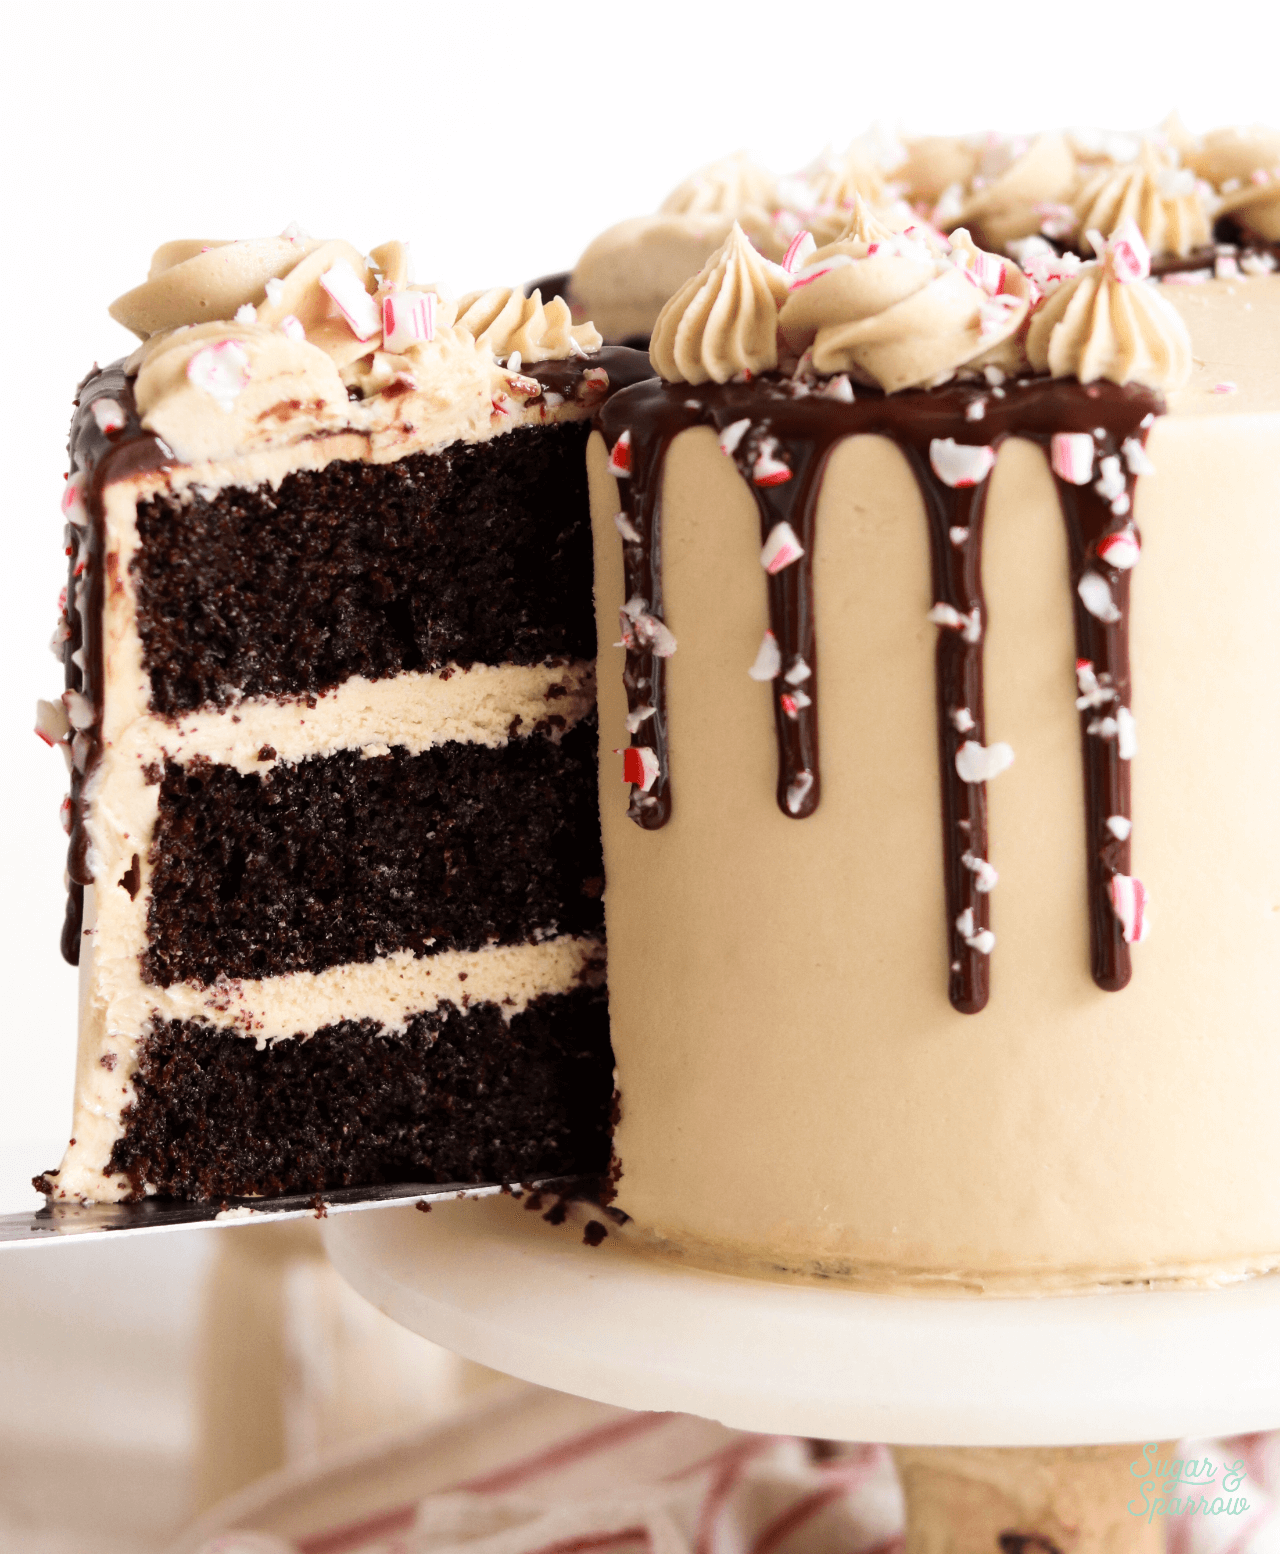
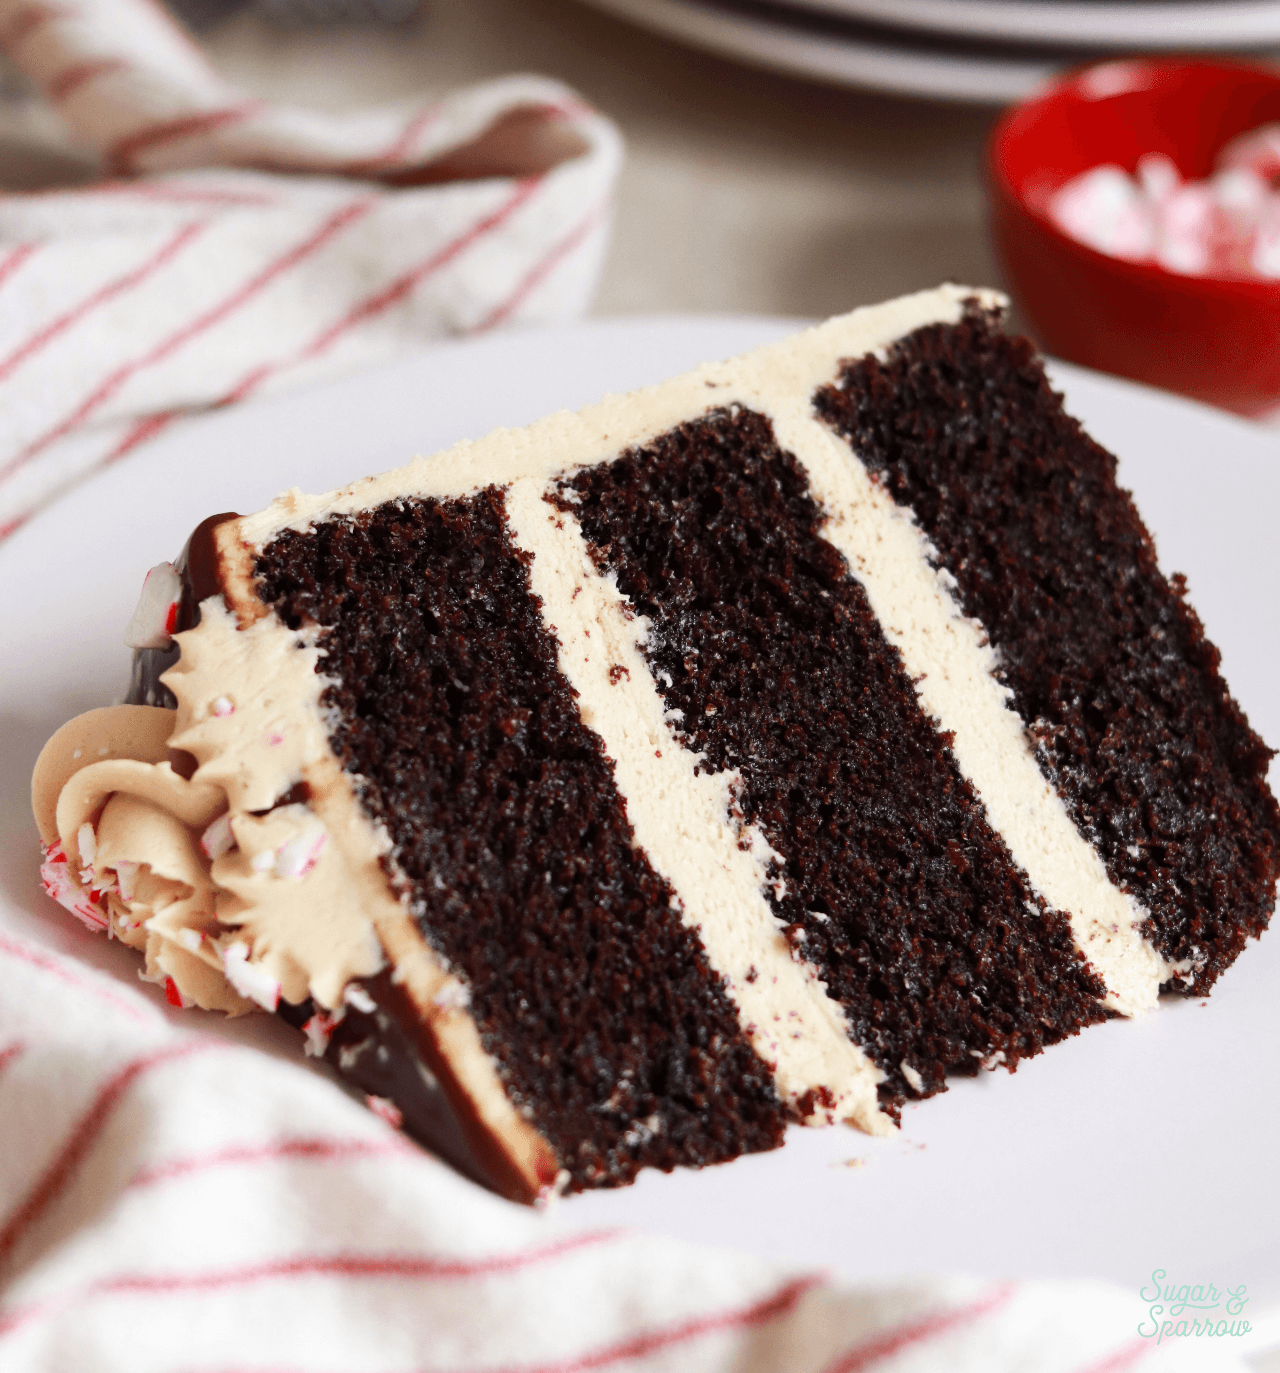
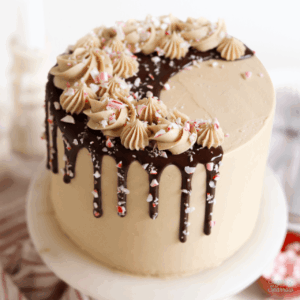
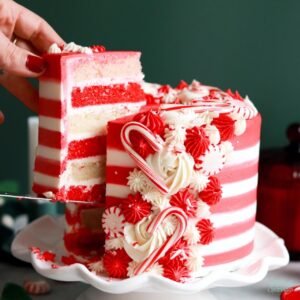
This peppermint mocha cake is based on one of my favorite festive coffee drinks! The layers of moist and decadent peppermint chocolate cake filled and frosted with coffee buttercream make it taste like the real deal in cake form. This one may be my favorite coffee flavored cake of all and it even impressed my husband, who is not a coffee drinker or a big fan of peppermint. We could not stop tasting it and talking about how good it was, so I am confident that you’ll love it too. Oh, and just look at that candy cane drip!
Decadent Peppermint Chocolate Cake
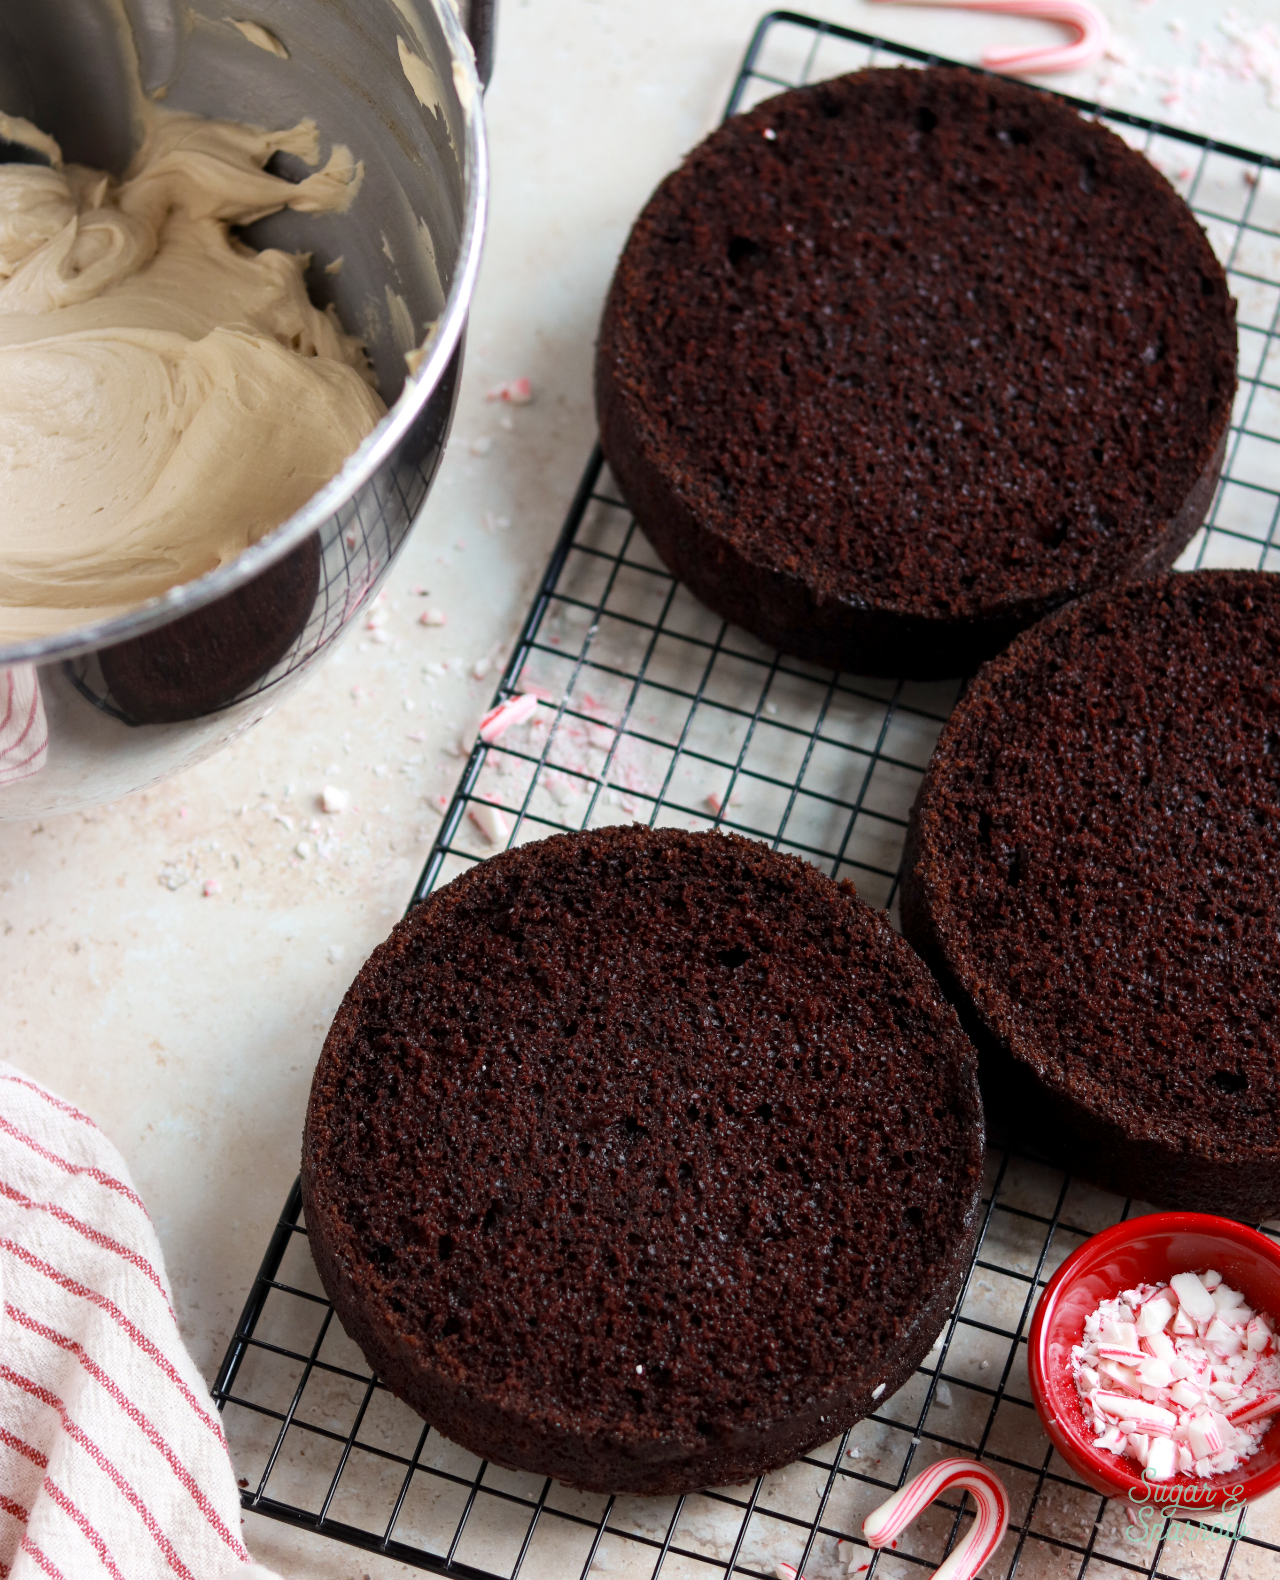
The peppermint chocolate cake layers are extra moist, easy to make, and have just a touch of peppermint to create the perfect balanced flavor. It starts with my one-bowl chocolate cake recipe as a base and the only difference is the addition of pure peppermint extract. It’s important to use peppermint extract (not mint extract) to create the ideal holiday flavor. The cake also calls for hot coffee to not only amplify the chocolate flavor but give it a little boost of coffee as well.
Rich Coffee Buttercream
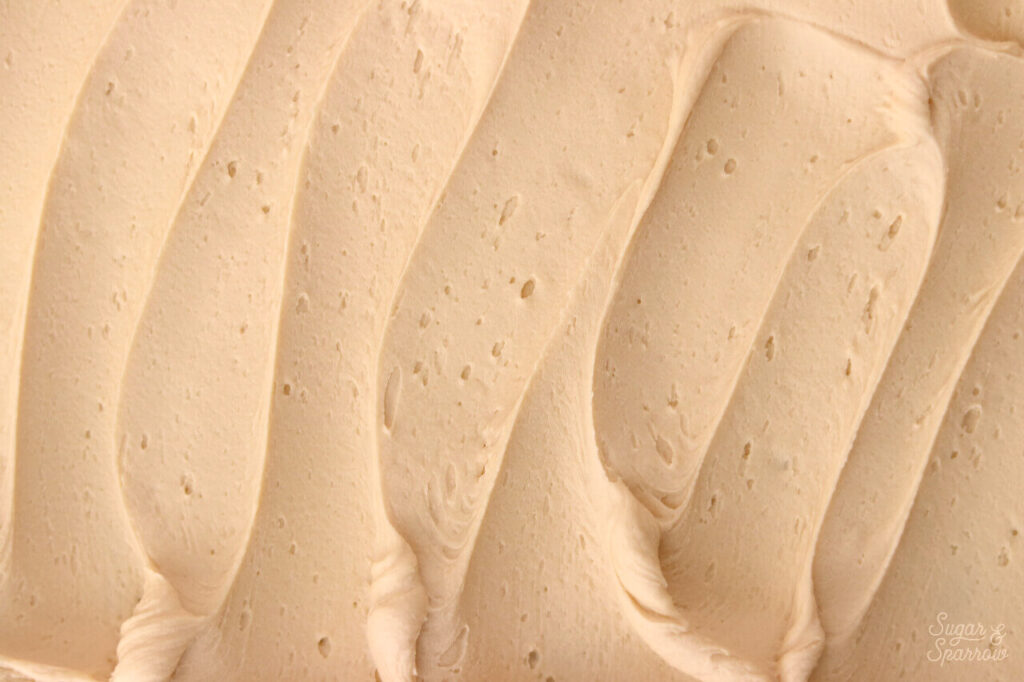
The filling and frosting for those peppermint chocolate cake layers is my favorite coffee buttercream. It’s so silky smooth, bursting with coffee flavor, and pairs well with almost any kind of cake. To create the perfect coffee flavor, I dissolve instant coffee into the milk portion of the frosting recipe, then add it in at the end. You could alternatively use instant espresso powder for the same effect.
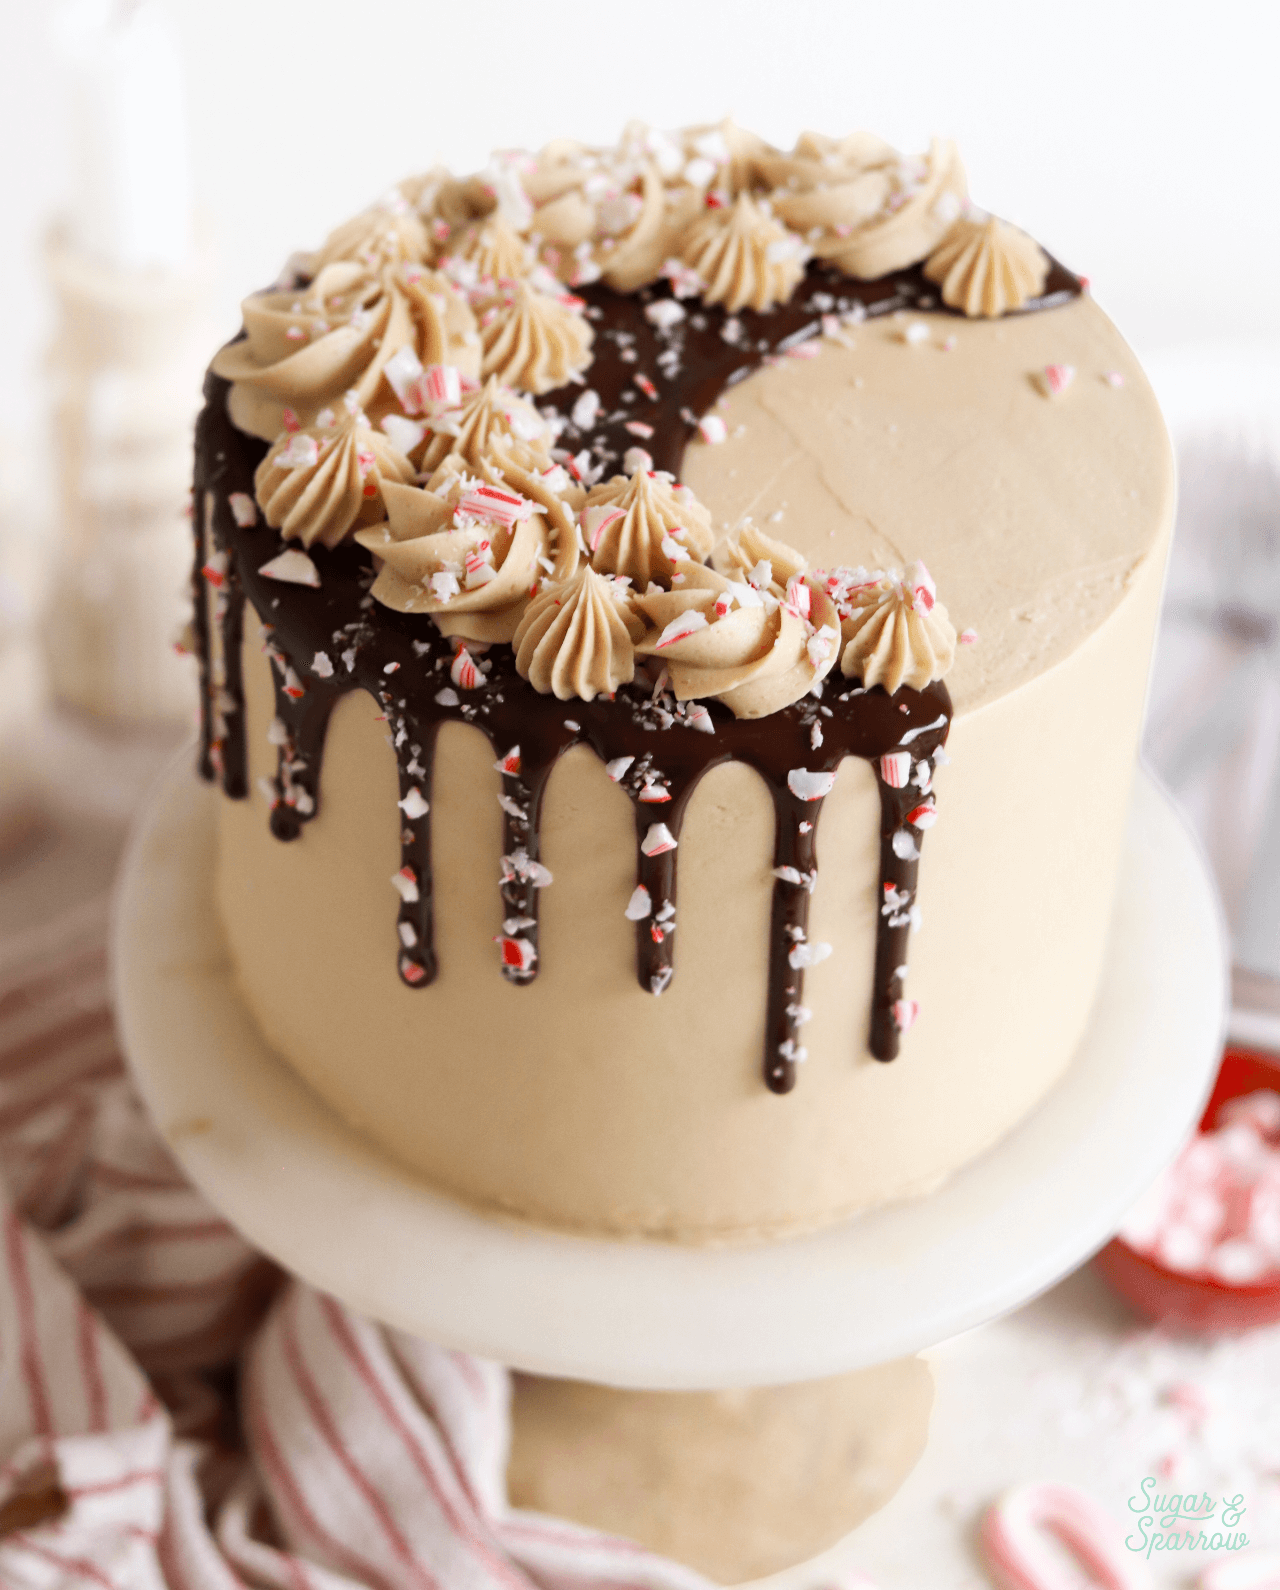
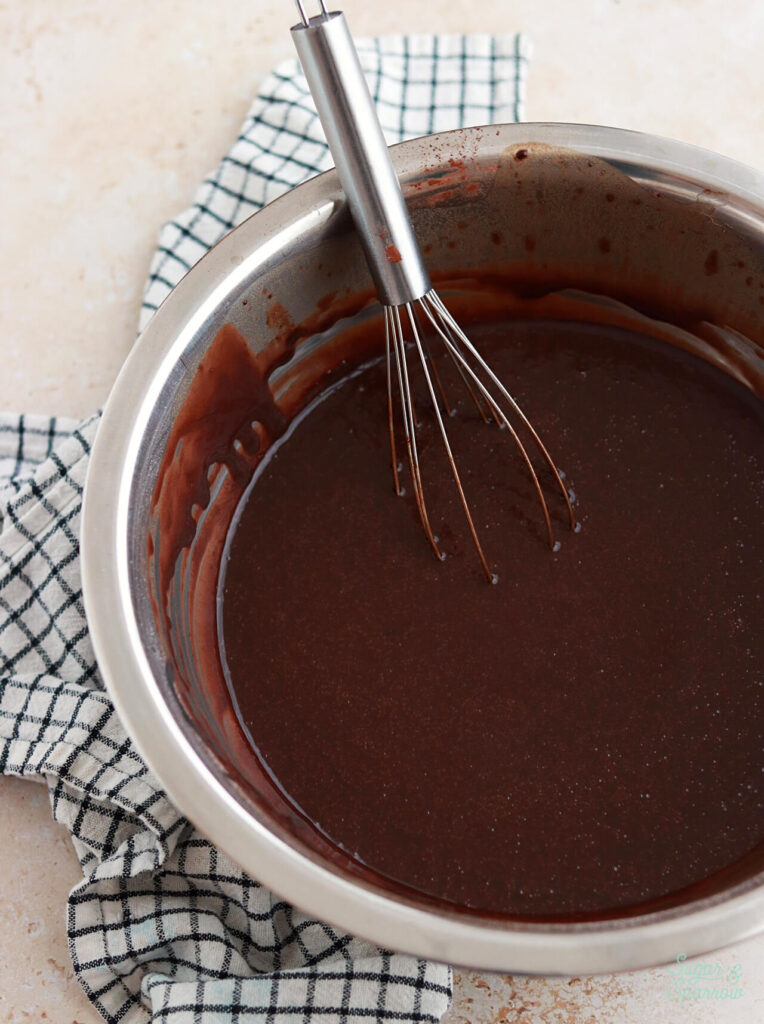
Candy Cane Chocolate Ganache Drip
After filling and frosting the cake with coffee buttercream to enhance the coffee flavor of this cake, I dripped it with my go-to Chocolate Ganache recipe. After the drips set, it was super easy to press on crushed candy canes and the result was so eye-catching! I basically used the same method as was used in this Sprinkle Drip Cake tutorial.
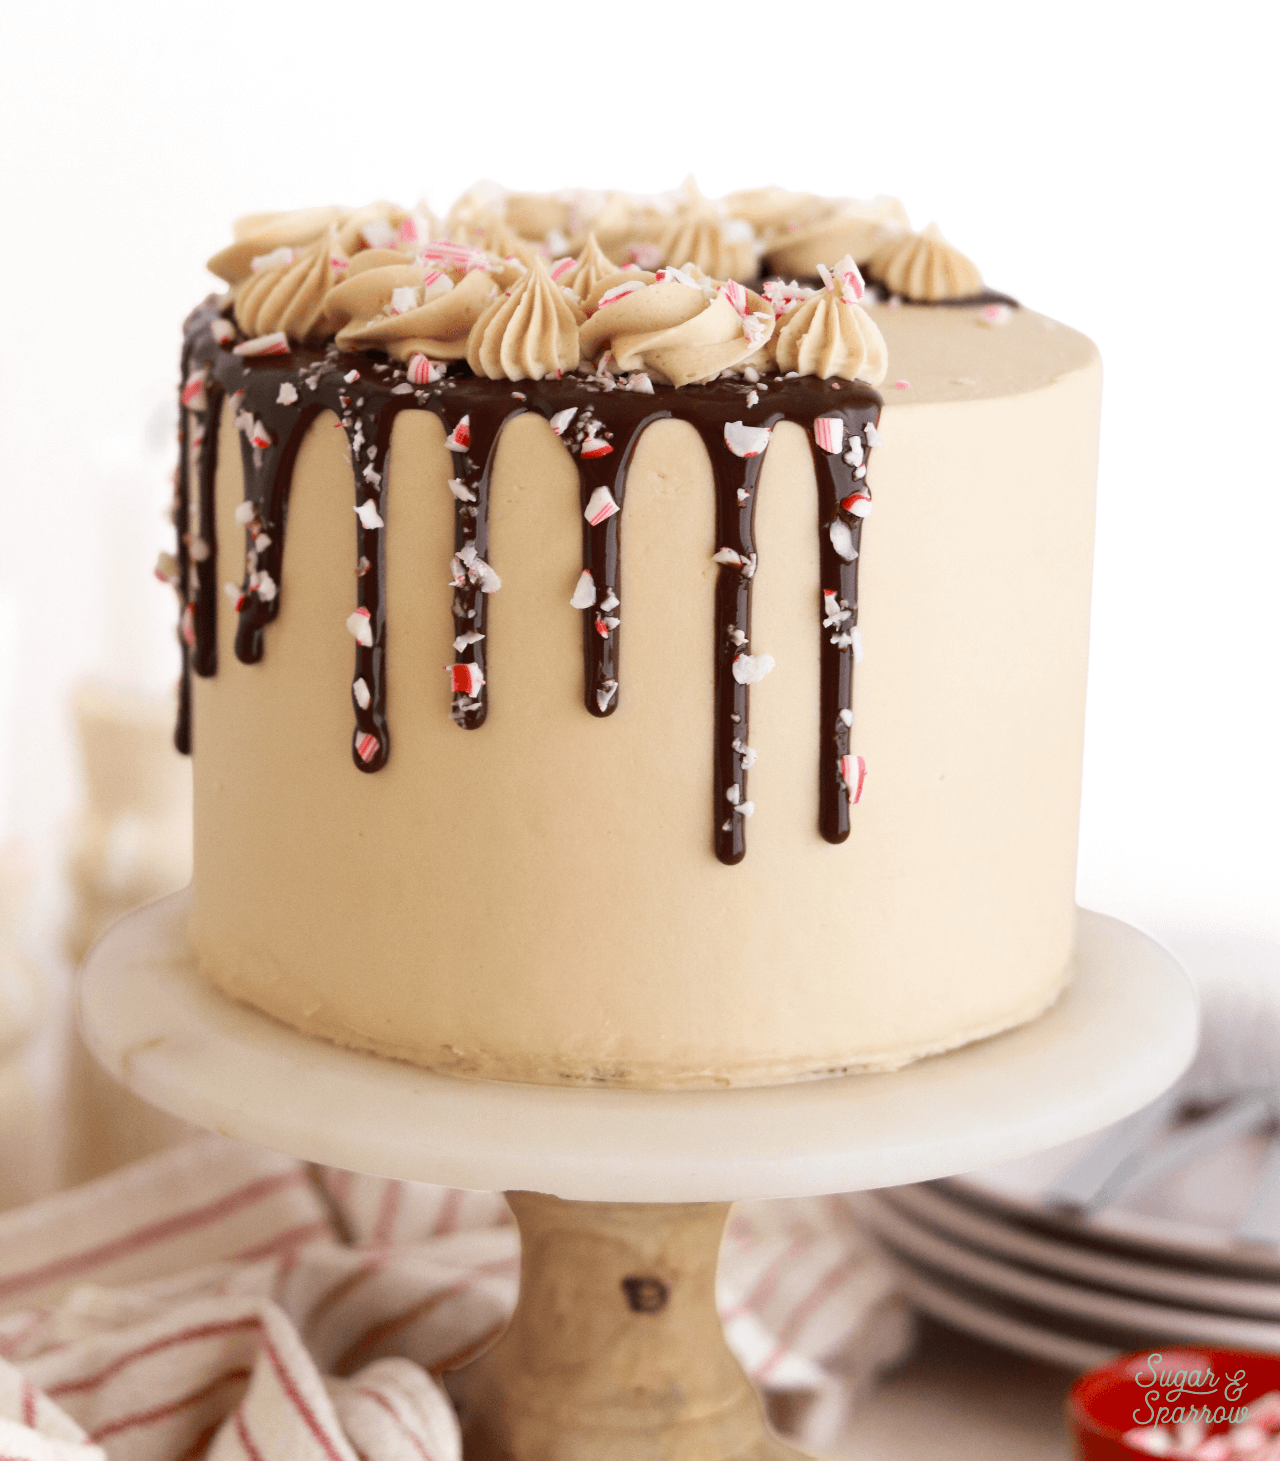
One important note on the candy cane drip: adding the candy cane bits can’t be done too far ahead of time. When I left the cake in the refrigerator overnight, the moisture of the drip ended up melting a few of the pieces. If you do want to make this cake ahead and keep that drip looking perfect, be sure to add the candy cane pieces the day you’re serving the cake. They’ll press onto the drip just fine, even after it has set.
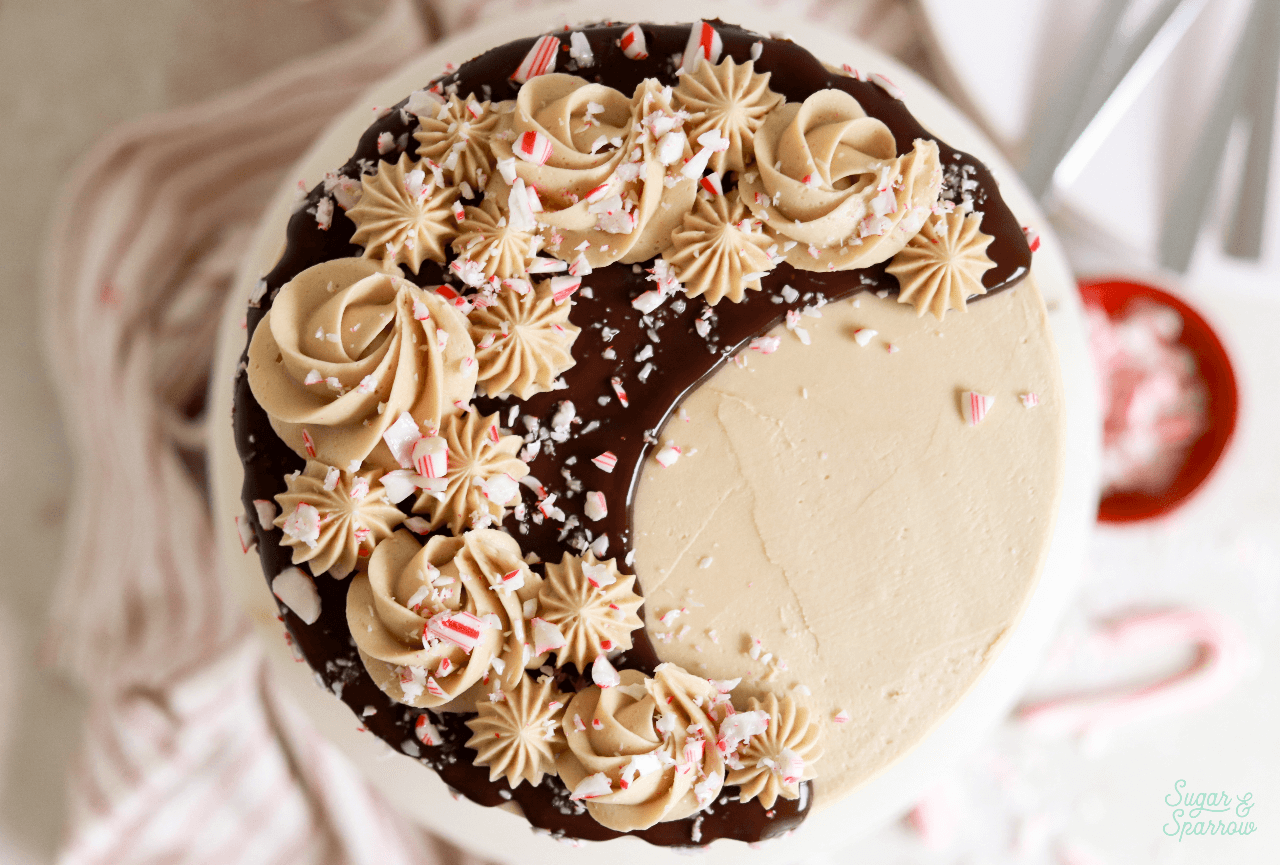
To finish the look, I added a little piping to the top in a crescent moon shape using Wilton Tip 1M (for the rosettes) and 4B (for the stars). Then, I sprinkled more candy cane pieces over the top. However you choose to decorate, this peppermint mocha cake is downright delicious. As I type this weeks later, I’m already thinking about making it all over again. I consider that to be a sign of a good cake!
More Festive Cakes You’ll Love
Here are some more cake recipes from my blog based on my favorite festive drinks:
- Gingerbread Latte Cake
- Hot Cocoa Cake
- Eggnog Layer Cake
- Peppermint Hot Cocoa Cake
- Spiced Vanilla Chai Cake
Did you make this recipe? I want to know what you think! Let me know in the comments below or tag me on Instagram. I love to see what you’re caking!
Peppermint Mocha Cake Recipe
Ingredients
Peppermint Mocha Cake
- 2 Cups (265g) all purpose flour
- 1 2/3 Cups (340g) granulated white sugar
- 2/3 Cup (60g) unsweetened natural cocoa powder
- 2 tsp baking soda
- 1 tsp baking powder
- 2 tsp instant espresso powder
- 1/2 tsp salt
- 1/2 Cup (120ml) vegetable oil
- 2 whole eggs, room temperature
- 1 tsp pure vanilla extract
- 1/2 tsp pure peppermint extract
- 1 Cup (240ml) buttermilk*, room temperature DIY recipe in notes
- 1 Cup (240ml) hot coffee
Coffee Buttercream
- 2 tsp instant coffee or instant espresso powder
- 3 Tbsp whole milk, room temperature
- 1 1/2 Cups (339g) unsalted butter, room temperature
- 5 Cups (600g) powdered sugar
- 1 Tbsp vanilla extract
- pinch of salt, or to taste
Chocolate Ganache Drip
- 1/2 Cup (93g) semi-sweet chocolate chips
- 1/2 Cup (120ml) heavy whipping cream
Additional Garnish
- 1/4 cup crushed candy canes
Instructions
Make the Peppermint Mocha Cake
- Preheat the oven to 350ºF (177ºC) and prepare three 6-inch or two 8-inch or 9-inch cake pans by spraying the sides with baking spray and fitting the bottoms with a parchment cake circle.
- Place all of the dry ingredients into a large bowl and whisk by hand to combine them. Add the vegetable oil, eggs, vanilla, peppermint, and buttermilk and whisk together until combined. Add the hot coffee in a slow stream, then whisk until combined and smooth. The batter will be very thin.
- Pour evenly into the prepared cake pans and bake for 32-36 minutes, until a toothpick inserted comes out clean. Cool completely before frosting.
Make the Coffee Buttercream
- Combine the instant espresso/coffee with the whole milk and set aside. In the bowl of a stand mixer, cream the butter on med-high until light and fluffy (about 5 minutes), scraping down bowl and paddle a few times in between.
- Add powdered sugar a few cups at a time, scraping down bowl and paddle between intervals. Then add the vanilla, the coffee/espresso milk mixture, and salt. Mix on low until fully incorporated, about one minute.
Make the Chocolate Ganache
- Place chocolate chips into a heat resistant bowl (glass or metal). If you’re starting with a chocolate bar, chop it into small pieces until they’re about the size of chocolate chips.
- In a saucepan over medium-high heat, warm heavy whipping cream until it just starts to simmer. I always look for small bubbles forming around the edge and a soft simmer starting in the middle. When it's reached this point, pour the cream into your bowl of chocolate and let sit for about 30 seconds.
- Whisk it together until it’s uniform in consistency and there are no bits of chocolate left on your whisk. Cool ganache at room temperature for 10-20 minutes, or until the ganache itself is room temperature or slightly above.
Assembly
- After the peppermint mocha cakes have cooled completely, level and torte the layers to your desired height. Then, fill and frost the cake with coffee buttercream. To create the look pictured, place the cake in the refrigerator for at least 30 minutes before dripping with chocolate ganache. Here are tips on how to create the perfect drip. Place the dripped cake back into the refrigerator for 5 minutes to let the drip set before pressing on the crushed candy cane pieces by hand.
Notes
- The peppermint mocha cake layers can be made ahead and stored, wrapped in plastic wrap, at room temperature for up to two days. Alternatively, you can store the wrapped cake layers in the freezer for up to 2 months before thawing and frosting.
- The coffee buttercream can be made ahead and stored in an airtight container in the refrigerator for up to two weeks. When you’re ready to use it, bring it back to room temperature and re-whip in your stand mixer to bring back to smooth buttercream consistency.
- The chocolate ganache can be made ahead and stored in the refrigerator in an airtight container for up to two weeks. When you’re ready to use it as a drip, microwave it in 10 second increments, stirring after every interval until your ganache is room temperature and uniform in consistency.
Hello Sue!
I made this outrageous cake exactly as the recipe suggested. I was goinv to have family members coming aftef the holidays, but it just didn’t happen. I was afraid this heautiful cake would just be seen by my husband and me. I was going to freeze part of it, but we ate the whole cake in less than a werk. It was that good!
The only change I would make would he extra frosting. The frosting was so good, we were tasting it a little too much just to make sure it was that good. Really.
I am going to make another one this week for a party. I am hoping we can keep our hands and fingers off of it until the party.
I was glad to read that this can be made with non-gluten flour. I will try that next time for sure.
Thank you for the five pounds of weight gain, but it was soooo worth it.
Are all of your recipes this good? If so, my clothing will be way too tight.
I think I am thanking you!
I am thanking you.
Mary Lu
Hi Mary Lu! What a wonderful review! I’m so happy this cake was such a hit and hope everyone at the party loves it just as much 🙂
I was wondering if you could add cocoa to the buttercream to make it more of a mint mocha rather than just coffee?
Hi Laurie! Yes, you can totally do that. For this recipe I would recommend adding 1/4 Cup + 2 Tbsp of cocoa powder to the buttercream along with the powdered sugar. I’m referencing this mocha buttercream recipe for that cocoa amount: https://sugarandsparrow.com/mocha-buttercream-recipe/
Hello,
I am thinking of using a caramel or salted caramel filling for this cake. Is this a good idea? I saw you have a caramel recipe. to make it “salted caramel”, would I add extra salt and omit the vanilla? Thanks!
Hi Evan! You could totally add caramel filling between these layers! And yes, if you want more of a salted caramel flavor add a little more salt and omit the vanilla. Enjoy!
Hello! Hoping to make this for the holidays. My store only has instant espresso coffee vs. espresso powder. Are they one and the same or can I use the instant espresso? Thank you! I LOVE your recipes!
Hi Maggie! You can use the instant espresso as a sub for the espresso powder! I do that all the time. Enjoy!
Hi,
Thank you for this recipe! Just tried it today and it was delicious. I had a few questions about the batter. After it was done baking, each cake rose, but had an inward curve in the middle on the sides. What can cause this to happen? I noticed that I see this a lot with more thin batters. I also had a lot of holes in my cake even though I tried not to overmix – how could I prevent this next time? Lastly, should the batter have some clumps or be completely smooth?
Thank you!
Hi Mia! That’s a puzzler, I’m not sure what would cause the inward curve on the sides of the cake. What kind of oven do you have (conventional or convection)? And what material and size of cake pans are you using?
Looks incredible and was looking forward to having it for my birthday but unfortunately had to throw the cake out after someone told me wax paper is actually not safe to line cake pans with and can leach into the cake as it bakes. 🙁
So a warning to everyone else planning to bake this- use parchment! 😉
Hi Bren! My box of wax paper (Reynolds brand) is safe for lining cake pans and says so right on the box, but you can absolutely use parchment paper to line your cake pans.
Hi Whitney!! My best friend requested this cake but gluten free. It turned out so delicious. I even substituted the flour with gluten free flour.. it was moist and had great flavor. Thank you
That is so wonderful to hear, Penny! I’m so happy it was a gf hit!
Hi there. I really want to make this, looks delicious. I only have one 6 inch tin. How long would I cook it for just in the one tin. Thank you.
Hi Sue! Assuming your 6 inch pan is 2 inches tall, you would bake for the same amount of time (40-45 min). If it’s a deeper tin it may take longer to bake. Enjoy!
Wow!!! Looks delicious
Thank you so much! I hope you get a chance to try it someday!