Every Thanksgiving, I look forward to a few things: 1) cooking all day with my mother in law with the music blasting our favorite dance-worthy hits, and 2) getting to make a delicious, eye-catching dessert that the whole family can enjoy. The Thanksgiving meal is my absolute favorite to eat too, especially when surrounded by my loved ones, so this holiday really checks all the boxes for me. And since I’m always on dessert duty (I take my role very seriously!) I’m always trying out new recipes to compliment the family favorites. This year, I thought I’d go a little above and beyond and translate the classic pumpkin pie into cake-form, which is how this Momofuku-inspired Pumpkin Pie Cake was born:

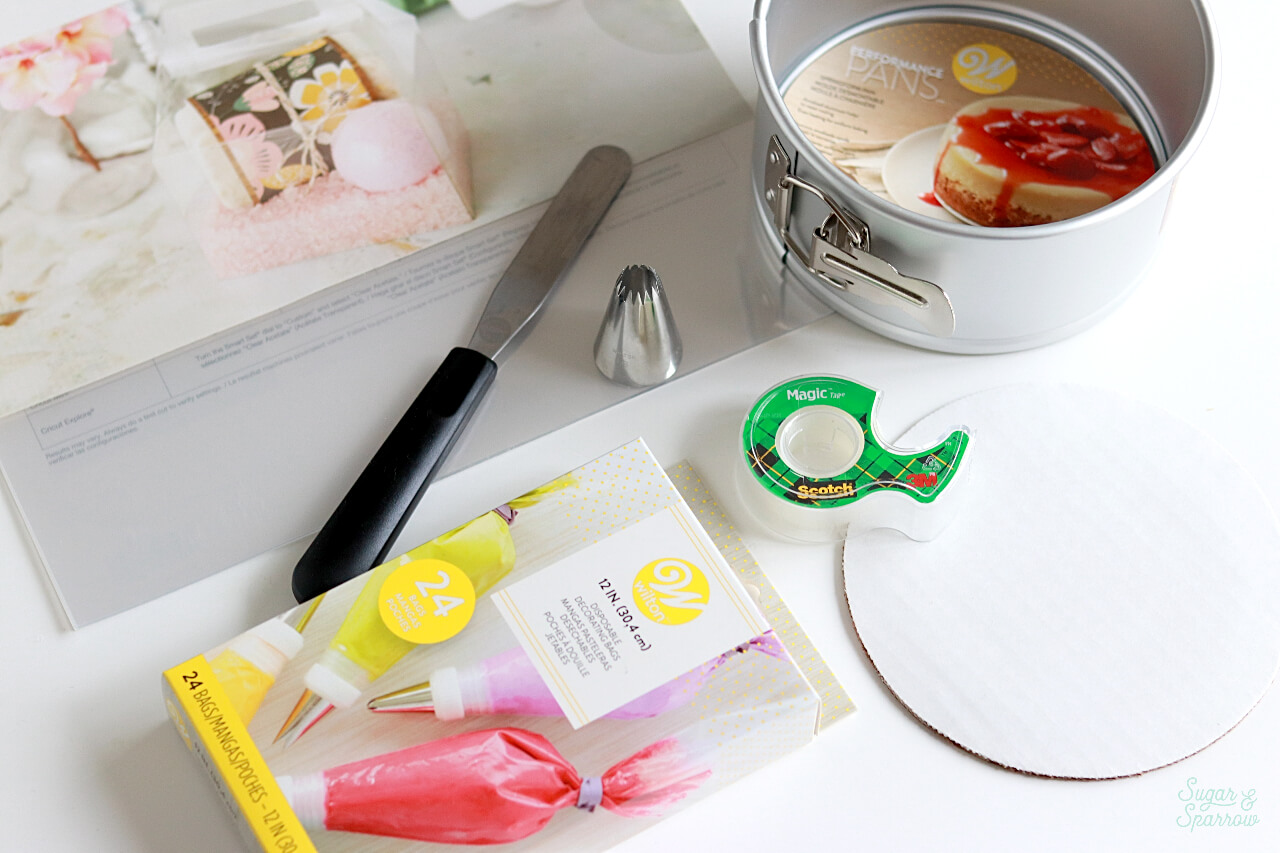
In the case of this Pumpkin Pie Cake, I shopped my local JOANN store for acetate sheets, a springform cake pan, piping bags, and the ideal piping tip to pipe that toasted meringue on top.
UPDATE 2025: JOANN has (sadly!!) gone out of business, so I have slightly changed these product links.
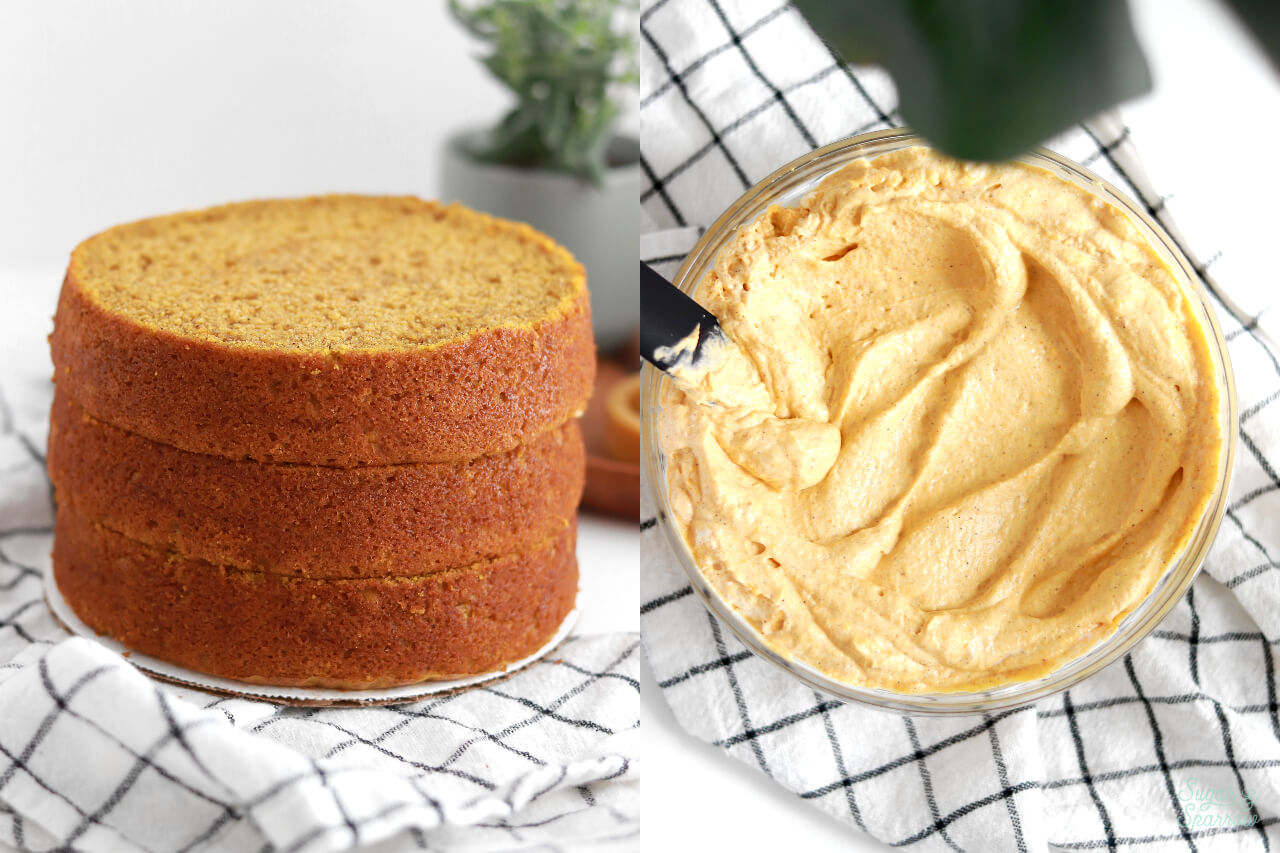
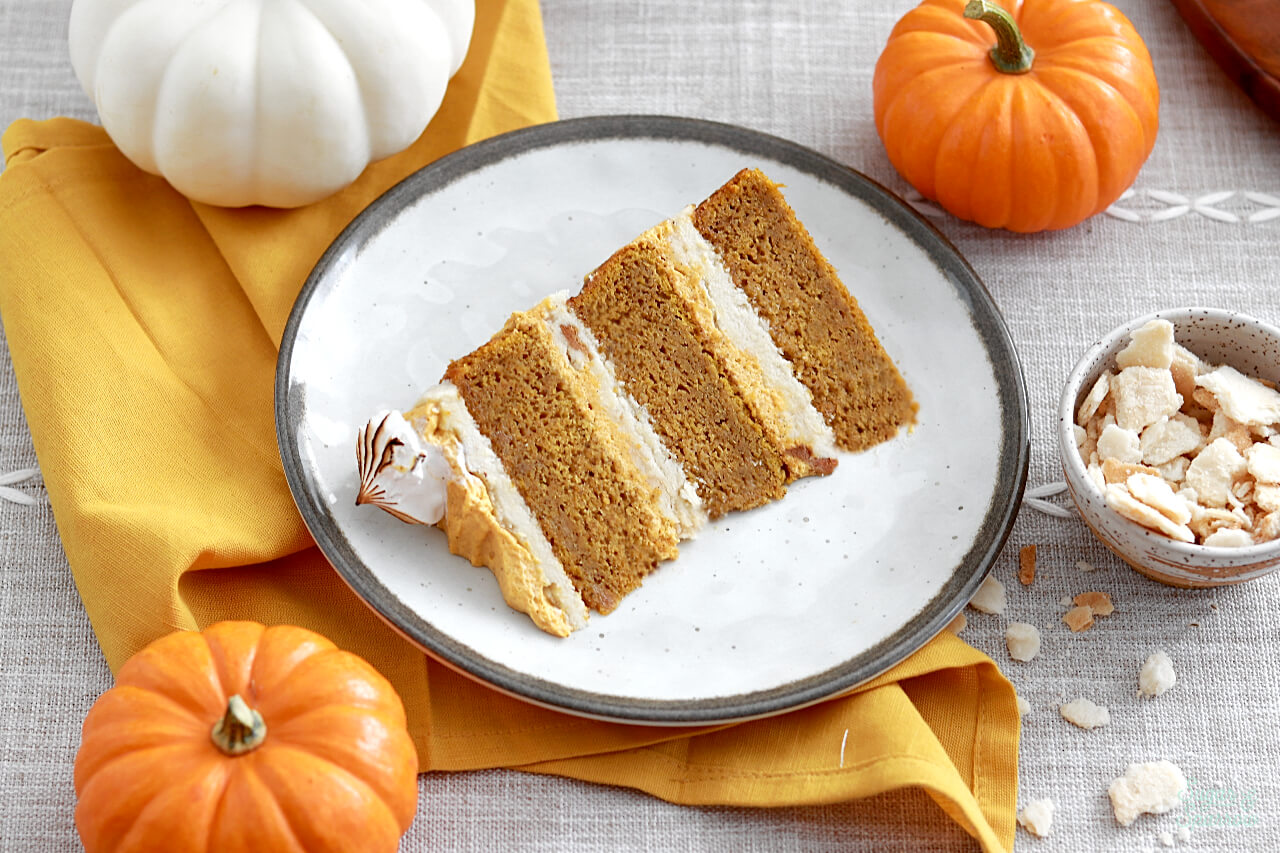
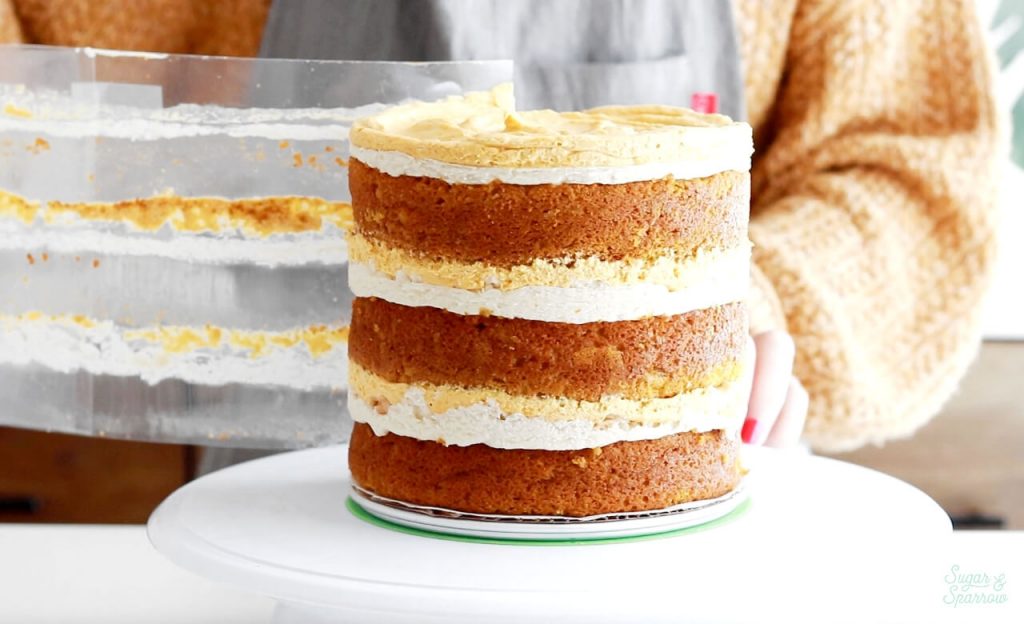
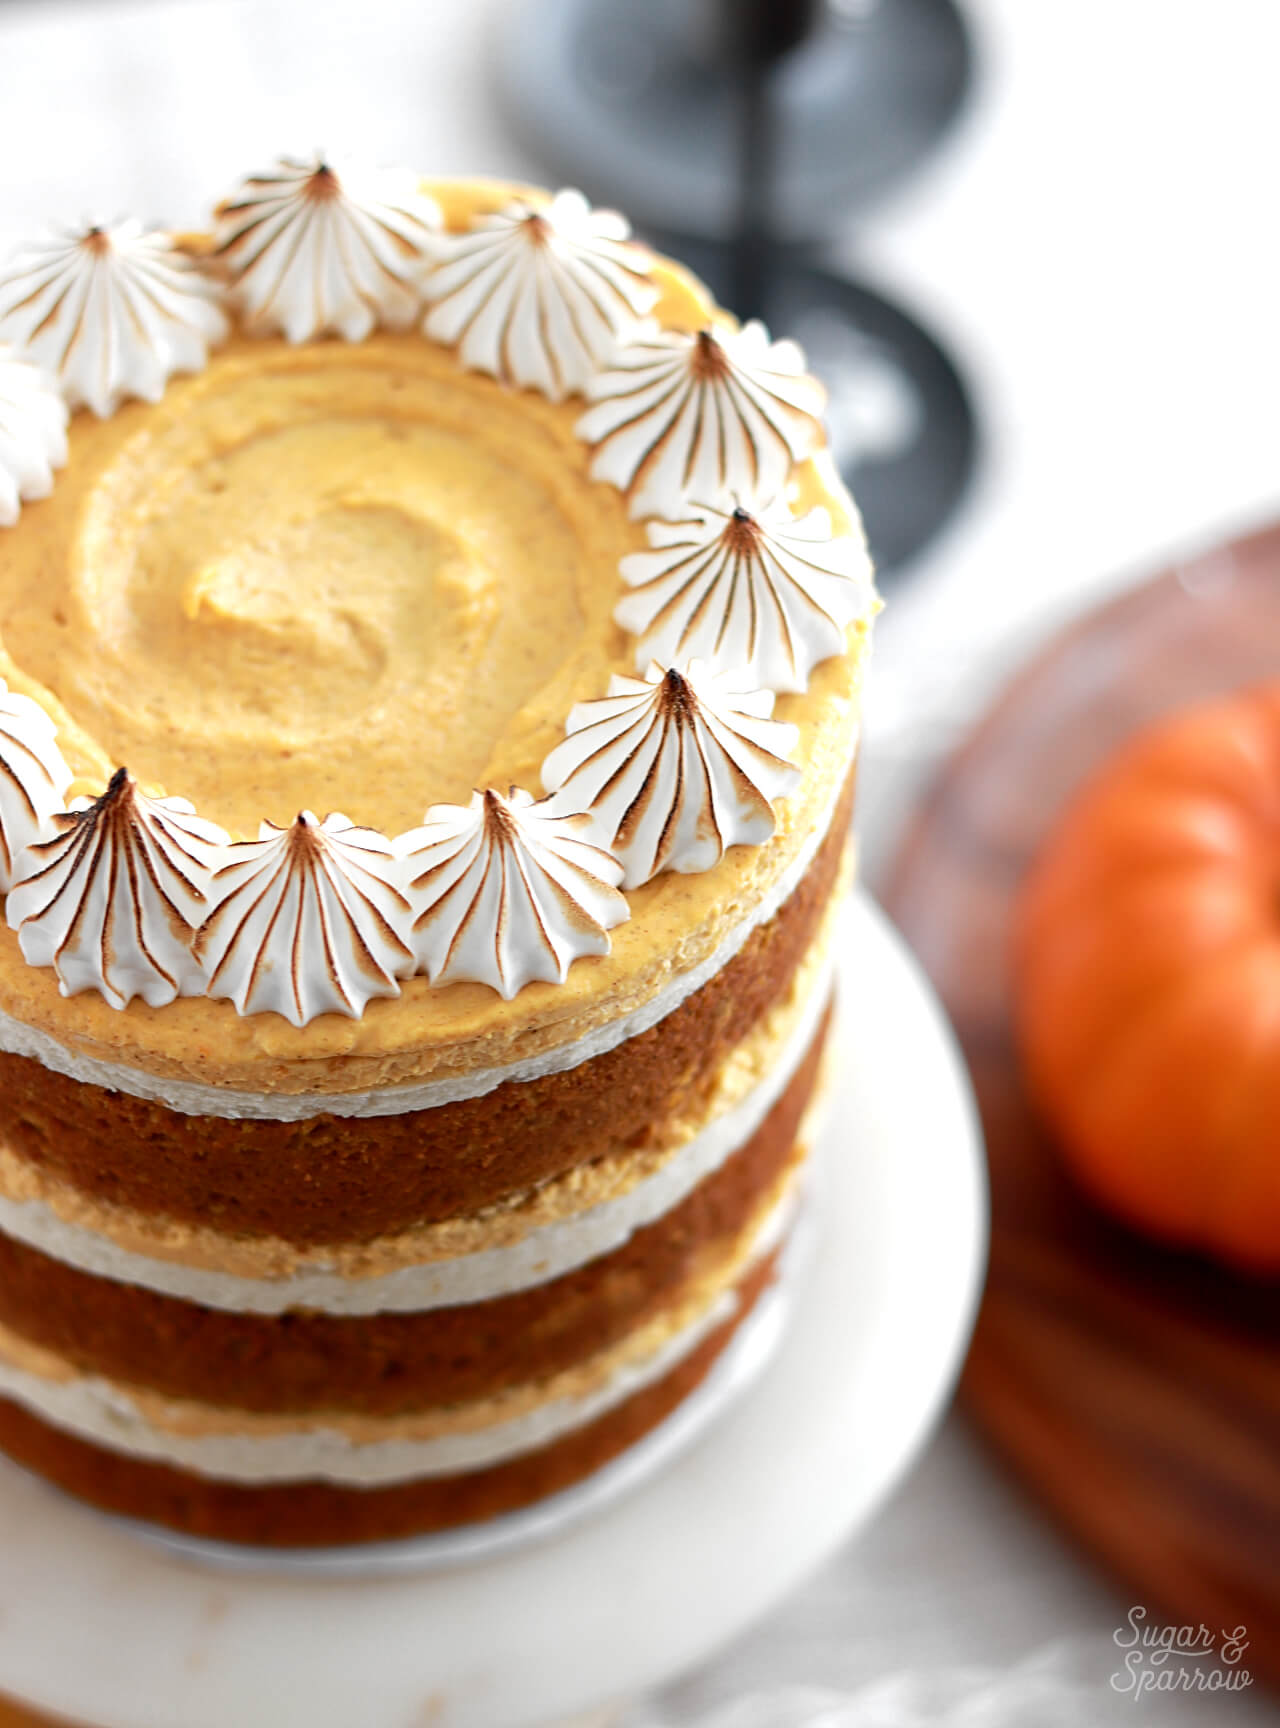
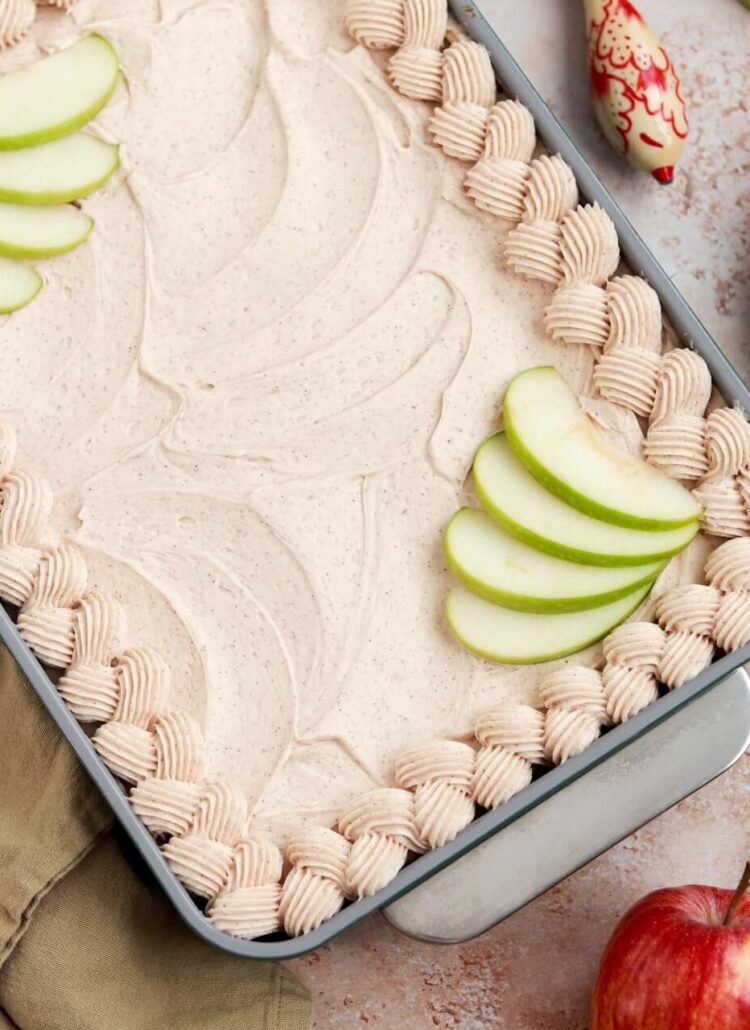
This Pumpkin Pie Cake has layers of tasty elements going on: I used my Pumpkin Layer Cake recipe for the cake layers and filled them with Pumpkin Creme Filling, Brown Sugar Buttercream, and pie crust pieces.
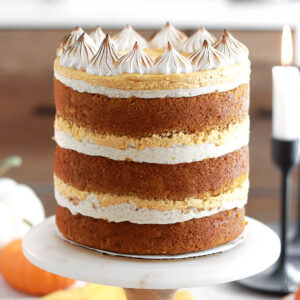
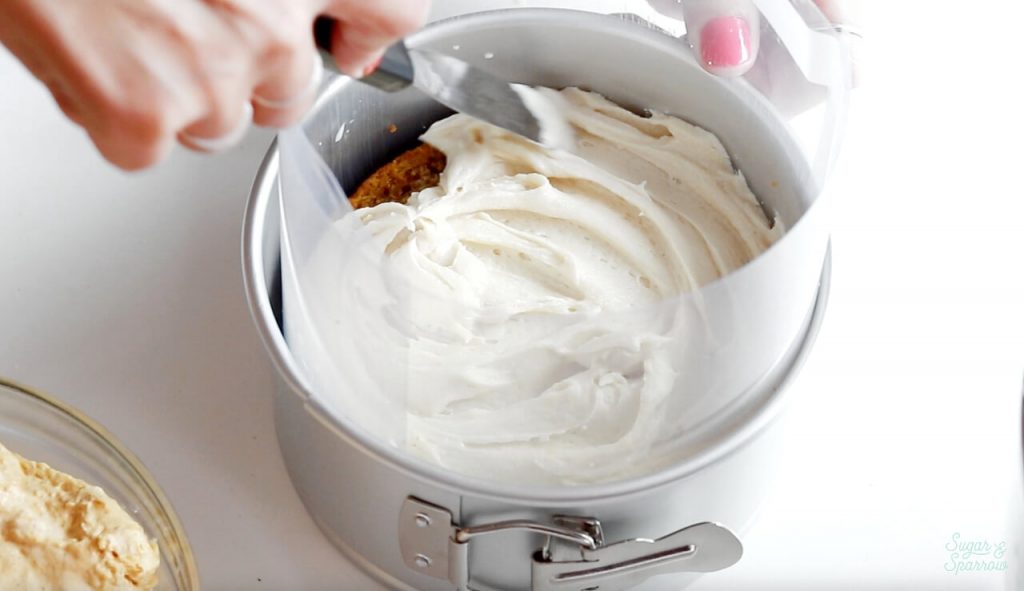
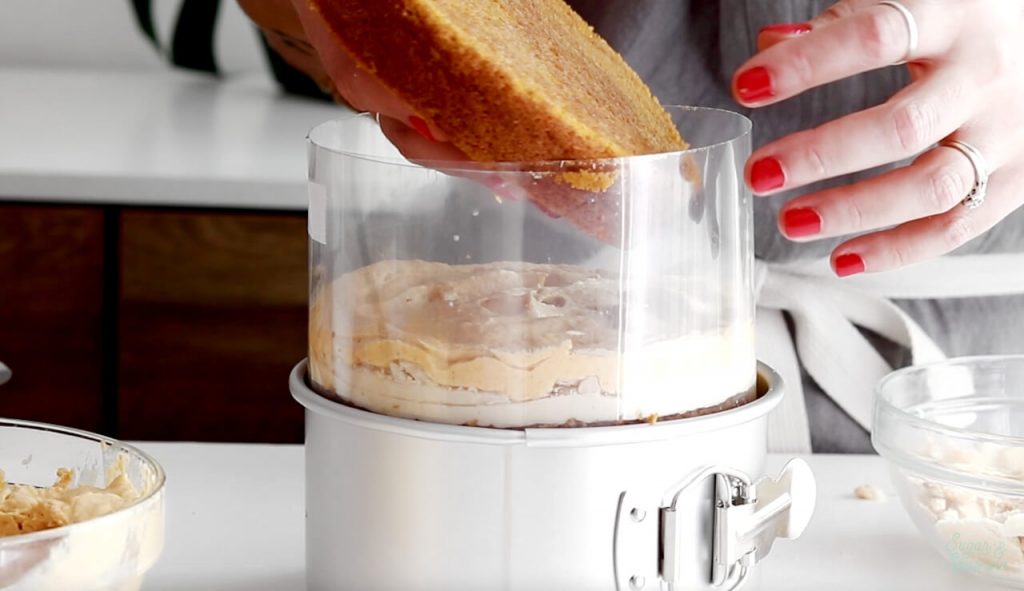
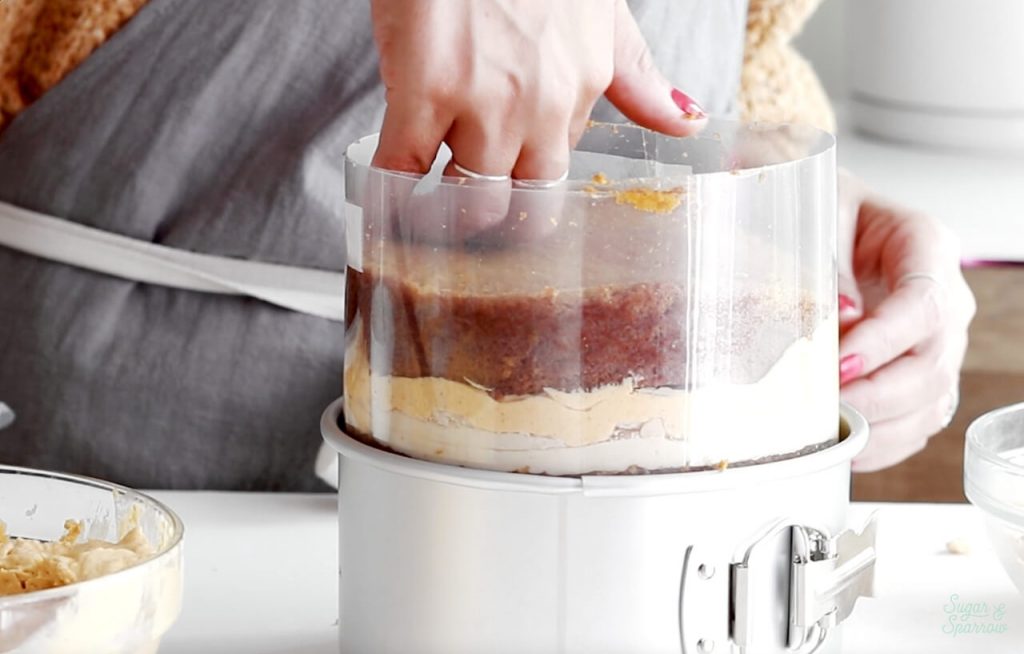
Using the springform pan lined with acetate, I was to assemble this Pumpkin Pie Cake in such a way that you can see each and every layer. I love that this assembly technique is so easy to put together and you truly don’t have to fuss about decorating perfectly. The layers are the showstopper. And an extra added bonus: it’s quick. You can make all of the elements ahead and spend just a few minutes putting it all together, which we all know is a life saver when planning and cooking an elaborate Thanksgiving meal.

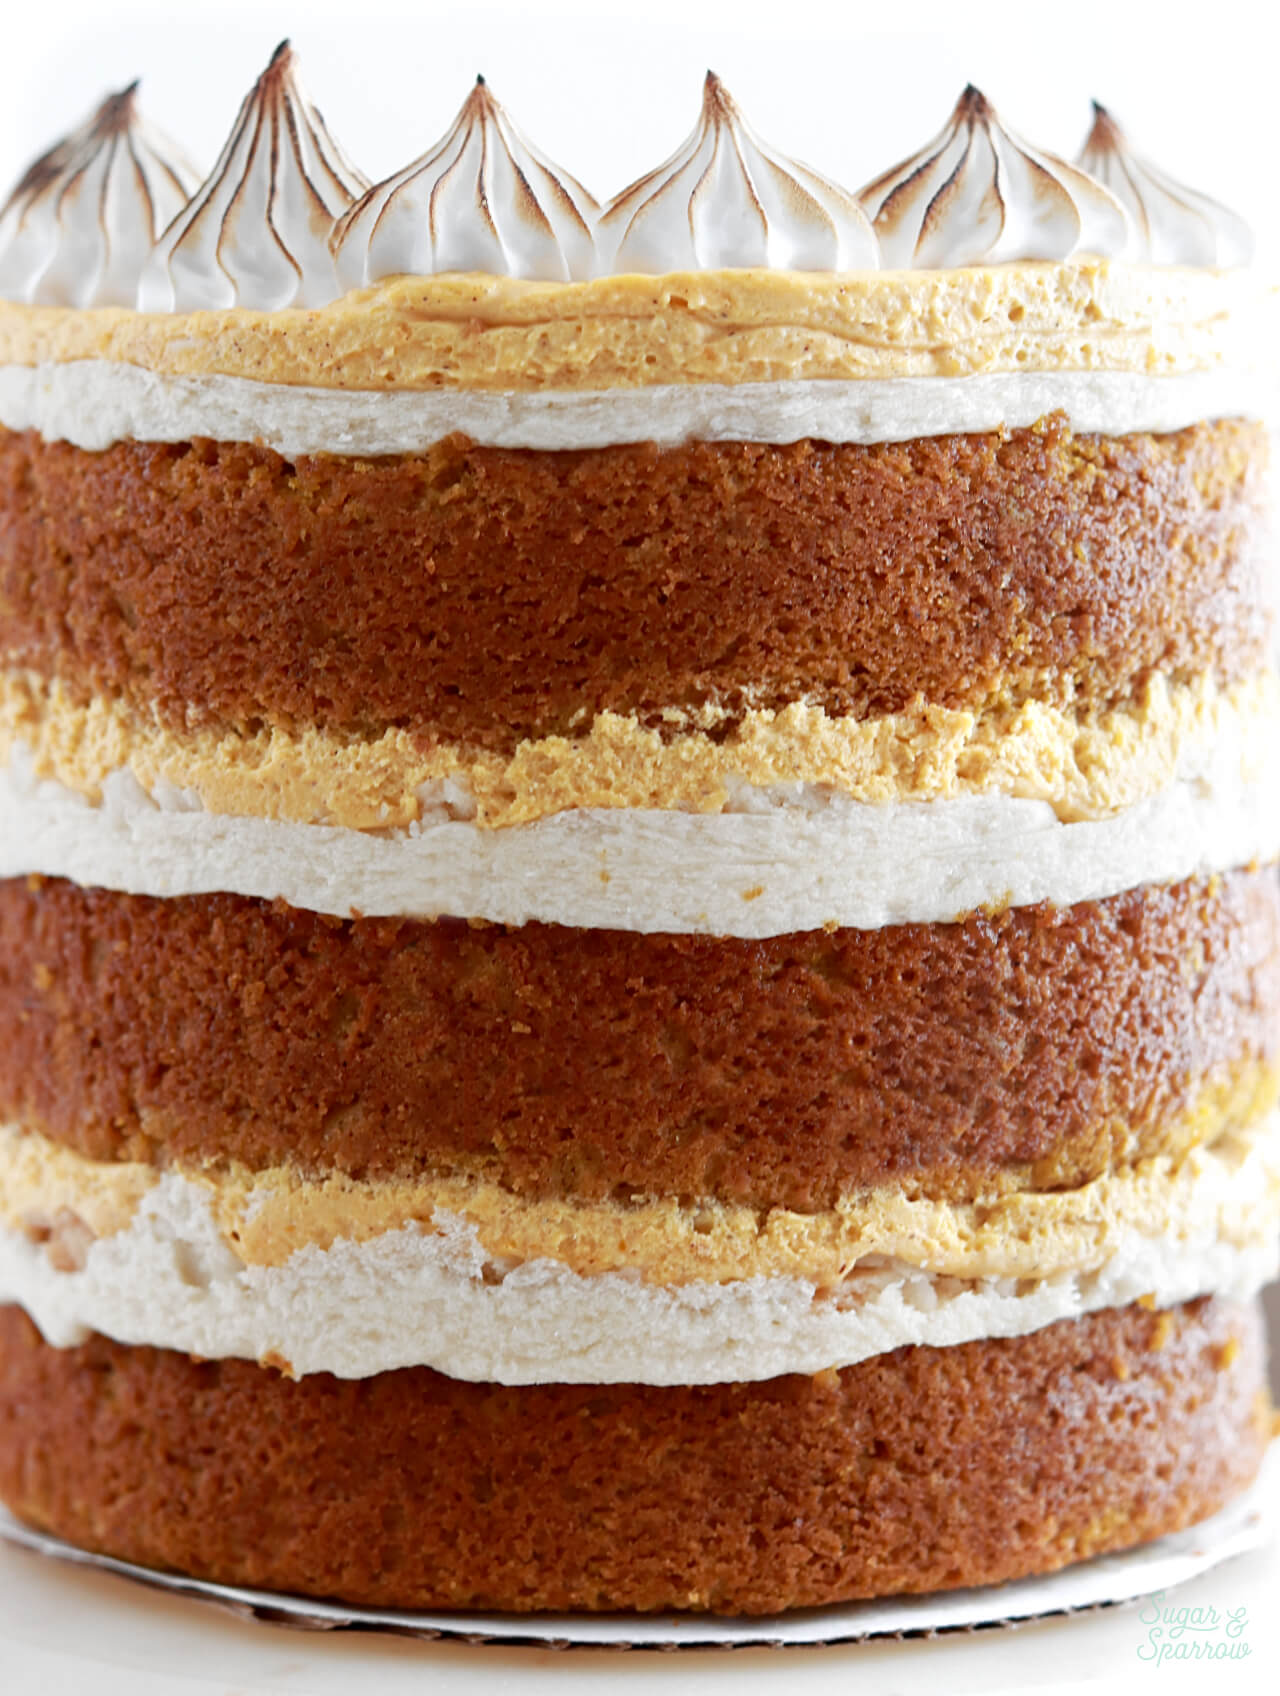
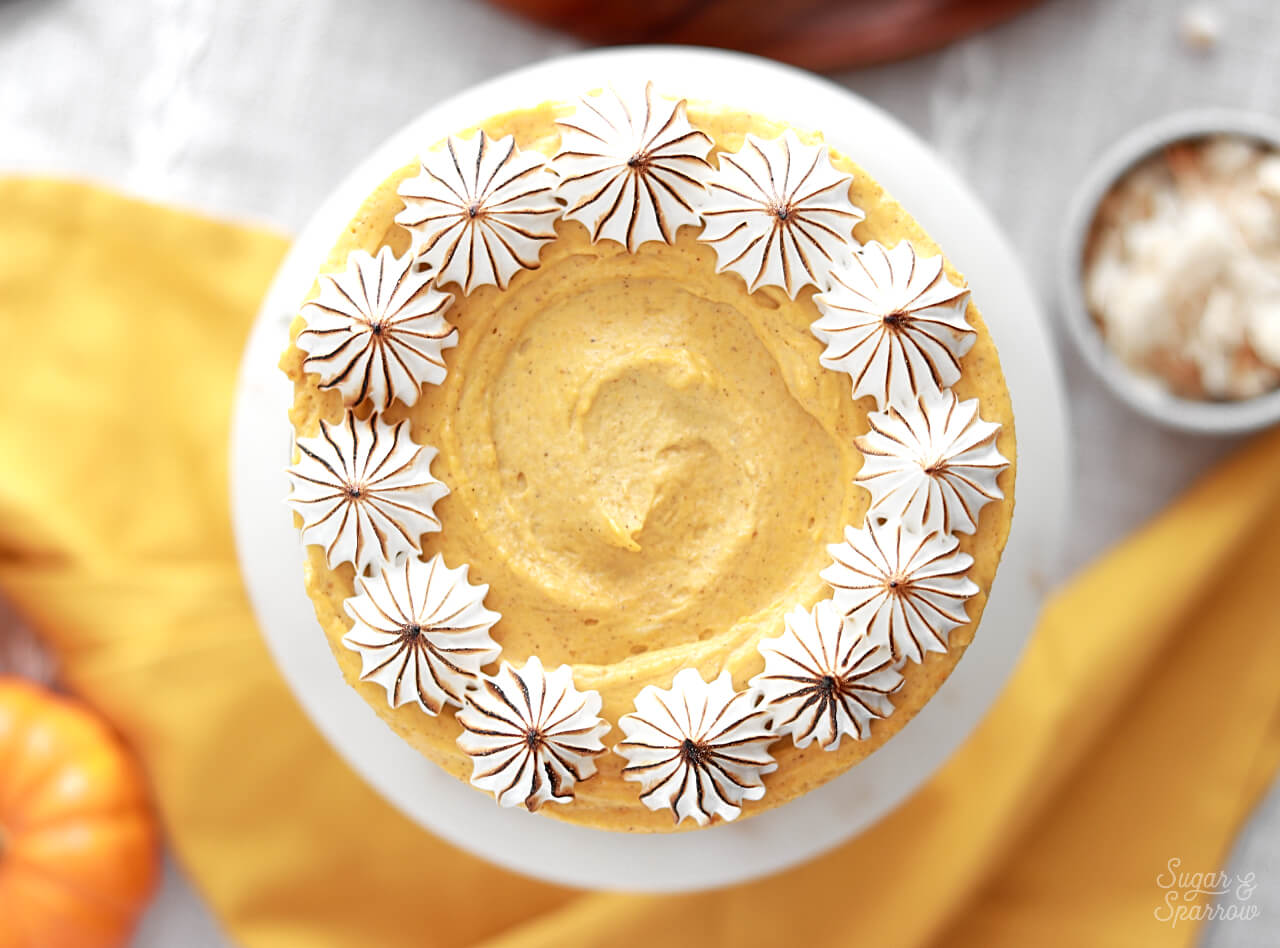
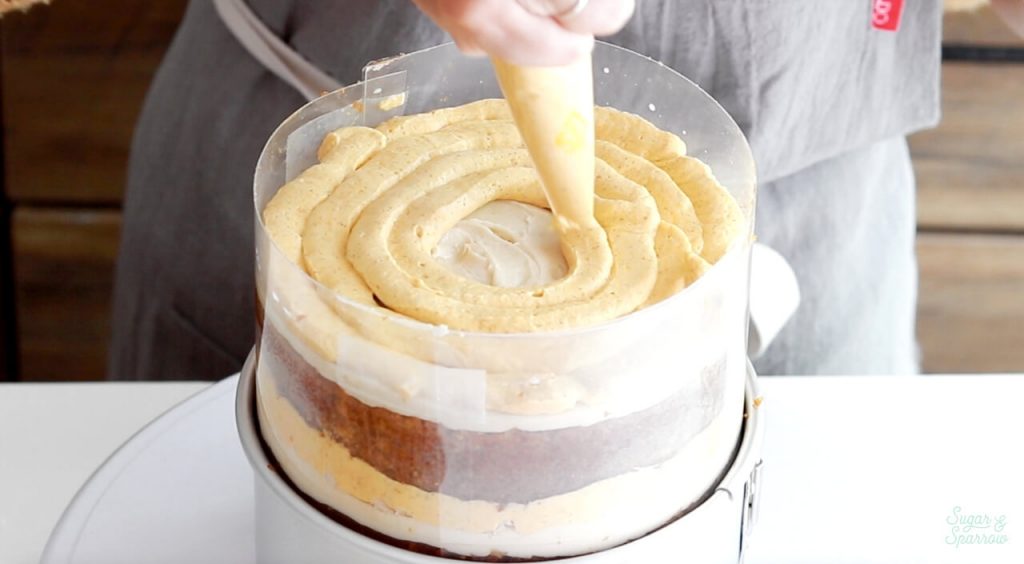
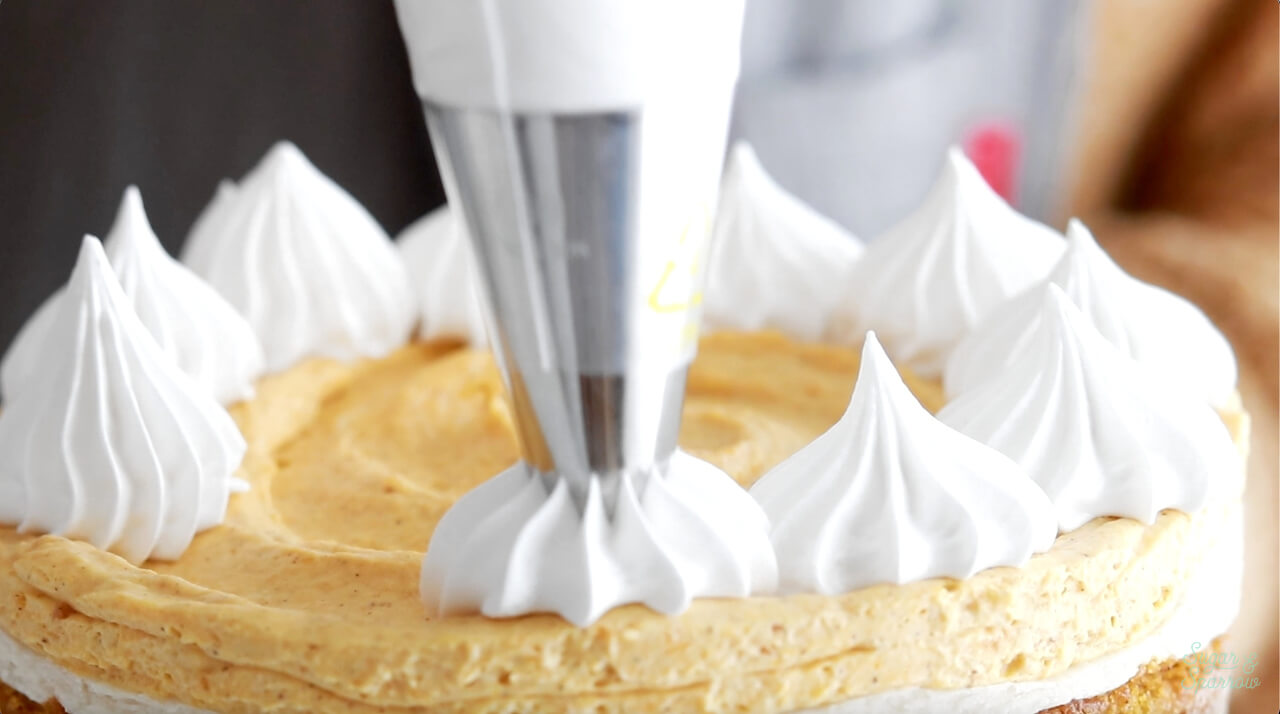
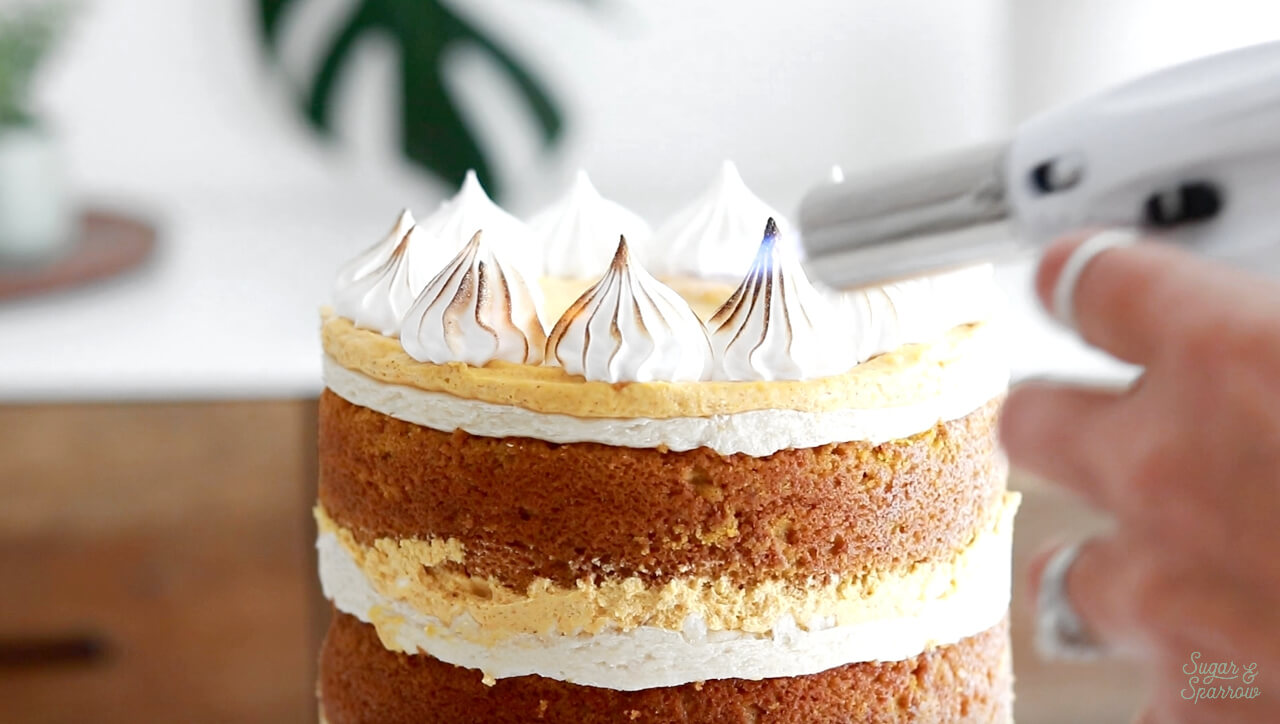
To top it all off, I piped my easy (only four ingredients!) Marshmallow Meringue recipe with Wilton tip 6B around the edges and toasted them with my kitchen torch. Busting out that kitchen torch might just be my favorite part of it all!

I’ll be sharing the recipes for each layer of this Pumpkin Pie Cake and all the info you need to assemble it below. First, here’s a video of the assembly process to inspire you:
If you’re into cake tutorials like this one, head on over to my YouTube Channel. You’ll find all sorts of cake decorating tutorials, recipes, and my entire Cake Basics series in video format. I’m always adding new videos there, so be sure to hit the subscribe button so you’ll always be the first to know about a new one.
Materials You Will Need:
- 6” Springform Cake Pan
- Acetate collar
- Scotch Tape
- Piping Bags
- 6 inch cake board
- Small icing spatula
- Three 6-inch pans for baking the cake layers
- Wilton Tip 6B (or other decorative piping tip of your choice)
- A kitchen torch (if planning on toasting the meringue)
- The recipes below
Pumpkin Pie Layer Cake
Ingredients
Pumpkin Cake
- 2 3/4 Cups (290g) cake flour, sifted before measuring
- 2 1/2 tsp baking powder
- 1 tsp baking soda
- 1 tsp salt
- 2 tsp ground cinnamon
- 1 tsp allspice
- 1 tsp nutmeg
- 1/2 tsp ground ginger
- 1 Cup (226g) unsalted butter, room temperature
- 3/4 Cup (140g) packed brown sugar
- 1 Cup (205g) white granulated sugar
- 3 large eggs, room temperature
- 2 tsp pure vanilla extract
- 1 1/2 Cups (12oz) pumpkin purèe
- 1 Cup (240ml) full fat buttermilk, room temperature DIY recipe in notes section below
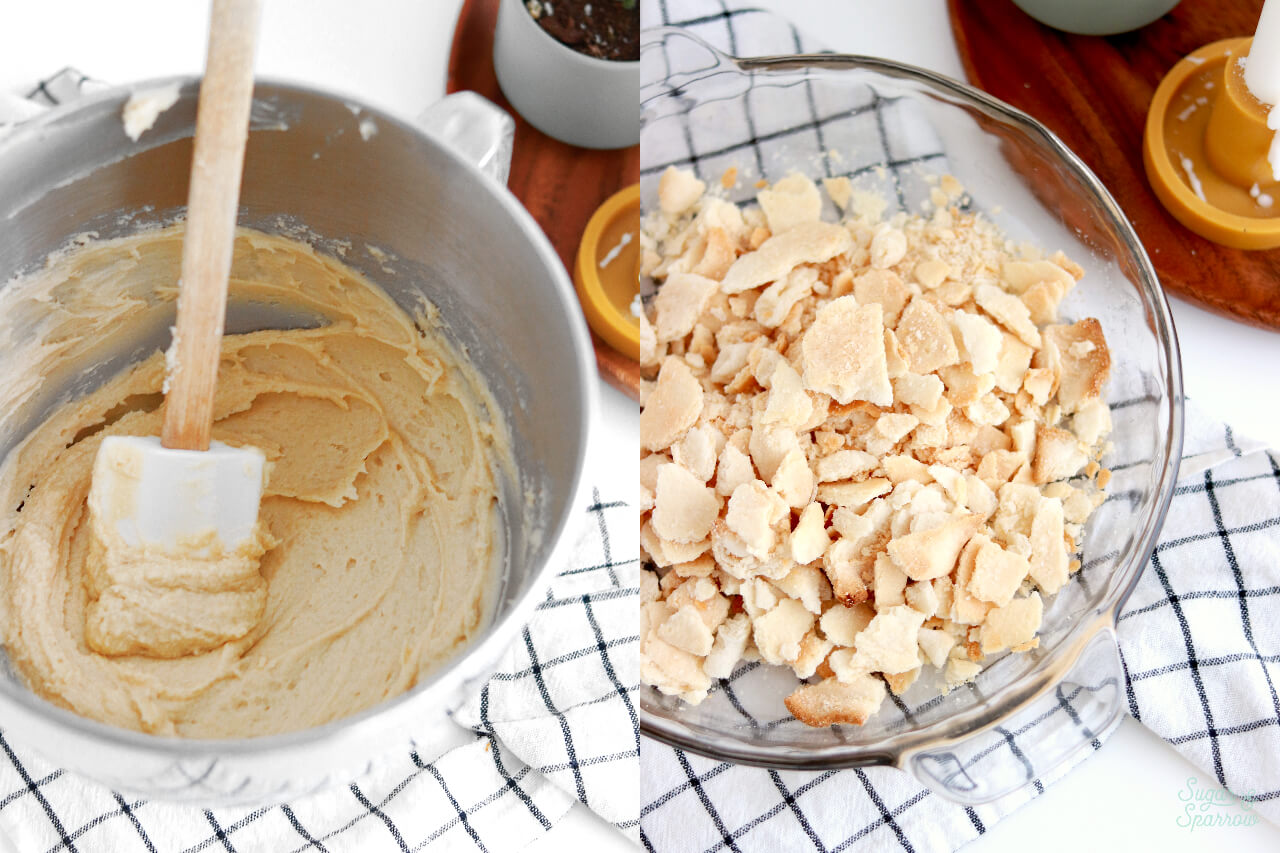
Brown Sugar Buttercream
- 1 Cup (226g) unsalted butter, room temperature
- 1/2 Cup (95g) packed brown sugar
- 3 1/2 Cups (420g) powdered sugar
- 2 tsp pure vanilla extract
- 3 Tbsp whole milk, room temperature
- 1/4 tsp salt, or to taste
Pumpkin Creme Filling
- 1 Cup (240ml) heavy whipping cream
- 1 Cup (120g) powdered sugar
- 1 Cup (8oz) cream cheese, softened
- 1 tsp ground cinnamon
- 1/4 tsp nutmeg
- 1 Cup (8oz) pumpkin purèe
- 1/2 tsp pure vanilla extract
Vanilla Milk Soak
- 1/3 Cup (80ml) whole milk
- 1 tsp pure vanilla extract
Additional Elements
- 1 package of store bought pie crust or ½ batch of your preferred homemade pie crust recipe, baked and crushed into pieces
- 1/2 batch Marshmallow Meringue Frosting (make as a last step) Recipe linked in assembly instructions below
Instructions
Make the Pumpkin Cake
- Preheat the oven to 350ºF and prepare three 6-inch cake pans by spraying the sides with cooking spray and placing a wax or parchment paper circle into the bottom of each one. Measure the cake flour by spooning into your measuring cup and leveling it. Place it into a medium sized bowl and add the baking powder, baking soda, salt, ground cinnamon, allspice, nutmeg, and ground ginger. Whisk together and set aside.
- In the bowl of your stand mixer (a handheld mixer works fine too!), cream the butter on high for two minutes until it's light and fluffy. Add in white and brown sugars and continue to mix on high for another two minutes, scraping down the bowl and paddle as needed. Add the eggs one at a time, mixing thoroughly after each addition. Add pumpkin puree and vanilla and mix for one minute on medium-high, scraping down the bowl and paddle once more.
- With the mixer on low speed, add in the dry ingredients and mix until just combined. Add the buttermilk in a steady stream and mix until just incorporated. Scrape down the sides and bottom of the bowl and give it a few stirs to make sure there are no lumps. Batter will be slightly thick, but pourable.
- Pour batter evenly between the cake pans (fill them no more than ⅔ full) and bake for 35-40 minutes, until a toothpick inserted comes out clean. Cool the cakes in the pan for ten minutes before removing and continuing to cool on a wire rack or flat surface.
Make the Brown Sugar Buttercream
- With a hand mixer or paddle attachment on your stand mixer, cream the butter and brown sugar on medium-high until it’s creamy, light, and homogenous. About 4 minutes.
- With the mixer on low, add the powdered sugar a few cups at a time, scraping down after each addition and making sure each cup is fully incorporated before adding the next one.
- Add vanilla, milk, and salt and mix on low for another minute until fully incorporated.
Make the Pumpkin Creme Filling
- Chill a metal mixing bowl or the bowl of your stand mixer in the freezer for 15 minutes. Once the bowl is chilled, add to it the heavy whipping cream and powdered sugar. Beat with a whisk attachment (a stand mixer or hand mixer will work for this) on high until peaks form and the mixture is thick and whipped, about 5 minutes. Remove the whipped cream mixture from the mixing bowl and set aside in a separate bowl.
- Add the softened cream cheese, canned pumpkin, vanilla, cinnamon, and nutmeg into the mixing bowl and mix on medium speed until it’s fully combined and there are no lumps, about 5 minutes.
- Using a rubber spatula, fold the whipped cream mixture into the pumpkin mixture until combined. Store in the refrigerator in an airtight container if not using immediately.
Make the Vanilla Milk Soak
- Combine the whole milk and vanilla. Set aside if using right away or refrigerate until ready to use.
Notes
Assembly
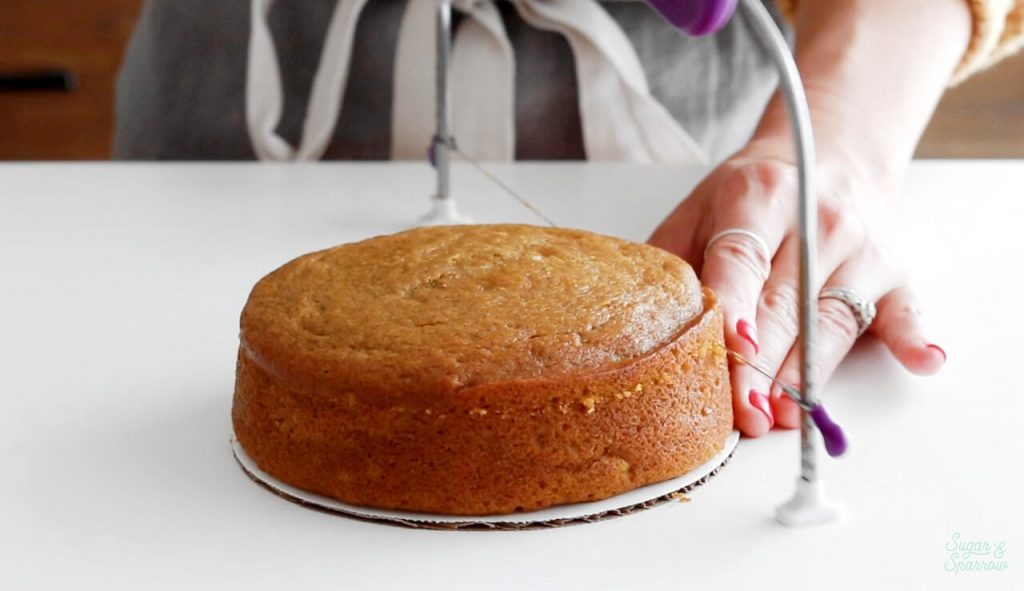
Once the Pumpkin Cake layers are cooled completely, torte each one with a cake leveler or serrated knife to make them all the same height.
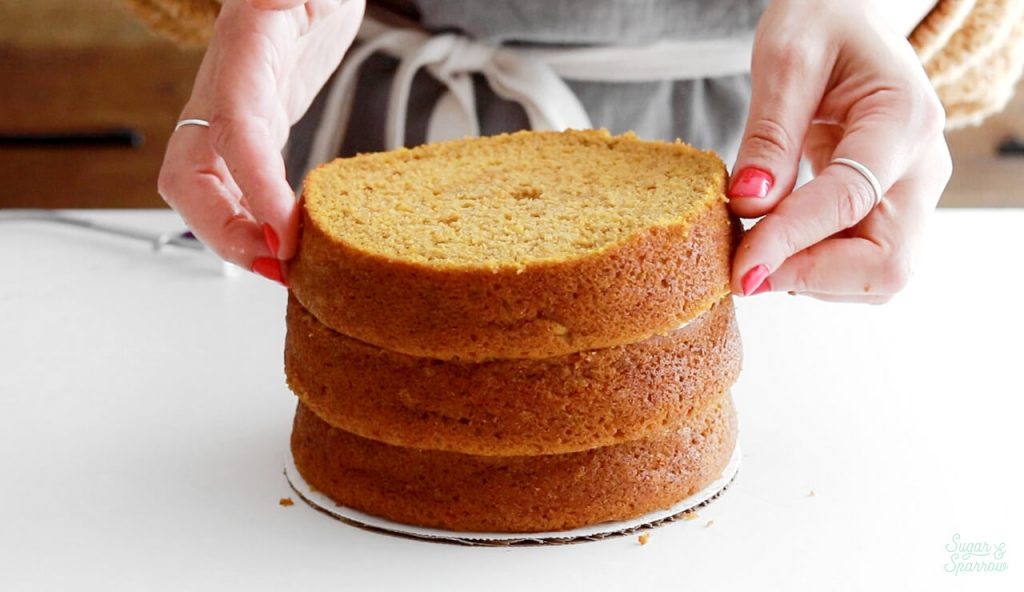
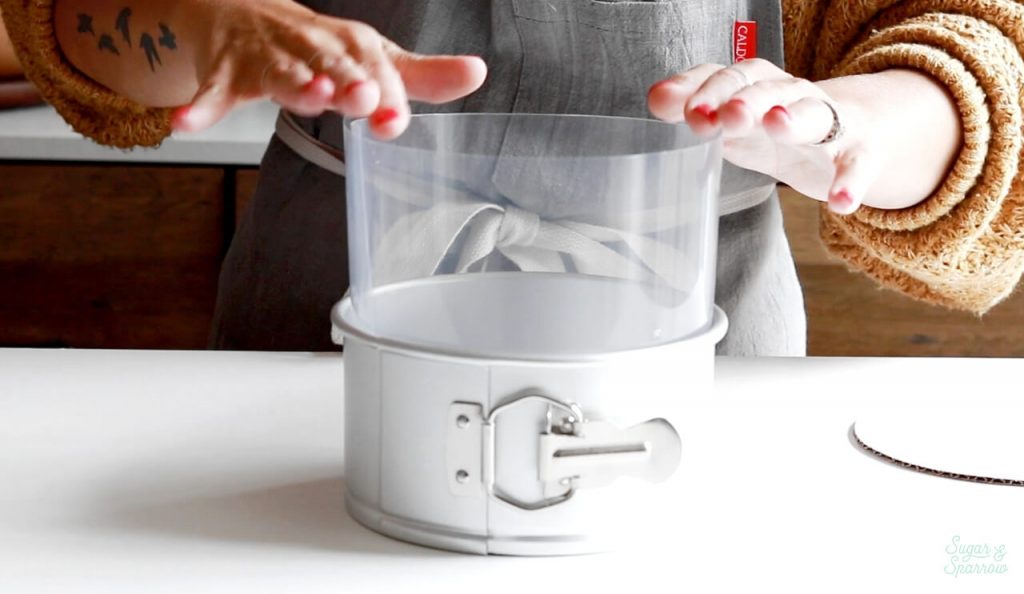
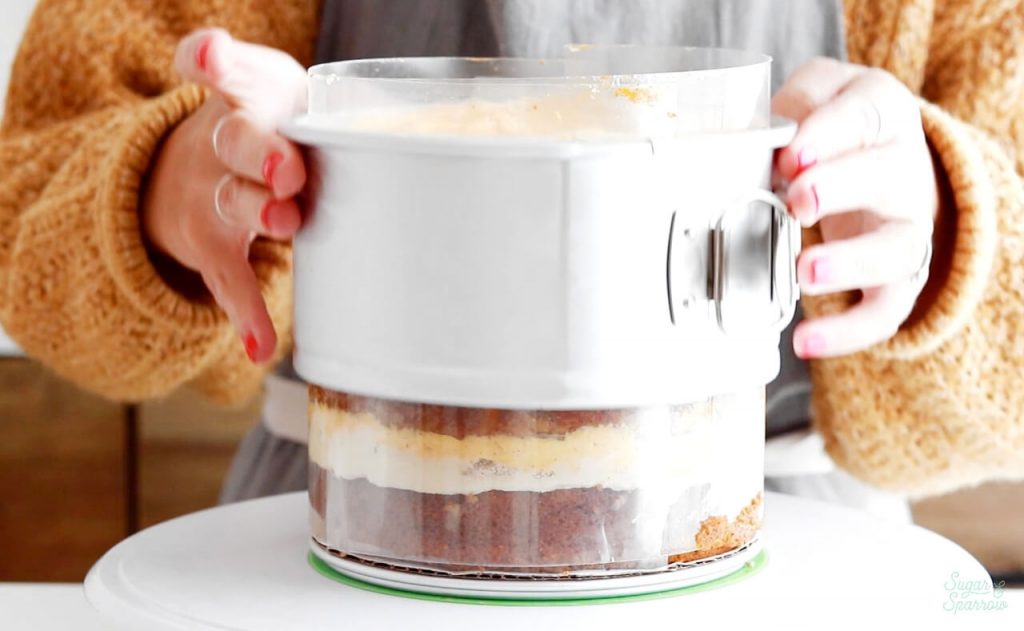
Line the springform cake pan with acetate to make a collar. Tape the sides together using a couple pieces of Scotch tape on the outside to keep the acetate level during the assembly process.
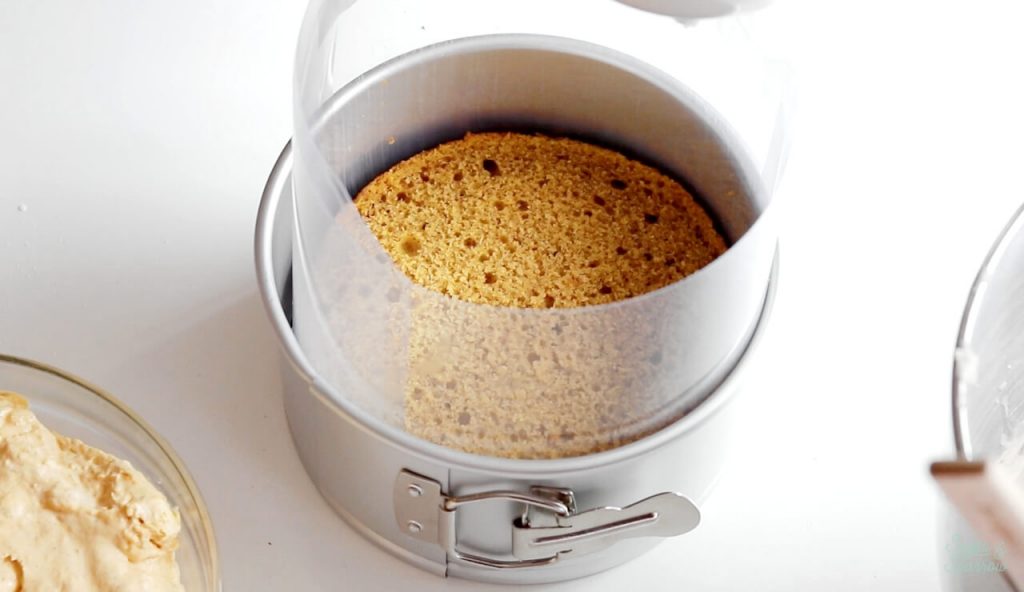
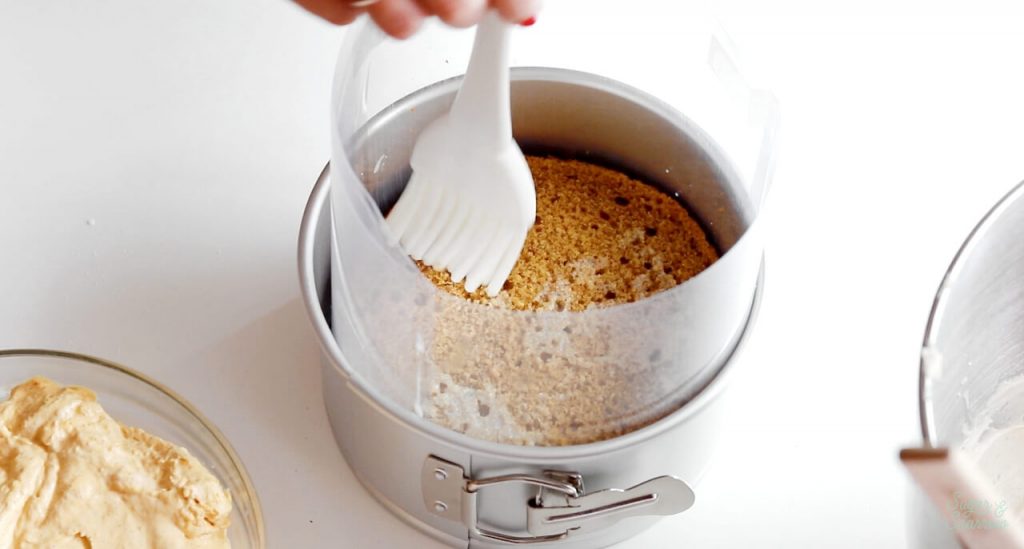
Place a cardboard cake board into the bottom of the acetate lined pan before placing the first layer of Pumpkin Cake on top. Then, brush a layer of Vanilla Milk Soak on top.
Pipe an even layer of Brown Sugar Buttercream over the top of the cake layer and smooth it down with an icing spatula. No need to get it completely smooth, but do make sure it’s as level as possible and reaches the acetate edges.
Generously sprinkle pie crust pieces over the top of the Brown Sugar Buttercream and pat them down with the back of your hand.

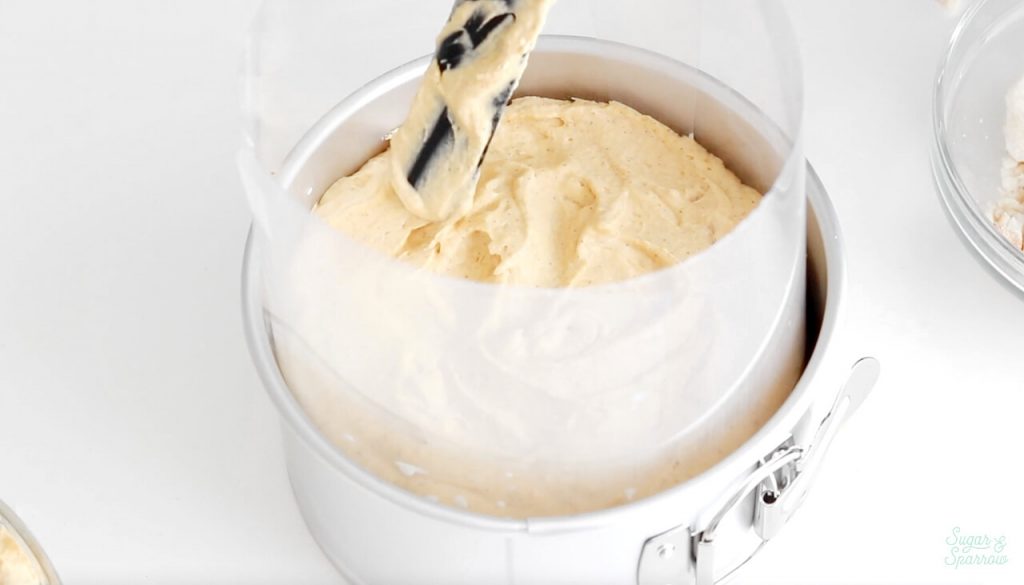
Pipe an even layer of Pumpkin Creme Filling over the top of the pie crust pieces and smooth it down with an icing spatula. Again, no need to get it completely smooth, but do make sure it’s as level as possible.
Repeat steps 3 through 6 until you’re ready to add the final layer of cake.

For the final cake layer, turn it upside down (so that the bottom of the cake is the top) before placing it on top of the Pumpkin Creme Filling.
Pipe a final layer of Brown Sugar Buttercream on top of the final cake layer and smooth it down with your angled spatula, then pipe a layer of Pumpkin Creme filling on top. Use your spatula to create a decorative swirl on top of the Pumpkin Creme Filling.
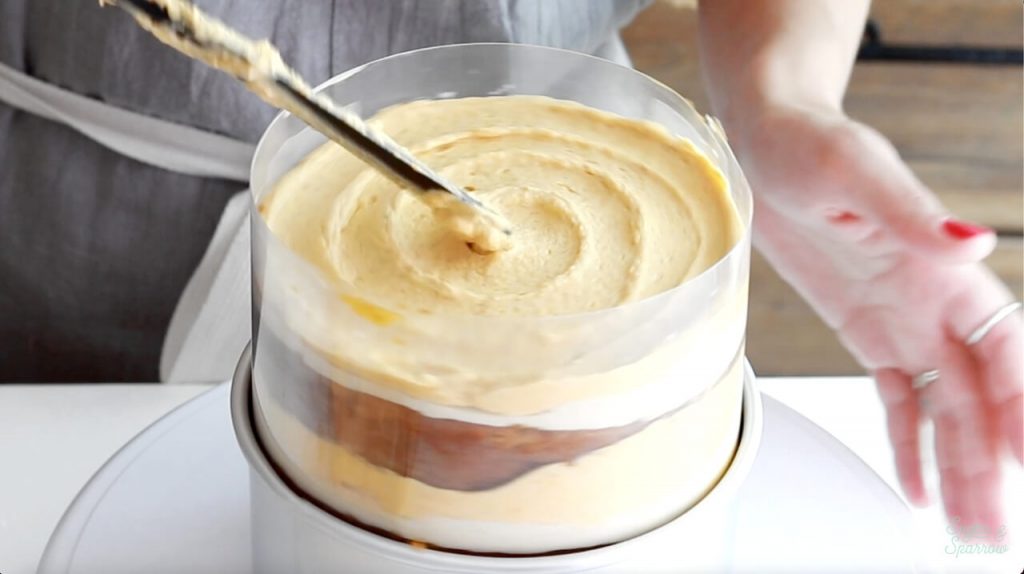
Place the entire cake into the refrigerator for at least one hour, or overnight to allow everything to set firmly. The exposed cake layers will be protected from getting dry because of the acetate siding and the Pumpkin Creme Buttercream on top. Once it’s set and ready, remove the cake from the springform pan and carefully peel away the acetate.
Make a half batch of my Marshmallow Meringue Frosting (note that since it’s a half batch, the cooking/whipping times will be about 2 minutes each instead of 4).
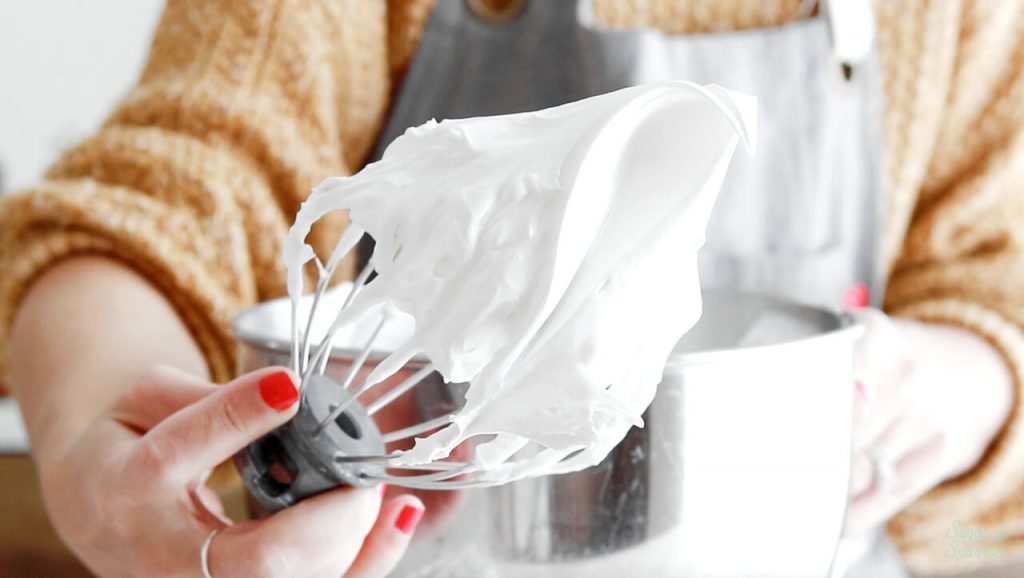
Fit a piping bag with Wilton Tip 6B before filling it with the meringue, then pipe stars with the meringue around the top edge of the cake. Use a kitchen torch to toast the meringue stars.
Make Ahead Tips & Notes
*DIY Cake Flour Recipe: To make your own cake flour, spoon and level one cup of all-purpose flour and remove 2 Tbsp. Add 2 Tbsp of cornstarch. Repeat per the amount of cake flour you need, then sift the flour and cornstarch mixture 4 times (don’t skip that step!). After sifting, spoon and level to re-measure the amount of cake flour you need.
The Pumpkin Cake Layers can be made ahead and stored, wrapped in plastic wrap, at room temperature for up to two days. Alternatively, you can store the wrapped cake layers in the freezer for up to 2 months before thawing and frosting.
The Brown Sugar Buttercream can be made ahead and stored in an airtight container in the refrigerator for up to two weeks. When you’re ready to use it, bring it back to room temperature and re-whip in your stand mixer to bring back to smooth buttercream consistency.
The Pumpkin Creme Filling can be made ahead and stored in an airtight container in the refrigerator for up to two weeks. Give it a few stirs right before you’re ready to use it.
The Vanilla Milk Soak can be made ahead and stored in an airtight container in the refrigerator for one week (go by the expiration date on your milk though).
For the pie pieces, I used store bought pie crusts and baked them according to the box instructions, then crumbled them up into little pieces. You are more than welcome to use your favorite from-scratch recipe as an alternative.
The Marshmallow Meringue needs to be made as a final step in the assembly process to make sure it maintains perfect piping consistency.
The fully assembled cake can be stored in the refrigerator (toasted meringue piping and all!) for up to two days before serving. You’ll want to wrap the sides of the cake in plastic wrap to keep them from drying out. Be sure to take the cake out of the refrigerator about an hour or two before serving, because cake always tastes better at room temperature.

If you’re looking for an easy, creative alternative to the classic Thanksgiving desserts this year, this recipe is sure to be a hit. It’s got all the Fall flavors you want in a Thanksgiving dessert, but it’s much prettier to look at and can be made in advance so you don’t have to stress about whipping it all up day-of.


Happy Thanksgiving, y’all. I hope you all have endless lists of what you’re thankful for this year and get to share it all with family and friends. And please let me know if you make this cake recipe! Leave a comment below to tell me about it or tag @sugarandsparrowco on Instagram to show us – love to see what you create!
Disclaimer: I was compensated by JOANN for my work of creating this project, styling, filming, photographing, and writing about their products. As always, all opinions are honest and my own. Thank you for supporting brands that support Sugar & Sparrow.


can I substitute the whole milk for evaporated or almond?
Hi Daniela! I have never tried it with an alternative milk, but I would opt for almond milk over evaporated milk as a substitute.
Is there a way to make the pumpkin mousse layer more stable/more firm? The cake was delicious and turned out well, but as it thawed and came to room temperature the mousse began to bulge and spill out. Thanks!!
I’m so happy this cake was a hit, Mike! I’ve never had an issue with the pumpkin creme filling at room temperature so I’m not sure what to do differently other than perhaps adding some gelatin to the whipped cream to make it a stabilized whipped cream base. It would be an experiment though.
Long ahot of getting an answer but here i go.
I have an issue with the buttercream. Apparently I didn’t cream the sugar and butter properly, it very grainy. Although i saw you answer to just whip it for longer, it doesn’t seem to be working for me. I added a few tbsp of heavy cream at a time and continued mixing, warmed a 1/4 cup of it to see if the temperature of it would dissolve the remaining crystals but its still very ‘gritty’. Any help/tips? Every other component is perfect, i made the cake and the pumpkin filling and they taste amazing.
Hi Valeria! The brown sugar buttercream can end up a little grainy from the brown sugar, especially if you didn’t fully incorporate the butter and sugar in the beginning of the recipe. Your best bet is to leave it alone for a few hours in an airtight container (overnight is best!) and then re-mix it with your stand mixer to make the consistency smooth. Allowing it to rest will give the brown sugar more time to dissolve organically. Hope that helps!
Hi,
When you say pie crust, you are referring to flour based pie crust correct? Not graham crackers? Can we substitute graham crackers instead of pie crust?
Thank you.
Chandana
Hi Chandana! I am referring to a flour based pie crust but you can totally sub a graham cracker crust instead. That sounds lovely!
I’m about to make this cake for a Friendsgiving dinner. Can I make it in a sheet pan and then cut it with a 6″ ring?
Hi Loris! I think so! I’ve never baked this cake in a sheet pan before so I would monitor the baking time and start checking for doneness at 20 minutes. Hope that helps!
Okay, tightwad question here. I’ve never used acetate sheets before. Is that something you can wash and reuse, or do you dispose of them after one use?
Hi Tonya! You could technically wash and reuse them if you wanted to!
This cake has all the elements of pumpkin pie at Thanksgiving. I made it as a 3 layer 9″ centerpiece. It weighed 13 lb. and was a huge hit. It fed a ton of people. I was asked to make a cake for a Bake Sale Raffle so I’m making this again. I am making the cake layers ahead and freezing them. When do I add the Milk Soak??? Before freezing or during assembly?
Yay, Sandy! I’m so happy this recipe was a hit! I’d add the milk soak during the assembly 🙂
I made these as 5oz cake jars (except the meringue) and they were amazing. How long do you think they would last refrigerated?
That sounds amazing, Oke! They should last 4-5 days in the refrigerator as long as they’re in an airtight jar.
OMG! What an Amazing Cake Recipe!!! Thank you for sharing. Will definitely make this again. I made it for Thanksgiving and everyone loved it. The only thing is, make sure your cake layers are only 1.5″ high, I accidently made them 2″ tall and had to make an additional cake.
Yay, Fran! I’m so glad you enjoyed this recipe!
This looks great! Since I’m not a huge fan of pie crust, I think I’ll exchange those layers for chopped praline pecans.
Oh my gosh, chopped praline pecans will be amazing!
Hello, would this method with the acetate work with chocolate cake and choc buttercream and vainilla buttercream filling too? Or does it work specifically becuase of the type of ingredients you have here?
Hi Bethany! This method will work with any cake/filling combo. Go for it!
Everyone kept commenting on how moist the cake was. My mother in law even said it’s the best cake she’s had. We modified it into 2 layers as we only could get 9” pans. We also ended up covering it with a piped buttercream since we could not get the supplies for the meringue, and unsuccessfully tried marshmallow fluff.
That’s amazing, Joe! I’m so happy to hear that this recipe was a hit!
This looks beautiful and delicious! I do like the exposed layers, but wanted to ask anyway. If I wanted to cover the cake in a frosting or meringue (so the layers would be a delicious surprise), which would you recommend from a flavor perspective? Thank you!
Hi Ana! You could totally cover the cake in buttercream. I would double the batch of Brown Sugar Buttercream and use that as the frosting. You could also go with Vanilla Buttercream or White Chocolate Buttercream if you’d rather go with a different flavor. Here are those recipes:
Vanilla Buttercream: https://sugarandsparrow.com/vanilla-buttercream-recipe/
White Chocolate Buttercream: https://sugarandsparrow.com/white-chocolate-buttercream-recipe/
Fantastic, thank you so much!
Can I freeze this cake, fully completed, except for the meringue?
Hi Cathy! You can certainly freeze this cake and then add the meringue before serving. I would freeze it with the acetate on so that the sides are protected or if you’ve already taken the acetate off, you can chill it in the refrigerator for 30 minutes before wrapping the cake in plastic wrap and freezing. Enjoy!
I made this for a birthday party. It was delicious, but the brown sugar buttercream was a bit gritty; is there anything I can do to prevent that when I make this again?
Thanks so much for sharing!
Yay, Penny! I’m so happy you loved this recipe! To make the brown sugar buttercream less gritty, try mixing for a longer amount of time at the end at the lowest speed on your mixer. This will give the brown sugar time to dissolve. Hope that helps!
I thought it was going to be gritty when I made it but by the time it was served the crystals had mostly broken down, and by the next day there was zero grit.