• Cake
  • Frosting
  • YouTube
  • My Favorite Tools
  • Nav Social Icons

  • Skip to primary navigation
  • Skip to main content
  • Skip to primary sidebar
  • Skip to footer
  • Recipes
    • Cake
    • Cupcakes
    • Frosting
    • Ice Cream
    • Vegan
  • Cake Basics
  • Tutorials
  • Blog
  • About
  • Mobile Menu Widgets

    Connect

    Search

Sugar & Sparrow logo in script font

Sugar & Sparrow

Lifestyle and Cake from Portland Oregon

  • Cake Basics
  • Recipes
    • Cake
    • Cupcakes
    • Cookies & Bars
    • Filling
    • Frosting
    • Ice Cream
    • No-Bake
    • Small Batch
    • Vegan
  • Tutorials
  • Book
  • Blog
  • About

Rainbow Arch Cake Topper Tutorial

May 31, 2022 · In: Decorations & Garnishes, Featured, Recipes, Tutorials

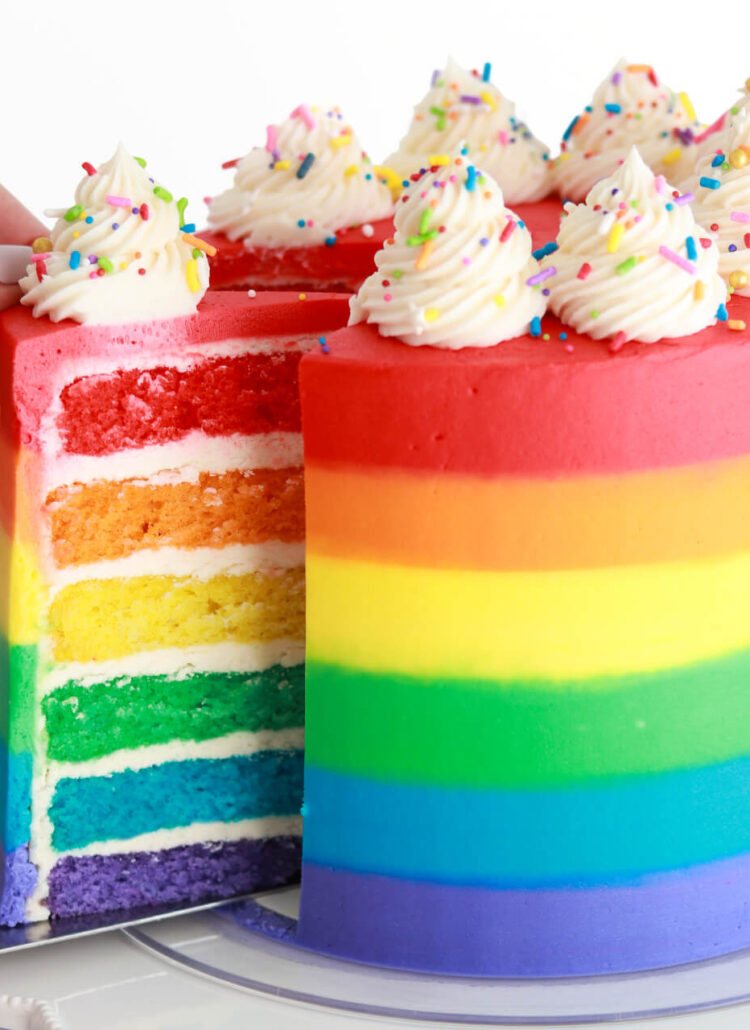
A few years ago, I was searching for the perfect rainbow arch cake topper for a Trolls themed cake and could not find what I was imagining anywhere. So instead, I decided to whip out some fondant and make my own. Although the rainbow cake topper ended up looking spot on, the fondant would not dry (at least not in the timeframe I needed it to) and I was starting to panic a bit. Then I improvised. I recreated the rainbow topper, only this time I used gum paste, which dries much faster and firmer than fondant. It looked exactly the same but dried hard as a rock in about 48 hours. The cake was saved! 

diy rainbow cake topper tutorial
rainbow cake topper diy

I recently made another gum paste rainbow arch topper, this time for a Bluey themed cake, and realized it’s such a fun DIY that I needed to share it with you all. The main things you need are gum paste, food color gels to create your rainbow color scheme, toothpicks, and about 48 hours of dry time. Here’s a quick video of the process before you read all about it below:

PS: If you love creative cake decorating tutorials like this one, be sure to check out my YouTube channel! 

Gum Paste Vs. Fondant

Gum paste is a pliable sugar dough that is very similar to fondant in texture and workability. The main difference is that it dries much harder than fondant. And while you’d use fondant to cover a cake and make simple decorations that guests might want to eat, you should only use gum paste for decorations like cake toppers or sugar flowers since it dries rock hard. Gum paste is technically edible, but it’s not really much fun to eat (and might chip a tooth!). 

gum paste vs fondant

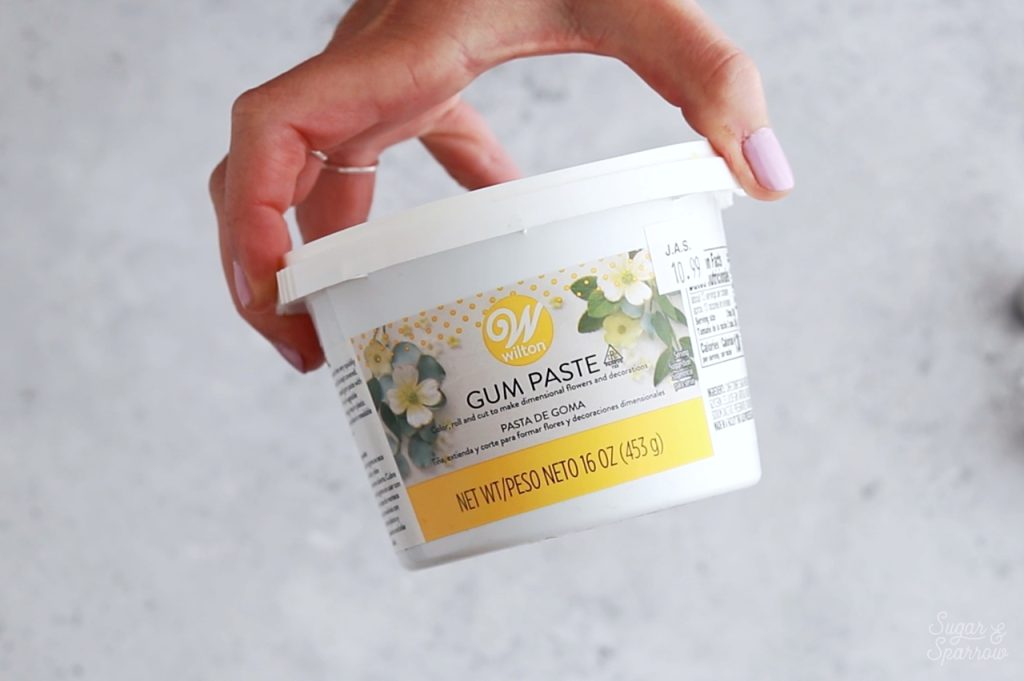
You can get gum paste on Amazon or at your local craft store that has a cake decorating aisle. If you make a lot of custom cakes, I definitely recommend having some on hand at all times for last minute decorations. It’s so much fun to work with and so durable – a win win! 

You Will Need

  • Gum paste
  • Food color gels of your choice (I used AmeriColor Deep Pink, Sky Blue, Electric Purple, and Lemon Yellow)
  • Rubber gloves
  • 1 Tbsp vegetable shortening 
  • A Cup or mug
  • 1-inch circular cookie cutter or round glass 
  • Small paint brush
  • 1 Tbsp water
  • Sharp knife
  • Large spatula
  • 2 toothpicks 
  • Wax or parchment paper

Step 1: Color the Gum Paste

Measure the gum paste into four 1-inch balls and place the rest back in the package. You may need to knead the gum paste with a little vegetable shortening to make it pliable if it seems too firm to work with at this point. 

how to color gum paste

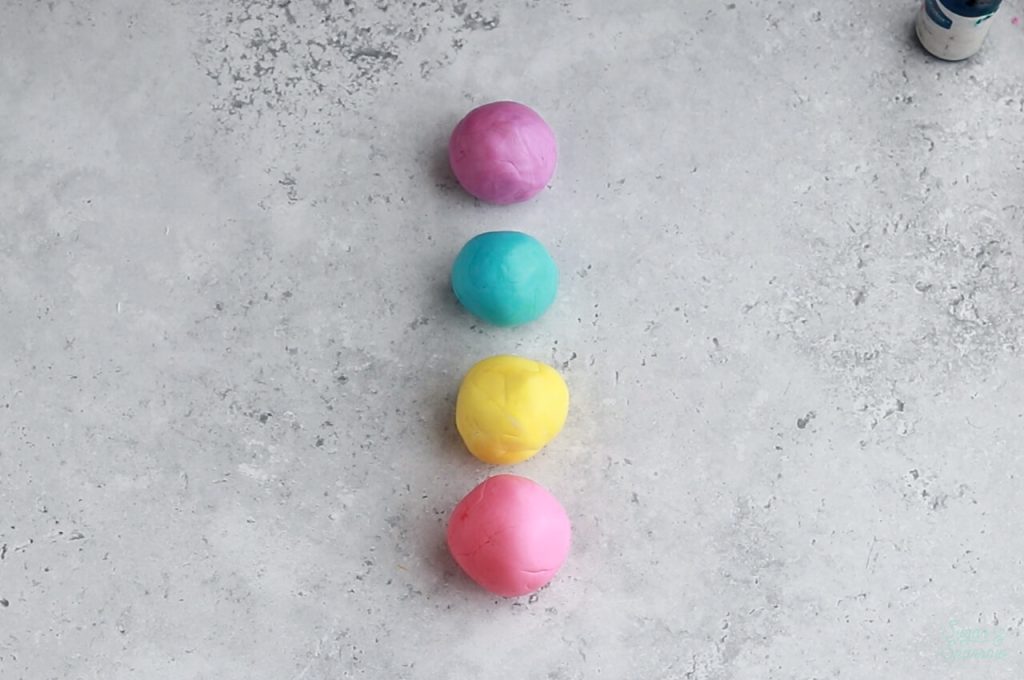
Put on your rubber gloves (so you don’t dye your hands!) and knead food color gel into the gum paste balls one by one to create the color palette you’re imagining. I used AmeriColor Deep Pink, Lemon Yellow, Sky Blue, and Electric Purple for this color palette (one drop per ball). Be sure to store any gum paste that’s not in use underneath a cup to keep it from drying out. 

Step 2: Roll the Gum Paste

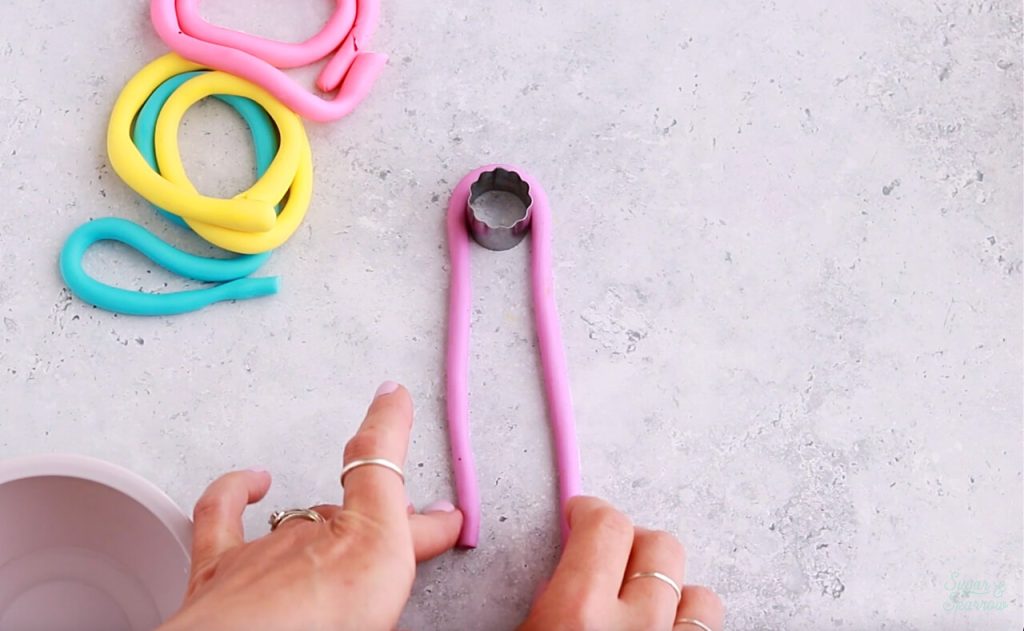
One by one, roll out each gum paste ball with your hands to make them into tube-like shapes. Each gum paste tube should be between ⅛ and ¼ inches in diameter, and about 8 inches long. 

gum paste rainbow tutorial

Do this part carefully so that each colored tube for the rainbow arch is the same diameter, and store any finished tubes underneath a glass while you’re rolling the other colors out. 

Step 3: Assemble the Rainbow Arch

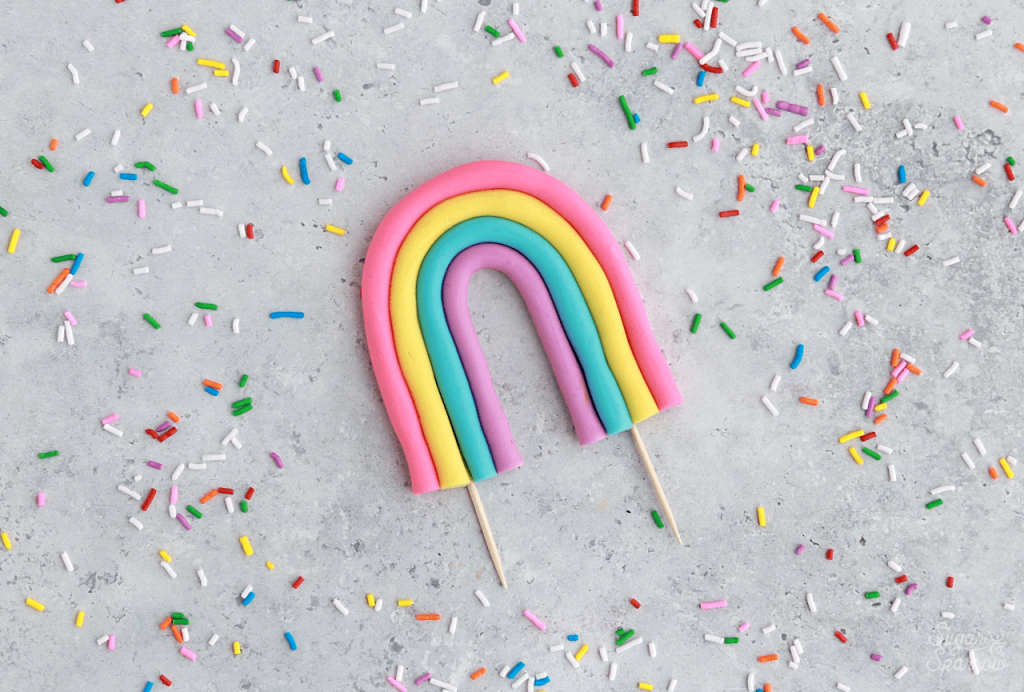
Place the round cookie cutter or circular glass onto your work table. This will be used as a centerpiece to build the rainbow arch around. Starting with the color that you want on the inside of the rainbow arch, wrap the middle of one of the gum paste tubes around the centerpiece to make a perfect arch, with the ends of the tube parallel to each other. I went with my Electric Purple tube for the inside color.

gum paste rainbow arch tutorial

Dip the small paint brush into the water and paint the edges of the gum paste arch. This will act as glue for the next color. 

rainbow cake topper tutorial

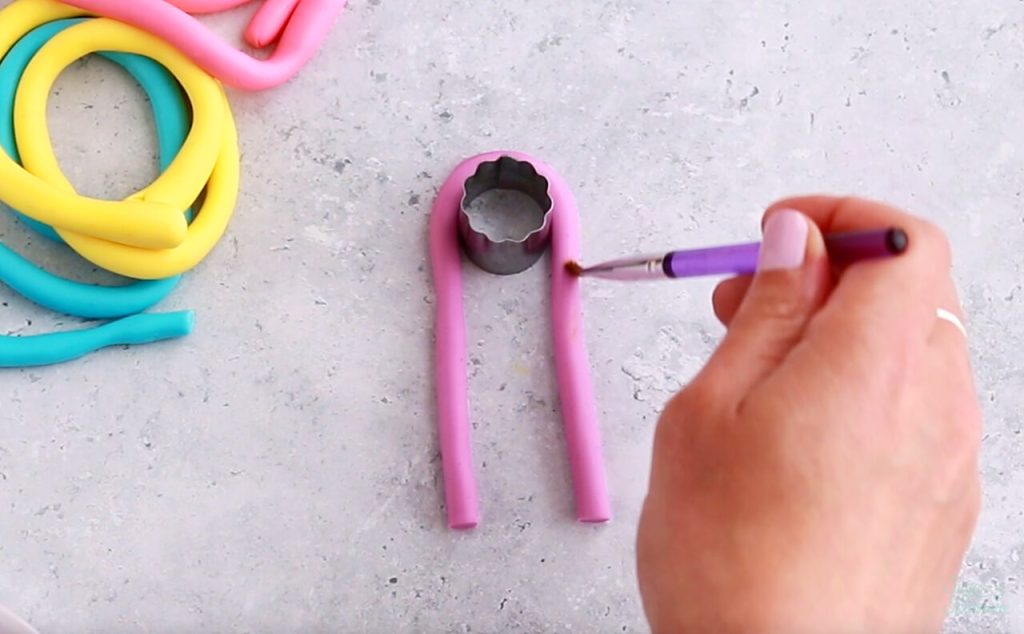
Wrap the next gum paste tube around the arch and gently press it around the first gum paste color to adhere it with the water. 

rainbow cake topper tutorial

Repeat adding water to the edges and adding additional gum paste tubes until your rainbow arch is all together, then remove the circular centerpiece. I ended up making the inside of the arch smaller by gently reshaping it with my hands once the centerpiece was removed.

rainbow arch cake topper tutorial

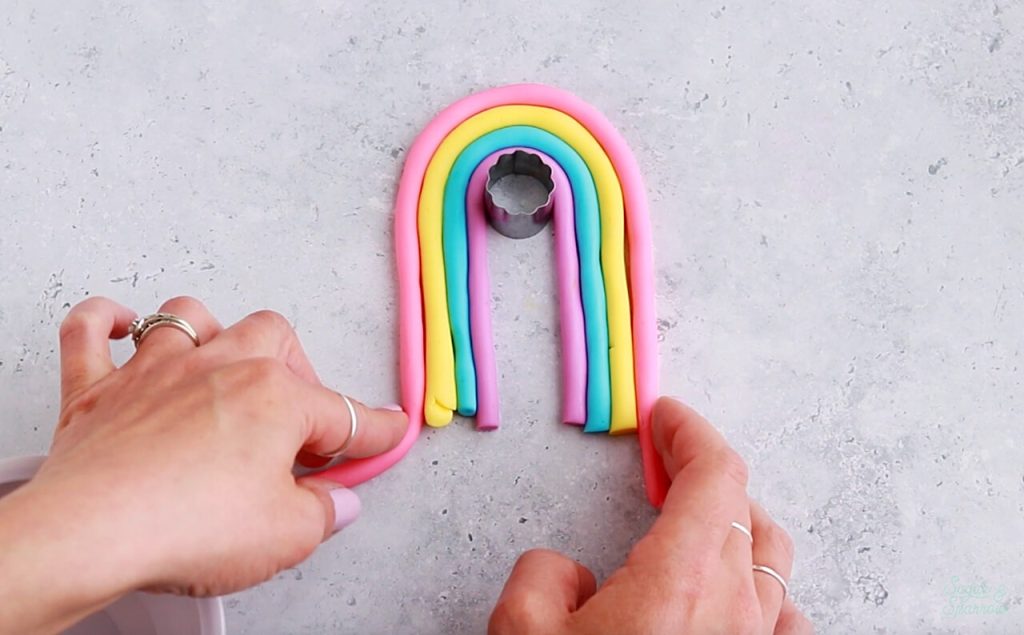
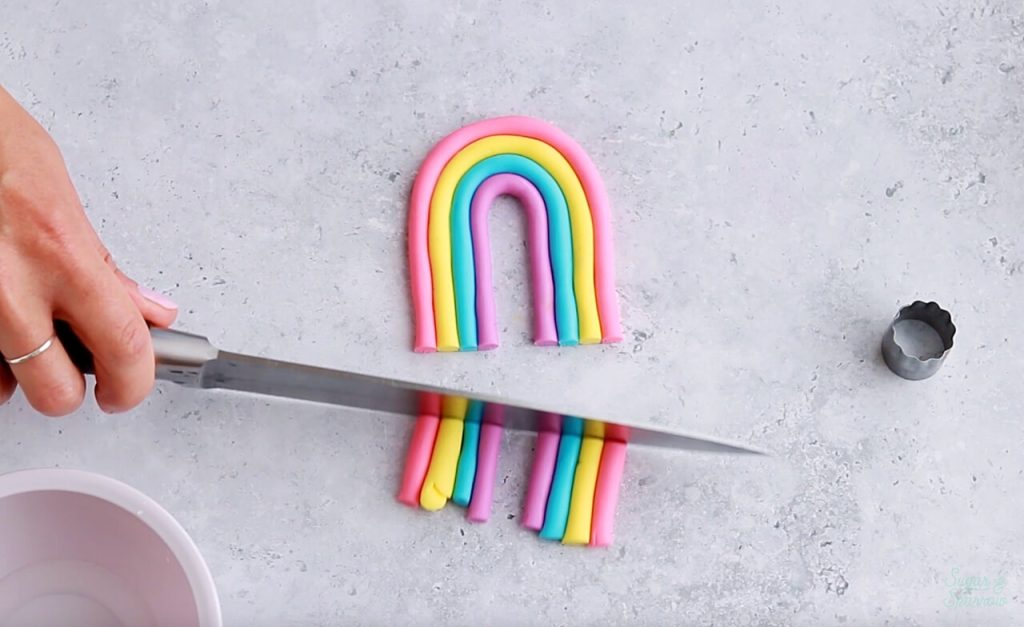
When your arch looks beautiful and even, use a sharp knife to chop off the uneven ends. 

how to make a rainbow cake topper

Step 4: Add Toothpicks

Gently flip the rainbow arch over (I used a large spatula to do this) and paint a little bit of water between the arch grooves where you’ll be placing your toothpicks on both sides. Then, gently press toothpicks onto the water. 

how to make a gum paste rainbow cake topper

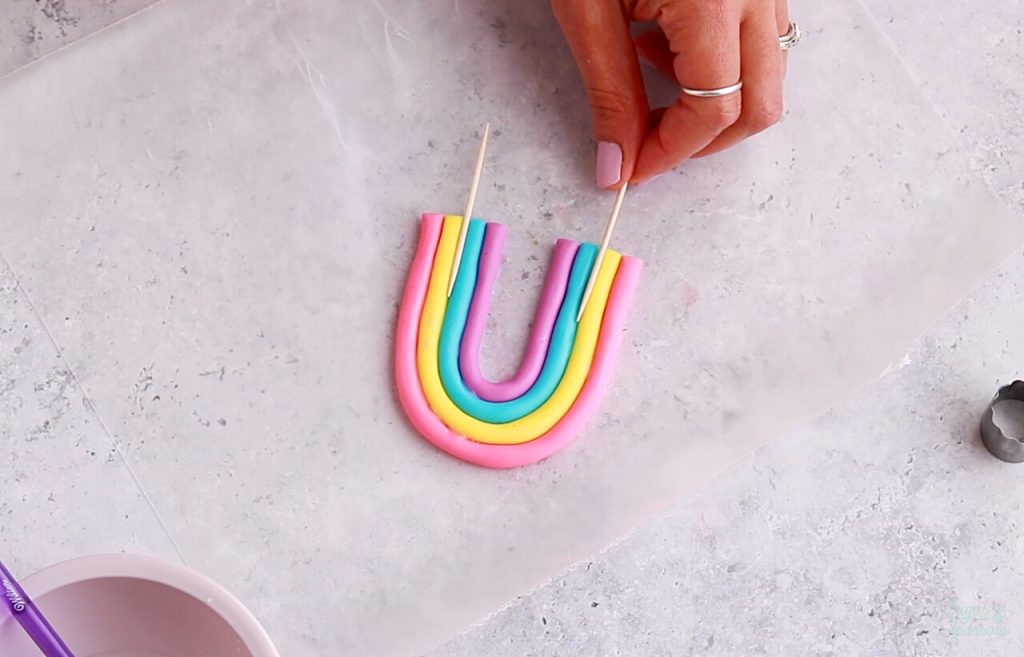
I’ve never had any problems with the toothpicks not adhering securely with this method, but if you want to make the arch topper extra sturdy, you can use a little water to glue a thin piece of scrap gumpaste over the toothpicks. This should hold them in place very well.  

Step 5: Allow to Dry for 48 Hours 

Allow the rainbow arch topper to dry in a cool, dark place for at least 48 hours, flipping it over at the 24 hour mark so that both sides dry equally. The color of your gum paste can fade if it dries in the direct sun, which is why it’s important to keep it in a dark place like your pantry or a drawer. 

arch rainbow cake topper diy

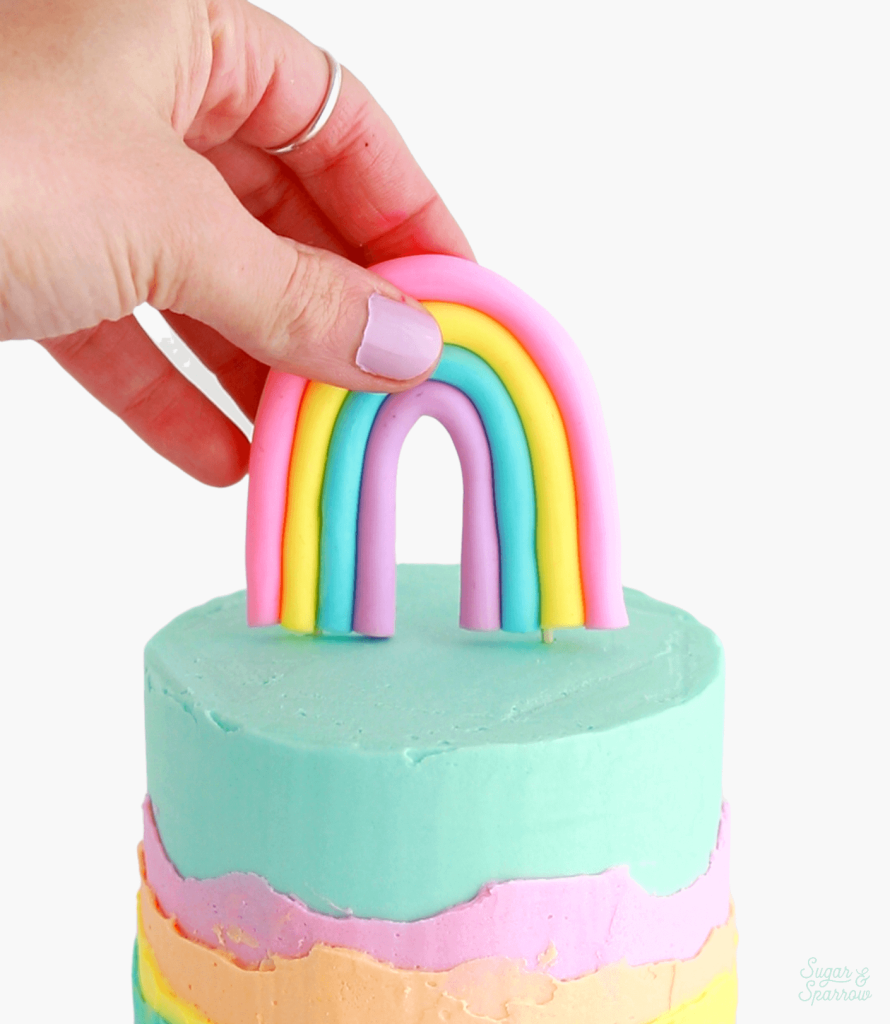
Once it’s completely dry, top your cake and be amazed! I love the rainbow arch look so much and I know it would look amazing in all sorts of colors. Perfect for a whimsical look or a modern one! 
Did you make this rainbow arch topper? I want to know how it went! Let me know in the comments below or feel free to tag @sugarandsparrowco on Instagram. I love to see your creativity!

By: Whitney · In: Decorations & Garnishes, Featured, Recipes, Tutorials · Tagged: bluey cake, cake decorating, cake ideas, cake toppers, gum paste, gum paste rainbow, rainbow cake, rainbow cake topper, rainbow topper, trolls cake

you’ll also love

Rainbow layer cake with rainbow frostingThe Ultimate Rainbow Cake (Inside and Out!)
st patricks day cake ideas by sugar and sparrowSt. Patrick’s Day Dessert Ideas
rainbow swirl cupcakes tutorialHow to Make Rainbow Swirl Cupcakes

Join the List

Stay up to date & receive the latest posts in your inbox.

Reader Interactions

Comments

  1. Mary says

    September 28, 2025 at 7:36 am

    Thank you for this tutorial! I am going to attempt to make a rainbow arch this week. Would the fridge be too cold to store it while it dries?

    Reply
    • Whitney says

      September 29, 2025 at 7:41 pm

      Hi Mary! I usually store these decorations at room temperature so that condensation doesn’t become an issue in the drying process. A pantry or basically anywhere where there isn’t direct sunlight is a good spot for the arch to dry. Hope that helps!

      Reply

Leave a Reply Cancel reply

Your email address will not be published. Required fields are marked *

Recipe Rating


Next Post >

How to Make the Perfect Buttercream Consistency + Troubleshooting Tips

Primary Sidebar

Welcome to Sugar & Sparrow

Welcome to Sugar & Sparrow

Helping you whip up pretty desserts with confidence and creativity. And hopefully sharing a few laughs with you along the way!

Learn More

Connect

let’s bake!

Get my very best recipes, baking tips, and decorating tutorials sent to your inbox

Featured Posts

sprinkle cake balls topper tutorial by sugar and sparrow

Sprinkle Cake Truffles

smores ice cream cake recipe by sugar and sparrow

The Ultimate S’mores Ice Cream Cake

christmas sugar cookie dough cake recipe

Christmas Sugar Cookie Dough Cake

Search

Archives

Follow Along

@sugarandsparrowco

HUMMINGBIRD CAKE 🤎 after weeks of testing this HUMMINGBIRD CAKE 🤎 after weeks of testing this recipe I found that the KEY to taking this already delicious cake to the next level is: roasting the bananas!! It’s an optional step in this recipe BUT it adds unparalleled caramel notes and noticeable richness to the flavor 🙌🏼 Along with the crushed pineapple, toasted pecans, and tangy cream cheese buttercream, this cake is NEXT LEVEL delicious, ultra-moist, melts in your mouth, and will have everyone asking for the recipe. 

Full recipe (with cream cheese frosting) linked in my bio + at https://sugarandsparrow.com/hummingbird-cake-recipe/ 

#hummingbirdcake #creamcheesefrosting #bananacake #cakedecorating #cakerecipe
OREO CUPCAKES 🖤 (recipe below) I made these for OREO CUPCAKES 🖤 (recipe below) I made these for a fundraiser at @vancity.youth last weekend and was reminded of how delicious this recipe is! There’s black cocoa powder in the cupcake batter to give them the PERFECT Oreo cookie flavor profile + the most delicious cookies and cream buttercream I’d eat all on its own. 
 
Full recipe at https://sugarandsparrow.com/oreo-cupcakes-recipe/ 
 
OREO CUPCAKES 
1 Cup (132g) all purpose flour 
3/4 Cup (150g) granulated sugar 
1/3 Cup (38g) black cocoa powder 
1 tsp baking soda 
1/2 tsp baking powder 
1/4 tsp salt 
1/4 Cup (60ml) vegetable oil 
1 large egg, room temp 
1/2 tsp pure vanilla extract 
1/2 Cup (120ml) buttermilk, room temp 
1/2 Cup (120ml) hot coffee or hot water 
 
1. Preheat the oven to 350ºF/177ºC and line a cupcake pan with 12-15 liners. 
2. In a large bowl, whisk all of the dry ingredients together. Add the vegetable oil, eggs, vanilla, and buttermilk and whisk to combine. Whisk in the hot coffee (or hot water). 
3. Pour the batter into the prepared cupcake liners and bake for 14-18 minutes. 
 
OREO BUTTERCREAM 
1 Cup (226g) unsalted butter, room temperature 
3 Cups (360g) powdered sugar 
2 tsp pure vanilla extract 
2 Tbsp whole milk, room temperature 
pinch of salt, or to taste 
9 Oreo cookies (96g), finely ground 
 
1. Using a hand mixer or stand mixer, cream the butter on medium-high speed until it’s creamy and pale, 5 min. 
2. Add the powdered sugar a few cups at a time, mixing on low speed and scraping down bowl and paddle in between intervals. Keep the mixer on low and add the vanilla, milk, and salt. Mix until fully incorporated and uniform, 1-2 min. 
4. Mix in the Oreo cookie crumbs on low speed. 
 
#oreo #oreocupcakes #cookiesandcream #chocolatecupcakes #cupcakes
RASPBERRY CAKE FILLING (recipe below) ♥️ this RASPBERRY CAKE FILLING (recipe below) ♥️ this perfectly sweet/tart raspberry cake filling is beautifully thick, seedless, and so rewarding to make from scratch! It takes just a handful of ingredients and can be made with fresh OR frozen raspberries 🙌🏼 

Get the full recipe + cake pairing suggestions at the link in my bio or at https://sugarandsparrow.com/seedless-raspberry-cake-filling/

INGREDIENTS:
2 1/2 Cups (10oz, 315g) fresh or frozen raspberries
1/2 Cup (100g) granulated sugar
1 Tbsp lemon juice
1 tsp lemon zest
1 1/2 Tbsp (12g) cornstarch
1 1/2 Tbsp (22ml) water

INSTRUCTIONS: 
1. In a saucepan set over medium heat, add the raspberries, granulated sugar, lemon juice, and lemon zest. Cook until the mixture begins to boil, stirring occasionally. 
2. Once boiling, lower the heat and simmer for 10-15 minutes while you continue stirring occasionally. Then, remove from heat and use a fine mesh sieve to strain out the seeds over a medium bowl. After straining, you’ll be left with about 1/4 Cup of seedy pulp.
3. In a small separate bowl, combine the cornstarch and water until uniform. Return the strained raspberry filling to the saucepan (wipe it free of any remaining seeds if needed) and add the cornstarch/water mixture. Cook over medium heat until boiling, stirring constantly, then reduce to a simmer and cook for 1-3 minutes, until the filling has thickened slightly, is no longer cloudy, and coats the back of the spatula.
4. Pour into an airtight container and refrigerate for at least 4 hours and up to 1 week. It will be jello-like once set but after stirring it will become a thick, jammy consistency that’s perfect to use as a cake or cupcake filling!

#raspberrycake #cakefilling #cakedecorating #raspberries #baking
STRAWBERRY LEMON CAKE 🍓🍋 this cake is so lig STRAWBERRY LEMON CAKE 🍓🍋 this cake is so light and refreshing and bursting with all-natural flavors! It’s layers of my favorite extra fluffy lemon cake + the most delicious freeze-dried strawberry buttercream that ends up the prettiest natural pink color. I’ll never get over those little flecks of strawberry in the buttercream or the tiny chamomile flowers adding so much cheer! 

Grab the recipe at the link in my bio or at https://sugarandsparrow.com/strawberry-lemon-cake/

#strawberrylemon #lemoncake #strawberrycake #cakedecorating #strawberrybuttercream
CHOCOLATE SHEET CAKE (recipe below) 🍫 🥳 this CHOCOLATE SHEET CAKE (recipe below) 🍫 🥳 this is everything I want in a chocolate cake: rich and decadent, stick-to-your-fork fudgy, ultra-chocolatey, shareable, and EASY! Like box mix easy but from-scratch and a MUST try if you’re in need of a good chocolate cake recipe to feed a crowd👩🏽‍🍳⁣ 
 
Get the full recipe (with chocolate frosting) at the link in my bio or at https://sugarandsparrow.com/chocolate-sheet-cake/ ✨⁣ 
⁣ 
CHOCOLATE SHEET CAKE
2 Cups (265g) all purpose flour⁣ 
1 2/3 Cups (340g) white granulated sugar⁣ 
2/3 Cup (60g) unsweetened natural cocoa powder⁣ 
2 tsp baking soda⁣ 
1 tsp baking powder⁣ 
1/2 tsp kosher salt⁣ 
1/2 Cup (120ml) vegetable oil⁣ 
2 eggs, room temperature⁣ 
1 1/2 tsp pure vanilla extract⁣ 
1 Cup (240ml) full-fat buttermilk⁣ 
1 Cup (240ml) hot coffee OR hot water⁣ 
⁣ 
INSTRUCTIONS⁣ 
1. Preheat the oven to 325ºF. Grease and line a 9x13 inch cake pan. ⁣ 
2. Place all of the dry ingredients into the bowl of a stand mixer (or use a large bowl with a hand mixer) and mix on low to combine. Add the vegetable oil, eggs, vanilla, and buttermilk and mix on low until combined. With the mixer still on low, add the hot coffee or hot water in a slow stream, then turn the mixer to medium and beat until smooth, about 2 minutes. The batter will be very thin. ⁣ 
3. Pour the batter into the prepared pan and bake for 35-40 minutes, until a toothpick inserted comes out clean.⁣ Full recipe (with frosting) link in my bio.
⁣ 
#chocolatecake #chocolate #sheetcake #chocolatelover #birthdaycake

Footer

On the Blog

  • Cake Basics
  • Recipes
  • Tutorials

Info

  • About
  • Privacy Policy & Disclosure

stay in the know

Copyright © 2026 · Theme by Sugar & Sparrow