• Cake
  • Frosting
  • YouTube
  • My Favorite Tools
  • Nav Social Icons

  • Skip to primary navigation
  • Skip to main content
  • Skip to primary sidebar
  • Skip to footer
  • Recipes
    • Cake
    • Cupcakes
    • Frosting
    • Ice Cream
    • Vegan
  • Cake Basics
  • Tutorials
  • Blog
  • About
  • Mobile Menu Widgets

    Connect

    Search

Sugar & Sparrow logo in script font

Sugar & Sparrow

Lifestyle and Cake from Portland Oregon

  • Cake Basics
  • Recipes
    • Cake
    • Cupcakes
    • Cookies & Bars
    • Filling
    • Frosting
    • Ice Cream
    • No-Bake
    • Small Batch
    • Vegan
  • Tutorials
  • Book
  • Blog
  • About

Raspberry Chocolate Cake Recipe

February 1, 2021 · In: Cake, Featured, Recipes, Seasonal, Valentines

Jump to Recipe

One of the very first recipes I put on this blog was this Raspberry Buttercream recipe. It’s one of my favorite buttercream recipes ever – ultra flavorful, not too sweet, and the natural color is just so beautiful! I’ve paired it with so many cake flavors (it truly goes with anything), but this Raspberry Chocolate Cake recipe is one classic flavor pairing I had yet to officially turn into a recipe until now. So with Valentine’s Day approaching, I thought it would be the perfect time to share this recipe with you to bake up for your loved ones! 

raspberry chocolate cake recipe by sugar and sparrow

This cake is so simple to whip up and the flavor combination is just divine. I’d even go as far as to say it’s a pretty sensual cake (cue the sax solo). The raspberry buttercream makes it extra aromatic and paired with the chocolate cake, the flavor is decadent but not too heavy. The perfect cake for any raspberry chocolate lover and anyone who doesn’t yet realize they’re a fan of these flavors (aka just about everyone!).

chocolate raspberry cake
chocolate raspberry cake by sugar and sparrow

It all starts with my favorite One-Bowl Chocolate Cake Recipe, which is just as easy as it sounds. Basically put everything into one bowl (in the right order, of course) and mix it up! Just in case you want to watch the process before you make this recipe, I do have a YouTube video that I whipped up to walk you through it. It’s basically everything you need and want in a chocolate cake: moist crumb, rich chocolate flavor, and simple ingredients. 

chocolate cake with raspberry buttercream recipe
raspberry chocolate cake recipe by sugar and sparrow

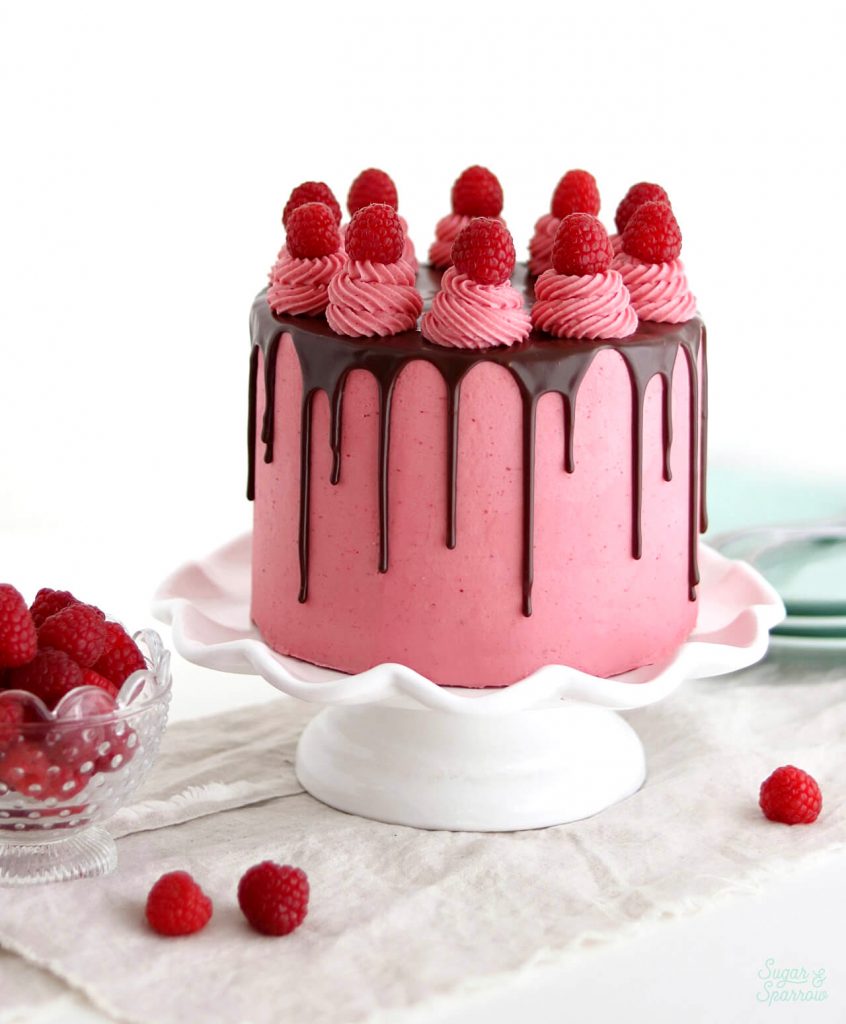
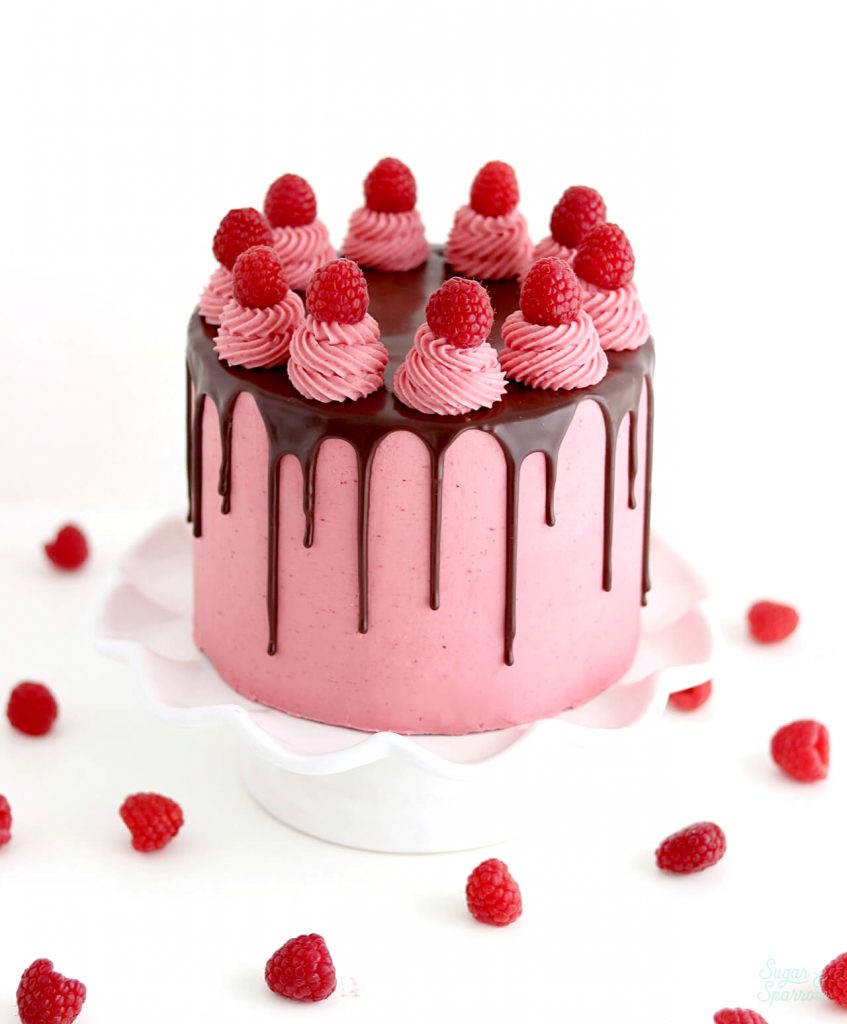
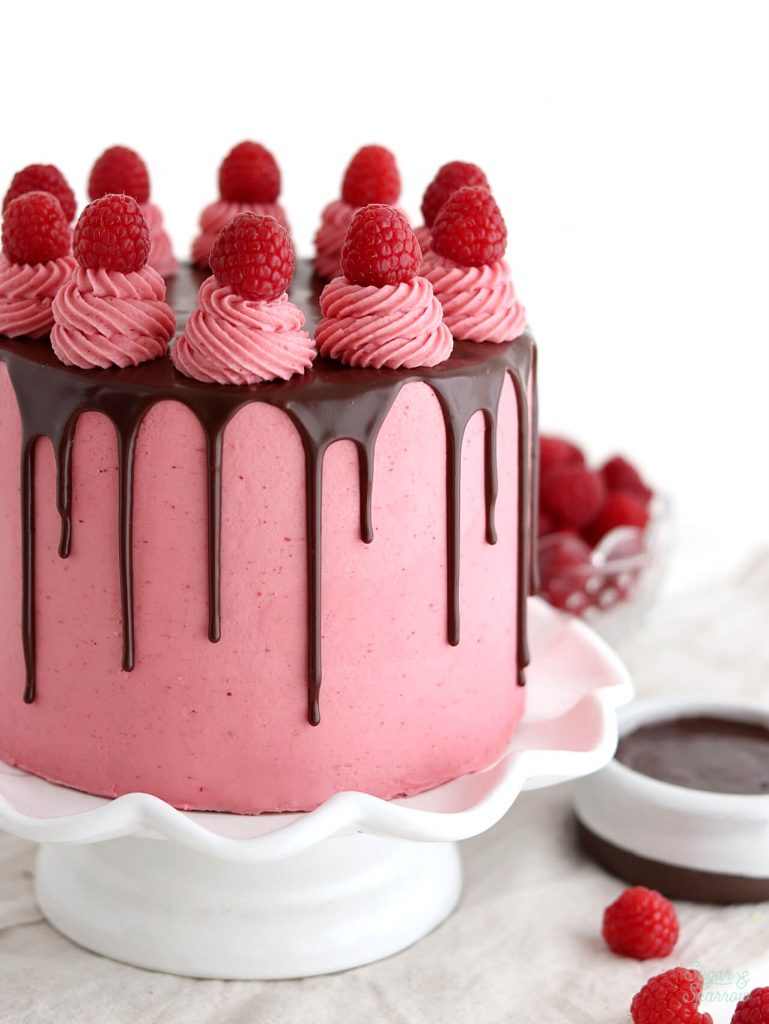
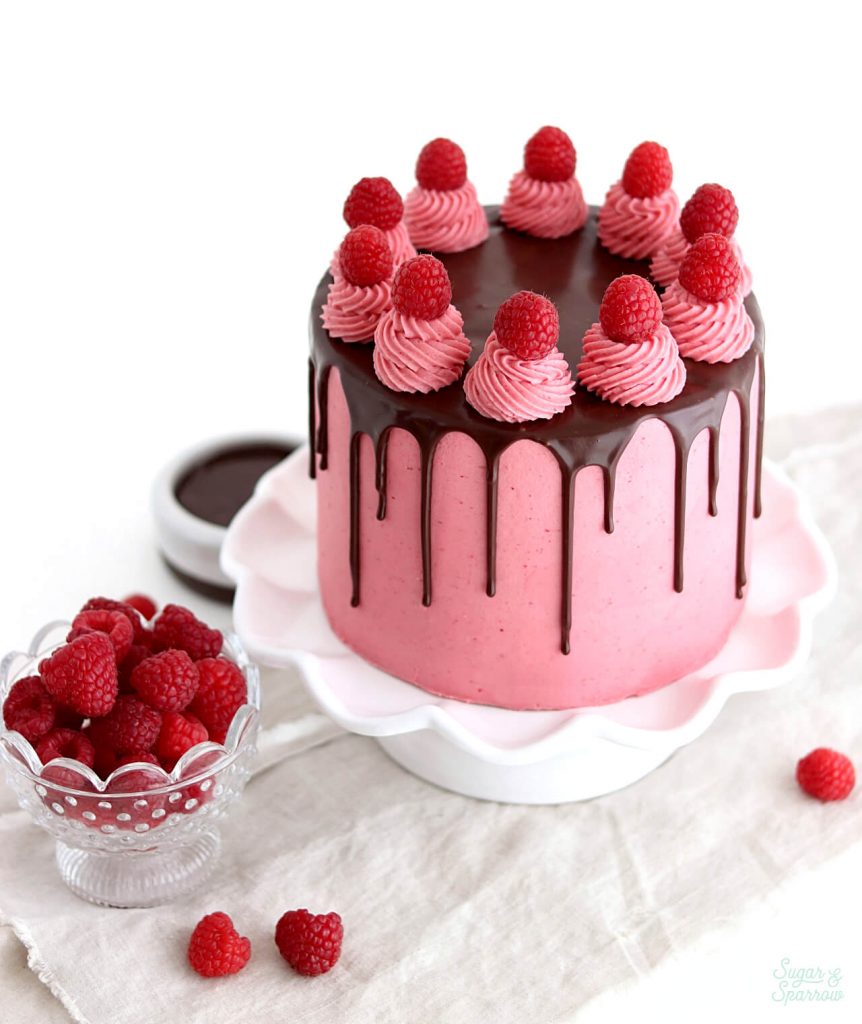
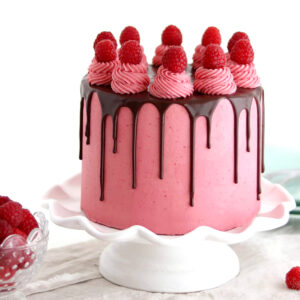
The Raspberry Buttercream is the filling and the frosting on this one, because it’s just so good that way. The secret to the beautiful flavor and consistency of this buttercream is freeze-dried raspberries. The process of freeze-drying removes the liquid from the berry and keeps ALL the flavor intact, so adding them to buttercream gives you the most flavorful buttercream with just the right consistency. And just look at that naturally gorgeous color! No added food color gels on this one, folks. This is the brand I use in the recipe, but you can find freeze-dried raspberries at most grocery stores, Trader Joe’s, and even Target if you’d rather shop local.

If you can’t find freeze-dried raspberries, I do have this raspberry buttercream recipe that uses fresh berries. It works beautifully as a substitute!

chocolate cake with raspberry frosting
chocolate ganache drip cake recipe

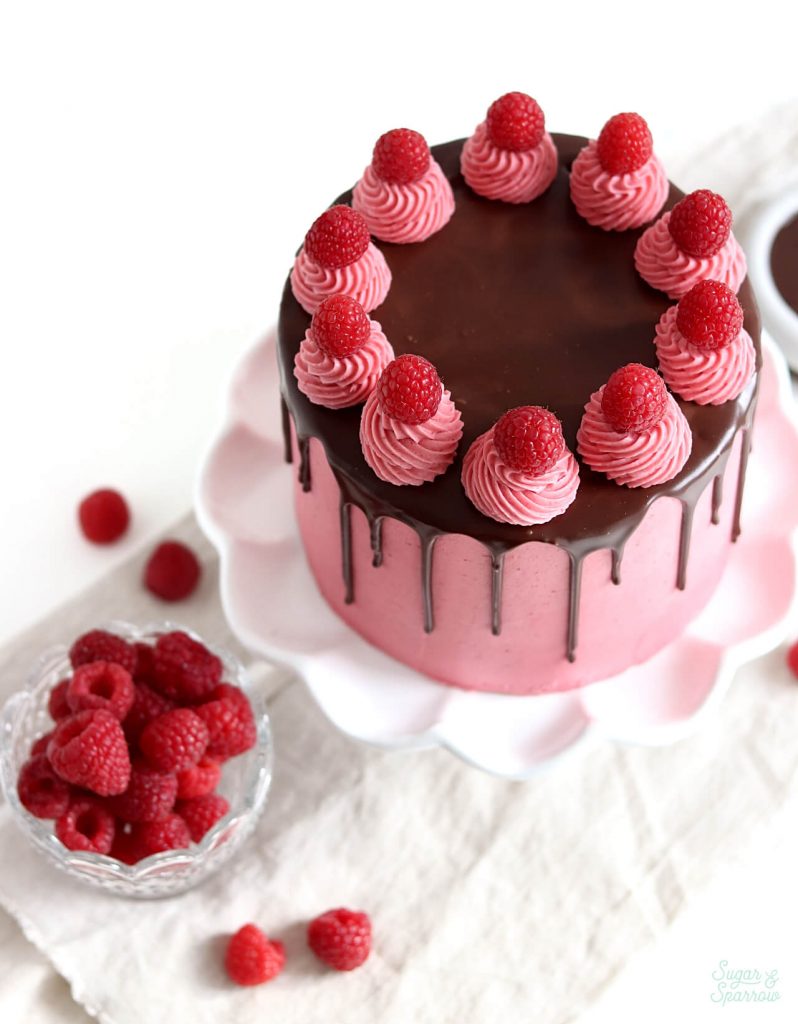
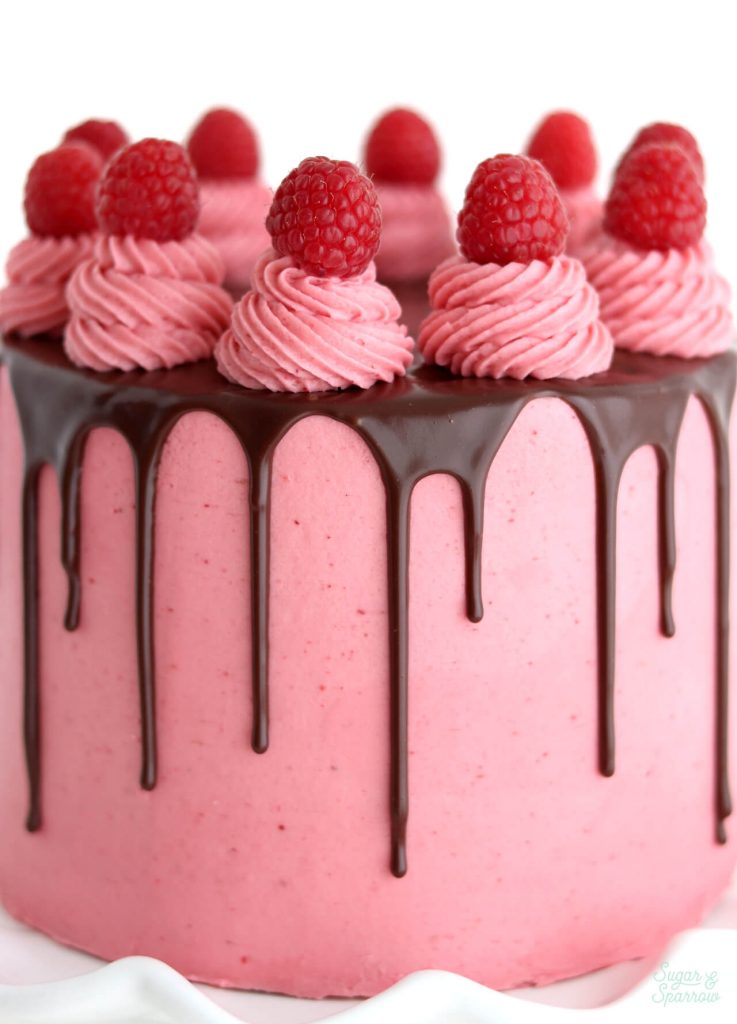
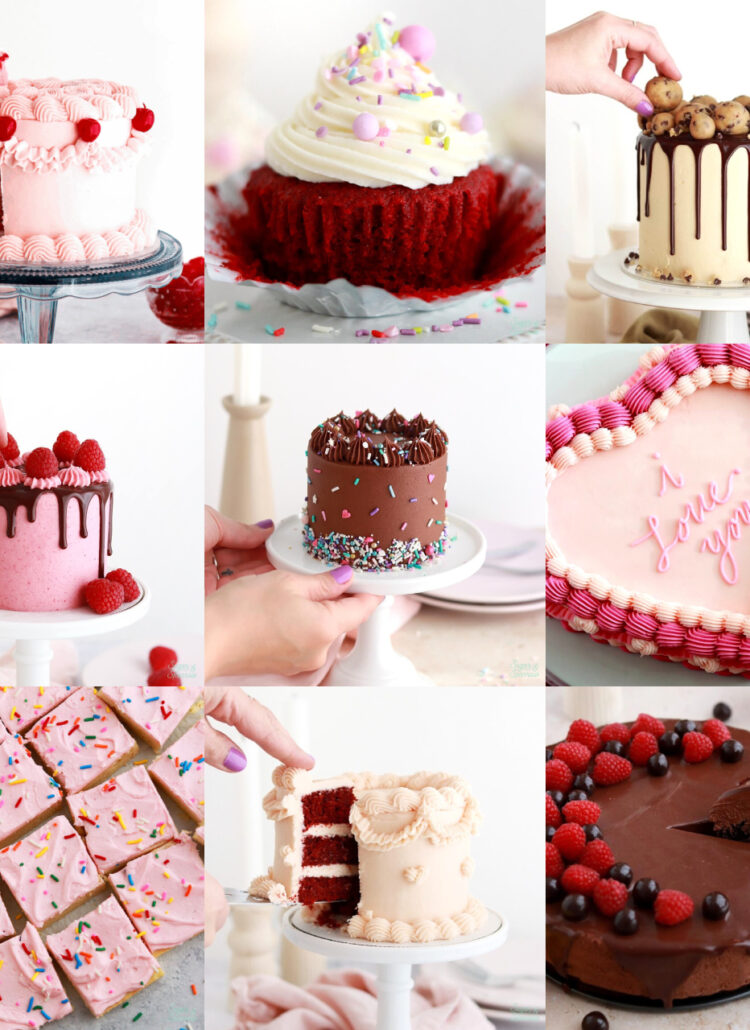
To decorate this beauty, I added a chocolate ganache drip and used Wilton Tip 4B to pipe swirls all around the top before adding a fresh raspberry to each. This recipe yields a triple layer 6-inch cake, but if you’d rather make a little 4-inch version instead you can half the entire recipe (cake and buttercream) to make a better sharing size for 2-4 people. And if this is your first time making and assembling a layer cake, or you want to learn my techniques for doing so, be sure to check out my Cake Basics series that shows you how to build a layer cake from start to finish!

raspberry chocolate cake recipe

Raspberry Chocolate Cake Recipe

5 from 9 votes
Layers of rich chocolate cake filled and frosted with raspberry buttercream and dripped with chocolate ganache for extra decadence – a raspberry chocolate lover's dream cake!
Print Recipe Pin Recipe
Prep Time:30 minutes mins
Cook Time:40 minutes mins
Servings: 15 slices

Ingredients

Chocolate Cake

  • 2 Cups (265g) all purpose flour
  • 1 2/3 Cups (340g) granulated white sugar
  • 2/3 Cup (60g) unsweetened natural cocoa powder not Dutch Process
  • 2 tsp baking soda
  • 1 tsp baking powder
  • 1/2 tsp salt
  • 1/2 Cup (120ml) vegetable oil
  • 2 whole eggs, room temperature
  • 1 1/2 tsp pure vanilla extract
  • 1 Cup (240ml) full-fat buttermilk, room temperature* DIY recipe in notes
  • 1 Cup (240ml) hot water

Raspberry Buttercream

  • 1 1/2 Cups (339g) unsalted butter, room temperature
  • 1 Cup (34g) freeze dried raspberries**
  • 4 1/2 Tbsp (68ml) whole milk, room temperature
  • 1 1/2 tsp vanilla extract
  • 6 Cups (720g) powdered sugar
  • 1/4 tsp salt

Chocolate Ganache

  • 1/2 Cup semi-sweet chocolate chips
  • 1/2 Cup heavy whipping cream

Additional Garnishes

  • fresh raspberries, optional

Instructions

Make the Chocolate Cake

  • Preheat the oven to 350ºF and prepare three 6-inch or two 8-inch cake pans by spraying the sides with cooking spray and fitting the bottoms with a wax paper or parchment cake circle. 
  • Place all of the dry ingredients into the bowl of a stand mixer and stir on low for 30 seconds to fully combine them. Add the vegetable oil, eggs, vanilla, and buttermilk and mix on low until just combined. With the mixer still on low, add the hot water in a slow stream, then turn the mixer to medium and beat until smooth, about 2 minutes. The batter will be very thin. 
  • Pour into prepared cake pans no more than 2/3 full and bake for 30-35 minutes, until a wooden toothpick inserted comes out clean. Cool completely before filling and frosting.

Make the Raspberry Buttercream

  • With a food processor, grind the raspberries into a fine powder. Sift out the seeds (if a few seeds end up in the powder that is totally ok) and set the powder aside.
  • Whip the butter using a stand mixer with a paddle attachment on medium speed until it’s creamy and light in color (5-10 minutes). Add vanilla, milk, and raspberry powder and continue to mix on medium for about two minutes.
  • Add powdered sugar a few cups at a time, scraping down the bowl and paddle after each addition. Add the salt and mix on low for another 30 seconds. 

Make the Chocolate Ganache

  • Place chocolate chips into a heat resistant bowl (glass or metal). If you’re starting with a chocolate bar, chop it into small pieces until they’re about the size of chocolate chips. 
  • In a saucepan over medium-high heat, warm heavy whipping cream until it just starts to simmer. I always look for small bubbles forming around the edge and a soft simmer starting in the middle. When it's reached this point, pour the cream into your bowl of chocolate and let sit for about 30 seconds. 
  • Whisk it together until it’s uniform in consistency and there are no bits of chocolate left on your whisk. Cool ganache at room temperature for 10-20 minutes, or until the ganache itself is room temperature or slightly above. 

Assembly

  • Once the Chocolate Cakes are cooled completely, level and torte the layers to make them even before filling and frosting with the Raspberry Buttercream. After the final layer of frosting is applied, chill the cake for 20-30 minutes before dripping with the Chocolate Ganache. To recreate the look pictured, add swirls of Raspberry Buttercream around the top of the cake with Wilton Tip 4B and add a fresh raspberry to the top of each swirl.

Notes

*DIY Buttermilk recipe: add 1 Tbsp of white vinegar to a jar and top it with 1 Cup of whole milk. Stir and let sit for 15 minutes before using in the recipe. 
**Raspberries: if you can’t find freeze-dried raspberries, I do have this raspberry buttercream recipe that uses fresh berries. 
Make Ahead Tips: 
  1. The Chocolate Cake can be made ahead and stored at room temperature, covered tightly in plastic wrap, for up to two days. Alternatively, you can cover with plastic wrap and store in the freezer for up to two months before thawing to room temperature. 
  2. The Raspberry Buttercream can be made ahead and stored in an airtight container in the refrigerator for up to two weeks. When you’re ready to use it, bring it back to room temperature and mix it together on low for about 30 seconds to bring it back to frosting consistency.
  3. The Chocolate Ganache can be made ahead and stored in the refrigerator in an airtight container for up to two weeks. When you’re ready to use it as a drip, microwave it in 10 second increments, stirring after every interval until your ganache is room temperature and uniform in consistency.
To Make as Cupcakes: fill cupcake tins no more than 2/3 full and bake at 350ºF for 15-17 minutes, until a toothpick inserted comes out clean. 

Did you make this recipe? I want to know what you think! Let me know in the comments below or tag me on Instagram. I love to see what you’re caking!

By: Whitney · In: Cake, Featured, Recipes, Seasonal, Valentines · Tagged: chocolate, chocolate cake recipe, chocolate ganache, chocolate raspberry cake, drip cakes, freeze dried raspberries, pink cake, raspberry, raspberry buttercream recipe, raspberry chocolate cake, valentines day cakes

you’ll also love

chocolate strawberry cake recipe by sugar and sparrowChocolate Covered Strawberry Cake
valentines day dessert recipes for date night24+ Valentine’s Day Dessert Ideas
oreo cookies and cream cakeOreo Layer Cake Recipe

Join the List

Stay up to date & receive the latest posts in your inbox.

Reader Interactions

Comments

  1. Sabrina says

    April 20, 2026 at 11:06 am

    5 stars
    WOW!!!! The raspberry buttercream is the absolute best frosting I have ever made or even eaten in my entire life! I bought powdered freeze dried raspberries with the seeds already removed, so it was extra simple too! Everyone that tried it loved it too. We had a little extra and it is fabulous on a variety of things (or even straight off a spoon), but especially on fruit. Awesome!

    Reply
    • Whitney says

      April 21, 2026 at 9:41 am

      Yay, Sabrina! I’m so happy this recipe was such a hit 🙂

      Reply
  2. karen says

    October 10, 2025 at 1:11 am

    5 stars
    I made this cake and it was delicious – and easy for a non experienced cake maker like myself.
    i am planning o make another for friend – how long will it keep after decorating?

    Reply
  3. LENA HARVEY says

    May 2, 2025 at 2:45 pm

    Hi. Quick question. Is the buttercream filling different than the outside? The outside looks darker than the inside. Looks good!

    Reply
    • Whitney says

      May 2, 2025 at 7:52 pm

      Hi Lena! The filling is the same. I think it’s just the lighting in the photo, the shadow is on the outside of the cake and the sun is hitting the inside, making it look a little lighter.

      Reply
  4. Caroline says

    February 27, 2025 at 5:26 pm

    Hello! How long do I bake if I’m using 3 6-inch pans? Making this for my son’s birthday!

    Reply
    • Whitney says

      February 27, 2025 at 8:22 pm

      Hi Caroline! The layers should bake for 30-35 minutes. I hope your son loves it!

      Reply
  5. Gnapi says

    January 24, 2024 at 12:35 pm

    Hi Whitney,
    May I know why you did not use cake flour in this recipe. I am seeing you mentioned all purpose flour. Any specific reason?

    Reply
    • Whitney says

      January 24, 2024 at 6:34 pm

      Hi Gnapi! Cake flour is too fine for chocolate cake recipes, the results are much better with all purpose flour in this case.

      Reply
  6. Anna Viktorija says

    January 24, 2024 at 8:25 am

    Hi! So excited to try this out! If I do a 4-inch one should I also cut the cooking time to half?

    Reply
    • Whitney says

      January 24, 2024 at 6:36 pm

      Hi Anna! I would use this recipe for a 4-inch layer cake and then make 1/3 of the buttercream amount to fill, frost, and decorate: https://sugarandsparrow.com/small-batch-chocolate-cake/ It’s based on the same chocolate cake recipe but yields the perfect amount for 3 4-inch layers!

      Reply
  7. Karina Jimenez says

    January 14, 2024 at 11:14 pm

    Hi Whitney,

    I can’t wait to try this recipe for my best friend’s birthday. Would I have to make any adjustments to the cake recipe if I use Dutch cocoa powder instead of regular cocoa powder? Also, instead of the cup of hot water can I use a cup of coffee to enhance the chocolate flavor?

    Reply
    • Whitney says

      January 15, 2024 at 8:52 pm

      Hi Karina! You can use dutch processed cocoa powder for this recipe, and can absolutely sub hot coffee in for the hot water. That really helps amplify the chocolate flavor. Enjoy!

      Reply
  8. Lilly says

    August 31, 2023 at 8:46 am

    Thank you Whitney, I made this cake and my whole family loved it!

    Reply
    • Whitney says

      September 6, 2023 at 11:59 am

      So happy to hear that, Lilly!

      Reply
  9. Lilly says

    August 24, 2023 at 1:17 pm

    Hi Whitney, I love your cakes and I’m about to make this one, but I was wondering if you have to make a different amount of buttercream for 2 8in pans instead of 3 6in pans, and thanks for sharing these awesome recipes.

    Reply
    • Whitney says

      August 28, 2023 at 10:30 pm

      Hi Lilly! Yes, the same amount of buttercream works well for 2 8-inch layers.

      Reply
  10. LORI VANSKYHOCK says

    August 16, 2023 at 6:48 am

    5 stars
    I cook, but I’m not much of a baker. My niece wanted a chocolate cake with raspberry frosting for her birthday (she herself is a master baker, so I was challenged). Made this recipe and it was the bomb! It looked almost like the picture and exploded with flavor (I used dark cocoa powder). I sprinkled some fairy dust on top to add a little luster and make it sparkle. Just wish I could upload a photo to show you how beautiful it was! Will definitely be making this again!

    Reply
    • Whitney says

      August 18, 2023 at 1:03 pm

      Yay, Lori! I’m so happy to hear that this recipe was such a success! If you want to DM me a pic on Instagram I’d love to see, or you can email me one at sugarandsparrow@gmail.com. So thrilled that you loved this one!

      Reply
  11. Lydia Benton says

    July 5, 2023 at 2:42 pm

    Hi Whitney! I am not the biggest fan of chocolate, so I was wondering if you think this recipe would go well with the cake swapped out for your lemon cake or vanilla cake? If so, do you recommend a white chocolate ganache on top?

    Reply
    • Whitney says

      July 10, 2023 at 10:14 pm

      Hi Lydia! Raspberry buttercream would work amazingly well with lemon cake or vanilla cake, and yes on the white chocolate ganache!

      Reply
  12. Jessica says

    February 20, 2023 at 8:24 am

    Hi, would the frosting recipe be enough to fill, coat and do the top part of a 3 layer 8 inch cake? Thanks!

    Reply
    • Whitney says

      February 21, 2023 at 7:38 pm

      Hi Jessica! I would make 1.5x the buttercream portion of the recipe to have enough for three 8 inch layers. You can use this recipe scale calculator to make the math easier: https://www.inchcalculator.com/recipe-scale-conversion-calculator/

      Reply
  13. Lauren says

    January 4, 2023 at 11:35 am

    How could this be converted into a 9 by 13 inch sheet cake?

    Reply
    • Whitney says

      January 9, 2023 at 9:54 pm

      Hi Lauren! You can absolutely bake this recipe as a 9 x 13 sheet cake. Fill the pan no more than halfway full and bake at 350F for 5-10 minutes longer than the baking time listed. Here’s a blog post I wrote with more info on converting my recipes into sheet cakes: https://sugarandsparrow.com/sheet-cake-recipes/ Hope that helps!

      Reply
  14. Lauren says

    January 4, 2023 at 11:33 am

    your recipe sounds amazing. I would like to use it for my son’s bday party, and I am curious how you would tweak the measurements and baking time to convert it into cupcakes?

    Reply
    • Whitney says

      January 9, 2023 at 9:56 pm

      I’m so excited for you to make this! To bake this recipe as cupcakes, fill the cupcake tins no more than 2/3 full and bake at 350F for 15-18 minutes, or until a toothpick inserted comes out clean.

      Reply
      • Rachel says

        March 5, 2023 at 1:48 pm

        Would you happen to know approximately how many cupcakes the recipe makes?

        Reply
        • Whitney says

          March 6, 2023 at 9:23 am

          Hi Rachel! This recipe makes 30-35 cupcakes 🙂

          Reply
          • Rachel says

            March 6, 2023 at 1:19 pm

            Thank you! I’m making these today for my daughter to take to our homeschool group. She’s turning 10 tomorrow.

  15. Heather says

    August 16, 2022 at 7:34 am

    I’m excited to make this cake for my dad’s birthday, however, I’m curious about the consistency of the raspberry buttercream – do I need to thin it for the crumb coat or should it be ok as is? Thanks in advance!

    Reply
    • Whitney says

      August 16, 2022 at 8:49 pm

      Hi Heather! You shouldn’t need to thin this buttercream for the crumb coat, but if you do feel like it needs thinning you can easily add 1-2 tsp of additional milk to thin it out. Hope that helps!

      Reply
  16. Rachel says

    May 29, 2022 at 10:54 am

    I am excited to try this cake! Could you tell me how many cups of buttercream this recipe makes?

    Reply
    • Whitney says

      May 31, 2022 at 7:31 pm

      Hi Rachel! I’m excited for you to try this cake! The buttercream portion of the recipe makes about 4.5 cups of buttercream.

      Reply
  17. Layla says

    May 12, 2022 at 4:38 am

    Heya! Can’t wait to make this!

    What would you reccommend increasing the recipe by for a 2 layer 12inch square cake? (I am sculpting it into a bum for a commission.) thanks!

    Reply
    • Whitney says

      May 14, 2022 at 7:19 pm

      Hi Layla! I would recommend making 2.5x the cake part of this recipe to have enough for two 12 inch square pans. Hope that helps!

      Reply
  18. Danielle says

    May 10, 2022 at 8:45 am

    5 stars
    All I used was the frosting and it was Amazing

    Reply
    • Whitney says

      May 10, 2022 at 9:29 am

      Yay, Danielle! I’m so happy you love this raspberry buttercream as much as I do!

      Reply
  19. Vicki says

    April 7, 2022 at 2:31 pm

    5 stars
    This cake is simply beautiful and delicious! Thank you for sharing your talent!

    Reply
    • Whitney says

      April 7, 2022 at 2:37 pm

      Yay, Vicki! I’m so happy you loved this recipe and thanks for the kind words 🙂

      Reply
  20. Shannon says

    February 23, 2022 at 11:32 am

    I love love love Sugar and Sparrow. Great work! Question – I’m going to make this frosting for a 3 tier 9 inch cake. Would this frosting recipe be enough?

    Reply
    • Whitney says

      February 25, 2022 at 8:24 am

      Thanks so much, Shannon! This frosting makes about 6 Cups of buttercream, which should be enough to fill and frost a 3-layer 9 inch cake. You might need to make a little more (about 1 Cup) for the swirls on top though. If you’re planning on adding the swirls on top, I would make half of this recipe (which will yield 1.5 Cups when halved): https://sugarandsparrow.com/raspberry-buttercream-recipe/ hope that helps!

      Reply
  21. Barb says

    February 5, 2022 at 12:37 pm

    5 stars
    I’ve made this cake a couple of times and am impressed with how well it turns out at high altitude. I live in the Denver area and usually have to modify cake recipes, but this one has turned out great both times without needing any adjustments. I’m wondering if it has to do with the smaller pan or the extra liquid, but whatever the reason it’s a great recipe! Thanks for sharing!

    Reply
    • Whitney says

      February 6, 2022 at 8:33 pm

      That’s amazing, Barb! I’m so happy that this cake has been a hit and you haven’t had to alter it for high altitude. Thanks so much for letting me know!

      Reply
  22. Nat says

    October 3, 2021 at 1:49 am

    Hi, I made your vanilla cake and it was so yum. I wanna try this next and was wondering if I could substitute oil with melted butter?

    Reply
    • Whitney says

      October 3, 2021 at 2:45 pm

      Yay, Nat! So happy to hear you love my vanilla cake recipe! I’ve never tried this recipe with melted butter before. I have a hunch that it would work, but I’m not entirely sure so it would be an experiment. Let me know if you try it!

      Reply
  23. Thea says

    August 29, 2021 at 1:54 am

    Hi Whitney!

    I found this cake and it is perfect for what I am looking to make for the baptism of my newly born niece :)!
    I have two questions for you,
    If I use 3 layers of 8 inch cakes – would I increase the batter by 50%? If so, how much more time do you think I should add to the cooking time?
    My second question is whether you think I can use lemon instead of white vinegar to make the buttermilk?
    Can’t wait to try this!:)

    Reply
    • Whitney says

      August 29, 2021 at 9:32 pm

      Hi Thea! To make enough batter for three 8 inch layers I would definitely make 1.5x this recipe. I would check the cakes at 40 min and see if you need more time from there. I’ve never subbed in lemon for the buttermilk but I think that should work. If you try it let me know how it goes. Enjoy!

      Reply
  24. Petra says

    April 30, 2021 at 1:10 pm

    Hi Whitney
    I would like to make a 2 layer 8 inch chocolate cake, fill it with rasberry buttercream and crumb coat and frost it with vanilla buttercream (I’m making your galaxy cake) could you tell me much rasberry buttercream I would need for the filling only please?
    Thank you

    Reply
    • Whitney says

      April 30, 2021 at 7:48 pm

      Hi Petra! For the filling only, you can make half of this recipe to have just the right amount: https://sugarandsparrow.com/raspberry-buttercream-recipe/ enjoy!

      Reply
  25. Hailey says

    March 30, 2021 at 5:55 pm

    Hi Whitney! For this recipe, you said that we could either use two 8″ pans or three 6″ pans, but I was wondering what pans you used?

    Thanks in advance!! (:

    Reply
    • Whitney says

      April 1, 2021 at 9:37 am

      Hi Hailey! I used three 6-inch pans for this recipe (and all of my recipes)!

      Reply
  26. Gwyneth says

    February 27, 2021 at 7:43 am

    Hi Whitney! Do you have a recipe for a raspberry cake filling that you love?

    Reply
    • Whitney says

      February 28, 2021 at 7:30 pm

      Hi Gwyneth! The closest thing to a raspberry filling recipe I have is the raspberry buttercream recipe that I used on this cake. I’ll add it to my list of future recipes to concoct though!

      Reply
  27. Sarah Shaler says

    February 11, 2021 at 9:37 pm

    Hi, Whitney!!

    I am so excited to try this recipe for Valentine’s Day! I’m trying to decide between baking the 4-inch or 6-inch cake. With the 4-inch version, would the halved batter amount be split between two or three 4-inch pans? I just want to be totally sure, haha! Thanks so much!

    Reply
    • Whitney says

      February 14, 2021 at 8:12 pm

      Hi Sarah! Half of the batter should be enough for three or four 4-inch layers. Enjoy!

      Reply
  28. Margaret says

    February 6, 2021 at 3:02 am

    Hi Whitney! I am excited to try making this cake! It looks beautiful and delicious. If I wanted to kick it up a notch and add something in between the cake layers (in addition to the buttercream) what would you suggest? Do you think fresh raspberries and additional chocolate ganache would work? Or do you think that would be too much.

    Reply
    • Whitney says

      February 8, 2021 at 8:43 am

      Hi Margaret! I think fresh raspberries and chocolate ganache would be perfect for adding extra elements in between the layers! If you do this be sure to add a buttercream dam when filling the cake so that the ganache and juice from the berries don’t leak out. You’ll find info for how to do that on this post: https://sugarandsparrow.com/fill-and-stack-cake-layers/

      Reply
  29. Paula says

    February 3, 2021 at 11:51 am

    Hi Whitney. Wondering if you have a favorite cake cutting chart that you follow?

    Reply
    • Whitney says

      February 4, 2021 at 9:20 pm

      Hi Paula! I don’t follow a cake cutting chart, but I do use this method: https://www.youtube.com/watch?v=V-TqeSvUbFs

      Reply
      • Paula says

        February 6, 2021 at 12:24 pm

        5 stars
        Perfect!

        Reply
  30. Paula says

    February 2, 2021 at 3:10 pm

    Hi Whitney! I am going to make this cake soon, and I was looking at the raspberry buttercream recipe. It says to use 26g of freeze dried raspberries. I did buy the same one’s you used from Trader Joe’s, and their bag is 34g. So just to make sure, I would be using almost the entire bag for the buttercream recipe, yes? I just weighed 26g on my scale, but that comes out to 1 cup in my glass measuring cup, and your recipe says 1 1/2 cups. Just a little confused…Thank you for your clarification. Can’t wait to try!

    Reply
    • Whitney says

      February 3, 2021 at 8:07 am

      Hi Paula! That is correct – you’ll use almost the entire bag of raspberries. You could even use the whole bag and be just fine since the seeds account for a lot of that extra weight and will be sifted out. As far as the cup measurement goes, I’ll have to remeasure and see if that might have been a typo on my part. I usually go by gram measurement for the berries. Hope that helps in the meantime!

      Reply
      • Paula says

        February 6, 2021 at 12:18 pm

        5 stars
        Thank you Whitney! I made this frosting, and it’s gorgeous!!!!! I have yet to put my cake together, but I really appreciate your reply. I’ll tag you when I have it complete. 🙂

        Reply
        • Whitney says

          February 8, 2021 at 8:43 am

          Yay, Paula! So happy you love this recipe and I’m so excited to see!

          Reply
      • Annalynna Andrew says

        March 20, 2023 at 8:04 pm

        5 stars
        Hi Whitney ! Instead of fresh raspberries for the frosting , can I also use raspberry puree ?

        Reply
        • Whitney says

          March 20, 2023 at 9:28 pm

          Hi Annalynna! I have only ever tried this recipe with freeze dried raspberries but you could absolutely try pureeing some raspberries and cooking them down until there’s the least amount of liquid left, bringing the reduced puree to room temp and then adding it in. I think that would work much better than pureed raspberries because those might add too much liquid and curdle the buttercream. Hope that helps!

          Reply

Leave a Reply Cancel reply

Your email address will not be published. Required fields are marked *

Recipe Rating


Next Post >

Sugar & Sparrow’s Best of 2020

Primary Sidebar

Welcome to Sugar & Sparrow

Welcome to Sugar & Sparrow

Helping you whip up pretty desserts with confidence and creativity. And hopefully sharing a few laughs with you along the way!

Learn More

Connect

let’s bake!

Get my very best recipes, baking tips, and decorating tutorials sent to your inbox

Featured Posts

sugarbear sleep vitamins

SugarBear Sleep Vitamins Cake Collab

a few of my favorite things for summer by sugar and sparrow

A Few of My Favorite Things (Summer 2025)

geode cupcake toppers by sugar and sparrow

Mini Geode Cupcake Toppers Tutorial

Search

Archives

Follow Along

@sugarandsparrowco

LEMON CUPCAKES 🍋 after about a dozen recipe tes LEMON CUPCAKES 🍋 after about a dozen recipe tests, this one is everything I could want in a lemon cupcake! Fluffy-yet-moist, bursting with natural lemon flavor, and absolutely irresistible topped with lemon cream cheese buttercream. 

Full recipe (with frosting) linked in my bio + at https://sugarandsparrow.com/homemade-lemon-cupcakes/

INGREDIENTS:
1 Cup (132g) all-purpose flour
1 tsp baking powder
1/4 tsp salt
1/4 Cup (60ml) whole milk, room temperature
3 Tbsp (45ml) lemon juice from 1 medium lemon
3/4 Cup (150g) granulated sugar
3 Tbsp (42g) unsalted butter, room temperature
2 Tbsp (30ml) vegetable oil
2 large eggs, room temperature
1 tsp pure vanilla extract

INSTRUCTIONS:
1. Preheat the oven to 350ºF (177ºF) and line a standard cupcake pan with 12 paper liners.
2. In a large bowl, whisk together the flour, baking powder, and salt. Set aside. 
3. In the bowl of a stand mixer fitted with the paddle attachment (or with a hand mixer and large bowl), add the lemon zest to the sugar and mix on low speed until fragrant and well combined, about 1 minute. Meanwhile, combine the lemon juice with the milk and set aside. 
4. Add the butter to the lemon-sugar mixture and cream on medium speed until and combined, about 2 minutes. Add the vegetable oil and beat until light and creamy, about 3 minutes. Scrape down the bowl and paddle as needed.
5. Mix in the eggs one at a time on low speed, then add the vanilla and turn the mixer to medium speed for one minute.
6. Turn the mixer off and add the flour mixture all at once. Mix on low speed until just combined, then slowly pour in the lemon-milk mixture. Mix until just combined, about 30 seconds.
7. Divide the batter equally between the liners and bake for 14-18 min. Cool, then top with frosting of your choice (link in bio for lemon cream cheese frosting)�
#lemoncupcakes #creamcheesefrosting #lemon #cupcakes #cupcakedecorating
April in my kitchen 🌸 I published 5 NEW recipes April in my kitchen 🌸 I published 5 NEW recipes on my site, baked my Oreo cupcake recipe for a fundraiser and found it was just as delicious as I remember, and filmed/photographed 3 recipes that will be on my blog in May (Lemon Cupcakes, Lemon Cream Cheese Buttercream, and No-Bake Marbled Strawberry Cheesecake) 🥰 

Comment “APRIL” to get all the available recipes and stay tuned for more! 

#bakersofinstagram #springbaking #cakedecorating #cupcakes #bakinglove
SHEET PAN COOKIE CAKE 🍪 slice it warm for a fud SHEET PAN COOKIE CAKE 🍪 slice it warm for a fudgy chocolate chip cookie OR let it settle into a moist and chewy cookie cake that’s perfect for decorating! My fave vanilla buttercream + sprinkles turn this giant chocolate chip cookie into the perfect birthday cake alternative at the end 🥳
⁣
Full recipe + decorating ideas at https://sugarandsparrow.com/sheet-pan-chocolate-chip-cookie-cake/
⁣
INGREDIENTS⁣
1 Cup (226g) unsalted butter, melted⁣
1 1/3 Cups (267g) packed light or dark brown sugar⁣
1/2 Cup (100g) granulated sugar⁣
3 large eggs⁣
1 Tbsp pure vanilla extract⁣
1 tsp baking soda⁣
1 tsp cornstarch⁣
1/2 tsp salt⁣
3 Cups (398g) all purpose flour⁣
2 Cups (350g) semi-sweet chocolate chips⁣
⁣
INSTRUCTIONS⁣
1. Preheat the oven to 350ºF (177ºC). Grease and line a 13×18 inch sheet pan.⁣
2. In a large bowl, add the brown sugar and granulated sugar. Melt the butter in the microwave and pour it over the top of the sugars. Whisk together until uniform. Add the eggs and vanilla, then continue whisking until uniform. Whisk in the baking soda, cornstarch, and salt.⁣
3. Add the flour and use a silicone spatula to fold it in until smooth cookie dough forms. Reserve 1/2 Cup of the chocolate chips and set them aside, then fold the remaining 1 1/2 Cups of chocolate chips into the cookie dough.⁣
4. Place the chocolate chip cookie dough onto the prepared sheet pan and use an offset spatula to spread it all the way to the edges in an even layer.⁣
5. Bake the cookie cake for 14-16 minutes, until it looks golden brown on the edges and set. 
6. Enjoy warm or let it cool and decorate with vanilla buttercream and sprinkles! ⁣
⁣
#cookiecake #chocolatechipcookies #sheetcake #birthdaycake #cakedecorating
STRAWBERRY CUPCAKES 🍓based on my beloved strawb STRAWBERRY CUPCAKES 🍓based on my beloved strawberry layer cake recipe, this cupcake version is just as moist yet fluffy and bursting with natural strawberry flavor! Between the mix of fresh strawberries in the cupcakes + freeze-dried strawberries in the frosting, the flavor is out of this world 🚀

Full recipe link in my bio (with strawberry buttercream) + at https://sugarandsparrow.com/strawberry-cupcakes/

STRAWBERRY CUPCAKES
Yield: 14 cupcakes

INGREDIENTS:
5 oz (143g) fresh or frozen strawberries
1/3 Cup (80ml) whole milk, room temp
1 1/2 Cups (158g) sifted cake flour
1 tsp baking powder
1/4 tsp baking soda
1/2 tsp salt
6 Tbsp (85g) unsalted butter, room temp
1 Cup (200g) granulated sugar
2 large eggs, room temp
3 Tbsp (45g) sour cream, room temp
1 tsp vanilla extract
1 drop pink food coloring (optional)

INSTRUCTIONS: 
1. Puree the strawberries using a food processor (you’ll have about 1/2 cup of puree), then place into a saucepan over medium-low heat. Bring to a simmer, then cook for 10-15 min, stirring occasionally, until you have 1/4 cup. Refrigerate until room temp.
2. Preheat oven to 350ºF (177ºC) and line a standard cupcake pan with liners.
3. Whisk together the sifted cake flour, baking powder, baking soda, and salt and set aside.
4. In a stand mixer w/ paddle attachment (or hand mixer + large bowl), whip the butter on high for 2 min. Add sugar and beat for 2 min, until light and fluffy. Turn the mixer to low and add the eggs one at a time, then add the vanilla and sour cream, turn the mixer to high and beat for 1 min. Meanwhile, whisk together the strawberry puree, whole milk, and food coloring (if using).
5. Turn the mixer off and add all of the dry ingredients at once. Mix on low until just combined, then add the strawberry milk mixture until just combined, about 30 seconds.
6. Fill the cupcake liners 2/3 full and bake for 14-18 minutes. Cool completely before topping with strawberry buttercream (full recipe linked above). 

#strawberrycupcakes #strawberrycake #pinkcupcakes #strawberry #cupcakes
COFFEE BUTTERCREAM (recipe below)☕️ this frost COFFEE BUTTERCREAM (recipe below)☕️ this frosting has AMAZING coffee flavor, is so easy to decorate cakes with, and pairs beautifully with so many flavors (chocolate, vanilla, or any cake flavor you’d want to turn into a latte). 

All my cake pairing suggestions are linked in my bio or at https://sugarandsparrow.com/coffee-buttercream-recipe/ 

COFFEE BUTTERCREAM⁣
Yield: 2.5 Cups⁣

INGREDIENTS⁣
1 1/2 tsp instant coffee or espresso powder⁣
1 1/2 Tbsp whole milk, room temperature⁣
1 Cup (226g) unsalted butter, room temperature⁣
3 1/2 Cups (420g) powdered sugar⁣
2 tsp pure vanilla extract⁣
Pinch of salt⁣

INSTRUCTIONS⁣
1. Combine the instant espresso/coffee with the whole milk and set aside. In the bowl of a stand mixer, beat the butter on high until creamy and smooth (about 5 minutes), scraping down the bowl and paddle a few times in between.⁣
2. Turn the mixer to low and add the powdered sugar a few cups at a time, scraping down the bowl and paddle between intervals. Add the vanilla, the coffee/espresso milk mixture, and salt. Mix on low until fully incorporated, about one minute.⁣

#coffeebuttercream #buttercream #frosting #coffeecake

Footer

On the Blog

  • Cake Basics
  • Recipes
  • Tutorials

Info

  • About
  • Privacy Policy & Disclosure

stay in the know

Copyright © 2026 · Theme by Sugar & Sparrow