• Cake
  • Frosting
  • YouTube
  • My Favorite Tools
  • Nav Social Icons

  • Skip to primary navigation
  • Skip to main content
  • Skip to primary sidebar
  • Skip to footer
  • Recipes
    • Cake
    • Cupcakes
    • Frosting
    • Ice Cream
    • Vegan
  • Cake Basics
  • Tutorials
  • Blog
  • About
  • Mobile Menu Widgets

    Connect

    Search

Sugar & Sparrow logo in script font

Sugar & Sparrow

Lifestyle and Cake from Portland Oregon

  • Cake Basics
  • Recipes
    • Cake
    • Cupcakes
    • Cookies & Bars
    • Filling
    • Frosting
    • Ice Cream
    • No-Bake
    • Small Batch
    • Vegan
  • Tutorials
  • Book
  • Blog
  • About

Sprinkled White Chocolate Cupcake Toppers

August 20, 2018 · In: Featured, Tutorials

This cupcake topper tutorial originally appeared as a guest post on SprinklePop’s blog. It’s too good not to re-share here – it’s one of my favorite looks for topping cupcakes and so easy to whip up. Enjoy!

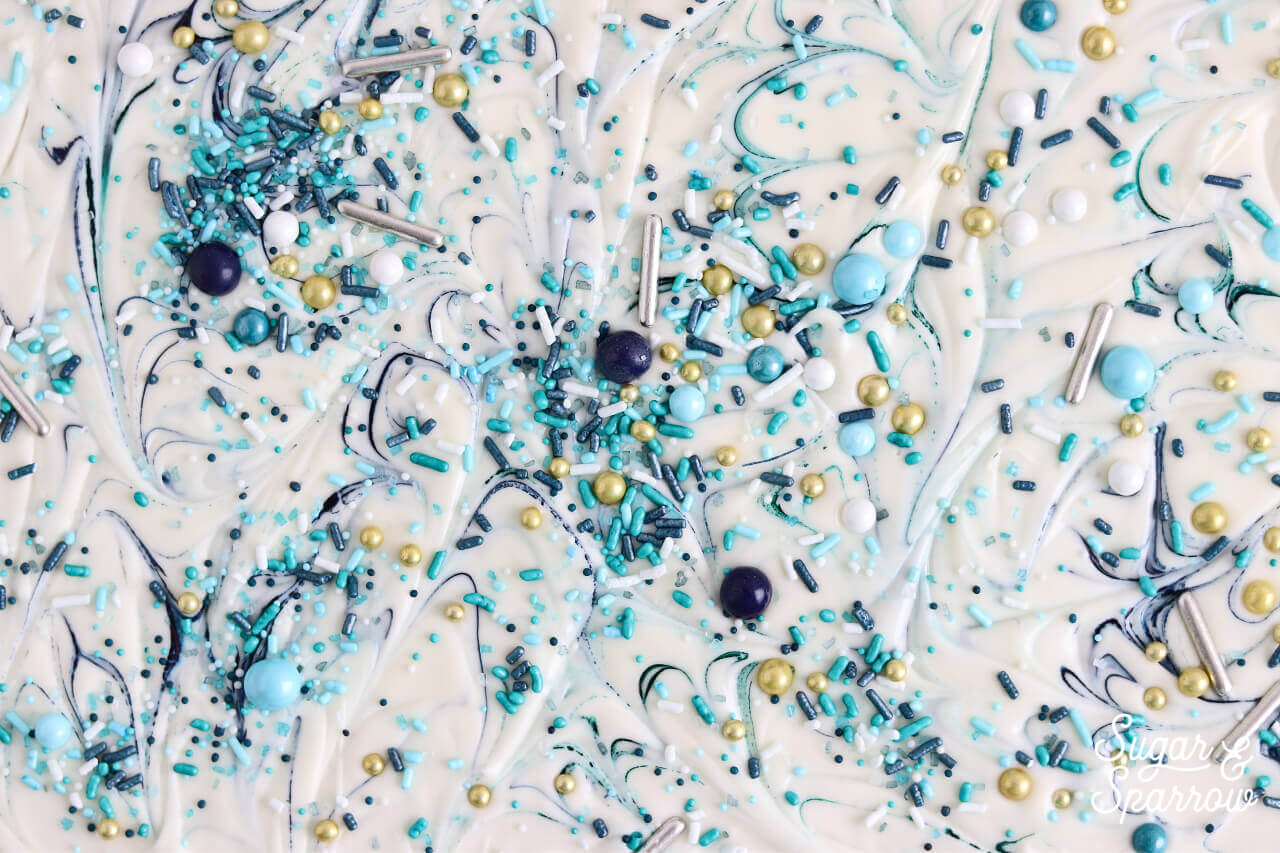
One of my very favorite mediums for creating cake and cupcake toppers is white chocolate. Not only is it versatile and easy to work with, it actually tastes good. And with some pretty additions like this eye-catching Sea Glass sprinkle mix and a food color gel marble effect, it’s downright beautiful! PS: the thing I love about these SprinklePop sprinkles is that they actually taste good too (the larger sprinkles are actually Sixlets!), so you get pretty color and texture without sacrificing flavor – a total win win!

sprinkled cupcake toppers by sugar and sparrow

It all starts with a big slab of marbled white chocolate that looks too pretty to cut into, but today I’m going to show you how to shape it into mini white chocolate discs that are perfect for topping cupcakes. All it takes is a great color scheme, a few sharp cookie cutters, and about thirty minutes from start to finish.

Disclaimer: this post does contain some affiliate links, meaning I may receive a small commission if you click them and purchase items I’ve recommended. Using these links won’t cost you any extra money, but they do help to keep Sugar & Sparrow up and running. Thank you for your support!

What You’ll Need:

  • 2 cups (266g) white chocolate chips
  • A heatproof bowl and microwave (double boiler works fine too!)
  • A candy thermometer
  • Parchment paper
  • Angled spatula
  • Small circular cookie cutters (2 inch diameter or less)
  • SprinklePop Sprinkles
  • Food color gels
  • Toothpick(s)

Step 1: Temper Your White Chocolate

Although you might be tempted to just melt your white chocolate quickly, tempering it is going to give you a finish that doesn’t look dingy and will snap (like solid chocolate should) instead of bend. To temper your chocolate, place your white chocolate chips in a heatproof bowl and reserve ¼ of the white chocolate chips (in this case, remove ½ cup and set aside). The reserved chips are what’s called a “seed” that will help bring your melted chocolate to the right temperature once it’s been melted.

how to temper white chocolate chips

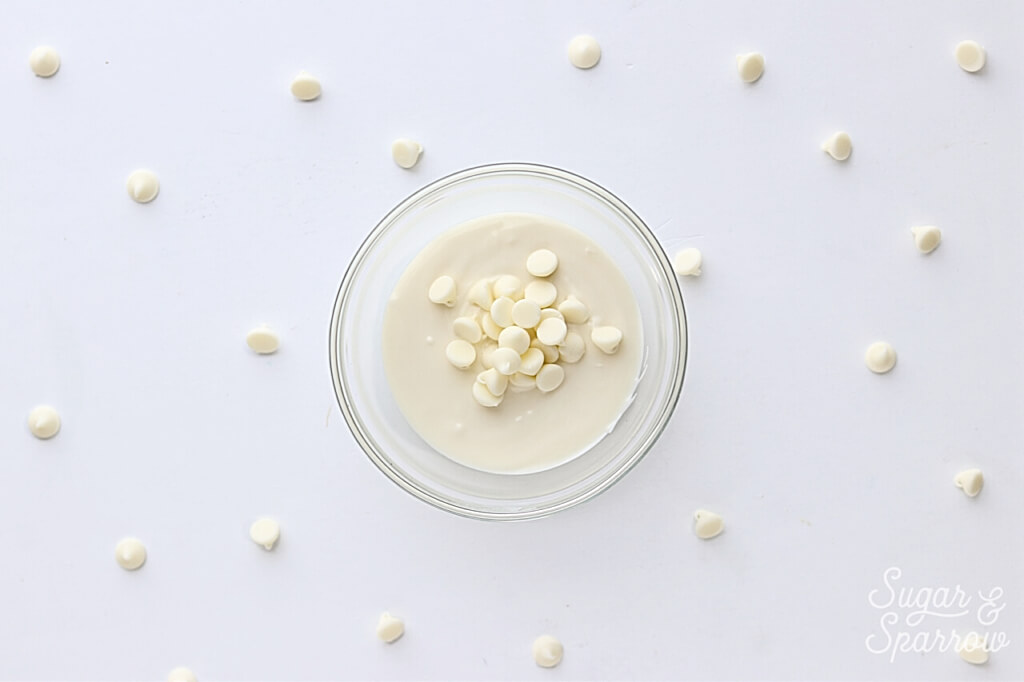
Microwave the white chocolate chips (sans seed) in 30 second increments, stirring after each interval. When the chips are uniformly melted, add your seed back in and stir until those white chocolate chips are melted and the temperature of the mixture reaches between 82 and 84ºF. You now have tempered chocolate!

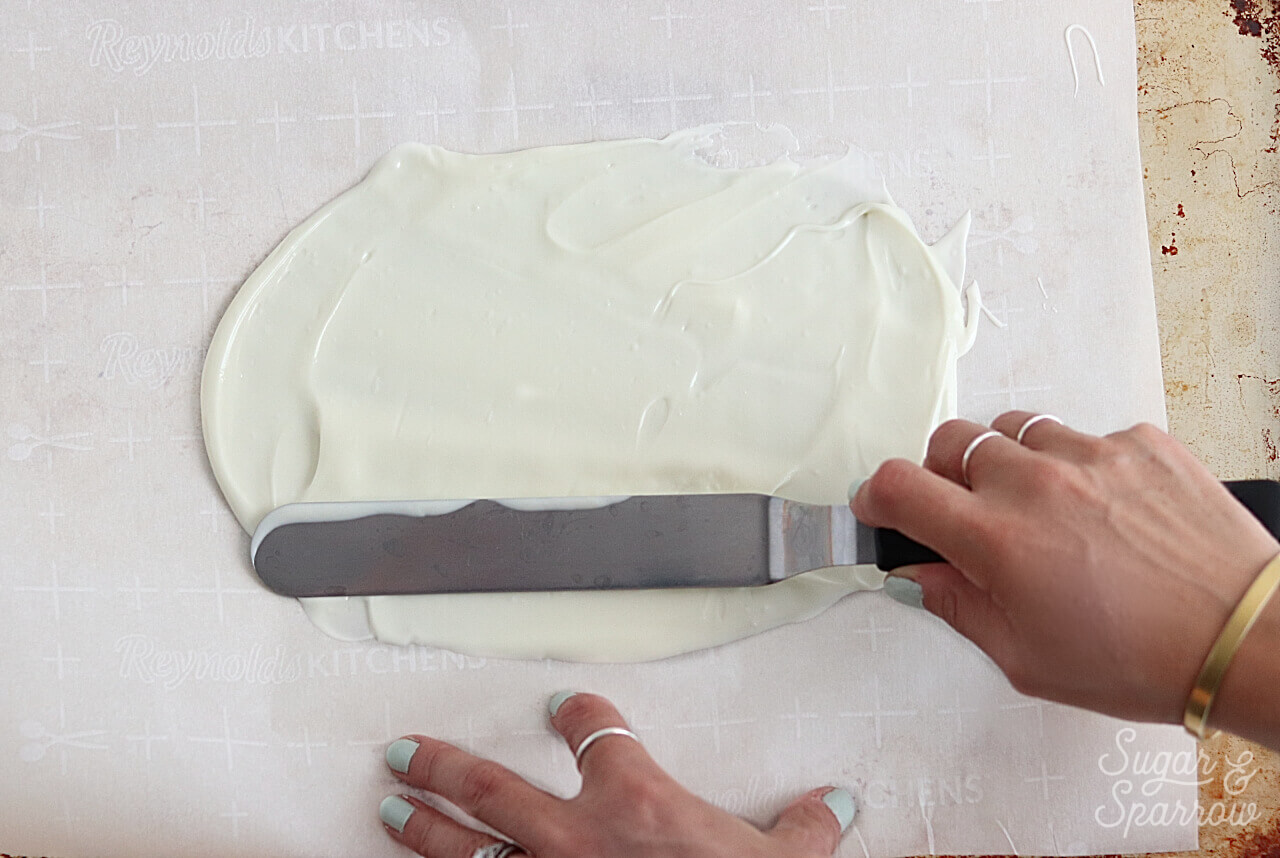
Step 2: Smooth Onto Parchment

Place a sheet of parchment paper over a flat surface and pour the melted white chocolate on top, smoothing with an angled spatula until you have a nice, even surface that’s about ⅛ to ¼ of an inch deep.

how to make white chocolate bark

Step 3: Create The Marble Effect

Squeeze a small drop of food color gel onto a toothpick and move it through the white chocolate to create a marbled effect. Keep in mind that too much food color gel could seize the white chocolate, so gently work it through a little at a time, swirling around with your toothpick. A little bit goes a long way!

how to marble white chocolate bark

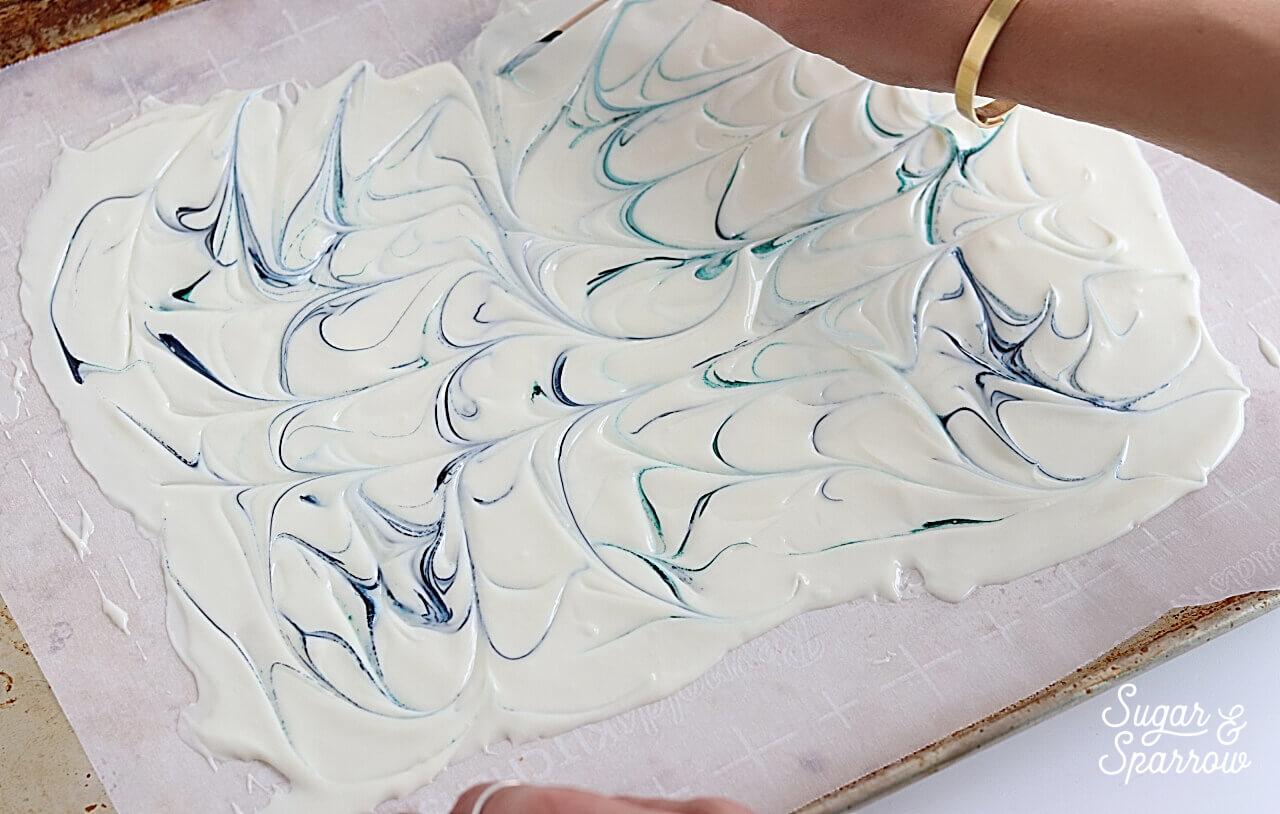
I used AmeriColor color gel pastes in Navy and Teal for this marbled effect and only used two small drops of each color.

Step 4: Sprinkle Generously

Now for the fun part! Toss some pretty sprinkles into the white chocolate until you’re mesmerized with how beautiful it’s looking. When you’re done sprinkling, it’s a really good idea to gently press the sprinkles as far into the white chocolate as they’ll go. That’ll make them stick more firmly. I think the Sea Glass sprinkle mix ended up looking so pretty with the marbled white chocolate backdrop!

how to make sprinkled white chocolate bark

Let the white chocolate sit at room temperature for about 5-10 minutes so that it’s set (still a little soft, but easy to slice through).

Step 5: Score With Cookie Cutters

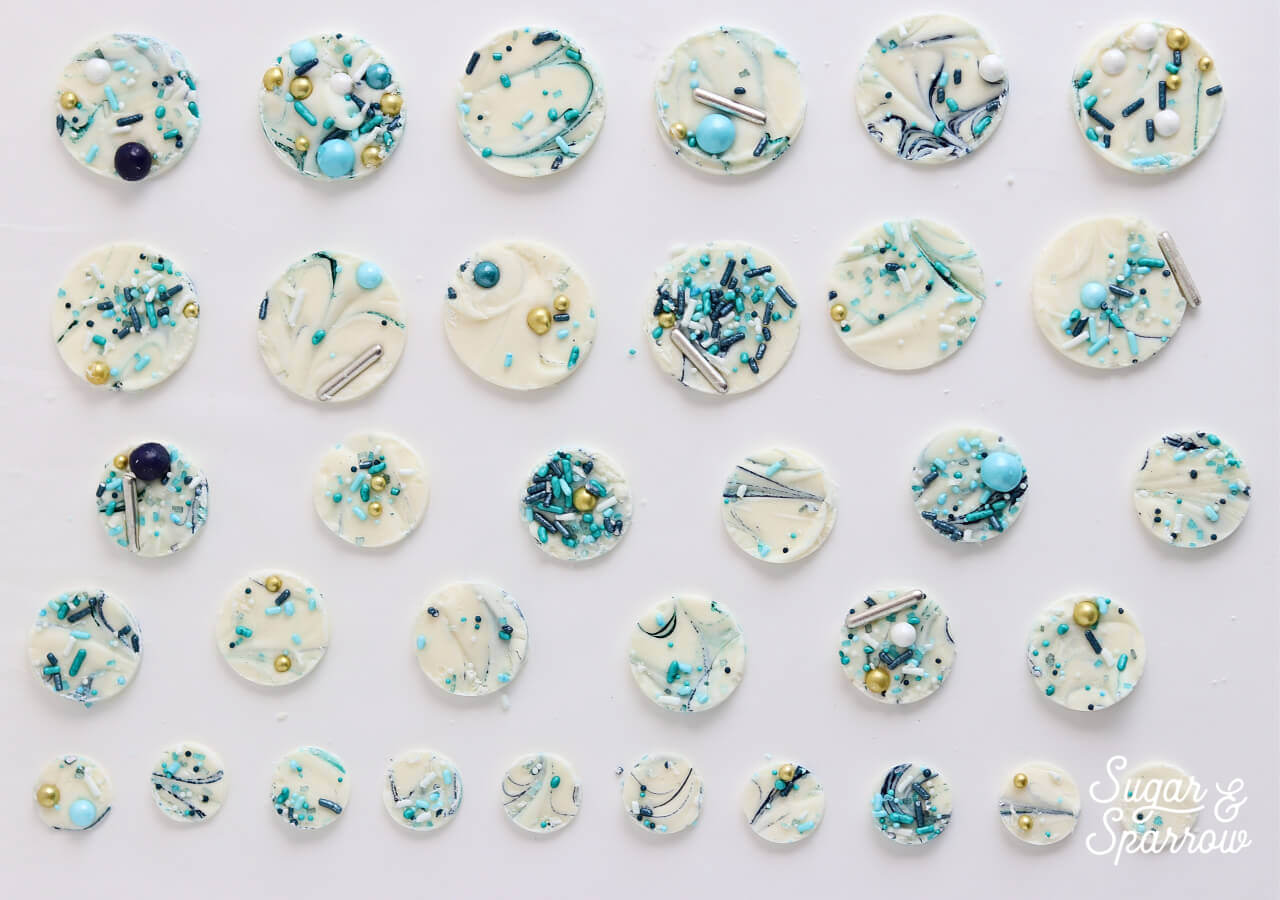
When your chocolate is set, it’s time to score it with your cookie cutters. I’ve used three different diameter sizes for these mini disks: ½ inch, 1 inch, and 2 inches. Press the cookie cutters into the set white chocolate to act as a guide for your final cuts. I always make more scores than I need just in case of breakage. It’s always good to have more! Side note: These circular cutters I’m using are part of a much larger set which comes in handy for making larger discs and other circular cake decorations! A must have for cake decorating.  

how to score white chocolate cookie cutters

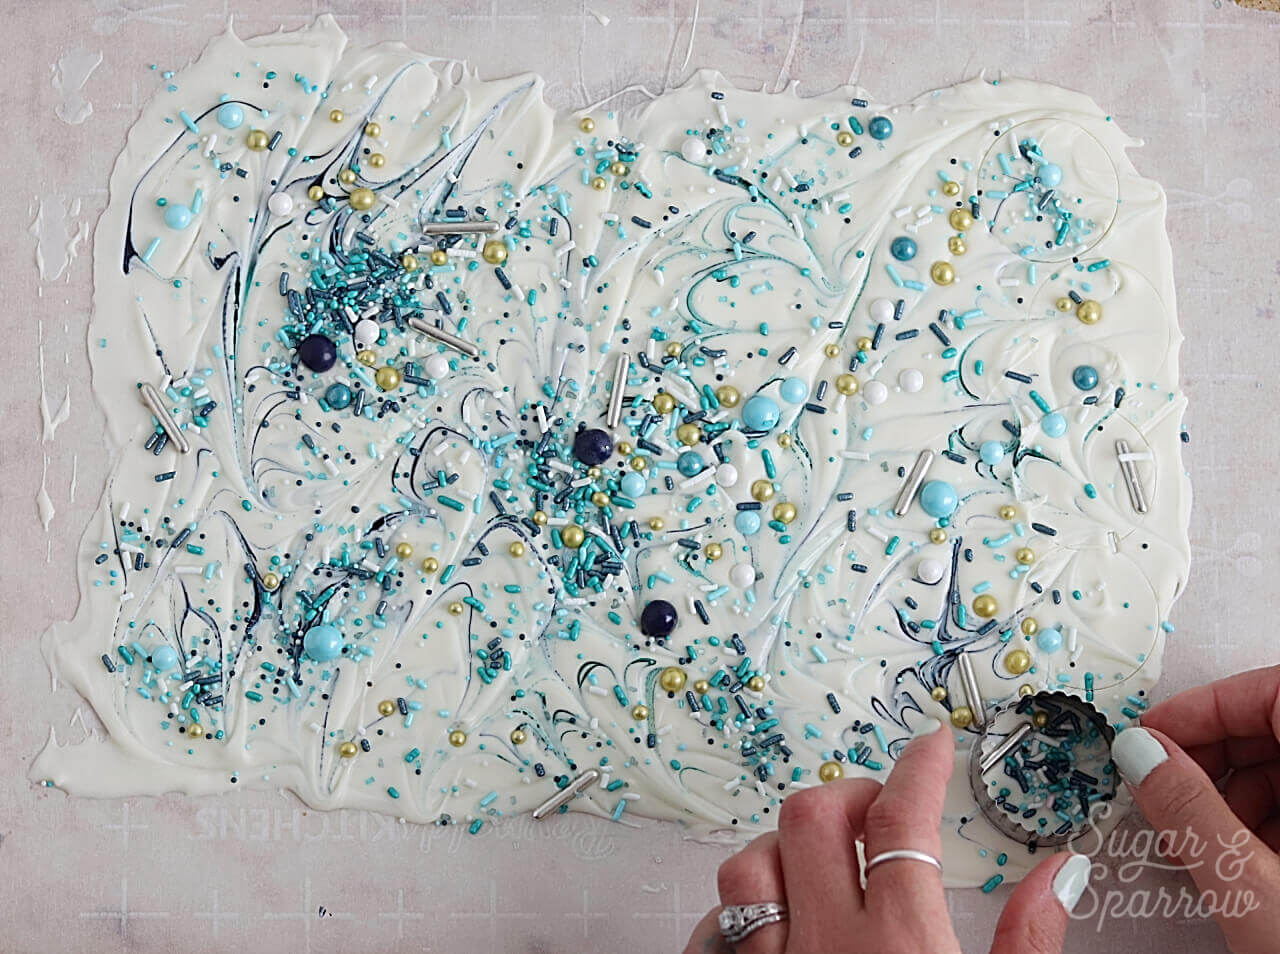
After you’ve made your scores, let the chocolate sit at room temperature for another 15-20 minutes to firm up. If you’re working in a warm environment, it’s a good idea to stick the chocolate in the refrigerator for about 10 minutes to harden instead of waiting for it to set up at room temperature.

Step 6: Make The Final Cuts

Once your white chocolate has hardened, it’s time to retrace those scores with your cookie cutters and make the final cuts. Gently press the cookie cutters over the areas you’ve scored, working them around in a circular motion until you cut right through.

white chocolate mini disc tutorial

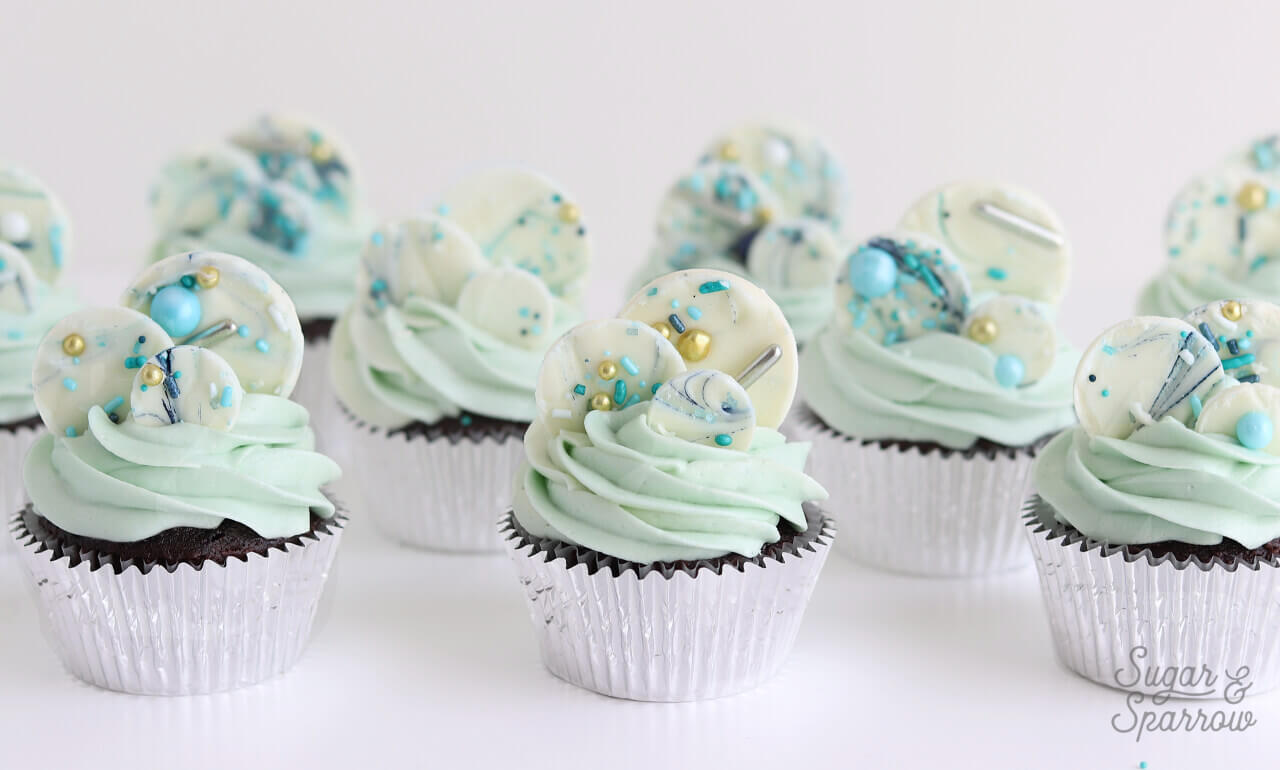
Step 7: Top Your Cupcakes

After you’ve frosted your cupcakes in a complementary color scheme, top them with your mini discs in any pattern you wish! Since I made three different disc sizes, I layered one of each size on the cupcakes in an offset pattern.

sprinkled white chocolate cupcakes by sugar and sparrow

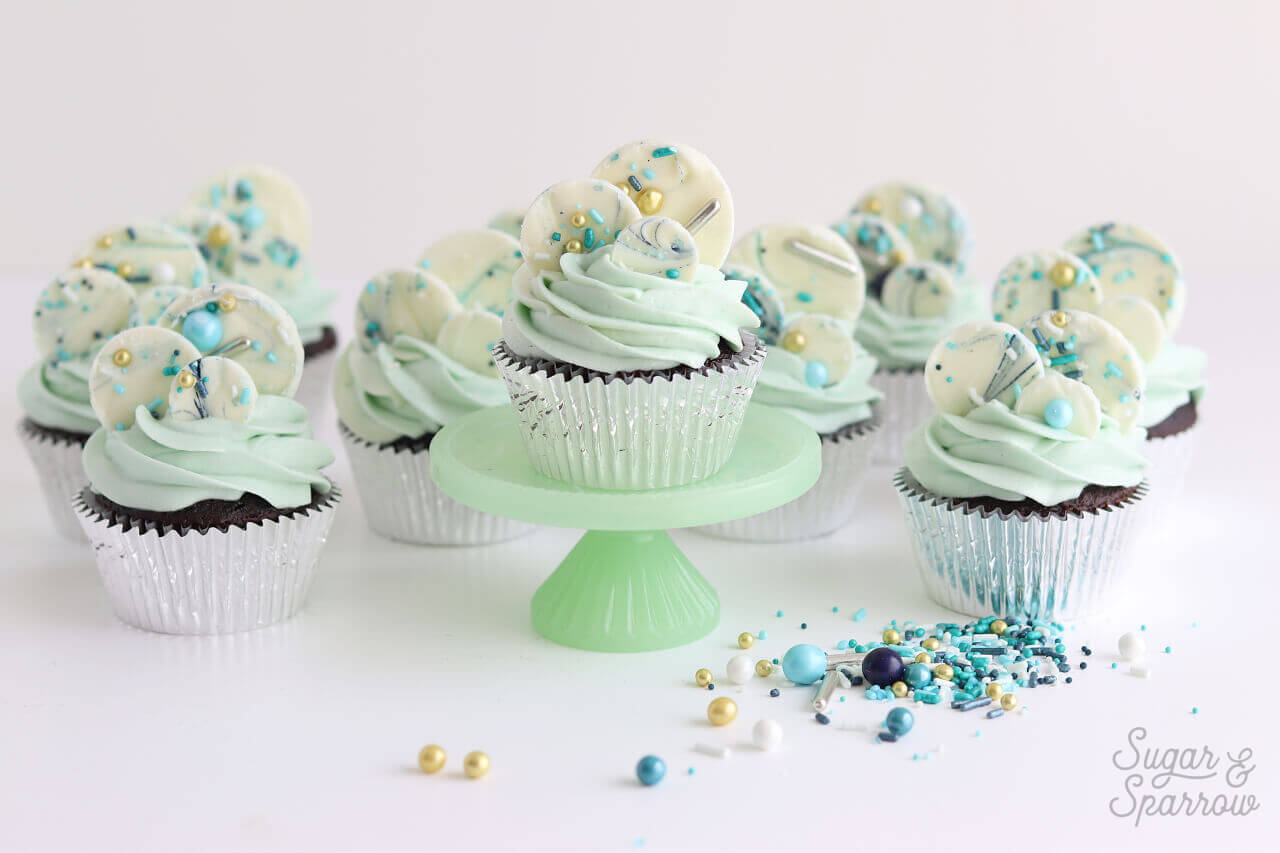
I used a little Teal food color gel to tint the buttercream because I was so enthralled with this Sea Glass sprinkle mix that I wanted to stick with an oceanic color scheme, but feel free to get creative. The cool thing about this white chocolate topper technique is that it looks great in all sorts of color variations. And since SprinklePop makes sprinkle mixes in just about every color scheme imaginable (even custom ones!) they’re the perfect addition.

If you end up trying the technique, let me know how you like it by tagging me on Instagram or commenting below. I love to see your creations!

By: Whitney · In: Featured, Tutorials · Tagged: cake, cake decorating, cupcake decorating, cupcake toppers, cupcakes, edible cupcake topper, sprinkled white chocolate, sprinklepop, sprinkles, white chocolate, white chocolate bark, white chocolate discs

you’ll also love

the best vanilla cupcakes recipeThe Perfect Vanilla Cupcake Recipe
pumpkin layer cake recipe by sugar and sparrowPerfect Pumpkin Layer Cake Recipe
oreo cookies and cream cakeOreo Layer Cake Recipe

Join the List

Stay up to date & receive the latest posts in your inbox.

Reader Interactions

Comments

  1. Resh says

    April 21, 2020 at 5:49 pm

    Hi,
    Will this work with normal white cooking chocolate? Or can you make decorations only with proper white chocolate?

    Reply
    • Whitney says

      April 22, 2020 at 8:05 am

      I’ve never tried making decorations with white baking chocolate, so I can’t say for sure. Try researching the brand of baking chocolate you’re using and see if it’s been done before. In a quick Google search, I learned that there is a difference in the melting structure and white baking chocolate may set up softer than white chocolate chips.

      Reply
  2. Elizabeth L says

    November 11, 2019 at 12:28 pm

    This is great! I’ve been looking for a way to add edible ‘planets’ to my daughter’s birthday cake. This could work well. I have a couple of questions, if you wouldn’t mind answering 🙂
    1. Would colored sugars sprinkled on top make it too hard to eat?
    2. Would I be able to place a popsicle stick or small dowel in each ‘planet’ while its warm, so that it can be stood up on top of a cake?

    Thank you for the tutorial and your help!

    Reply
    • Whitney says

      November 11, 2019 at 1:40 pm

      Hi Elizabeth! I think this technique would be perfect for making edible planets! Colored sugar sprinkles should be totally fine on top – shouldn’t make them too hard to eat. And you can either place a popsicle stick/dowel into each one while warm or “glue” the stick to an already dried planet with more melted white chocolate or candy melts. Either way should be good!

      Reply
  3. Alex says

    July 24, 2019 at 3:27 am

    These look amazing!!! Do you think the same white chocolate technique could be used to make bunny ear toppers? And do you think they won’t melt on a super hot summer day?

    Reply
    • Whitney says

      July 24, 2019 at 9:38 am

      Hi Alex! This technique will totally work for bunny ears! I’d recommend either getting some bunny ear cookie cutters or simply using a sharp knife to cut out the shape of bunny ears when the chocolate has just begun to set. As far as melting goes, it depends on how hot and how long they’re in direct sun. The white chocolate will begin to melt at 110 degrees. Hope that helps!

      Reply
  4. Jem says

    October 16, 2018 at 5:23 pm

    Hi Janna. Thanks for generously sharing the “seeding” technique. This is something new to me. I have done chocolate tempering before and outcome was not good. Happy to learn from you.:)

    Reply
    • Whitney says

      October 17, 2018 at 8:43 am

      Hi Jem! No problem! I hope this technique helps 🙂

      Reply
  5. Jaana says

    August 25, 2018 at 1:30 am

    These look stunning!
    Can you please tell me. Will the chocolate stay nice in appearance and texture if I have to store overnight in the fridge? Thanks x

    Reply
    • Whitney says

      August 25, 2018 at 9:25 am

      Hi Jaana! Although I usually store mine at room temperature, they would be fine to store overnight in the fridge. I’ve topped cakes with white chocolate discs like this before and have kept them in the fridge overnight. They look the same the next day!

      Reply
      • Jaana says

        September 1, 2018 at 7:03 pm

        Thanks! X
        I made these this morn and they look amazing!

        Reply
        • Whitney says

          September 2, 2018 at 10:03 pm

          Hooray!! Saw them on Instagram and they DO look amazing! I absolutely love the color combo you went with. Great work!!

          Reply

Leave a Reply Cancel reply

Your email address will not be published. Required fields are marked *

Recipe Rating


Next Post >

How To Make A Spatula Painted Cake

Primary Sidebar

Welcome to Sugar & Sparrow

Welcome to Sugar & Sparrow

Helping you whip up pretty desserts with confidence and creativity. And hopefully sharing a few laughs with you along the way!

Learn More

Connect

let’s bake!

Get my very best recipes, baking tips, and decorating tutorials sent to your inbox

Featured Posts

fondant decorations for cake by sugar and sparrow

3 Ways to Make Fondant Decorations with a Tasty by Wilton Kit

chocolate strawberry cake recipe by sugar and sparrow

Chocolate Covered Strawberry Cake

Spring desserts: Spring cakes and cupcakes, strawberry shortcake sheet cake, no-churn ice cream, no-bake cheesecake, and more

34+ Spring Dessert Recipes (Cakes, Cupcakes, No-Bake Desserts, and More!)

Search

Archives

Follow Along

@sugarandsparrowco

Everything I baked in June☀️I was so motivated to Everything I baked in June☀️I was so motivated to bake this month (summer flavors had me INSPIRED!) and could barely keep up with myself but I ended up publishing 7 new recipes on my website + finalized 5 more that will be up ASAP! 

Comment “JUNE” to get all the recipes that are available now:

-Cookie Dough Ice Cream Cake
-Rocky Road Cupcakes (w/ homemade marshmallow creme filling!)
-Blackberry Lavender Cake
-Homemade Blackberry Filling
-Whipped Cream Cheese Frosting
-Strawberry Shortcake Cookie Bars
-Berries & Cream Sheet Cake

https://sugarandsparrow.com/everything-i-baked-in-june
 
#cake #bakersofinstagram #baking #bakinglove #cakedecorating
WHIPPED CREAM CHEESE FROSTING ☁️ this easy 4-ingre WHIPPED CREAM CHEESE FROSTING ☁️ this easy 4-ingredient whipped cream frosting is deliciously light, comes together SO easily, and is stabilized with cream cheese to make it the perfect thick consistency for filling and frosting cakes and cupcakes!! It’s so good with my strawberry shortcake sheet cake and berries & cream cake and I have a feeling I’m going to be whipping it up for many more summer cakes😍

Full recipe with cake pairing suggestions at https://sugarandsparrow.com/whipped-cream-cheese-frosting/ 

INGREDIENTS 
1 Cup (8oz, 226g) full-fat brick-style cream cheese, cold
1 Cup (120g) powdered sugar
1 tsp pure vanilla extract
2 1/2 Cups (600ml) heavy whipping cream, cold

INSTRUCTIONS
1. Chill the bowl of your stand mixer (or the large bowl you’ll be using with your hand mixer) into the refrigerator for 20 minutes.
2. Into the cold mixing bowl, add the cream cheese and beat on medium speed with the whisk attachment until creamy, 2 min. Add the powdered sugar and mix on low speed until mostly incorporated, then turn the mixer to medium-high speed and mix for 1 min.
3. Add the vanilla extract, then turn the mixer to medium-high speed and slowly pour in the heavy whipping cream (down the side of the bowl so it doesn’t fly everywhere). Once all the cream is added, continue mixing on medium-high for just about 30 seconds longer, keeping a close eye on the mixing bowl to watch it thicken. It should come together into a thick, silky frosting consistency at this point, where you can dip the whisk into the frosting and it holds a slight peak when you hold it upright.
4. Use the frosting immediately to decorate cakes and/or cupcakes for best results!

#whippedcreamfrosting #creamcheesefrosting #cakedecorating #whippedcream #frosting
TOP 10 4TH OF JULY DESSERTS 🎆 These are just a few TOP 10 4TH OF JULY DESSERTS 🎆 These are just a few of my favorite summer dessert recipes that will disappear at any Fourth of July celebration.

Comment “JULY” and I’ll send you all 20+ of my favorite 4th of July dessert ideas – naturally red white and blue desserts like my berries and cream cake, easy no-bake desserts, no-churn ice cream, strawberry shortcake inspired recipes, and all the treats that will go FAST at any barbecue.

https://sugarandsparrow.com/4th-of-july-desserts/

#fourthofjuly #4thofjuly #summerdessert #partycake #dessertideas
STRAWBERRY SHORTCAKE COOKIE BARS 🍓my hot take: str STRAWBERRY SHORTCAKE COOKIE BARS 🍓my hot take: strawberry shortcake toppings on a buttery, soft sugar cookie base is WAY BETTER than traditional strawberry shortcake. I topped my favorite sugar cookie bar recipe with silky whipped cream cheese frosting + homemade strawberry sauce and now I’m ruined 😵

Full recipe is linked in my bio + at https://sugarandsparrow.com/strawberry-shortcake-cookie-bars/ 

SOFT SUGAR COOKIE BARS
2 Cups + 2 Tbsp (283g) all purpose flour
1 tsp baking powder
1/2 tsp baking soda
1/2 tsp salt
3/4 Cup (170g) unsalted butter, room temp
1 Cup (200g) granulated sugar
1 large egg
1 large egg yolk
1 1/2 tsp pure vanilla extract

1. Preheat the oven to 350ºF (177ºC). Grease and line an 8-inch square baking pan with parchment paper, leaving a slight overhang for easy release.
2. Whisk together the flour, baking powder, baking soda, and salt. Set aside.
3. Using a stand mixer with the paddle attachment (or hand mixer) cream together the butter and sugar on high speed until pale and fluffy, 2-3 min.
4. Turn the mixer to medium and add the egg, egg yolk, and vanilla. Mix until combined, then add the flour mixture and mix on low speed until a uniform cookie dough forms.
5. Press the cookie dough into the prepared pan in an even layer, all the way to the edges. Bake for 18-20 minutes, until the edges are just starting to brown. 
6. Cool the sugar cookie bars in the pan for 30 minutes, then transfer to a wire rack to cool completely. Top with whipped cream cheese frosting and strawberry sauce (full recipe linked in my bio!)

#strawberryshortcake #strawberries #whippedcreamfrosting #cookiebars #sugarcookies
BLACK FOREST CAKE 🍒 this is my favorite thing to m BLACK FOREST CAKE 🍒 this is my favorite thing to make during cherry season! My version is decadent chocolate cake soaked with homemade cherry syrup, fresh cherry filling, and whipped cream frosting. Top it with a chocolate ganache drip if you want to go the extra mile! 

Full recipe + decorating tutorial is linked in my bio + at https://sugarandsparrow.com/black-forest-cake-recipe/

PS I’m working on a sheet cake version of this recipe that’s even easier! Stay tuned.

#blackforestcake #cherrycake #chocolatecake #cherries #cakedecorating

Footer

On the Blog

  • Cake Basics
  • Recipes
  • Tutorials

Info

  • About
  • Privacy Policy & Disclosure

stay in the know

Copyright © 2026 · Theme by Sugar & Sparrow