• Cake
  • Frosting
  • YouTube
  • My Favorite Tools
  • Nav Social Icons

  • Skip to primary navigation
  • Skip to main content
  • Skip to primary sidebar
  • Skip to footer
  • Recipes
    • Cake
    • Cupcakes
    • Frosting
    • Ice Cream
    • Vegan
  • Cake Basics
  • Tutorials
  • Blog
  • About
  • Mobile Menu Widgets

    Connect

    Search

Sugar & Sparrow logo in script font

Sugar & Sparrow

Lifestyle and Cake from Portland Oregon

  • Cake Basics
  • Recipes
    • Cake
    • Cupcakes
    • Cookies & Bars
    • Filling
    • Frosting
    • Ice Cream
    • No-Bake
    • Small Batch
    • Vegan
  • Tutorials
  • Book
  • Blog
  • About

White Chocolate Milk Splash Tutorial

May 30, 2018 · In: Decorations & Garnishes, Featured, Recipes, Tutorials

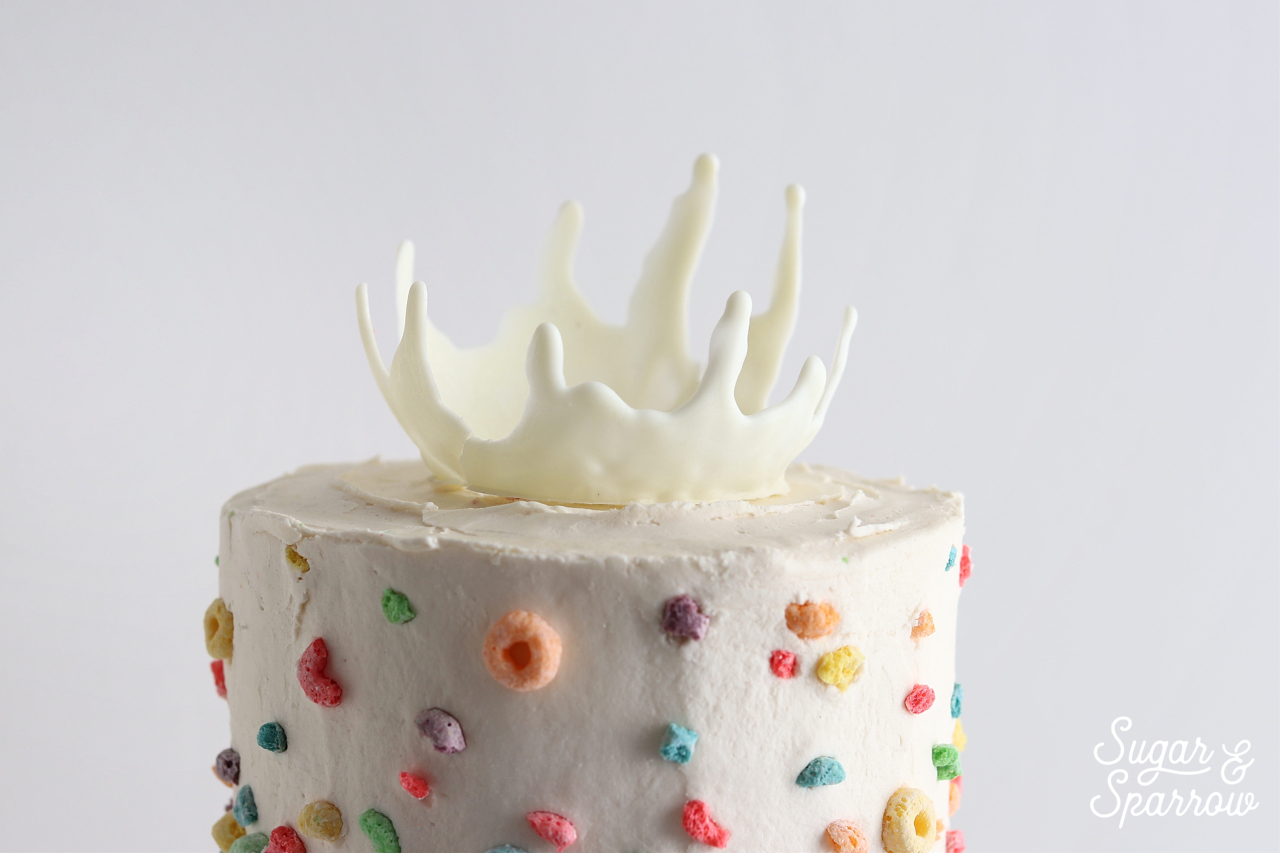
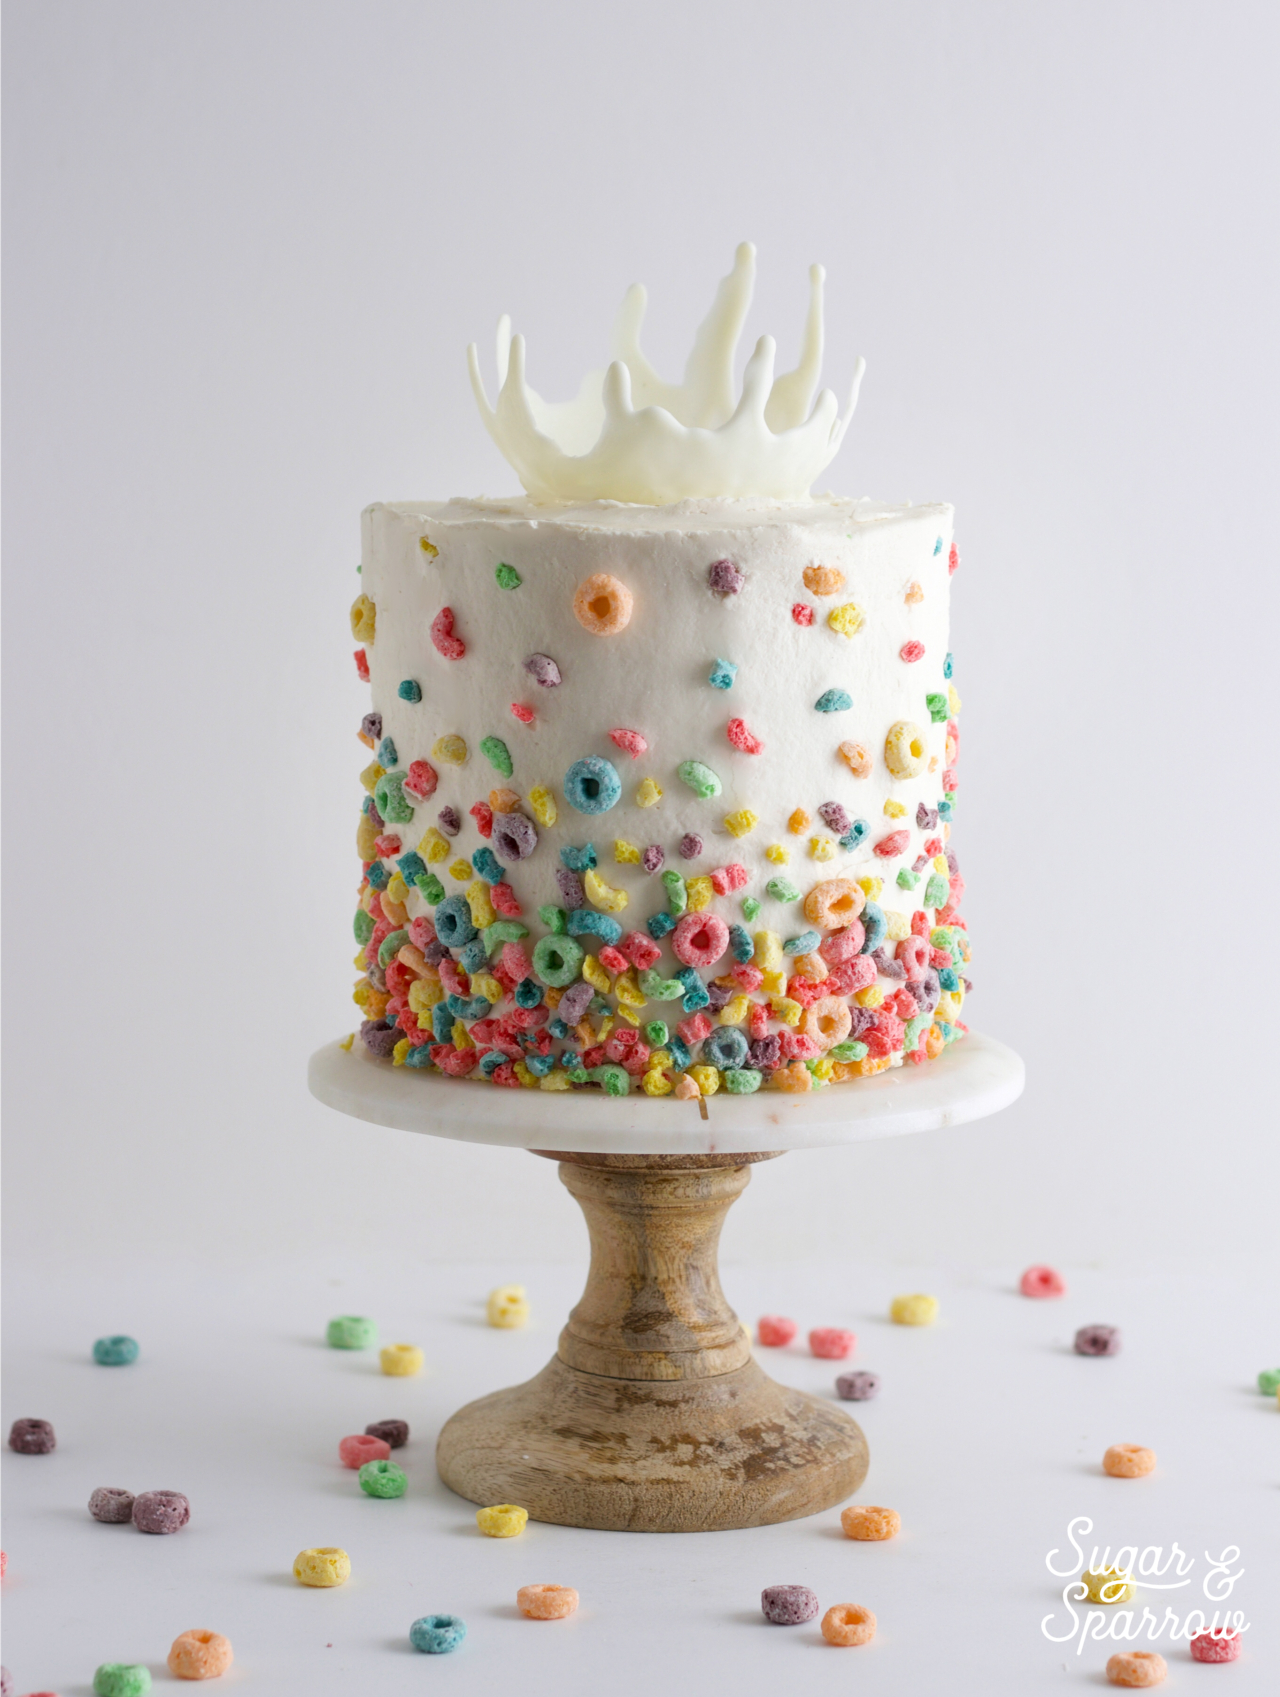
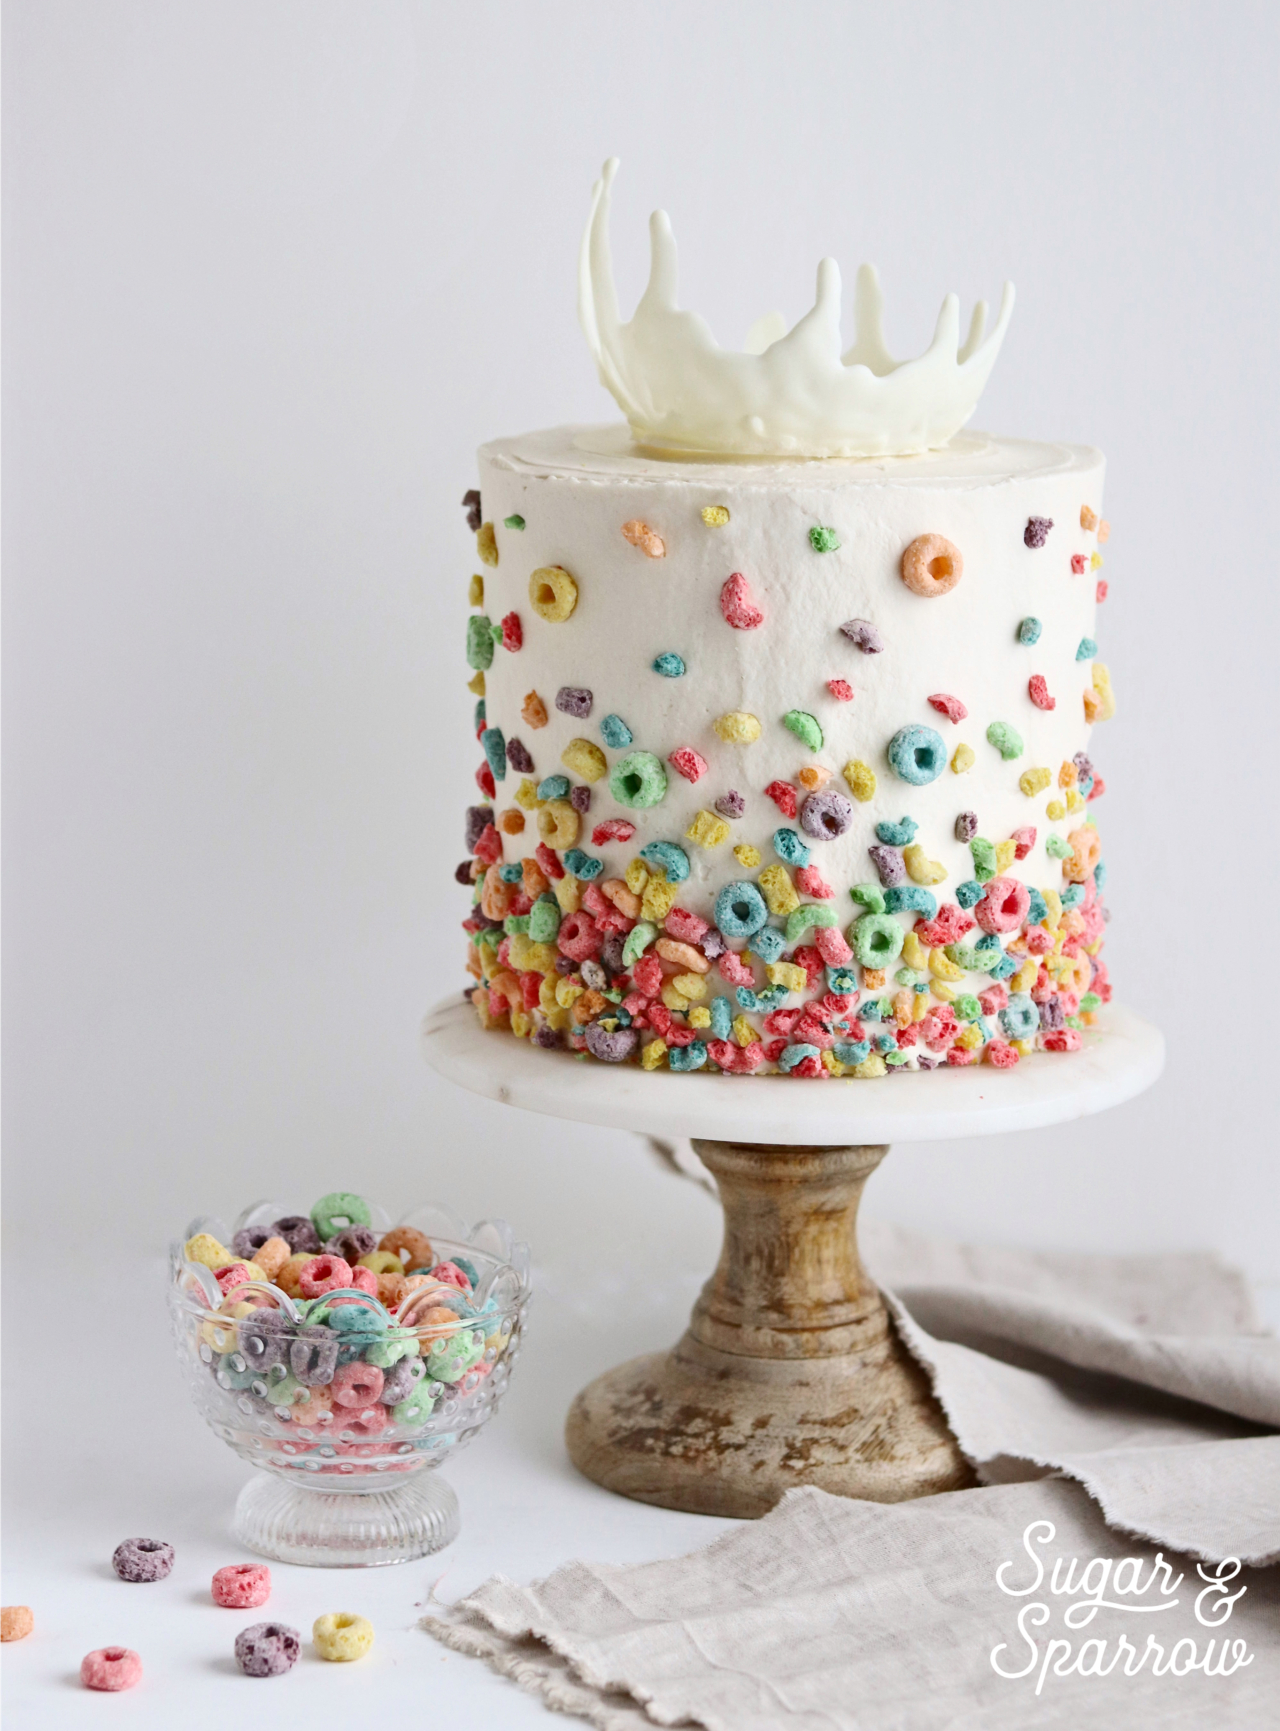
As the topper for my Milk and Cereal Cake, I ended up creating a white chocolate “milk splash” to make it look like cereal milk was coming up out of the cake. Bringing the idea to life definitely took a few tries, because the techniques I initially thought would work ended up being complete disasters. After researching chocolate techniques, studying milk splash photography, and watching a few YouTube videos, I discovered a way to replicate the look with white chocolate. And now you’ll be able to get the look too!

milk and cereal cake by sugar and sparrow

The idea came to me while sketching the design concepts for the Milk and Cereal cake, which is typically my starting point with all of my cakes. I originally planned on creating white chocolate brushstrokes to look like little splashes of milk coming up the side of the cake, and when I showed my graphic designer husband, he stared for a second and said, “why don’t you just figure out how to do a big milk splash on top?” I loved the idea, sketched it out, and proceeded to study milk splash photography to figure out how to approach the design.

milk and cereal milksplash cake by sugar and sparrow

For the first attempt, I tried wrapping a bowl with saran wrap (face down) and pouring tempered white chocolate over it. After letting it set in the fridge, it would not release. The saran wrap stuck firmly to the bowl and all of the drips of the splash ended up breaking off. Next, I tried to do the same technique on the inside of the bowl so that I could simply lift the saran wrap upward to release the white chocolate. That didn’t work either.

how to make a white chocolate milk splash cake

What finally worked was pouring cooled white chocolate over a small balloon. I’d seen a few YouTube videos on how to make bowls out of chocolate this way, and I figured it was the smartest way to get the job done. Here’s how to get the look: 

What You’ll Need

  • A few small (5 inch) balloons
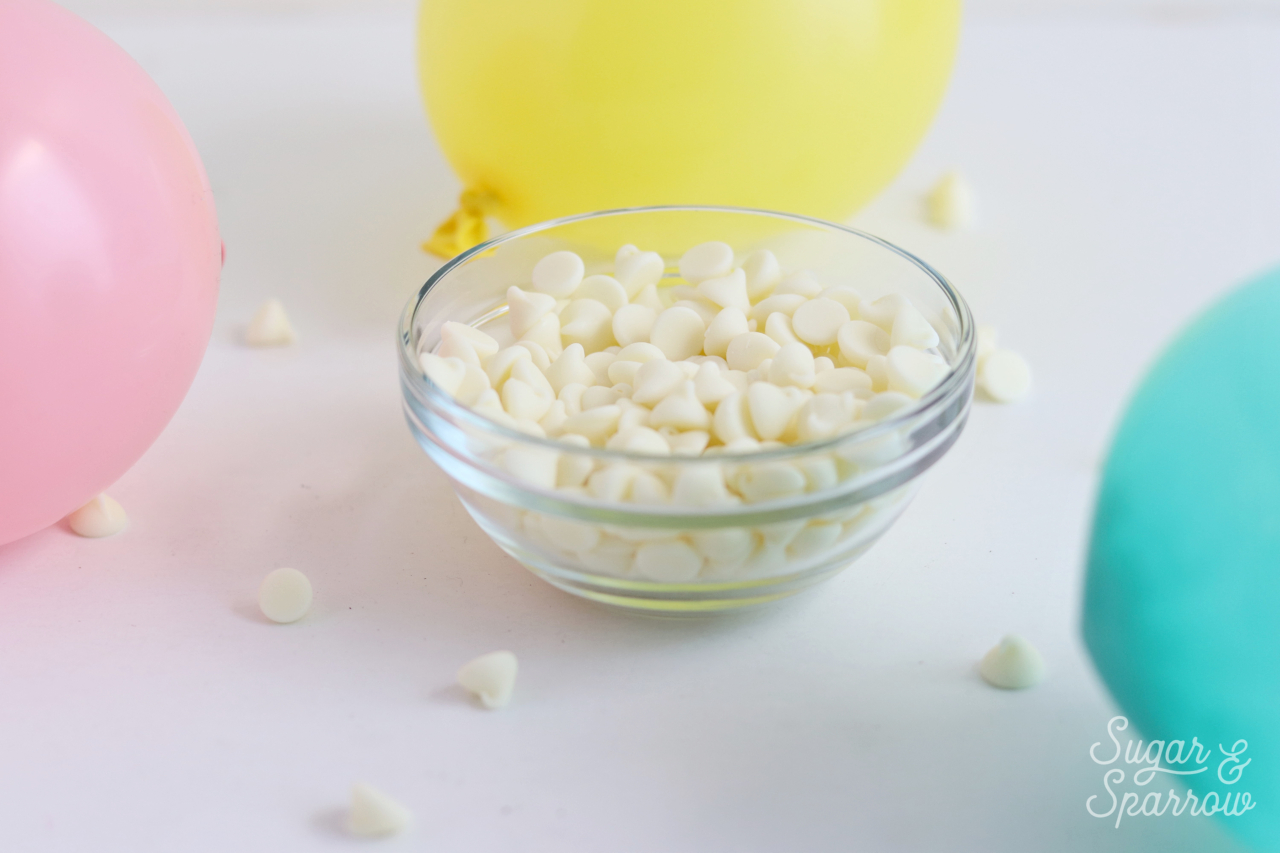
  • 1 cup (183g) white chocolate chips
  • Microwave or double boiler for melting chocolate
  • A few small bowls for holding balloons upright
  • Cooking spray
  • A piping bag
  • Palette knife or small metal spatula
  • Safety pin
  • Frying pan

Step 1: Blow Up Balloons

This part’s the easiest. Blow up your balloons to the circumference you’re wanting and place then into small bowls to keep them upright.

chocolate bowls balloon tutorial

Step 2: Temper And Cool The Chocolate

Place the white chocolate chips into a microwave safe bowl and reserve ¼ of the chips to use as the “seed”. Microwave the chocolate (without the seed) in 30-second intervals, stirring after each round, until it’s melted and has reached 116 degrees fahrenheit.

how to temper white chocolate

When the white chocolate has reached that point, stir in the reserved seed until those chips have melted and the temperature drops to 86 degrees.

Step 3: Create The Milk Splash

Spray a little cooking spray onto the tops of each balloon (helps the chocolate releasing process), then place the melted chocolate into a piping bag and snip off a small opening. Take the balloons, one by one, out of their holder bowls. Use one hand to hold the balloon and the other hand to pipe a milk splash design onto the balloon, covering the top of the balloon (which will be the bottom of the milk splash) and creating drips around the sides to give the splash effect.

white chocolate milksplash tutorial

When you’re finished piping each milk splash, place the balloon back into the holder bowl. Be careful with this step, since the balloons will become top heavy with the added weight of the white chocolate. Place the balloons into the refrigerator to set for at least 15-20 minutes.

Step 4: Pop The Balloons

Once the white chocolate has fully set, use a palette knife to carefully slide between the balloon and each drip so that the more delicate parts of your milk splash are pre-released. Then use a safety pin or other sharp object to make a small incision in the balloon. You’ll want it to pop slowly so that it doesn’t snap off your chocolate drips.

white chocolate milk splash tutorial by Sugar and Sparrow

If you find that the balloon has stuck to the white chocolate in areas, very gently release those parts by hand. The balloon should come away from the white chocolate with a little elbow grease.

Step 5: Shape The Milk Splash

With a frying pan or other type of shallow pan over Medium-Low heat on your stovetop, gently hold the bottom of your milk splash over the heated surface. This will cause the rounded bottom to melt away, leaving you with more of a crown-like topper. This extra step makes the milk splash look more realistic when it’s on the cake.

how to make a white chocolate milksplash

Be super careful not to melt the chocolate too quickly, and keep the stove setting closer to Low than Medium. Slow and steady wins the race with this one.

If you happen to break any of the drips during the process of creating the milk splash (like I totally did!) you can use the heated pan to melt one end of the drip and “glue” it back where it belongs. The chocolate will bind together and set, and you probably won’t even notice the repair!

Step 6: Assembly

After the milk splash is set, shaped, and ready to go, all you have to do is place it on top of your cake. I filled mine with a little cereal to make it look like I threw cereal onto the top of the cake to cause the milk splash. Feel free to get creative with the way you use yours!

cereal cake with white chocolate milk splash by Sugar and Sparrow

By: Whitney · In: Decorations & Garnishes, Featured, Recipes, Tutorials · Tagged: cake decorating, cake tutorial, milk and cereal cake, milk splash, milk splash cake, milk splash photography, white chocolate milk splash

you’ll also love

the best vanilla cupcakes recipeThe Perfect Vanilla Cupcake Recipe
pumpkin layer cake recipe by sugar and sparrowPerfect Pumpkin Layer Cake Recipe
oreo cookies and cream cakeOreo Layer Cake Recipe

Join the List

Stay up to date & receive the latest posts in your inbox.

Reader Interactions

Comments

  1. Cassidy Reinholtz says

    September 30, 2023 at 4:48 pm

    I was trying to do this but I don’t have a microwave so I was doing a double broiler method. The chocolate just clumped up and wouldn’t melt into a smooth consistency

    Reply
    • Whitney says

      October 3, 2023 at 9:42 pm

      Hi Cassidy! Is it possible that some water got into the chocolate? Or that the boiling water beneath the bowl came in contact with the bottom of the bowl? It sounds like your white chocolate seized, which can happen in either scenario. Here’s a quick youtube video to troubleshoot that in case that’s what happened: https://www.youtube.com/watch?app=desktop&v=cV-T9-H90pA

      Reply
  2. Hilary says

    October 5, 2021 at 2:28 pm

    If using lucky charms marshmallows on the cake, do the colors bleed onto the frosting? And if so, about how much time do I have before they bleed? Thinking when I can place the marshmallows. Thank you!

    Reply
    • Whitney says

      October 6, 2021 at 7:56 am

      Hi Hilary! I have made this Milk & Cereal cake with marshmallows before and haven’t had any issues with the colors of the marshmallows bleeding. You should be able to place the marshmallows up to a day ahead.

      Reply
  3. Heather says

    June 8, 2021 at 2:21 pm

    Amazing! Thanks for sharing. Hoping to use this on top of a mermaid cake for my daughter. Fingers crossed!

    Reply
    • Whitney says

      June 12, 2021 at 9:32 am

      Yay, Heather! What a fun idea!

      Reply
  4. Corri says

    May 24, 2020 at 6:32 pm

    Thanks!!

    Reply
  5. Corri says

    May 24, 2020 at 6:24 pm

    Hey there!! So, when you put the white chocolate on top of the balloon instead of letting the chocolate sit for 15 minutes prior to putting it on top of the balloon, could you fill the balloon with cold water and put the chocolate top immediately??

    Reply
    • Whitney says

      May 26, 2020 at 2:55 pm

      Hi Corri, I have never tried filling the balloon with water before, so I can’t say what will happen. I do know that when water touches chocolate it tends to make it seize, so I would avoid popping the balloon at the end if you try the filling with water method.

      Reply
  6. Elly says

    March 20, 2020 at 9:08 am

    So excited to see this cake on Pinterest today! My husband works with high-speed photography of splashes (and other things) at MIT — this is gonna be a PERFECT birthday surprise for him!!

    Reply
    • Whitney says

      March 20, 2020 at 9:50 am

      Yay, Elly! This will be absolutely perfect for your husband’s birthday!

      Reply
  7. Tina says

    January 27, 2020 at 1:14 am

    Going to attempt this today for my cereal crazy son… wish me luck!

    Reply
    • Whitney says

      January 27, 2020 at 9:10 am

      Yay, Tina! Excited for you to try this!

      Reply
  8. Sarah says

    July 30, 2019 at 8:30 pm

    I’m having a lot of trouble getting the balloon technique to work without coloring from the balloon pulling off and staying on the white chocolate. I’ve sprayed the balloon generally and it’s still happening. Any suggestions? Is there a certain brand of balloon better for this then others?

    Reply
    • Whitney says

      August 1, 2019 at 9:47 am

      Hi Sarah! I would definitely try a different brand of balloons. A balloon shouldn’t have a colored shell on top of the rubber that can pull away. These are the brand of balloons that I used, but any brand that doesn’t have a colored shell on top of the rubber should work just fine: https://www.etsy.com/listing/528699841/tutti-frutti-balloon-fruit-birthday?ga_search_query=happy&ref=shop_items_search_1&frs=1

      Reply
  9. Ronna says

    June 9, 2019 at 7:15 am

    Thanks so much for your tutorial. I tried this and loved the results. It really doesn’t look as fun as yours…sadly, in Canada Fruit Loops are made of all natural coloring so my cake isn’t as colorful as yours. I was disappointed when I first did it but I’m thinking it is a more muted version of yours.
    Thanks again so much for your tutorial. It really helped!

    Reply
    • Whitney says

      June 10, 2019 at 9:47 pm

      Hi Ronna! So happy you loved the tutorial! I’m sure the cake turned out lovely with the muted color palette 🙂 I actually love the way the muted Froot Loops look and I’m sure natural coloring is way better for you! Haha.

      Reply
    • Thams says

      July 16, 2020 at 11:32 am

      Heyyy, SAME in South Africa (Cape Town) it’s also made of all natural colourings so the colour of the frootloops aren’t as “pretty” but they taste just as amazing!

      Reply
  10. Lucy says

    April 15, 2019 at 6:52 am

    This is so helpful, thank you! I’m definitely going to try this, with your cereal cake recipe too! (My husband loves cereal so it’d be perfect for him!) Do you think that candy melts would work the same as white chocolate?

    Reply
    • Whitney says

      April 15, 2019 at 10:37 am

      Hi Lucy! This will make the perfect cake for your husband! So excited for you to try the recipe and top it with the chocolate milk splash. I’ve never tried this technique with Candy Melts, but I’d imagine they’d work just fine. Just make sure the Candy Melts are cooled slightly before adding them to the balloon, so they don’t end up popping it 🙂

      Reply
      • Lucy says

        April 18, 2019 at 3:10 am

        Thanks! I’ll let you know how it goes! (I’ll tag you on insta)

        Reply
  11. Jon says

    March 15, 2019 at 10:35 pm

    Hi Whitney! This is stunning and I tried it tonight. I made the balloon/splash. Unfortunately my balloon popped while there was chocolate on it and the chocolate flew everywhere! I’m trying again tomorrow. Do you think my chocolate was too hot for the balloon? Any advice would be much appreciated. Thanks!

    Reply
    • Whitney says

      March 16, 2019 at 4:38 pm

      Hi Jon! So sorry about that! It sounds like the chocolate was definitely too hot for the balloon. Do you know what the temperature of the chocolate was? My advice is to make sure that the chocolate is below 86 degrees before you start piping on the chocolate. If you don’t have a candy thermometer to measure the temp, I’d just give it a good 15 minutes or so after melting the chocolate (make sure you’re stirring every so often to make sure it’s still liquid) before piping it onto the balloon.

      Reply
  12. Neccy says

    March 14, 2019 at 6:35 am

    I’m so excited about this cake. I’m going to try it for one of my Church gatherings. Thanks !

    Reply
    • Whitney says

      March 14, 2019 at 1:12 pm

      Awesome, Neccy! I hope you love the recipe!!

      Reply
  13. Brandi says

    January 18, 2019 at 6:30 pm

    This is brilliant and so lovely! I’ve decided a year in advance, this is my daughter’s third birthday cake! LoL

    Reply
    • Whitney says

      January 21, 2019 at 8:44 am

      Thanks so much Brandi! And way to plan ahead! 🙂

      Reply
  14. Emily says

    January 17, 2019 at 4:22 pm

    My son has requested this cake for his 6th birthday tomorrow. I CANNOT WAIT to make it for him. This is sheer genius. Every bit of it!!! Thank you for the inspiration!

    Reply
    • Whitney says

      January 18, 2019 at 8:46 am

      Hi Emily! SO excited for you to make this cake for your son’s birthday!! Let me know how it goes!!

      Reply
  15. Bernice Baran says

    June 7, 2018 at 2:59 pm

    I love this cake so much! Was patiently waiting for your post on this as I saw it on your instagram first. LOVE LOVE LOVE it, will definitely make this one day!

    Reply
    • Whitney says

      June 8, 2018 at 10:38 am

      Yay Bernice!! So excited for you to make this!!

      Reply
  16. April Pennix says

    May 31, 2018 at 2:51 am

    I absolutely love this and can’t wait to try it. Thank you for sharing.

    Reply
    • Whitney says

      May 31, 2018 at 8:42 am

      Thanks so much April! Excited for you to try it!

      Reply
      • Heather Vincent says

        July 26, 2020 at 6:09 am

        HI, I’m going to make this beautiful cake but when it comes to buttercream I don’t have a stand mixer so no paddle attachment. I have a food processor so I’m unsure how to get the correct texture. Can you suggest a solution please I would be so grateful.

        Reply
        • Whitney says

          July 26, 2020 at 12:19 pm

          Hi Heather! I already answered this on Instagram DM but I’ll say what I said there: I would recommend using a hand mixer over using a food processor, only because I’ve never made buttercream with a food processor before and can’t say with assurance what the outcome will be. Following the same timing/speeds on my buttercream recipes with a hand mixer works just fine!

          Reply

Trackbacks

  1. Loving Lately - Sadie's Nest says:
    March 7, 2019 at 6:36 am

    […] we saw this milk splash cereal cake from sugarandsparrow.com we knew we had to give it a try! Placing Fruit Loops and Fruity Pebbles whimsically around the milky […]

    Reply
  2. Milk And Cereal Cake Recipe says:
    May 30, 2018 at 8:52 am

    […] to figure out how to make it happen. Don’t worry, I’ve even created a full tutorial on the white chocolate milk splash in case you want to get the […]

    Reply

Leave a Reply Cancel reply

Your email address will not be published. Required fields are marked *

Recipe Rating


Next Post >

Milk And Cereal Cake Recipe

Primary Sidebar

Welcome to Sugar & Sparrow

Welcome to Sugar & Sparrow

Helping you whip up pretty desserts with confidence and creativity. And hopefully sharing a few laughs with you along the way!

Learn More

Connect

let’s bake!

Get my very best recipes, baking tips, and decorating tutorials sent to your inbox

Featured Posts

a few of my favorite things for summer by sugar and sparrow

A Few of My Favorite Things (Summer 2025)

funfetti cake recipe with vanilla buttercream

Funfetti Layer Cake Recipe

road trip from portland to san francisco

Portland To San Francisco Road Trip

Search

Archives

Follow Along

@sugarandsparrowco

STRAWBERRY SHORTCAKE ICE CREAM CAKE 🍓if Strawbe STRAWBERRY SHORTCAKE ICE CREAM CAKE 🍓if Strawberry Shortcake Ice Cream Bars make you nostalgic for your childhood ice cream truck days, you’re going to LOVE this easy ice cream cake version - no ice cream maker needed 🙌🏼 

Full recipe on my blog at https://sugarandsparrow.com/strawberry-shortcake-ice-cream-cake/

STRAWBERRY CRUNCH 
24 whole (280g) Golden Oreos, finely ground
3 Oz box strawberry jello
4 Tbsp unsalted butter, melted

ICE CREAM LAYERS
1/2 Cup (15g) freeze-dried strawberries
2 Cups heavy whipping cream, cold
1 Tbsp pure vanilla extract, divided
14 Oz sweetened condensed milk
1 1/2 tsp strawberry jam or preserves

1. Combine the strawberry crunch ingredients and bake on a lined cookie sheet at 350ºF for 4 min.
2. For the crust, combine 1 Cup of the strawberry crunch with 2 Tbsp melted butter. Press into the bottom of a 6-inch springform pan and line with an acetate collar. Place in the freezer while you move on.
3. Using a food processor, grind the freeze-dried strawberries into a fine powder. Set aside.
4. Add the heavy whipping cream and 2 tsp of vanilla extract into a chilled bowl, then whip it with a hand mixer to stiff peaks. Place in the refrigerator.
5. Divide the condensed milk between two medium bowls. To one bowl, add 1 teaspoon of vanilla. To the second bowl, add the finely strawberry powder and the jam/preserves. Whisk the ingredients together within each individual bowl.
6. Divide the whipping cream evenly between each of the two bowls you created in the previous step. Fold each sweetened condensed milk mixture together with the divided whipped cream to create the vanilla ice cream and strawberry ice cream.
7. Layer half of each of the ice creams on top of the strawberry crunch crust, sprinkle a layer of strawberry crunch on top, then repeat. Freeze for 6 hours and serve. 
#icecreamcake #strawberryshortcake #nochurnicecream #icecreamlover #strawberry
LEMON CUPCAKES 🍋 after about a dozen recipe tes LEMON CUPCAKES 🍋 after about a dozen recipe tests, this one is everything I could want in a lemon cupcake! Fluffy-yet-moist, bursting with natural lemon flavor, and absolutely irresistible topped with lemon cream cheese buttercream. 

Full recipe (with frosting) linked in my bio + at https://sugarandsparrow.com/homemade-lemon-cupcakes/

INGREDIENTS:
1 Cup (132g) all-purpose flour
1 tsp baking powder
1/4 tsp salt
1/4 Cup (60ml) whole milk, room temperature
3 Tbsp (45ml) lemon juice from 1 medium lemon
3/4 Cup (150g) granulated sugar
3 Tbsp (42g) unsalted butter, room temperature
2 Tbsp (30ml) vegetable oil
2 large eggs, room temperature
1 tsp pure vanilla extract

INSTRUCTIONS:
1. Preheat the oven to 350ºF (177ºF) and line a standard cupcake pan with 12 paper liners.
2. In a large bowl, whisk together the flour, baking powder, and salt. Set aside. 
3. In the bowl of a stand mixer fitted with the paddle attachment (or with a hand mixer and large bowl), add the lemon zest to the sugar and mix on low speed until fragrant and well combined, about 1 minute. Meanwhile, combine the lemon juice with the milk and set aside. 
4. Add the butter to the lemon-sugar mixture and cream on medium speed until and combined, about 2 minutes. Add the vegetable oil and beat until light and creamy, about 3 minutes. Scrape down the bowl and paddle as needed.
5. Mix in the eggs one at a time on low speed, then add the vanilla and turn the mixer to medium speed for one minute.
6. Turn the mixer off and add the flour mixture all at once. Mix on low speed until just combined, then slowly pour in the lemon-milk mixture. Mix until just combined, about 30 seconds.
7. Divide the batter equally between the liners and bake for 14-18 min. Cool, then top with frosting of your choice (link in bio for lemon cream cheese frosting)�
#lemoncupcakes #creamcheesefrosting #lemon #cupcakes #cupcakedecorating
April in my kitchen 🌸 I published 5 NEW recipes April in my kitchen 🌸 I published 5 NEW recipes on my site, baked my Oreo cupcake recipe for a fundraiser and found it was just as delicious as I remember, and filmed/photographed 3 recipes that will be on my blog in May (Lemon Cupcakes, Lemon Cream Cheese Buttercream, and No-Bake Marbled Strawberry Cheesecake) 🥰 

Comment “APRIL” to get all the available recipes and stay tuned for more! 

#bakersofinstagram #springbaking #cakedecorating #cupcakes #bakinglove
SHEET PAN COOKIE CAKE 🍪 slice it warm for a fud SHEET PAN COOKIE CAKE 🍪 slice it warm for a fudgy chocolate chip cookie OR let it settle into a moist and chewy cookie cake that’s perfect for decorating! My fave vanilla buttercream + sprinkles turn this giant chocolate chip cookie into the perfect birthday cake alternative at the end 🥳
⁣
Full recipe + decorating ideas at https://sugarandsparrow.com/sheet-pan-chocolate-chip-cookie-cake/
⁣
INGREDIENTS⁣
1 Cup (226g) unsalted butter, melted⁣
1 1/3 Cups (267g) packed light or dark brown sugar⁣
1/2 Cup (100g) granulated sugar⁣
3 large eggs⁣
1 Tbsp pure vanilla extract⁣
1 tsp baking soda⁣
1 tsp cornstarch⁣
1/2 tsp salt⁣
3 Cups (398g) all purpose flour⁣
2 Cups (350g) semi-sweet chocolate chips⁣
⁣
INSTRUCTIONS⁣
1. Preheat the oven to 350ºF (177ºC). Grease and line a 13×18 inch sheet pan.⁣
2. In a large bowl, add the brown sugar and granulated sugar. Melt the butter in the microwave and pour it over the top of the sugars. Whisk together until uniform. Add the eggs and vanilla, then continue whisking until uniform. Whisk in the baking soda, cornstarch, and salt.⁣
3. Add the flour and use a silicone spatula to fold it in until smooth cookie dough forms. Reserve 1/2 Cup of the chocolate chips and set them aside, then fold the remaining 1 1/2 Cups of chocolate chips into the cookie dough.⁣
4. Place the chocolate chip cookie dough onto the prepared sheet pan and use an offset spatula to spread it all the way to the edges in an even layer.⁣
5. Bake the cookie cake for 14-16 minutes, until it looks golden brown on the edges and set. 
6. Enjoy warm or let it cool and decorate with vanilla buttercream and sprinkles! ⁣
⁣
#cookiecake #chocolatechipcookies #sheetcake #birthdaycake #cakedecorating
STRAWBERRY CUPCAKES 🍓based on my beloved strawb STRAWBERRY CUPCAKES 🍓based on my beloved strawberry layer cake recipe, this cupcake version is just as moist yet fluffy and bursting with natural strawberry flavor! Between the mix of fresh strawberries in the cupcakes + freeze-dried strawberries in the frosting, the flavor is out of this world 🚀

Full recipe link in my bio (with strawberry buttercream) + at https://sugarandsparrow.com/strawberry-cupcakes/

STRAWBERRY CUPCAKES
Yield: 14 cupcakes

INGREDIENTS:
5 oz (143g) fresh or frozen strawberries
1/3 Cup (80ml) whole milk, room temp
1 1/2 Cups (158g) sifted cake flour
1 tsp baking powder
1/4 tsp baking soda
1/2 tsp salt
6 Tbsp (85g) unsalted butter, room temp
1 Cup (200g) granulated sugar
2 large eggs, room temp
3 Tbsp (45g) sour cream, room temp
1 tsp vanilla extract
1 drop pink food coloring (optional)

INSTRUCTIONS: 
1. Puree the strawberries using a food processor (you’ll have about 1/2 cup of puree), then place into a saucepan over medium-low heat. Bring to a simmer, then cook for 10-15 min, stirring occasionally, until you have 1/4 cup. Refrigerate until room temp.
2. Preheat oven to 350ºF (177ºC) and line a standard cupcake pan with liners.
3. Whisk together the sifted cake flour, baking powder, baking soda, and salt and set aside.
4. In a stand mixer w/ paddle attachment (or hand mixer + large bowl), whip the butter on high for 2 min. Add sugar and beat for 2 min, until light and fluffy. Turn the mixer to low and add the eggs one at a time, then add the vanilla and sour cream, turn the mixer to high and beat for 1 min. Meanwhile, whisk together the strawberry puree, whole milk, and food coloring (if using).
5. Turn the mixer off and add all of the dry ingredients at once. Mix on low until just combined, then add the strawberry milk mixture until just combined, about 30 seconds.
6. Fill the cupcake liners 2/3 full and bake for 14-18 minutes. Cool completely before topping with strawberry buttercream (full recipe linked above). 

#strawberrycupcakes #strawberrycake #pinkcupcakes #strawberry #cupcakes

Footer

On the Blog

  • Cake Basics
  • Recipes
  • Tutorials

Info

  • About
  • Privacy Policy & Disclosure

stay in the know

Copyright © 2026 · Theme by Sugar & Sparrow