• Cake
  • Frosting
  • YouTube
  • My Favorite Tools
  • Nav Social Icons

  • Skip to primary navigation
  • Skip to main content
  • Skip to primary sidebar
  • Skip to footer
  • Recipes
    • Cake
    • Cupcakes
    • Frosting
    • Ice Cream
    • Vegan
  • Cake Basics
  • Tutorials
  • Blog
  • About
  • Mobile Menu Widgets

    Connect

    Search

Sugar & Sparrow logo in script font

Sugar & Sparrow

Lifestyle and Cake from Portland Oregon

  • Cake Basics
  • Recipes
    • Cake
    • Cupcakes
    • Cookies & Bars
    • Filling
    • Frosting
    • Ice Cream
    • No-Bake
    • Small Batch
    • Vegan
  • Tutorials
  • Book
  • Blog
  • About

Woven Tapestry Cake Tutorial

May 13, 2023 · In: Featured, Tutorials

I have been keeping a collection of saved posts on Instagram that are all woven tapestry wall hangings – not because I have them all over my house (I don’t… yet), but purely because the colors and textures are so inspiring! It’s so satisfying to watch them come together too. If you haven’t seen videos of the process, drop what you’re doing and look them up before you come back here and learn how to make the cake version! 

woven tapestry cake tutorial

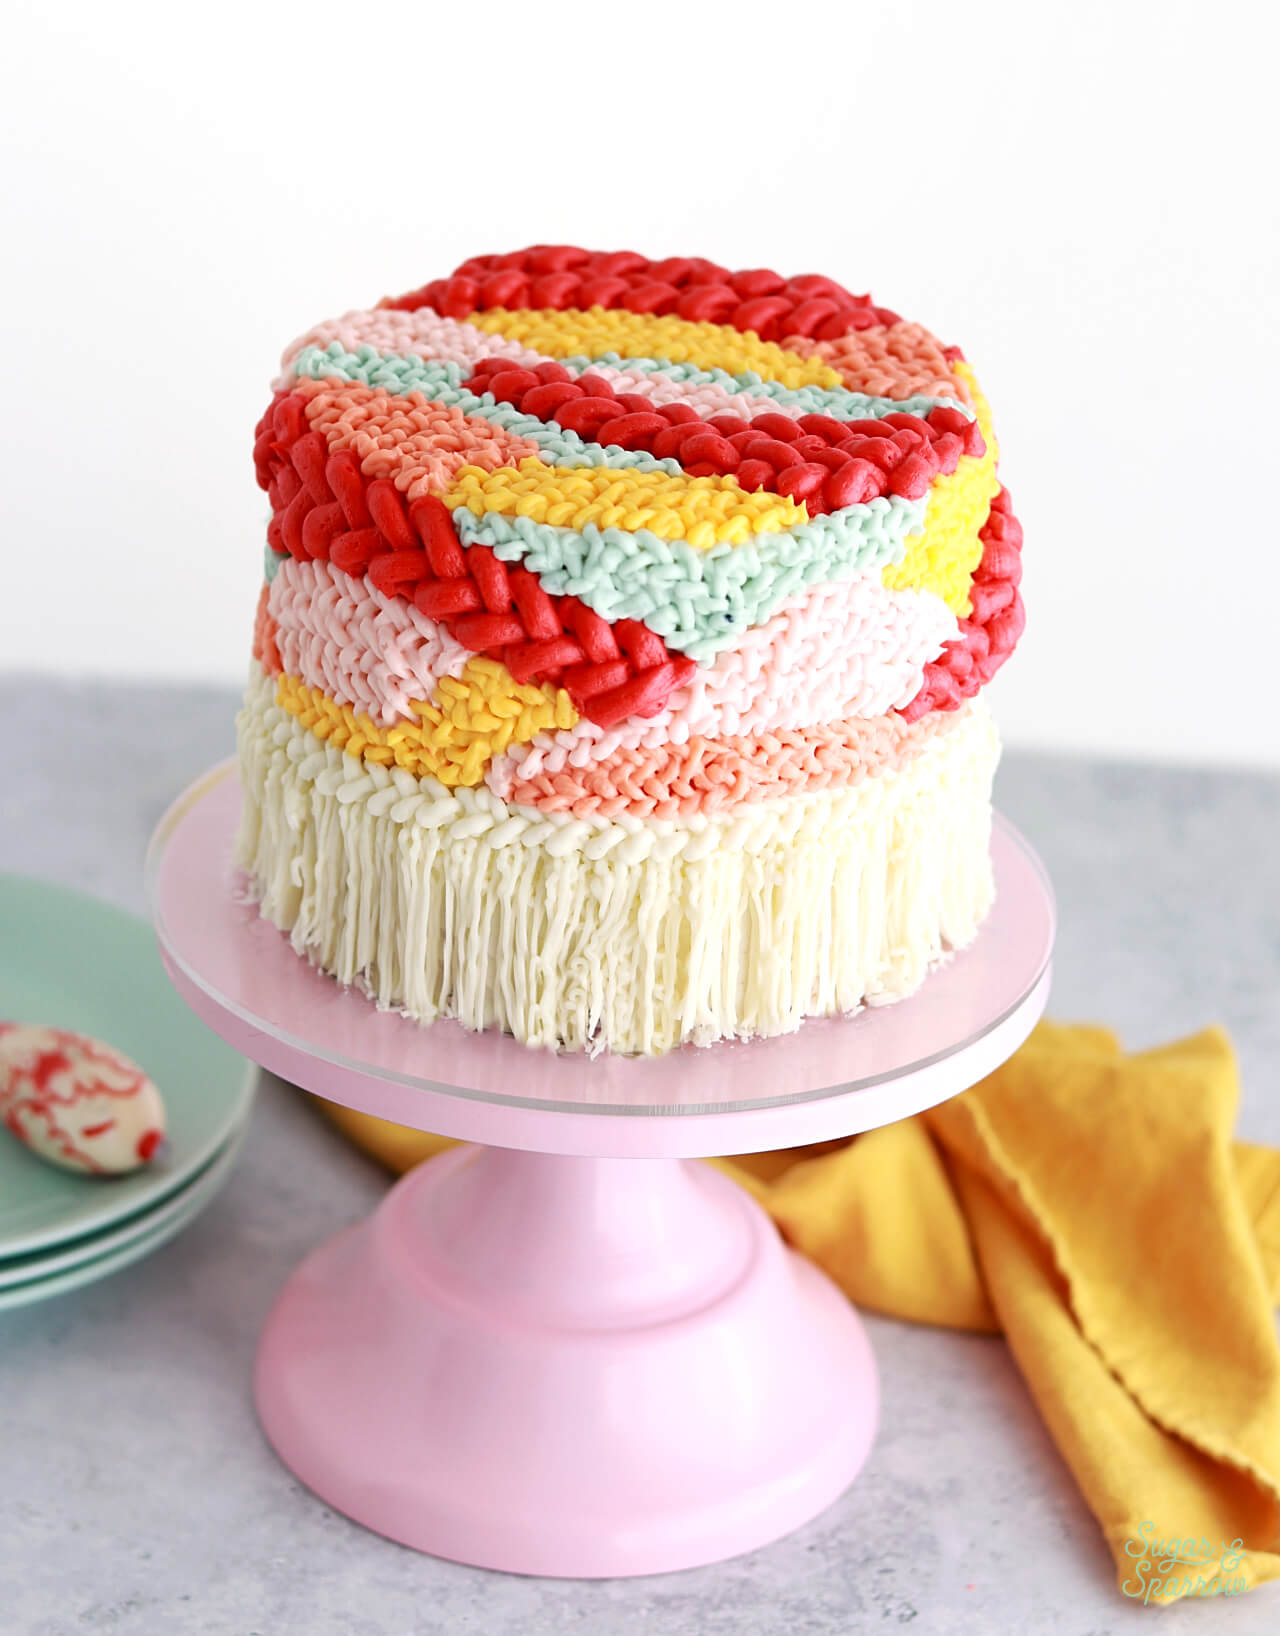
This cake was extremely therapeutic to make and I just love how it turned out! It would be so cute for a baby shower, for a friend who loves tapestry, or simply because you need a fun piping project. 

woven tapestry art cake by sugar and sparrow
woven knit buttercream cake by sugar and sparrow

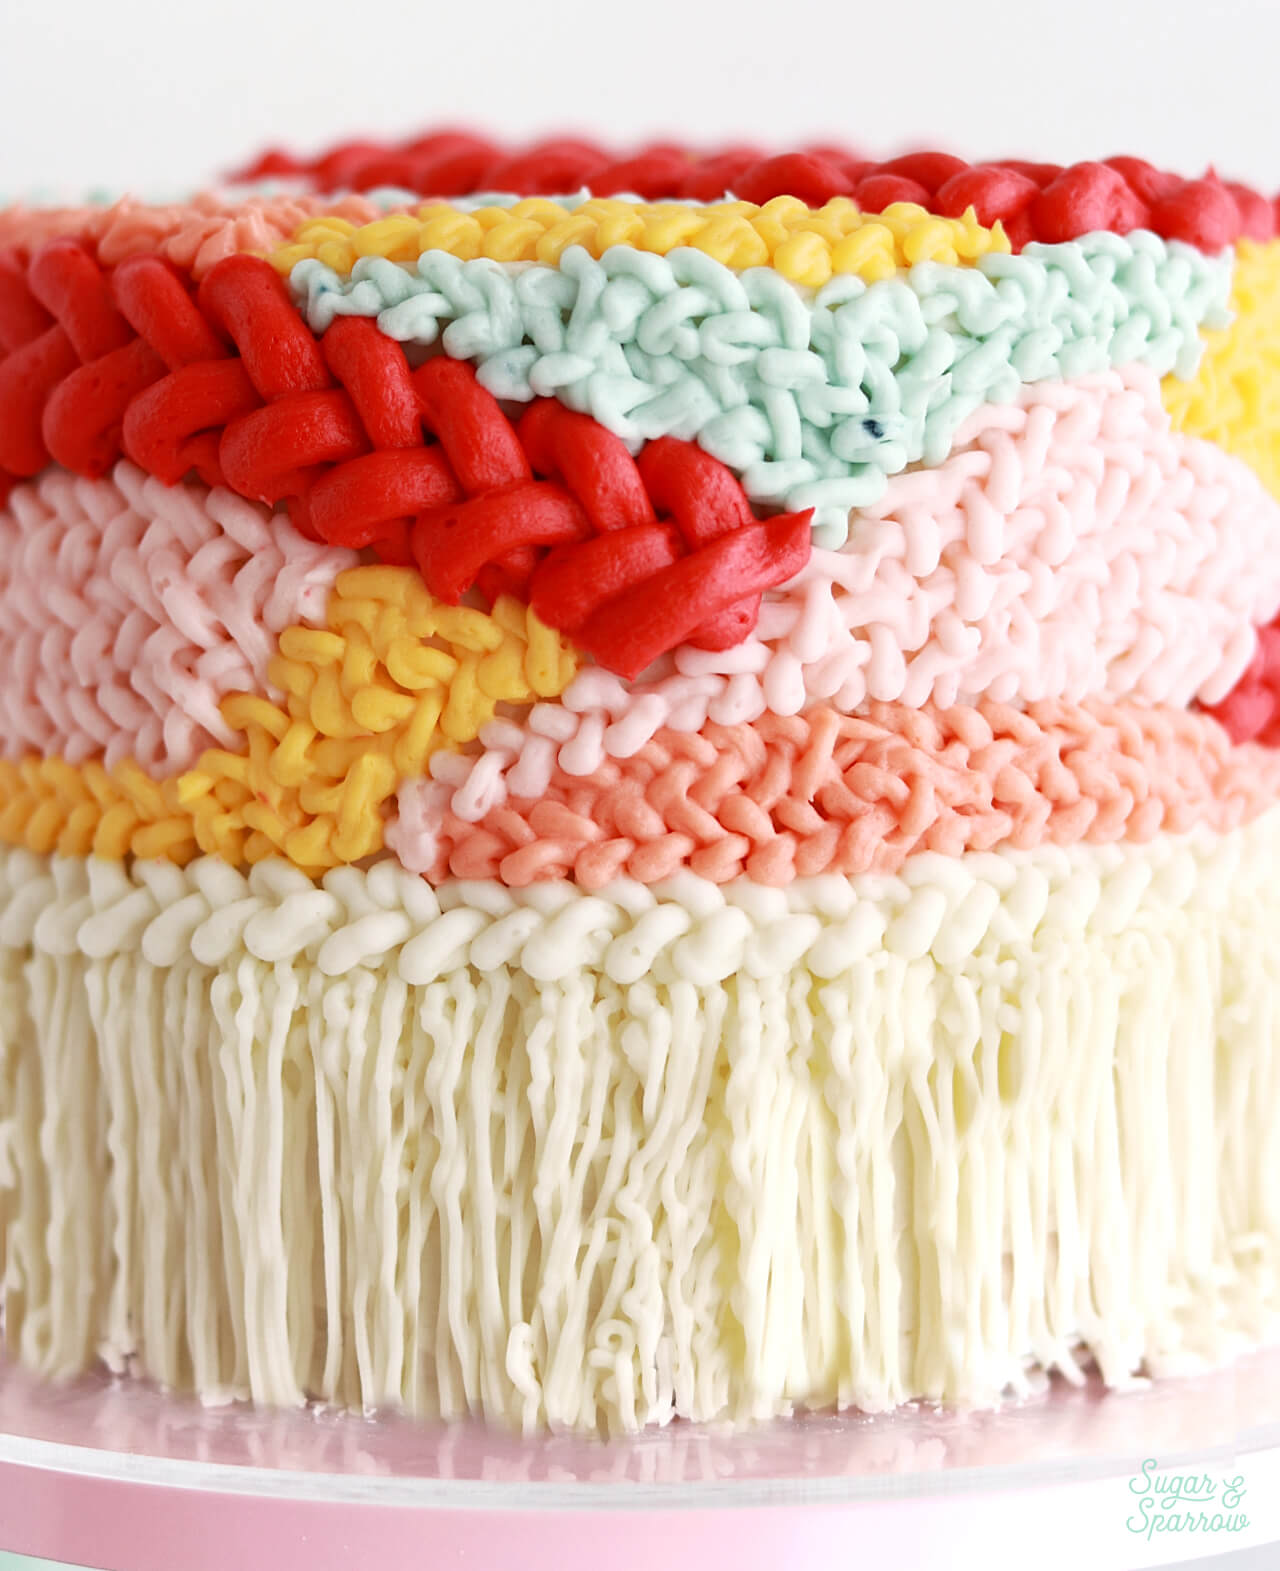
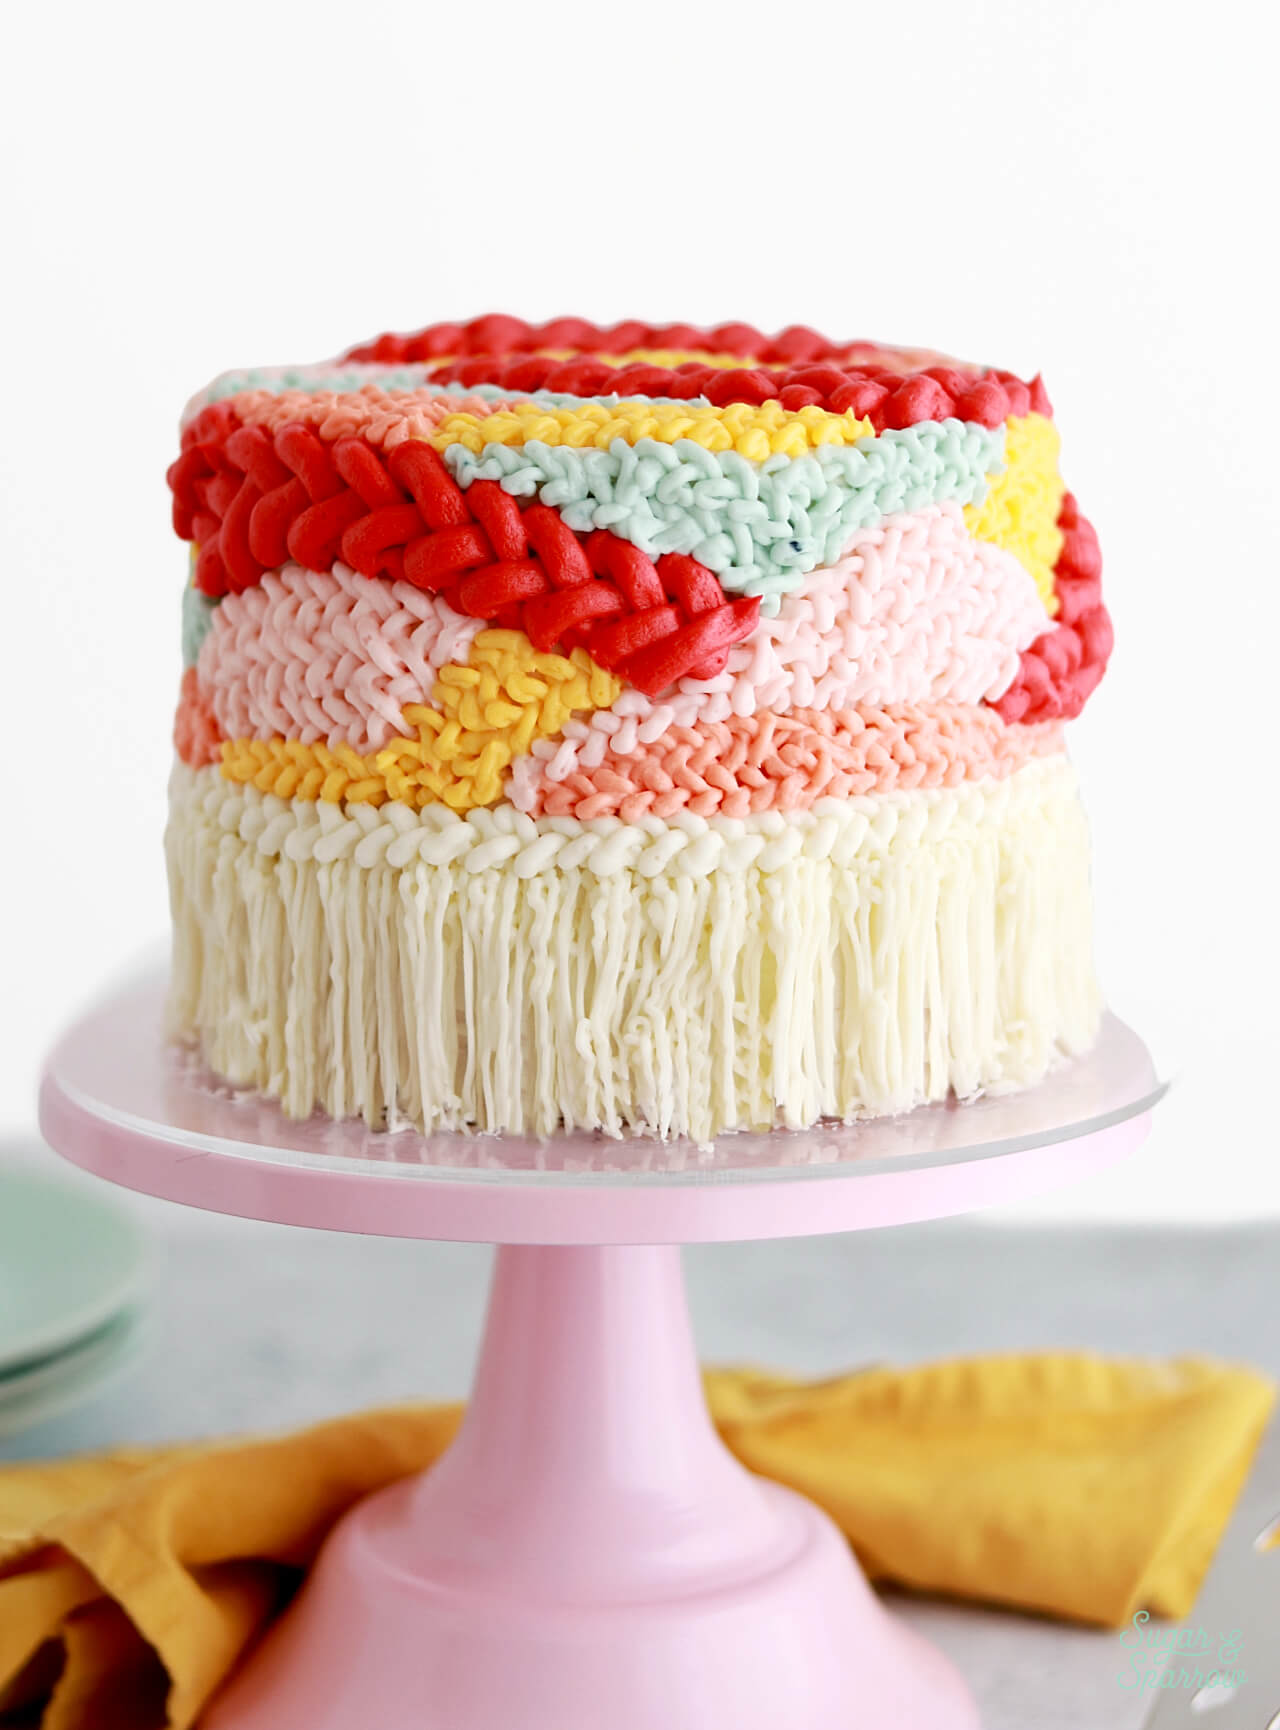
It only took 5 colors (plus white) and 6 piping tips – Wilton Tip 3 (x3), 5, 10, and 233. You can use any round tip sizes to recreate the look and I do recommend having a little size variety to break up the pattern. Aside from the shag piping along the bottom of the cake, you’ll basically be doing the same piping technique over and over again: a braiding motion that ends up looking like knitting. 

What Kind of Buttercream to Use

Technically, you can use any kind of buttercream that is easy to pipe and will hold color well. My go-to is this vanilla buttercream, which is an American buttercream recipe. It’s super easy to color and pipe using a medium consistency. If meringue based buttercream or something else is your go-to, feel free to pair it with this tutorial!  

woven tapestry wall hanging buttercream cake

You Will Need

  • A chilled, crumb coated cake (mine is three 6” layers)
  • 3-4 Cups of vanilla buttercream (about 1.25 batches)
  • Cake turntable
  • Toothpick
  • Food color gels of your choice 
  • Bowls and spoons for color mixing
  • Wilton Tip 233
  • Wilton Tip 3 (x3)
  • Wilton Tip 5
  • Wilton Tip 10
  • Piping bags

Step 1: Color the Buttercream + Prepare the Piping Bags

To create this exact color palette, divide the buttercream evenly between six bowls and set one aside since it will be kept uncolored. The colors I used for the remaining five bowls are as follows: AmeriColor Tulip Red, Egg Yellow, Wedgewood, Dusty Rose, and Peach (with just a hint of Dusty Rose added). 

piped buttercream tapestry cake tutorial

Fit one piping bag with Wilton Tip 233 (the shag tip) and fill it with half of the white/uncolored buttercream. Fit another bag with Wilton Tip 5 and fill it with the other half of the white buttercream. Prepare the rest of the piping bags with the remaining tips and fill them with the colors of your choice. I used Wilton Tip 10 with the Tulip Red buttercream, Tip 5 with the coral orange buttercream, and the rest of the colors with Tip 3. 

Step 2: Mark the Sections

Place your chilled, crumb coated cake on the turntable. Either use the bottom layer of the cake that peeks through the crumb coat as a marker or use a toothpick to mark the bottom third of the cake by holding it in one place while you rotate the turntable. This is where the shag piping will go. 

woven tapestry cake tutorial

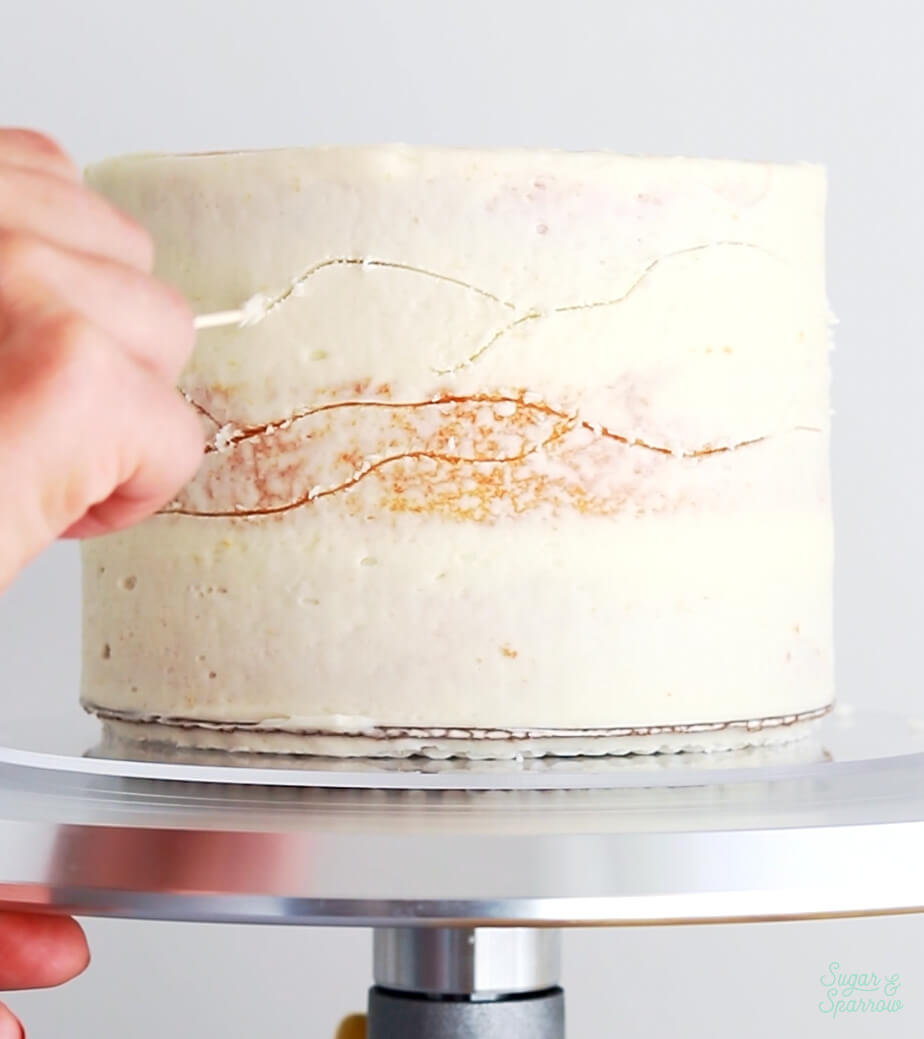
Continue rotating the turntable as you mark random, wavy portions on the top two thirds of the cake. These will create the sections where each color will go, so feel free to mark a lot of them. The bigger the section, the more you’ll have to fill in with one color. 

Step 3: Add the Shag Piping

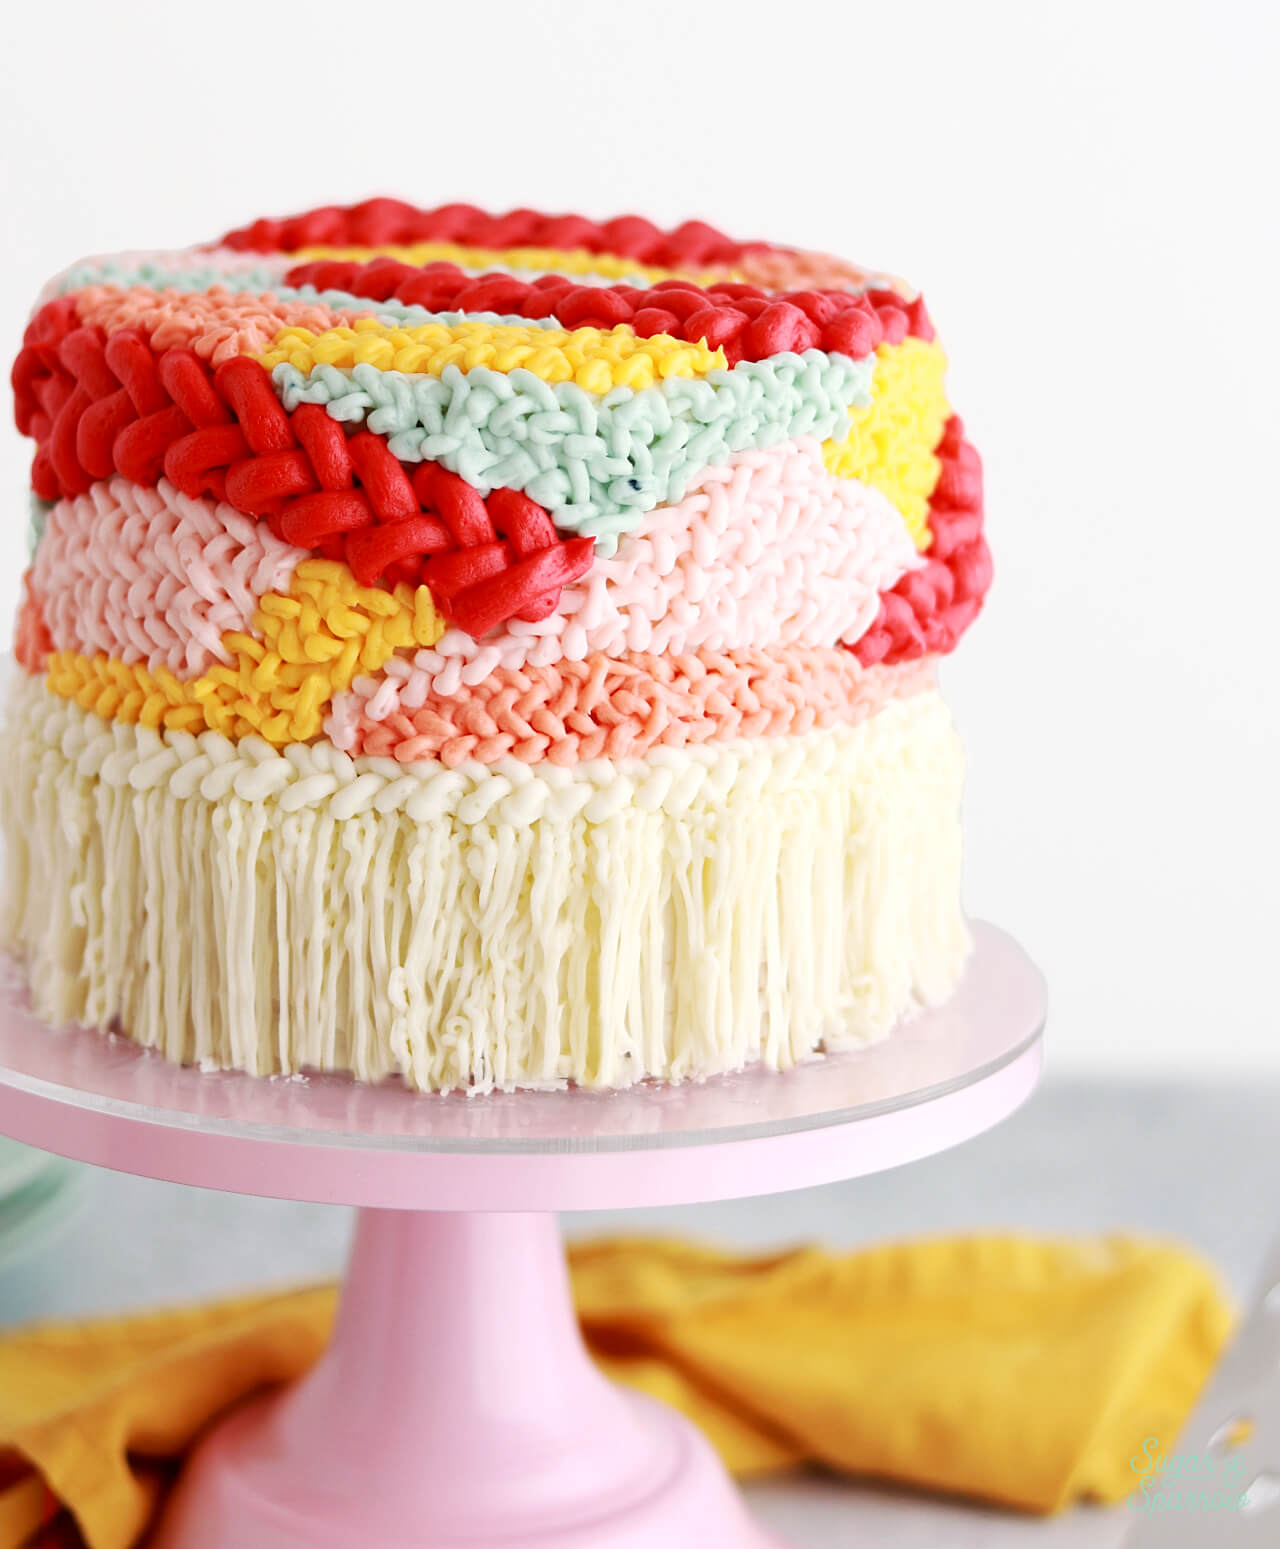
Hold the bag fitted with Tip 233 pointed at the line that marks the bottom third of the cake. Hovering about ⅛ inch from the surface, put pressure on the bag as you draw it down quickly to create long pieces of shag all around the bottom third of the cake. 

shag piping tutorial

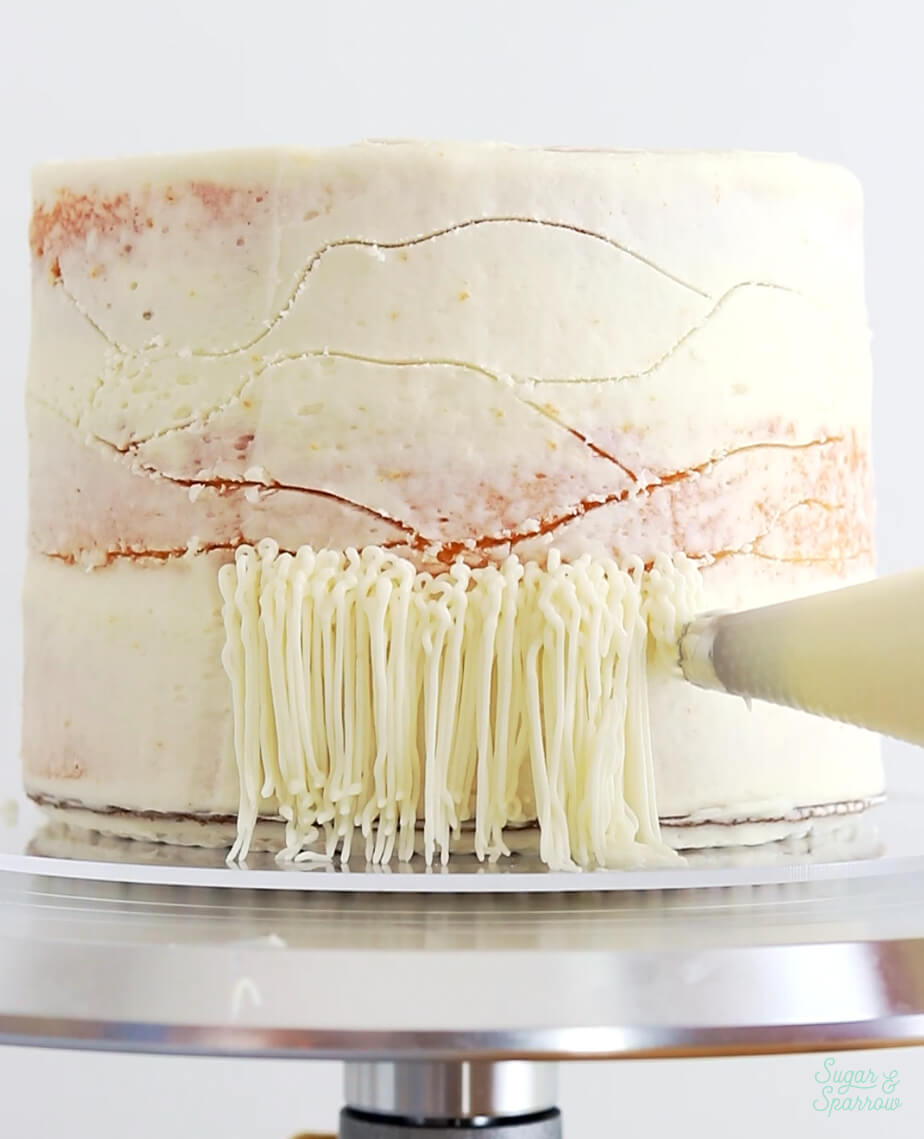
If you have some patchy areas, you can always go over them again with more shag. You really cannot add too much here. 

shag buttercream piping tutorial

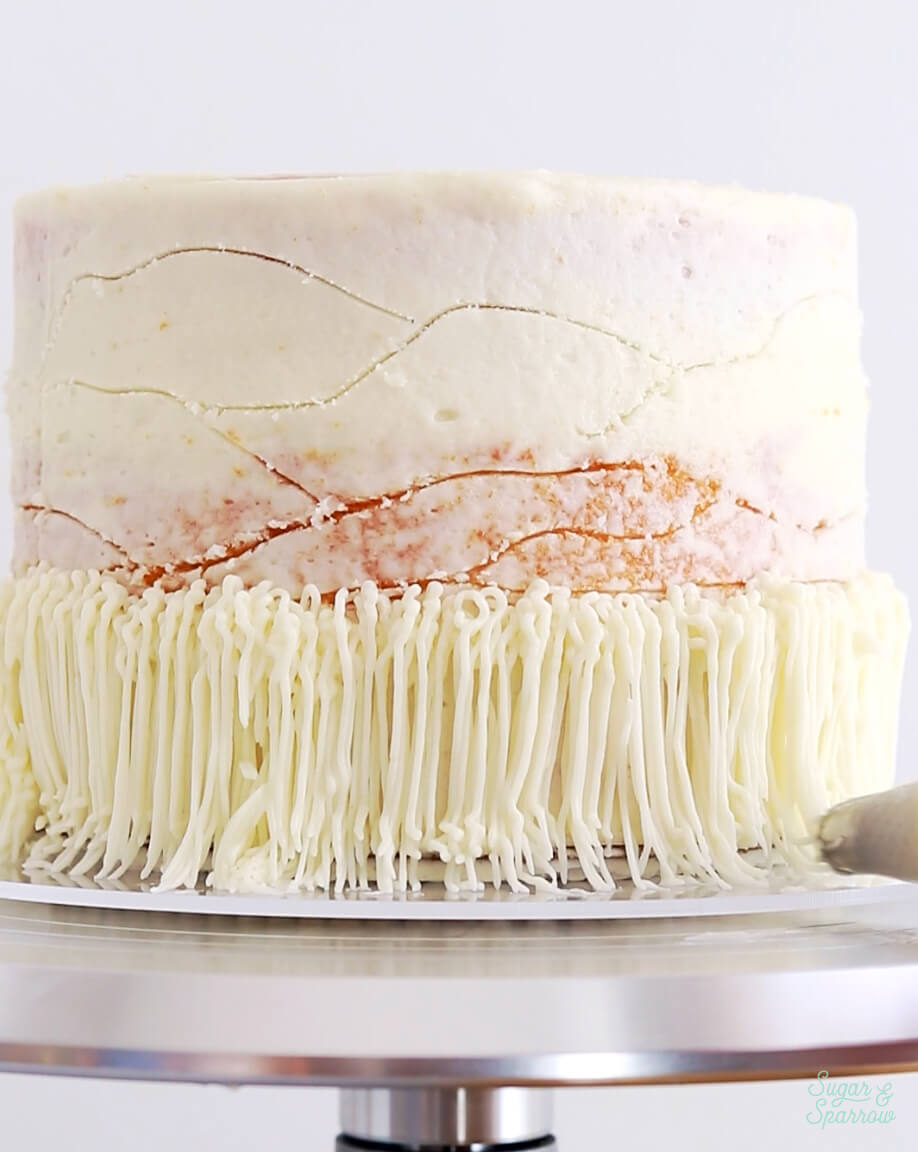
When you’re finished adding the shag piping around the bottom third of the cake, use the other white/uncolored bag fitted with Tip 5 to pipe a braided border along the top of the shag.

woven tapestry shag cake tutorial

For the braided technique, simply criss cross the buttercream diagonally to create little overlapping x’s. Step 4 of this buttercream sweater cake tutorial shows the technique in detail (look at technique 2, aka the middle row). 

Step 4: Fill in the Sections with Knitted Buttercream

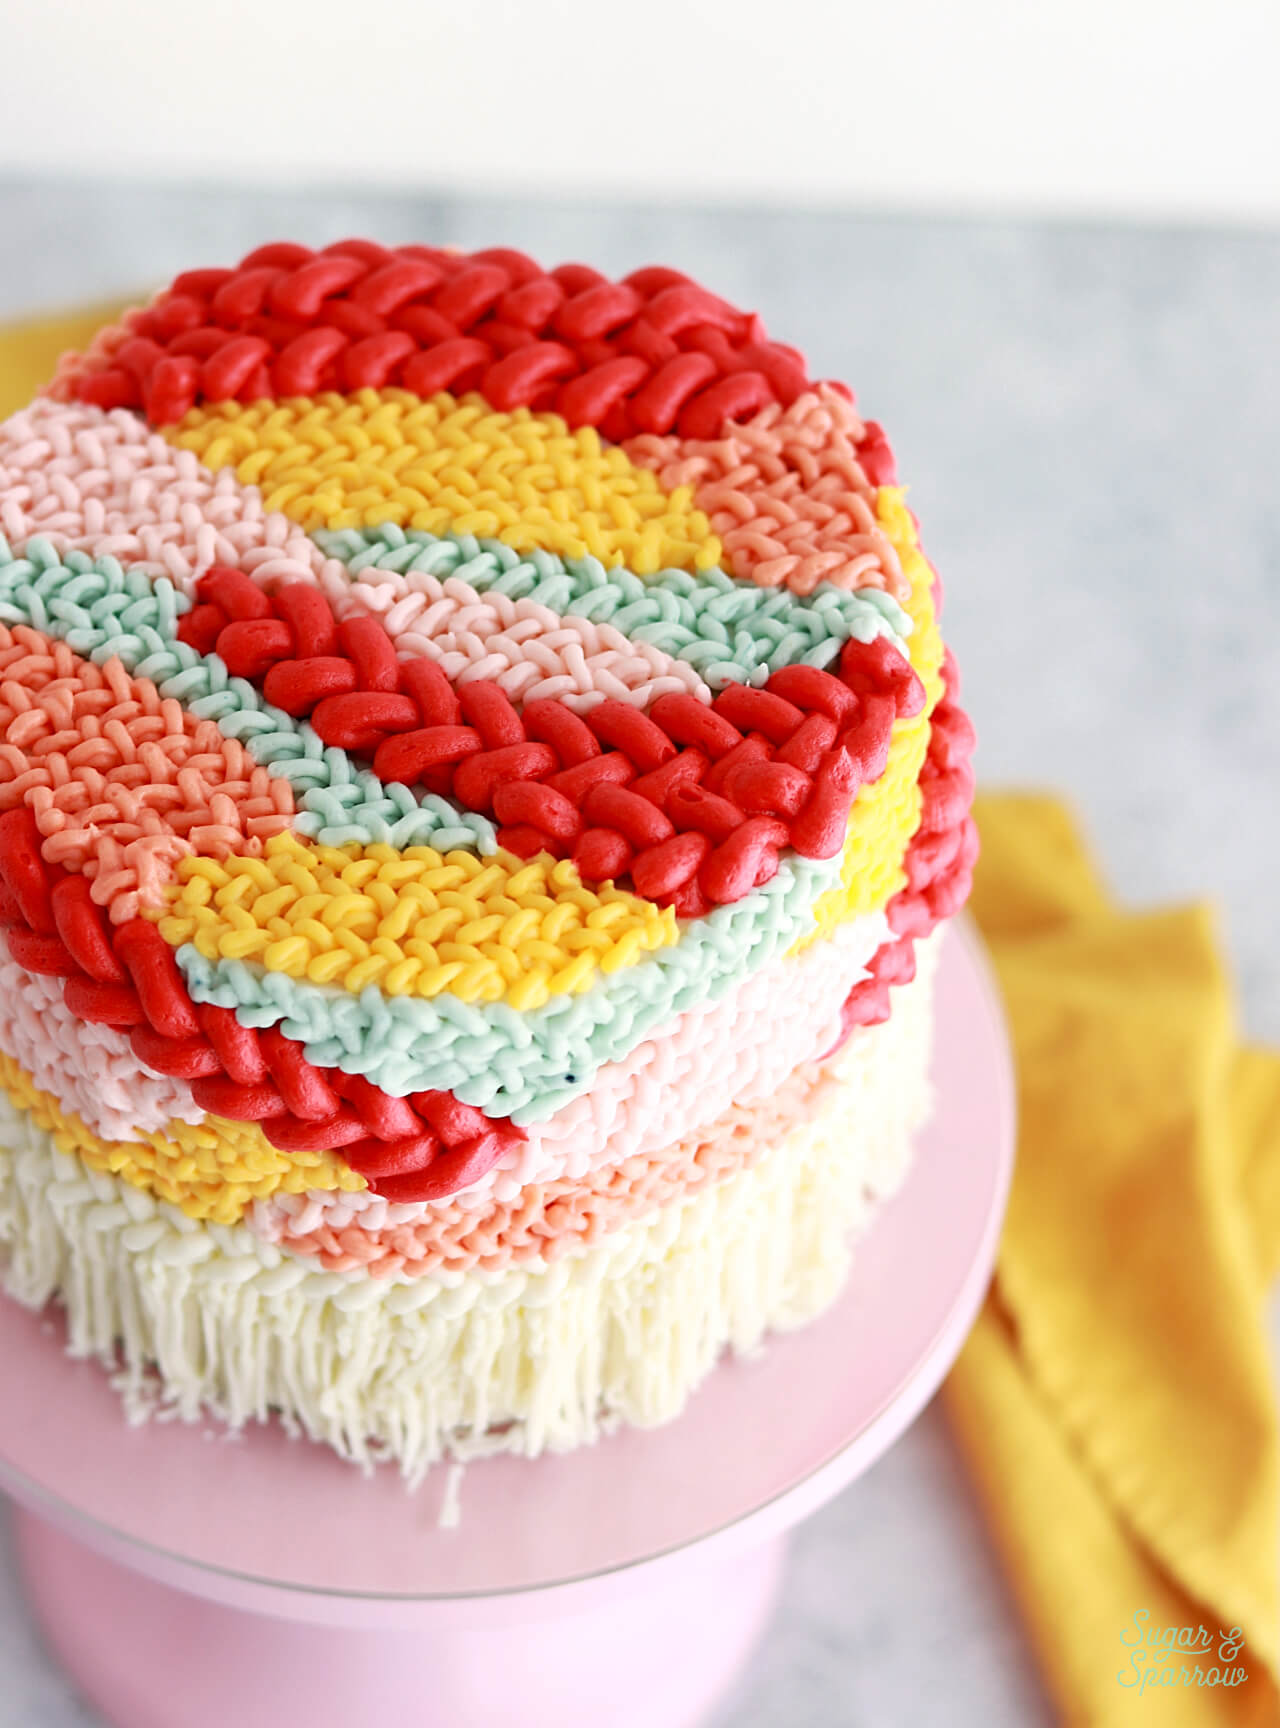
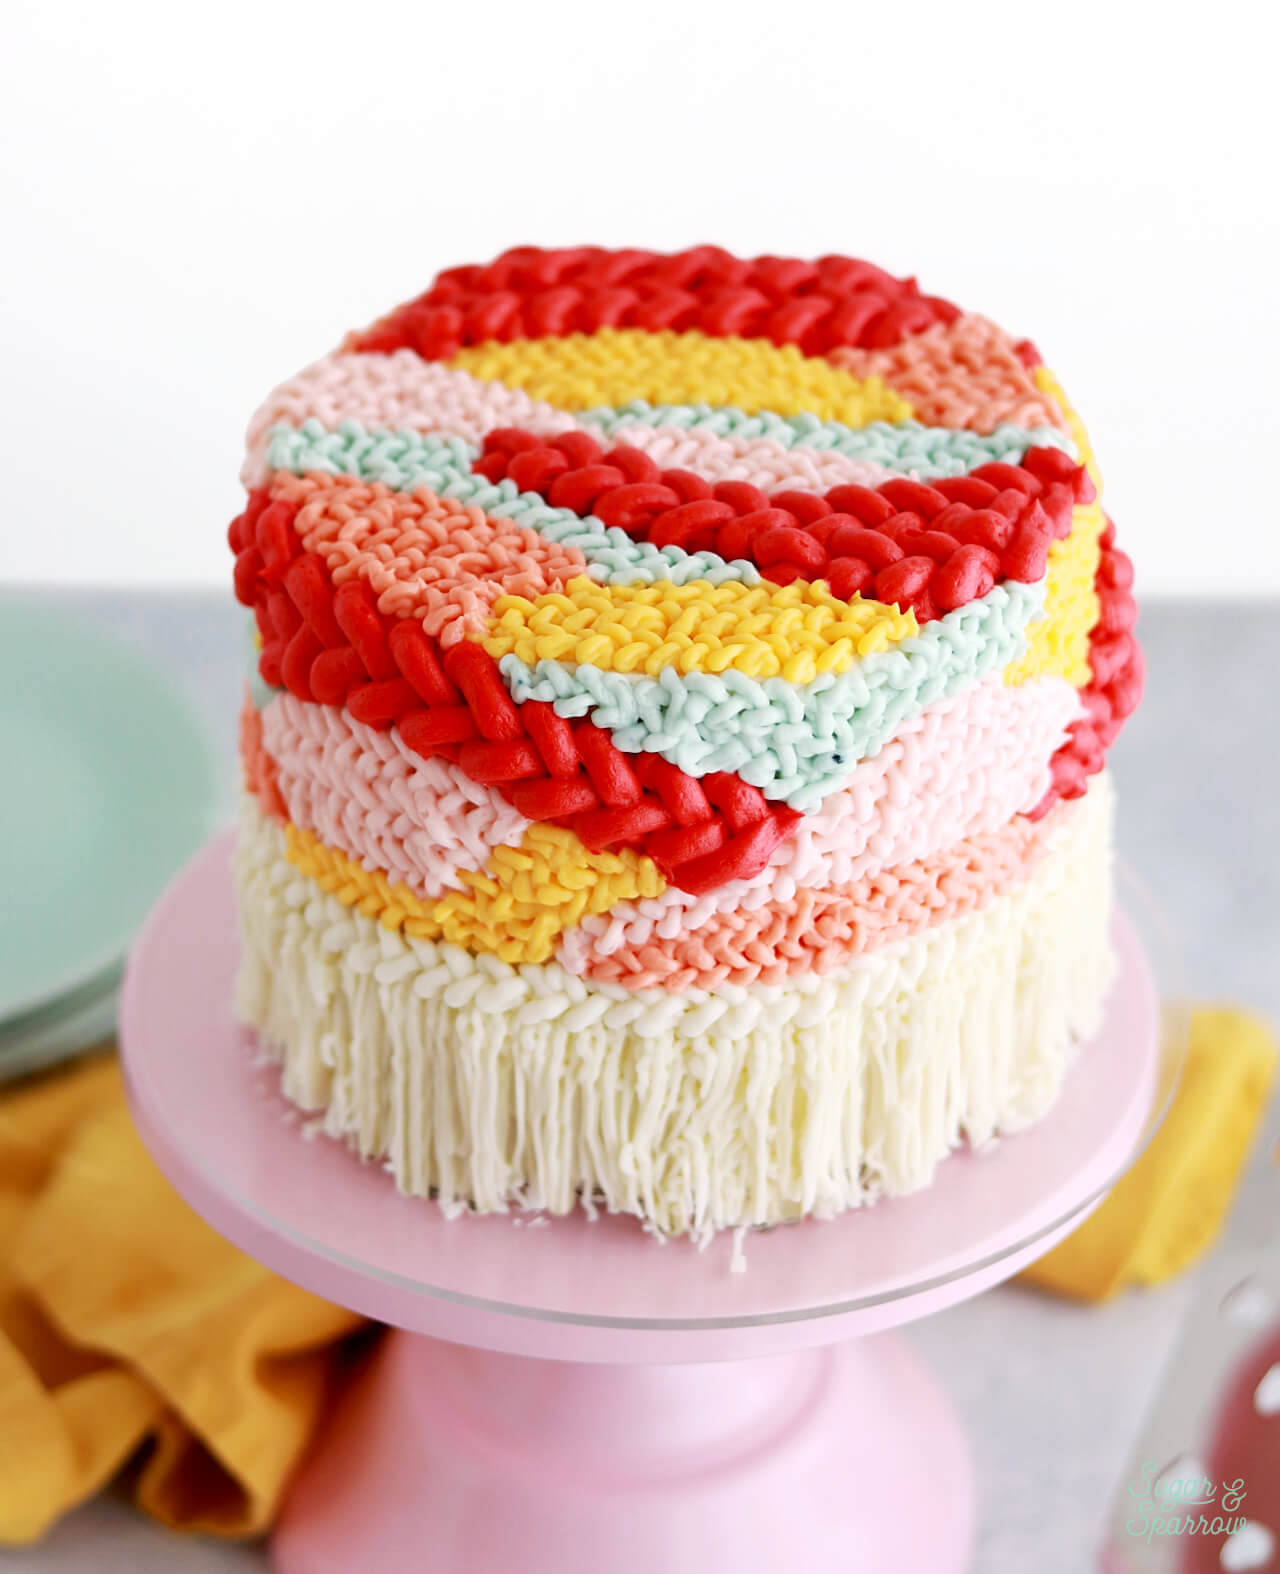
Using that same braided technique, fill in each of the wavy sections with different buttercream colors. It helps to follow the wave formations while you pipe instead of trying to keep every line straight. 

how to pipe knitted buttercream

Tip 10 will give you the chunkiest braids. Be sure to place them sparingly since they stand out so much. 

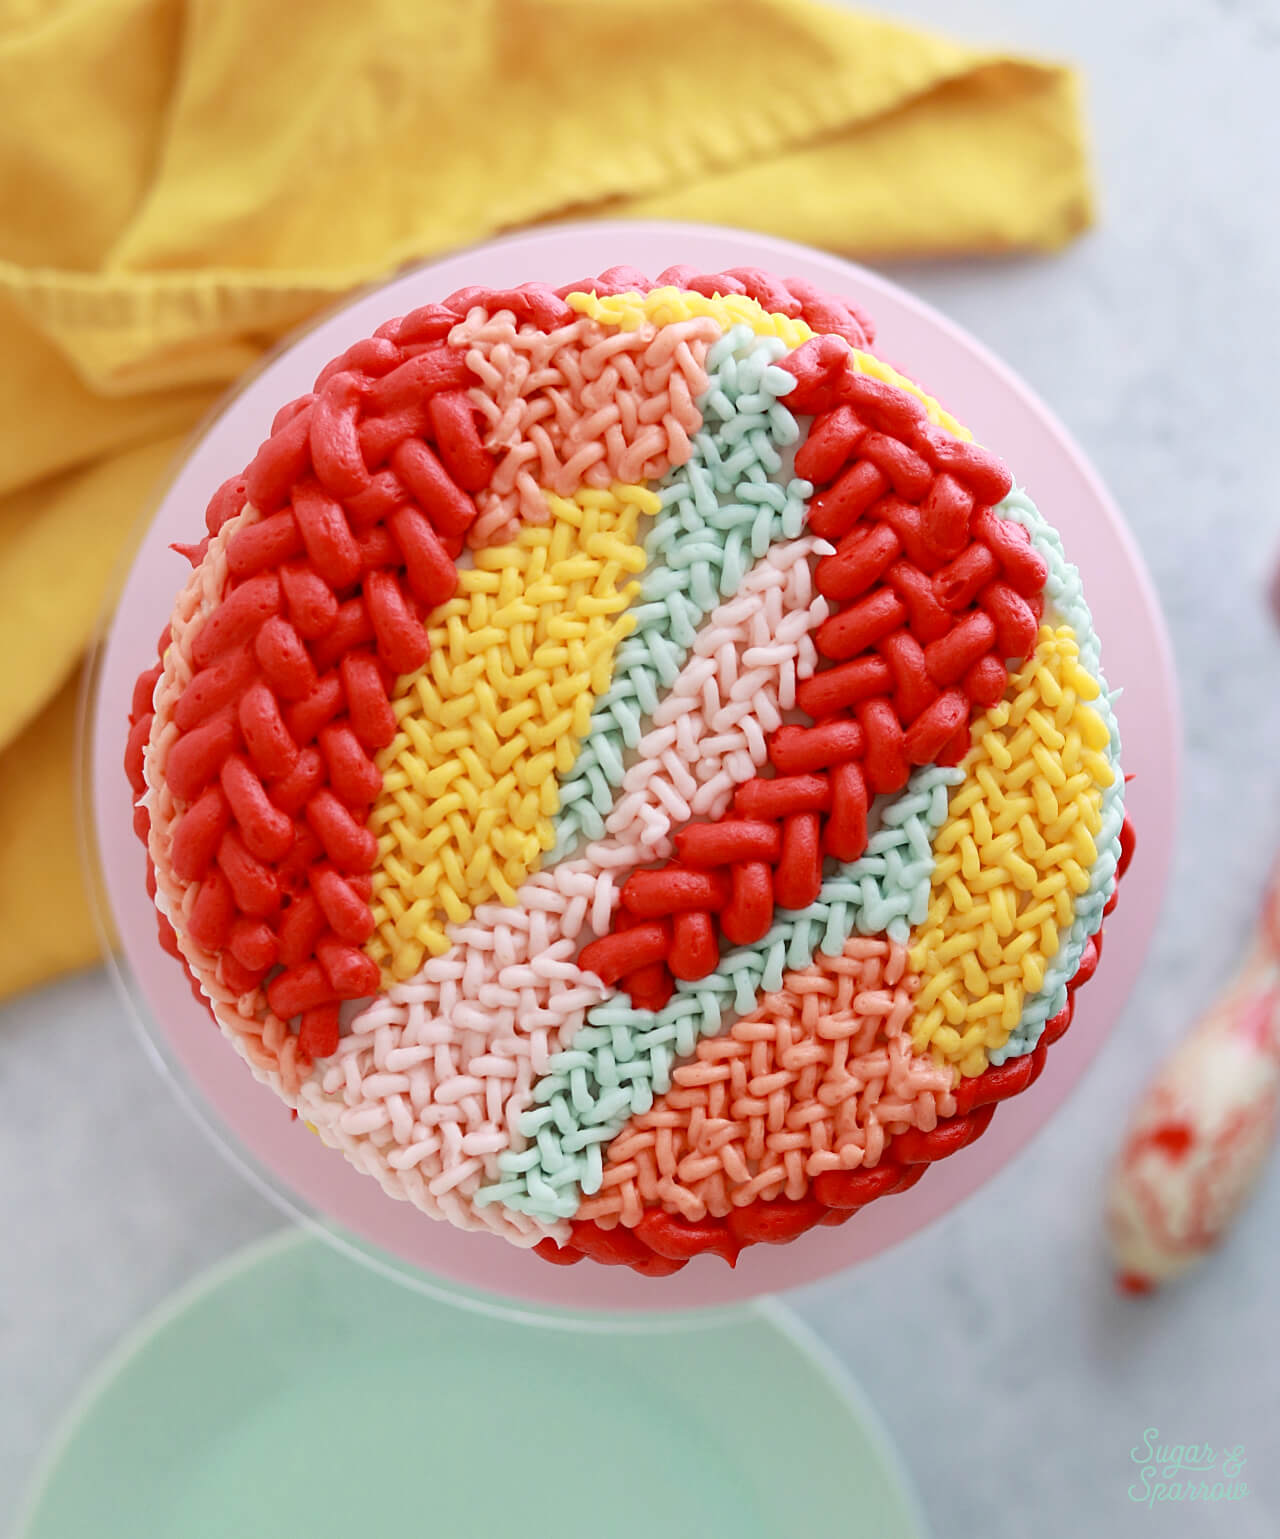
Step 5: Decorate the Top of the Cake

Once you’re finished filling in all the wavy sections around the sides of the cake, fill in the top of the cake using the same piping techniques. 

knitted buttercream tapestry cake tutorial

And voila! A woven tapestry cake that will turn all the heads! The textures going on here are just so eye-catching and the process of creating the cake is honestly so therapeutic. So much easier than it looks! 

woven buttercream cake tutorial by sugar and sparrow
woven tapestry cake tutorial by sugar and sparrow

I’d love to see this cake design in more color palettes and I’m sure you couldn’t go wrong with whatever colors you choose. Let me know if you make it in the comments below and feel free to tag @sugarandsparrowco on Instagram to show me! I love to see what you create.

By: Whitney · In: Featured, Tutorials · Tagged: baby shower cake ideas, cake art, knitted cake, tapestry cake, woven cake, woven tapestry cake

you’ll also love

fondant decorations for cake by sugar and sparrow3 Ways to Make Fondant Decorations with a Tasty by Wilton Kit
painted cake tutorialPainted Buttercream Cake Tutorial
buttercream sweater cakeButtercream Knitted Sweater Cake Tutorial

Join the List

Stay up to date & receive the latest posts in your inbox.

Reader Interactions

Comments

  1. Jackie says

    May 13, 2023 at 5:37 pm

    Hi Whitney
    Why do you bake your 6 inch cake pans on a baking sheet.

    Reply
    • Whitney says

      May 31, 2023 at 11:38 am

      Hi Jackie! I actually don’t bake them on a baking sheet. If you’re referring to my youtube videos where I place the cake batter filled pans onto a baking sheet and walk out of the scene I’m just using the baking sheet as a tray to carry the pans to the oven 🙂

      Reply

Leave a Reply Cancel reply

Your email address will not be published. Required fields are marked *

Recipe Rating


Next Post >

How Much Buttercream Do I Need? Helpful Chart Included!

Primary Sidebar

Welcome to Sugar & Sparrow

Welcome to Sugar & Sparrow

Helping you whip up pretty desserts with confidence and creativity. And hopefully sharing a few laughs with you along the way!

Learn More

Connect

let’s bake!

Get my very best recipes, baking tips, and decorating tutorials sent to your inbox

Featured Posts

freeze dried cherry buttercream recipe

Freeze-Dried Cherry Buttercream

I’m Filming My First Cake Course.. In Spain!

red velvet cake recipe by sugar and sparrow

Red Velvet Cake with Cream Cheese Frosting

Search

Archives

Follow Along

@sugarandsparrowco

STRAWBERRY SHORTCAKE ICE CREAM CAKE 🍓if Strawbe STRAWBERRY SHORTCAKE ICE CREAM CAKE 🍓if Strawberry Shortcake Ice Cream Bars make you nostalgic for your childhood ice cream truck days, you’re going to LOVE this easy ice cream cake version - no ice cream maker needed 🙌🏼 

Full recipe on my blog at https://sugarandsparrow.com/strawberry-shortcake-ice-cream-cake/

STRAWBERRY CRUNCH 
24 whole (280g) Golden Oreos, finely ground
3 Oz box strawberry jello
4 Tbsp unsalted butter, melted

ICE CREAM LAYERS
1/2 Cup (15g) freeze-dried strawberries
2 Cups heavy whipping cream, cold
1 Tbsp pure vanilla extract, divided
14 Oz sweetened condensed milk
1 1/2 tsp strawberry jam or preserves

1. Combine the strawberry crunch ingredients and bake on a lined cookie sheet at 350ºF for 4 min.
2. For the crust, combine 1 Cup of the strawberry crunch with 2 Tbsp melted butter. Press into the bottom of a 6-inch springform pan and line with an acetate collar. Place in the freezer while you move on.
3. Using a food processor, grind the freeze-dried strawberries into a fine powder. Set aside.
4. Add the heavy whipping cream and 2 tsp of vanilla extract into a chilled bowl, then whip it with a hand mixer to stiff peaks. Place in the refrigerator.
5. Divide the condensed milk between two medium bowls. To one bowl, add 1 teaspoon of vanilla. To the second bowl, add the finely strawberry powder and the jam/preserves. Whisk the ingredients together within each individual bowl.
6. Divide the whipping cream evenly between each of the two bowls you created in the previous step. Fold each sweetened condensed milk mixture together with the divided whipped cream to create the vanilla ice cream and strawberry ice cream.
7. Layer half of each of the ice creams on top of the strawberry crunch crust, sprinkle a layer of strawberry crunch on top, then repeat. Freeze for 6 hours and serve. 
#icecreamcake #strawberryshortcake #nochurnicecream #icecreamlover #strawberry
LEMON CUPCAKES 🍋 after about a dozen recipe tes LEMON CUPCAKES 🍋 after about a dozen recipe tests, this one is everything I could want in a lemon cupcake! Fluffy-yet-moist, bursting with natural lemon flavor, and absolutely irresistible topped with lemon cream cheese buttercream. 

Full recipe (with frosting) linked in my bio + at https://sugarandsparrow.com/homemade-lemon-cupcakes/

INGREDIENTS:
1 Cup (132g) all-purpose flour
1 tsp baking powder
1/4 tsp salt
1/4 Cup (60ml) whole milk, room temperature
3 Tbsp (45ml) lemon juice from 1 medium lemon
3/4 Cup (150g) granulated sugar
3 Tbsp (42g) unsalted butter, room temperature
2 Tbsp (30ml) vegetable oil
2 large eggs, room temperature
1 tsp pure vanilla extract

INSTRUCTIONS:
1. Preheat the oven to 350ºF (177ºF) and line a standard cupcake pan with 12 paper liners.
2. In a large bowl, whisk together the flour, baking powder, and salt. Set aside. 
3. In the bowl of a stand mixer fitted with the paddle attachment (or with a hand mixer and large bowl), add the lemon zest to the sugar and mix on low speed until fragrant and well combined, about 1 minute. Meanwhile, combine the lemon juice with the milk and set aside. 
4. Add the butter to the lemon-sugar mixture and cream on medium speed until and combined, about 2 minutes. Add the vegetable oil and beat until light and creamy, about 3 minutes. Scrape down the bowl and paddle as needed.
5. Mix in the eggs one at a time on low speed, then add the vanilla and turn the mixer to medium speed for one minute.
6. Turn the mixer off and add the flour mixture all at once. Mix on low speed until just combined, then slowly pour in the lemon-milk mixture. Mix until just combined, about 30 seconds.
7. Divide the batter equally between the liners and bake for 14-18 min. Cool, then top with frosting of your choice (link in bio for lemon cream cheese frosting)�
#lemoncupcakes #creamcheesefrosting #lemon #cupcakes #cupcakedecorating
April in my kitchen 🌸 I published 5 NEW recipes April in my kitchen 🌸 I published 5 NEW recipes on my site, baked my Oreo cupcake recipe for a fundraiser and found it was just as delicious as I remember, and filmed/photographed 3 recipes that will be on my blog in May (Lemon Cupcakes, Lemon Cream Cheese Buttercream, and No-Bake Marbled Strawberry Cheesecake) 🥰 

Comment “APRIL” to get all the available recipes and stay tuned for more! 

#bakersofinstagram #springbaking #cakedecorating #cupcakes #bakinglove
SHEET PAN COOKIE CAKE 🍪 slice it warm for a fud SHEET PAN COOKIE CAKE 🍪 slice it warm for a fudgy chocolate chip cookie OR let it settle into a moist and chewy cookie cake that’s perfect for decorating! My fave vanilla buttercream + sprinkles turn this giant chocolate chip cookie into the perfect birthday cake alternative at the end 🥳
⁣
Full recipe + decorating ideas at https://sugarandsparrow.com/sheet-pan-chocolate-chip-cookie-cake/
⁣
INGREDIENTS⁣
1 Cup (226g) unsalted butter, melted⁣
1 1/3 Cups (267g) packed light or dark brown sugar⁣
1/2 Cup (100g) granulated sugar⁣
3 large eggs⁣
1 Tbsp pure vanilla extract⁣
1 tsp baking soda⁣
1 tsp cornstarch⁣
1/2 tsp salt⁣
3 Cups (398g) all purpose flour⁣
2 Cups (350g) semi-sweet chocolate chips⁣
⁣
INSTRUCTIONS⁣
1. Preheat the oven to 350ºF (177ºC). Grease and line a 13×18 inch sheet pan.⁣
2. In a large bowl, add the brown sugar and granulated sugar. Melt the butter in the microwave and pour it over the top of the sugars. Whisk together until uniform. Add the eggs and vanilla, then continue whisking until uniform. Whisk in the baking soda, cornstarch, and salt.⁣
3. Add the flour and use a silicone spatula to fold it in until smooth cookie dough forms. Reserve 1/2 Cup of the chocolate chips and set them aside, then fold the remaining 1 1/2 Cups of chocolate chips into the cookie dough.⁣
4. Place the chocolate chip cookie dough onto the prepared sheet pan and use an offset spatula to spread it all the way to the edges in an even layer.⁣
5. Bake the cookie cake for 14-16 minutes, until it looks golden brown on the edges and set. 
6. Enjoy warm or let it cool and decorate with vanilla buttercream and sprinkles! ⁣
⁣
#cookiecake #chocolatechipcookies #sheetcake #birthdaycake #cakedecorating
STRAWBERRY CUPCAKES 🍓based on my beloved strawb STRAWBERRY CUPCAKES 🍓based on my beloved strawberry layer cake recipe, this cupcake version is just as moist yet fluffy and bursting with natural strawberry flavor! Between the mix of fresh strawberries in the cupcakes + freeze-dried strawberries in the frosting, the flavor is out of this world 🚀

Full recipe link in my bio (with strawberry buttercream) + at https://sugarandsparrow.com/strawberry-cupcakes/

STRAWBERRY CUPCAKES
Yield: 14 cupcakes

INGREDIENTS:
5 oz (143g) fresh or frozen strawberries
1/3 Cup (80ml) whole milk, room temp
1 1/2 Cups (158g) sifted cake flour
1 tsp baking powder
1/4 tsp baking soda
1/2 tsp salt
6 Tbsp (85g) unsalted butter, room temp
1 Cup (200g) granulated sugar
2 large eggs, room temp
3 Tbsp (45g) sour cream, room temp
1 tsp vanilla extract
1 drop pink food coloring (optional)

INSTRUCTIONS: 
1. Puree the strawberries using a food processor (you’ll have about 1/2 cup of puree), then place into a saucepan over medium-low heat. Bring to a simmer, then cook for 10-15 min, stirring occasionally, until you have 1/4 cup. Refrigerate until room temp.
2. Preheat oven to 350ºF (177ºC) and line a standard cupcake pan with liners.
3. Whisk together the sifted cake flour, baking powder, baking soda, and salt and set aside.
4. In a stand mixer w/ paddle attachment (or hand mixer + large bowl), whip the butter on high for 2 min. Add sugar and beat for 2 min, until light and fluffy. Turn the mixer to low and add the eggs one at a time, then add the vanilla and sour cream, turn the mixer to high and beat for 1 min. Meanwhile, whisk together the strawberry puree, whole milk, and food coloring (if using).
5. Turn the mixer off and add all of the dry ingredients at once. Mix on low until just combined, then add the strawberry milk mixture until just combined, about 30 seconds.
6. Fill the cupcake liners 2/3 full and bake for 14-18 minutes. Cool completely before topping with strawberry buttercream (full recipe linked above). 

#strawberrycupcakes #strawberrycake #pinkcupcakes #strawberry #cupcakes

Footer

On the Blog

  • Cake Basics
  • Recipes
  • Tutorials

Info

  • About
  • Privacy Policy & Disclosure

stay in the know

Copyright © 2026 · Theme by Sugar & Sparrow