Black Forest Cake
Layers of decadent chocolate cake brushed with homemade cherry syrup and filled with whipped cream frosting and fresh cherry filling. The whipped cream frosting is stabilized to make it easier for cake decorating. Topped with a chocolate ganache drip, this is a delicious take on the classic Black Forest Cake!
Servings 15 slices
Ingredients
Chocolate Cake
- 2 Cups (265g) all purpose flour
- 1 2/3 Cups (340g) granulated sugar
- 2/3 Cup (60g) unsweetened natural cocoa powder
- 2 tsp baking soda
- 1 tsp baking powder
- 1/2 tsp kosher salt
- 1/2 Cup (120ml) vegetable oil
- 2 large eggs, room temperature
- 1 1/2 tsp pure vanilla extract
- 1 Cup (240ml) full-fat buttermilk*, room temperature DIY recipe in the notes
- 1 Cup (240ml) hot coffee or hot water
Cherry Filling & Syrup
- 1 1/2 Cups (250g) fresh sweet cherries, pitted and halved frozen cherries work as well!
- 3 Tbsp granulated sugar
- 2 Tbsp water
- 1 tsp lemon juice
- 1/2 tsp almond extract
Stabilized Whipped Cream Frosting
- 1 tsp unflavored gelatin
- 1 1/2 Tbsp cold water
- 2 1/4 Cups (540ml) heavy whipping cream, cold
- 3/4 Cup (90g) powdered sugar
- 1 1/2 tsp pure vanilla extract
Chocolate Ganache (Optional)
- 1/2 Cup (93g) semi-sweet chocolate chips
- 1/2 Cup (120ml) heavy whipping cream
Garnish
- 6-7 fresh sweet cherries
Instructions
Make the Chocolate Cake
- Preheat the oven to 350ºF (177ºC) and prepare three 6-inch or two 8-inch cake pans by spraying the sides with cooking spray and fitting the bottoms with a wax paper or parchment cake circle.
- Place all of the dry ingredients into the bowl of a stand mixer and stir on low for 30 seconds to fully combine them. Add the vegetable oil, eggs, vanilla, and buttermilk and mix on low until just combined. With the mixer still on low, add the hot coffee (or hot water) in a slow stream, then turn the mixer to medium and beat until smooth, about 2 minutes. The batter will be very thin.
- Pour into prepared cake pans and bake for 32-36 minutes, until a toothpick inserted comes out clean. Cool completely before filling and frosting.
Make the Cherry Filling & Syrup
- Add all of the cherry filling ingredients into a medium saucepan set over medium heat. Stir to combine and bring to a boil, stirring occasionally. Reduce the heat to a simmer and continue cooking the cherry mixture for 5 minutes.
- Using a mesh strainer or slotted spoon, remove the cherries from the saucepan and place them into a separate container to cool. This will be your cherry filling.
- Continue cooking the liquid that remains in the saucepan, stirring frequently until it reduces by half, about 10 minutes. Pour the liquid into a separate container to cool and set aside. This will be your cherry syrup.
Make the Stabilized Whipped Cream
- Make the stabilized whipped cream right before you're ready to assemble the cake (the cake layers and filling/syrup should be cooled to room temperature). Get started by chilling the metal bowl of your stand mixer for 15-20 minutes in the refrigerator or freezer.
- Sprinkle the gelatin into a small glass measuring cup or microwave safe dish. Add the cold water and whisk until the gelatin is dissolved. Set the mixture aside for 5 minutes to let the gelatin set.
- While the gelatin is setting, add the heavy whipping cream, powdered sugar, and vanilla extract into the chilled metal bowl of your stand mixer fitted with the paddle attachment and mix on low speed to combine. Turn the mixer to high speed and beat until the mixture is thickened, stopping just shy of reaching soft peaks, about 1 min.
- At this point, the gelatin should be solidified. If so, pop it into the microwave for 5-10 seconds, until the mixture has re-liquified but is still cool to the touch. Use a whisk to briefly stir the gelatin mixture together to make sure it's smooth.
- With the mixer on low speed, drizzle the liquid gelatin into the cream. Slowly increase the speed to medium-high and continue to beat until you have reached stiff, fluffy peaks, about 2 minutes. Use immediately to ensure the best consistency for piping.
Make the Chocolate Ganache (Optional)
- Place the chocolate chips into a heat resistant bowl (glass or metal) and set aside. In a saucepan over medium-high heat, warm the heavy whipping cream until it just starts to simmer. I always look for small bubbles forming around the edge and a soft simmer starting in the middle. When it's reached this point, pour the cream into your bowl of chocolate and let sit for about 30 seconds.
- Whisk the chocolate and cream together until it’s uniform in consistency and there are no bits of chocolate left on your whisk. Cool the ganache at room temperature for 10-20 minutes, or until the ganache itself is room temperature or slightly above, before dripping the cake in the assembly instructions below.
Assembly
- Once the chocolate cake layers are cooled, level them to your desired height. Add the first layer onto a cardboard cake round on your turntable or cake stand. Use a pastry brush to add some of the cherry syrup onto the cake layer as a soak.
- Add a layer of whipped cream frosting onto the cake layer and create a bit of a dam on the outer edges by smoothing the center down lower than the edges with your angled spatula. This is to keep the cherry filling from spilling out from between the cake layers. Add half of the cherry filling into the dam.
- Place the next cake layer on top and repeat the process of adding the cherry syrup, whipped cream, and the rest of the cherry filling. Place the final cake layer on top, upside down so that the bottom of the cake layer becomes the top of the cake.
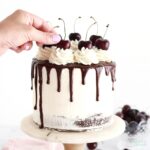
- Use the rest of the whipped cream frosting to decorate the cake. To create the look pictured, reserve about 1/2 Cup of the frosting for the swirls on top and use the remaining whipped cream frosting to create a semi naked finish on the cake. Place the cake in the refrigerator while you prepare the chocolate ganache, which should be room temperature or slightly above (see this blog post for tips about creating the perfect ganache consistency).
- Remove the cake from the refrigerator and use either a piping bag or small spoon to drip the chocolate ganache over the sides of the cake. Place the cake back in the refrigerator for about 5 minutes to let the ganache drip set, then fill a piping bag fitted with Wilton Tip 1M with the reserved whipped cream frosting. Pipe swirls on the top edge of the cake and top each one with a fresh cherry.
Notes
*DIY Buttermilk Recipe: add 1 Tbsp of white vinegar to a jar and top it with 1 Cup of whole milk. Stir and let sit for 15 minutes before using in the recipe.
Kirsch: If you want a more traditional black forest cake, add 1 1/2 Tablespoons of kirsch (cherry brandy) to the cherry filling ingredients.
Make Ahead Tips:
- The chocolate cake layers can be made ahead and stored at room temperature, covered tightly in plastic wrap, for up to two days. Alternatively, you can cover with plastic wrap and store in the freezer for up to two months before thawing to room temperature.
- The cherry filling and syrup can be made ahead and stored in the refrigerator for up to one week.
- The chocolate ganache can be made ahead and stored in the refrigerator in an airtight container for up to two weeks. When you’re ready to use it as a drip, microwave it in 10 second increments, stirring after every interval until your ganache is room temperature and uniform in consistency.
- The stabilized whipped cream cannot be made ahead. It should be made right before you're ready to assemble the cake.
- The assembled and decorated black forest cake can be stored in the refrigerator for 1-2 days before serving. Store leftovers in the refrigerator for up to 4 days.