Hot Cocoa Cake Recipe
Layers of hot cocoa infused cake, hot cocoa flavored buttercream, and homemade marshmallow creme filling – inspired by a cup of hot cocoa with marshmallows!
Servings 15 slices
Ingredients
Hot Cocoa
- 1 1/3 Cups (320ml) whole milk
- 4 Tbsp hot cocoa mix
Hot Cocoa Cake
- 2 Cups (265g) all purpose flour
- 1 1/2 Cups (300g) white granulated sugar
- 2/3 Cup (60g) unsweetened natural cocoa powder (not Dutch Process)
- 2 tsp baking soda
- 1 tsp baking powder
- 1/2 tsp salt
- 1/2 Cup (120ml) vegetable oil
- 2 whole eggs, room temperature
- 1 1/2 tsp pure vanilla extract
- 1 Cup (240ml) hot cocoa made with whole milk, room temperature recipe above
- 1 Cup (240ml) hot water
Hot Cocoa Buttercream
- 1 1/2 Cups (339g) unsalted butter, room temperature
- 4 1/2 Cups (540g) powdered sugar
- 1/2 Cup (45g) cocoa powder
- 1/4 Cup (60g) hot cocoa made with whole milk, room temperature recipe above
- 2 tsp pure vanilla extract
- 1/4 tsp salt
Homemade Marshmallow Creme Filling*
- 2 large egg whites
- 1/2 Cup (100g) granulated sugar
- 1/4 tsp cream of tartar
- 1/2 tsp pure vanilla extract
Toppings
- Mini and Large marshmallows for decoration
Instructions
Make the Hot Cocoa
- In a small saucepan over medium heat, whisk together the milk and hot cocoa mix. Bring to a simmer, then set aside and cool to room temperature before continuing on with this recipe.
Make the Hot Cocoa Cake
- Preheat the oven to 350ºF (177ºC) and prepare three 6-inch or two 8-inch cake pans by spraying the sides with baking spray and fitting the bottoms with a parchment cake circle.
- Place all of the dry ingredients into the bowl of a stand mixer fitted with the paddle attachment and stir on low for 30 seconds to fully combine them. Add the vegetable oil, eggs, vanilla, and hot cocoa and mix on low until just combined. Ensure that the hot water has been heated to a simmer, then with the mixer still on low, add the hot water in a slow stream. Turn the mixer to medium and beat until smooth, about 2 minutes. The batter will be very thin.
- Pour into prepared cake pans no more than 2/3 full and bake for 32-36 minutes, or until a wooden toothpick inserted comes out clean. Cool completely before frosting.
Make the Hot Cocoa Buttercream
- In a stand mixer fitted with a paddle attachment, whip butter on medium speed until creamy and light in color, about 5 minutes. Scrape down the bowl and paddle and add half of the powdered sugar, then mix on low speed until combined. Add the rest of the powdered sugar, cocoa powder, hot cocoa, vanilla, and salt. Mix on low speed until combined and smooth, scraping down the bowl and paddle as needed.
Make the Marshmallow Creme Filling
- Fill a medium saucepan with an inch or two of water and bring it to a simmer over medium heat. Whisk together the egg whites, granulated sugar, and cream of tartar in a heatproof bowl, then place it on top of the simmering saucepan. Make sure that the bottom of the bowl does not touch the water. Alternatively, you can use a double boiler for this part.
- Whisk the egg white mixture continuously until the sugar and cream of tartar are dissolved, 3-4 minutes. It will thin out and be very frothy on top.
- Remove the mixture from the heat and add it to a stand mixer fitted with the whisk attachment (you can use a hand mixer for this part as well). Add the vanilla, then beat on high speed until stiff, glossy peaks form, about 3-5 minutes. To test it, dip your whisk attachment into the meringue and make sure the peak holds.
Assembly
- Once the cake layers are completely cool, level them to your desired height. Pipe a ring of hot cocoa buttercream around the edge of the first cake layer, then fill the middle halfway with marshmallow creme filling before filling the rest of the space with hot cocoa buttercream (here's a tutorial on this filling method). Add the next cake layer on top and repeat the filling process before adding the final cake layer on top, upside down so that the bottom of the cake is facing up. Crumb coat with the hot cocoa buttercream and refrigerate for 20 minutes.
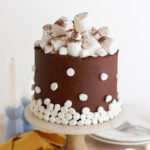
- To create the look pictured, use the rest of the hot cocoa buttercream to frost a smooth buttercream finish, keeping the top edge "unfinished" (aka don't swipe the top edges inward to make them sharp). Use clean kitchen scissors or a paring knife to slice the mini marshmallows in half and place them onto the buttercream finish in an ombrè layout. The cut side of the marshmallow should be sticky enough to press onto the side of the cake and adhere, but if you need to, brush on a little water to make it stickier. Finish the design by adding the rest of the marshmallow creme on top, then piling marshmallows of various sizes onto it and dusting with cocoa powder.
Notes
*Homemade Marshmallow Creme Filling: you can alternatively use store bought marshmallow creme if you'd rather not make it from scratch. The store bought stuff does tend to squish out from between the layers when the cake is sliced, which is one reason why I prefer the homemade version (it holds its shape better).
Make Ahead Tips:
- The hot cocoa cake layers can be made ahead and stored, wrapped in plastic wrap, at room temperature for up to two days. Alternatively, you can store the wrapped cake layers in the freezer for up to 2 months before thawing and frosting.
- The hot cocoa buttercream can be made ahead and stored in an airtight container in the refrigerator for up to two weeks. When you’re ready to use it, bring it back to room temperature and re-whip in your stand mixer to bring back to smooth buttercream consistency.
- The marshmallow creme filling is best used right away, but if you need to you can store it in an airtight container at room temperature for up to 6 hours or in the refrigerator for up to 2 days. It may deflate slightly when stored in the refrigerator.