Rainbow Cake with Rainbow Buttercream
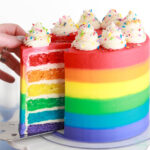
The ULTIMATE rainbow cake: six layers of rainbow colored cake layers inside, rainbow striped buttercream on the outside, and a rainbow sprinkled swirl border on top. The cake layers are made with my bakery-style white cake recipe (extra soft and moist!), then filled and frosted with my favorite vanilla buttercream.
Servings 20 slices
Equipment
- Six 6-inch cake pans
Ingredients
Rainbow Cake
- 2 1/2 Cups (265g) sifted cake flour* DIY recipe in notes
- 2 tsp baking powder
- 1/2 tsp baking soda
- 1/2 tsp salt
- 1 1/2 Cups (300g) granulated sugar
- 1/2 Cup (113g) unsalted butter, room temperature
- 4 large egg whites, room temperature
- 1/2 Cup (120ml) vegetable oil
- 1 Tbsp pure vanilla extract
- 1 1/4 Cups (300ml) full-fat buttermilk*, room temperature DIY recipe in notes
- red, orange, yellow, green, blue, and purple food coloring
Vanilla Buttercream
- 2 Cups (452g) unsalted butter, room temperature
- 7 Cups (840g) powdered sugar
- 4 tsp pure vanilla extract
- 1/4 Cup whole milk, room temperature
- pinch of salt, or to taste
- red, orange, yellow, green, blue, and purple food coloring
Garnish
- 2 Tbsp rainbow sprinkles
Instructions
Make the Rainbow Cake
- Preheat the oven to 325°F (163°C) and prepare six 6-inch cake pans by spraying the sides with baking spray and fitting a parchment paper circle to the bottom of each pan.
- In a medium bowl, add the flour, baking powder, baking soda and salt. Whisk together and set aside.
- In the bowl of a stand mixer fitted with the paddle attachment, beat the butter at high speed until creamy, about 2 minutes. Add the sugar and cream it together with the butter at medium-high speed until light and fluffy, about 2 minutes, scraping the bowl and paddle at the halfway point. Turn the mixer to low and add the egg whites one at a time, mixing until they are just combined and scraping down the bowl and paddle as needed. Add the vegetable oil and vanilla, increase the mixer speed to high and beat for 1 minute.
- Turn the mixer off and add the flour mixture all at once. Mix the ingredients on low speed until just combined, then slowly pour in the buttermilk. Continue mixing at low speed for about 30 seconds, until the batter is uniform and combined. The batter will be slightly thin.
- Divide the batter evenly between six bowls. You should have about 200g of batter per bowl. In the first bowl, whisk in a few drops of red food coloring until you create red colored batter (keep in mind it will darken in the baking process!). Repeat the process with the remaining bowls using orange, yellow, green, blue, and purple food coloring.
- Pour each bowl of batter into a separate cake pan and bake for 18-22 minutes, until the layers spring back to the touch and a toothpick inserted comes out clean. Let the cake layers cool in their pans for 5 minutes, then remove them from the pans and allow them to cool completely on a wire rack.
Make the Vanilla Buttercream
- With a hand mixer or paddle attachment on your stand mixer, cream the butter on medium-high until it’s creamy and light (almost white) in color. About 7 minutes.
- With the mixer on low, add the powdered sugar one cup at a time, scraping down after each addition and making sure each cup is fully incorporated before adding the next one. Add the vanilla, milk, and salt and mix on low for another minute until fully incorporated. Wait to add the food coloring until Step 2 of the Assembly process below.
Assembly
- Once the cake layers are completely cooled, level them to get rid of any domed tops and create even layers. Add a swipe of vanilla buttercream onto a cardboard cake circle and place the first cake layer on top. Fill and stack the cake layers in reverse rainbow order, using about 1/8 inch of buttercream between each layer. When you get to the final cake layer, place it upside down on top of the stack, then crumb coat the cake with vanilla buttercream. Refrigerate the cake for 15-20 minutes to let the crumb coat firm up while you prepare the rest of the buttercream.
- Color the Buttercream: Reserve about 1 Cup of buttercream for the swirls on top, then divide the rest of the buttercream between 6 bowls. One bowl (the one you’ll tint red) should have slightly more buttercream since it will be used for the top of the cake and one of the stripes. Add food coloring to each bowl to create red, orange, yellow, green, blue, and purple buttercream.
- To create the rainbow striped design pictured: Add each buttercream color into its own piping bag and cut off about 1/2 inch opening. Starting at the bottom with the purple buttercream, squeeze the piping bag while you rotate the turntable to add stripes of buttercream to the cake. Try to keep each color in line with the colors of the cake layers so they line up when the cake is sliced. Repeat the process in reverse rainbow order, then cover the top of the cake with red buttercream. Smooth the top down with an angled spatula, then create a smooth finish on the sides with your icing smoother before swiping the top edges inward to create sharp edges.
- Add the reserved white buttercream into a piping bag fitted with Tip 4B and pipe swirls on top of the cake, then garnish the swirls with rainbow sprinkles.
Notes
*DIY cake flour recipe: if you can't find cake flour locally, here's how to make a homemade version using all purpose flour and cornstarch. Keep in mind that if you do use the homemade version, the gram measurement will weigh more (295g instead of 265g) since all-purpose flour is heavier than cake flour.
*DIY buttermilk recipe: add 1 Tbsp of white vinegar to a jar and top it with 1 1/4 Cups of whole milk. Stir and let sit for 15 minutes before using in the recipe.
Make ahead tips:
- The cake layers can be made ahead and stored at room temperature, covered tightly in plastic wrap, for up to two days. Alternatively, you can cover with plastic wrap and store in the freezer for up to two months before thawing to room temperature.
- The vanilla buttercream can be made ahead and stored in an airtight container in the refrigerator for up to two weeks. When you’re ready to use it, bring it back to room temperature and re-whip in your stand mixer to bring back to smooth buttercream consistency.