• Cake
  • Frosting
  • YouTube
  • My Favorite Tools
  • Nav Social Icons

  • Skip to primary navigation
  • Skip to main content
  • Skip to primary sidebar
  • Skip to footer
  • Recipes
    • Cake
    • Cupcakes
    • Frosting
    • Ice Cream
    • Vegan
  • Cake Basics
  • Tutorials
  • Blog
  • About
  • Mobile Menu Widgets

    Connect

    Search

Sugar & Sparrow logo in script font

Sugar & Sparrow

Lifestyle and Cake from Portland Oregon

  • Cake Basics
  • Recipes
    • Cake
    • Cupcakes
    • Cookies & Bars
    • Filling
    • Frosting
    • Ice Cream
    • No-Bake
    • Small Batch
    • Vegan
  • Tutorials
  • Book
  • Blog
  • About

Toasted S’mores Cupcakes

June 30, 2020 · In: Cupcakes, Featured, Recipes, Seasonal, Summer

Jump to Recipe

I can’t tell you how many requests I’ve gotten for a cupcake version of my S’mores Cake with Toasted Marshmallow Buttercream. It’s one of my all-time favorite recipes (s’mores fan to the core, here!) and there are so many amazing flavors going on in it: graham cracker cake, decadent chocolate, toasted marshmallow buttercream. I had to get a little creative to capture the magic of these flavors in cupcake form, and I am so happy with how they turned out. Behold!

smores cupcake recipe by Sugar and Sparrow

These S’mores Cupcakes have a lot going on, but every step is totally worth the amazing flavor. It all starts with a graham cracker flavored cupcake baked on top of a graham cracker crust (my husband’s idea, and it is so genius). You basically mix up a quick graham cracker crust and press a spoonful of it into the bottom of the cupcake tin before adding the cupcake batter on top. Although the cupcake batter is already flavored with graham cracker crumbs, the crust adds the perfect amount of texture and really takes the graham cracker flavor to the next level! 

smores cupcakes filled with marshmallow
graham cracker cupcakes with chocolate buttercream and toasted marshmallow

After those tasty graham cracker cupcakes cooled, I filled them with marshmallow fluff and frosted them with my favorite chocolate buttercream. And since one thing I really loved about the S’mores Cake I made last year was the piped and toasted meringue, I decided to use that same technique to top these cupcakes! The marshmallow meringue recipe below is the perfect piping consistency, and toasting it is my favorite part of the whole recipe. 

chocolate marshmallow cupcakes
smores cupcakes with toasted marshmallow

If you don’t feel like going the extra mile to make marshmallow meringue, you can totally top these with a regular ol’ marshmallow and toast it with a culinary torch. The marshmallow meringue is so pretty and tasty, but it is the only thing in this recipe that can’t be made ahead of time. That being said, if you do decide to spend that extra 10 minutes making the meringue (worth it!), make sure you whip it up right before you’re gonna pipe it on. After you toast it, the meringue holds its shape for two days, whether it’s at room temp or refrigerated. 
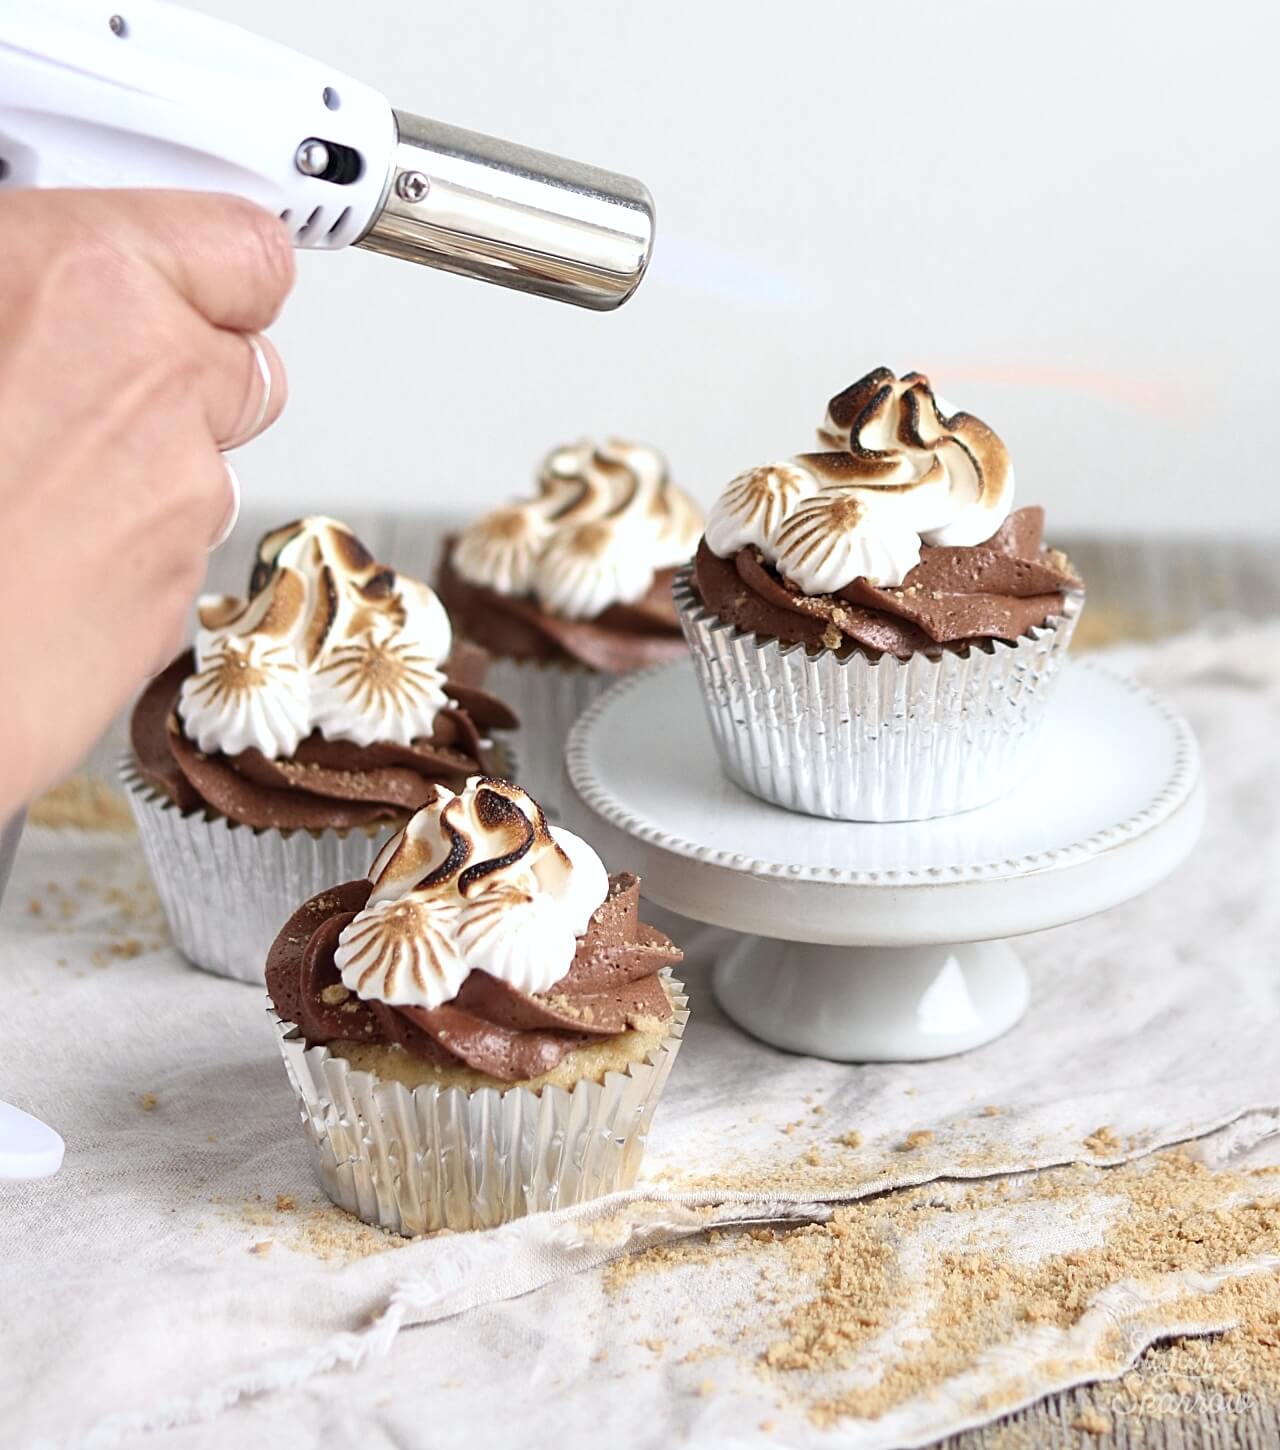
toasted meringue on cupcakes

Whether you’re a hardcore s’mores fan or you’re making these for someone else who is, they are sure to please. Between the gooey marshmallow, the graham cracker cupcake, and the perfect hit of chocolate, these beauties are a little bit of s’mores heaven. Enjoy!

Toasted S’mores Cupcakes

5 from 2 votes
Graham Cracker Cupcakes filled with Marshmallow Fluff, topped with Chocolate Buttercream and Toasted Marshmallow Meringue – the perfect S'mores Cupcakes!
Print Recipe Pin Recipe
Prep Time:40 minutes mins
Cook Time:17 minutes mins
Servings: 14 cupcakes

Ingredients

Graham Cracker Crust

  • 1/2 Cup (52g) graham crackers, ground into crumbs
  • 2 Tbsp white granulated sugar
  • 2 Tbsp unsalted butter, melted

Graham Cracker Cupcakes

  • 1/2 Cup (52g) graham crackers, ground into crumbs
  • 1 1/4 Cups (133g) cake flour, sifted before measuring
  • 1 tsp baking powder
  • 1/4 tsp baking soda
  • 1/2 tsp salt
  • 1/3 Cup (71g) unsalted butter, room temperature
  • 2/3 Cup (137g) granulated white sugar
  • 1 egg + 1 egg yolk, room temperature
  • 1/2 tsp vanilla extract
  • 1/2 Cup (120ml) whole milk, room temperature

Marshmallow Filling

  • 1/3 Cup Marshmallow Fluff

Chocolate Buttercream

  • 1/2 Cup (113g) unsalted butter, room temperature
  • 1 1/2 Cups (180g) powdered sugar
  • 1/4 Cup (21g) natural unsweetened cocoa powder
  • 2 Tbsp whole milk, room temperature
  • 1 tsp vanilla extract
  • pinch of salt

Marshmallow Meringue Topping

  • 3 large egg whites, room temperature
  • 3/4 Cup (150g) granulated white sugar
  • 1/4 tsp cream of tartar
  • 1 tsp vanilla extract

Instructions

Make The Graham Cracker Crust

  • In a small bowl, stir together the graham cracker crumbs and granulated sugar. Add the melted butter and mix until well incorporated.

Make The Graham Cracker Cupcakes

  • Preheat the oven to 350˚F and line a muffin pan or cupcake pan with liners. Press a spoonful of the Graham Cracker Crust into the bottom of each cupcake liner.
  • In a medium sized bowl, add the graham cracker crumbs, sifted cake flour, baking powder, baking soda, and salt. Whisk to combine and set aside.
  • In the bowl of a stand mixer with the paddle attachment, cream butter for one minute on high. Scrape down the bowl and paddle and add the sugar. Cream together on high for two minutes, scraping down the bowl and paddle once in between. Turn the mixer to low and add the egg and egg yolk until combined.
  • Add vanilla and mix on medium for one minute. Turn the mixer to low and add all of the dry ingredients at once until just combined, then add the milk all at once. Scrape down the bowl and paddle once more and mix on low for about 30 seconds. Do not overmix.  
  • Pour batter on top of the graham cracker crust bottomed liners to fill no more than ⅔ full. Bake for 17 minutes or until a toothpick inserted comes out clean. Cool completely before filling or frosting.

Make The Chocolate Buttercream

  • In a stand mixer fitted with a paddle attachment, whip butter on medium speed until creamy and light in color, about four minutes. Scrape down the bowl and paddle and turn the mixer to low, then add powdered sugar, cocoa powder, milk, salt, and vanilla extract. Increase the speed to medium and beat for one full minute.

Make The Marshmallow Meringue

  • Whisk the egg whites, sugar, and cream of tartar together in a small heatproof bowl. Set the bowl over a saucepan filled with an inch or two of simmering water, making sure the bottom of the bowl doesn’t touch the water (or else it will cook your eggs!). Whisk the mixture constantly until the sugar has dissolved, about 4 minutes.
  • Once the sugar has dissolved, pour the mixture into the bowl of your stand mixer fitted with the whisk attachment. Add the vanilla and whisk the mixture on high for 6 full minutes, until stiff peaks form. You should be able to dip the whisk into the meringue and it forms a peak that maintains its shape when turned right side up and upside down.

Assembly

  • Once the Graham Cracker Cupcakes are cooled, cut out the centers using a knife or inverted large piping tip. Fill the empty centers with Marshmallow Fluff. Fit a piping bag with Wilton tip 1M and fill it with Chocolate Buttercream, then pipe a swirl of chocolate buttercream on top of each cupcake. Sprinkle with graham cracker crumbs.
  • To get the look pictured, fit one piping bag with Wilton Tip 1M and another with Wilton Tip 4B. Fill both piping bags with Marshmallow Meringue. Pipe a small swirl with Wilton Tip 1M on top of each cupcake, then pipe two stars next to each small meringue swirl with Wilton Tip 4B. Toast the meringue accents (carefully!) with a culinary torch.

Notes

Make Ahead Tips:
The Graham Cracker Cupcakes can be made ahead and stored in an airtight container at room temperature for up to one day. Alternatively, you can place them in the freezer in an airtight container for up to one month before thawing and using. 
The Chocolate Buttercream can be made ahead and stored in an airtight container at room temperature for up to 1 day. Alternatively, you can store it in an airtight container in the refrigerator for up to two weeks. When you’re ready to use it, bring it back to room temperature and rewhip with your stand mixer to bring back to frosting consistency. 
The Marshmallow Meringue cannot be made ahead and must be made right before you’re ready to pipe and torch it. 

Did you make these cupcakes? I want to know how it went! Let me know in the comments below and be sure to tag @sugarandsparrowco on Instagram. I love to see what you’re caking!

By: Whitney · In: Cupcakes, Featured, Recipes, Seasonal, Summer · Tagged: cake decorating, chocolate buttercream, chocolate buttercream recipe, chocolate frosting, cupcake decorating, cupcake ideas, cupcake recipe, graham cracker crust, graham cracker cupcake recipe, graham cracker cupcakes, marshmallow meringue, pipeable meringue, smores, smores cupcake recipe, smores cupcakes, summer cupcake recipe, toasted marshmallow meringue, toasted meringue

you’ll also love

strawberry swirled no-bake cheesecake topped with strawberriesNo-Bake Marbled Strawberry Cheesecake
the best vanilla cupcakes recipeThe Perfect Vanilla Cupcake Recipe
hot cocoa cake recipe with homemade marshmallow fillingHot Cocoa Cake with Homemade Marshmallow Filling

Join the List

Stay up to date & receive the latest posts in your inbox.

Reader Interactions

Comments

  1. Erica M says

    August 1, 2025 at 11:49 am

    5 stars
    The recipe sound great can’t wait to bake these. Can I put a marshmallow in the center then more batter on top and bake them. Would that work. Please advise

    Reply
    • Whitney says

      August 1, 2025 at 8:39 pm

      Hi Erica! That sounds like it would be amazing! I haven’t tried it myself, but after a little research it seems like if you freeze the marshmallow before placing it into the center of the cupcake and baking, it helps keep the marshmallow intact and gooey after baking. Let me know if you try it!

      Reply
  2. Sarah Dominguez says

    April 8, 2024 at 1:58 pm

    If I need about 40-50 cupcakes for my son’s 1st birthday party, should I make 3-4 separate batches? Or is it ok to double or triple the recipe in one go? What’s a good strategy?

    Reply
    • Whitney says

      April 8, 2024 at 8:32 pm

      Hi Sarah! You could totally double or triple this recipe in one go. Enjoy!

      Reply
  3. Grace says

    August 4, 2022 at 10:43 am

    Hello! Thank you for sharing this! If I wanted to make a smaller batch, would it be possible to just half the recipe of the cupcakes, frosting, etc? If so, would that work for the other cupcakes recipes too?

    Thank you!

    Reply
    • Whitney says

      August 4, 2022 at 6:15 pm

      Hi Grace! Yes – if you want to make a smaller batch you can absolutely half this recipe or any of my recipes!

      Reply
  4. Ashley says

    November 9, 2021 at 10:13 am

    5 stars
    These are 100% worth the effort. Great recipe I’ll be making again and again.

    Reply
    • Whitney says

      November 10, 2021 at 9:07 am

      Yay, Ashley! I’m so happy you loved these cupcakes!

      Reply
  5. Kristie says

    October 31, 2020 at 8:06 pm

    I’m about to make these! I don’t have a culinary torch though. Any tips for an alternate? Thank you!

    Reply
    • Whitney says

      November 2, 2020 at 6:50 am

      Hi Kristie! Unfortunately, I haven’t been able to find an alternative to a culinary torch for toasting the meringue. I’ve tried a lighter/matches and it just doesn’t give the same effect. Sorry for the inconvenience!

      Reply
  6. Elena says

    August 24, 2019 at 6:19 am

    Can these be done without the crumb bottom, daughter thinks she’s needing these for her wedding and that means 150 of them!

    Reply
    • Whitney says

      August 24, 2019 at 8:40 am

      Hi Elena! These can certainly be made without the graham cracker crust and they still taste amazing 🙂 They would make such fun wedding cupcakes!

      Reply
  7. Michele Mallory-Davidson says

    August 9, 2019 at 10:13 am

    These look sooooo good!
    Graham cracker cupcakes sound amazing.

    Reply
    • Whitney says

      August 9, 2019 at 10:15 am

      Thanks, Michele! They are heavenly and I hope you get the chance to try them!

      Reply

Leave a Reply Cancel reply

Your email address will not be published. Required fields are marked *

Recipe Rating


Next Post >

Coming Soon: Cake Basics

Primary Sidebar

Welcome to Sugar & Sparrow

Welcome to Sugar & Sparrow

Helping you whip up pretty desserts with confidence and creativity. And hopefully sharing a few laughs with you along the way!

Learn More

Connect

let’s bake!

Get my very best recipes, baking tips, and decorating tutorials sent to your inbox

Featured Posts

lemon cake with cream cheese buttercream

Lemon Cake With Lemon Cream Cheese Buttercream

no-churn cookie dough ice cream cake recipe by sugar and sparrow

The BEST Cookie Dough Ice Cream Cake

strawberry buttercream frosting recipe

Fresh Strawberry Buttercream Recipe

Search

Archives

Follow Along

@sugarandsparrowco

NO-BAKE BISCOFF CHEESECAKE ✨this is the perfect EA NO-BAKE BISCOFF CHEESECAKE ✨this is the perfect EASY no-bake dessert for Fall and I cannot get over the incredible spiced caramel flavor!! I added Biscoff cookie butter to my favorite no-bake cheesecake base, piled it onto a Biscoff cookie crust, then topped it with a melted cookie butter drip + tons of crunchy cookie crumbs.  
 
🤎Full recipe linked in my bio + at https://sugarandsparrow.com/no-bake-biscoff-cheesecake/ 
 
BISCOFF CRUST: 
1 8.8oz package Biscoff cookies (250g) 
1/3 Cup (75g) unsalted butter, melted 
 
FILLING: 
16 Oz (452g) full-fat brick-style cream cheese, room temp 
1/4 Cup (50g) powdered sugar 
3/4 Cup (210g) creamy Biscoff cookie butter 
1 tsp ground cinnamon 
1 tsp pure vanilla extract 
1 Cup (240ml) heavy whipping cream, cold 
 
INSTRUCTIONS: 
1. Combine the Biscoff crust ingredients until the mixture resembles wet sand, then press firmly into the bottom of a 9-inch springform pan.  
2. In a large bowl, whip the cream cheese until smooth, then add the powdered sugar, cookie butter, cinnamon, and vanilla and mix until smooth.  
3. In a separate medium bowl, whip the heavy whipping cream to stiff peaks, then fold into the cream cheese mixture until no streaks remain. 
4. Add the filling on top of the Biscoff crust, cover, and refrigerate for at least 8 hours. 
5. Once set, top with melted cookie butter and crushed Biscoff cookies. 
 
#biscoff #biscoffcheesecake #nobakecheesecake #biscoffcake #nobake 
A mini pumpkin spice latte cake to celebrate my SI A mini pumpkin spice latte cake to celebrate my SIL 🥳 two 6-inch layers of spiced pumpkin cake with the most delicious coffee buttercream + a little vintage piping for good measure ☕️ making a birthday cake for my family and friends will always be my favorite love language!!

👩🏽‍🍳 Recipes: perfect pumpkin layer cake + coffee buttercream (both found at sugarandsparrow.com) or you can find a dedicated PSL cake recipe in my book! 
✨ Piping Tips: @wiltoncakes tip 3 for the writing + tip 4B for the borders
☕️ Garnish: chocolate covered espresso beans

#pumpkincake #birthdaycake #pumpkinspicelatte #minicake #cakedecorating
BROWN BUTTER CREAM CHEESE FROSTING 🤎🧈 brown butter BROWN BUTTER CREAM CHEESE FROSTING 🤎🧈 brown butter is the KEY to making cream cheese frosting even better! You get the tang of cream cheese but with rich, nutty caramelized notes of brown butter and it’s HEAVENLY on any Fall cake 🙌🏼 I paired with my carrot cake recipe here but it’s also incredible with spice cake, pumpkin cake, chocolate cake, and more! 

Full recipe + all my favorite cake pairing suggestions in my bio and here: https://sugarandsparrow.com/brown-butter-cream-cheese-frosting/

BROWN BUTTER CREAM CHEESE FROSTING 
YIELD: 3.5 Cups  
 
INGREDIENTS 
1/2 Cup (113g) unsalted butter 
8 Oz (226g) full-fat brick-style cream cheese, room temperature NOT the spread 
4 Cups (480g) powdered sugar 
1 tsp pure vanilla extract 
pinch of salt, or to taste 
 
INSTRUCTIONS 
1. Brown the butter: Add the butter into a large frying pan and cook over medium heat until the butter melts, stirring occasionally. Continue cooking for 3-5 minutes while stirring constantly. First it will foam, then bubble as little white particles of milk solids separate, then the white specks will caramelize and turn medium-brown and smell deliciously nutty. Remove from heat, transfer to a glass container, and cool until it re-solidifies and is the consistency of softened butter (about 45 minutes in fridge).  
2. Add the cooled brown butter into the bowl of your stand mixer fitted with a paddle attachment and add the cream cheese. Mix on medium-high until fluffy and light in color, 5 min, scraping down the bowl and paddle as needed. 
3. Turn the mixer to low speed and add the powdered sugar a few cups at a time, scraping down the bowl and paddle after mixing in each addition. Add the vanilla and salt and continue mixing on low speed until smooth and uniform. 
 
#brownbutter #creamcheesefrosting #creamcheese #buttercream #cakedecorating
HOMEMADE COOKIE DOUGH ICE CREAM 🍪🍦(recipe below) t HOMEMADE COOKIE DOUGH ICE CREAM 🍪🍦(recipe below) turns out that making cookie dough ice cream from scratch is not only EASY with the no-churn method, it also ensures you get the ideal amount of soft chocolate chip cookie dough in every single bite 🙌🏼

🍦Recipe link in my bio + at https://sugarandsparrow.com/no-churn-cookie-dough-ice-cream/ 

COOKIE DOUGH BITES
1 Cup (132g) all-purpose flour, heat-treated
1/4 Cup (57g) unsalted butter, room temp
1/4 Cup (50g) granulated sugar
1/3 Cup (67g) packed light brown sugar
1 tsp pure vanilla extract
2 Tbsp (30ml) whole milk
1/4 tsp salt
1/2 Cup (90g) mini chocolate chips

INSTRUCTIONS:
1. Line a cookie sheet with parchment, add the flour in a single layer, and bake at 350ºF (177ºC) for 5 minutes, until the flour has reached 160ºF (71ºC). Cool to room temp. 
2. Cream together the butter, granulated sugar, and brown sugar using a hand mixer or stand mixer. Add the vanilla, milk, and salt and mix until combined. Mix in  the (cooled) heat-treated flour on low speed, then mix in the chocolate chips.
3. Use 1/2 tsp measuring spoon to measure out the cookie dough bites and refrigerate.

NO-CHURN ICE CREAM
2 Cups (480ml) heavy whipping cream, cold
14 Oz sweetened condensed milk
2 tsp vanilla extract
pinch of salt
1/2 Cup (90g) mini chocolate chips

INSTRUCTIONS: 
1. Add the cold heavy whipping cream into a large chilled metal bowl. Beat with a hand mixer (or whisk attachment on your stand mixer) until stiff peaks form, about 2-4 minutes. 
2. In a separate medium bowl, whisk together the sweetened condensed milk, vanilla, and salt. Pour the vanilla condensed milk mixture into the large bowl of whipped cream and fold together until fully combined.
3. Reserve about 1/4 cup of the cookie dough bites and a few tbsp mini chocolate chips, then fold the rest of the chocolate chips and cookie dough into the vanilla ice cream mixture. Add the cookie dough ice cream into a loaf pan, sprinkle the reserved cookie dough and chocolate chips on top. Cover and freeze for 6-8 hours, after which the ice cream should be semi-firm, scoop-able, and ready to enjoy!

#cookiedoughicecream #cookiedough #nobake #icec
MILKY WAY CAKE 🍫✨this tastes JUST like a Milky Way MILKY WAY CAKE 🍫✨this tastes JUST like a Milky Way candy bar, but in cake form! It’s layers of decadent chocolate cake filled with homemade chocolate nougat and gooey caramel, then topped with chocolate buttercream. A MUST try if you love Milky Way 😍
 
Comment RECIPE and I’ll send it straight to your inbox or find it at https://sugarandsparrow.com/milky-way-cake-recipe/ 
⁣ 
#milkywaycake #caramel #chocolatecake #chocolatecaramelcake #cakesofinstagram

Footer

On the Blog

  • Cake Basics
  • Recipes
  • Tutorials

Info

  • About
  • Privacy Policy & Disclosure

stay in the know

Copyright © 2026 · Theme by Sugar & Sparrow