• Cake
  • Frosting
  • YouTube
  • My Favorite Tools
  • Nav Social Icons

  • Skip to primary navigation
  • Skip to main content
  • Skip to primary sidebar
  • Skip to footer
  • Recipes
    • Cake
    • Cupcakes
    • Frosting
    • Ice Cream
    • Vegan
  • Cake Basics
  • Tutorials
  • Blog
  • About
  • Mobile Menu Widgets

    Connect

    Search

Sugar & Sparrow logo in script font

Sugar & Sparrow

Lifestyle and Cake from Portland Oregon

  • Cake Basics
  • Recipes
    • Cake
    • Cupcakes
    • Cookies & Bars
    • Filling
    • Frosting
    • Ice Cream
    • No-Bake
    • Small Batch
    • Vegan
  • Tutorials
  • Book
  • Blog
  • About

Striped Buttercream Circus Animals Party Cake

May 20, 2019 · In: Featured, Tutorials

In my memories of childhood snacks, Circus Animals were an extra special treat. My eyes still get wide when I see the iconic pink and white frosted cookies covered in sprinkles, so when I found out that this by SprinklePop was largely inspired by them, my heart definitely soared! I just knew I had to create a fun pink and white sprinkled cake with major Circus Animal cookie vibes to celebrate my love for all of it.

pink and white striped cake with sprinkles

Just one look at the colors going on in the sprinkle mix will transport you back to childhood. The larger pink and white spherical sprinkles are perfectly intermixed with rainbow-colored jimmies and nonpareils. It’s all the colors of Circus Animal cookies in sprinkle form and made me giddy just opening the bottle! Look at how beautiful these sprinkles are:

circus animals sprinkles by SprinklePop

Going with the fun circus-inspired theme, I decided to make the cake striped with pink and white buttercream. It’s the first time I’ve ever used a cake comb for striping the cake, and I found it to be a serious hack for creating perfectly level and evenly-spaced stripes! I’ll show you all the tips I learned below, so if you’ve been dying to create a buttercream striped cake and haven’t yet tried the cake comb technique, I highly recommend it. It’ll save you so much time and stress. And just look at how pretty the sprinkles look on these stripes!

striped buttercream cake tutorial
circus animals cake by Sugar and Sparrow

I whipped up a video of the entire process, from striping the cake to adding the sprinkles, so you can visually see the techniques before reading all about them in the tutorial below:

You Will Need

  • A 6-inch crumb coated cake that’s been chilled
  • 1.5 batches of vanilla buttercream frosting
  • Pink food color gel
  • A cake turntable
  • An icing scraper and angled spatula
  • A cake comb
  • 2 piping bags
  • 8 oz bottle of
  • Wilton Tip 1M
  • Circus Animal cookies for garnish

Step 1: Frost The Cake

With your crumb coated cake on the turntable, frost the cake with the vanilla buttercream and use the icing scraper and angled spatula to create a smooth buttercream finish.

how to frost a cake with buttercream

If you’re looking for tips on how to get the buttercream extra smooth and level, this blog post will give you all the info you need!

Step 2: Comb The Cake

With the smooth buttercream frosting still wet to the touch, hold the cake comb at a 45 degree angle toward your body and gently indent the cake with it. Be sure to wipe the cake comb clean each time you go around the cake.

using a cake comb on buttercream
buttercream stripes cake tutorial

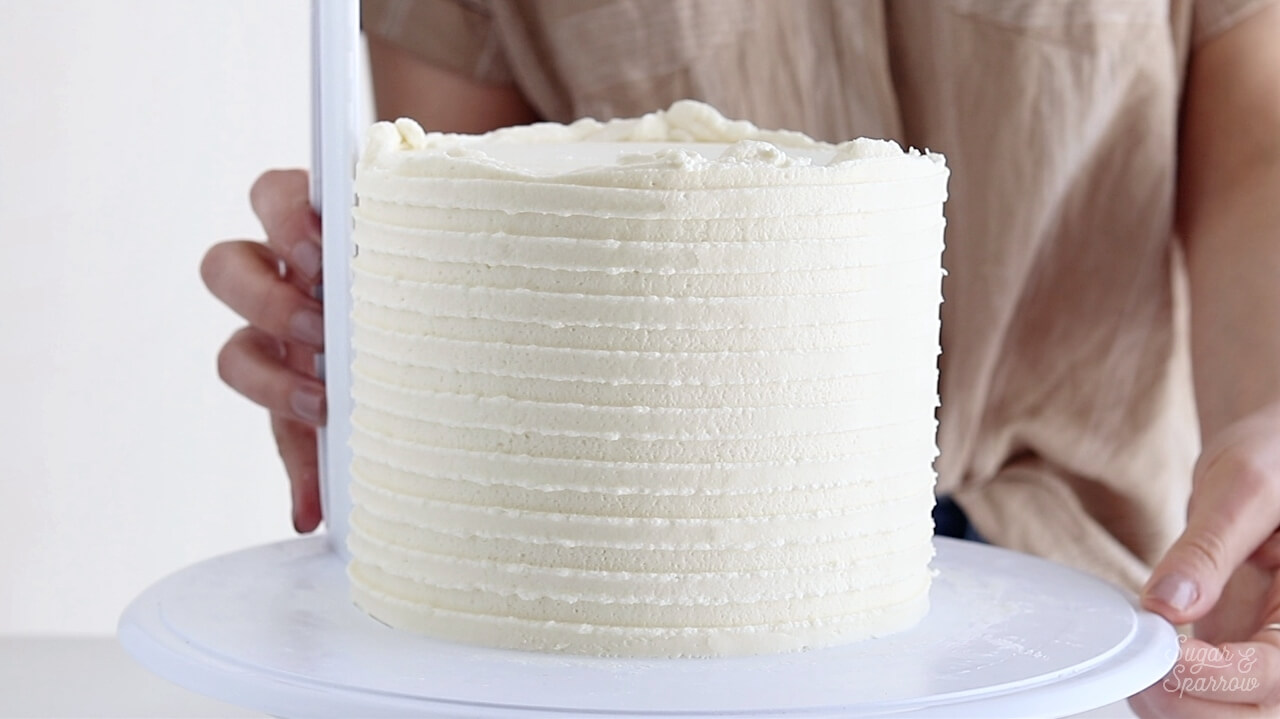
Continue the process of combing the cake and wiping the comb clean until you’ve got even grooves in the buttercream all around the cake. They should be about ⅛ to ¼ of an inch deep when you’re finished.

Step 3: Create The Buttercream Stripes

Tint all of the leftover buttercream a light pink shade using your favorite color gel. I used a tiny amount of Americolor Electric Pink to get the shade pictured. After the buttercream has been tinted, load it into a piping bag and snip off ¼ inch opening. Fill each of the grooves on the cake with the pink buttercream and be sure to overfill the grooves rather than underfill them.

how to make buttercream stripes on cake

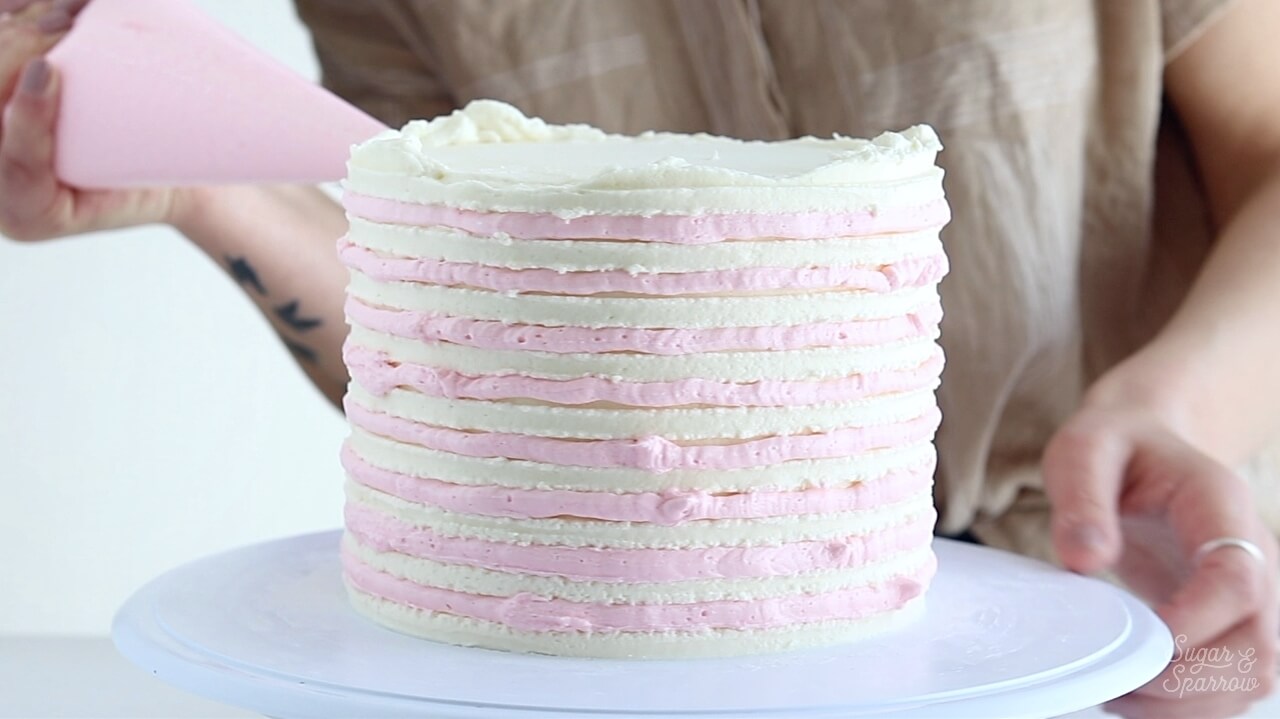
When you’re finished filling all of the grooves with pink buttercream, use a clean icing scraper to smooth the cake. It will look a bit messy at first, but keep smoothing the cake (wipe your icing scraper clean in between smoothing!) until perfect buttercream stripes are revealed.

perfect buttercream stripes tutorial

Once your buttercream stripes are looking amazing, swipe your angled spatula over the top of the cake, from the outer edges inward, to create sharp edges.

how to make a striped buttercream cake

Step 4: Add The Sprinkles

With your striped buttercream still wet to the touch, add the all around the bottom edges of the cake. The easiest way to do this is to pour the sprinkles into the palm of your hand, then gently press them to the cake.

how to add sprinkles to cake

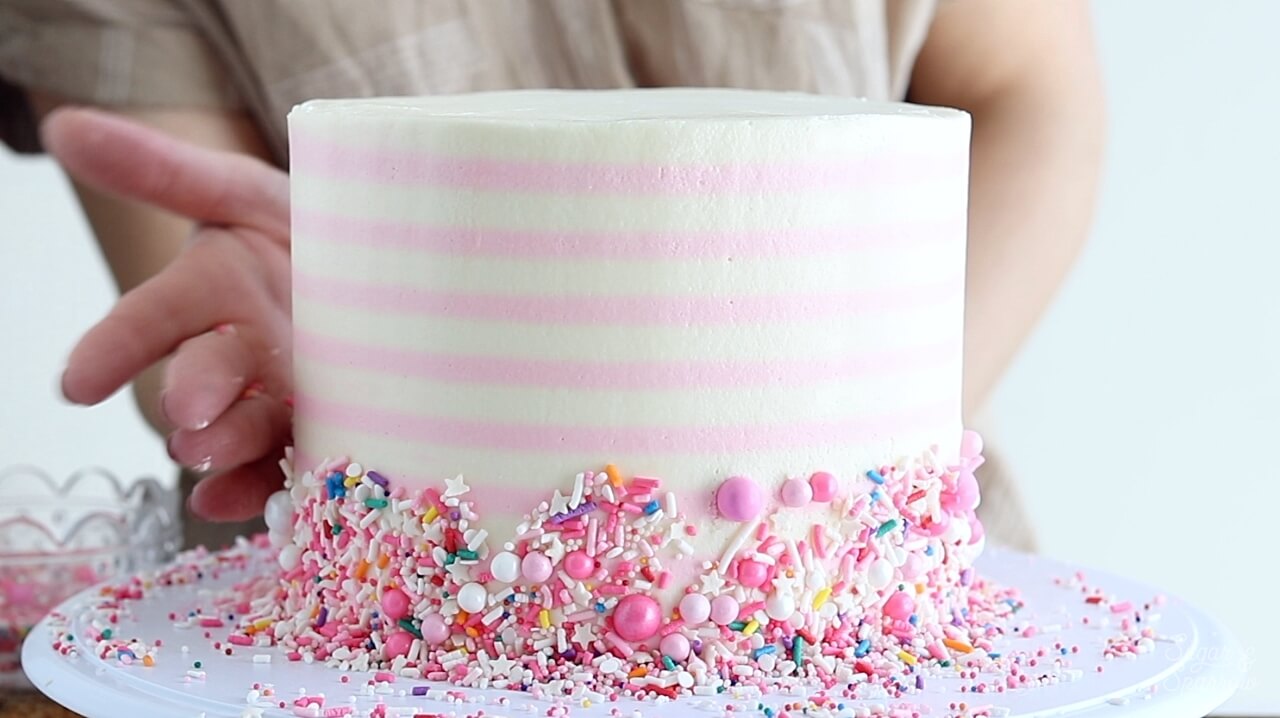
When you finish sprinkling the bottom edges, gently place the sprinkles in a floating pattern around the top two thirds of the cake. You can use a pair of tweezers for this part, but I find that pressing a sprinkle to my finger before gently touching the cake with it is the easiest way to add sprinkles one by one without making marks in the cake finish.

how to put sprinkles on a cake

Once you’re happy with the sprinkled sides, pop the cake in the refrigerator for about 20 minutes to let everything firm up before continuing the decorating process.

Step 5: Decorate The Top

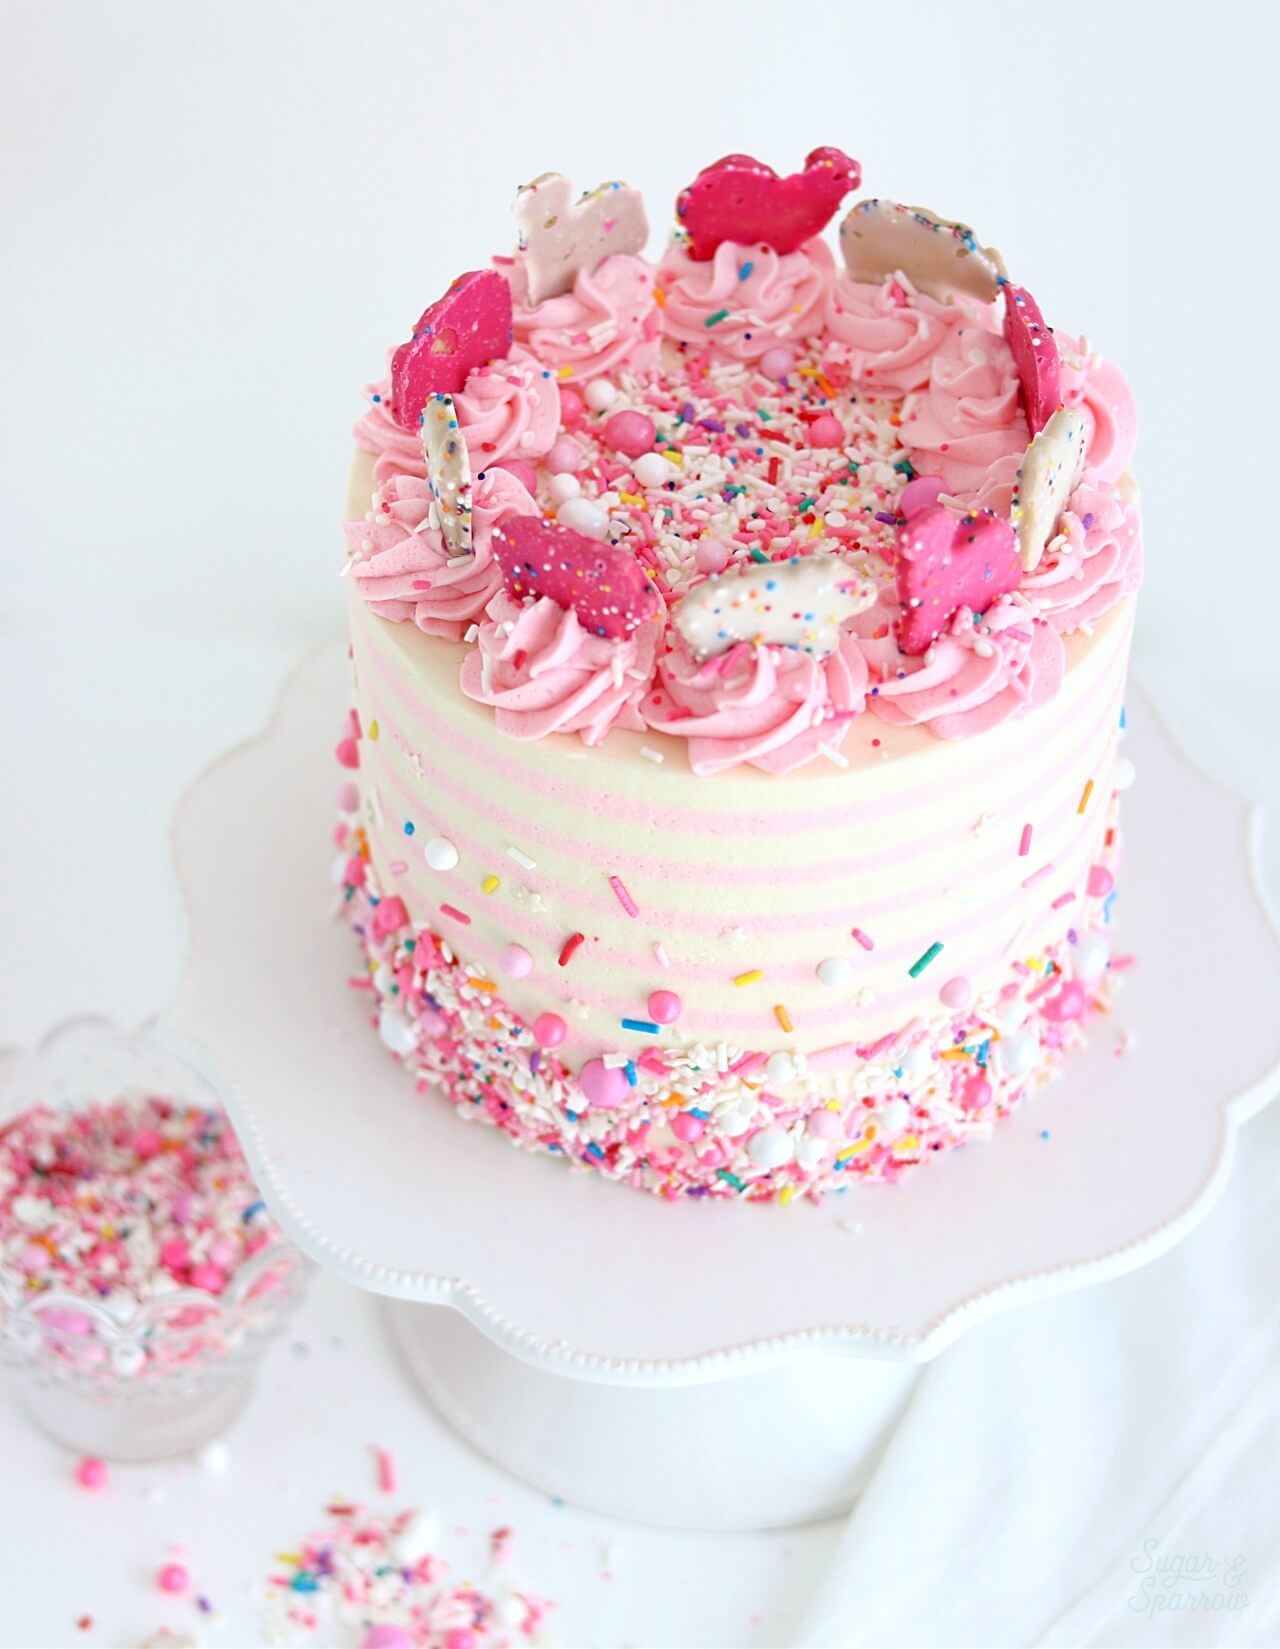
Prepare a piping bag by fitting it with Wilton Tip 1M and filling it with more pink buttercream, then pipe swirls all around the top edge of the cake. Generously add A Frosted Affair sprinkles to the swirl border and fill in the entire top of the cake with more sprinkles if you’d like. Then, place a Circus Animal cookie on top of each buttercream swirl.

cake topped with circus animals

And there you have it: a fun, Circus Animal-inspired cake with the prettiest sprinkles ever! It’s perfect for a circus-themed party or to get a little nostalgic.

pink and white striped cak

For more cake tutorial videos, be sure to follow along on my YouTube channel! And if you’re inspired to make this cake, be sure to tag me on Instagram so I can see it. I love to know what you’re caking!

By: Whitney · In: Featured, Tutorials · Tagged: cake decorating, cake tutorial, circus animals cake, frosted circus animals cookies, party cake, pink and white striped cake, sprinklepop, sprinkles, striped buttercream cake, striped buttercream cake tutorial, striped cake

you’ll also love

the best vanilla cupcakes recipeThe Perfect Vanilla Cupcake Recipe
candy cane cake with red and white cake layers and striped buttercreamStriped Candy Cane Cake Recipe
pumpkin layer cake recipe by sugar and sparrowPerfect Pumpkin Layer Cake Recipe

Join the List

Stay up to date & receive the latest posts in your inbox.

Reader Interactions

Comments

  1. Amanda says

    January 1, 2022 at 11:19 am

    Hi there! I want to try making this for my birthday and wanted to ask how many layers does the 6″ cake have? Two layers? Three?

    Thanks for any help!!

    Reply
    • Whitney says

      January 1, 2022 at 11:47 am

      So excited for you to make this cake, Amanda! Happy Birthday!! I used three 6 inch layers for this design 🙂

      Reply
  2. Adetutu says

    July 20, 2020 at 6:06 am

    Lovely nd very easy to know!!!!!

    Reply
    • Whitney says

      July 20, 2020 at 11:49 am

      Thanks so much, Adetutu!

      Reply

Trackbacks

  1. Festa Circo Rosa: ideias de decoração, bolo e lembrancinhas says:
    September 29, 2025 at 6:41 am

    […] Foto: sugar and sparrow […]

    Reply

Leave a Reply Cancel reply

Your email address will not be published. Required fields are marked *

Recipe Rating


Next Post >

Mini Geode Cupcake Toppers Tutorial

Primary Sidebar

Welcome to Sugar & Sparrow

Welcome to Sugar & Sparrow

Helping you whip up pretty desserts with confidence and creativity. And hopefully sharing a few laughs with you along the way!

Learn More

Connect

let’s bake!

Get my very best recipes, baking tips, and decorating tutorials sent to your inbox

Featured Posts

goodie girl cookies

Goodie Girl Cookie Cupcakes + Giveaway!

hot cocoa cake recipe with homemade marshmallow filling

Hot Cocoa Cake with Homemade Marshmallow Filling

The best easter dessert recipes

24+ Best Easter Dessert Recipes

Search

Archives

Follow Along

@sugarandsparrowco

Everything I baked in June☀️I was so motivated to Everything I baked in June☀️I was so motivated to bake this month (summer flavors had me INSPIRED!) and could barely keep up with myself but I ended up publishing 7 new recipes on my website + finalized 5 more that will be up ASAP! 

Comment “JUNE” to get all the recipes that are available now:

-Cookie Dough Ice Cream Cake
-Rocky Road Cupcakes (w/ homemade marshmallow creme filling!)
-Blackberry Lavender Cake
-Homemade Blackberry Filling
-Whipped Cream Cheese Frosting
-Strawberry Shortcake Cookie Bars
-Berries & Cream Sheet Cake

https://sugarandsparrow.com/everything-i-baked-in-june
 
#cake #bakersofinstagram #baking #bakinglove #cakedecorating
WHIPPED CREAM CHEESE FROSTING ☁️ this easy 4-ingre WHIPPED CREAM CHEESE FROSTING ☁️ this easy 4-ingredient whipped cream frosting is deliciously light, comes together SO easily, and is stabilized with cream cheese to make it the perfect thick consistency for filling and frosting cakes and cupcakes!! It’s so good with my strawberry shortcake sheet cake and berries & cream cake and I have a feeling I’m going to be whipping it up for many more summer cakes😍

Full recipe with cake pairing suggestions at https://sugarandsparrow.com/whipped-cream-cheese-frosting/ 

INGREDIENTS 
1 Cup (8oz, 226g) full-fat brick-style cream cheese, cold
1 Cup (120g) powdered sugar
1 tsp pure vanilla extract
2 1/2 Cups (600ml) heavy whipping cream, cold

INSTRUCTIONS
1. Chill the bowl of your stand mixer (or the large bowl you’ll be using with your hand mixer) into the refrigerator for 20 minutes.
2. Into the cold mixing bowl, add the cream cheese and beat on medium speed with the whisk attachment until creamy, 2 min. Add the powdered sugar and mix on low speed until mostly incorporated, then turn the mixer to medium-high speed and mix for 1 min.
3. Add the vanilla extract, then turn the mixer to medium-high speed and slowly pour in the heavy whipping cream (down the side of the bowl so it doesn’t fly everywhere). Once all the cream is added, continue mixing on medium-high for just about 30 seconds longer, keeping a close eye on the mixing bowl to watch it thicken. It should come together into a thick, silky frosting consistency at this point, where you can dip the whisk into the frosting and it holds a slight peak when you hold it upright.
4. Use the frosting immediately to decorate cakes and/or cupcakes for best results!

#whippedcreamfrosting #creamcheesefrosting #cakedecorating #whippedcream #frosting
TOP 10 4TH OF JULY DESSERTS 🎆 These are just a few TOP 10 4TH OF JULY DESSERTS 🎆 These are just a few of my favorite summer dessert recipes that will disappear at any Fourth of July celebration.

Comment “JULY” and I’ll send you all 20+ of my favorite 4th of July dessert ideas – naturally red white and blue desserts like my berries and cream cake, easy no-bake desserts, no-churn ice cream, strawberry shortcake inspired recipes, and all the treats that will go FAST at any barbecue.

https://sugarandsparrow.com/4th-of-july-desserts/

#fourthofjuly #4thofjuly #summerdessert #partycake #dessertideas
STRAWBERRY SHORTCAKE COOKIE BARS 🍓my hot take: str STRAWBERRY SHORTCAKE COOKIE BARS 🍓my hot take: strawberry shortcake toppings on a buttery, soft sugar cookie base is WAY BETTER than traditional strawberry shortcake. I topped my favorite sugar cookie bar recipe with silky whipped cream cheese frosting + homemade strawberry sauce and now I’m ruined 😵

Full recipe is linked in my bio + at https://sugarandsparrow.com/strawberry-shortcake-cookie-bars/ 

SOFT SUGAR COOKIE BARS
2 Cups + 2 Tbsp (283g) all purpose flour
1 tsp baking powder
1/2 tsp baking soda
1/2 tsp salt
3/4 Cup (170g) unsalted butter, room temp
1 Cup (200g) granulated sugar
1 large egg
1 large egg yolk
1 1/2 tsp pure vanilla extract

1. Preheat the oven to 350ºF (177ºC). Grease and line an 8-inch square baking pan with parchment paper, leaving a slight overhang for easy release.
2. Whisk together the flour, baking powder, baking soda, and salt. Set aside.
3. Using a stand mixer with the paddle attachment (or hand mixer) cream together the butter and sugar on high speed until pale and fluffy, 2-3 min.
4. Turn the mixer to medium and add the egg, egg yolk, and vanilla. Mix until combined, then add the flour mixture and mix on low speed until a uniform cookie dough forms.
5. Press the cookie dough into the prepared pan in an even layer, all the way to the edges. Bake for 18-20 minutes, until the edges are just starting to brown. 
6. Cool the sugar cookie bars in the pan for 30 minutes, then transfer to a wire rack to cool completely. Top with whipped cream cheese frosting and strawberry sauce (full recipe linked in my bio!)

#strawberryshortcake #strawberries #whippedcreamfrosting #cookiebars #sugarcookies
BLACK FOREST CAKE 🍒 this is my favorite thing to m BLACK FOREST CAKE 🍒 this is my favorite thing to make during cherry season! My version is decadent chocolate cake soaked with homemade cherry syrup, fresh cherry filling, and whipped cream frosting. Top it with a chocolate ganache drip if you want to go the extra mile! 

Full recipe + decorating tutorial is linked in my bio + at https://sugarandsparrow.com/black-forest-cake-recipe/

PS I’m working on a sheet cake version of this recipe that’s even easier! Stay tuned.

#blackforestcake #cherrycake #chocolatecake #cherries #cakedecorating

Footer

On the Blog

  • Cake Basics
  • Recipes
  • Tutorials

Info

  • About
  • Privacy Policy & Disclosure

stay in the know

Copyright © 2026 · Theme by Sugar & Sparrow