• Cake
  • Frosting
  • YouTube
  • My Favorite Tools
  • Nav Social Icons

  • Skip to primary navigation
  • Skip to main content
  • Skip to primary sidebar
  • Skip to footer
  • Recipes
    • Cake
    • Cupcakes
    • Frosting
    • Ice Cream
    • Vegan
  • Cake Basics
  • Tutorials
  • Blog
  • About
  • Mobile Menu Widgets

    Connect

    Search

Sugar & Sparrow logo in script font

Sugar & Sparrow

Lifestyle and Cake from Portland Oregon

  • Cake Basics
  • Recipes
    • Cake
    • Cupcakes
    • Cookies & Bars
    • Filling
    • Frosting
    • Ice Cream
    • No-Bake
    • Small Batch
    • Vegan
  • Tutorials
  • Book
  • Blog
  • About

How to Package and Transport Cakes (with Minimal Stress!)

December 30, 2024 · In: FAQ, Featured

The only thing more stressful than making a custom cake is DRIVING that cake to an event. I’ve found this to be true whether the cake is for celebrating the biggest day of someone’s life or for a dear friend who would love you regardless of what condition the cake arrived in. Every speed bump, twist, and turn can feel like a mini panic attack. Over the years I’ve learned (through much trial and error) how to safely transport a cake from point a to point b with minimal stress, and a lot of it comes down to packaging the cake properly.

how to package a cake for transporting

Disclaimer: This post contains affiliate links to the products I use and have found helpful, and I do receive a small commission from your purchases. Thank you for your support! 

Cake Boards 

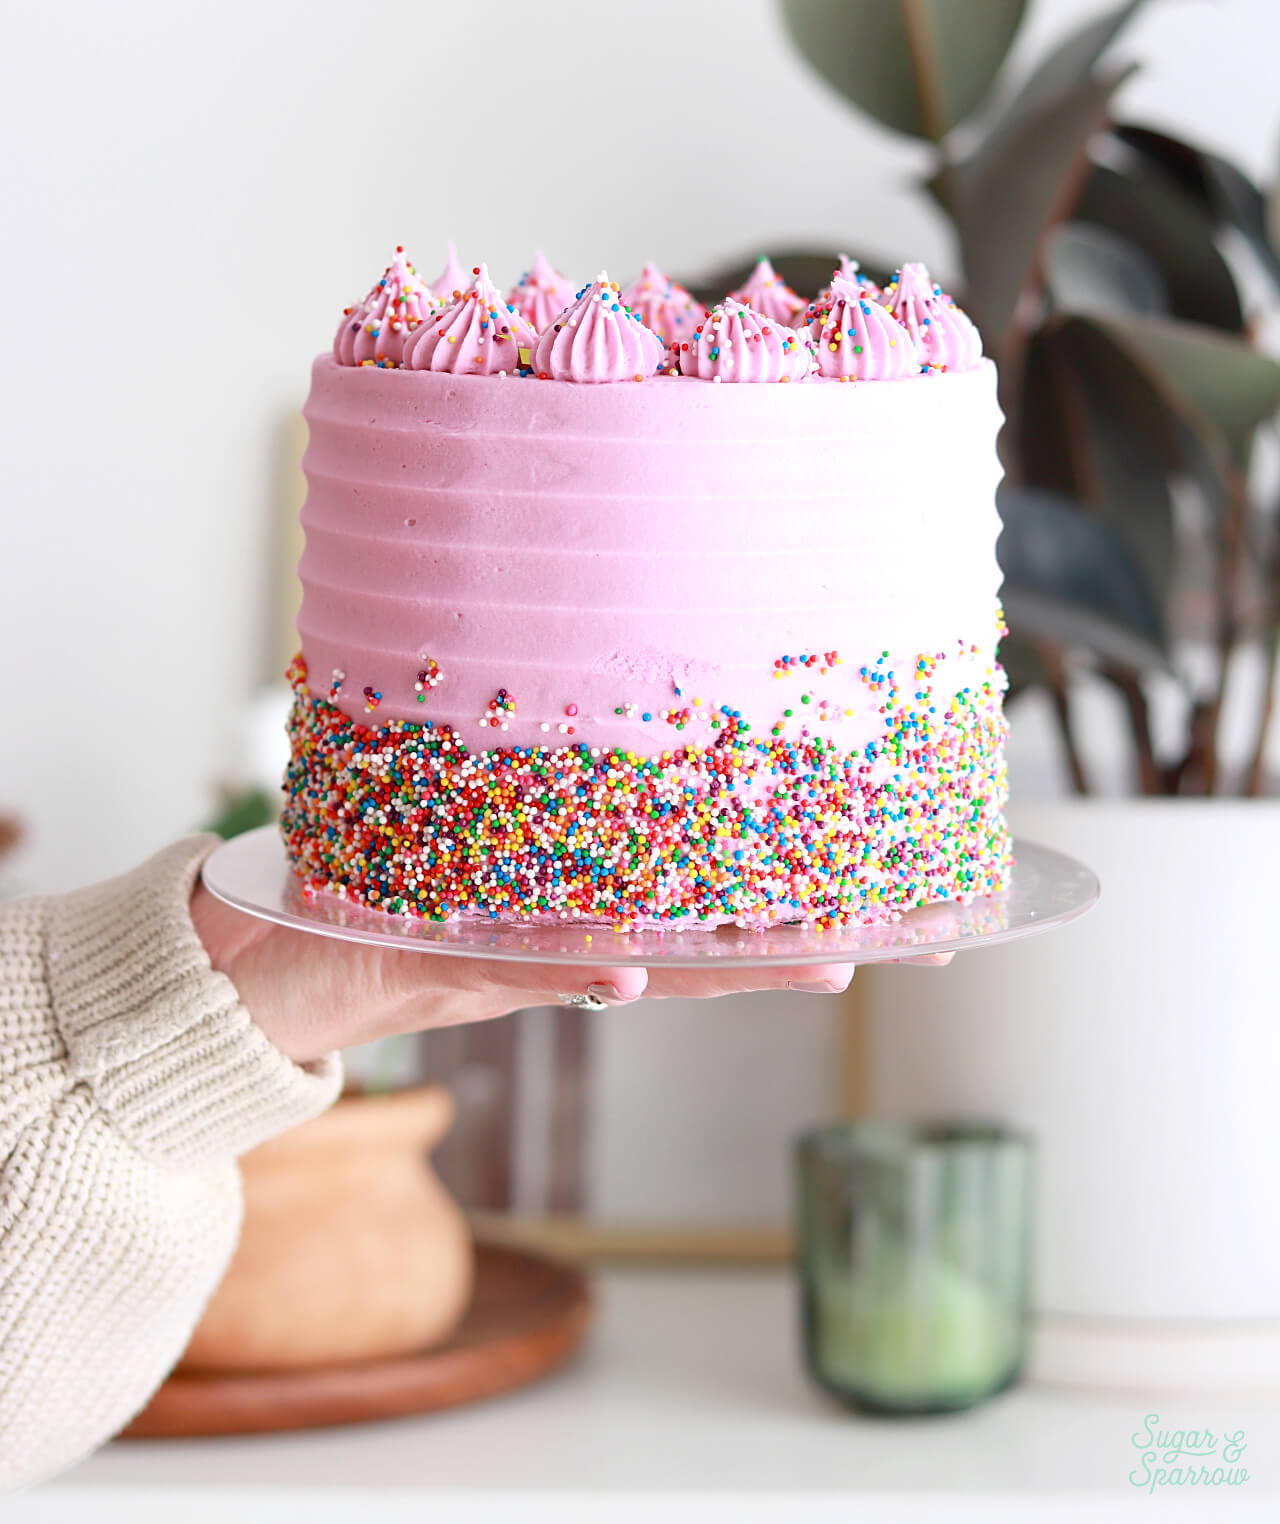
To easily lift and move your cake from the turntable (or refrigerator) into a box, I recommend decorating it on a cake board that’s bigger than the diameter of your cake. This gives you a nice edge to grip and carry around without ruining your frosting. I like to use acrylic disks like these because they’re clear, reusable, easy to clean, and won’t get greasy from buttercream like a non-coated cardboard cake circle would. If you’d rather use a disposable option, these oil-proof cake circles will keep your presentation looking great. 

cake rounds for cake decorating

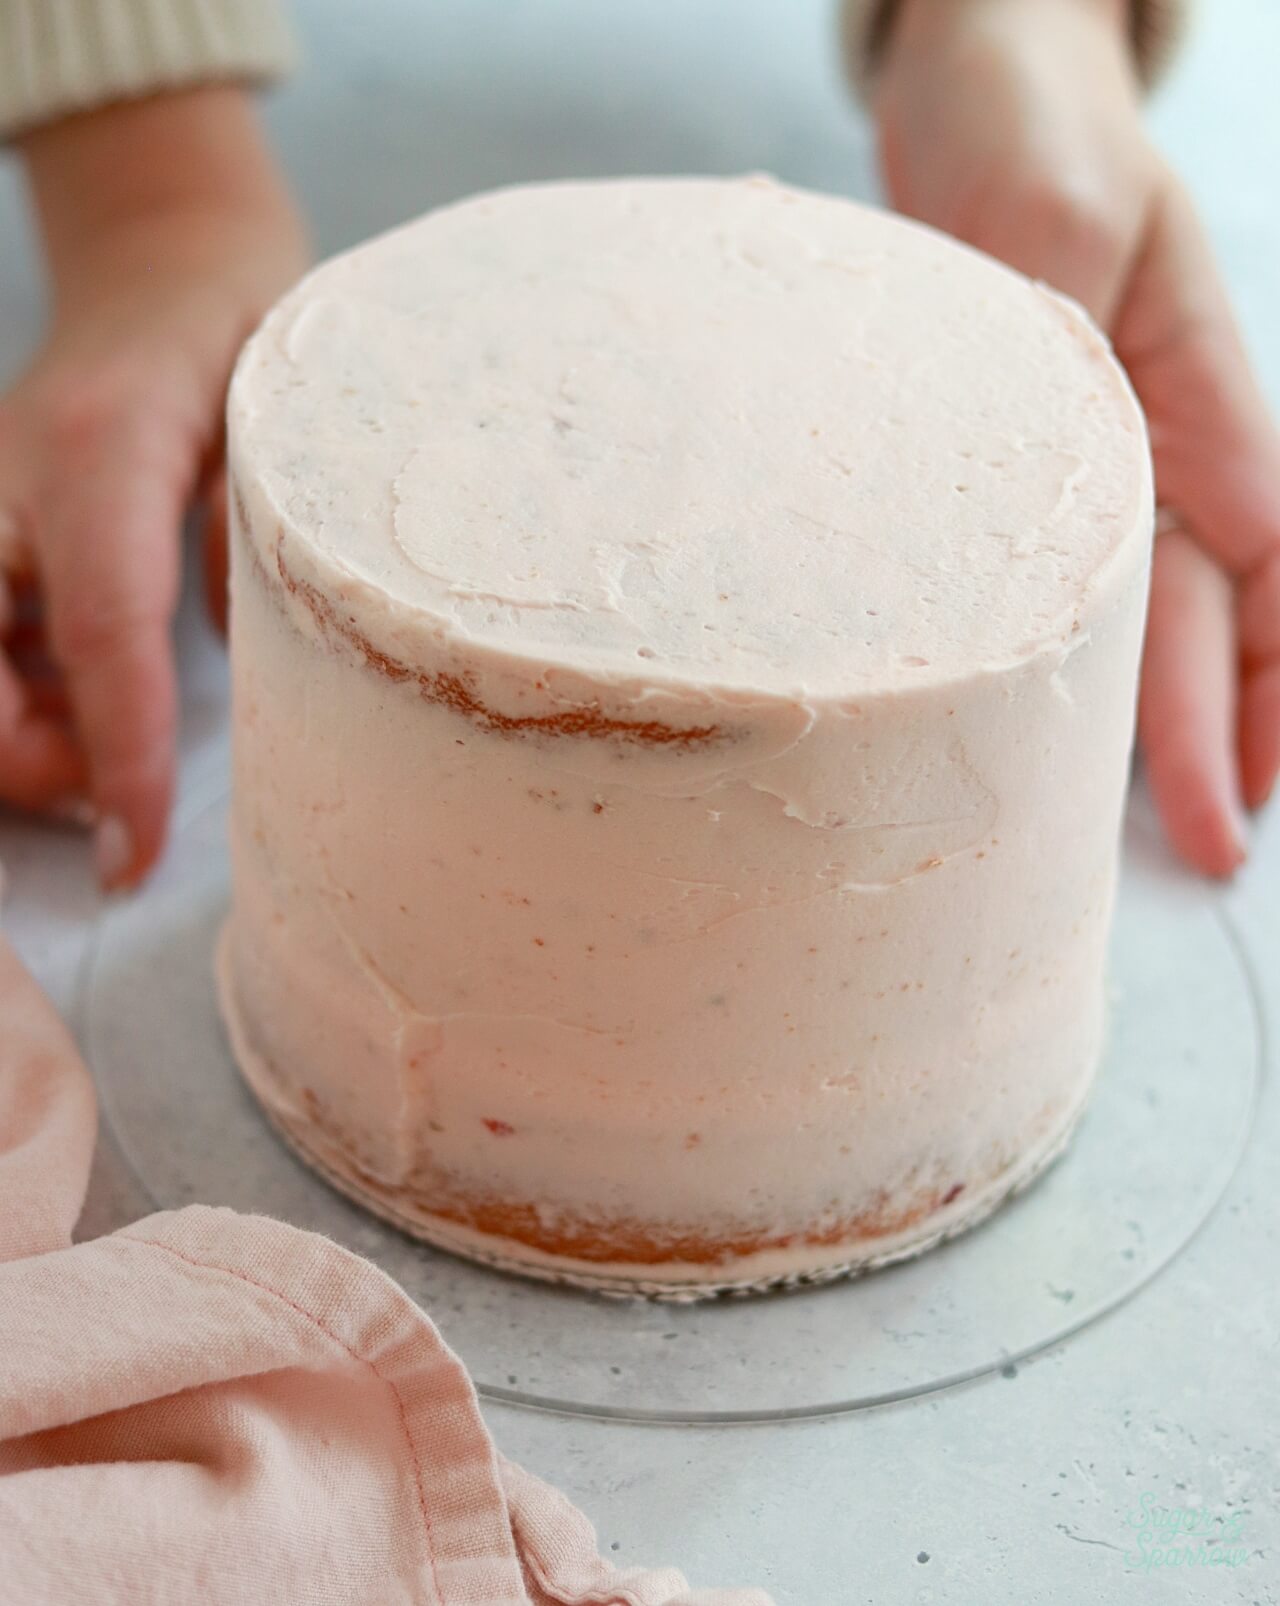
If you’re wondering about sizing, I generally opt for a diameter that’s 2 inches wider than my cake (8-inch cake circle under a 6-inch cake, 10-inch cake circle under an 8-inch cake, and so on). 

Non-Slip Pads

I was wandering the aisles at my local grocery store when I saw these multi-use grippers and thought these are perfectly shaped non-slip pads I could use for my cakes. Turns out I was onto something, because I use them ALL THE TIME. 

nonslip pad for cakes

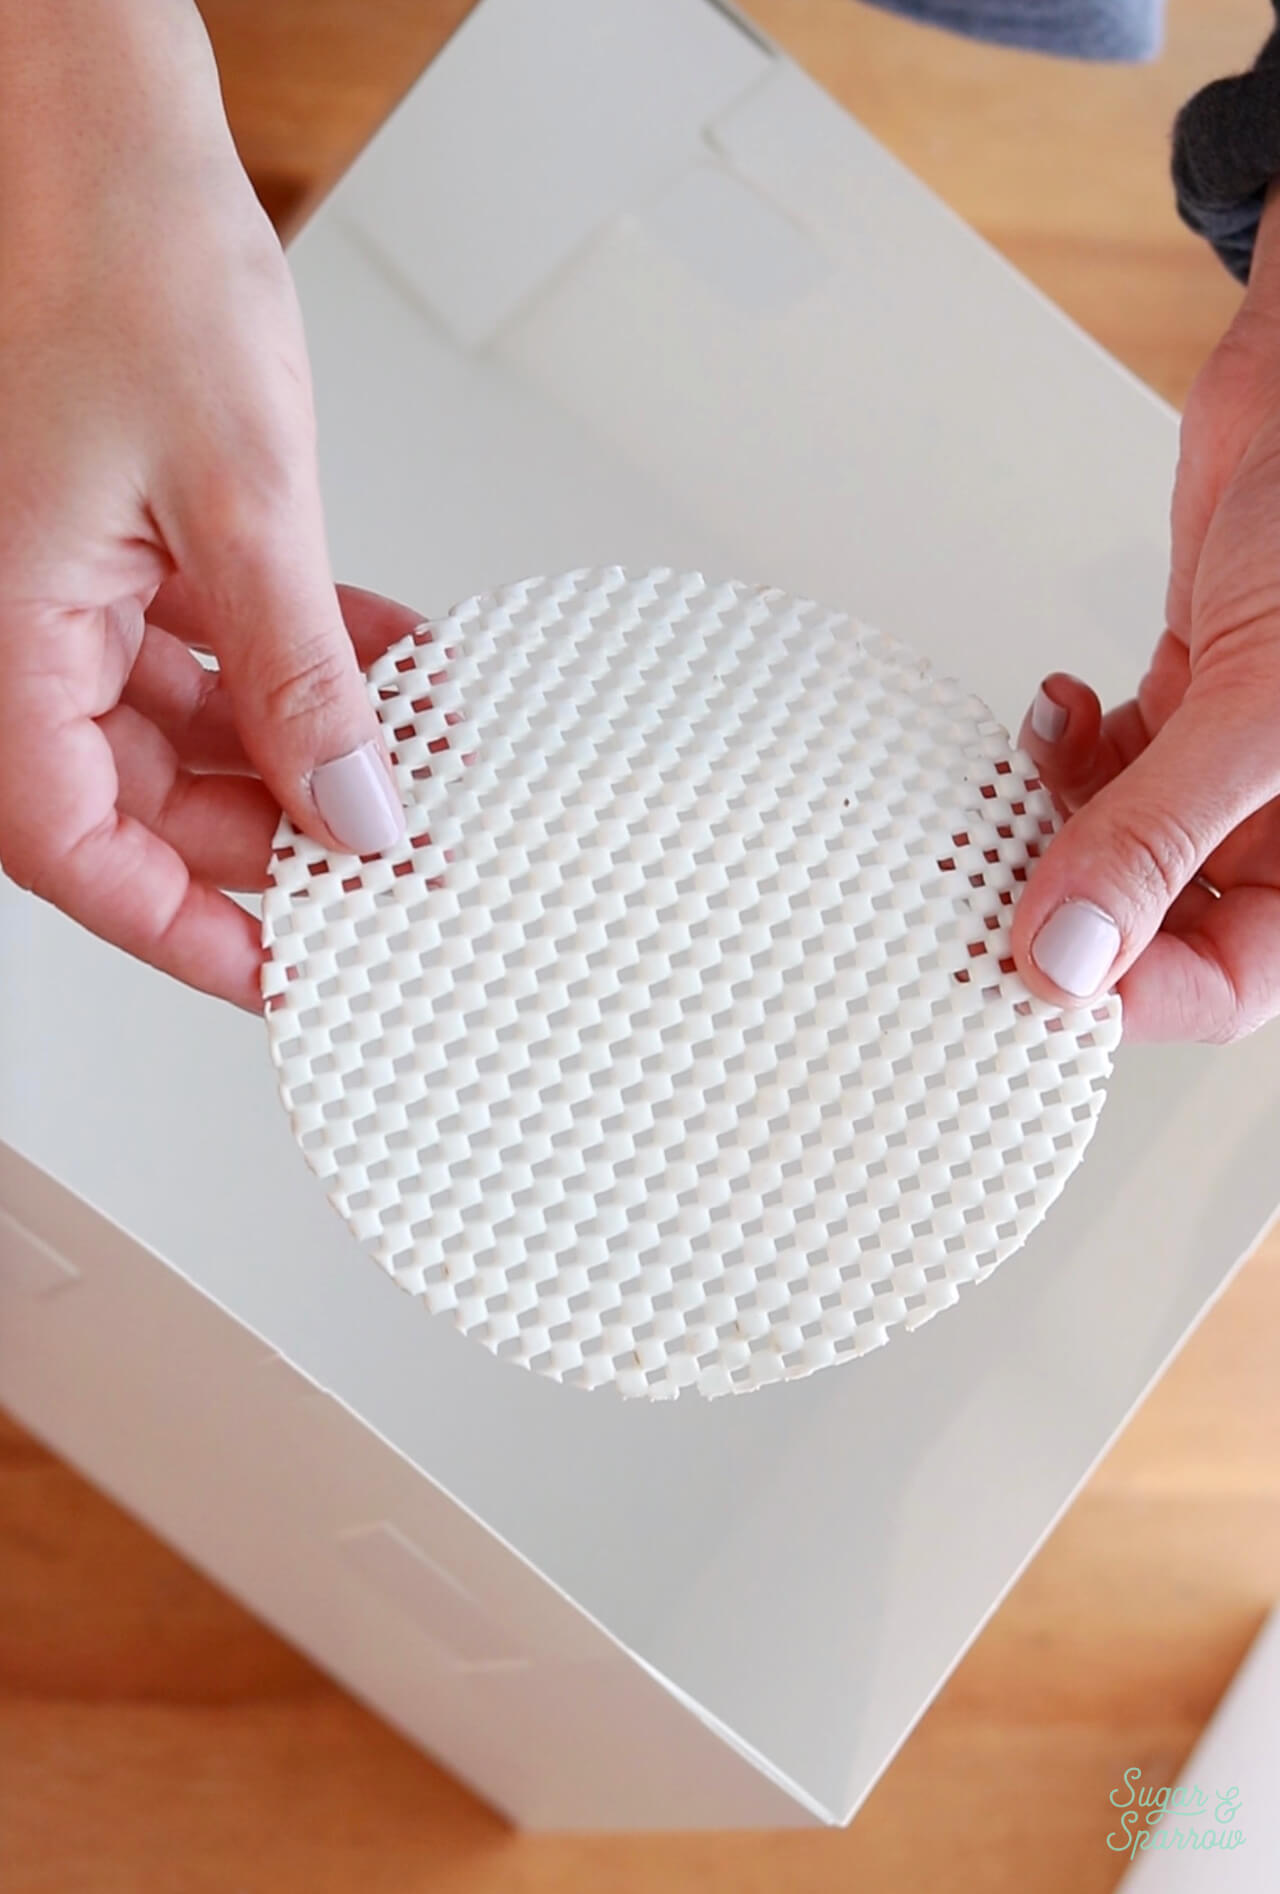
I place them underneath my cake board when decorating on the turntable so the cake doesn’t slide around while I’m frosting it. I place them inside my cake boxes before putting the cake in so the cake doesn’t slide around in the box while I’m driving. It can be totally heart-wrenching to take a turn too sharp and hear the sound of your cake sliding into the side of the box, ruining some of your pretty decorating. Having a non-slip pad is a game changer! 

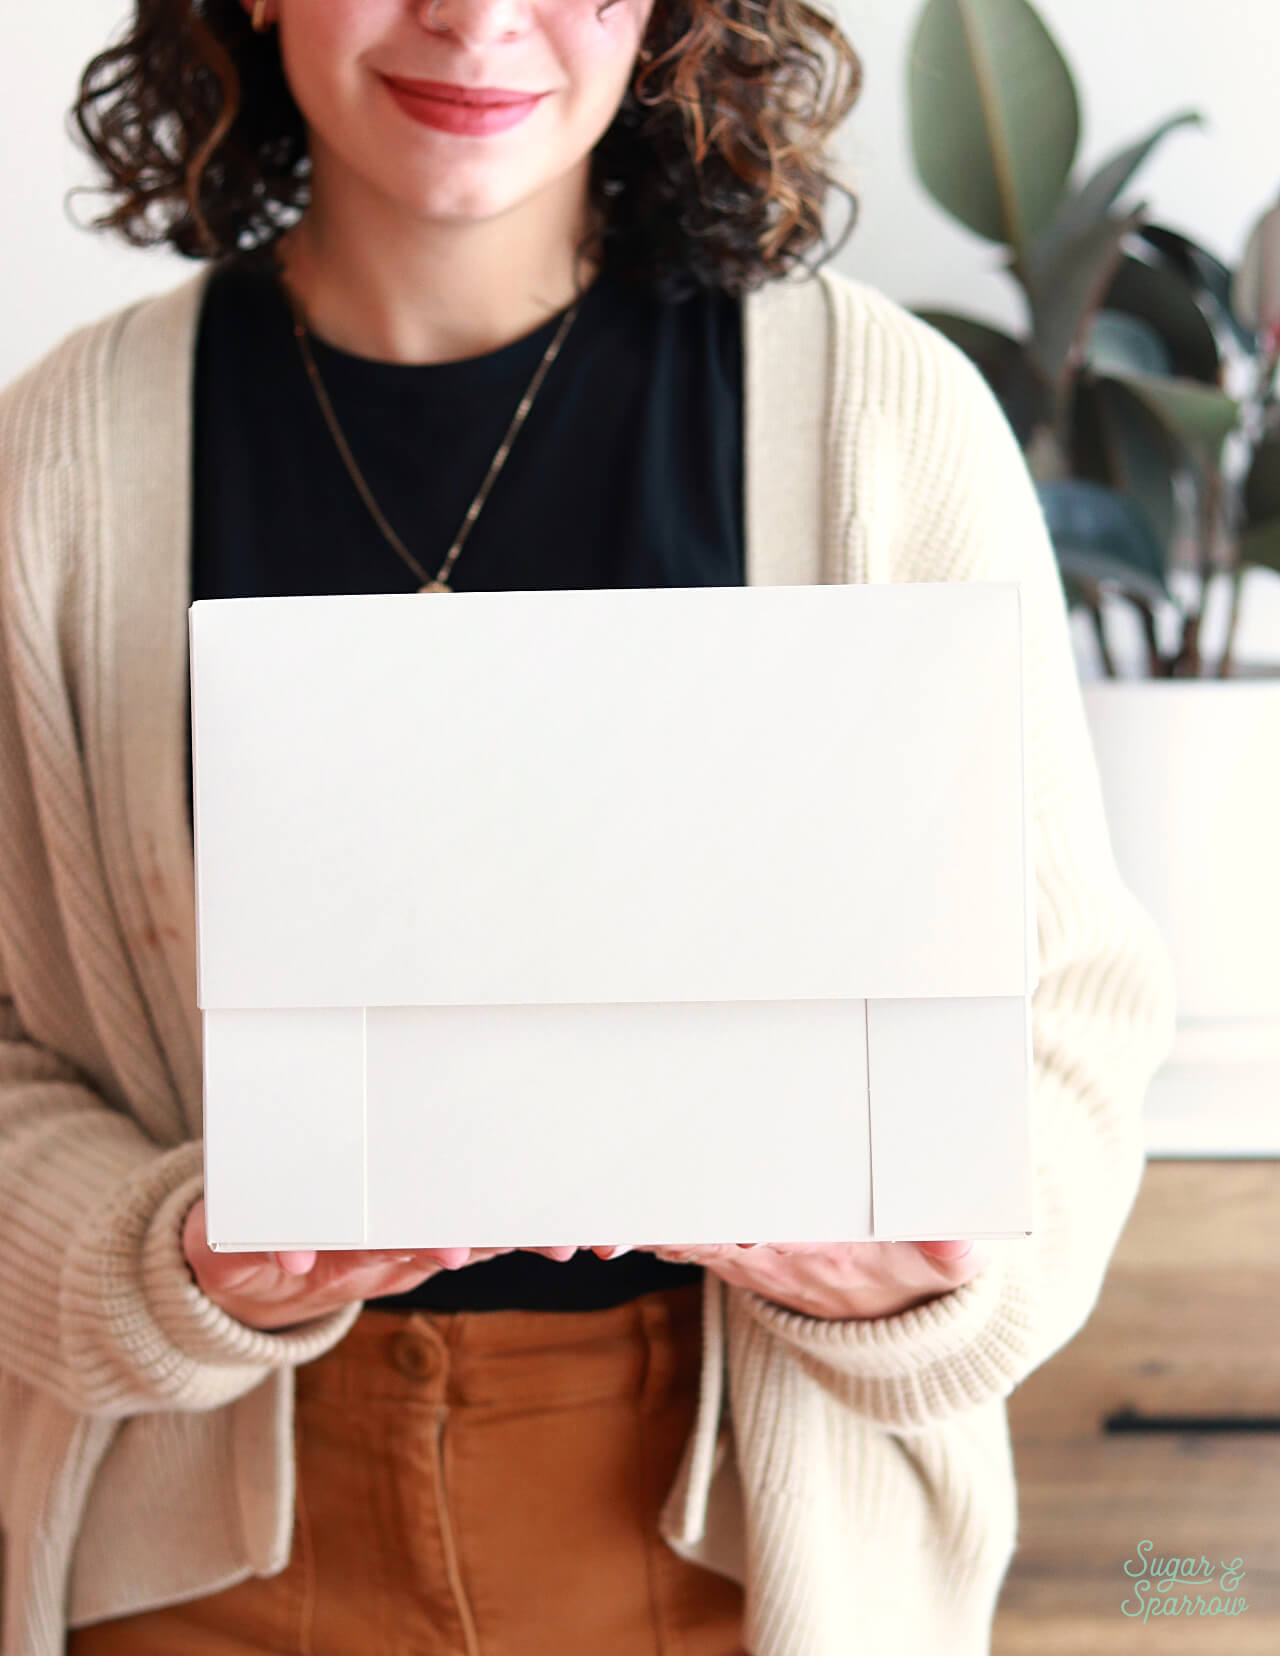
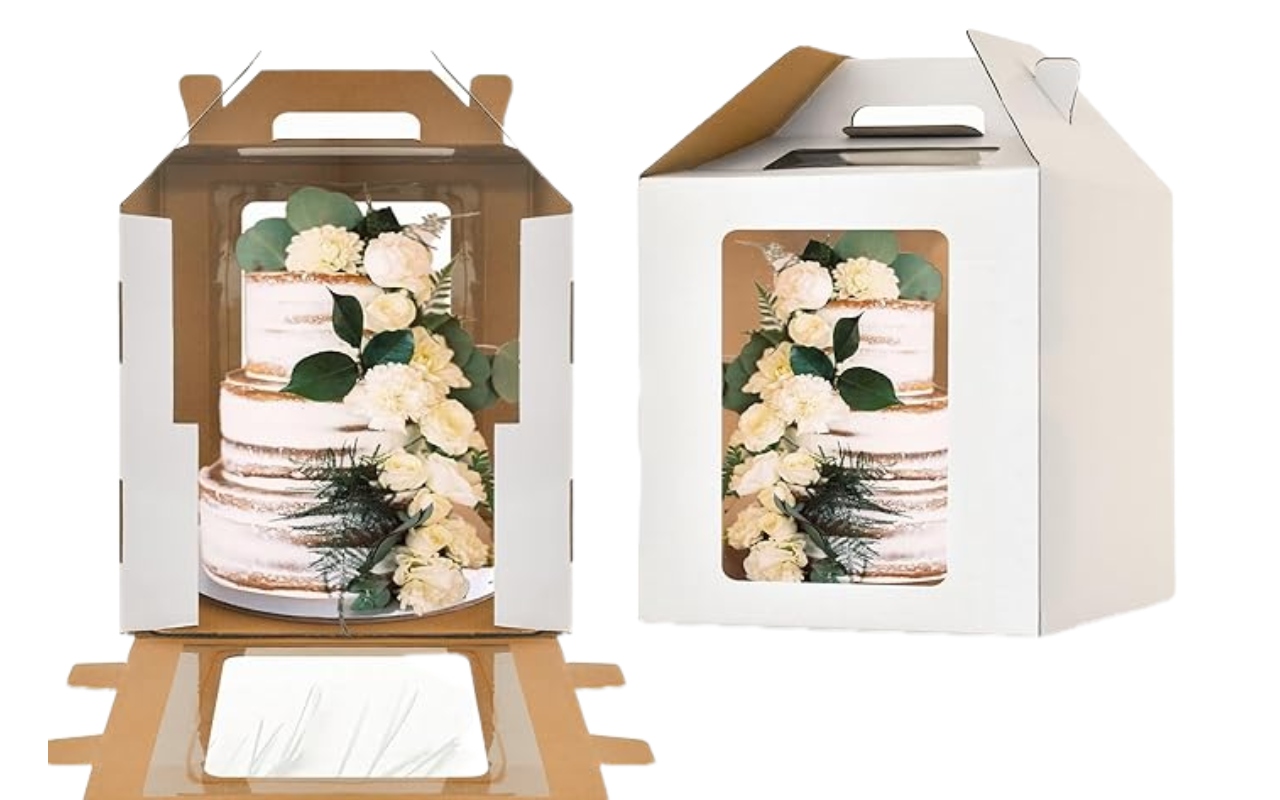
Boxes for Tall Cakes 

For the better half of my career as a home baker, I was using cake boxes that were not tall enough to fit the height of my cakes. That meant delivering cakes with the top of the box off, or taping skewers inside the box to make the lid sit taller. Both of those methods work, but they’re not the most professional. 

boxes for tall cakes

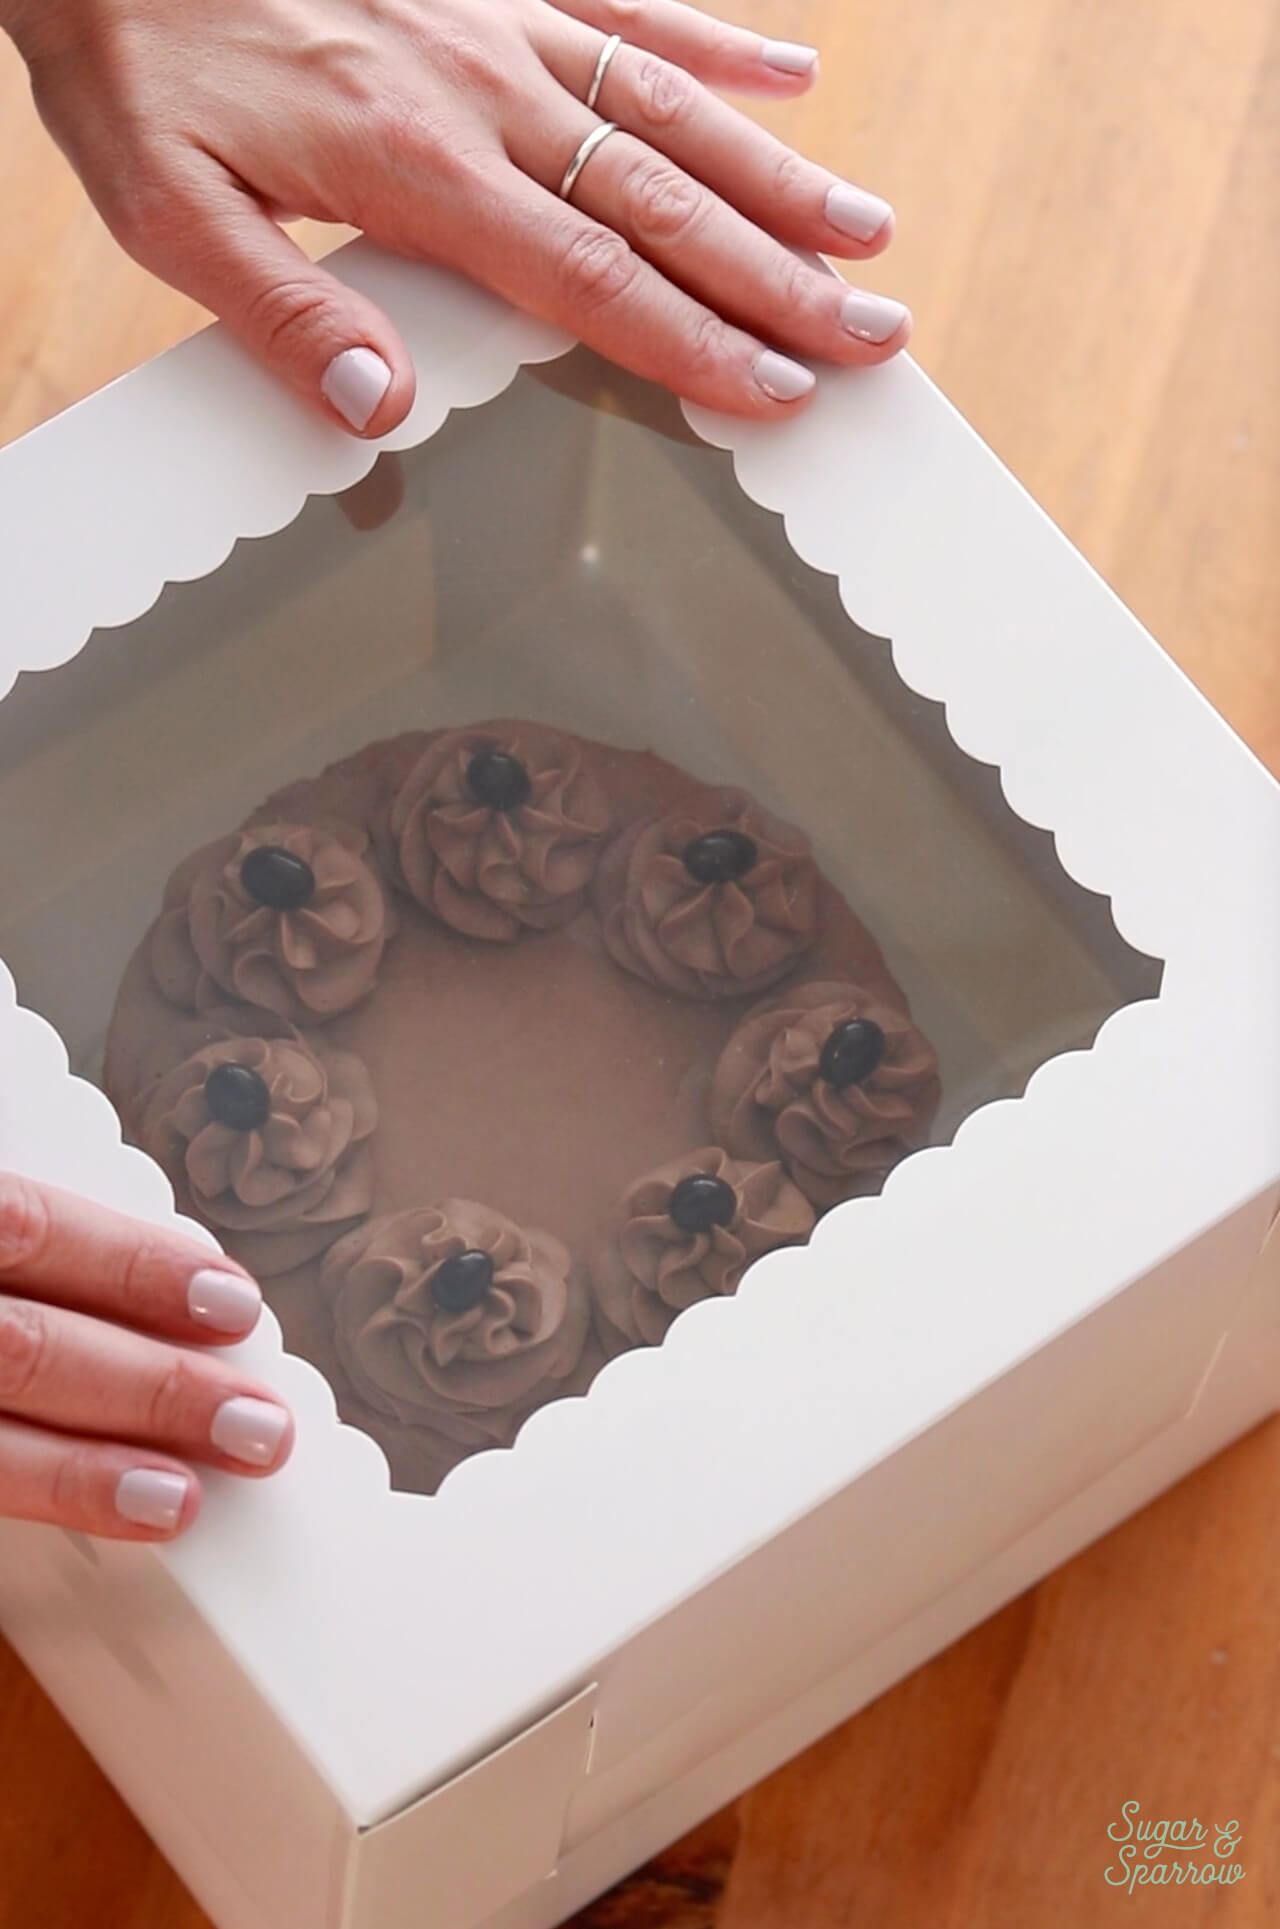
The vast majority of my layer cakes end up being about 6 inches tall. So when I found these boxes on Amazon that are 8 inches tall I was excited to try them. They’re 10-inches wide, so they’ve been awesome for cakes that are 6-inch or 8-inch diameter. And I love that they have a little window at the top to show off your cake. 

how to package a cake for delivery

Boxes for Small Cakes + Cupcakes

For 4-inch layer cakes, I like to use these 6-inch cake boxes. My 4-inch cakes tend to be three layers high and stand at about 4 inches tall including the border piped on top, and since these boxes are 5 inches tall, this cake size fits perfectly. 

If you want to make sure your cupcakes stay perfectly decorated and don’t slide around in the box, you’ll want to opt for a box with cupcake inserts. Inserts have perfectly sized holes to put each cupcake in and keep them all separated and situated. 

how to transport cupcakes

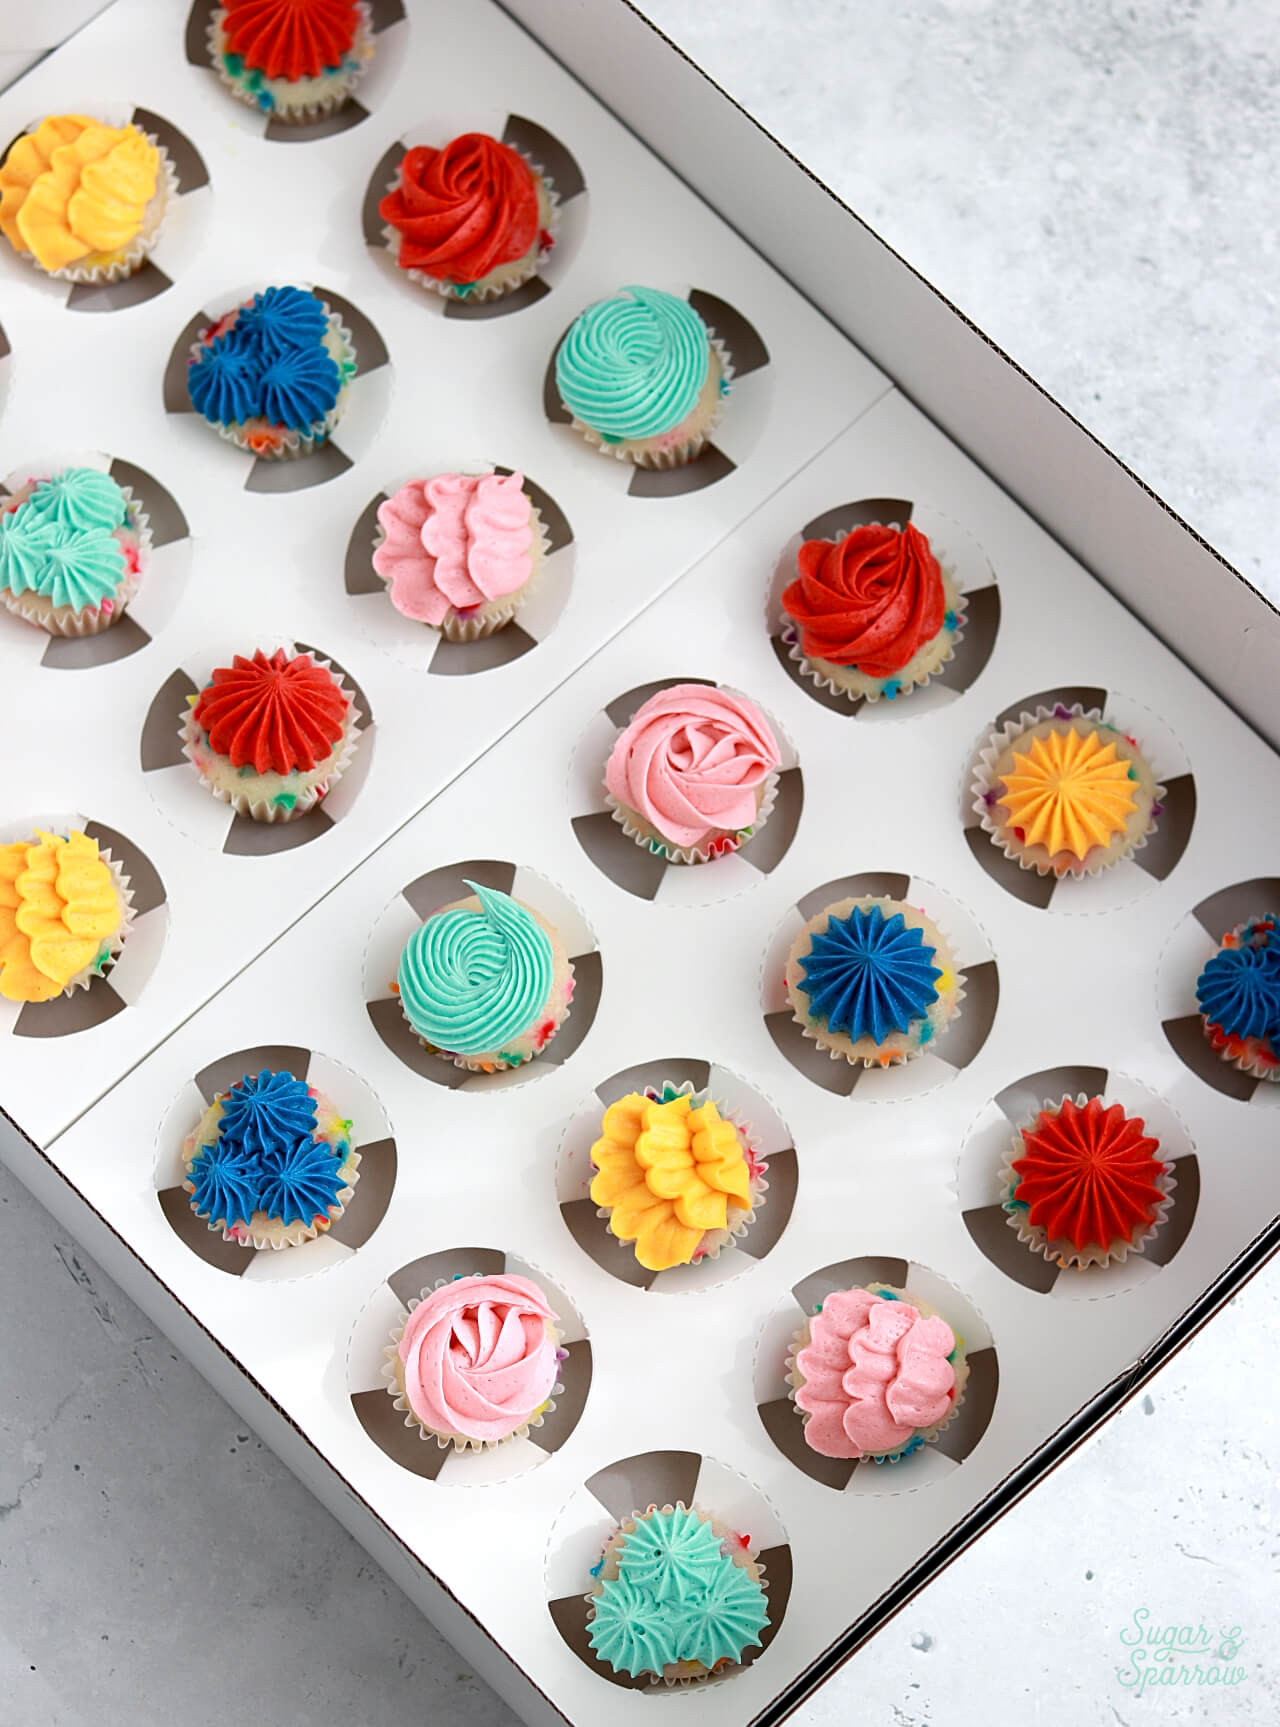
I recommend the same setup for mini cupcakes and these are the boxes I use for those. 

Boxes for Tiered Cakes 

There are two methods of transporting when it comes to tiered cakes: assembled or unassembled. If you’re transporting an assembled tiered cake, it means you’ve already stacked the tiers on top of one another and you’re ready to drive an extra tall cake to an event. You can either package the cake in an extra wide and tall cake box like this or even a thick cardboard box without a lid. If you’re looking to invest in a reusable tiered cake box, this one by CakeSafe is built to ensure your tiered cakes stay perfect during transport. 

boxes for transporting tiered cakes

If you’re transporting an unassembled tiered cake, it means you’ve decorated each tier separately and you will be stacking the tiers at your event. For this method, you can package each cake tier in a separate box. Here are some common sizes for cake tiers:

  • 12-inch cake boxes
  • 10-inch cake boxes
  • 8-inch cake boxes
  • 6-inch cake boxes
  • 4-inch cake boxes

Additional Cake Transporting Tips for Success

To make this process as stress-free as possible, here are some final recommendations:

  1. Refrigerate your cake until you’re ready to leave. This will make the frosting nice and firm, minimizing the chances of the layers underneath sliding around and making your cake lopsided.
  2. Carry the cake box from the bottom, not the sides. This will ensure your cake won’t fall out of the bottom of the box in case of gravity. 
  3. Package tall cake toppers. If your cake toppers are taller than your box, leave them off the cake, nicely packaged for transport. You could also simply remove the box lid (if weather permits). 
  4. Crank the air conditioning. Especially for hot weather and/or long drives, you’re going to want your car to feel like a refrigerator. 
  5. Pack a cake emergency kit. In case the cake gets damaged during the transport, I like to be prepared to fix it with a mini repair kit. This is usually just a tote bag with some extra buttercream, icing spatulas, and anything else I used to decorate the cake like piping bags and tips, sprinkles, flowers, etc. This way you can cover up or otherwise patch any damage, should that happen. 
  6. Educate your recipient. While a cold cake is recommended for storing and transporting, it’s going to taste way better at room temperature. Tell your recipient to carry the cake box from the bottom and store it in the refrigerator until at least 1.5-2 hours before serving. If the event is outdoors, make sure the cake will be displayed in a shaded area on a sturdy table. The more you educate them about proper handling of the cake, the less stressed you’ll be about mishaps as you leave the delivery. 

How to Package a Cake for Transport

To recap all of the above info into a handy little tutorial, here’s what I do to package my cakes for easy delivery:

Step 1: Decorate on a Larger Cake Board

Decorate your cake on a larger cake circle than the diameter of your cake. You can either start by placing the bottom cake layer (glued with a swipe of buttercream) right onto that larger circle or fill and stack the cake on a circle the same diameter as your cake layers, crumb coat it, and chill the crumb coated cake. Once the cake is nice and firm and easier to handle, grab a larger cake circle or acrylic disc and place a piece of tape on top (a). Tape the bottom of the cake circle beneath your cake to the larger disc (b, c).  

how to decorate a cake

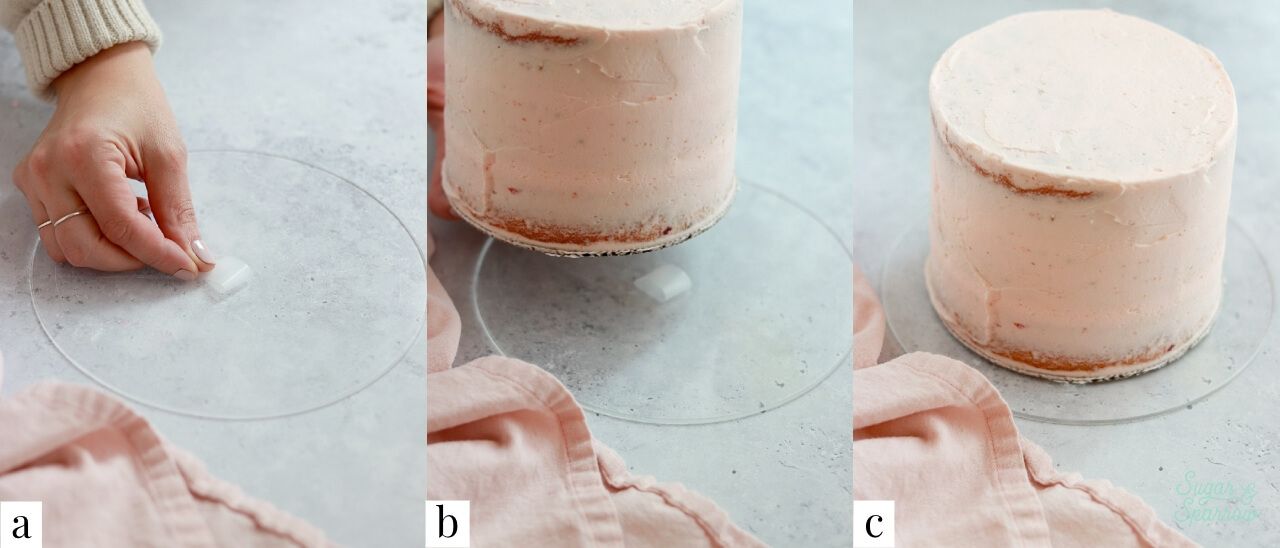
Now the cake will be much easier to handle throughout the decorating process, as you can carry it around by the larger cake disc.

Pink birthday cake

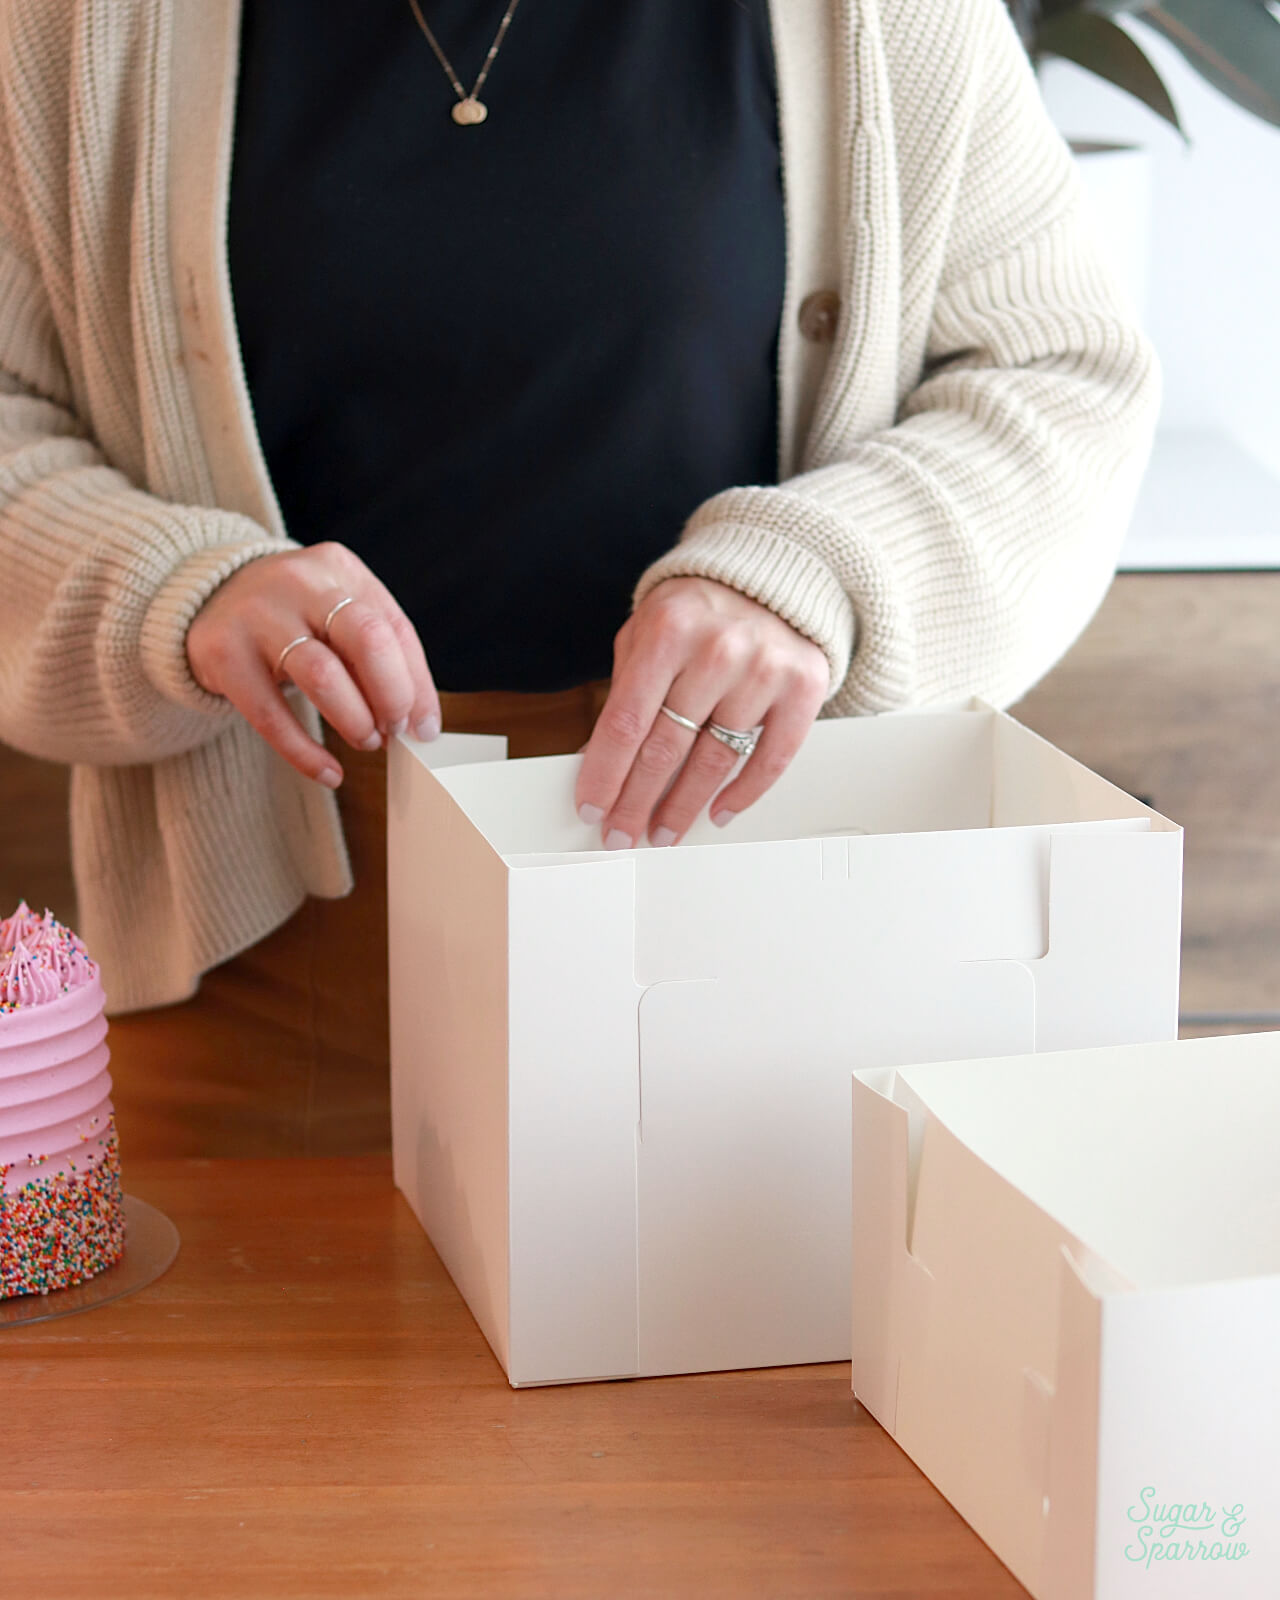
Step 2: Assemble the Cake Box 

Assemble your cake box according to the instructions.  

tall cake boxes

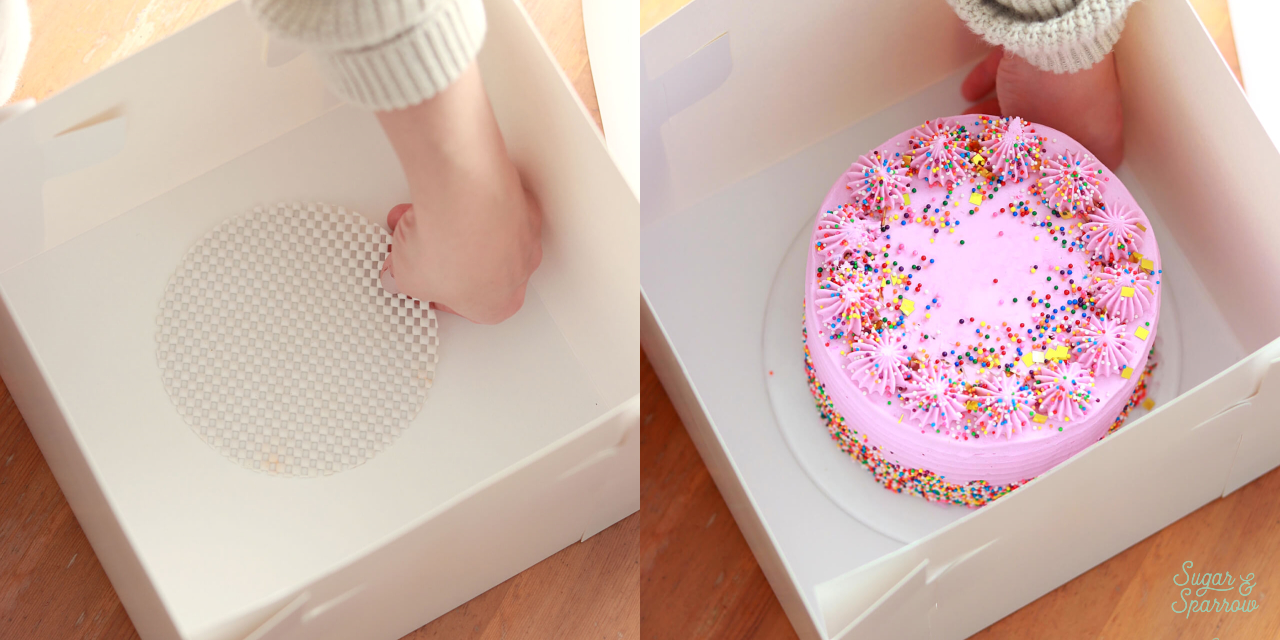
Step 3: Package the Cake  

Place a non-slip pad inside the box and place your cake on top. 

how to package a cake for delivery

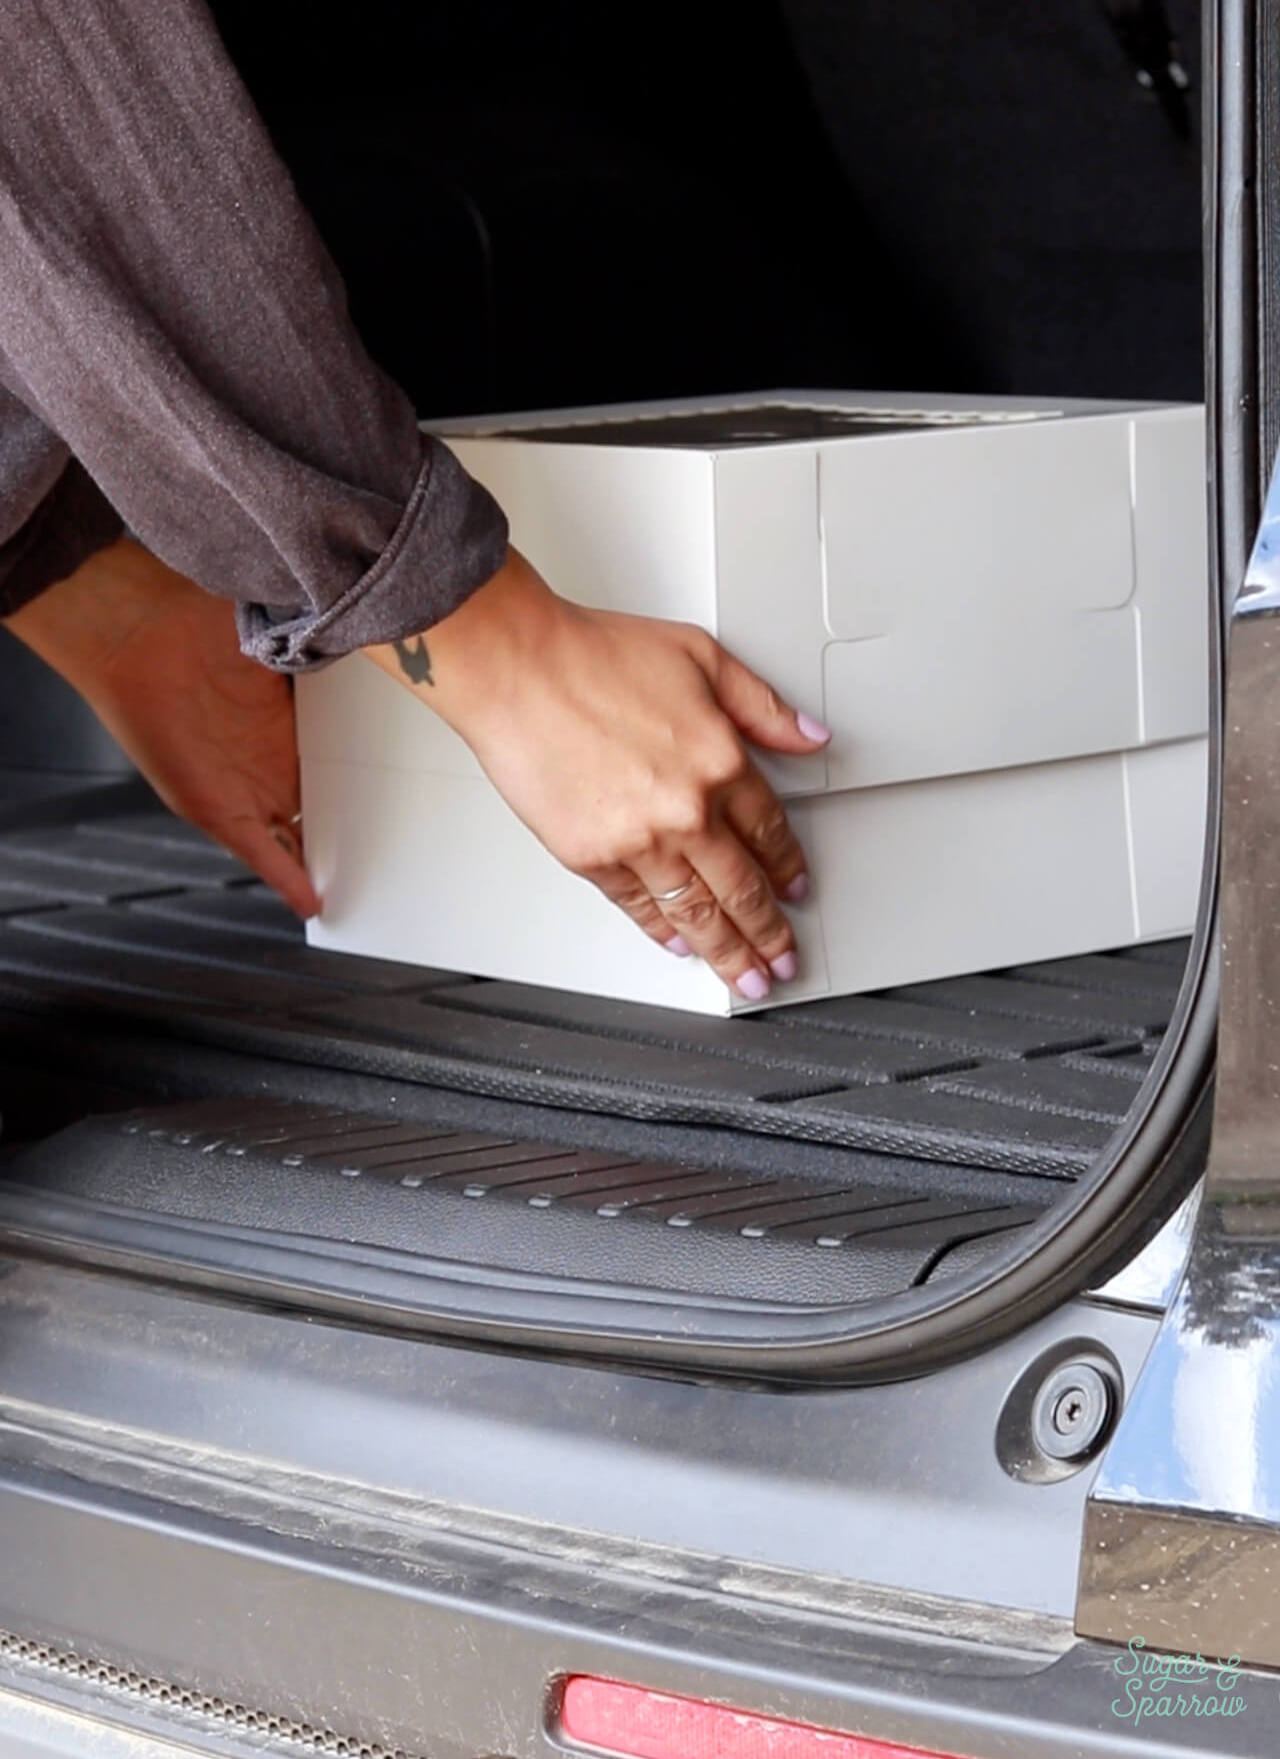
Step 4: Place the Cake in Your Vehicle

Holding the cake box with both hands on the bottom, carry the cake to your car and place it onto a flat surface (such as the floor in front of your passenger seat or the trunk). 

where to place cake in car

Step 5: Crank the Air Conditioning if Needed 

Crank up the air conditioning if it’s a particularly hot day and drive carefully!

Did I answer all your questions about transporting cakes and cupcakes? Let me know if you have more in the comments section below!

By: Whitney · In: FAQ, Featured · Tagged: cake boxes, how to transport cakes, packaging cakes

you’ll also love

buttercream daisy cake tutorial by sugar and sparrowDaisy Cake Tutorial
millionaire's cake recipe from scratchMillionaire Cake (Inspired by Disney World)
how to convert layer cake recipes into cupcakesHow to Bake My Layer Cake Recipes as Cupcakes

Join the List

Stay up to date & receive the latest posts in your inbox.

Reader Interactions

Comments

  1. 12345 says

    November 29, 2025 at 6:01 am

    Is there a safe and easy way to transport one of your 6″ cake recipes (so a tall cake) in a 8″ wide 6″ tall box? How can I make it taller?

    Reply
    • Whitney says

      November 29, 2025 at 4:37 pm

      Hi there! To make a cake box taller I tape skewers or boba straws to the inside corners of the box, then the box lid rests on top of those. Or you can leave the box lid off if the weather will allow. Hope that helps!

      Reply
  2. Bakery Boxes says

    November 11, 2025 at 4:48 am

    Impressive! Thanks for sharing this.

    Reply
  3. Carol M. says

    June 22, 2025 at 7:54 pm

    So detailed and well-explained. Thank you for taking some of the stress out of cake decorating and travel!

    Reply
  4. Jackie says

    April 29, 2025 at 11:54 am

    Hi
    Amazon no longer sell the tall cake boxes, is there any place else I can order those boxes.

    Reply
  5. Renee says

    January 2, 2025 at 3:26 pm

    I like to use silpat (silicone baking mats) lined aluminum baking sheets under the boxes to keep the them from sliding around in the car. If I put it in the backseat I can make it level by using towels which also creates a little nook for it. Also works well if I’m bringing dessert, like pie, to a friends house for dinner. Luckily our Volkswagen sportwagon comes with these velcro cargo blocks for the back area (level) that I use to secure the pan on all four corners. I live in a rural area with winding roads. I gotten good at getting things to their destination in one piece.

    Reply
  6. Victoria says

    January 2, 2025 at 1:32 pm

    SO HELPFUL! I had a slight issue with transporting a cheesecake, the cake board it was on was a little smaller than the box so it slide in the box. It was perfectly fine but when I took the lid off to show the beautiful presentation it was so crooked pushed to the side. I’m going to be on the lookout for those little non slip grip pads. Thank you so much!!

    Reply
  7. Penny Thomas says

    January 2, 2025 at 7:15 am

    Thank you so much for these amazing tips! You explained everything so well!

    Reply
    • Whitney says

      January 2, 2025 at 9:20 am

      Yay, Penny! I’m so happy this post is helpful!!

      Reply

Leave a Reply Cancel reply

Your email address will not be published. Required fields are marked *

Recipe Rating


Next Post >

Christmas Sugar Cookie Dough Cake

Primary Sidebar

Welcome to Sugar & Sparrow

Welcome to Sugar & Sparrow

Helping you whip up pretty desserts with confidence and creativity. And hopefully sharing a few laughs with you along the way!

Learn More

Connect

let’s bake!

Get my very best recipes, baking tips, and decorating tutorials sent to your inbox

Featured Posts

striped buttercream cake

Piped Stripe Buttercream Cake Tutorial

24 fall baking recipes

38+ Fall Baking Recipes

christmas yule log recipe

Yule Log Cake Recipe (Bûche De Noël)

Search

Archives

Follow Along

@sugarandsparrowco

LEMON CUPCAKES 🍋 after about a dozen recipe tes LEMON CUPCAKES 🍋 after about a dozen recipe tests, this one is everything I could want in a lemon cupcake! Fluffy-yet-moist, bursting with natural lemon flavor, and absolutely irresistible topped with lemon cream cheese buttercream. 

Full recipe (with frosting) linked in my bio + at https://sugarandsparrow.com/homemade-lemon-cupcakes/

INGREDIENTS:
1 Cup (132g) all-purpose flour
1 tsp baking powder
1/4 tsp salt
1/4 Cup (60ml) whole milk, room temperature
3 Tbsp (45ml) lemon juice from 1 medium lemon
3/4 Cup (150g) granulated sugar
3 Tbsp (42g) unsalted butter, room temperature
2 Tbsp (30ml) vegetable oil
2 large eggs, room temperature
1 tsp pure vanilla extract

INSTRUCTIONS:
1. Preheat the oven to 350ºF (177ºF) and line a standard cupcake pan with 12 paper liners.
2. In a large bowl, whisk together the flour, baking powder, and salt. Set aside. 
3. In the bowl of a stand mixer fitted with the paddle attachment (or with a hand mixer and large bowl), add the lemon zest to the sugar and mix on low speed until fragrant and well combined, about 1 minute. Meanwhile, combine the lemon juice with the milk and set aside. 
4. Add the butter to the lemon-sugar mixture and cream on medium speed until and combined, about 2 minutes. Add the vegetable oil and beat until light and creamy, about 3 minutes. Scrape down the bowl and paddle as needed.
5. Mix in the eggs one at a time on low speed, then add the vanilla and turn the mixer to medium speed for one minute.
6. Turn the mixer off and add the flour mixture all at once. Mix on low speed until just combined, then slowly pour in the lemon-milk mixture. Mix until just combined, about 30 seconds.
7. Divide the batter equally between the liners and bake for 14-18 min. Cool, then top with frosting of your choice (link in bio for lemon cream cheese frosting)�
#lemoncupcakes #creamcheesefrosting #lemon #cupcakes #cupcakedecorating
April in my kitchen 🌸 I published 5 NEW recipes April in my kitchen 🌸 I published 5 NEW recipes on my site, baked my Oreo cupcake recipe for a fundraiser and found it was just as delicious as I remember, and filmed/photographed 3 recipes that will be on my blog in May (Lemon Cupcakes, Lemon Cream Cheese Buttercream, and No-Bake Marbled Strawberry Cheesecake) 🥰 

Comment “APRIL” to get all the available recipes and stay tuned for more! 

#bakersofinstagram #springbaking #cakedecorating #cupcakes #bakinglove
SHEET PAN COOKIE CAKE 🍪 slice it warm for a fud SHEET PAN COOKIE CAKE 🍪 slice it warm for a fudgy chocolate chip cookie OR let it settle into a moist and chewy cookie cake that’s perfect for decorating! My fave vanilla buttercream + sprinkles turn this giant chocolate chip cookie into the perfect birthday cake alternative at the end 🥳
⁣
Full recipe + decorating ideas at https://sugarandsparrow.com/sheet-pan-chocolate-chip-cookie-cake/
⁣
INGREDIENTS⁣
1 Cup (226g) unsalted butter, melted⁣
1 1/3 Cups (267g) packed light or dark brown sugar⁣
1/2 Cup (100g) granulated sugar⁣
3 large eggs⁣
1 Tbsp pure vanilla extract⁣
1 tsp baking soda⁣
1 tsp cornstarch⁣
1/2 tsp salt⁣
3 Cups (398g) all purpose flour⁣
2 Cups (350g) semi-sweet chocolate chips⁣
⁣
INSTRUCTIONS⁣
1. Preheat the oven to 350ºF (177ºC). Grease and line a 13×18 inch sheet pan.⁣
2. In a large bowl, add the brown sugar and granulated sugar. Melt the butter in the microwave and pour it over the top of the sugars. Whisk together until uniform. Add the eggs and vanilla, then continue whisking until uniform. Whisk in the baking soda, cornstarch, and salt.⁣
3. Add the flour and use a silicone spatula to fold it in until smooth cookie dough forms. Reserve 1/2 Cup of the chocolate chips and set them aside, then fold the remaining 1 1/2 Cups of chocolate chips into the cookie dough.⁣
4. Place the chocolate chip cookie dough onto the prepared sheet pan and use an offset spatula to spread it all the way to the edges in an even layer.⁣
5. Bake the cookie cake for 14-16 minutes, until it looks golden brown on the edges and set. 
6. Enjoy warm or let it cool and decorate with vanilla buttercream and sprinkles! ⁣
⁣
#cookiecake #chocolatechipcookies #sheetcake #birthdaycake #cakedecorating
STRAWBERRY CUPCAKES 🍓based on my beloved strawb STRAWBERRY CUPCAKES 🍓based on my beloved strawberry layer cake recipe, this cupcake version is just as moist yet fluffy and bursting with natural strawberry flavor! Between the mix of fresh strawberries in the cupcakes + freeze-dried strawberries in the frosting, the flavor is out of this world 🚀

Full recipe link in my bio (with strawberry buttercream) + at https://sugarandsparrow.com/strawberry-cupcakes/

STRAWBERRY CUPCAKES
Yield: 14 cupcakes

INGREDIENTS:
5 oz (143g) fresh or frozen strawberries
1/3 Cup (80ml) whole milk, room temp
1 1/2 Cups (158g) sifted cake flour
1 tsp baking powder
1/4 tsp baking soda
1/2 tsp salt
6 Tbsp (85g) unsalted butter, room temp
1 Cup (200g) granulated sugar
2 large eggs, room temp
3 Tbsp (45g) sour cream, room temp
1 tsp vanilla extract
1 drop pink food coloring (optional)

INSTRUCTIONS: 
1. Puree the strawberries using a food processor (you’ll have about 1/2 cup of puree), then place into a saucepan over medium-low heat. Bring to a simmer, then cook for 10-15 min, stirring occasionally, until you have 1/4 cup. Refrigerate until room temp.
2. Preheat oven to 350ºF (177ºC) and line a standard cupcake pan with liners.
3. Whisk together the sifted cake flour, baking powder, baking soda, and salt and set aside.
4. In a stand mixer w/ paddle attachment (or hand mixer + large bowl), whip the butter on high for 2 min. Add sugar and beat for 2 min, until light and fluffy. Turn the mixer to low and add the eggs one at a time, then add the vanilla and sour cream, turn the mixer to high and beat for 1 min. Meanwhile, whisk together the strawberry puree, whole milk, and food coloring (if using).
5. Turn the mixer off and add all of the dry ingredients at once. Mix on low until just combined, then add the strawberry milk mixture until just combined, about 30 seconds.
6. Fill the cupcake liners 2/3 full and bake for 14-18 minutes. Cool completely before topping with strawberry buttercream (full recipe linked above). 

#strawberrycupcakes #strawberrycake #pinkcupcakes #strawberry #cupcakes
COFFEE BUTTERCREAM (recipe below)☕️ this frost COFFEE BUTTERCREAM (recipe below)☕️ this frosting has AMAZING coffee flavor, is so easy to decorate cakes with, and pairs beautifully with so many flavors (chocolate, vanilla, or any cake flavor you’d want to turn into a latte). 

All my cake pairing suggestions are linked in my bio or at https://sugarandsparrow.com/coffee-buttercream-recipe/ 

COFFEE BUTTERCREAM⁣
Yield: 2.5 Cups⁣

INGREDIENTS⁣
1 1/2 tsp instant coffee or espresso powder⁣
1 1/2 Tbsp whole milk, room temperature⁣
1 Cup (226g) unsalted butter, room temperature⁣
3 1/2 Cups (420g) powdered sugar⁣
2 tsp pure vanilla extract⁣
Pinch of salt⁣

INSTRUCTIONS⁣
1. Combine the instant espresso/coffee with the whole milk and set aside. In the bowl of a stand mixer, beat the butter on high until creamy and smooth (about 5 minutes), scraping down the bowl and paddle a few times in between.⁣
2. Turn the mixer to low and add the powdered sugar a few cups at a time, scraping down the bowl and paddle between intervals. Add the vanilla, the coffee/espresso milk mixture, and salt. Mix on low until fully incorporated, about one minute.⁣

#coffeebuttercream #buttercream #frosting #coffeecake

Footer

On the Blog

  • Cake Basics
  • Recipes
  • Tutorials

Info

  • About
  • Privacy Policy & Disclosure

stay in the know

Copyright © 2026 · Theme by Sugar & Sparrow