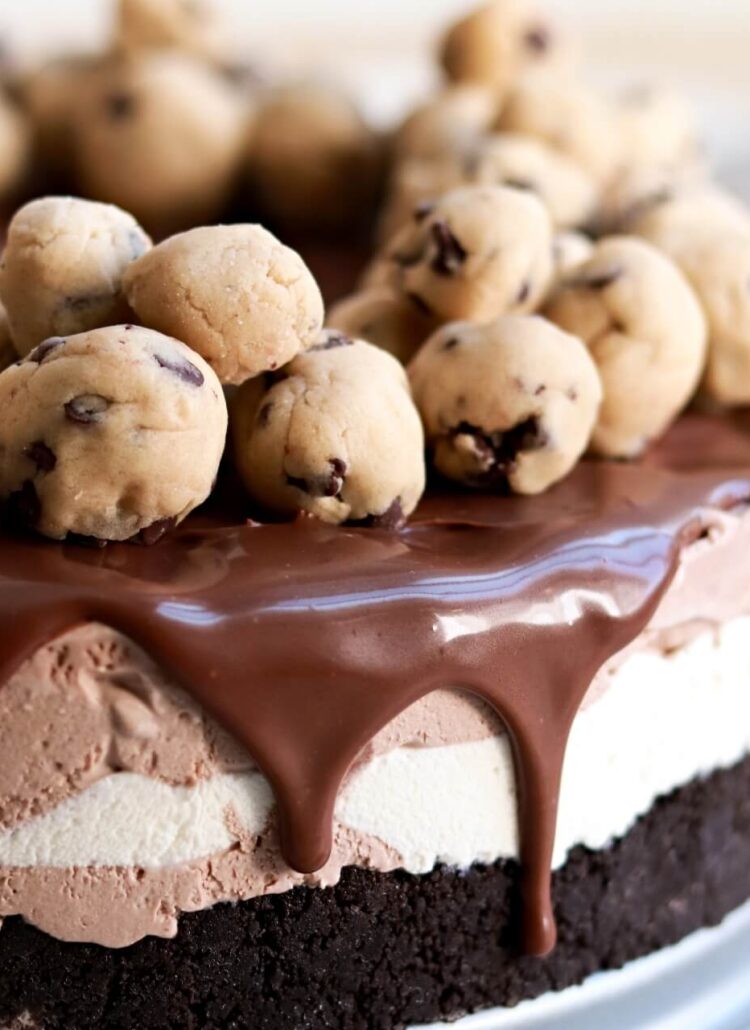
I’m definitely the kind of person who has to eat a little bit of cookie dough every time I’m baking cookies. So naturally, when I learned that there was a way to make edible cookie dough I was very excited about it. And then when I heard that people were using the edible cookie dough as cake filling I had to try it. Turns out that edible cookie dough is delicious, safe to eat (so guilt free pleasure!), and works beautifully as a cake filling in this Christmas sugar cookie dough cake!
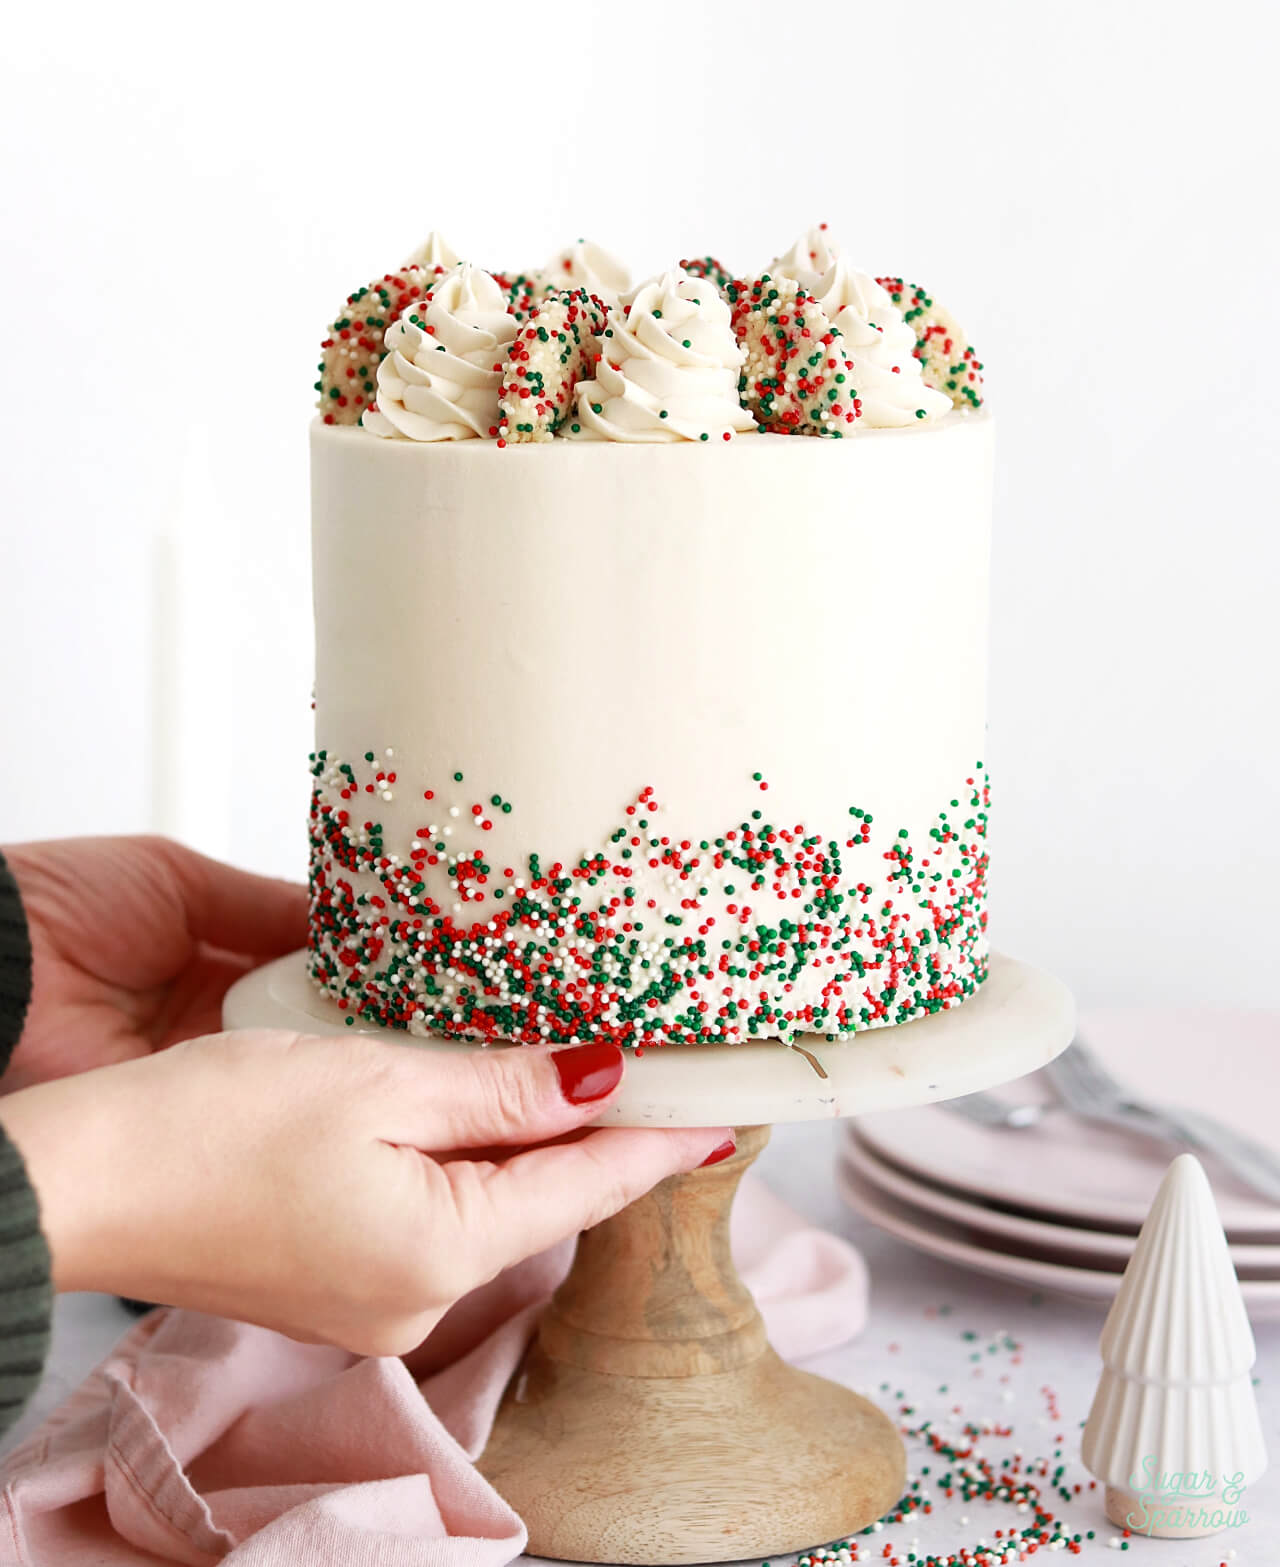
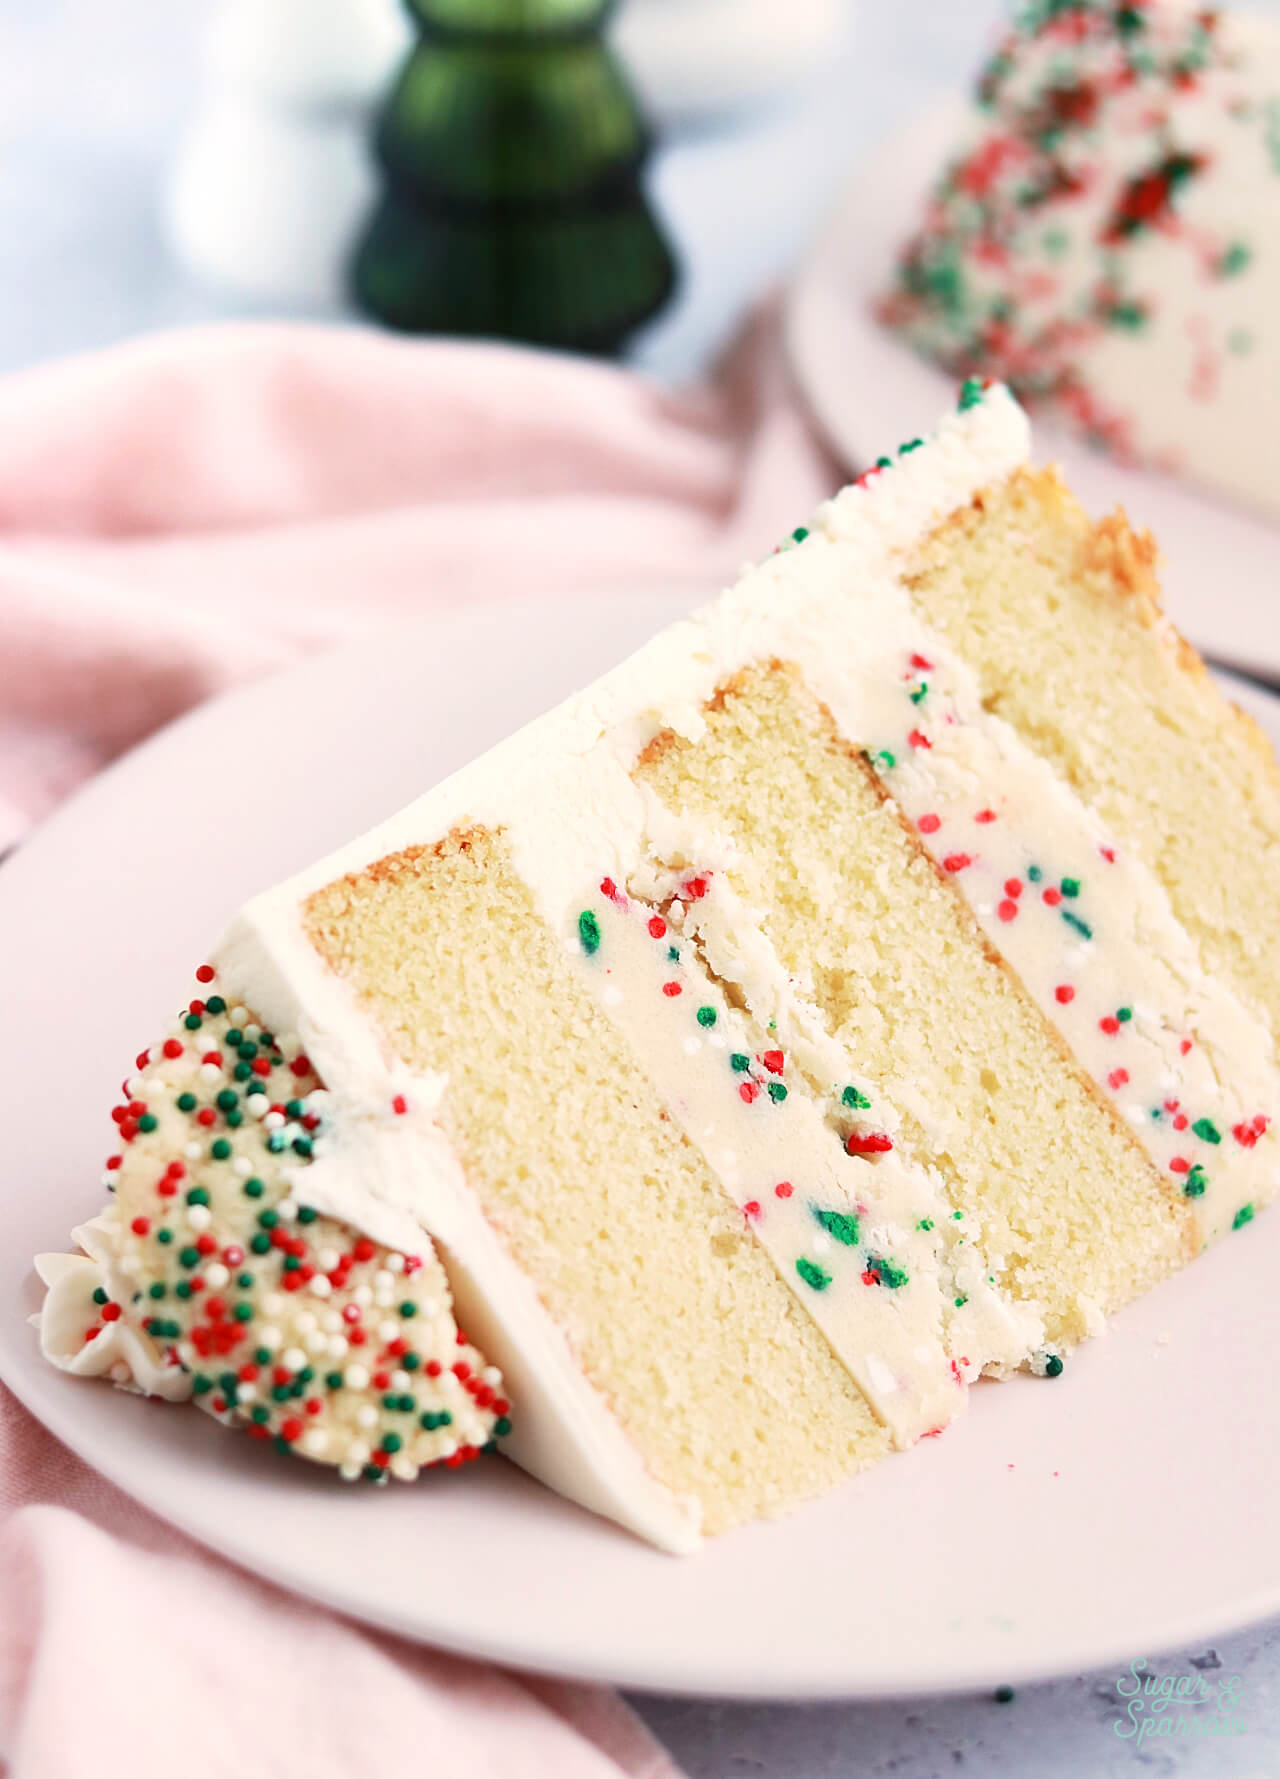
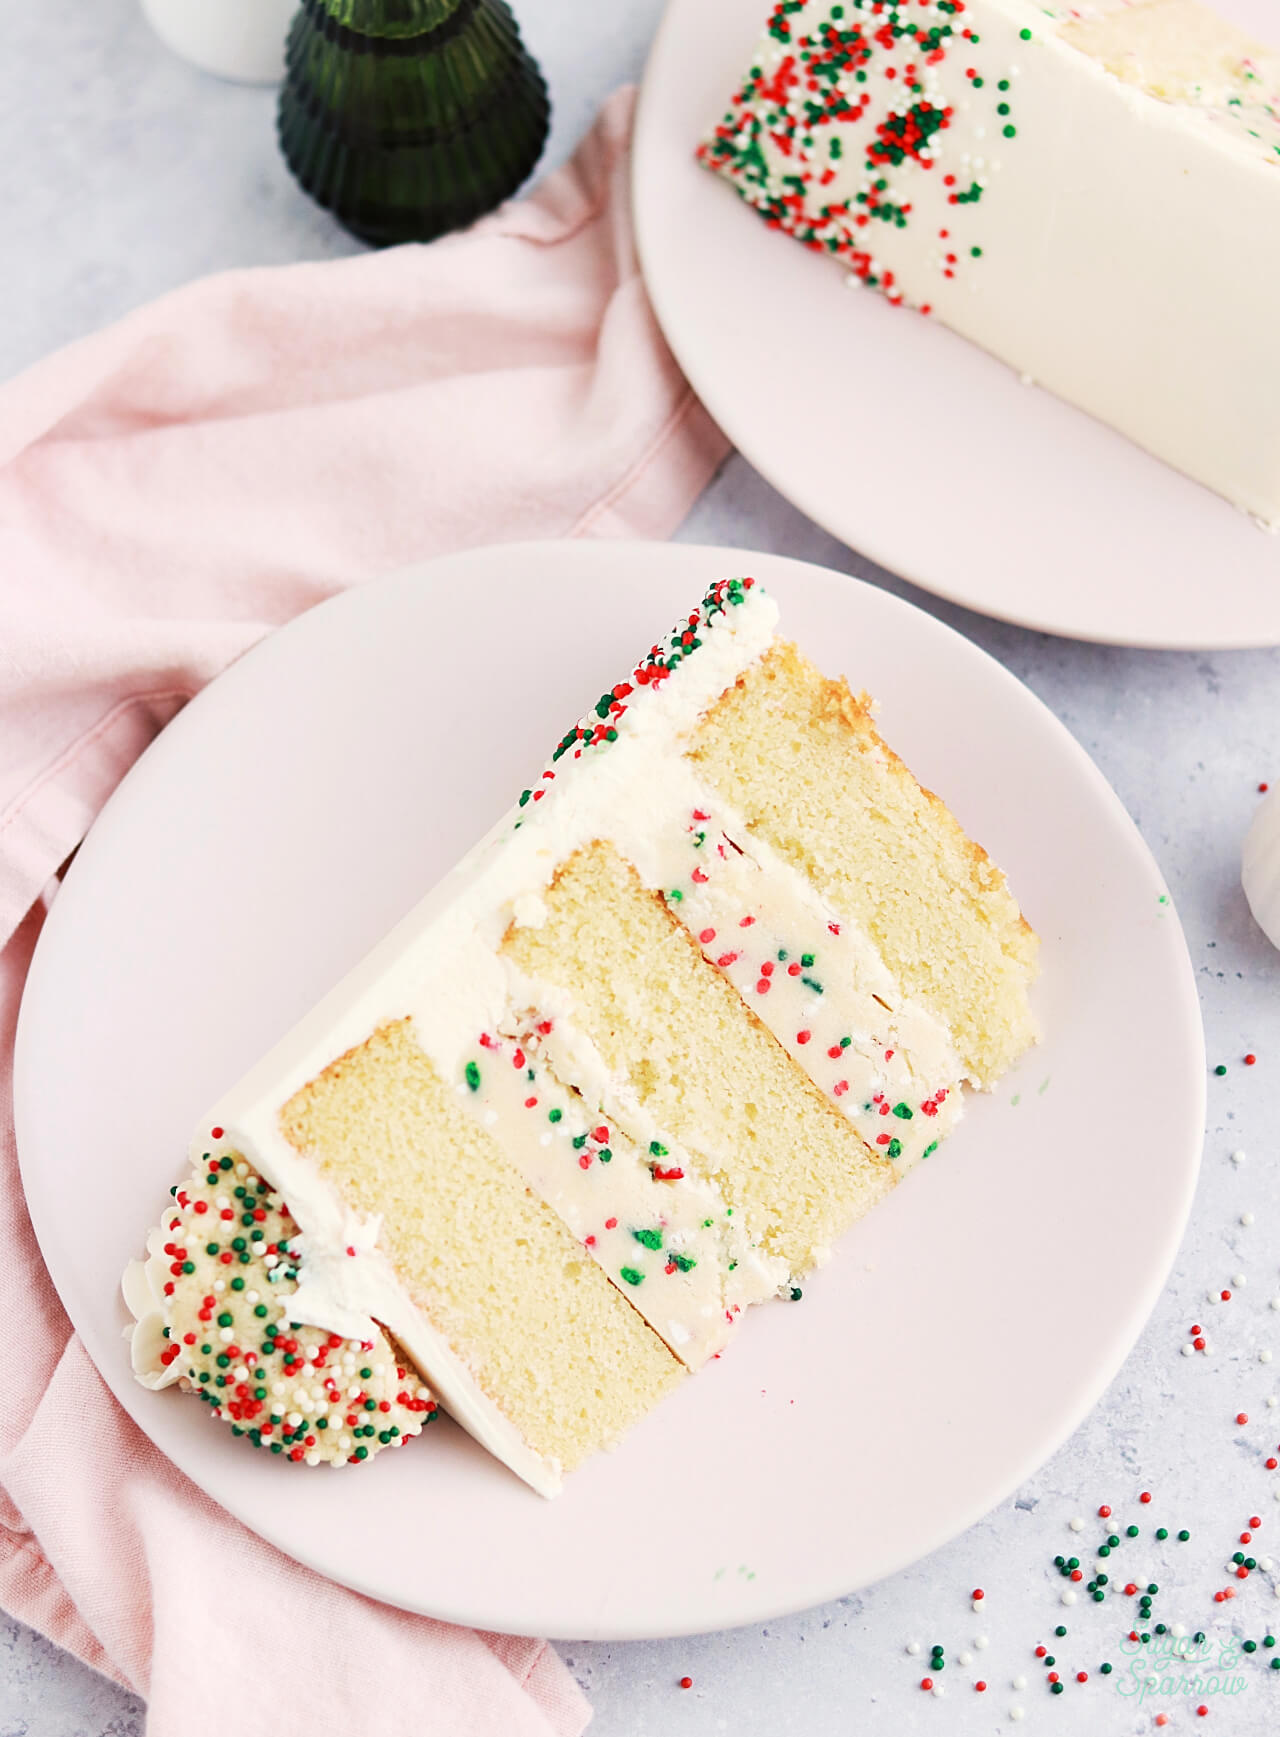
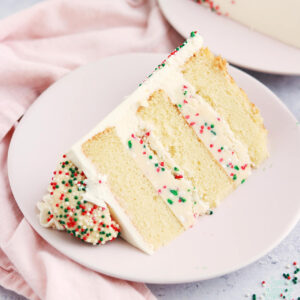
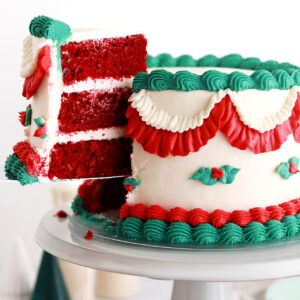
This Christmas sugar cookie dough cake features layers of my favorite extra-soft vanilla cake, vanilla buttercream, and edible sugar cookie dough placed between each cake layer. The sugar cookie dough is studded with Christmas-colored jimmy sprinkles for an extra festive touch and all of the textures together are just stunning. Definitely indulgent but in the best way!
How to Make Cookie Dough That’s Safe to Eat
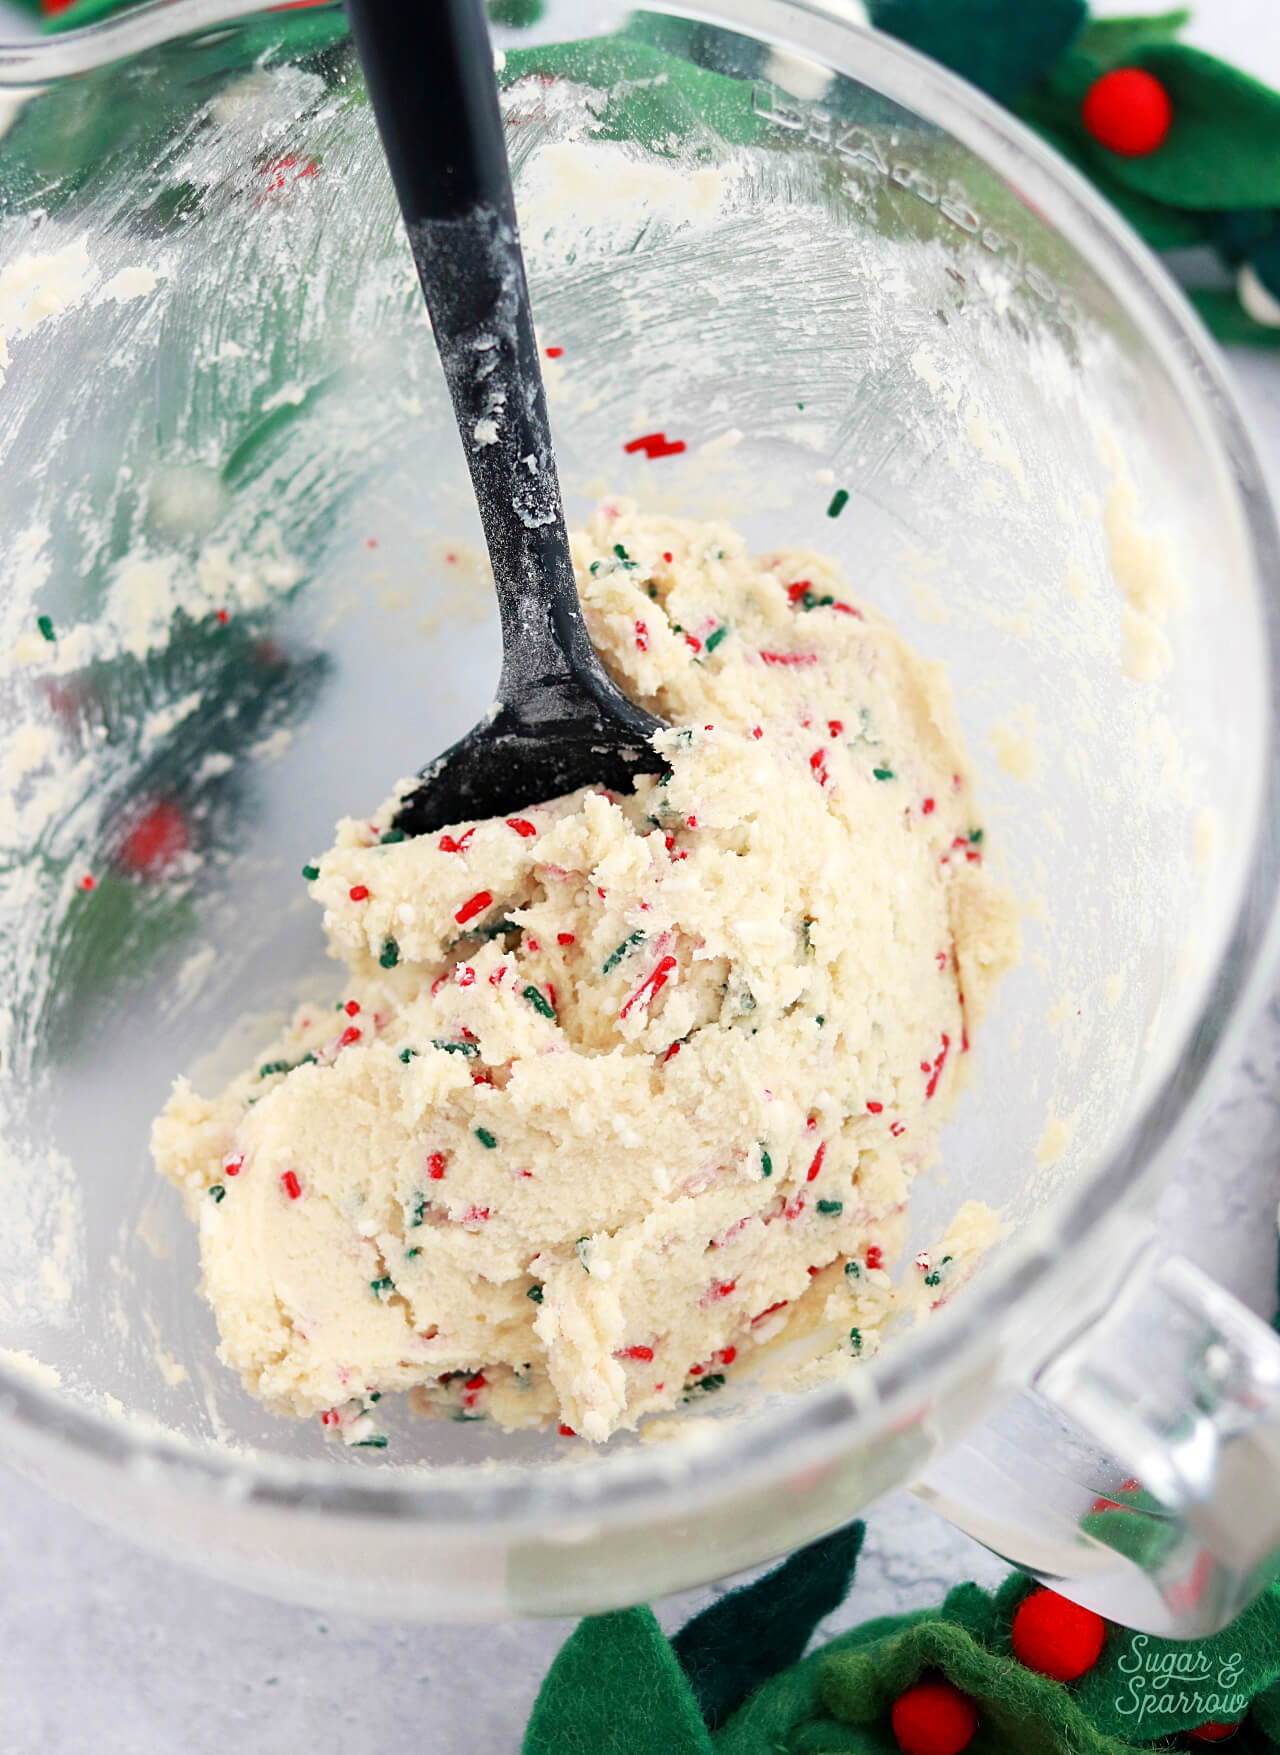
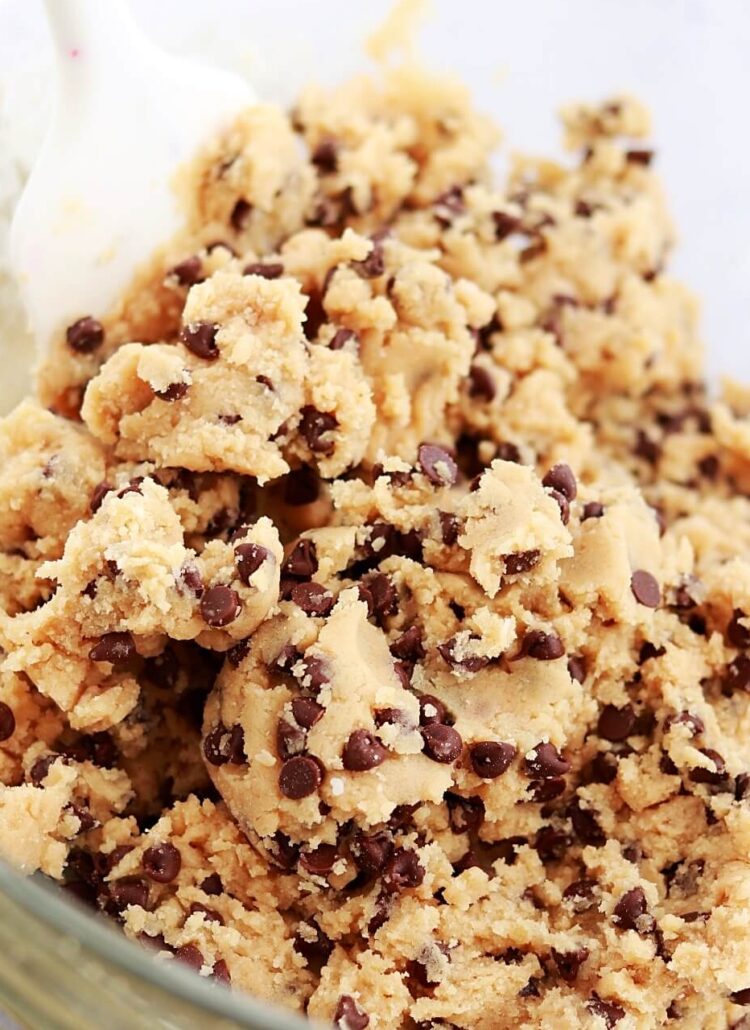
There are two ingredients that make traditional cookie dough unsafe for consumption: raw eggs and raw flour. To make cookie dough that is safe to eat and just as delicious, you need to remove the eggs from the recipe and heat treat (or gently cook) the flour. This will pasteurize it and kill any bacteria that will cause foodborne illness.
This edible cookie dough recipe has the following ingredients:
- Heat-Treated Flour. This is regular all-purpose flour that has been cooked until it reaches 160ºF (71ºC). To do this, I spread mine onto a cookie sheet and bake at 300ºF (149ºC) for 4-5 minutes, until a food thermometer inserted into the thickest point of the flour reads 160ºF (71ºC).
- Unsalted Butter. Like all great sugar cookie doughs, this one is butter based. If you only have salted butter on hand you can use that as a substitute and omit the salt in the recipe.
- Granulated Sugar + Powdered Sugar. A combination of these two sugars sweetens the dough and gives just the right amount of crunch.
- Heavy Whipping Cream. This thins the dough just enough to be soft and creamy. You can alternatively use whole milk or any milk alternative as a substitute.
- Vanilla + Almond Extract. For the perfect sugar cookie flavor. If you prefer, you can use more vanilla in place of the almond extract, but I feel that adding a little almond gives this dough a more nostalgic flavor.
- Salt. A pinch of salt balances the sweetness in this dough.
- Sprinkles. Some Christmas-colored jimmy sprinkles add pretty pops of color and fun texture to the filling.
Using Cookie Dough as a Cake Filling
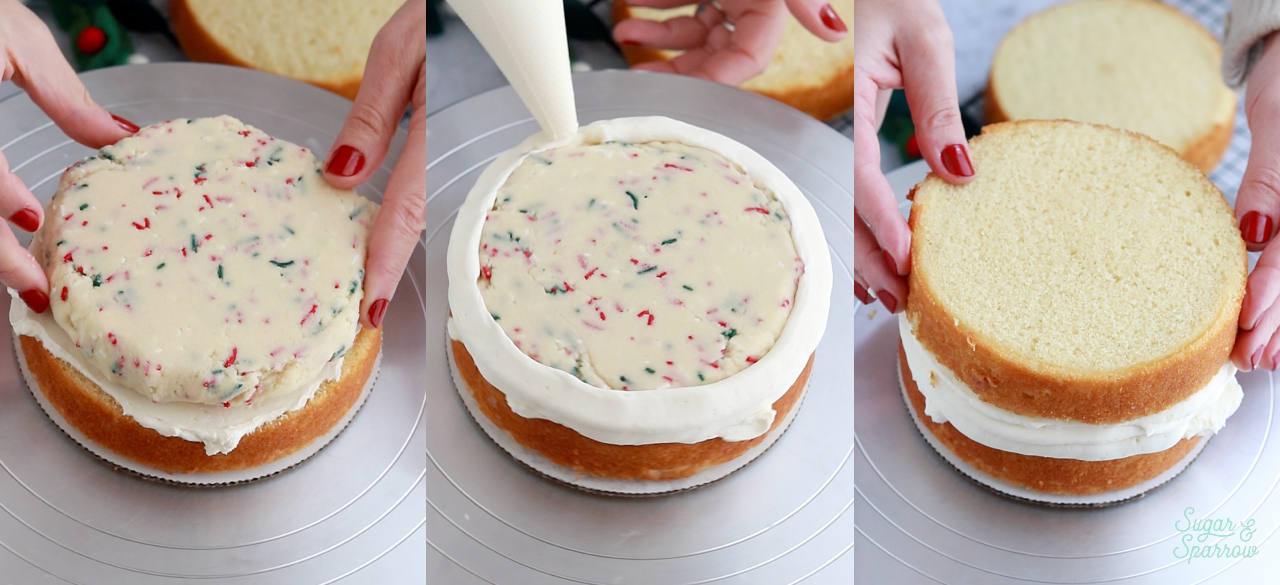
After mixing up the edible cookie dough, I formed it into discs that were slightly smaller in diameter than my cake layers. This involved cutting out some parchment paper circles to line the bottoms of my cake pans, then adding the dough on top. I then pressed it down flat, forming it into a disc that had about ½ inch border between the edge of the dough and the edge of the pan.

Once I had my discs made, I popped them in the refrigerator to firm up slightly, just so they’d be easier to work with. Then, I spread some buttercream onto a cake layer, added a cookie dough disc on top, and piped buttercream around the edge of the disc before adding the next layer on top.
Alternatively, you can crumble the cookie dough in between the layers. I might mix some cookie dough chunks into my buttercream next time I make a cake like this and see how that goes!
Decorating the Christmas Sugar Cookie Dough Cake
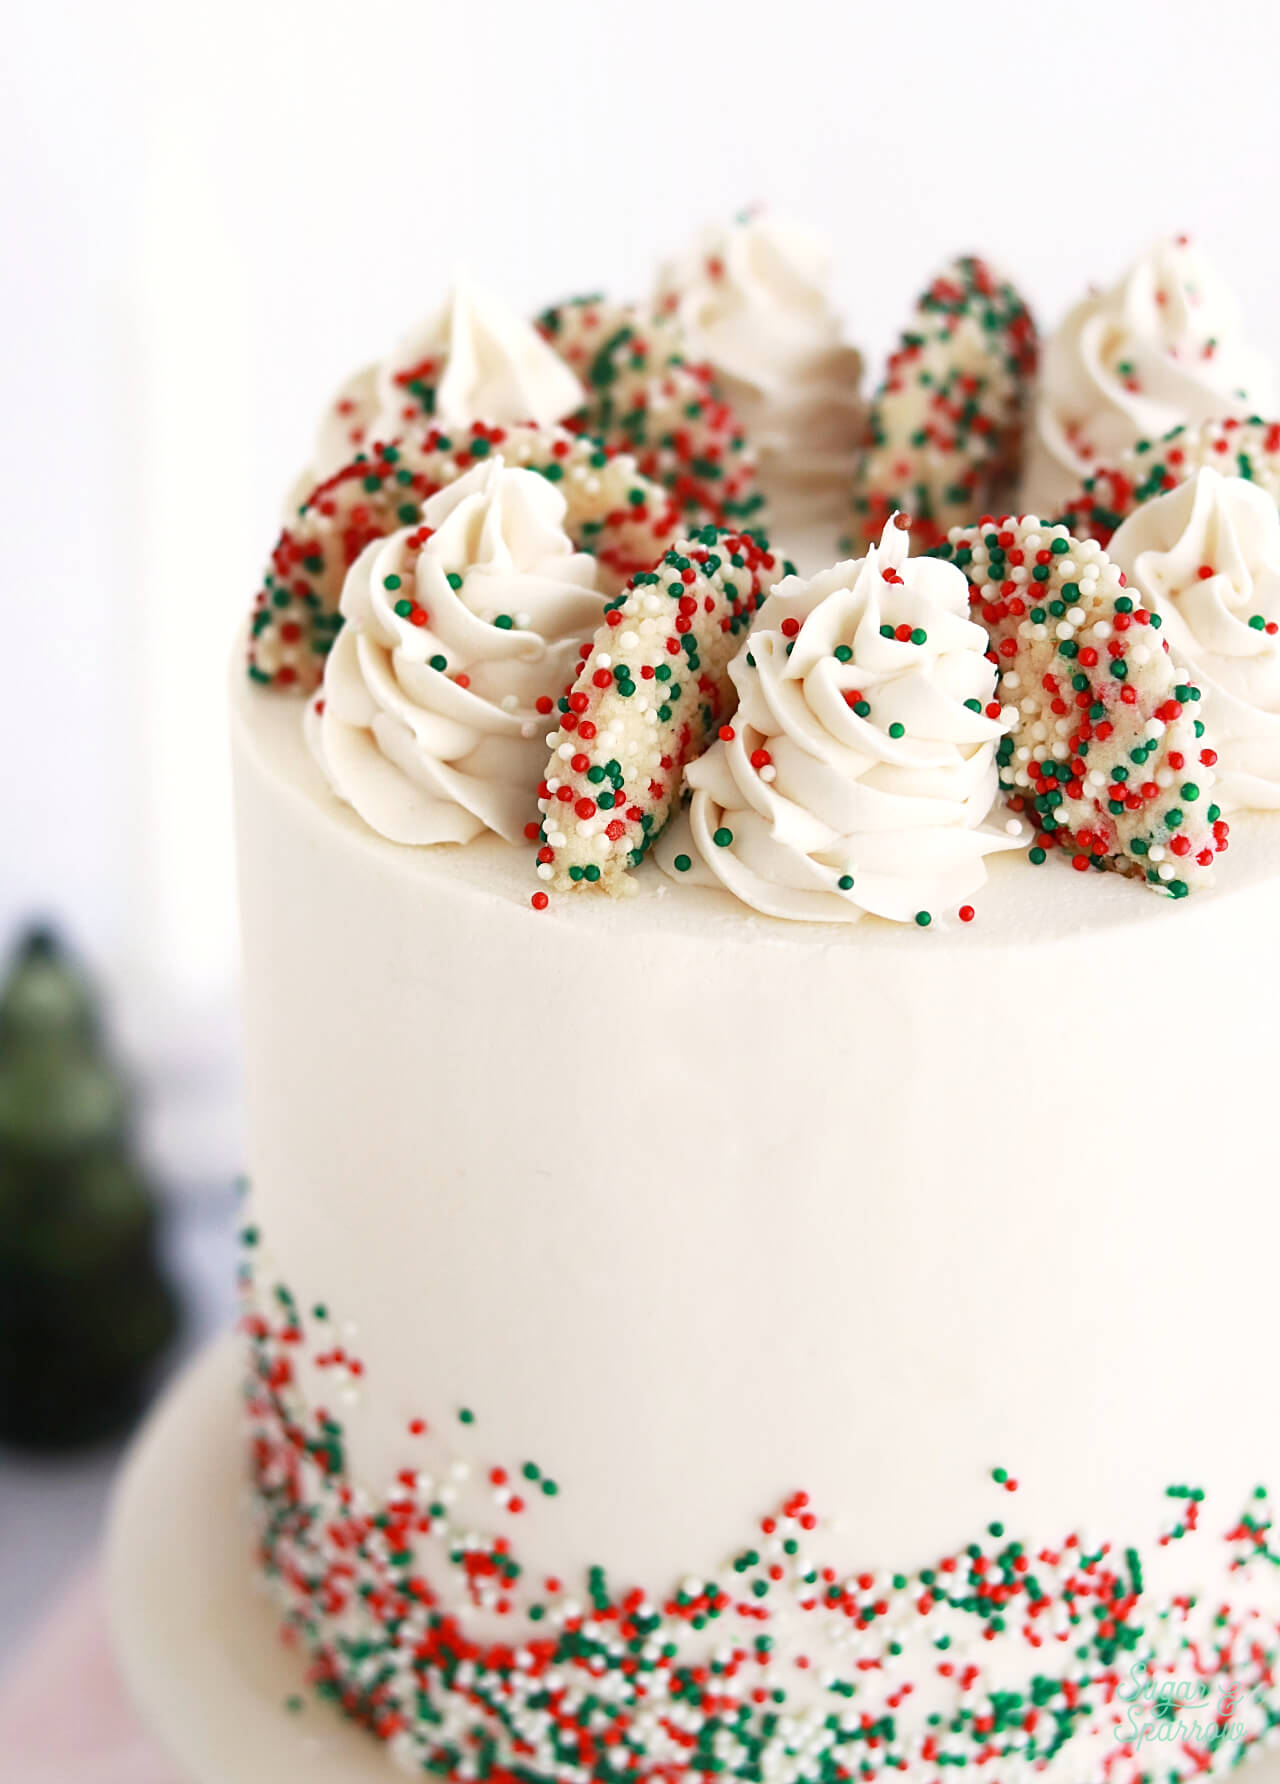
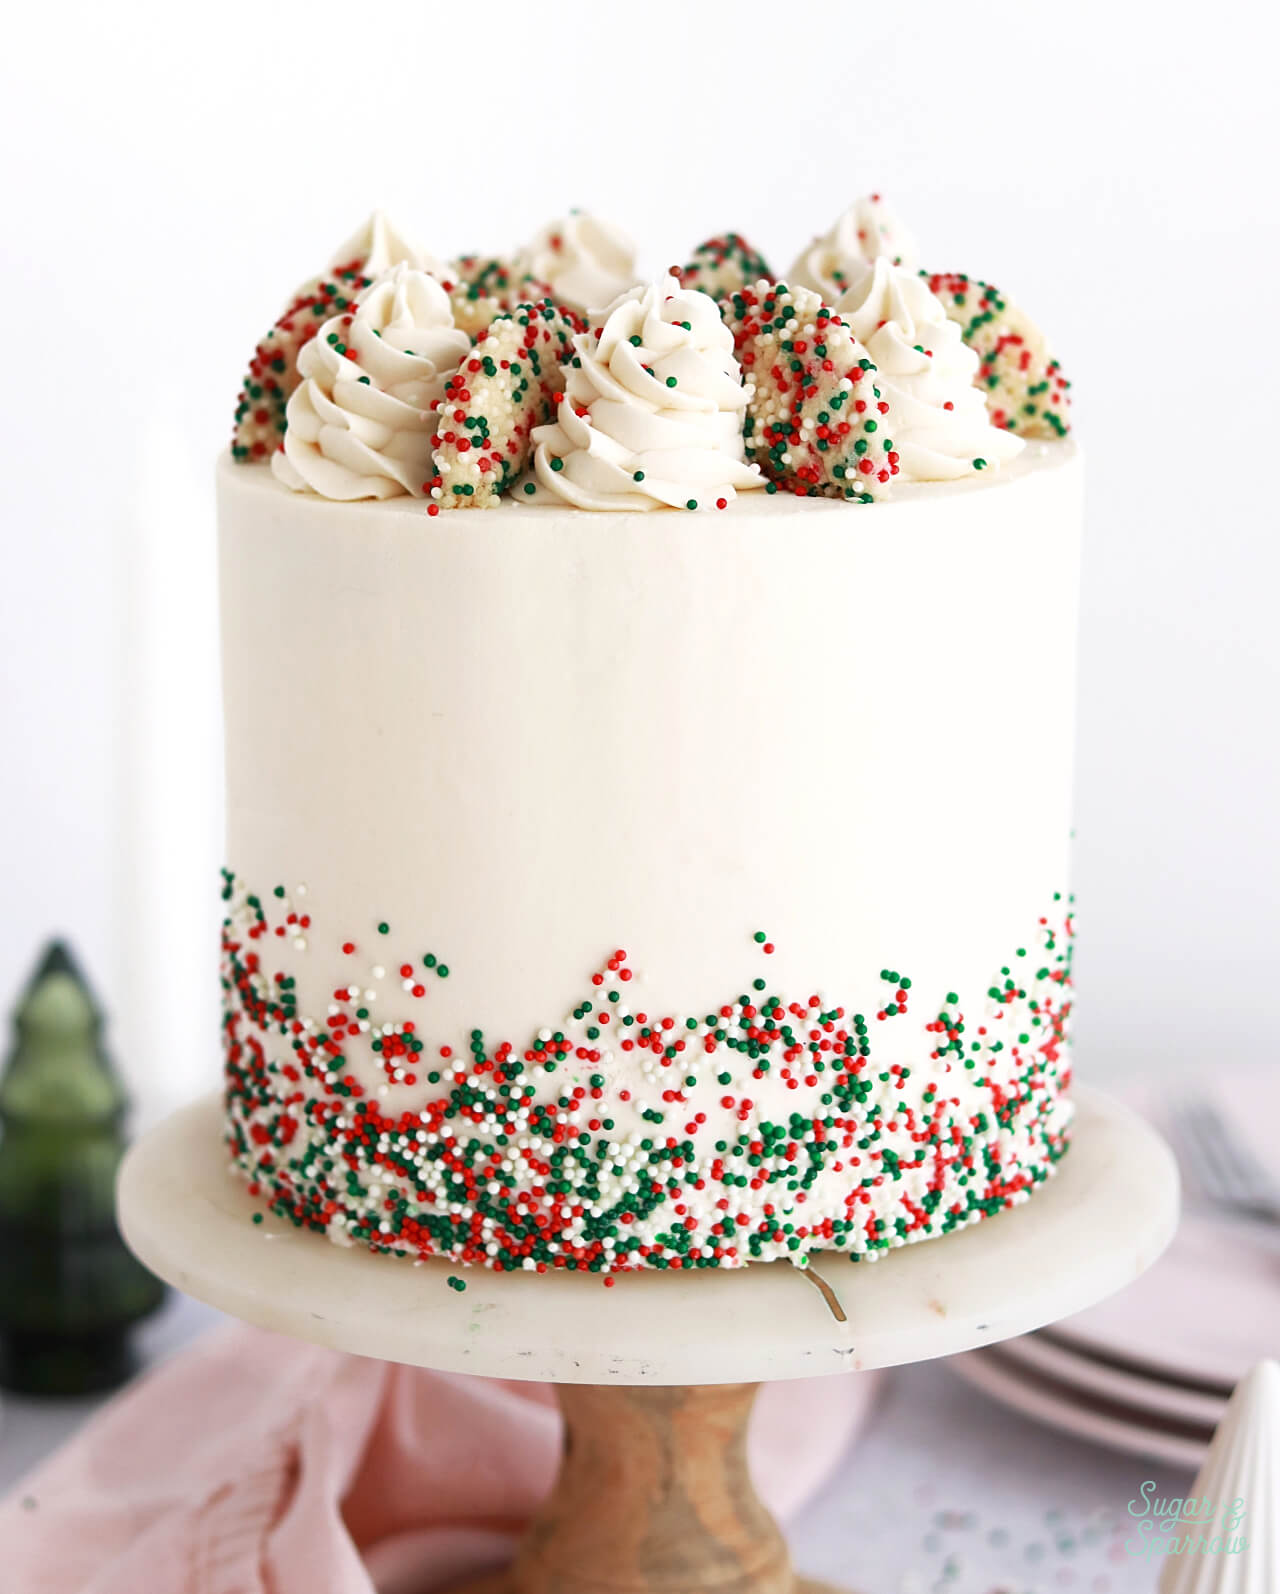
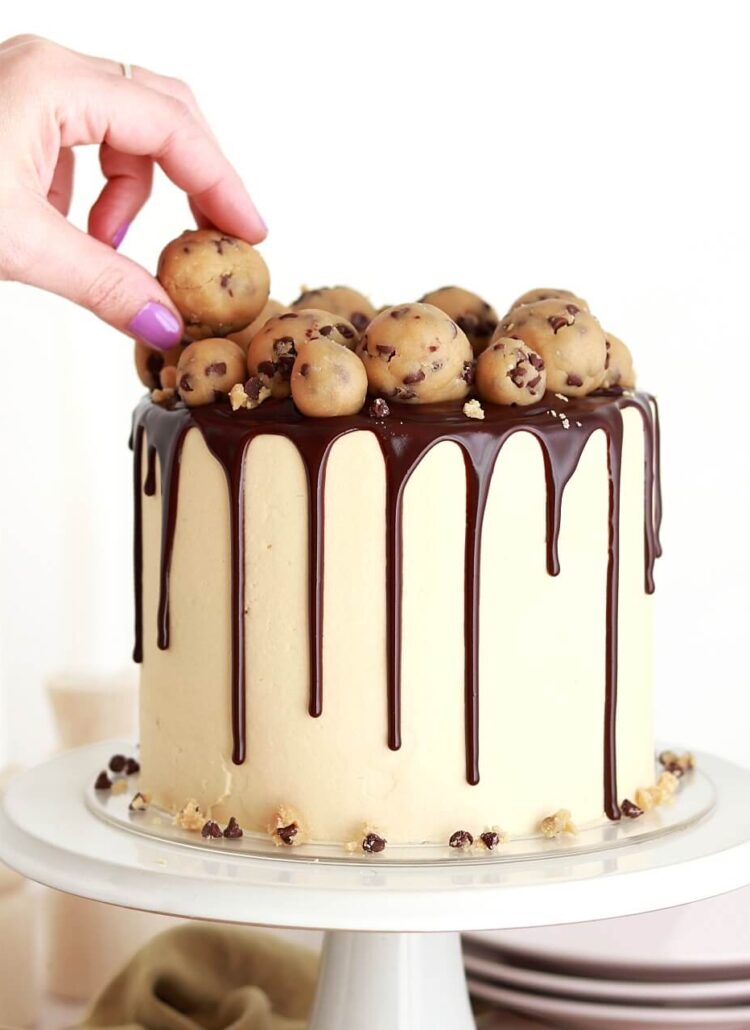
I absolutely love how the design of this Christmas sugar cookie cake turned out! I used my favorite vanilla buttercream to frost the cake with a smooth buttercream finish, then pressed some Christmas nonpareil sprinkles all around the bottom of the cake. I will admit that this part was a bit messy, only because the sprinkles got everywhere. They’re so bouncy! So even though I had a cookie sheet underneath my cake turntable, the nonpareils bounced right to the floor. I definitely had some sweeping to do afterwards.
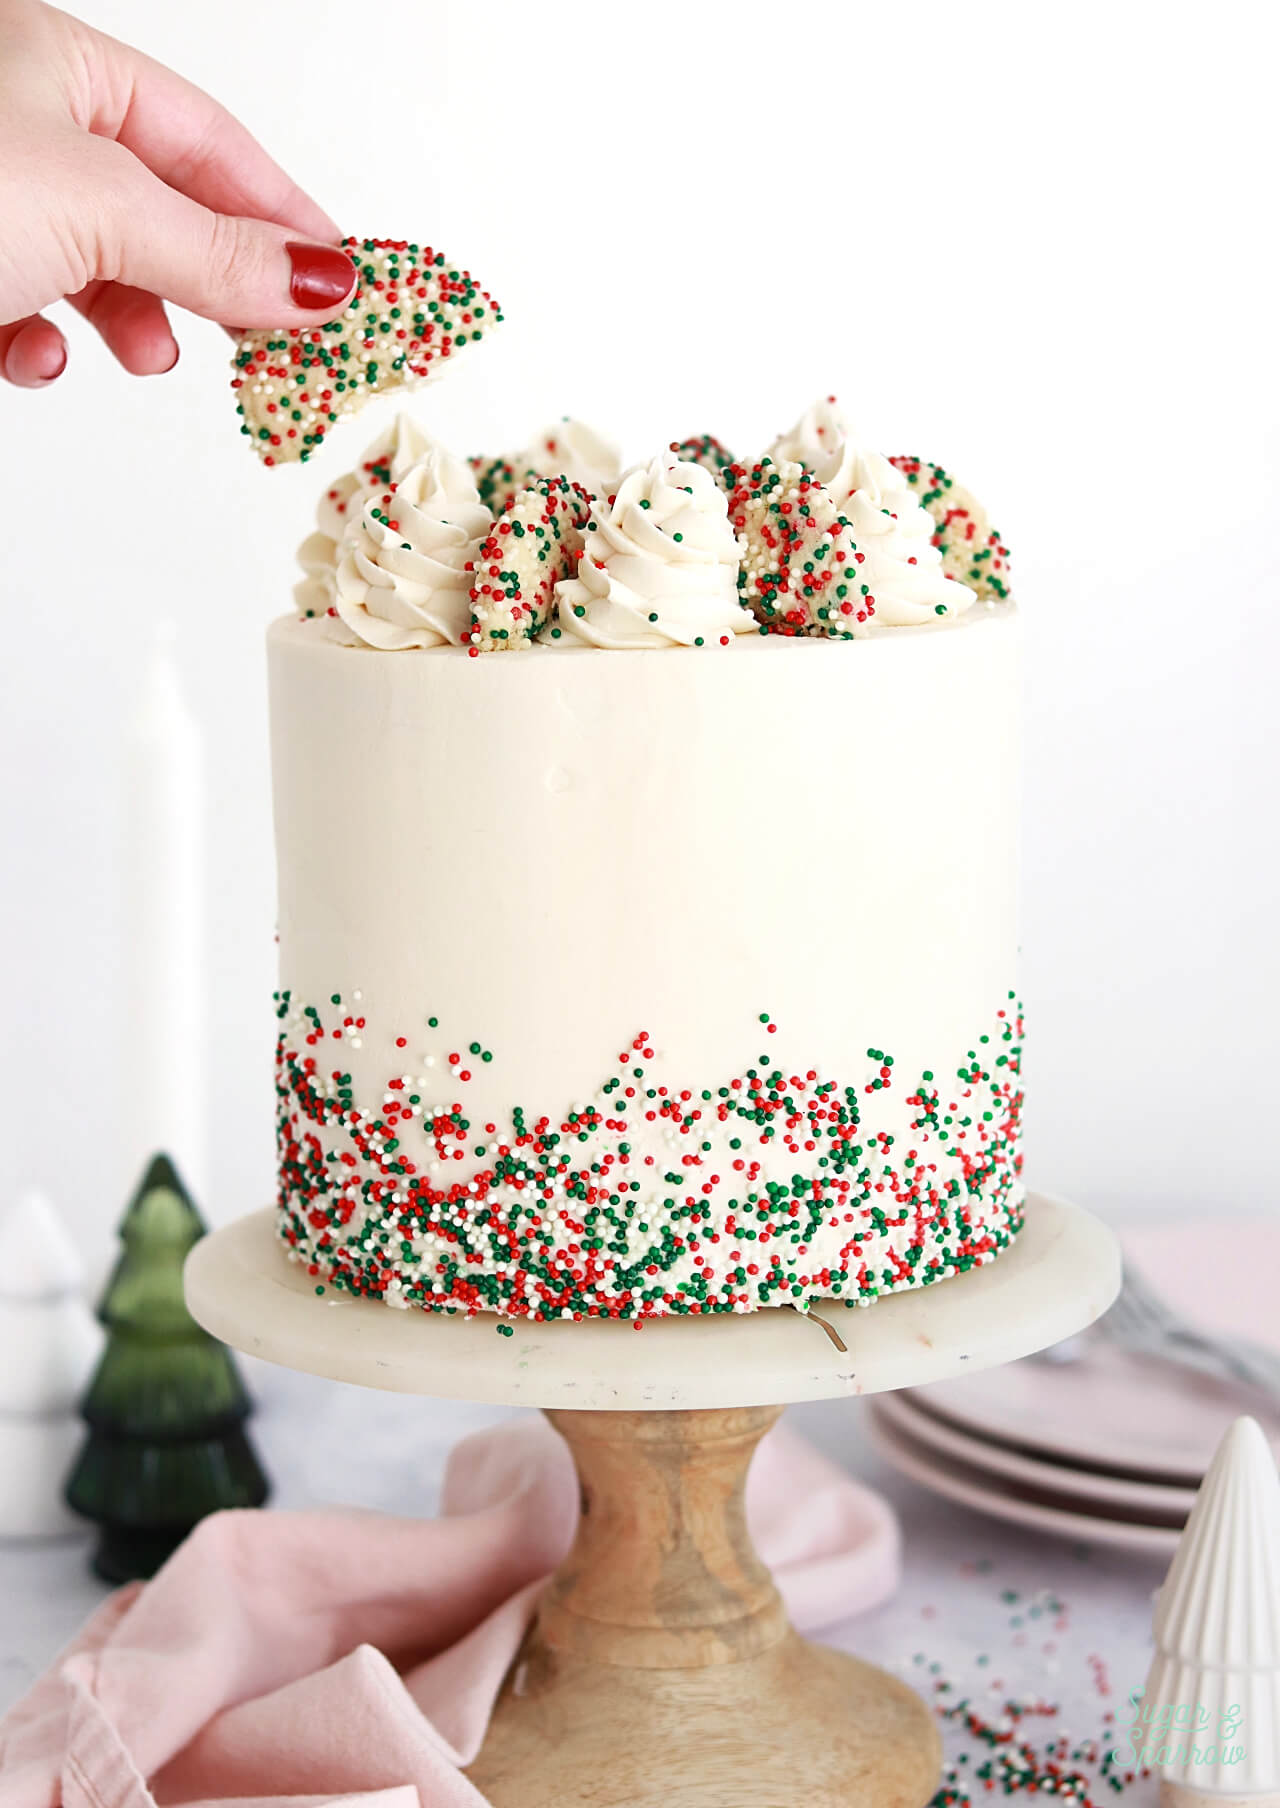

You can top the cake with any sugar cookies you want (even store bought would be great!), but I had some cookie baking to do for a Christmas cookie exchange. I ended up making these Candy Cane Kiss Cookies from Sally’s Baking Addiction to take to the cookie exchange and baked some of them without the Candy Cane Kiss to use as cake toppers. I cut the cookies in half before placing them in between buttercream swirls I piped with Wilton Tip 1M. I am completely obsessed with this design!
However you decorate, this cake is such a fun and indulgent dessert for any cookie dough lover this holiday season! I hope you love it!
Christmas Sugar Cookie Dough Cake
Ingredients
Vanilla Cake
- 2 3/4 Cups (290g) sifted cake flour* DIY recipe in notes
- 2 tsp baking powder
- 1/2 tsp baking soda
- 1 tsp salt
- 3/4 Cup (170g) unsalted butter, room temperature
- 1 1/2 Cups (300g) granulated white sugar
- 2 large eggs + 2 egg whites, room temperature
- 1/2 cup (120g) sour cream, room temperature
- 1 Tbsp pure vanilla extract
- 1 Cup (240ml) whole milk, room temperature
Edible Sugar Cookie Dough Filling
- 1 Cup (133g) all-purpose flour
- 1/3 Cup (75g) unsalted butter, room temperature
- 1/2 Cup (100g) granulated sugar
- 1/4 Cup (30g) powdered sugar
- 1 1/2 Tbsp heavy whipping cream
- 1/2 tsp pure vanilla extract
- 1/2 tsp almond extract
- 1/2 tsp salt
- 1/4 Cup (45g) Christmas colored sprinkles optional
Vanilla Buttercream
- 2 Cups (452g) unsalted butter, room temperature
- 7 Cups (840g) powdered sugar
- 4 tsp pure vanilla extract
- 4 Tbsp whole milk, room temperature
- 1/4 tsp salt, or to taste
Garnishes
- sugar cookies** store bought or homemade
- Christmas colored nonpareil sprinkles
Instructions
Make the Vanilla Cake
- Preheat the oven to 350°F. Prepare three 6-inch or two 8-inch cake pans by spraying the sides with a cooking spray (Baker's Joy is my favorite) and fitting a parchment paper circle to the bottom of the pan.
- Sift the cake flour and then measure by spooning and leveling it in your measuring cup. Add the cake flour, baking powder, baking soda, and salt into a bowl and whisk to combine. Set aside.
- In the bowl of your stand mixer (a handheld mixer works fine too!), beat the butter on high for two minutes until it's light and creamy. Add in the sugar and continue to mix on medium-high for another two minutes. Turn the mixer to low and add the eggs and egg whites, one at a time, mixing until just combined and scraping down the bowl and paddle as needed. Add the vanilla and sour cream, turn the mixer to high, and beat for one full minute. It will look curdled at this point, but don’t worry – it will become smooth cake batter at the end.
- Add in the dry ingredients all at once and turn the mixer to low speed. Mix until just combined, then slowly pour in the milk. Continue to mix on low speed until just combined, about 30 seconds. Scrape down the sides and bottom of the bowl and give it a few stirs with a whisk to make sure there are no lumps. The batter will be slightly thick.
- Pour the batter evenly into the prepared cake pans and bake for 30-35 minutes. They're done when they spring back to the touch and a toothpick inserted into the middle comes out clean. Let the cakes cool in the pan for five minutes before turning them out onto a wire rack for an additional few hours of cooling. Make sure they're entirely room temperature before applying any frosting.
Make the Edible Sugar Cookie Dough Filling
- Heat Treat the Flour: Preheat the oven to 300ºF (149ºC) and add the flour on top, smoothing it down into a fairly even layer. Bake in 2 minute increments until the temperature of the flour reaches 160ºF (71ºC). You can check by inserting a food grade thermometer into the deepest pile of the flour. It took about 4 minutes for mine to reach 160ºF (71ºC).
- Once the flour reaches this point, remove it from the oven. Carefully lift up the parchment paper and use it to slide the flour into a separate bowl. Set aside to cool for 20-30 minutes, until the flour is room temperature, before moving on to the next step.
- In the bowl of a stand mixer fitted with the paddle attachment (or with a large bowl and hand mixer), add the butter, granulated sugar, and powdered sugar. Beat on high speed until light and creamy, about 2 minutes.
- Add the heavy whipping cream, vanilla extract, almond extract, and salt. Mix on medium speed until fully combined, 1-2 minutes. Add the heat treated (now room temperature) flour and continue mixing on low speed until the mixture forms a uniform dough, about 1 minute, then fold in the sprinkles.
- Form the Cookie Dough Discs: Using the same diameter cake pans you used to bake the vanilla cake, line the bottoms with wax or parchment paper. If you baked three 6-inch cake layers, divide the cookie dough into two equal portions and line the bottom of two 6-inch cake pans. Press the dough into each cake pan until it is about 1/4 inch thick disc, leaving about 1/2 inch between the edge of the disc and the edge of the cake pan. If you baked two 8-inch layers, line the bottom of one 8-inch cake pan and press all of the dough into one disc, leaving the same 1/2 inch space between the disc and cake pan edge.
- Refrigerate the cookie dough disc(s) for about 15 minutes to make them easier to handle before using them in the cake assembly. Alternatively, you can wrap the whole disc in plastic wrap and refrigerate the dough up to one week ahead.
Make the Vanilla Buttercream
- With a hand mixer or paddle attachment on your stand mixer, cream the butter on medium-high until it’s creamy and light (almost white) in color. About 7 minutes.
- With the mixer on low, add the powdered sugar a few cups at a time, scraping down after each addition and making sure each cup is fully incorporated before adding the next one.
- Add vanilla, milk, and salt and mix on low for another minute until fully incorporated.
Assembly
- Once the vanilla cakes are cooled throughout, level and torte the layers to your desired height. Place a cardboard cake circle on top of your cake turntable, add a swipe of buttercream (to act as glue), and place the first cake layer on top of it. Add a thin layer of vanilla buttercream onto the cake layer, then place the sugar cookie dough disc on top. Add about 1 Cup of vanilla buttercream into a piping bag and use it to pipe around the edge of the cookie dough disc to fill in the gap between the edge of the disc and edge of the cake. Keep piping until you reach the top edge of the disc, then place the next cake layer on top. Repeat this filling and stacking process with any additional layers.
- Crumb coat the cake with vanilla buttercream and place it into the refrigerator for at least 20 minutes to let the crumb coat firm up before frosting with a smooth layer of vanilla buttercream.
- To create the design pictured, while the frosting is still tacky to the touch, add Christmas-colored nonpareil sprinkles to the bottom edges of the cake. Add the remaining buttercream into a piping bag fitted with Wilton Tip 1M and pipe 6 buttercream swirls on top of the cake, spaced about 1/2 inch apart. Place a sugar cookie (or half of a sprinkle sugar cookie in this case) in between each swirl. Top each swirl with more Christmas-colored nonpareil sprinkles.
Notes
- The vanilla cake layers can be baked, cooled, wrapped in plastic wrap, and left out at room temperature up to two days ahead of decorating. Unfrosted cake layers can be wrapped tightly in plastic wrap and stored in the freezer for up to two months before thawing and frosting.
- The sugar cookie dough filling can be made ahead, formed into discs, wrapped in plastic wrap, then stored in the refrigerator for up to one week.
- The vanilla buttercream can be made ahead and stored in an airtight container in the refrigerator for up to two weeks. When you’re ready to use it, bring it back to room temperature and re-whip in your stand mixer to bring back to smooth buttercream consistency.
Did you make this recipe? Let me know what you think in the comments below, or tag @sugarandsparrowco on Instagram! I love to see your creations and hear your feedback.
I made this cake and it is DELICIOUS!! I bought extra Frosted Sugar Cookie Coffee Creamer so that I can make another one later.
Why did you ruin your site with all these ads. I used to enjoy it but now it’s on the list of website I won’t even bother to open.
When the recipe is covered in ads, it makes it impossible to load and scroll through. It’s a bummer your website is like this now.
Sorry you feel that way, Jan. These ads cover the cost of running my website and providing these recipes to you for free.
If you have Apple just hit the “hide annoying ads” tap on them and they are gone! I appreciate all of your recipes, made the Christmas Cookie Dough Cake the other day. I love that you give “make ahead tips” as I have arthritis and can’t make all other components in one day anymore. I just took the disc out of the fridge and it seems hard, so hoping it softens as it comes to room temp! I tag you on Instagram with pics. The Oatmeal Cookie cake was sooooo good! Merry Christmas and know that there as bakers out there that LOVE your recipes.
Hi Diane! I’m excited for you to make this cake! And thank you for the kind words about my recipes, that is so encouraging! The cookie dough will definitely soften at room temperature. It does get pretty hard in the refrigerator, just like any cookie dough, so be sure to take it out of the refrigerator a few hours before serving it. Merry Christmas!