• Cake
  • Frosting
  • YouTube
  • My Favorite Tools
  • Nav Social Icons

  • Skip to primary navigation
  • Skip to main content
  • Skip to primary sidebar
  • Skip to footer
  • Recipes
    • Cake
    • Cupcakes
    • Frosting
    • Ice Cream
    • Vegan
  • Cake Basics
  • Tutorials
  • Blog
  • About
  • Mobile Menu Widgets

    Connect

    Search

Sugar & Sparrow logo in script font

Sugar & Sparrow

Lifestyle and Cake from Portland Oregon

  • Cake Basics
  • Recipes
    • Cake
    • Cupcakes
    • Cookies & Bars
    • Filling
    • Frosting
    • Ice Cream
    • No-Bake
    • Small Batch
    • Vegan
  • Tutorials
  • Book
  • Blog
  • About

How To Make A Spatula Painted Cake

August 13, 2018 · In: Featured, Tutorials

A few months ago, I got the opportunity to try this spatula painted buttercream technique on a wedding cake and it was so much fun! I had a beautiful buttercream color palette to work with (terracotta + blush + cream + burgundy) and wanted to create something eye-catching and different. Using this technique turned out to be so easy and beautiful and I couldn’t wait to try it again. So naturally, after getting my hands on this amazing AmeriColor Nifty Fifty color gel kit, the first thing I thought to do was create a spatula painted cake with another fun color palette!

spatula painted cake tutorial

 I am absolutely over the moon for these color gel pastes and they deserve an entire post all their own. The kit comes with (you guessed it) fifty different colors, and they’re all so good that I probably will never have to spend time mixing custom colors ever again – something I had to do all the time before. Here’s a little video I whipped up to show you the color palette I chose with the spatula painted technique before you read all about it:

Disclaimer: this post does contain some affiliate links, meaning I may receive a small commission if you click them and purchase items I’ve recommended. Using these links won’t cost you any extra money, but they do help to keep Sugar & Sparrow up and running. Thank you for your support!

You Will Need:

  • A cake that’s been frosted with smooth buttercream and chilled
  • A few cups of tintable buttercream (like vanilla or another light-colored flavor)
  • Food color gels of your choosing
  • Small icing spatula (I use this one)

Step 1: Start With A Chilled Buttercream Cake

This technique looks beautiful on top of a smooth buttercream surface, especially when you’re only doing it partially down the sides like I am. If you’re planning on covering the entire cake with swipes of buttercream, you could technically start with a crumb coated cake since the entire surface will be covered. Either way, starting with a chilled cake is essential.

smooth buttercream cake tutorial

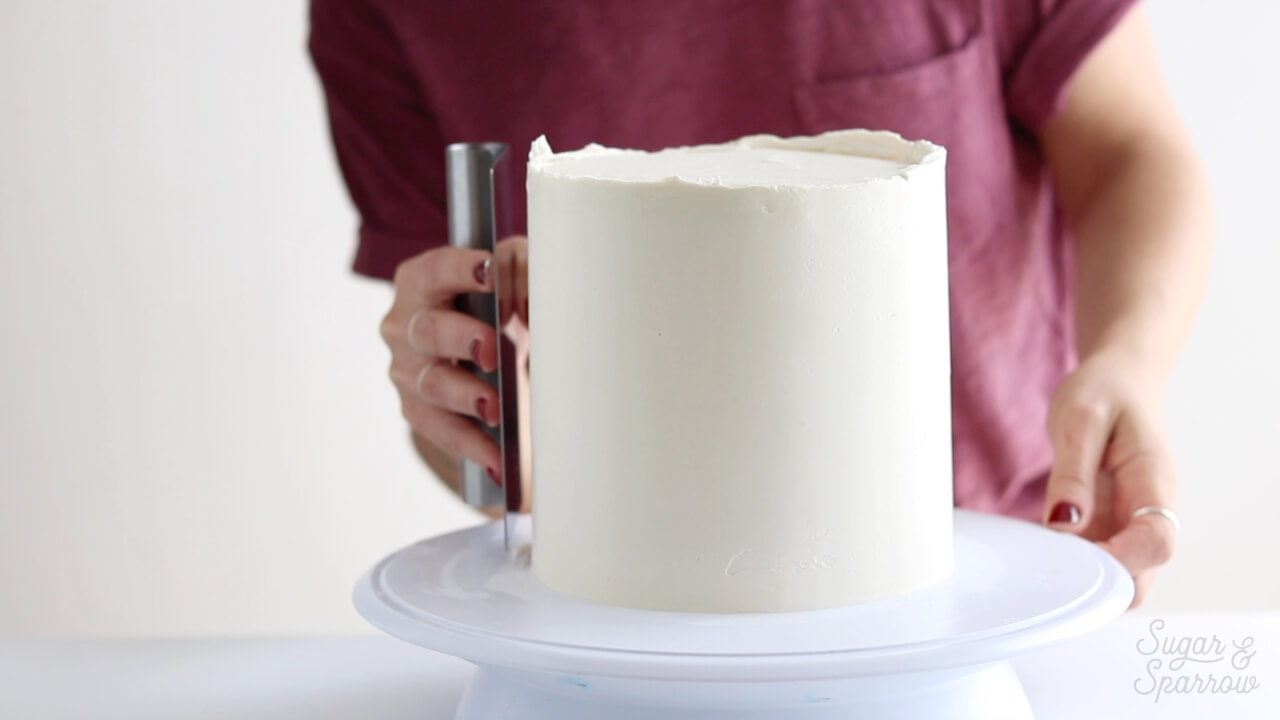
Make sure the cake you’re decorating has been chilled for at least 30 minutes and is firm to the touch as a starting point. This way, the swipes of buttercream will adhere perfectly without affecting the buttercream underneath.

Step 2: Mix Up Your Color Palette

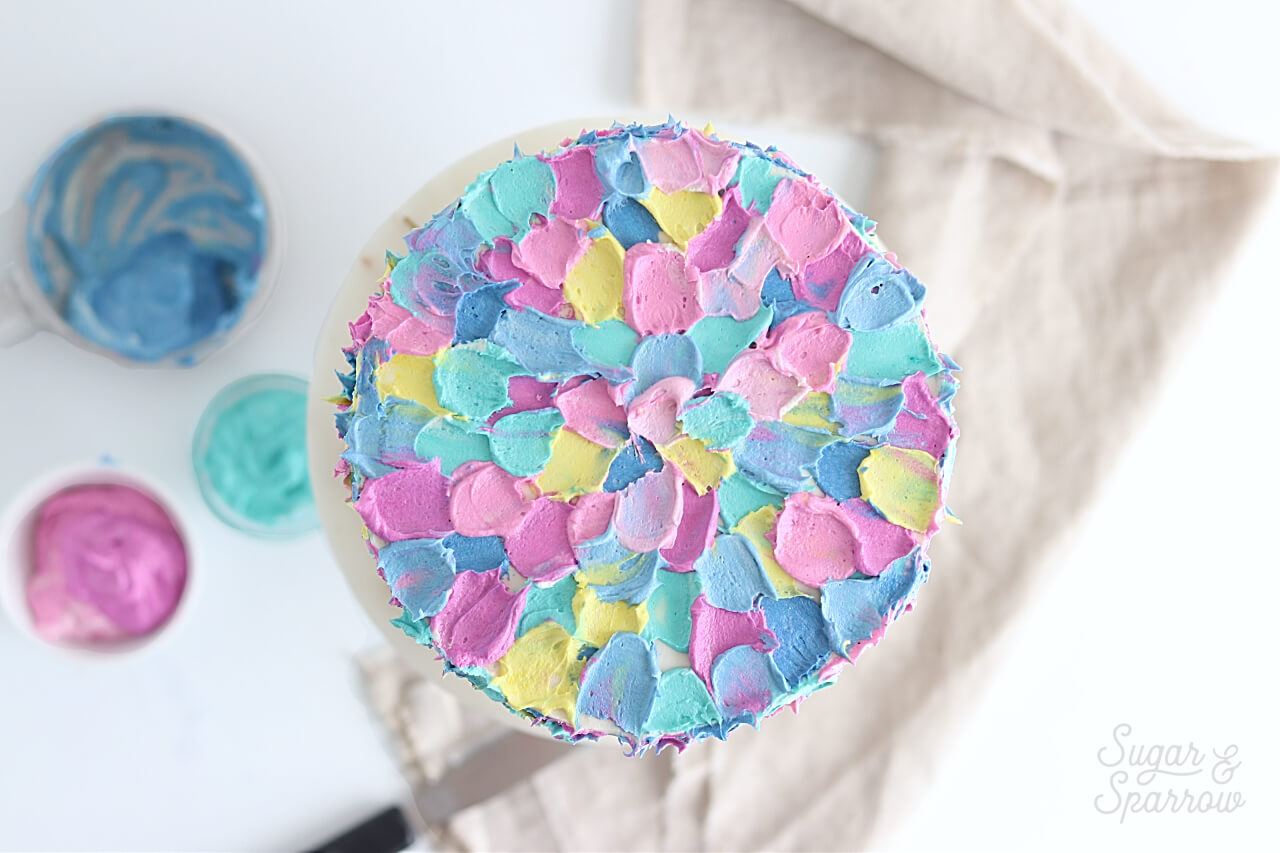
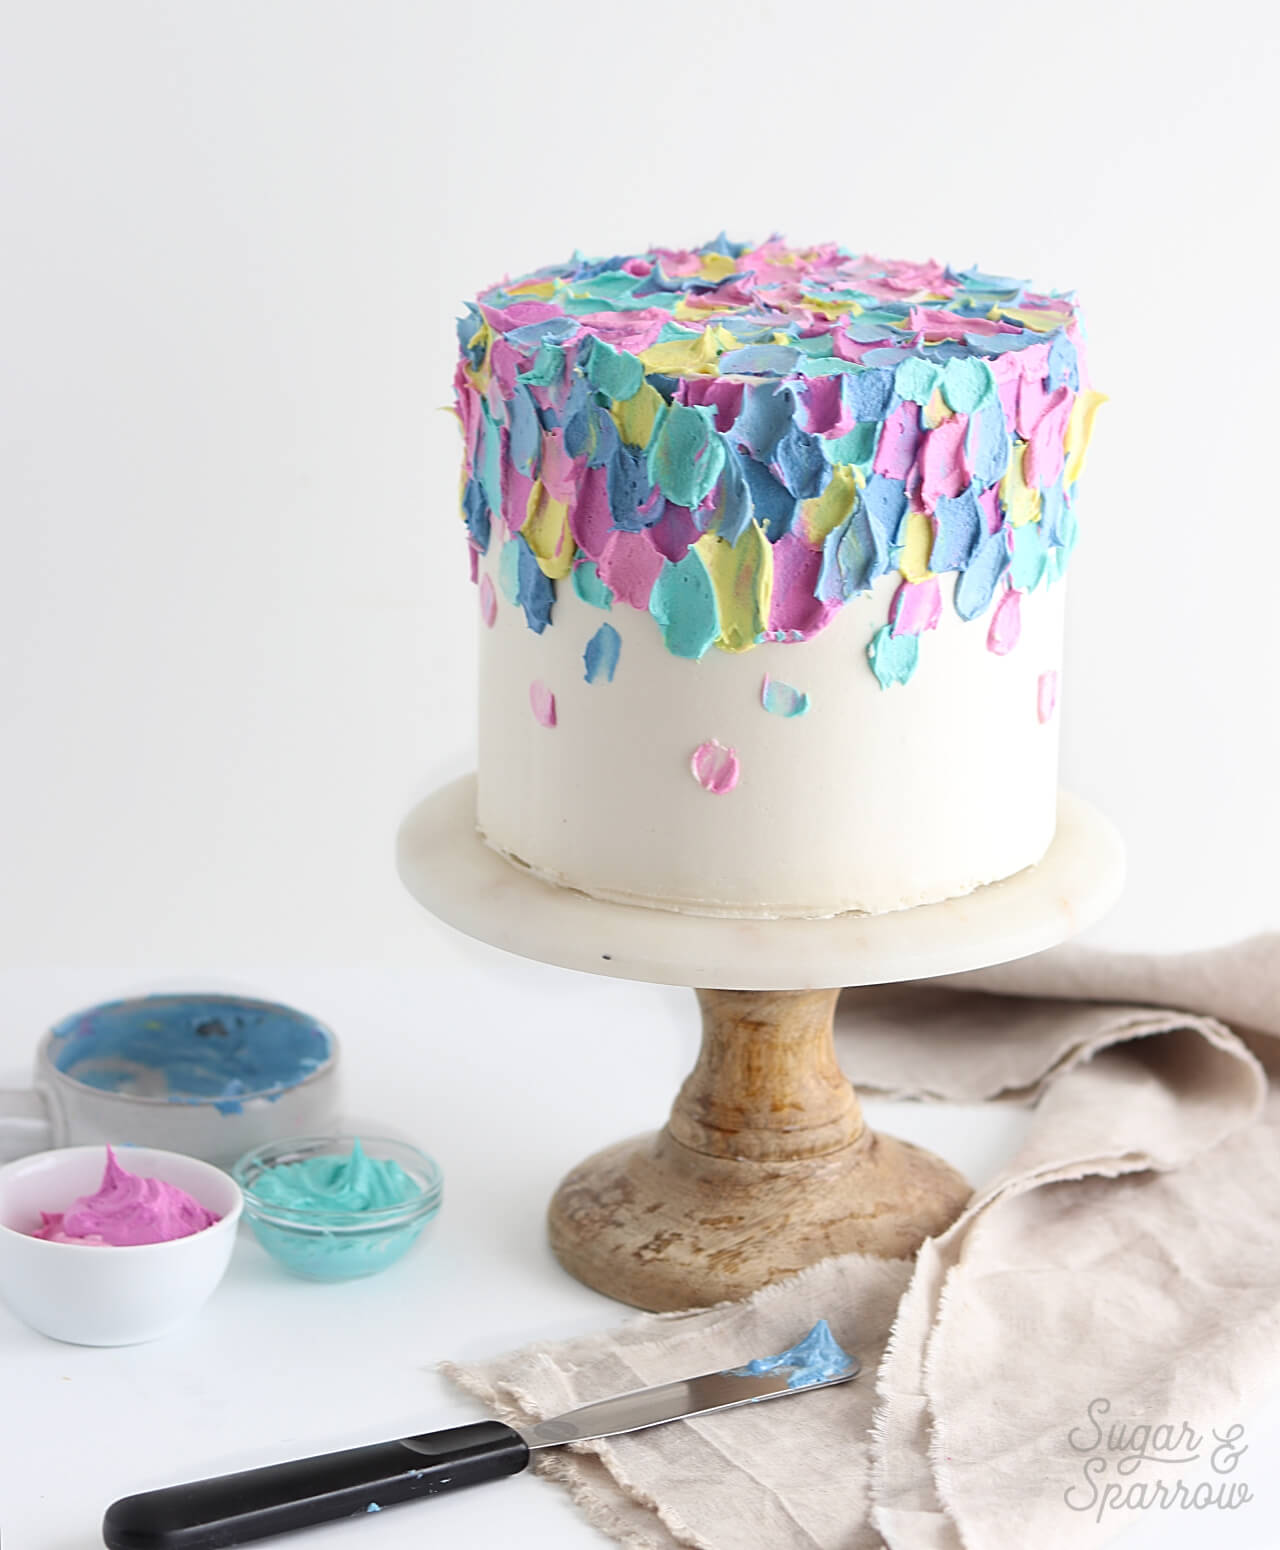
Divide your buttercream into separate bowls and tint them with food color gels until you achieve the perfect color palette. The color palette for this specific cake consisted of just five AmeriColor colors that I thought would look pretty together: navy, turquoise, lemon yellow, electric purple, and fuschia. I love the way it turned out!

americolor gel pastes and buttercream

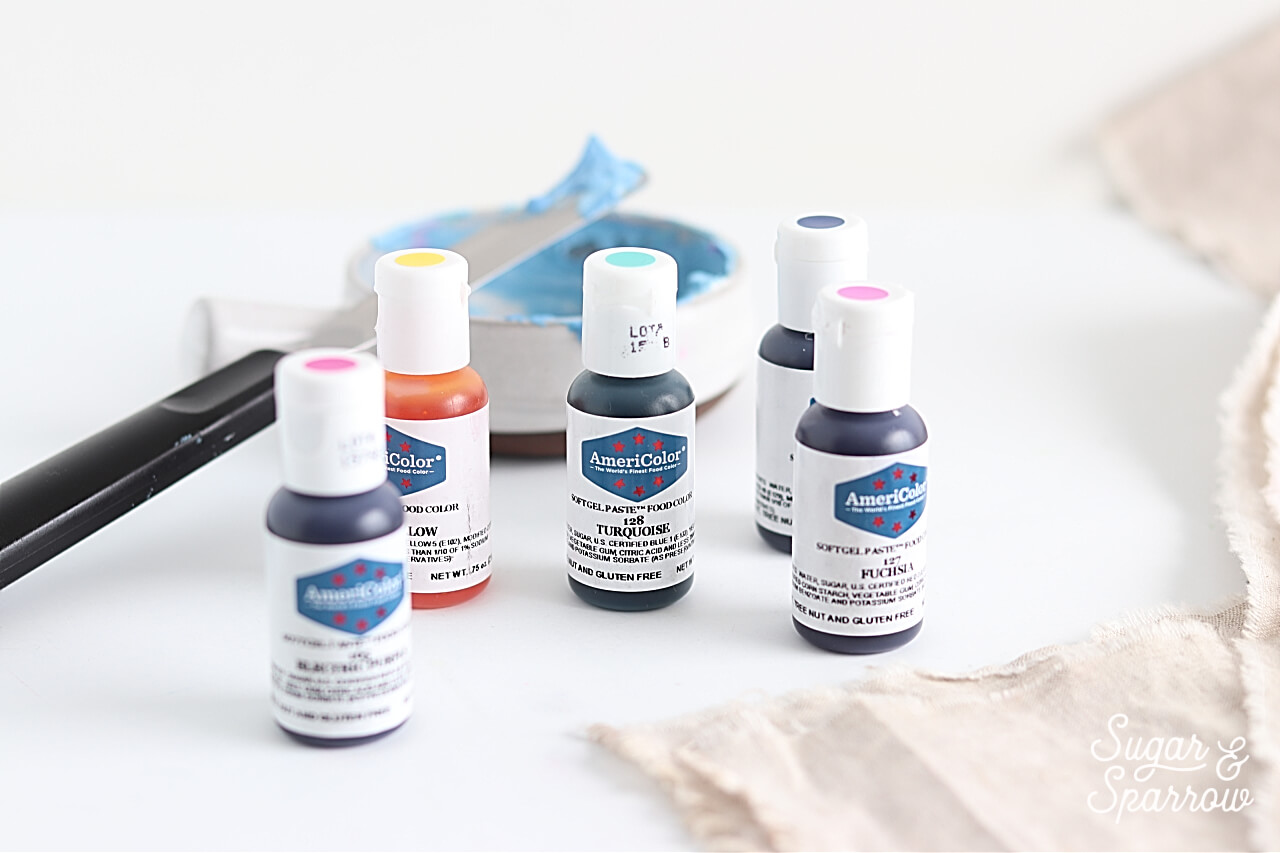
Feel free to get creative with your color palette, because you can’t really go wrong with this technique! I’ve seen it done beautifully with a monochromatic color palette and the first time I created a cake like this I used varying shades of terracotta, blush, cream and burgundy. Total magic.

Step 3: Apply Your Paint Strokes

One color at a time, use your icing spatula to swipe paint strokes onto the cake in an upward motion. You’ll want them to overlap some, but all in a random pattern.  

painting buttercream onto cake

buttercream cake decorating techniques

how to paint a cake with buttercream

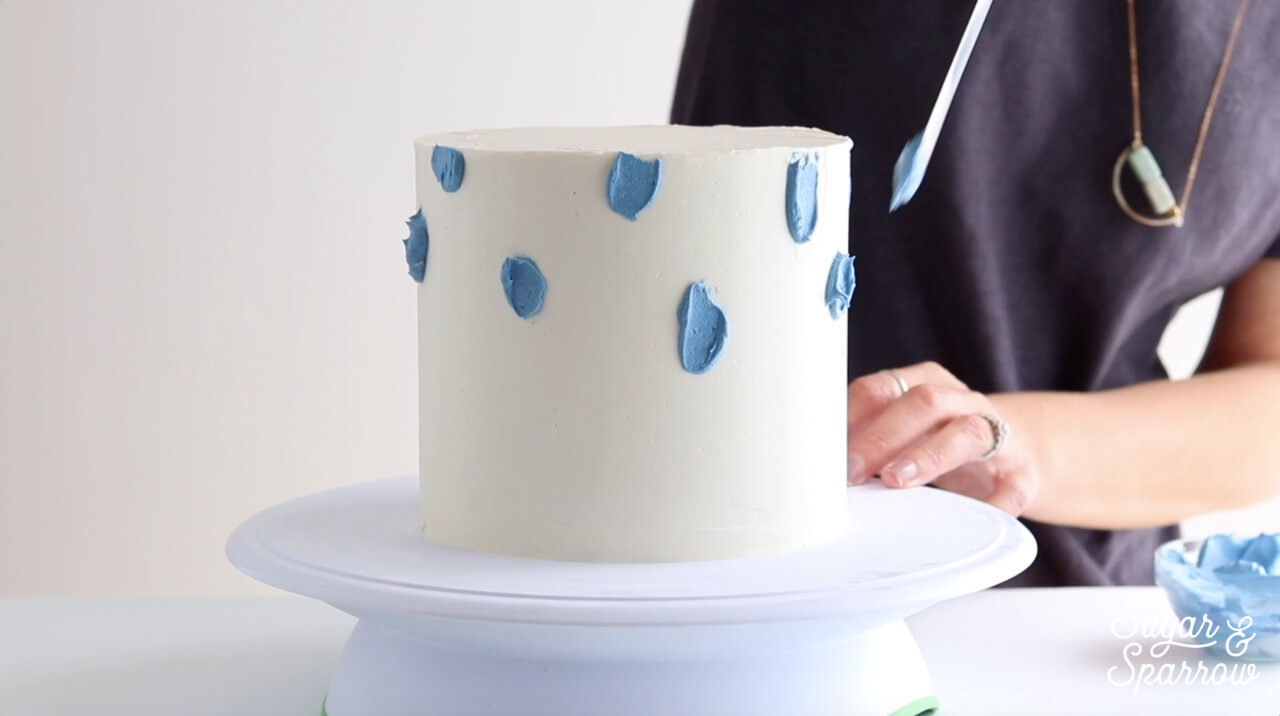
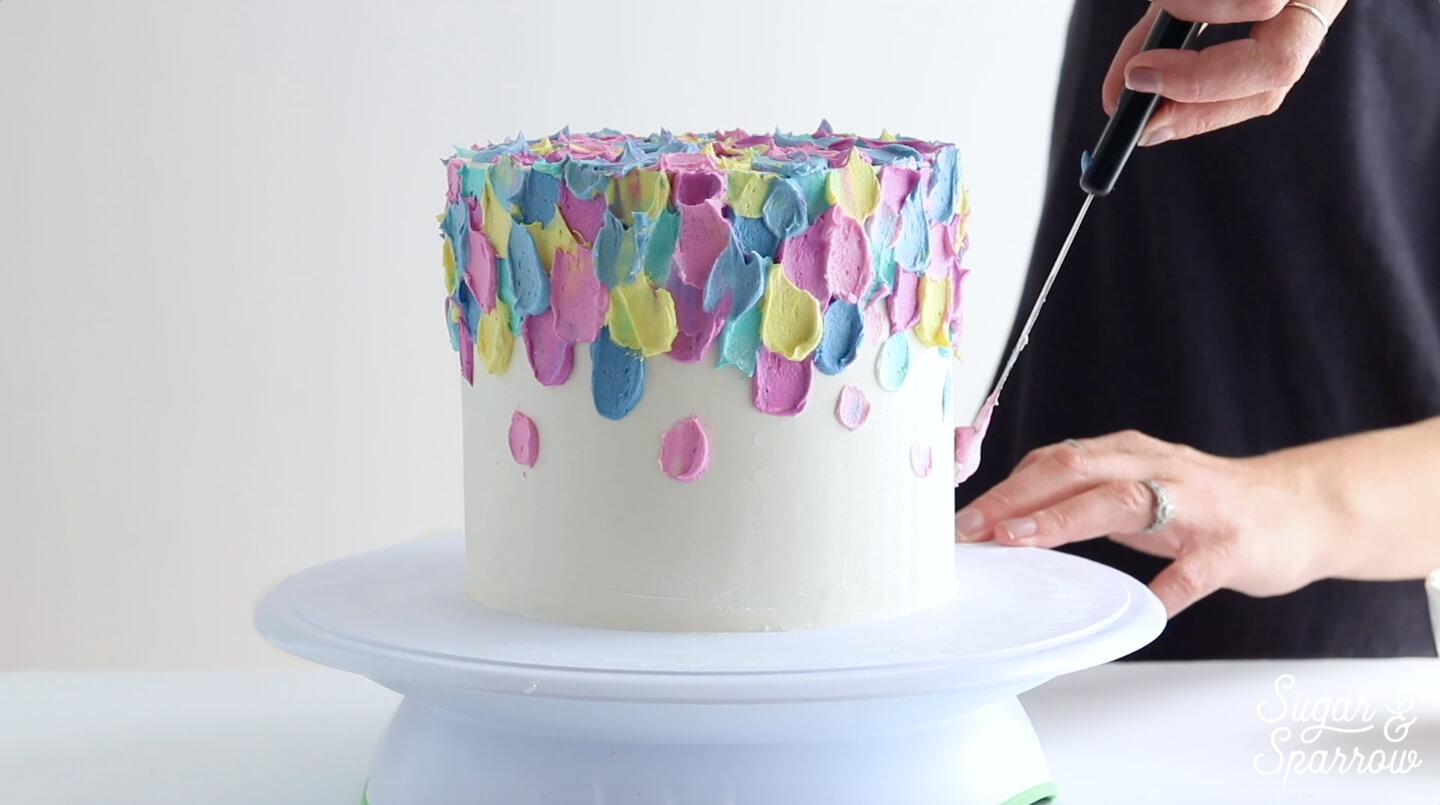
When you’re applying the buttercream paint strokes to the top of the cake, swipe the spatula from the outer edge toward the center of the cake and keep the strokes pointed toward the same direction. Like this:

spatula painted buttercream cake by sugar and sparrow

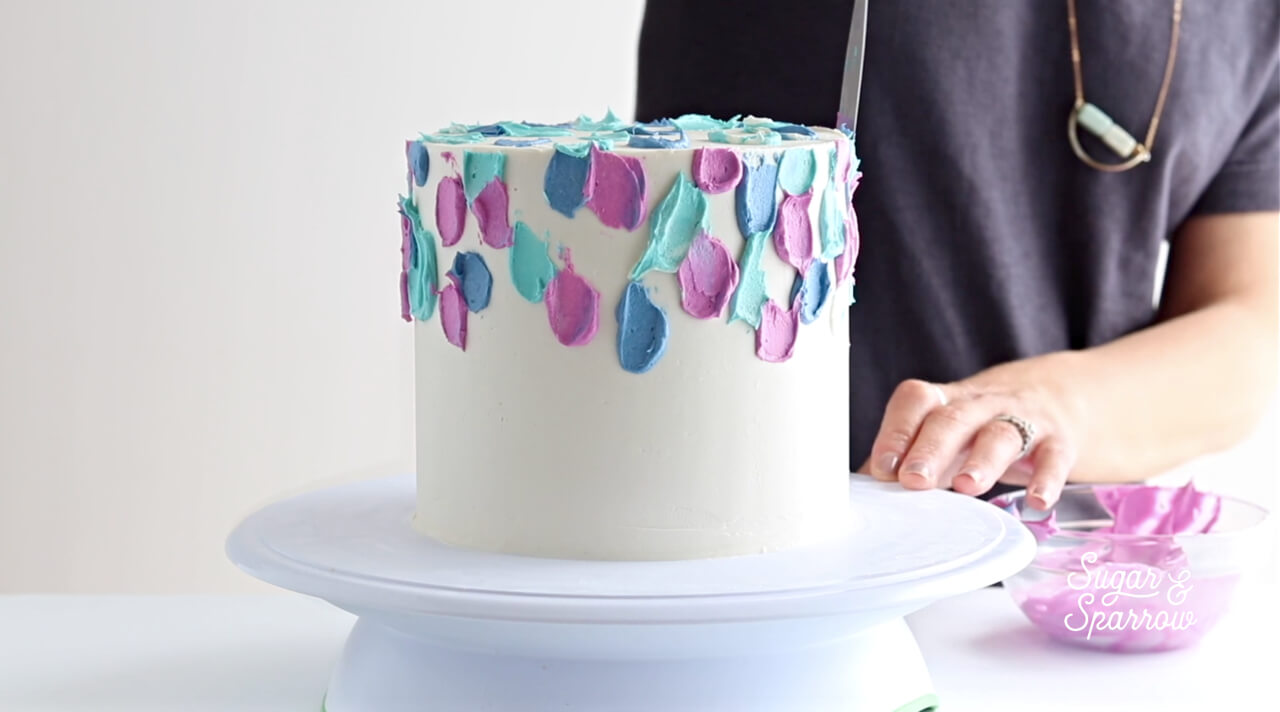
In this particular cake design, I stopped my buttercream paint strokes halfway down the side of the cake with the exception of some smaller, random strokes further down. You can use this technique on the entire cake as an alternative, or just do the sides of the cake and decorate the top with other elements, like a floral arrangement. Whatever look you’re going for, this is such a fun and easy way to add an eye-catching artsy effect! It’s one of my new favorite techniques, and I can’t wait to try it in other color schemes.

painted buttercream cake by sugar and sparrow

Ready to give this technique a try? Tag me on Instagram and show me what you end up creating. I can’t wait to see what fun color palettes and designs you come up with!

By: Whitney · In: Featured, Tutorials · Tagged: americolor, artsy cake, buttercream cake, cake, cake decorating, cake decorating techniques, cake tutorial, frosting, icing spatula, painting with buttercream, spatula painted cake

you’ll also love

the best vanilla cupcakes recipeThe Perfect Vanilla Cupcake Recipe
pumpkin layer cake recipe by sugar and sparrowPerfect Pumpkin Layer Cake Recipe
oreo cookies and cream cakeOreo Layer Cake Recipe

Join the List

Stay up to date & receive the latest posts in your inbox.

Reader Interactions

Comments

  1. gal says

    April 28, 2024 at 2:17 pm

    hi! for this cake did you put in straws to hold, or did you directly frost it once piled up? Thank you

    Reply
    • Whitney says

      May 2, 2024 at 8:29 pm

      Hi gal! I didn’t put straws in it. It’s not tall enough to need supports like that. But, I did refrigerate the cake after frosting it to make it a firm canvas for the spatula painting technique.

      Reply
  2. Noe says

    August 19, 2023 at 4:12 pm

    Hi Whitney! I love love love this cake. Do you think it will work with ermine buttercream? Do you have any experience coloring that frosting? Thanks a ton 🙂

    Reply
    • Whitney says

      August 20, 2023 at 8:23 am

      Hi Noe! I love ermine frosting and although I have never personally tried to color it, I just Googled to see if anyone else has done that before. It looks like ermine frosting is easy to color! I’d say go for it 🙂

      Reply
  3. Dorothy says

    June 28, 2021 at 10:09 am

    Thank you we are having trouble with the strokes. The tutorial was so fast it was hard to tell how you applied it. Is it more of a swiping stroke

    Reply
    • Whitney says

      June 28, 2021 at 8:57 pm

      Yes, the strokes are like a swiping motion. You’ll add some buttercream to your spatula/palette knife and press it to the cake while swiping upward. Hope that helps!

      Reply
  4. Dorothy says

    June 26, 2021 at 3:43 pm

    Do you use a stiff icing

    Reply
    • Whitney says

      June 27, 2021 at 9:09 pm

      Hi Dorothy! For this technique I use my vanilla buttercream recipe as-is: https://sugarandsparrow.com/vanilla-buttercream-recipe it’s not super stiff, more of a medium consistency. Hope that helps!

      Reply
  5. Bahar says

    May 19, 2021 at 10:27 am

    Hi,
    In order not to get the colors mixed, do we need to chill after each color before adding the next color? Thank you so much

    Reply
    • Whitney says

      May 20, 2021 at 9:32 am

      Hi Bahar! I don’t chill the cake in between colors. They don’t mix too easily when you layer them one at a time.

      Reply
  6. Freya says

    April 17, 2021 at 9:04 am

    Hi Whitney,
    Would the whole cake need to be kept chilled after the spatula strokes are added or can it be kept ambient?
    Many thanks,
    Freya

    Reply
    • Whitney says

      April 20, 2021 at 2:42 pm

      Hi Freya, the cake doesn’t need to be refrigerated after the spatula strokes are added unless you’re using a frosting that requires refrigeration. The buttercream recipe I link to in this post doesn’t require refrigeration. Enjoy!

      Reply
  7. Brooke says

    January 26, 2021 at 12:19 pm

    Could you use a cream cheese icing for this?

    Reply
    • Whitney says

      January 29, 2021 at 2:24 pm

      Hi Brooke! You totally could.

      Reply
  8. Lynn says

    January 9, 2020 at 4:38 pm

    Hi! Have you ever made and/or seen a cake using this technique that starts off with a cake that has been frosted with chocolate frosting, rather than white?

    Reply
    • Whitney says

      January 10, 2020 at 9:36 am

      Hi Lynn! I haven’t seen that done (yet!) but I think it could look really cool in a color palette that includes chocolate as the base!

      Reply
  9. Alexis says

    September 21, 2019 at 6:49 pm

    How many layers and what size did you use to make this cake?

    Reply
    • Whitney says

      September 23, 2019 at 9:01 am

      Hi Alexis! For this cake, I used three 6-inch layers.

      Reply
  10. meh says

    July 26, 2019 at 12:27 am

    hey can this be done with whipped cream instead of butter cream icing over the cake?

    Reply
    • Whitney says

      July 26, 2019 at 3:15 pm

      Hi there! I’m not sure if whipped cream alone would be stable enough to frost a cake. Instead, I would find a stabilized whipped cream frosting recipe and the technique should work fine with that. I would share a recipe if I had one! Something to add to my list for developing 🙂

      Reply
  11. Ashley says

    June 27, 2019 at 10:47 pm

    Hi Whitney,
    What can you use to spread and smooth the buttercream if you don’t have a metal/plastic smoother please?
    Thanks

    Reply
    • Whitney says

      June 28, 2019 at 9:46 am

      Hi Ashley! I have never tried using anything to smooth buttercream except for an icing smoother/bench scraper. You can try using something like a butter knife, but it’s almost impossible to get an entirely smooth buttercream cake without the right tools.

      Reply
  12. Janice says

    October 9, 2018 at 9:33 pm

    Hi Whitney! Could I get you advise if this technique works using Italian Meringue Buttercream? Your recipes usually call for American Buttercream, but these don’t work very well in Singapore’s hot and humid climate.

    Am looking forward to decorate a cake (for a baby shower) using this technique if it works with the Italian Buttercream. 🙂

    Reply
    • Whitney says

      October 10, 2018 at 9:55 am

      Hi Janice! It would most certainly work with Italian Meringue Buttercream! Just follow the exact same steps and you’ll be good to go 🙂

      Reply

Leave a Reply Cancel reply

Your email address will not be published. Required fields are marked *

Recipe Rating


Next Post >

Funfetti Layer Cake Recipe

Primary Sidebar

Welcome to Sugar & Sparrow

Welcome to Sugar & Sparrow

Helping you whip up pretty desserts with confidence and creativity. And hopefully sharing a few laughs with you along the way!

Learn More

Connect

let’s bake!

Get my very best recipes, baking tips, and decorating tutorials sent to your inbox

Featured Posts

strawberry buttercream frosting recipe

Fresh Strawberry Buttercream Recipe

cookie bar recipe with halloween candy bars

Halloween Candy Cookie Bars

lemon sheet cake recipe by sugar and sparrow

Lemon Sheet Cake

Search

Archives

Follow Along

@sugarandsparrowco

FUNFETTI SHEET CAKE 🥳 the most celebratory flavor FUNFETTI SHEET CAKE 🥳 the most celebratory flavor of all and so perfect for a crowd. It’s extra soft and moist vanilla cake speckled with rainbow sprinkles + captures that box mix texture but it’s 100% homemade and EASY! Top it with vanilla buttercream and rainbow sprinkles for the perfect party cake 🎉
 
Full recipe (w/ frosting) at the link in my bio or at https://sugarandsparrow.com/funfetti-sheet-cake/ 

INGREDIENTS 
2 1/2 Cups (265g) sifted cake flour 
2 tsp baking powder 
1/2 tsp baking soda 
1 tsp salt 
3/4 Cup (170g) unsalted butter, room temp 
1 3/4 Cup (340g) granulated white sugar 
3 large eggs, room temp 
1/2 Cup (120g) sour cream, room temp 
1 Tbsp pure vanilla extract 
1 Cup (240ml) whole milk, room temp 
1/3 Cup (60g) rainbow sprinkles, coated in 1 tsp flour 
 
INSTRUCTIONS 
1. Preheat the oven to 325°F (163ºC). Grease and line a 9×13 baking pan. 
2. In a medium bowl, whisk together the sifted cake flour, baking powder, baking soda, and salt. Set aside.  
3. In the bowl of your stand mixer fitted with the paddle attachment (or with a large bowl and hand mixer), beat the butter and sugar on medium-high speed until light and fluffy, 4 min. Add the eggs one at a time, then add the vanilla and sour cream and mix for one minute on high speed. 
4. Turn the mixer off and add the dry ingredients all at once. Mix on low speed until just combined, then add the milk and mix until just incorporated.  
5. Coat the rainbow sprinkles in 1 teaspoon of flour, then gently fold them into the cake batter. Pour the batter into the prepared baking pan and bake for 30-35 minutes, or until the cake springs back to the touch and a toothpick inserted into the middle comes out clean. Let the cake cool in the baking dish until room temperature, then decorate with vanilla buttercream + rainbow sprinkles (full recipe link in bio!) 
 
#funfetti #funfetticake #sheetcake #cake #birthdaycake
COOKIE DOUGH ICE CREAM CAKE 🍪🍦this is the birthday COOKIE DOUGH ICE CREAM CAKE 🍪🍦this is the birthday cake of my DREAMS and I’m so excited to share the recipe with you!! It’s chocolate and vanilla no-churn ice creams with homemade cookie dough chunks in every bite, swirled together and set on a delicious Oreo cookie crust 😍 easy, perfectly sliceable, and ideal for making ahead! I’m already dreaming about when I can make it again ✨

Get the recipe link in my bio + at https://sugarandsparrow.com/chocolate-chip-cookie-dough-ice-cream-cake/

#birthdaycake #icecreamcake #cakedecorating #nochurnicecream #icecreamlover
My kitchen in May 💛 some of these recipes had me f My kitchen in May 💛 some of these recipes had me feeling CRAZY with how many tests they took 🤪 but in the end I am so happy with these ones I got to hit the publish button on + I made my DREAM birthday cake that I can’t wait to share ASAP!!

Comment “MAY” to get all the recipes that are available now:

-Strawberry Shortcake Sheet Cake
-Lemon Cupcakes
-Lemon Cream Cheese Buttercream
-Orange Poppyseed Cake
-Whipped Mascarpone Frosting
-No-Bake Marbled Strawberry Cheesecake
-Chocolate Chip Cookie Cake

https://sugarandsparrow.com/everything-i-baked-in-may
 
#dessert #bakersofinstagram #baking #bakinglove #dessertlovers
CLASSIC BIRTHDAY CAKE 🥳 yellow cake with chocolate CLASSIC BIRTHDAY CAKE 🥳 yellow cake with chocolate frosting makes me so nostalgic for my childhood birthdays + my homemade version captures that moist and fluffy texture of box mix, but it’s 100% HOMEMADE! Pair it with chocolate frosting + lots of rainbow sprinkles and make it to celebrate someone special 💛
  
Full recipe (with chocolate frosting) is linked in my bio or at https://sugarandsparrow.com/yellow-cake-recipe/
  
INGREDIENTS  
2 Cups (210g) sifted cake flour  
1 1/2 tsp baking powder  
1/2 tsp baking soda  
1/2 tsp salt  
1/2 Cup (113g) unsalted butter, room temp  
3 Tbsp (45ml) vegetable oil  
1 1/3 Cups (267g) granulated sugar  
2 large eggs, room temp  
2 large egg yolks, room temp  
1/3 Cup (80g) sour cream, room temp  
2 tsp pure vanilla extract  
3/4 Cup (180ml) whole milk, room temp  
  
INSTRUCTIONS  
1. Preheat the oven to 350°F (177°C). Grease and line three 6-inch or two 8-inch cake pans.  
2. In a medium bowl, add the sifted cake flour, baking powder, baking soda and salt. Whisk together and set aside.  
3. In the bowl of your stand mixer fitted with the paddle attachment (or with a handheld mixer and large bowl), beat the butter on high speed until it’s creamy, 2 min. Add the vegetable oil and sugar, then continue to mix on medium-high until pale and fluffy, 2 min. Add the eggs and egg yolks one at a time, mixing on low speed for 10-15 seconds after each addition. Add the vanilla and sour cream and turn the mixer to high speed for 1 min.   
4. Turn the mixer off and add the dry ingredients all at once. Mix on low speed until the ingredients just start to combine, then add the milk in a steady stream and continue mixing until incorporated, about 30 seconds.   
5. Pour the batter evenly into the prepared cake pans and bake for 28-32 minutes. Let the cakes cool, then fill and frost with chocolate buttercream (full recipe linked in my bio!)
  
#birthdaycake #yellowcake #cakedecorating #chocolatecake #cakelover
S’MORES ICEBOX CAKE 🔥 Every bit as gooey and decad S’MORES ICEBOX CAKE 🔥 Every bit as gooey and decadent as it seems and I am blown away at how EASY this recipe is! It’s layers of graham crackers, chocolate ganache, and homemade marshmallow creme, piled high in a loaf pan and refrigerated overnight. The graham crackers soften into a cake-like texture and transform this dessert into the easiest s’mores cake ever.  
 
Recipe linked in my bio and at https://sugarandsparrow.com/smores-icebox-cake/
 
#smorescake #iceboxcake #nobake #smores #cakedecorating

Footer

On the Blog

  • Cake Basics
  • Recipes
  • Tutorials

Info

  • About
  • Privacy Policy & Disclosure

stay in the know

Copyright © 2026 · Theme by Sugar & Sparrow