• Cake
  • Frosting
  • YouTube
  • My Favorite Tools
  • Nav Social Icons

  • Skip to primary navigation
  • Skip to main content
  • Skip to primary sidebar
  • Skip to footer
  • Recipes
    • Cake
    • Cupcakes
    • Frosting
    • Ice Cream
    • Vegan
  • Cake Basics
  • Tutorials
  • Blog
  • About
  • Mobile Menu Widgets

    Connect

    Search

Sugar & Sparrow logo in script font

Sugar & Sparrow

Lifestyle and Cake from Portland Oregon

  • Cake Basics
  • Recipes
    • Cake
    • Cupcakes
    • Cookies & Bars
    • Filling
    • Frosting
    • Ice Cream
    • No-Bake
    • Small Batch
    • Vegan
  • Tutorials
  • Book
  • Blog
  • About

How To Cover A Cake In Sprinkles

December 12, 2018 · In: Featured, Holiday, Seasonal, Tutorials, Winter

This was originally a guest post that I wrote for SprinklePop’s blog. It’s too good not to re-share over here, because covering a cake in sprinkles is an essential cake decorating skill you’re gonna want in your repertoire. Oh, and it’s a whole lot of fun too, so enjoy!  

Incorporating sprinkles into cake design is something I’ve loved from the beginning of my cake making journey. But although I’ve been caking for years, I’ve never actually attempted to cover an entire cake in sprinkles – until now, that is! Behold:

Christmas sprinkles cake by Sugar and Sparrow

sprinklepop sprinkles cake by sugar and sparrow

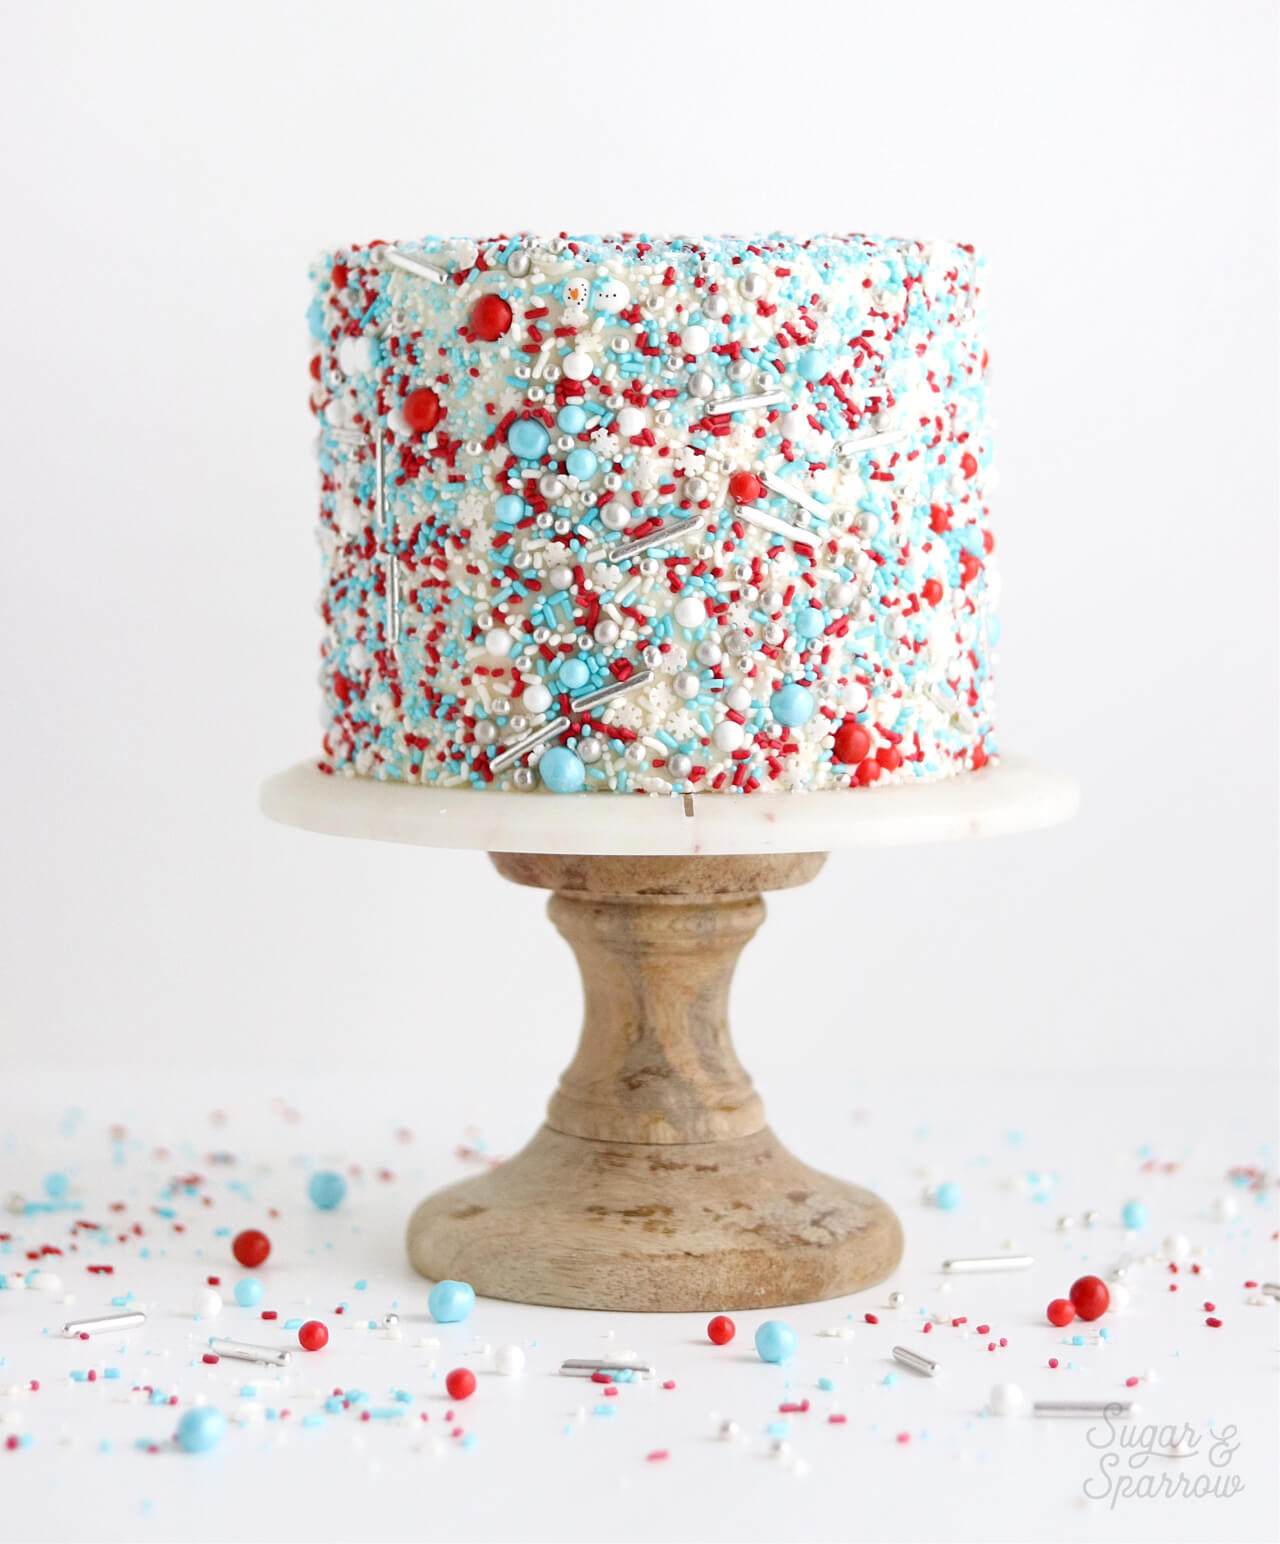
How pretty are those sprinkles? They’re the Oh Snow Cute sprinkle mix by SprinklePop and they’re part of a beautiful collection of Holiday sprinkles available in their shop! I love the color contrast of the icy blues and Christmas reds, and if you look real close you’ll find some tiny little snowmen and snowflakes mixed in (hence the name “Oh Snow Cute”). I think they’re so perfect for a non-green-and-red Holiday look, but you’ve got to check out the other Holiday sprinkles in the collection because they’re all so beautiful!

I was totally surprised to find that covering a cake with sprinkles was actually easy, even as a first timer. All you need is a smooth buttercream cake and a tray full of sprinkles to roll it around in! Ok, maybe there are a few other things you need, but I promise I will spare no details so you can reach sprinkle cake greatness. Here’s a quick video of the process before I walk you through the step-by-step below:

You Will Need:

  • 8oz bottle of Oh Snow Cute sprinkles (or other favorite sprinkle mix)
  • A baking sheet
  • A crumb coated cake
  • Enough buttercream for a final frosting layer
  • Icing scraper
  • Angled icing spatula
  • Cake turntable
  • Cardboard cake circle (the same diameter as your cake)

Step 1: Frost The Sides Of Your Cake

Start by frosting the sides of your cake only. Use your icing scraper to create smooth, straight sides as a buttercream finish. For the buttercream ridge that forms around the top rim of the cake, use your angled icing spatula to frost it inward (across the top of the cake) and create sharp edges around the top rim.

how to frost a cake with smooth buttercream

When your sides are looking smooth and your edges are looking sharp, place the cake into the refrigerator for 10-15 minutes so the buttercream begins to set, but isn’t too firm to the touch.

Step 2: Spread Sprinkles Onto Baking Sheet

While your cake is chilling in the refrigerator, spread the sprinkles onto the baking sheet. Feel free to shake them around so they get mixed up really well.

how to roll a buttercream cake in sprinkles

Step 3: Roll The Cake In Sprinkles

Remove the cake from the refrigerator and place a cardboard cake circle on top of the cake. With one hand on the top cardboard cake circle and one hand on the bottom one, gently roll the cake through the sprinkles.

how to roll a cake in sprinkles

how to cover a buttercream cake in sprinkles

Feel free to stop halfway around, shake the sprinkle tray to keep the sprinkles well mixed, and continue rolling the cake until the sides are completely covered.

Step 4: Ice The Top Of The Cake

Place the cake back onto your turntable and remove the cardboard circle from the top of the cake, then frost the top with buttercream.

sprinkle covered cake tutorial

Use your angled icing spatula to make sure the top of the cake is as smooth and level as possible while maintaining your sharp edges. When you’re finished, pop the cake back into the refrigerator for about five minutes so the buttercream on top begins to set slightly.

Step 5: Cover The Top In Sprinkles

Finally, pour sprinkles over the top of the cake and smooth them with your icing spatula until the entire top is level and covered in sprinkles.

sprinkle cake tutorial by sugar and sparrow

Voila! A sprinkle-covered masterpiece! I ended up piping an open star border with my Wilton Tip 6B for some extra flair. 

sprinkle covered cake by sugar and sparrow

The best part about this technique is that it will work with sprinkles of all shapes and colors. It’s an easy way to make an eye-catching creation, whether it’s for the Holidays or any day!

By: Whitney · In: Featured, Holiday, Seasonal, Tutorials, Winter · Tagged: buttercream cake, cake decorating, cake tutorial, christmas cake, holiday cake, sprinkle cake, sprinkle covered cake, sprinklepop

you’ll also love

the best vanilla cupcakes recipeThe Perfect Vanilla Cupcake Recipe
pumpkin layer cake recipe by sugar and sparrowPerfect Pumpkin Layer Cake Recipe
oreo cookies and cream cakeOreo Layer Cake Recipe

Join the List

Stay up to date & receive the latest posts in your inbox.

Reader Interactions

Comments

  1. Cheryl says

    November 25, 2023 at 1:57 pm

    I’m planning on making myself a small sprinkle covered cake for my birthday next month. I’m not crazy about buttercream frosting. Would a cream cheese frosting work?

    Reply
    • Whitney says

      November 29, 2023 at 9:14 am

      Hi Cheryl! What a fun birthday cake idea! Yes, cream cheese frosting will work just fine with this tutorial.

      Reply
  2. Katherine says

    May 15, 2022 at 7:34 am

    Looks amazing, did the colours bleed please?

    Reply
    • Whitney says

      May 16, 2022 at 9:48 pm

      Thanks so much, Katherine! The colors didn’t bleed at all.

      Reply
  3. Benjamin Stephen says

    July 30, 2021 at 4:45 am

    But the speckle are they consumables ?

    Reply
    • Whitney says

      August 1, 2021 at 9:51 am

      Hi Benjamin! Yes, the sprinkles are consumable.

      Reply
  4. Kristin Groh says

    March 9, 2021 at 8:19 am

    Hello! I am going to try this style out this week. I was wondering if you use an American buttercream for this or if that will not work because it is crusting? Thanks

    Reply
    • Whitney says

      March 10, 2021 at 9:00 am

      Hi Kristin! Yes, American buttercream is what I use all the time for this method!

      Reply
  5. jeannine says

    January 26, 2020 at 5:03 pm

    WOW! I am so impressed with your cakes. I finally have time to browse your archives, and I am so inspired. Thank you so much! You are bring great recipes, and joy to my day! and… the video tutorials are great!

    Reply
    • Whitney says

      January 26, 2020 at 9:36 pm

      Thanks so much for the kind words, Jeannine! Excited for you to try these recipes and tutorials 🙂

      Reply
  6. Jess says

    November 15, 2019 at 1:56 pm

    Hi Whitney this is amazing!! I was just wondering how you would just cover the bottom of the cake in sprinkles as you have done in the picture with your vanilla cake recipe?

    Reply
    • Whitney says

      November 16, 2019 at 3:16 pm

      Hi Jess! To just cover the bottom of the cake, I grab a handful of sprinkles and press them to the side of the cake with the palm of my hand. It works best when the buttercream is still slightly wet to the touch.

      Reply
  7. Roxanne says

    February 21, 2019 at 9:14 pm

    Hi,

    I love your site, I can’t stop looking at it! I have been getting into making cakes and love all of your techniques and tips, they are so helpful!!

    How many ounces of sprinkles would it take to cover an entire 3 tier 6inch cake, like this one?

    Reply
    • Whitney says

      February 22, 2019 at 12:24 pm

      Hi Roxanne! You are so sweet! I’m so happy to hear you’re loving the blog 🙂 For this cake, I used an 8oz bottle of sprinkles to roll the cake in and it was perfect. I had sprinkles left over (I think I only ended up needing about 5oz to cover the cake entirely), but to roll the cake its better to have more sprinkles than too little.

      Reply

Leave a Reply Cancel reply

Your email address will not be published. Required fields are marked *

Recipe Rating


Next Post >

Merry & Bright Christmas Cake

Primary Sidebar

Welcome to Sugar & Sparrow

Welcome to Sugar & Sparrow

Helping you whip up pretty desserts with confidence and creativity. And hopefully sharing a few laughs with you along the way!

Learn More

Connect

let’s bake!

Get my very best recipes, baking tips, and decorating tutorials sent to your inbox

Featured Posts

berry chantilly cake recipe sheet cake

Berry Chantilly Sheet Cake

salted caramel buttercream recipe for cakes and cupcakes

Salted Caramel Buttercream Recipe

freeze dried cherry buttercream recipe

Freeze-Dried Cherry Buttercream

Search

Archives

Follow Along

@sugarandsparrowco

COFFEE BUTTERCREAM (recipe below)☕️ this frost COFFEE BUTTERCREAM (recipe below)☕️ this frosting has AMAZING coffee flavor, is so easy to decorate cakes with, and pairs beautifully with so many flavors (chocolate, vanilla, or any cake flavor you’d want to turn into a latte). 

All my cake pairing suggestions are linked in my bio or at https://sugarandsparrow.com/coffee-buttercream-recipe/ 

COFFEE BUTTERCREAM⁣
Yield: 2.5 Cups⁣

INGREDIENTS⁣
1 1/2 tsp instant coffee or espresso powder⁣
1 1/2 Tbsp whole milk, room temperature⁣
1 Cup (226g) unsalted butter, room temperature⁣
3 1/2 Cups (420g) powdered sugar⁣
2 tsp pure vanilla extract⁣
Pinch of salt⁣

INSTRUCTIONS⁣
1. Combine the instant espresso/coffee with the whole milk and set aside. In the bowl of a stand mixer, beat the butter on high until creamy and smooth (about 5 minutes), scraping down the bowl and paddle a few times in between.⁣
2. Turn the mixer to low and add the powdered sugar a few cups at a time, scraping down the bowl and paddle between intervals. Add the vanilla, the coffee/espresso milk mixture, and salt. Mix on low until fully incorporated, about one minute.⁣

#coffeebuttercream #buttercream #frosting #coffeecake
HUMMINGBIRD CAKE 🤎 after weeks of testing this HUMMINGBIRD CAKE 🤎 after weeks of testing this recipe I found that the KEY to taking this already delicious cake to the next level is: roasting the bananas!! It’s an optional step in this recipe BUT it adds unparalleled caramel notes and noticeable richness to the flavor 🙌🏼 Along with the crushed pineapple, toasted pecans, and tangy cream cheese buttercream, this cake is NEXT LEVEL delicious, ultra-moist, melts in your mouth, and will have everyone asking for the recipe. 

Full recipe (with cream cheese frosting) linked in my bio + at https://sugarandsparrow.com/hummingbird-cake-recipe/ 

#hummingbirdcake #creamcheesefrosting #bananacake #cakedecorating #cakerecipe
OREO CUPCAKES 🖤 (recipe below) I made these for OREO CUPCAKES 🖤 (recipe below) I made these for a fundraiser at @vancity.youth last weekend and was reminded of how delicious this recipe is! There’s black cocoa powder in the cupcake batter to give them the PERFECT Oreo cookie flavor profile + the most delicious cookies and cream buttercream I’d eat all on its own. 
 
Full recipe at https://sugarandsparrow.com/oreo-cupcakes-recipe/ 
 
OREO CUPCAKES 
1 Cup (132g) all purpose flour 
3/4 Cup (150g) granulated sugar 
1/3 Cup (38g) black cocoa powder 
1 tsp baking soda 
1/2 tsp baking powder 
1/4 tsp salt 
1/4 Cup (60ml) vegetable oil 
1 large egg, room temp 
1/2 tsp pure vanilla extract 
1/2 Cup (120ml) buttermilk, room temp 
1/2 Cup (120ml) hot coffee or hot water 
 
1. Preheat the oven to 350ºF/177ºC and line a cupcake pan with 12-15 liners. 
2. In a large bowl, whisk all of the dry ingredients together. Add the vegetable oil, eggs, vanilla, and buttermilk and whisk to combine. Whisk in the hot coffee (or hot water). 
3. Pour the batter into the prepared cupcake liners and bake for 14-18 minutes. 
 
OREO BUTTERCREAM 
1 Cup (226g) unsalted butter, room temperature 
3 Cups (360g) powdered sugar 
2 tsp pure vanilla extract 
2 Tbsp whole milk, room temperature 
pinch of salt, or to taste 
9 Oreo cookies (96g), finely ground 
 
1. Using a hand mixer or stand mixer, cream the butter on medium-high speed until it’s creamy and pale, 5 min. 
2. Add the powdered sugar a few cups at a time, mixing on low speed and scraping down bowl and paddle in between intervals. Keep the mixer on low and add the vanilla, milk, and salt. Mix until fully incorporated and uniform, 1-2 min. 
4. Mix in the Oreo cookie crumbs on low speed. 
 
#oreo #oreocupcakes #cookiesandcream #chocolatecupcakes #cupcakes
RASPBERRY CAKE FILLING (recipe below) ♥️ this RASPBERRY CAKE FILLING (recipe below) ♥️ this perfectly sweet/tart raspberry cake filling is beautifully thick, seedless, and so rewarding to make from scratch! It takes just a handful of ingredients and can be made with fresh OR frozen raspberries 🙌🏼 

Get the full recipe + cake pairing suggestions at the link in my bio or at https://sugarandsparrow.com/seedless-raspberry-cake-filling/

INGREDIENTS:
2 1/2 Cups (10oz, 315g) fresh or frozen raspberries
1/2 Cup (100g) granulated sugar
1 Tbsp lemon juice
1 tsp lemon zest
1 1/2 Tbsp (12g) cornstarch
1 1/2 Tbsp (22ml) water

INSTRUCTIONS: 
1. In a saucepan set over medium heat, add the raspberries, granulated sugar, lemon juice, and lemon zest. Cook until the mixture begins to boil, stirring occasionally. 
2. Once boiling, lower the heat and simmer for 10-15 minutes while you continue stirring occasionally. Then, remove from heat and use a fine mesh sieve to strain out the seeds over a medium bowl. After straining, you’ll be left with about 1/4 Cup of seedy pulp.
3. In a small separate bowl, combine the cornstarch and water until uniform. Return the strained raspberry filling to the saucepan (wipe it free of any remaining seeds if needed) and add the cornstarch/water mixture. Cook over medium heat until boiling, stirring constantly, then reduce to a simmer and cook for 1-3 minutes, until the filling has thickened slightly, is no longer cloudy, and coats the back of the spatula.
4. Pour into an airtight container and refrigerate for at least 4 hours and up to 1 week. It will be jello-like once set but after stirring it will become a thick, jammy consistency that’s perfect to use as a cake or cupcake filling!

#raspberrycake #cakefilling #cakedecorating #raspberries #baking
STRAWBERRY LEMON CAKE 🍓🍋 this cake is so lig STRAWBERRY LEMON CAKE 🍓🍋 this cake is so light and refreshing and bursting with all-natural flavors! It’s layers of my favorite extra fluffy lemon cake + the most delicious freeze-dried strawberry buttercream that ends up the prettiest natural pink color. I’ll never get over those little flecks of strawberry in the buttercream or the tiny chamomile flowers adding so much cheer! 

Grab the recipe at the link in my bio or at https://sugarandsparrow.com/strawberry-lemon-cake/

#strawberrylemon #lemoncake #strawberrycake #cakedecorating #strawberrybuttercream

Footer

On the Blog

  • Cake Basics
  • Recipes
  • Tutorials

Info

  • About
  • Privacy Policy & Disclosure

stay in the know

Copyright © 2026 · Theme by Sugar & Sparrow