• Cake
  • Frosting
  • YouTube
  • My Favorite Tools
  • Nav Social Icons

  • Skip to primary navigation
  • Skip to main content
  • Skip to primary sidebar
  • Skip to footer
  • Recipes
    • Cake
    • Cupcakes
    • Frosting
    • Ice Cream
    • Vegan
  • Cake Basics
  • Tutorials
  • Blog
  • About
  • Mobile Menu Widgets

    Connect

    Search

Sugar & Sparrow logo in script font

Sugar & Sparrow

Lifestyle and Cake from Portland Oregon

  • Cake Basics
  • Recipes
    • Cake
    • Cupcakes
    • Cookies & Bars
    • Filling
    • Frosting
    • Ice Cream
    • No-Bake
    • Small Batch
    • Vegan
  • Tutorials
  • Book
  • Blog
  • About

Belgian Waffle Layer Cake

April 10, 2024 · In: Cake, Featured, Recipes

Jump to Recipe

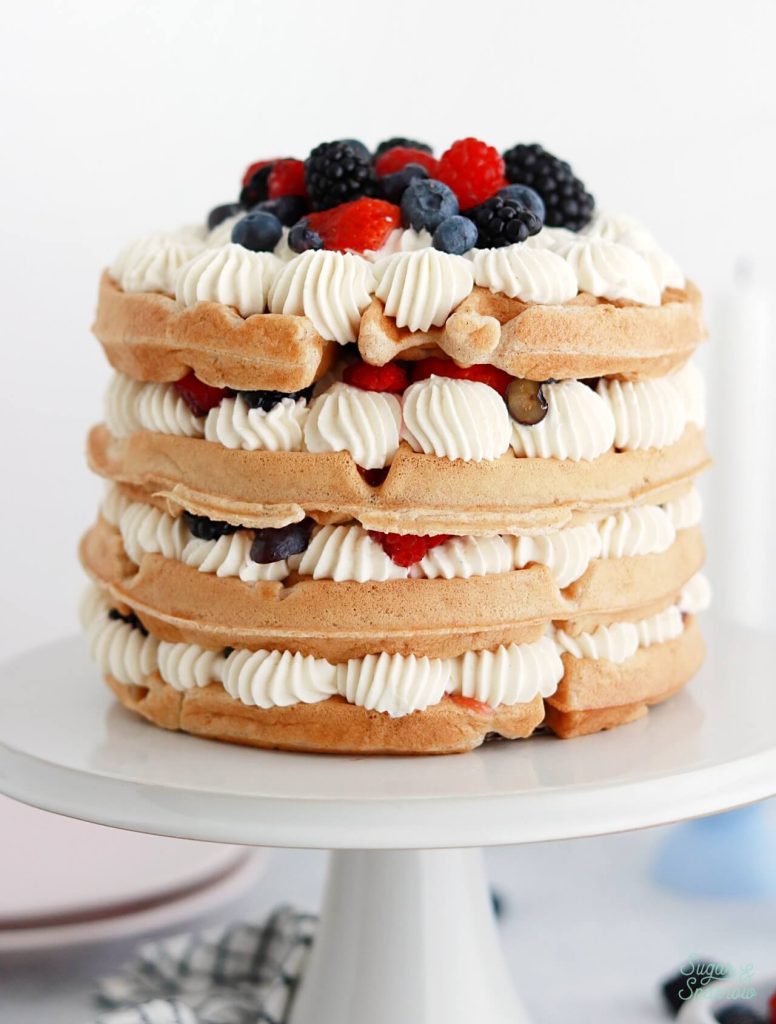
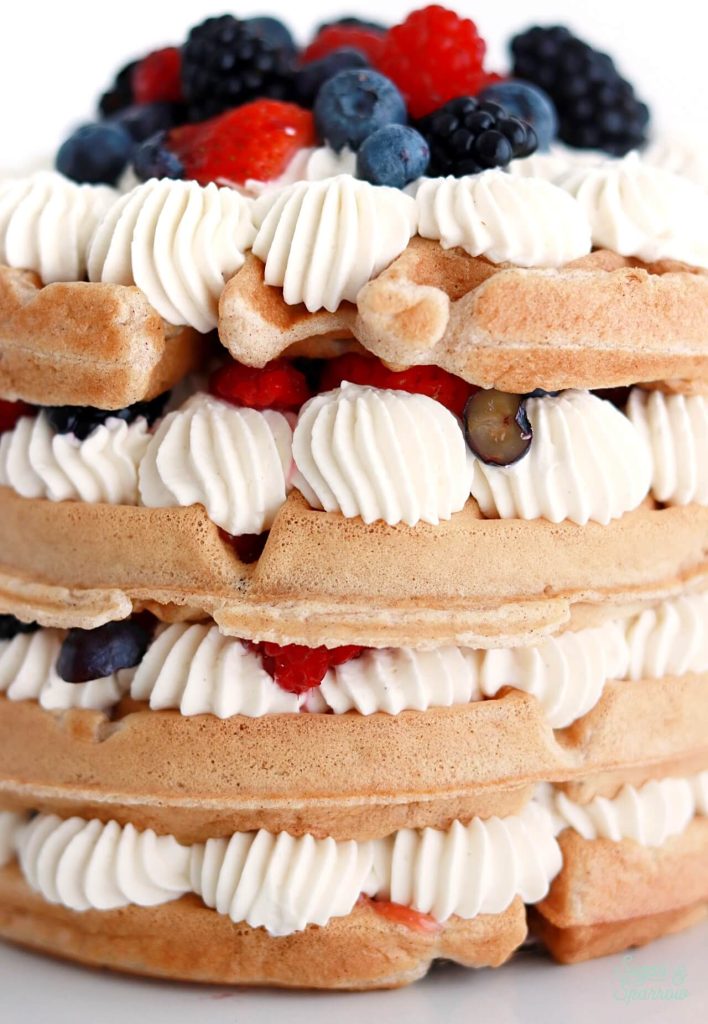
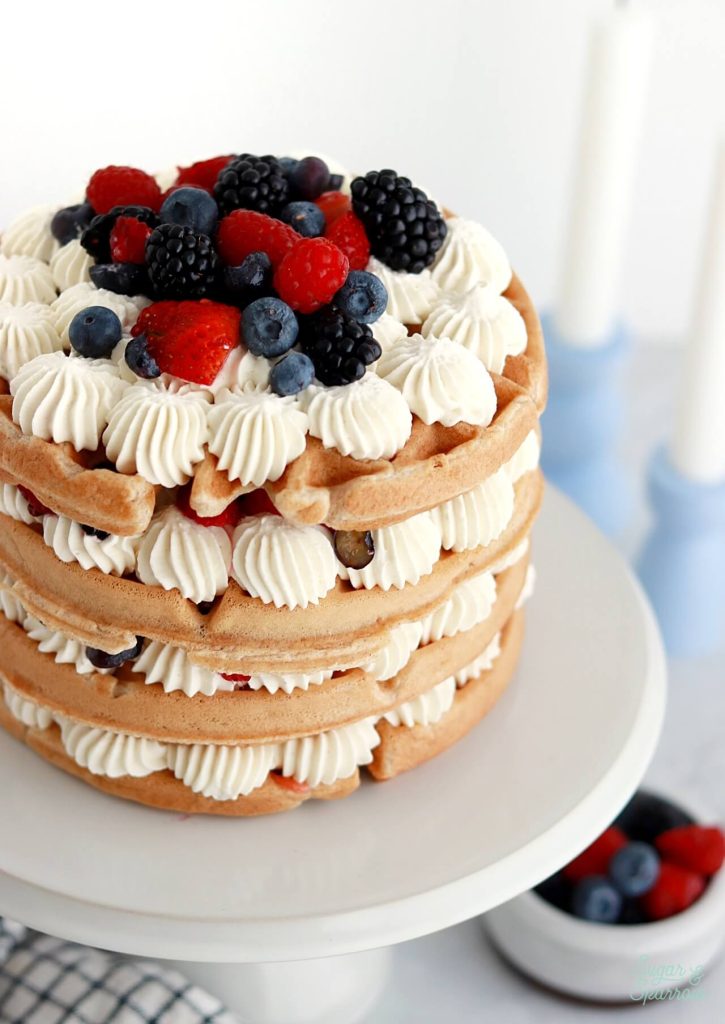
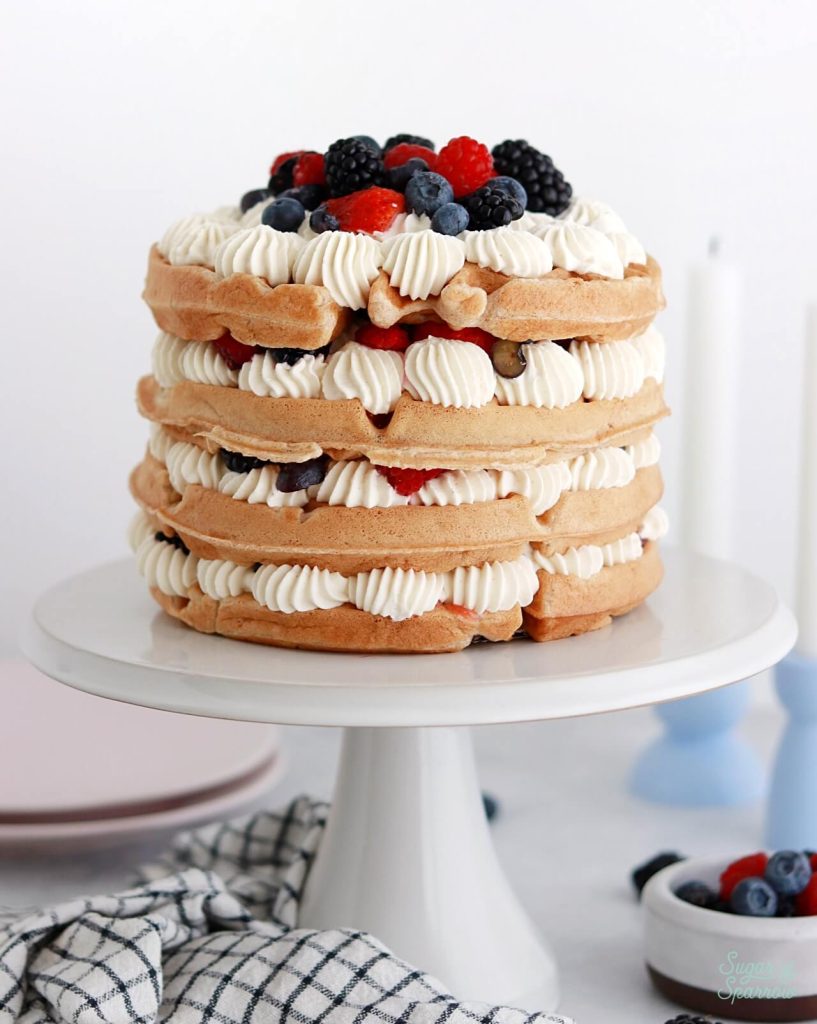
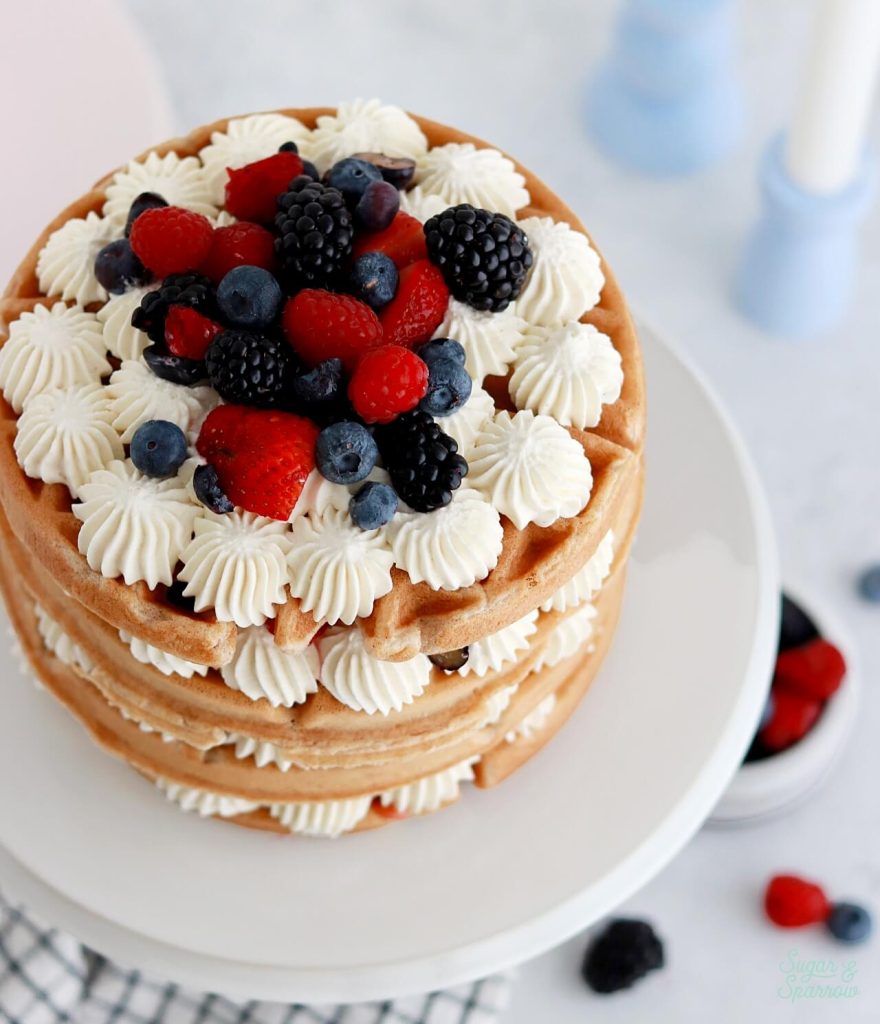
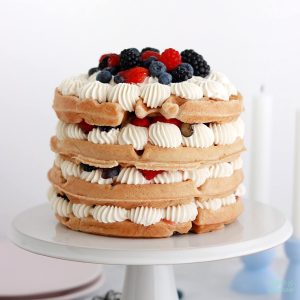
I made an impulse purchase the other day and bought this sage green Belgian waffle maker, mostly because it’s the most beautiful color ever and also because Belgian waffles are probably my favorite brunch food of all time. And then I thought, what if I made a whole stack of them with fresh berries and jam and delicious mascarpone cream between each one? Which naturally snowballed into this: a Belgian waffle layer cake! 

This post may contain affiliate links. For more information, see our disclosure policy.

Belgian waffle layer cake by sugar and sparrow

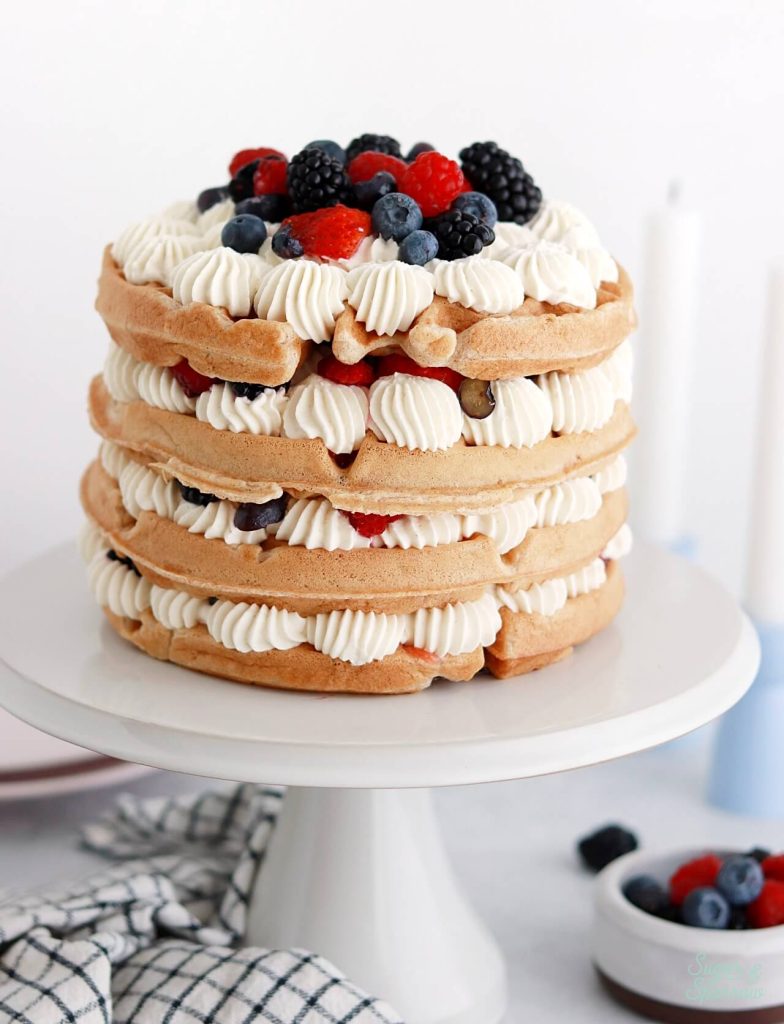
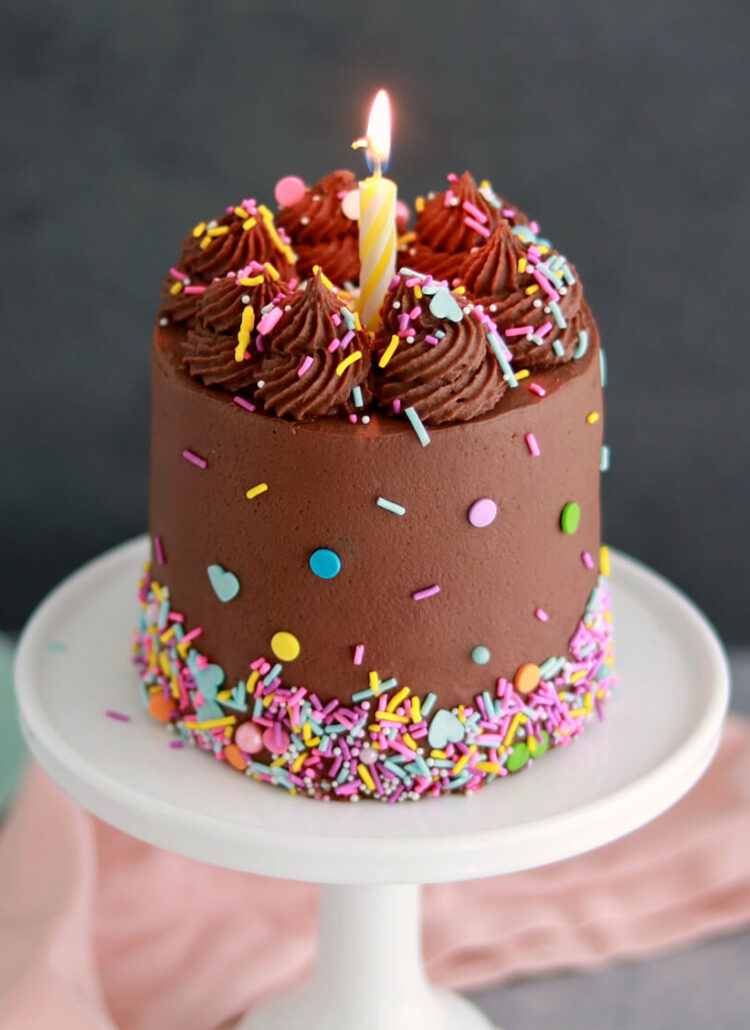
This Belgian waffle cake is so fun to make and the perfect centerpiece for a brunch. The mascarpone cream, jam, and fresh berries keep it classic and delightful for Spring. If it were May I would have added some chamomile flowers to make it even cheerier so tuck that idea away if you’re making this recipe at the right time of year! 

belgian waffle breakfast cake recipe
brunch cake ideas: belgian waffle cake

From-Scratch Waffles vs. Waffle Mix

I love the from-scratch Belgian waffle recipe below because it’s fairly easy to make and uses simple ingredients that end up tasting so special. Maybe it’s the hint of cinnamon. The waffles turn out nice and fluffy on the inside and perfectly crunchy on the outside. You will have to use far more dishes between whipping the egg whites and mixing the dry and wet ingredients separately, but it feels very chef-like to make the waffles from scratch and you will be pretty proud of yourself when you’re finished!

belgian waffle maker beautiful sage green

If you’d rather keep it as simple as possible, this recipe will absolutely work (and still taste great) with waffle mix. I personally like Krusteaz brand, but you can use any Belgian waffle mix that you know you’ll love. Regardless of whether you choose the from-scratch route or box mix, the mascarpone cream frosting will elevate your waffle cake to new heights! 

Crispy Waffle Tip: If your waffles are more on the floppy side instead of crispy when they come out of the waffle maker, you can crisp them up by placing them in a 250ºF oven (right on the rack) for 5-8 minutes. Just be sure to bring them back to room temperature before assembling with the frosting.

homemade belgian waffle recipe

The Easiest Mascarpone Cream Frosting

This mascarpone cream frosting is so creamy and light and just the right amount of sweet. Even saying the words mascarpone cream makes it sound a little fancy, but the truth is it couldn’t be easier to make. There are only four ingredients and all you do is add them into your stand mixer (at the same time!) and let the machine whip them into the perfect frosting. Simple as that! 

Since there is a lot of dairy involved in the frosting, it’s not recommended to leave out at room temperature for longer than two hours. This means you’ll need to refrigerate any frosting you make ahead of waffle cake assembly time, plus take care not to leave the assembled cake out for longer than two hours on display. 

mascarpone cream frosting recipe
belgian waffle cake with mascarpone cream frosting

Making Components Ahead of Time 

The one downside to this Belgian waffle cake is that it needs to be assembled pretty close to serving/display time so that it’s fresh. BUT that doesn’t mean you can’t prepare all the elements ahead of time and have them ready to go. The assembly process takes less than 10 minutes if you’re prepared for it. 

You can make the Belgian waffles up to a week ahead and store them in the freezer, then defrost them in the oven to bring them back to their fluffy/crispy texture. Just make sure they’re entirely room temperature before assembling with the mascarpone cream frosting so it doesn’t melt. And if you’d rather not make the waffles that far in advance, it’s also perfectly acceptable to make the waffles the day of and store them at room temperature for up to 6 hours. 

belgian waffle cake with mascarpone cream frosting and berries
waffle cake recipe with mascarpone cream frosting

Since the mascarpone cream frosting is so simple and comes together in about 5 minutes, I would recommend making it right before assembling to make sure it’s the perfect consistency. If you’re in a pinch though, the mascarpone cream can be made up to two days ahead of time, stored in an airtight container in the refrigerator. It may need to be gently re-mixed when made ahead, but be careful not to over-beat it or else it could become curdled. Your safest bet is to make it the day of, when you have your Belgian waffles ready to go. 

Once you assemble the cake, put it on display and amaze all your guests with your brunch-inspired masterpiece! It’s impressive and inviting all at the same time, and I can’t wait for you to taste the layers together.

Slicing & Serving the Belgian Waffle Cake 

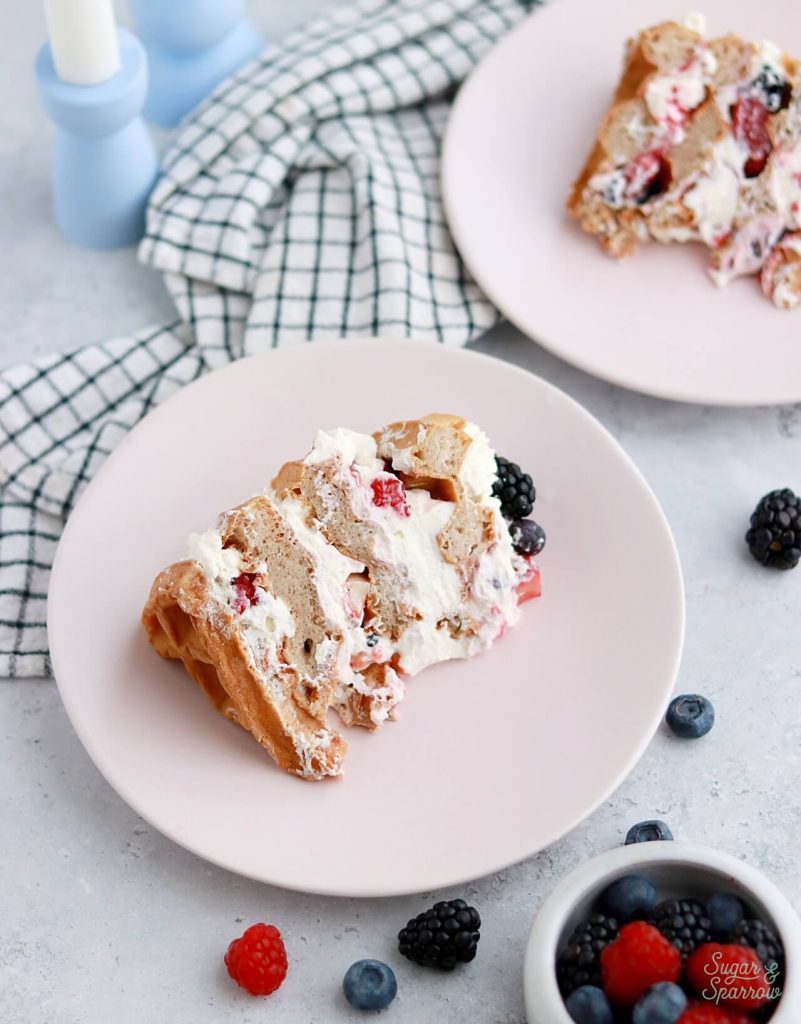
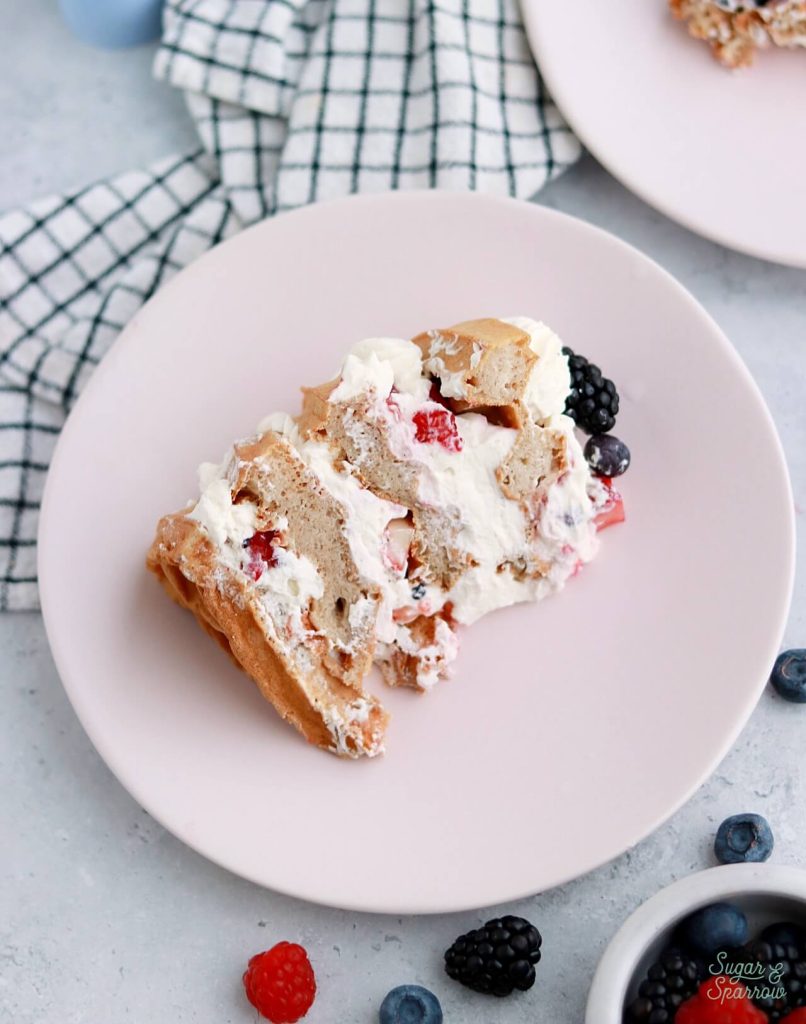
I’m not going to lie, this cake isn’t the easiest to cut into slices. I found that a sharp serrated knife worked best for keeping the layers from squishing down too much in the cutting process. But even though some of the bottom layers got squished, the cake still tasted AMAZING. And although the slices are a little messy they look delicious and inviting in their imperfectness. 

belgian waffles from scratch recipe

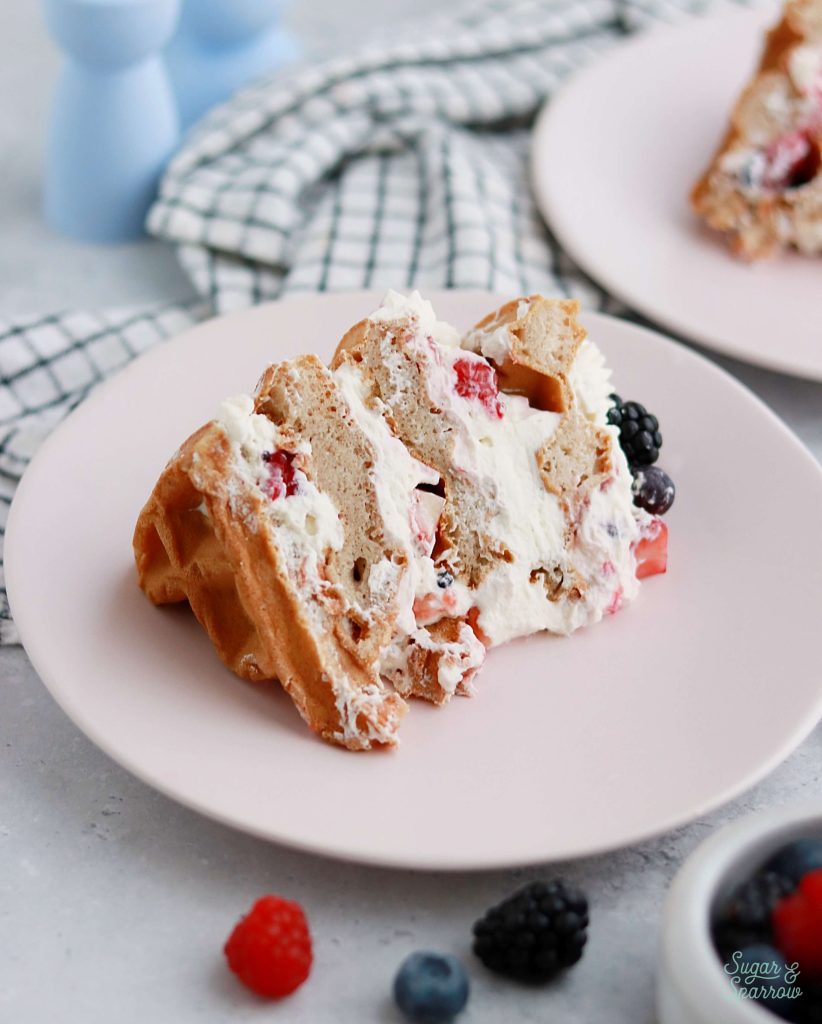
If you’d rather, you could disassemble the waffle cake and cut it into slices from there. Whatever you feel is easiest! It’ll still be completely delicious as long as you get all the elements in every slice, which is easy to do. Between the fluffy waffles, sweet hint of jam, creamy mascarpone frosting, and the beautiful fresh berries, you’ll be in heaven.

belgian waffle layer cake

Belgian Waffle Layer Cake

Fluffy Belgian waffles layered high with silky smooth mascarpone cream frosting, a hint of jam, and fresh berries. The perfect centerpiece for a brunch spread!
Print Recipe Pin Recipe
Prep Time:40 minutes mins
Cook Time:20 minutes mins
Servings: 12 slices

Ingredients

Homemade Belgian Waffles

  • 2 1/4 Cups (298g) all purpose flour
  • 1 Tbsp baking powder
  • 3 Tbsp (38g) granulated sugar
  • 1/2 tsp salt
  • 1 tsp ground cinnamon
  • 2 large eggs, separated
  • 1/2 Cup (120ml) vegetable oil
  • 2 Cups (480ml) whole milk
  • 1 tsp pure vanilla extract

Mascarpone Cream Frosting

  • 1 3/4 Cups (210g) powdered sugar
  • 2 tsp pure vanilla extract or vanilla bean paste
  • 1 Cup (8oz, 225g) mascarpone cheese, cold
  • 2 1/4 Cups (540ml) heavy whipping cream, cold

Berry Layers

  • 1/2 Cup berry jam of your choice (I used strawberry)
  • 2 Tbsp water
  • 1/4 Cup fresh raspberries, halved
  • 1/4 Cup fresh blueberries, halved
  • 1/4 Cup fresh blackberries, halved
  • 1/4 Cup fresh strawberries, quartered
  • 1/4 Cup all of the above berries, kept whole for garnish

Instructions

Make the Belgian Waffles

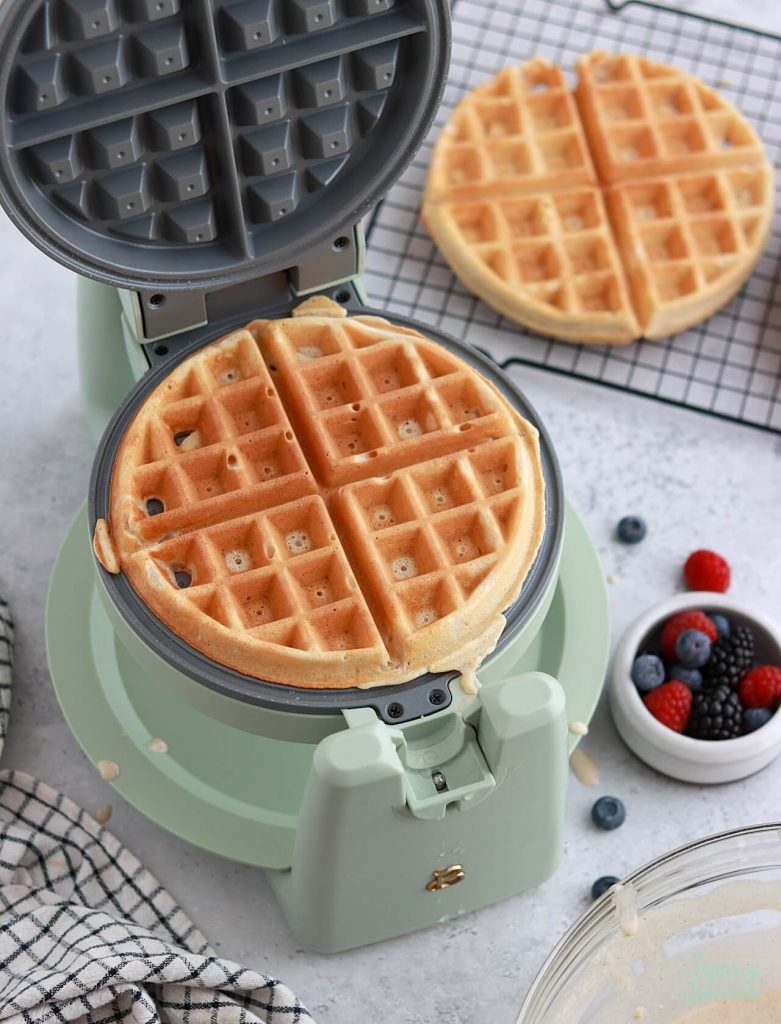
  • Preheat your waffle maker. Mine specified not to use cooking spray, but if your waffle maker requires it, add a coating of cooking spray now and in between each waffle.
  • In a large bowl, whisk together the dry ingredients: baking powder, sugar, salt, and cinnamon. Set aside.
  • Add the egg whites into a medium bowl and beat with a hand mixer (or stand mixer with the whisk attachment) until stiff peaks form, 2-3 minutes. Set aside.
  • In another medium bowl, add the egg yolks, vegetable oil, milk, and vanilla extract. Whisk until combined, then pour the mixture into the dry ingredients and mix until combined. Gently fold in the egg whites with a rubber spatula.
  • Pour the batter onto your hot waffle maker and cook according to the manufacturer's directions. My waffle maker took about 2.5 minutes per waffle.
  • Set the waffles aside to cool completely before assembly.

Make the Mascarpone Cream Frosting

  • Place all of the mascarpone cream ingredients into the bowl of your stand mixer fitted with the whisk attachment. Mix on low speed to combine for about 1 minute.
  • Turn the mixer to high speed and whip until it becomes the consistency of whipped cream with stiff peaks, 2-3 minutes. Any longer and it may begin to separate, so keep a close eye on it while mixing.
  • Use immediately (preferred), or store the frosting in an airtight container in the refrigerator for up to 2 days ahead of time.

Prepare the Toppings

  • Add the jam and water into a small bowl and mix until combined. Set aside.
  • Add all of the halved and quartered berries into a medium bowl and toss to combine. Set aside.

Assembly

  • Place the first waffle onto a cake stand (or whatever you’re using to serve the cake). Add the jam mixture into a piping bag and snip off the end. Drizzle ¼ of the jam mixture on top of the waffle.
  • Add the mascarpone cream frosting into a piping bag fitted with Wilton Tip 8B and pipe stars all over the surface of the waffle. Alternatively you can add a layer of the mascarpone cream frosting with an icing spatula for an even more rustic look.
  • Add about ¼ Cup of the berry mixture on top.
  • Repeat layering waffles and fillings 3 more times to make a four-layer waffle cake, only place the whole berries on the very top layer of mascarpone cream frosting.
  • Display immediately and serve within three hours. You can technically place the decorated cake in the refrigerator a little ahead of time but note that the waffles will become much softer if you do. I do not recommend storing it in the refrigerator for longer than an hour.

Notes

Crispy Waffle Tip: If your waffles are more on the floppy side instead of crispy when they come out of the waffle maker, you can crisp them up by placing them in a 250ºF oven (right on the rack) for 5-8 minutes. Just be sure to bring them back to room temperature before assembling with the frosting.
Using Waffle Mix: This recipe works just as well when you use your favorite Belgian waffle mix to make the waffle portion! I like Krusteaz brand.
Make Ahead Tips:
  1. You can make and freeze the waffles up to one week ahead of time. To do so, place the waffles on a parchment-lined baking tray and place in the freezer for about 30 minutes. They’ll be semi-frozen (and less likely to stick together) at this point and you can add them all into a large Ziplock bag to continue storing in the freezer. When you’re ready to use them, preheat the oven to 350ºF and place the frozen waffles on a parchment-lined baking tray. Bake for 5-10 minutes, or until crispy on the edges and no longer frozen. Remove from the oven and cool to room temperature before assembling with the frosting and berries. 
  2. The mascarpone cream frosting can be made up to two days in advance and stored in an an airtight container in the refrigerator. For the best frosting consistency, make it right before assembling the waffle cake. It only takes a few minutes and minimal effort. 

I hope you love this Belgian waffle cake recipe as much as I do! Let me know what you think in the comments below + be sure to tag @sugarandsparrowco on Instagram to show me cake pics. I love to see what you create!

By: Whitney · In: Cake, Featured, Recipes · Tagged: belgian waffle cake, belgian waffles, mascarpone cream frosting, waffle cake

you’ll also love

whipped chocolate ganache for cakesWhipped Chocolate Ganache
how to mix rainbow buttercream colorsThe Easiest Way to Make Rainbow Buttercream Colors
cookie bar recipe with halloween candy barsHalloween Candy Cookie Bars

Join the List

Stay up to date & receive the latest posts in your inbox.

Reader Interactions

Leave a Reply Cancel reply

Your email address will not be published. Required fields are marked *

Recipe Rating


Next Post >

Lemon Buttercream Recipe

Primary Sidebar

Welcome to Sugar & Sparrow

Welcome to Sugar & Sparrow

Helping you whip up pretty desserts with confidence and creativity. And hopefully sharing a few laughs with you along the way!

Learn More

Connect

let’s bake!

Get my very best recipes, baking tips, and decorating tutorials sent to your inbox

Featured Posts

easy salted caramel recipe

Easy Salted Caramel Recipe

lemon cake with cream cheese buttercream

Lemon Cake With Lemon Cream Cheese Buttercream

buttercream consistency

How to Make the Perfect Buttercream Consistency + Troubleshooting Tips

Search

Archives

Follow Along

@sugarandsparrowco

LEMON CUPCAKES 🍋 after about a dozen recipe tes LEMON CUPCAKES 🍋 after about a dozen recipe tests, this one is everything I could want in a lemon cupcake! Fluffy-yet-moist, bursting with natural lemon flavor, and absolutely irresistible topped with lemon cream cheese buttercream. 

Full recipe (with frosting) linked in my bio + at https://sugarandsparrow.com/homemade-lemon-cupcakes/

INGREDIENTS:
1 Cup (132g) all-purpose flour
1 tsp baking powder
1/4 tsp salt
1/4 Cup (60ml) whole milk, room temperature
3 Tbsp (45ml) lemon juice from 1 medium lemon
3/4 Cup (150g) granulated sugar
3 Tbsp (42g) unsalted butter, room temperature
2 Tbsp (30ml) vegetable oil
2 large eggs, room temperature
1 tsp pure vanilla extract

INSTRUCTIONS:
1. Preheat the oven to 350ºF (177ºF) and line a standard cupcake pan with 12 paper liners.
2. In a large bowl, whisk together the flour, baking powder, and salt. Set aside. 
3. In the bowl of a stand mixer fitted with the paddle attachment (or with a hand mixer and large bowl), add the lemon zest to the sugar and mix on low speed until fragrant and well combined, about 1 minute. Meanwhile, combine the lemon juice with the milk and set aside. 
4. Add the butter to the lemon-sugar mixture and cream on medium speed until and combined, about 2 minutes. Add the vegetable oil and beat until light and creamy, about 3 minutes. Scrape down the bowl and paddle as needed.
5. Mix in the eggs one at a time on low speed, then add the vanilla and turn the mixer to medium speed for one minute.
6. Turn the mixer off and add the flour mixture all at once. Mix on low speed until just combined, then slowly pour in the lemon-milk mixture. Mix until just combined, about 30 seconds.
7. Divide the batter equally between the liners and bake for 14-18 min. Cool, then top with frosting of your choice (link in bio for lemon cream cheese frosting)�
#lemoncupcakes #creamcheesefrosting #lemon #cupcakes #cupcakedecorating
April in my kitchen 🌸 I published 5 NEW recipes April in my kitchen 🌸 I published 5 NEW recipes on my site, baked my Oreo cupcake recipe for a fundraiser and found it was just as delicious as I remember, and filmed/photographed 3 recipes that will be on my blog in May (Lemon Cupcakes, Lemon Cream Cheese Buttercream, and No-Bake Marbled Strawberry Cheesecake) 🥰 

Comment “APRIL” to get all the available recipes and stay tuned for more! 

#bakersofinstagram #springbaking #cakedecorating #cupcakes #bakinglove
SHEET PAN COOKIE CAKE 🍪 slice it warm for a fud SHEET PAN COOKIE CAKE 🍪 slice it warm for a fudgy chocolate chip cookie OR let it settle into a moist and chewy cookie cake that’s perfect for decorating! My fave vanilla buttercream + sprinkles turn this giant chocolate chip cookie into the perfect birthday cake alternative at the end 🥳
⁣
Full recipe + decorating ideas at https://sugarandsparrow.com/sheet-pan-chocolate-chip-cookie-cake/
⁣
INGREDIENTS⁣
1 Cup (226g) unsalted butter, melted⁣
1 1/3 Cups (267g) packed light or dark brown sugar⁣
1/2 Cup (100g) granulated sugar⁣
3 large eggs⁣
1 Tbsp pure vanilla extract⁣
1 tsp baking soda⁣
1 tsp cornstarch⁣
1/2 tsp salt⁣
3 Cups (398g) all purpose flour⁣
2 Cups (350g) semi-sweet chocolate chips⁣
⁣
INSTRUCTIONS⁣
1. Preheat the oven to 350ºF (177ºC). Grease and line a 13×18 inch sheet pan.⁣
2. In a large bowl, add the brown sugar and granulated sugar. Melt the butter in the microwave and pour it over the top of the sugars. Whisk together until uniform. Add the eggs and vanilla, then continue whisking until uniform. Whisk in the baking soda, cornstarch, and salt.⁣
3. Add the flour and use a silicone spatula to fold it in until smooth cookie dough forms. Reserve 1/2 Cup of the chocolate chips and set them aside, then fold the remaining 1 1/2 Cups of chocolate chips into the cookie dough.⁣
4. Place the chocolate chip cookie dough onto the prepared sheet pan and use an offset spatula to spread it all the way to the edges in an even layer.⁣
5. Bake the cookie cake for 14-16 minutes, until it looks golden brown on the edges and set. 
6. Enjoy warm or let it cool and decorate with vanilla buttercream and sprinkles! ⁣
⁣
#cookiecake #chocolatechipcookies #sheetcake #birthdaycake #cakedecorating
STRAWBERRY CUPCAKES 🍓based on my beloved strawb STRAWBERRY CUPCAKES 🍓based on my beloved strawberry layer cake recipe, this cupcake version is just as moist yet fluffy and bursting with natural strawberry flavor! Between the mix of fresh strawberries in the cupcakes + freeze-dried strawberries in the frosting, the flavor is out of this world 🚀

Full recipe link in my bio (with strawberry buttercream) + at https://sugarandsparrow.com/strawberry-cupcakes/

STRAWBERRY CUPCAKES
Yield: 14 cupcakes

INGREDIENTS:
5 oz (143g) fresh or frozen strawberries
1/3 Cup (80ml) whole milk, room temp
1 1/2 Cups (158g) sifted cake flour
1 tsp baking powder
1/4 tsp baking soda
1/2 tsp salt
6 Tbsp (85g) unsalted butter, room temp
1 Cup (200g) granulated sugar
2 large eggs, room temp
3 Tbsp (45g) sour cream, room temp
1 tsp vanilla extract
1 drop pink food coloring (optional)

INSTRUCTIONS: 
1. Puree the strawberries using a food processor (you’ll have about 1/2 cup of puree), then place into a saucepan over medium-low heat. Bring to a simmer, then cook for 10-15 min, stirring occasionally, until you have 1/4 cup. Refrigerate until room temp.
2. Preheat oven to 350ºF (177ºC) and line a standard cupcake pan with liners.
3. Whisk together the sifted cake flour, baking powder, baking soda, and salt and set aside.
4. In a stand mixer w/ paddle attachment (or hand mixer + large bowl), whip the butter on high for 2 min. Add sugar and beat for 2 min, until light and fluffy. Turn the mixer to low and add the eggs one at a time, then add the vanilla and sour cream, turn the mixer to high and beat for 1 min. Meanwhile, whisk together the strawberry puree, whole milk, and food coloring (if using).
5. Turn the mixer off and add all of the dry ingredients at once. Mix on low until just combined, then add the strawberry milk mixture until just combined, about 30 seconds.
6. Fill the cupcake liners 2/3 full and bake for 14-18 minutes. Cool completely before topping with strawberry buttercream (full recipe linked above). 

#strawberrycupcakes #strawberrycake #pinkcupcakes #strawberry #cupcakes
COFFEE BUTTERCREAM (recipe below)☕️ this frost COFFEE BUTTERCREAM (recipe below)☕️ this frosting has AMAZING coffee flavor, is so easy to decorate cakes with, and pairs beautifully with so many flavors (chocolate, vanilla, or any cake flavor you’d want to turn into a latte). 

All my cake pairing suggestions are linked in my bio or at https://sugarandsparrow.com/coffee-buttercream-recipe/ 

COFFEE BUTTERCREAM⁣
Yield: 2.5 Cups⁣

INGREDIENTS⁣
1 1/2 tsp instant coffee or espresso powder⁣
1 1/2 Tbsp whole milk, room temperature⁣
1 Cup (226g) unsalted butter, room temperature⁣
3 1/2 Cups (420g) powdered sugar⁣
2 tsp pure vanilla extract⁣
Pinch of salt⁣

INSTRUCTIONS⁣
1. Combine the instant espresso/coffee with the whole milk and set aside. In the bowl of a stand mixer, beat the butter on high until creamy and smooth (about 5 minutes), scraping down the bowl and paddle a few times in between.⁣
2. Turn the mixer to low and add the powdered sugar a few cups at a time, scraping down the bowl and paddle between intervals. Add the vanilla, the coffee/espresso milk mixture, and salt. Mix on low until fully incorporated, about one minute.⁣

#coffeebuttercream #buttercream #frosting #coffeecake

Footer

On the Blog

  • Cake Basics
  • Recipes
  • Tutorials

Info

  • About
  • Privacy Policy & Disclosure

stay in the know

Copyright © 2026 · Theme by Sugar & Sparrow