• Cake
  • Frosting
  • YouTube
  • My Favorite Tools
  • Nav Social Icons

  • Skip to primary navigation
  • Skip to main content
  • Skip to primary sidebar
  • Skip to footer
  • Recipes
    • Cake
    • Cupcakes
    • Frosting
    • Ice Cream
    • Vegan
  • Cake Basics
  • Tutorials
  • Blog
  • About
  • Mobile Menu Widgets

    Connect

    Search

Sugar & Sparrow logo in script font

Sugar & Sparrow

Lifestyle and Cake from Portland Oregon

  • Cake Basics
  • Recipes
    • Cake
    • Cupcakes
    • Cookies & Bars
    • Filling
    • Frosting
    • Ice Cream
    • No-Bake
    • Small Batch
    • Vegan
  • Tutorials
  • Book
  • Blog
  • About

Whipped Chocolate Ganache

April 11, 2025 · In: Featured, Filling, Frosting, Recipes

Jump to Recipe

This whipped chocolate ganache is rich and chocolatey without being overly sweet and so simple to make. It has the consistency of buttercream frosting which makes it so easy to work with for cake decorating, whether you’re filling a cake, frosting a smooth finish or piping details. It’s made with just two ingredients: semi-sweet chocolate and heavy whipping cream. For those of you who want a more sophisticated filling or frosting for your cakes, whipped chocolate ganache is sure to impress! 

whipped chocolate ganache frosting recipe
whipped chocolate ganache recipe for cake decorating

Whipped Chocolate Ganache Ingredients

This simple whipped chocolate ganache recipe uses just two ingredients: chocolate and heavy whipping cream. It’s important to use good quality semi-sweet chocolate to create a rich and smooth ganache. I use Nestle semi-sweet chocolate chips for this recipe, but any semi-sweet chocolate with “cocoa butter” in the ingredients list will work. This ingredient indicates that it’s an authentic chocolate and not just chocolate-flavored candy melts. As an alternative to chocolate chips, you can also use a good quality chocolate bar roughly chopped until the pieces are the size of chocolate chips. And if you’d rather use other types of chocolate (like white chocolate or dark chocolate), see the notes portion of the recipe card below.

The heavy whipping cream is also known as double cream. It has the perfect fat percentage to create a rich ganache and is heated until simmering before you pour it over the chocolate and combine. I don’t recommend using other types of creams or milks for this recipe since the fat percentage won’t be comparable and may yield a ganache that is too thin for whipping. 

How to Make Whipped Chocolate Ganache

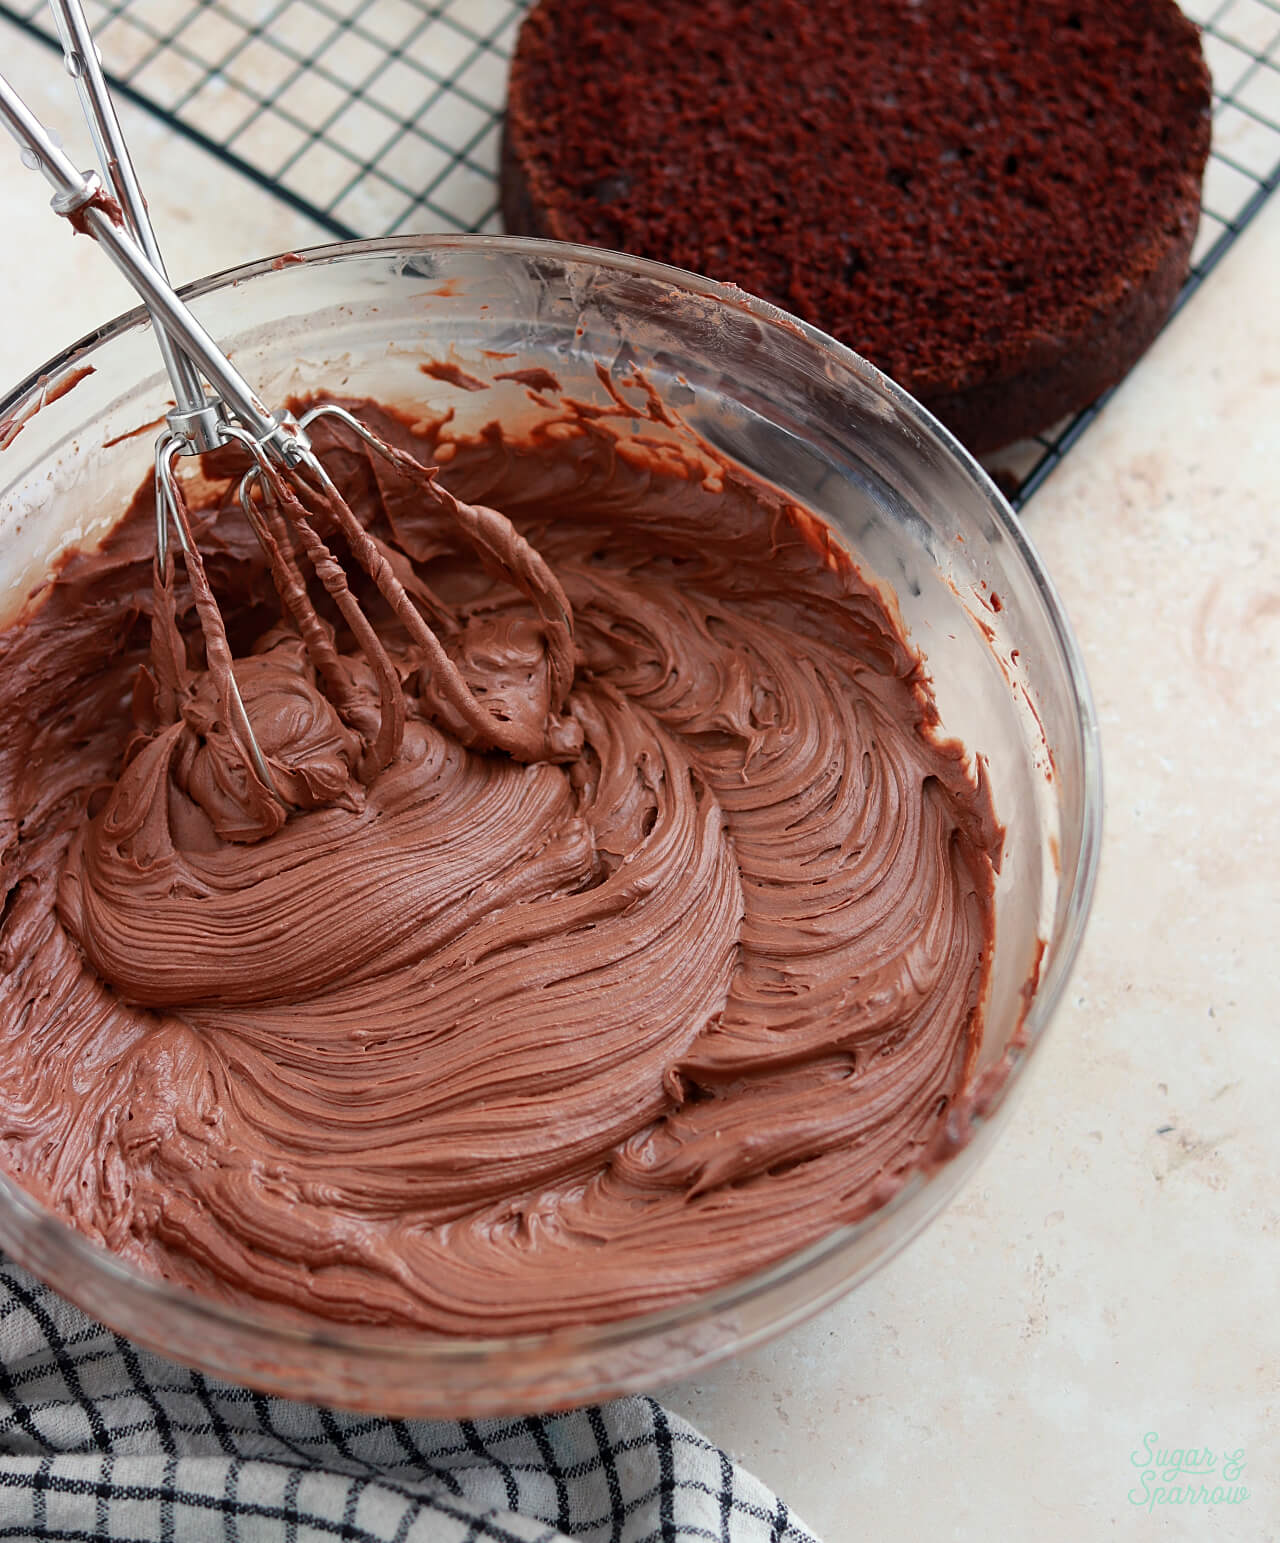
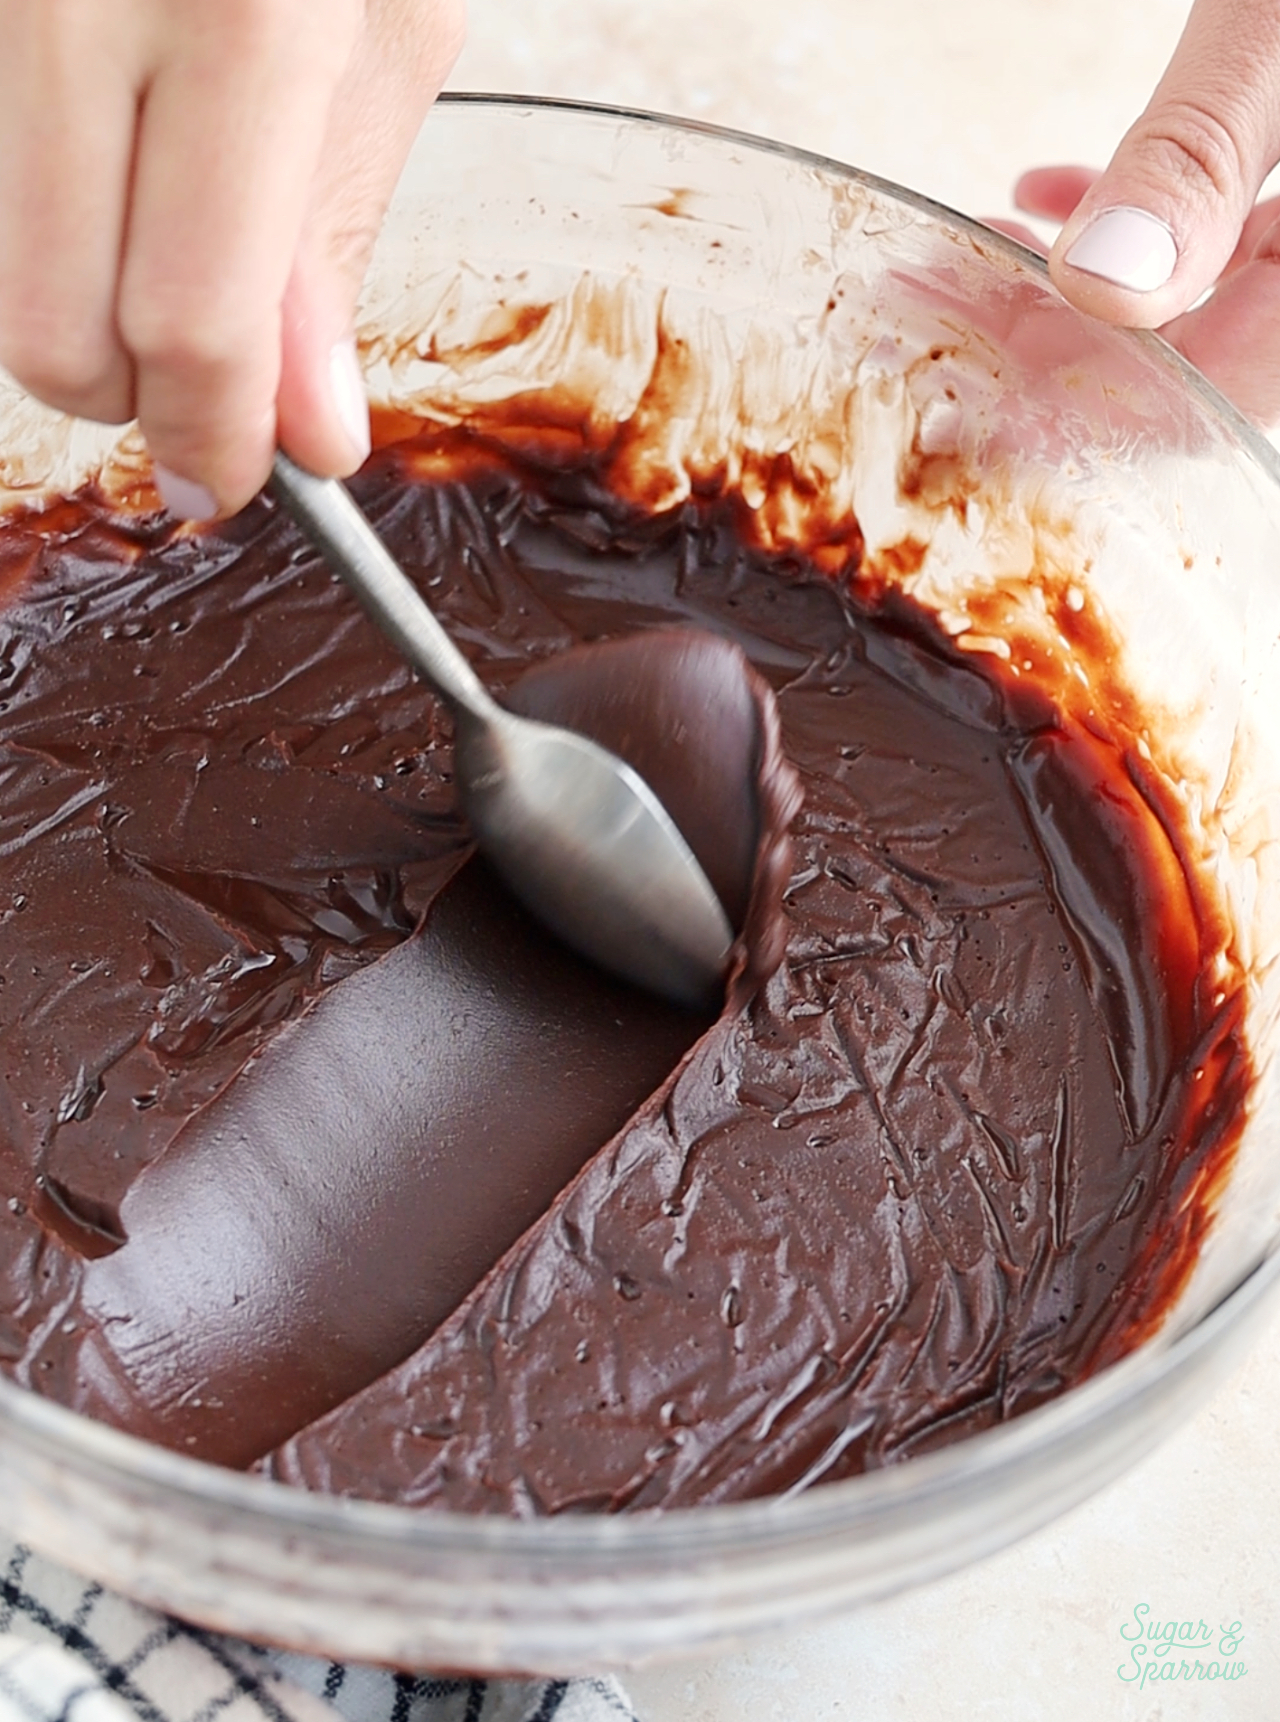
If you’ve ever made chocolate ganache for a drip cake before, you’re familiar with making a 1:1 ratio consistency ganache that’s nice and thin (but not *too* thin) for creating a decorative drip. Whipped chocolate ganache uses the same process of making the ganache, but then cooling it until room temperature and whipping it up until it’s the consistency of frosting. First you’ll simmer the heavy whipping cream, add it to your bowl of chocolate, and whisk until combined:

how to make chocolate ganache

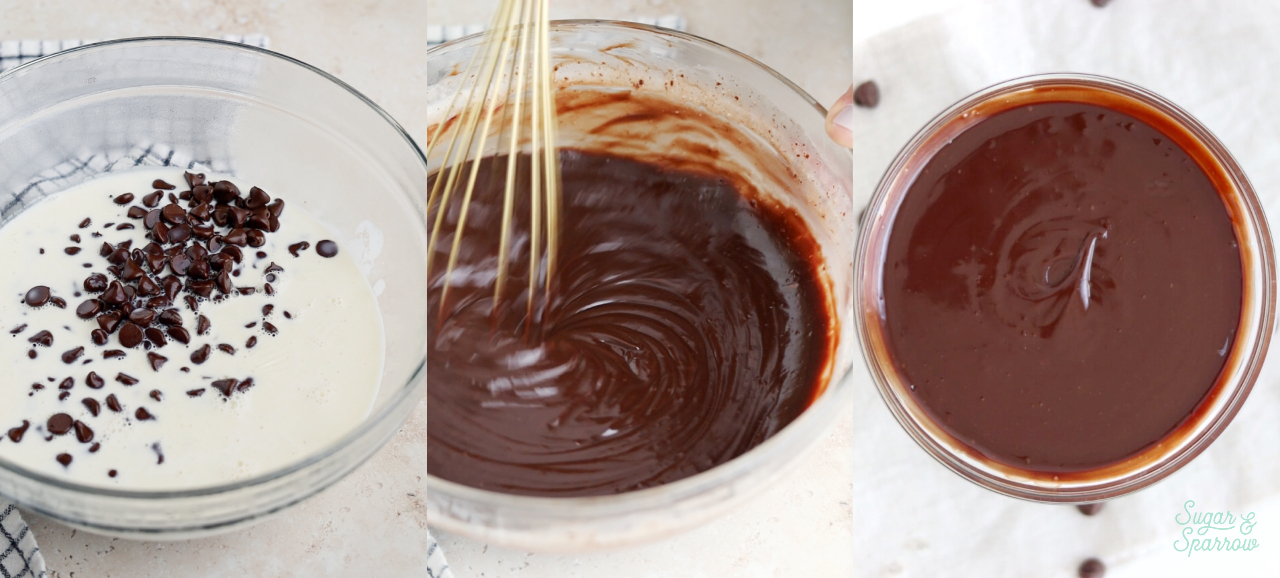
Then, you’ll cover the ganache with a layer of plastic wrap. Be sure it touches the surface of the ganache.

how to make whipped chocolate ganache

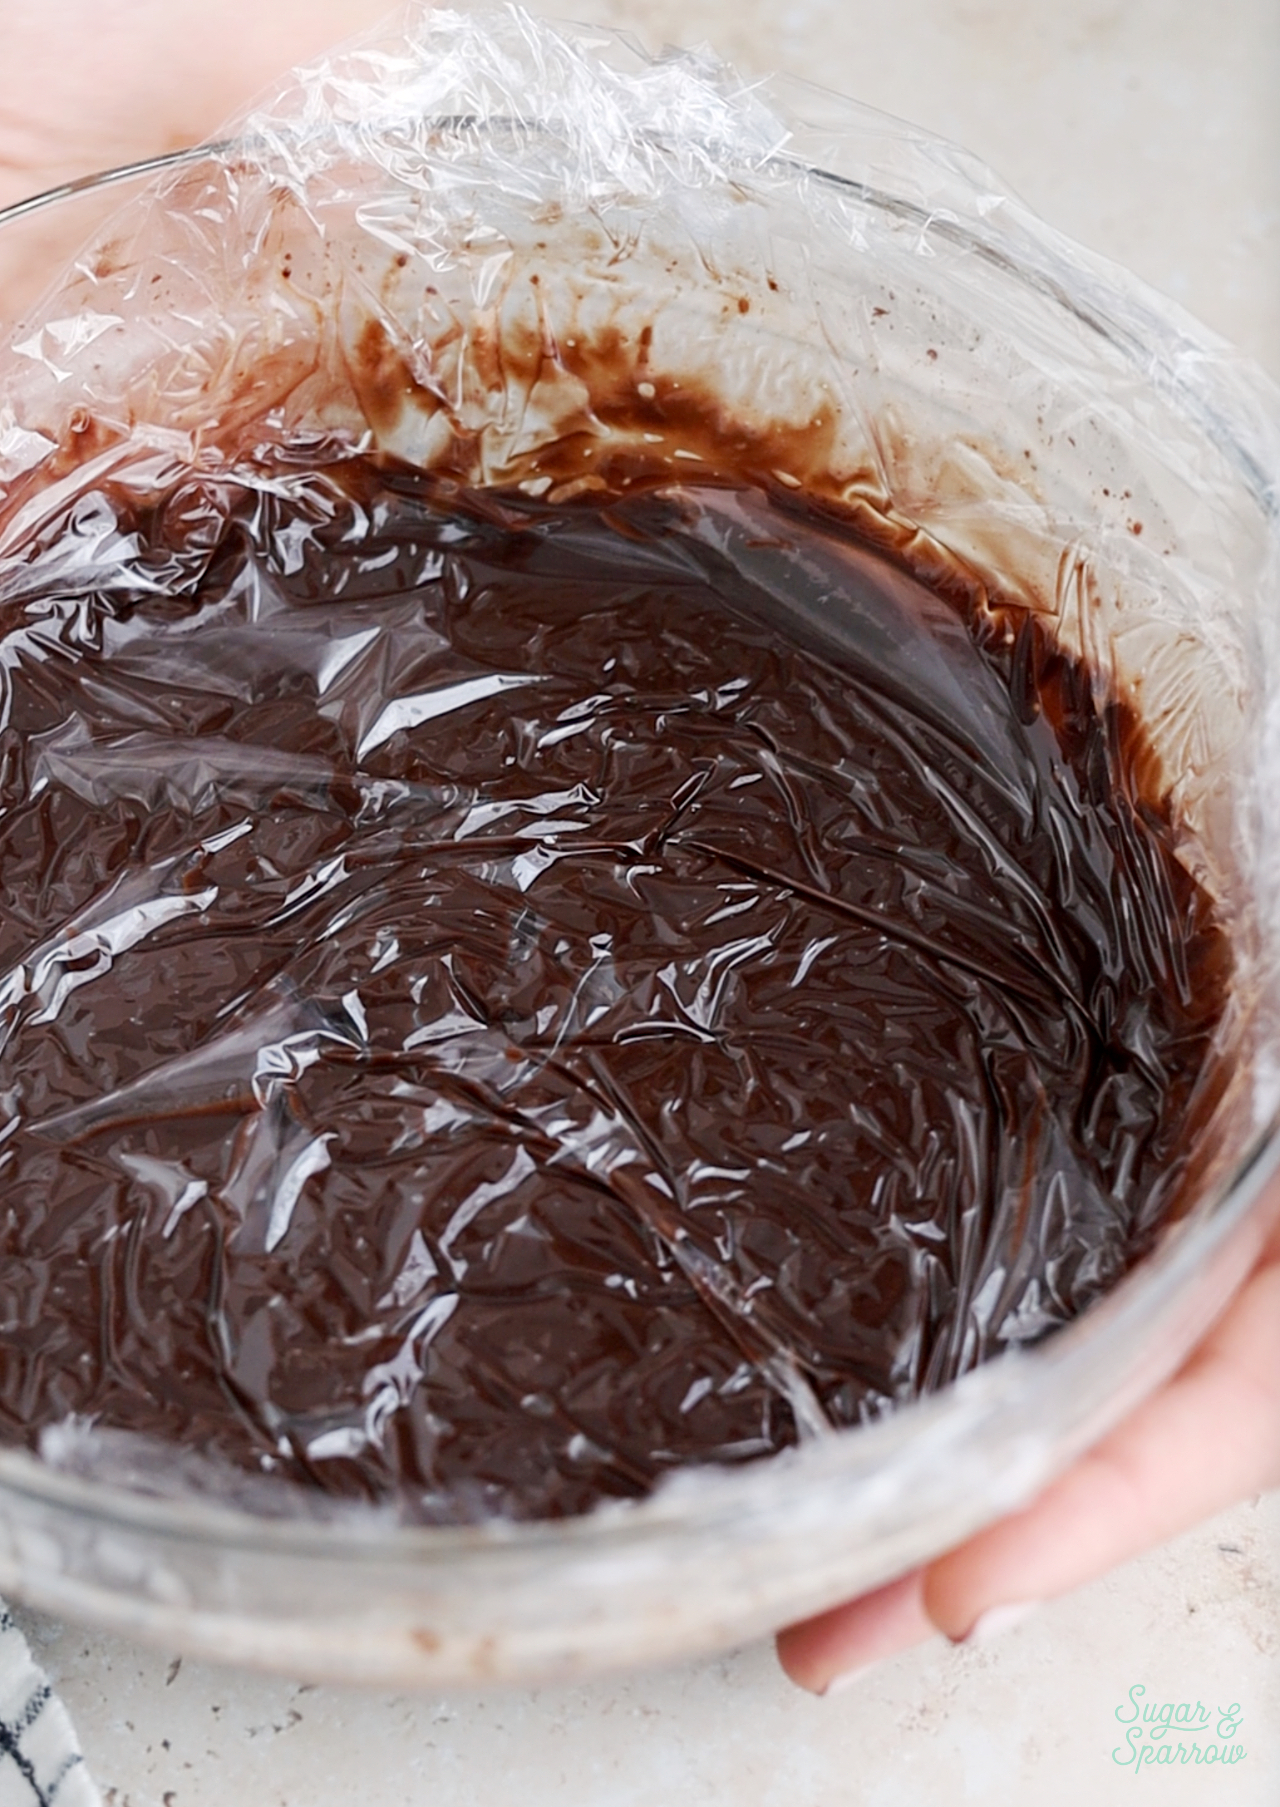
After this, refrigerate the ganache until it thickens to the consistency of peanut butter. Depending on the depth of your dish, this could take anywhere from 50 minutes to 2 hours.

whipped chocolate ganache peanut butter consistency

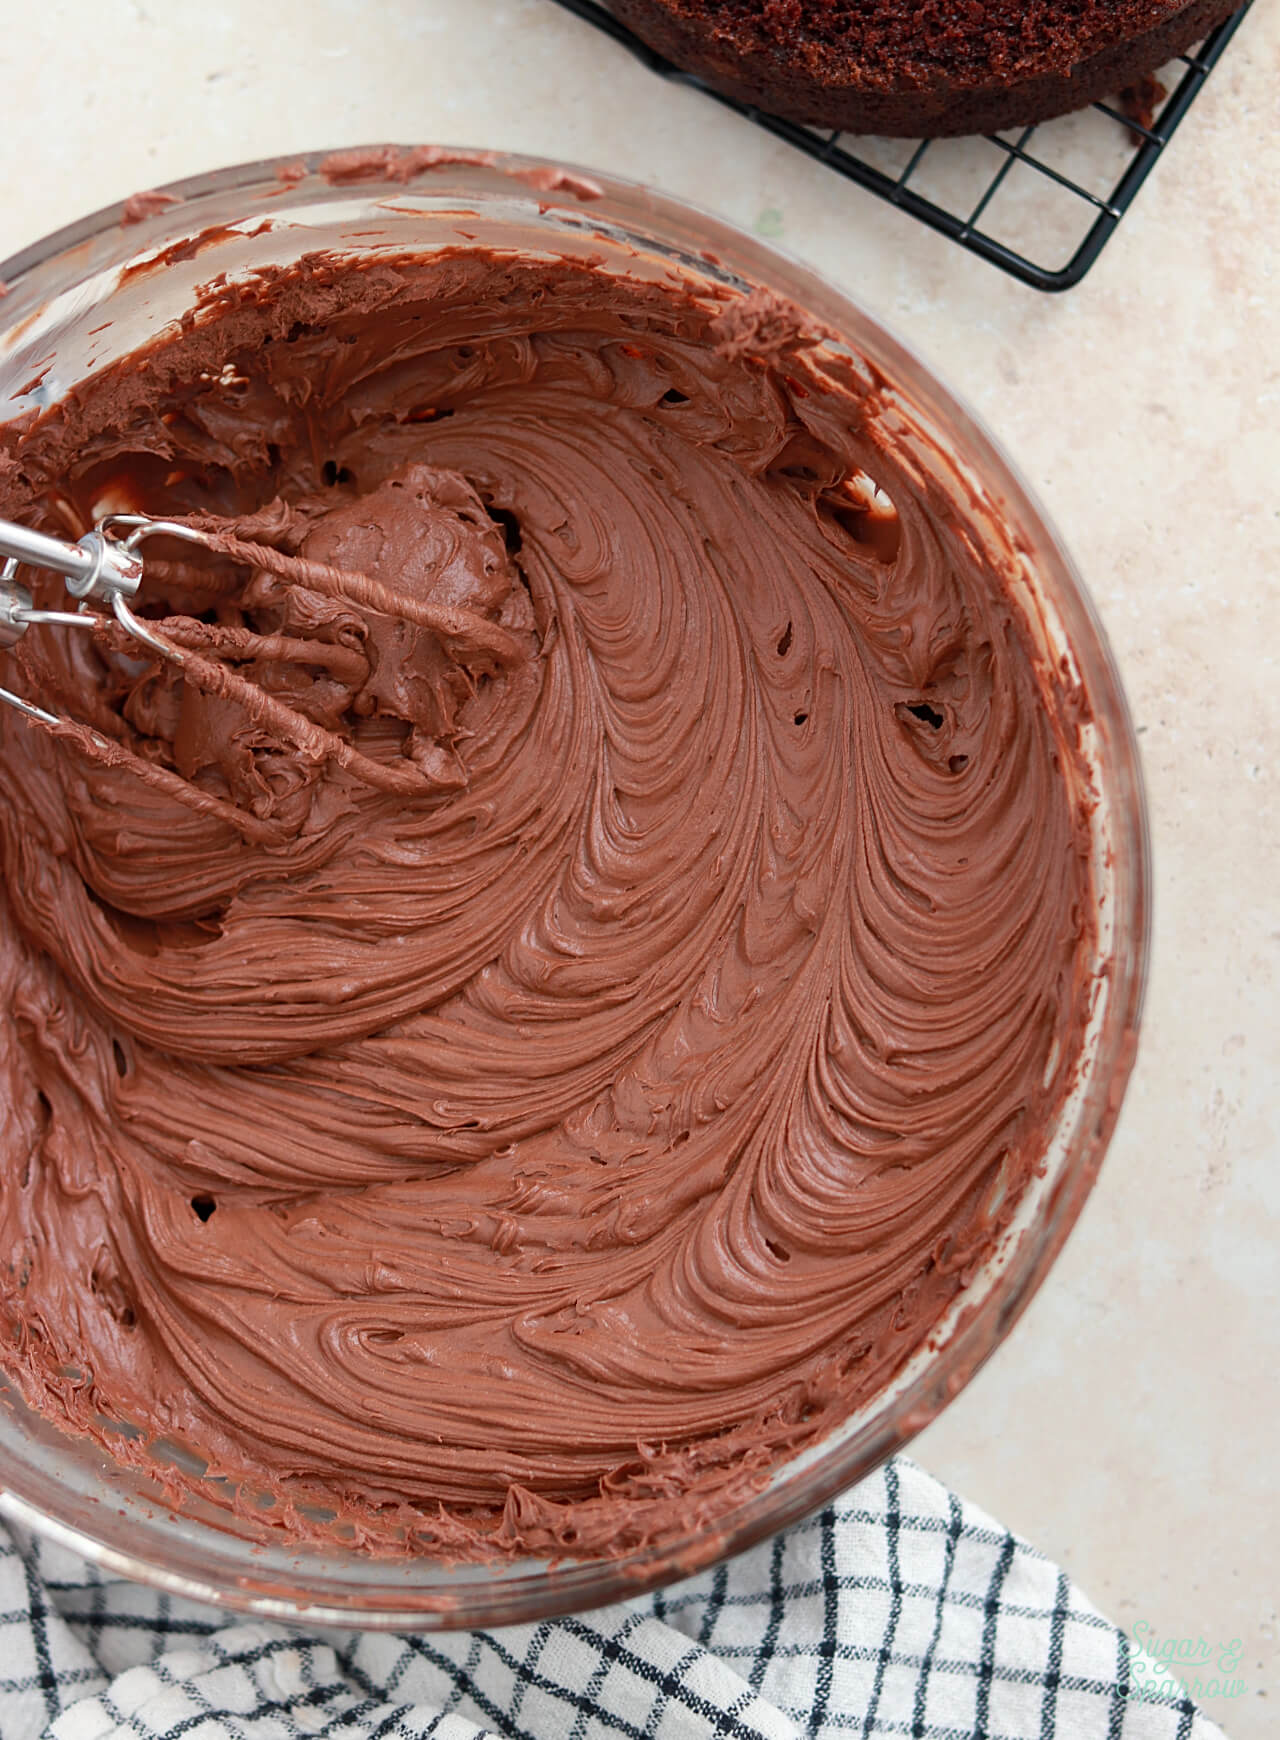
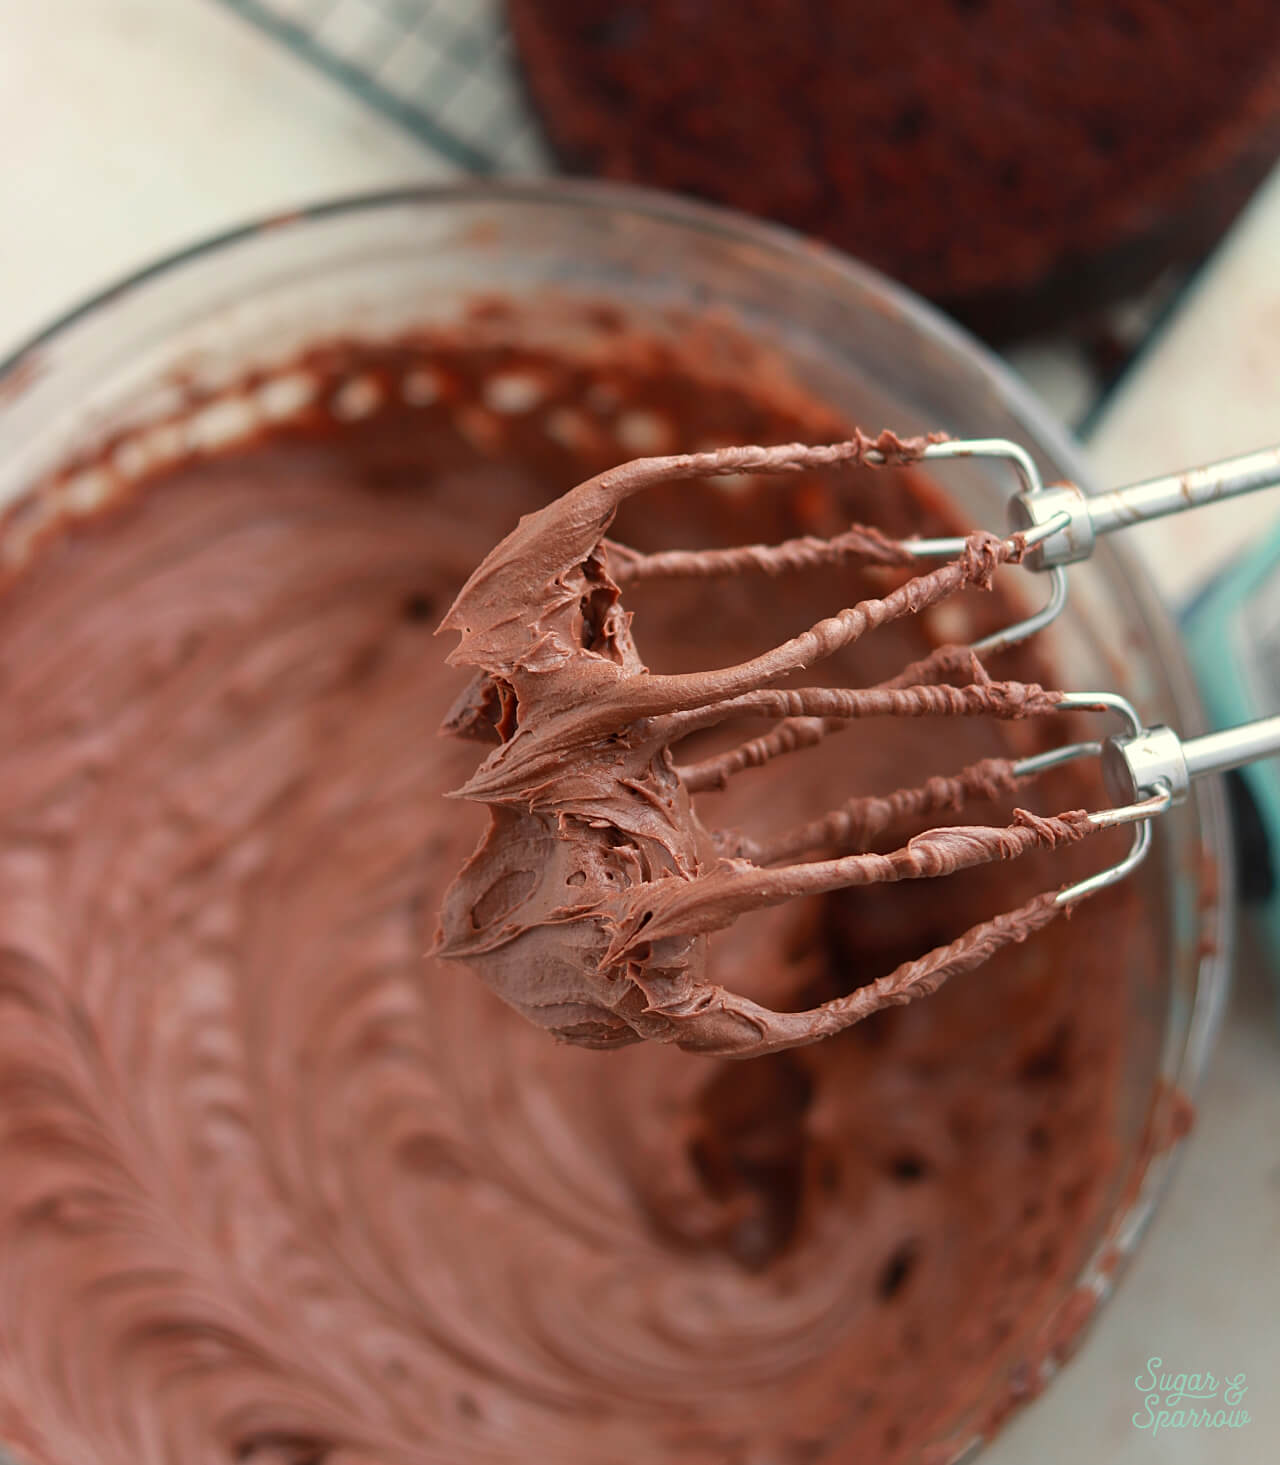
Finally, whip the ganache until it lightens in color and maintains a nice peak. This takes about 2-3 minutes.

whipped chocolate ganache recipe instructions

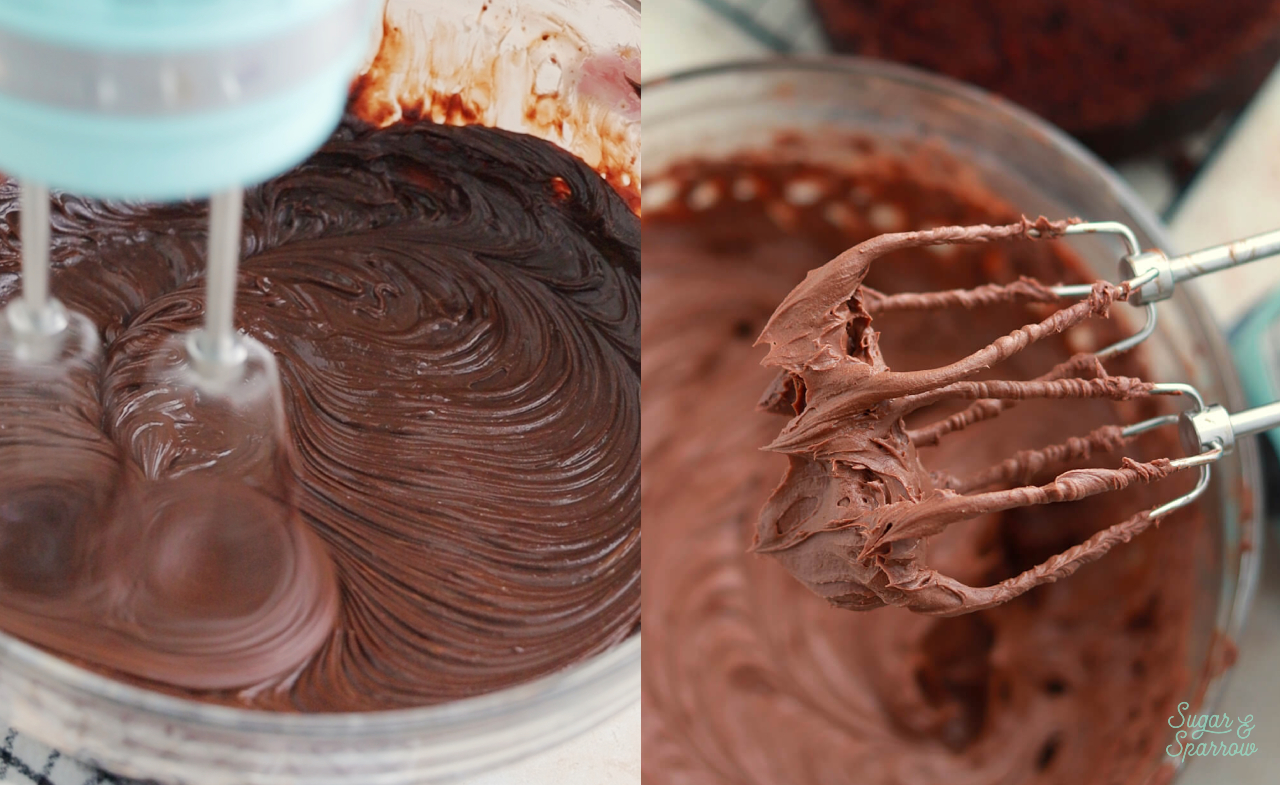
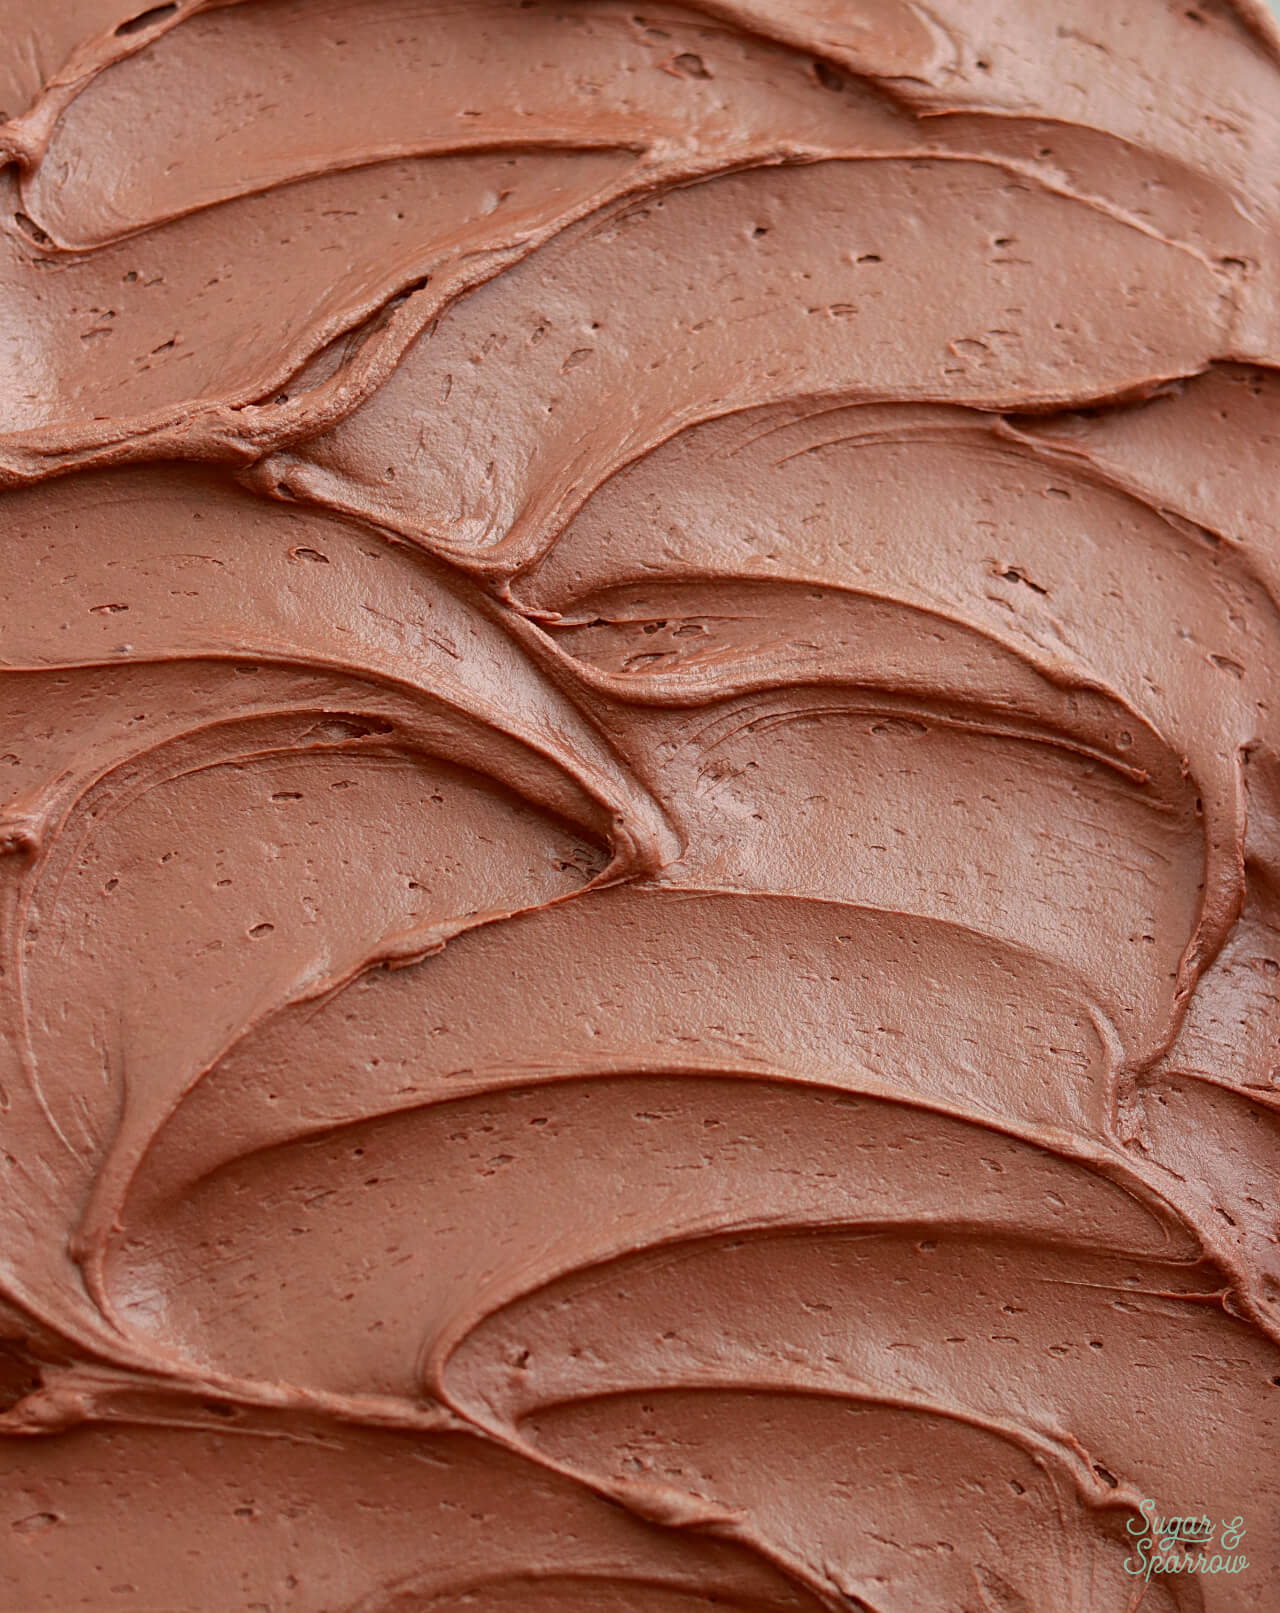
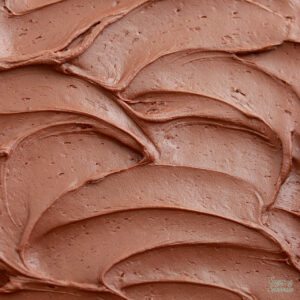
Now you’re ready to use the whipped chocolate ganache! It has the rich chocolate flavor profile of chocolate ganache, but the texture of smooth buttercream, making it ideal for filling and frosting cakes, piping onto cupcakes, filling macarons and more. 

whipped chocolate ganache recipe

Whipped Ganache Tips & Troubleshooting

There are a few things that can go sideways when it comes to whipped chocolate ganache, but all have easy solutions! Here are the most common problems that can occur with whipped ganache and how to troubleshoot:

  • Oily or Separated Ganache. If the ganache has separated, you’ll see oily spots in it. This usually happens if the cream wasn’t heated properly or too much fat was added somehow. To fix it, heat the ganache over a double boiler over low heat and whisk vigorously until the ganache comes back together. Once it looks uniform again, cool it down to room temperature before whipping.
  • Grainy Ganache. This likely means your cream was too hot when added and scalded the chocolate. To fix this, add your ganache into a double boiler set over low heat and gently stir until it comes back together. If it’s not coming back together you can stir in more heavy whipping cream, 1 Tablespoon at a time, until the ganache starts to incorporate. 
  • Ganache looks curdled after whipping. Over-whipping the ganache will cause it to look curdled or grainy. The only way to fix this is to place the ganache back into a heatproof bowl and set it over a pot of simmering water (or double boiler). Melt it back into liquid, whisking constantly, and re-cool it to room temperature before whipping it again for less time than before. 
  • Ganache is too thin to whip. This means too much cream was added and you’ll need to fix the ratio by adding more chocolate. Reheat the ganache over a double boiler, add 1-2 Tablespoons of additional chocolate, and whisk until uniform before cooling back down and re-whipping.
how to fix grainy chocolate ganache

Cake Decorating with Whipped Chocolate Ganache 

This whipped chocolate ganache frosts and pipes like a dream. I used it in this Hostess Cupcake Layer Cake recipe, both for piping a dam for the soft marshmallow filling and to frost a smooth finish on the exterior of the cake. It also pipes well for detail work on a cake, cupcakes, or using as a macaron filling. 

chocolate cake with marshmallow filling and chocolate ganache frosting

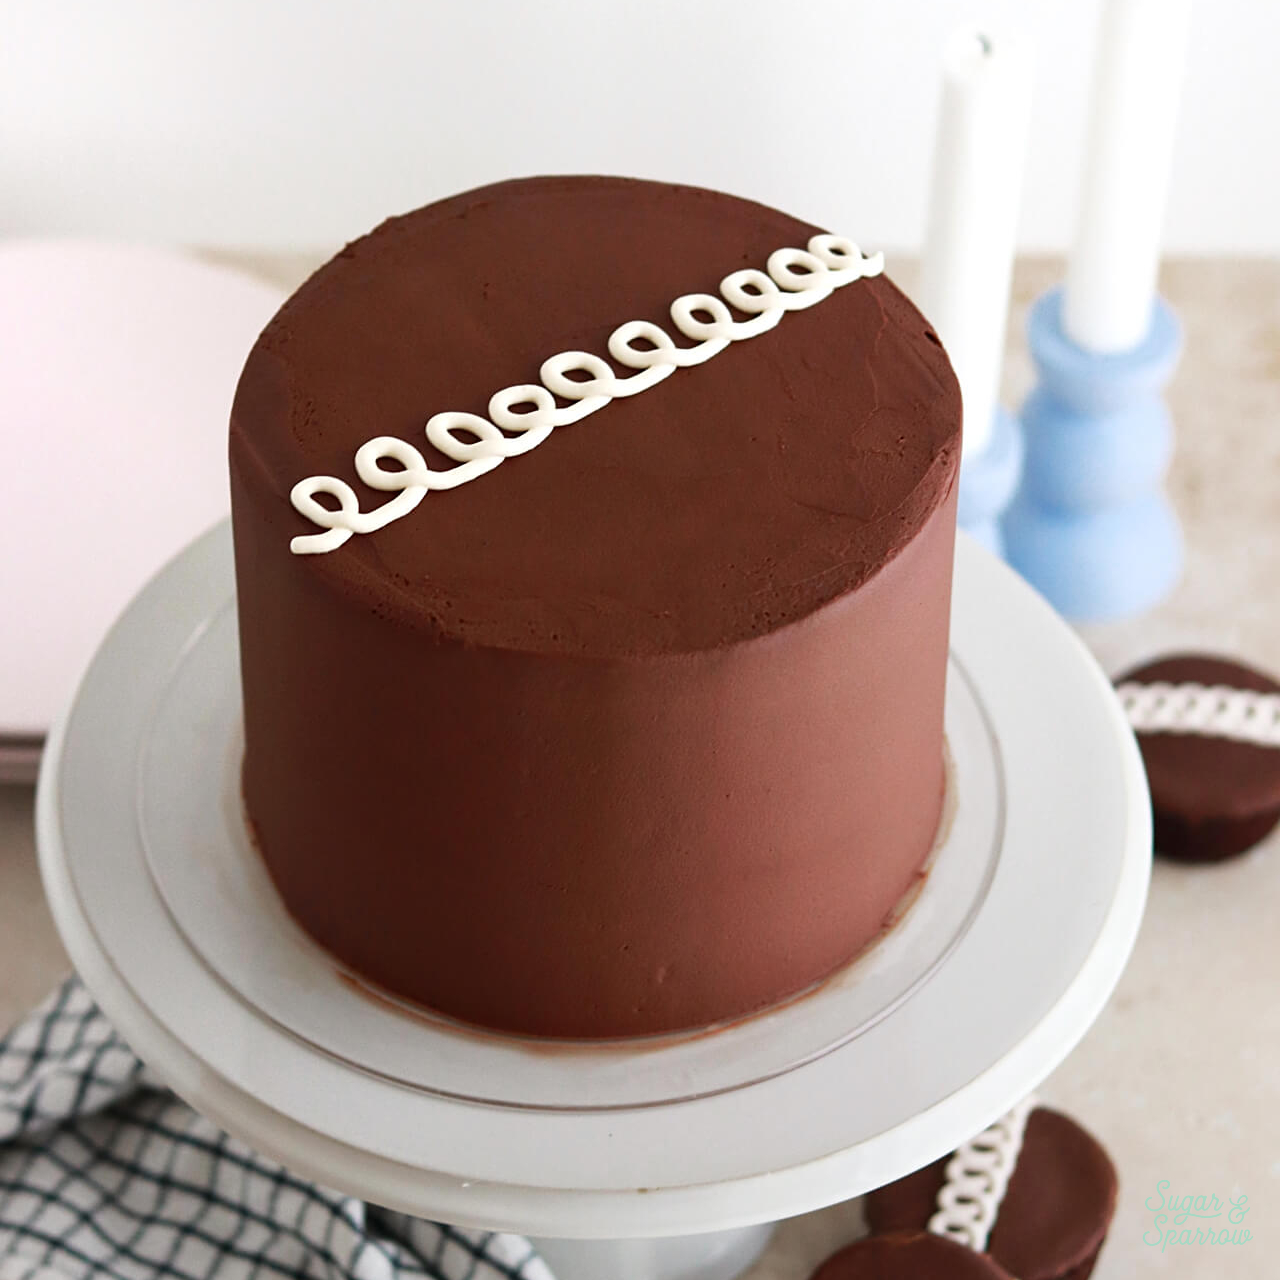
The one real difference between working with buttercream frosting vs. whipped chocolate ganache is that you might need to re-whip the ganache if it solidifies too much while you’re decorating. For instance, if you fill and stack the cake with ganache, crumb coat it, and then you’re waiting for that crumb coat to chill in the refrigerator before moving on with decorating, the ganache that’s sitting out at room temperature might solidify over time. At any point in the decorating process, you can re-whip the ganache for 30 seconds to one minute to bring it right back to smooth consistency.

Here’s a quick video that shows how to make this whipped chocolate ganache:

If you love recipe videos like this one, be sure to check out my YouTube channel! I’ve got a growing collection of cake recipes, decorating tutorials, and Cake Basics over there. Hit the subscribe button on my page so you never miss a new video.

whipped chocolate ganache for cakes

Whipped Chocolate Ganache

5 from 2 votes
This rich and velvety smooth whipped chocolate ganache is the perfect consistency for filling and frosting cakes, piping onto cupcakes, and filling macarons. The perfect buttercream alternative for those who love chocolate and don't want their filling/frosting to be overly sweet!
Print Recipe Pin Recipe
Prep Time:10 minutes mins
Cook Time:10 minutes mins
Cooling Time:1 hour hr
Total Time:1 hour hr 20 minutes mins
Course: Dessert
Cuisine: American, French
Servings: 4 Cups

Ingredients

  • 2 Cups (16oz, 370g) semi-sweet chocolate*
  • 2 Cups (16oz, 480ml) heavy whipping cream

Instructions

  • Place the chocolate chips into a heat resistant bowl (glass or metal) and set aside. In a saucepan over medium-high heat, warm the heavy whipping cream until it just starts to simmer. I always look for small bubbles forming around the edge and a soft simmer starting in the middle. When it's reached this point, pour the cream into your bowl of chocolate, cover it with a plate, and let it sit for 2 minutes.
  • Whisk the chocolate and heavy cream mixture together until it’s uniform in consistency and there are no bits of chocolate left on your whisk. Cover the surface of the ganache with a piece of plastic wrap and refrigerate until the ganache is room temperature. This can take up to 2 hours depending on how deep your bowl of ganache is (the shallower the container the quicker it will set). With my medium sized bowl it took 50 minutes to chill.
  • When the ganache is ready to whip it will be about the consistency of smooth peanut butter. Use a stand mixer with the whisk attachment or a hand mixer, whip the ganache on medium-high speed just until it lightens in color and maintains a nice peak (similar to the consistency of buttercream frosting), about 2-3 minutes**.
  • Use immediately to fill and frost cakes, pipe onto cupcakes, or fill macarons. If at any point you need to re-whip your chocolate ganache frosting after it's been sitting out, just add it back into your stand mixer with the whisk attachment or use a hand mixer to bring it back to smooth consistency.

Notes

*Chocolate: Make sure you use good quality semi-sweet chocolate (chips or bar!). A good rule of thumb is to check the ingredients list for “cocoa butter” – this indicates that it’s an authentic chocolate and not chocolate flavored candy melts. If you’d rather use a different kind of chocolate than semi-sweet, here are the measurements for other types:
  • Dark Chocolate: use the recipe above, but add 4 extra Tbsp of heavy whipping cream. 
  • White Chocolate: use a 3:1 ratio, or 2 Cups (370g) white chocolate chips + 2/3 Cup (160ml) heavy whipping cream. 
**If your whipped ganache starts to look curdled, it has been over-whipped. The only way to fix this is to place the ganache back into a heatproof bowl and set it over a pot of simmering water (or double boiler). Melt it back into liquid, whisking constantly, and re-cool it to room temperature before whipping it again for less time than before. 
Make Ahead Tips: 
  1. You can make the chocolate ganache, cover with plastic wrap, and store in the refrigerator for up to two weeks before bringing it back to room temperature and continuing on with Step 3. 
  2. The already whipped ganache frosting can be stored in an airtight container in the refrigerator for up to two weeks. When you’re ready to use it, bring it back to room temperature and re-whip until it reaches smooth frosting consistency. 
Yield: this recipe makes enough to fill and frost a double layer 8-inch cake or triple layer 6-inch cake, or frost about 36 Cupcakes. 

Did you make this whipped chocolate ganache recipe? Let me know what you think in the comments below, or by tagging me on Instagram! I love to see your creations and hear your feedback. 

By: Whitney · In: Featured, Filling, Frosting, Recipes · Tagged: chocolate ganache, whipped chocolate ganache

you’ll also love

oreo cookies and cream cakeOreo Layer Cake Recipe
easy chocolate mousse cake with raspberriesEasy Chocolate Mousse Cake
funfetti birthday cake recipeDouble Funfetti Birthday Cake

Join the List

Stay up to date & receive the latest posts in your inbox.

Reader Interactions

Comments

  1. RE says

    May 2, 2026 at 6:25 am

    Excited to try this today!! Can I pipe this onto cupcakes? I’m going to make ahead and pipe the ganache on tomorrow. Any recommendations?

    Reply
    • Whitney says

      May 3, 2026 at 8:11 pm

      Hi there! I’m excited for you to try this recipe too. If you’re making it ahead, you can either 1) make the ganache and store it in the refrigerator for up to 2 weeks before bringing it to room temperature (peanut butter consistency) and whipping into frosting consistency, or 2) make the whipped ganache ahead, store in the refrigerator and bring back to room temperature before re-whipping into frosting consistency. Hope that helps!

      Reply
  2. Anna Vard says

    February 19, 2026 at 8:04 pm

    Need help
    My ganache won’t thicken to peanut butter consistency
    In fridge and runny
    Should I add more chocolate

    Reply
    • Whitney says

      February 22, 2026 at 9:08 pm

      Hi Anna! The amount of time it takes for the ganache to reach peanut butter consistency depends on how shallow or deep your bowl is. It can take up to two hours to reach this stage if your bowl is deep, but it will happen. I don’t think it’s necessary to add more chocolate.

      Reply
  3. Dina says

    November 30, 2025 at 2:41 pm

    I made this and I thought it turned out amazing but when I started spreading it on the cake it hardened.
    Just so you know It wasn’t because of the cake.
    I don’t know what happened I didn’t over-whip it….
    Could it be that I use chocolate chips?

    Reply
    • Whitney says

      November 30, 2025 at 6:23 pm

      Hi Dina! Chocolate chips are totally fine with this recipe. This frosting will harden when it starts to set, so next time gently warm it in the microwave in 5 second intervals until it’s smooth frosting consistency (you may need to re-whip it for a minute as well) and then it should be way easier to work with.

      Reply
  4. Lori says

    November 7, 2025 at 6:06 am

    Hi can I use this recipe and the incorporate the chocolate ganache to vanilla buttercream for filling a cake? I wouldn’t want to just use the chocolate ganache for a tall cake I am scared it will not hold and fall apart.
    Thanks

    Reply
    • Whitney says

      November 11, 2025 at 2:53 pm

      Hi Lori! You could mix chocolate ganache with buttercream to make it more stable, but that will basically make chocolate buttercream. I have a recipe for that here if you want to use chocolate buttercream instead: https://sugarandsparrow.com/chocolate-buttercream-recipe/ otherwise I’d recommend making a buttercream dam and filling the center with chocolate ganache. This should give you plenty of stability when filling and stacking your cake.

      Reply
  5. Kelly says

    October 13, 2025 at 7:06 pm

    I can’t wait to try this recipe! I plan to fill chocolate cupcakes with this whipped ganache and top them with your raspberry buttercream. Will the filling get hard or will it stay soft? If I make it 2 days ahead, do I need to refrigerate my cupcakes? Thank you!

    Reply
    • Whitney says

      October 13, 2025 at 8:21 pm

      Hi Kelly! That sounds delicious! The filling will be soft at room temperature but should be refrigerated since the ganache contains a lot of dairy. I would either 1) make the individual elements ahead of time, store them separately (ganache and frosting in the refrigerator, cupcakes at room temperature covered in plastic wrap), then assemble them the day you need them after bringing the ganache and frosting back to room temp. Or 2) Make and assemble the cupcakes, then store them in a cupcake box in the refrigerator. Take them out of the refrigerator a few hours before serving so that the frosting and ganache can come back to room temperature. Hope that helps!

      Reply
      • Kelly says

        October 15, 2025 at 8:00 am

        Thank you so much for the quick response. I will definately hold off on assembly until the day of and just make and refrigerate the ganache. Your recipes are just as phenomenal as the support and encouragement you give bakers.

        Reply
  6. Elle says

    June 9, 2025 at 1:39 pm

    5 stars
    I made this today using Nestle dark chocolate chips (53% cacao) and made exactly as written. We don’t like very sweet desserts, so this was perfect for us. When making this to put on a cake I am taking somewhere I think I would use semi-sweet as others tend to like their desserts a bit sweeter. Either way, you can’t go wrong! This is so easy and so delicious. Thanks for a great frosting recipe!

    Reply
  7. Sydney Hunter says

    June 4, 2025 at 8:42 pm

    Hi, so glad I found your recipe and site!! So easy to read and follow. I have a question: I made the ganache up to step 2 and have it in fridge with plastic wrap and trying to figure out if once I take it out of the fridge after a few days do I need to wait for it to return to room temp (vs cold out of the fridge) before whipping? Thank you!

    Reply
    • Whitney says

      June 4, 2025 at 10:14 pm

      Hi Sydney! So happy to hear you’re finding my site helpful! For the ganache, you might want to take it out of the refrigerator about 20 minutes before whipping. You want it to be the consistency of smooth peanut butter before you whip it. If you wait until it’s room temperature it might be too soft and won’t whip into the right consistency. Hope that helps!

      Reply
  8. Anne says

    May 9, 2025 at 2:34 pm

    5 stars
    Made it with dark callebaut chocolate. The best thing! But do I have to cling wrap my cake after i crumb coat it and put it in the refrigerator? Thanks!

    Reply
    • Whitney says

      May 10, 2025 at 10:58 am

      Hi Anne! So happy you love this recipe and I bet it’s amazing with that chocolate! You don’t need to cling wrap it after crumb coat unless you really want to. It would be an extra layer of protection against refrigerator scents.

      Reply

Leave a Reply Cancel reply

Your email address will not be published. Required fields are marked *

Recipe Rating


Next Post >

Lemon Blueberry Cake with Lemon Cream Cheese Buttercream

Primary Sidebar

Welcome to Sugar & Sparrow

Welcome to Sugar & Sparrow

Helping you whip up pretty desserts with confidence and creativity. And hopefully sharing a few laughs with you along the way!

Learn More

Connect

let’s bake!

Get my very best recipes, baking tips, and decorating tutorials sent to your inbox

Featured Posts

salted caramel apple cake

Salted Caramel Apple Cake Recipe

fault line cake tutorial

Sprinkle Fault Line Cake Tutorial

rainbow swirl cupcakes tutorial

How to Make Rainbow Swirl Cupcakes

Search

Archives

Follow Along

@sugarandsparrowco

STRAWBERRY SHORTCAKE ICE CREAM CAKE 🍓if Strawbe STRAWBERRY SHORTCAKE ICE CREAM CAKE 🍓if Strawberry Shortcake Ice Cream Bars make you nostalgic for your childhood ice cream truck days, you’re going to LOVE this easy ice cream cake version - no ice cream maker needed 🙌🏼 

Full recipe on my blog at https://sugarandsparrow.com/strawberry-shortcake-ice-cream-cake/

STRAWBERRY CRUNCH 
24 whole (280g) Golden Oreos, finely ground
3 Oz box strawberry jello
4 Tbsp unsalted butter, melted

ICE CREAM LAYERS
1/2 Cup (15g) freeze-dried strawberries
2 Cups heavy whipping cream, cold
1 Tbsp pure vanilla extract, divided
14 Oz sweetened condensed milk
1 1/2 tsp strawberry jam or preserves

1. Combine the strawberry crunch ingredients and bake on a lined cookie sheet at 350ºF for 4 min.
2. For the crust, combine 1 Cup of the strawberry crunch with 2 Tbsp melted butter. Press into the bottom of a 6-inch springform pan and line with an acetate collar. Place in the freezer while you move on.
3. Using a food processor, grind the freeze-dried strawberries into a fine powder. Set aside.
4. Add the heavy whipping cream and 2 tsp of vanilla extract into a chilled bowl, then whip it with a hand mixer to stiff peaks. Place in the refrigerator.
5. Divide the condensed milk between two medium bowls. To one bowl, add 1 teaspoon of vanilla. To the second bowl, add the finely strawberry powder and the jam/preserves. Whisk the ingredients together within each individual bowl.
6. Divide the whipping cream evenly between each of the two bowls you created in the previous step. Fold each sweetened condensed milk mixture together with the divided whipped cream to create the vanilla ice cream and strawberry ice cream.
7. Layer half of each of the ice creams on top of the strawberry crunch crust, sprinkle a layer of strawberry crunch on top, then repeat. Freeze for 6 hours and serve. 
#icecreamcake #strawberryshortcake #nochurnicecream #icecreamlover #strawberry
LEMON CUPCAKES 🍋 after about a dozen recipe tes LEMON CUPCAKES 🍋 after about a dozen recipe tests, this one is everything I could want in a lemon cupcake! Fluffy-yet-moist, bursting with natural lemon flavor, and absolutely irresistible topped with lemon cream cheese buttercream. 

Full recipe (with frosting) linked in my bio + at https://sugarandsparrow.com/homemade-lemon-cupcakes/

INGREDIENTS:
1 Cup (132g) all-purpose flour
1 tsp baking powder
1/4 tsp salt
1/4 Cup (60ml) whole milk, room temperature
3 Tbsp (45ml) lemon juice from 1 medium lemon
3/4 Cup (150g) granulated sugar
3 Tbsp (42g) unsalted butter, room temperature
2 Tbsp (30ml) vegetable oil
2 large eggs, room temperature
1 tsp pure vanilla extract

INSTRUCTIONS:
1. Preheat the oven to 350ºF (177ºF) and line a standard cupcake pan with 12 paper liners.
2. In a large bowl, whisk together the flour, baking powder, and salt. Set aside. 
3. In the bowl of a stand mixer fitted with the paddle attachment (or with a hand mixer and large bowl), add the lemon zest to the sugar and mix on low speed until fragrant and well combined, about 1 minute. Meanwhile, combine the lemon juice with the milk and set aside. 
4. Add the butter to the lemon-sugar mixture and cream on medium speed until and combined, about 2 minutes. Add the vegetable oil and beat until light and creamy, about 3 minutes. Scrape down the bowl and paddle as needed.
5. Mix in the eggs one at a time on low speed, then add the vanilla and turn the mixer to medium speed for one minute.
6. Turn the mixer off and add the flour mixture all at once. Mix on low speed until just combined, then slowly pour in the lemon-milk mixture. Mix until just combined, about 30 seconds.
7. Divide the batter equally between the liners and bake for 14-18 min. Cool, then top with frosting of your choice (link in bio for lemon cream cheese frosting)�
#lemoncupcakes #creamcheesefrosting #lemon #cupcakes #cupcakedecorating
April in my kitchen 🌸 I published 5 NEW recipes April in my kitchen 🌸 I published 5 NEW recipes on my site, baked my Oreo cupcake recipe for a fundraiser and found it was just as delicious as I remember, and filmed/photographed 3 recipes that will be on my blog in May (Lemon Cupcakes, Lemon Cream Cheese Buttercream, and No-Bake Marbled Strawberry Cheesecake) 🥰 

Comment “APRIL” to get all the available recipes and stay tuned for more! 

#bakersofinstagram #springbaking #cakedecorating #cupcakes #bakinglove
SHEET PAN COOKIE CAKE 🍪 slice it warm for a fud SHEET PAN COOKIE CAKE 🍪 slice it warm for a fudgy chocolate chip cookie OR let it settle into a moist and chewy cookie cake that’s perfect for decorating! My fave vanilla buttercream + sprinkles turn this giant chocolate chip cookie into the perfect birthday cake alternative at the end 🥳
⁣
Full recipe + decorating ideas at https://sugarandsparrow.com/sheet-pan-chocolate-chip-cookie-cake/
⁣
INGREDIENTS⁣
1 Cup (226g) unsalted butter, melted⁣
1 1/3 Cups (267g) packed light or dark brown sugar⁣
1/2 Cup (100g) granulated sugar⁣
3 large eggs⁣
1 Tbsp pure vanilla extract⁣
1 tsp baking soda⁣
1 tsp cornstarch⁣
1/2 tsp salt⁣
3 Cups (398g) all purpose flour⁣
2 Cups (350g) semi-sweet chocolate chips⁣
⁣
INSTRUCTIONS⁣
1. Preheat the oven to 350ºF (177ºC). Grease and line a 13×18 inch sheet pan.⁣
2. In a large bowl, add the brown sugar and granulated sugar. Melt the butter in the microwave and pour it over the top of the sugars. Whisk together until uniform. Add the eggs and vanilla, then continue whisking until uniform. Whisk in the baking soda, cornstarch, and salt.⁣
3. Add the flour and use a silicone spatula to fold it in until smooth cookie dough forms. Reserve 1/2 Cup of the chocolate chips and set them aside, then fold the remaining 1 1/2 Cups of chocolate chips into the cookie dough.⁣
4. Place the chocolate chip cookie dough onto the prepared sheet pan and use an offset spatula to spread it all the way to the edges in an even layer.⁣
5. Bake the cookie cake for 14-16 minutes, until it looks golden brown on the edges and set. 
6. Enjoy warm or let it cool and decorate with vanilla buttercream and sprinkles! ⁣
⁣
#cookiecake #chocolatechipcookies #sheetcake #birthdaycake #cakedecorating
STRAWBERRY CUPCAKES 🍓based on my beloved strawb STRAWBERRY CUPCAKES 🍓based on my beloved strawberry layer cake recipe, this cupcake version is just as moist yet fluffy and bursting with natural strawberry flavor! Between the mix of fresh strawberries in the cupcakes + freeze-dried strawberries in the frosting, the flavor is out of this world 🚀

Full recipe link in my bio (with strawberry buttercream) + at https://sugarandsparrow.com/strawberry-cupcakes/

STRAWBERRY CUPCAKES
Yield: 14 cupcakes

INGREDIENTS:
5 oz (143g) fresh or frozen strawberries
1/3 Cup (80ml) whole milk, room temp
1 1/2 Cups (158g) sifted cake flour
1 tsp baking powder
1/4 tsp baking soda
1/2 tsp salt
6 Tbsp (85g) unsalted butter, room temp
1 Cup (200g) granulated sugar
2 large eggs, room temp
3 Tbsp (45g) sour cream, room temp
1 tsp vanilla extract
1 drop pink food coloring (optional)

INSTRUCTIONS: 
1. Puree the strawberries using a food processor (you’ll have about 1/2 cup of puree), then place into a saucepan over medium-low heat. Bring to a simmer, then cook for 10-15 min, stirring occasionally, until you have 1/4 cup. Refrigerate until room temp.
2. Preheat oven to 350ºF (177ºC) and line a standard cupcake pan with liners.
3. Whisk together the sifted cake flour, baking powder, baking soda, and salt and set aside.
4. In a stand mixer w/ paddle attachment (or hand mixer + large bowl), whip the butter on high for 2 min. Add sugar and beat for 2 min, until light and fluffy. Turn the mixer to low and add the eggs one at a time, then add the vanilla and sour cream, turn the mixer to high and beat for 1 min. Meanwhile, whisk together the strawberry puree, whole milk, and food coloring (if using).
5. Turn the mixer off and add all of the dry ingredients at once. Mix on low until just combined, then add the strawberry milk mixture until just combined, about 30 seconds.
6. Fill the cupcake liners 2/3 full and bake for 14-18 minutes. Cool completely before topping with strawberry buttercream (full recipe linked above). 

#strawberrycupcakes #strawberrycake #pinkcupcakes #strawberry #cupcakes

Footer

On the Blog

  • Cake Basics
  • Recipes
  • Tutorials

Info

  • About
  • Privacy Policy & Disclosure

stay in the know

Copyright © 2026 · Theme by Sugar & Sparrow