This berries & cream sheet cake is deliciously light and refreshing, so pretty to look at, and couldn’t be easier to throw together! The recipe starts with baking my extra soft and moist bakery-style white cake in a 9×13 pan, then topping it with billowy whipped cream frosting and fresh summer berries. You can use any fresh berries you prefer for the topping – I went with strawberries, raspberries, blueberries, and blackberries for a variety of colors and textures. However you top it, this is the perfect easy cake for 4th of July, a BBQ, or any Spring/Summer party!
Why You’ll Love this Berries & Cream Sheet Cake
- Quick and easy. There are no complicated techniques to make the elements that make up this berries & cream sheet cake. The bakery-style vanilla cake is an easy recipe that bakes up fluffy, moist, and full of vanilla flavor. The whipped cream cheese frosting comes together in minutes. And after you make those two elements all that’s left to do is top the cake with the frosting and fresh berries.
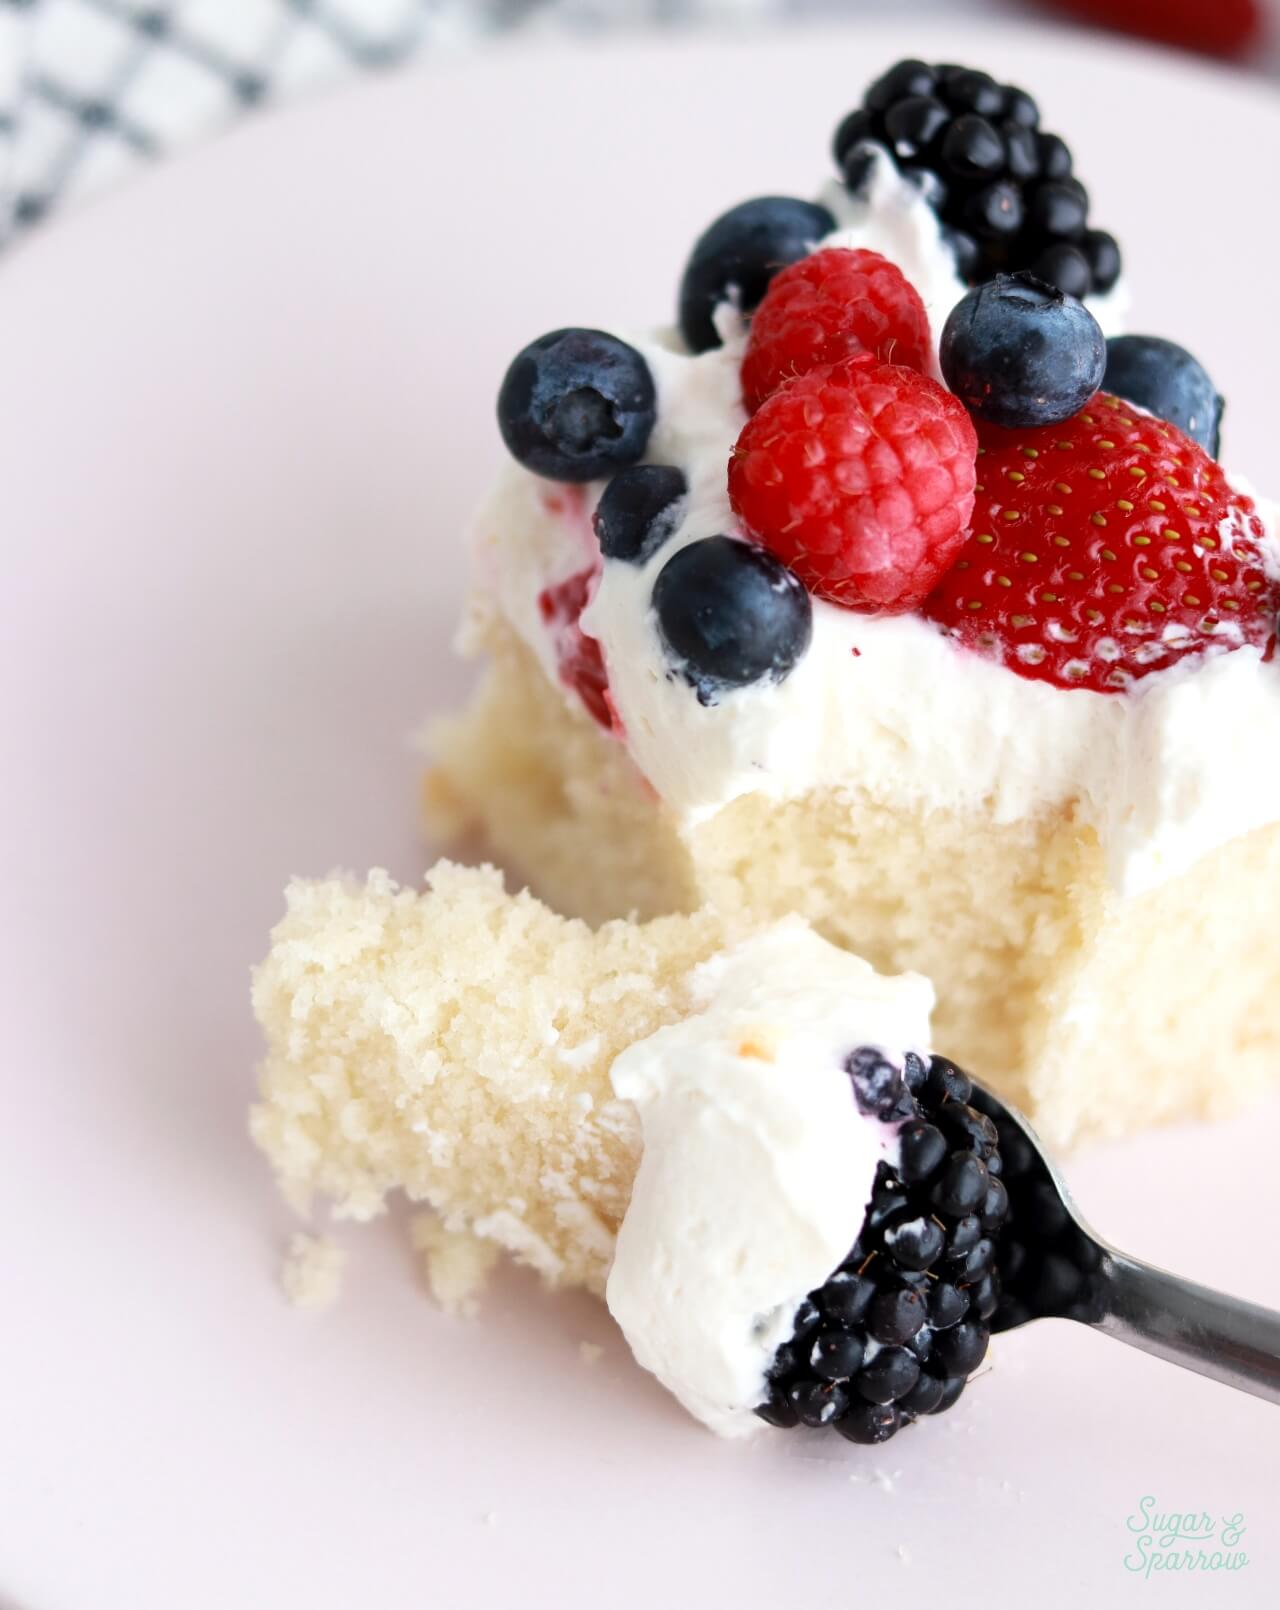
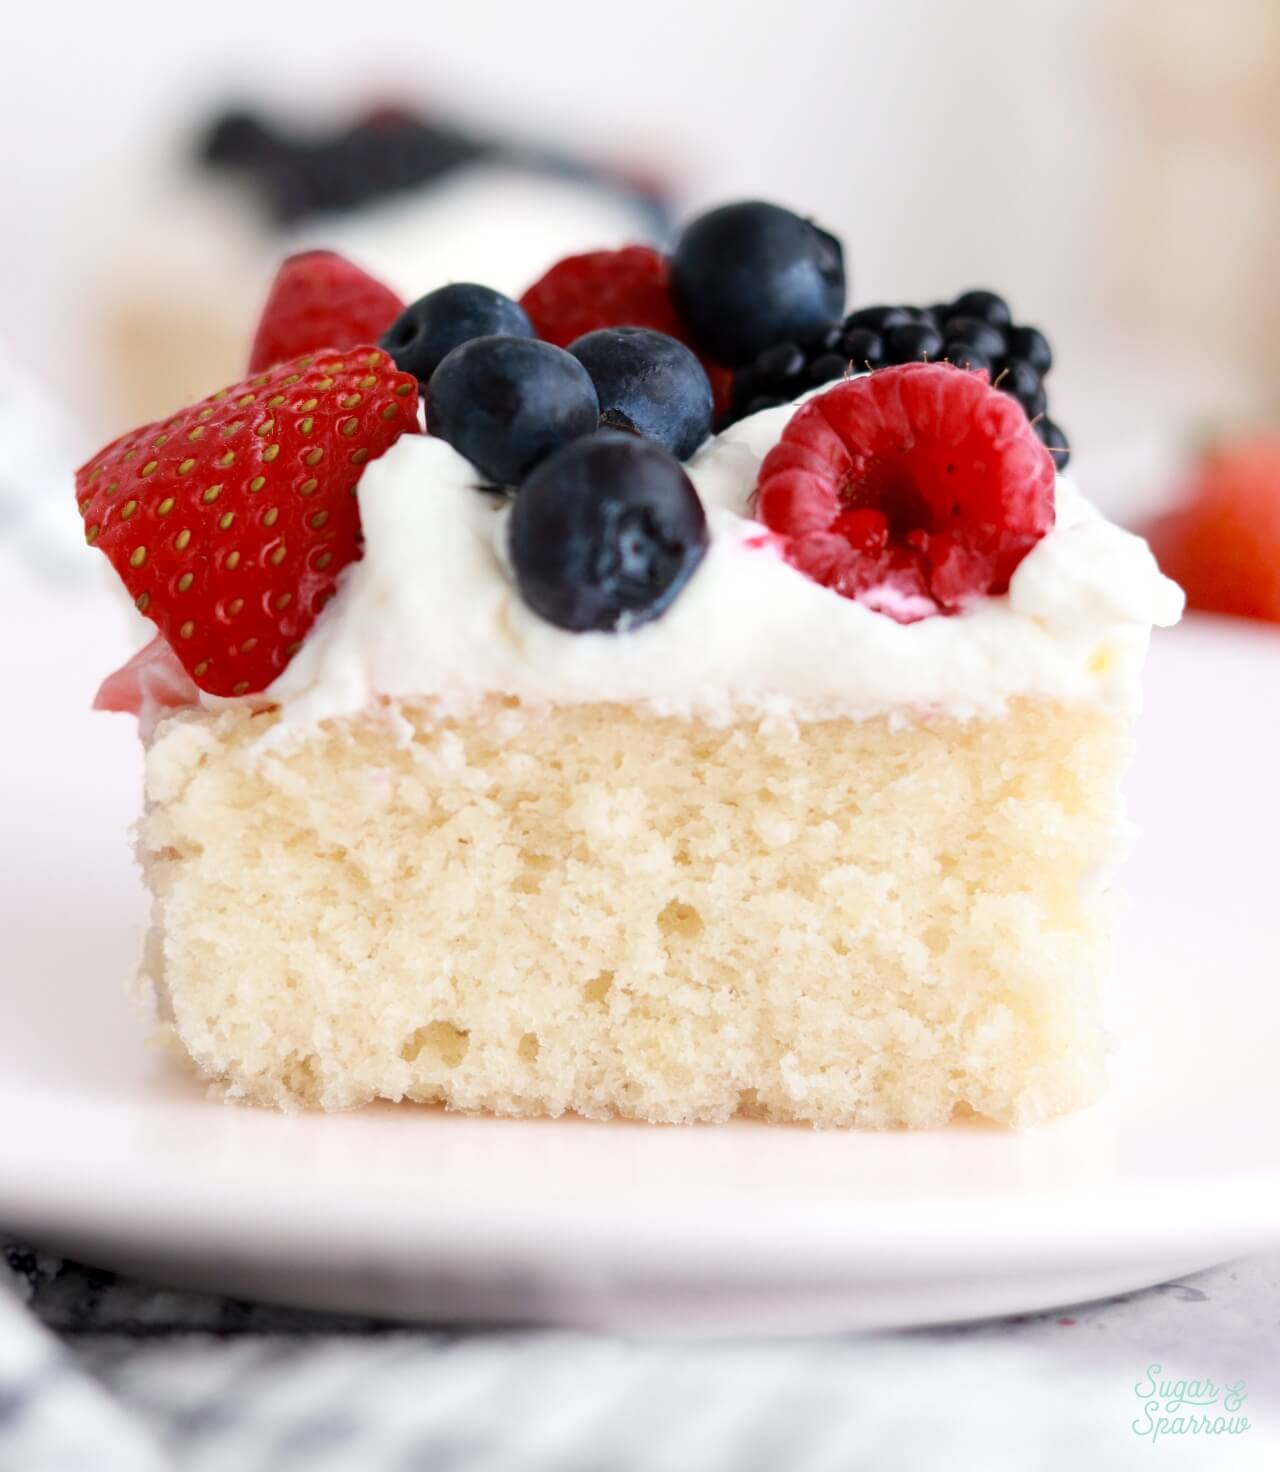
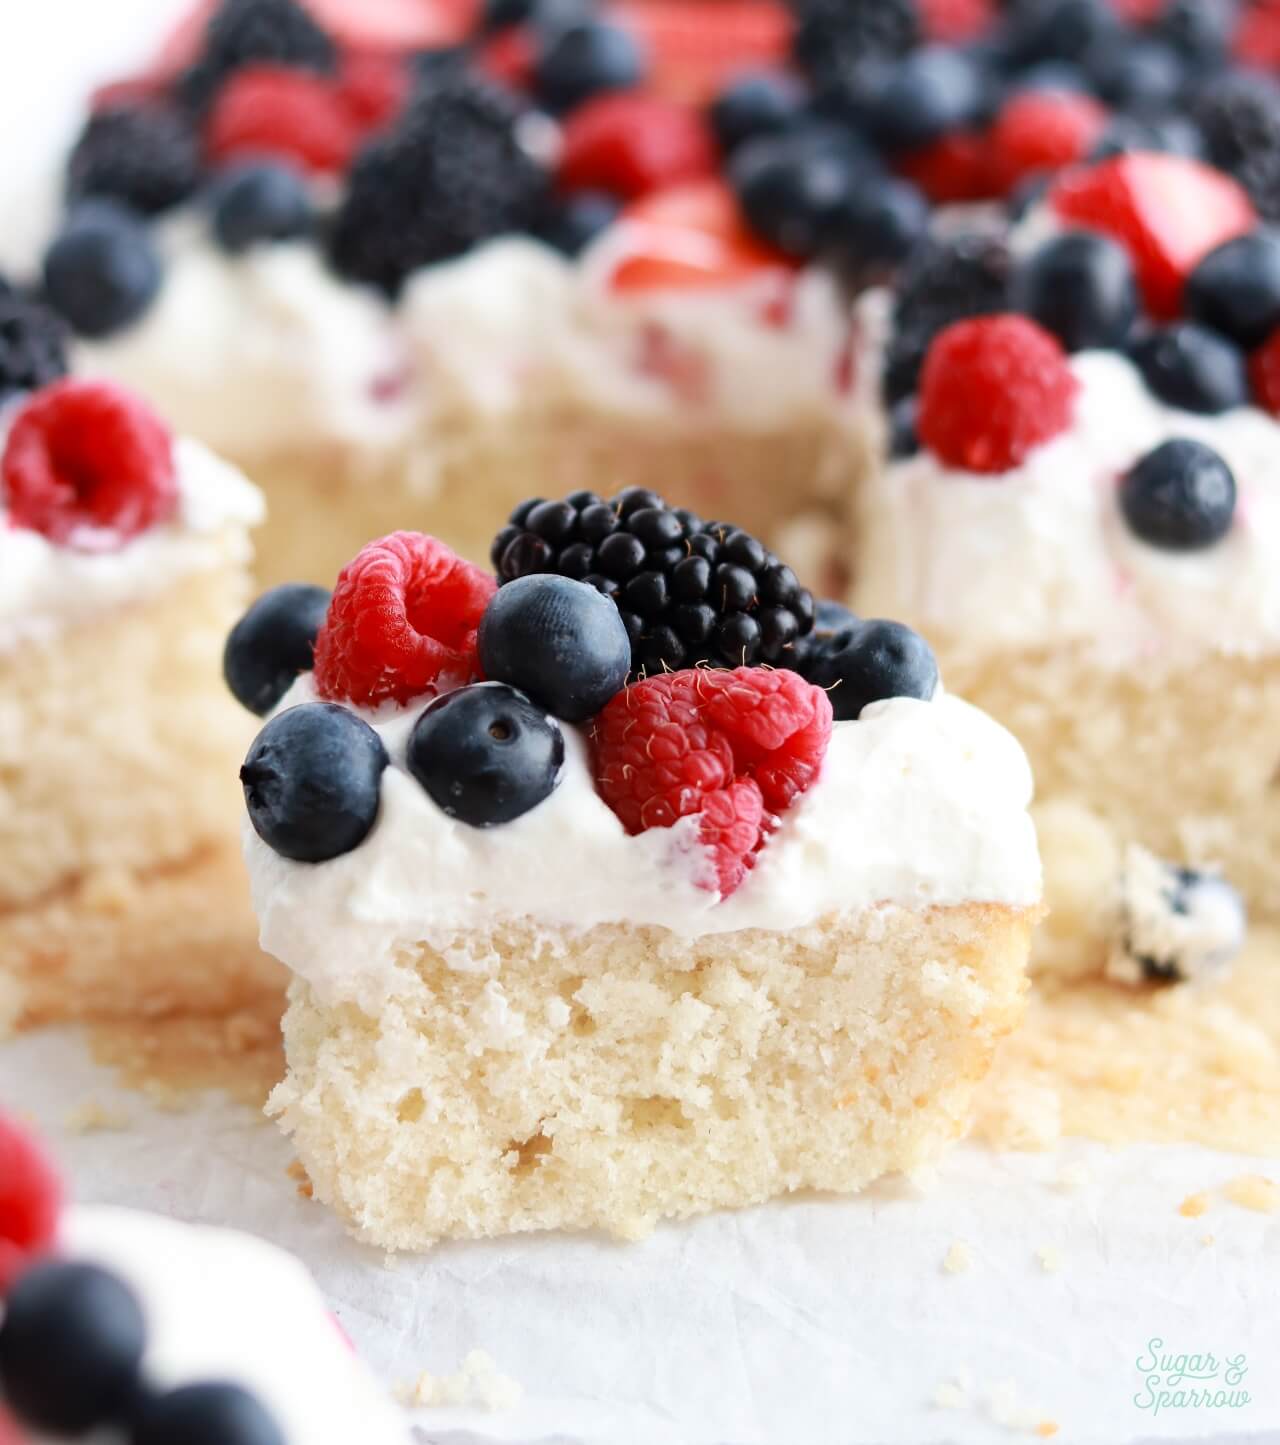
- Light and refreshing. The soft vanilla cake is topped with a super light whipped cream cheese frosting that isn’t super sweet. Imagine a whipped cream frosting with notes of cream cheese and that’s exactly what the frosting tastes like. Paired with the fresh berries and fluffy vanilla cake, it’s absolutely heavenly!
- Effortlessly beautiful. You don’t have to know much about cake decorating to make this cake a showstopper! Just pile on the whipped cream cheese frosting, smooth it into a semi-even layer (the more rustic the better), then top it with the berries.
- Perfect for BBQs and summer gatherings. Whether you need a dessert for the 4th of July, a BBQ, or a Summer birthday party, this berries & cream sheet cake is ideal. You can even assemble it in the baking pan for easy transport.
Bakery-Style Vanilla Sheet Cake
This berries & cream sheet cake recipe begins with my favorite bakery-style white cake, which is extra soft, packed with vanilla flavor, and stays moist for days. The batter is simple to make and it bakes beautifully in a 9×13 pan. Here are some of the key ingredients that make it the perfect texture (and some substitutes in case you need them):
- Cake Flour. To achieve the super soft bakery-style texture in this cake, you’ll need to use cake flour. It produces a much fluffier cake than all-purpose (or plain) flour because of its lower protein content (the more protein in your flour the stiffer the dough and less ability to maintain moisture). You can find cake flour at most grocery stores, but if all you’ve got is all-purpose flour in your pantry, here are instructions for how to make your own cake flour. Keep in mind that if you do use the homemade version, the gram measurement will weigh more (295g instead of 265g) since all-purpose flour is heavier than cake flour.
- Butter + Oil. A combination of butter and oil are used as the base fats here. The butter adds richness and structure while the oil keeps the crumb super moist and flexible. If you only have salted butter on hand, you can use that and omit the salt in the recipe. And while I like to use plain vegetable oil, you can substitute an equal amount of any neutral oil you’re used to baking with (canola, refined avocado, etc).
- Egg Whites. To keep the cake extra light (and nearly white in color), I use four large egg whites in this recipe. You can either use fresh egg whites and save the yolks for another recipe, or use ½ Cup of carton egg whites in place of the fresh ones if that is more convenient.
- Pure Vanilla Extract. To create that perfect vanilla flavor, use a good quality vanilla extract or substitute with an equal amount of vanilla bean paste.
- Buttermilk. The fattiest of all the milks, buttermilk creates a rich texture and locks in lots of moisture. If you can’t find buttermilk locally, you can easily make a DIY version using whole milk and vinegar or lemon juice. The instructions are in the notes of the recipe card below.
Whipped Cream Cheese Frosting
I love that this whipped cream cheese frosting comes together with just four ingredients in about five minutes. It’s essentially a whipped cream frosting with cream cheese added, which helps stabilize the frosting and makes it thick enough for frosting the cake. The only thing you’ll need to do as prep work is place the bowl of your stand mixer (or the large metal or glass bowl you’re making the frosting in) in the refrigerator for about 20 minutes so it’s cold when you get started.
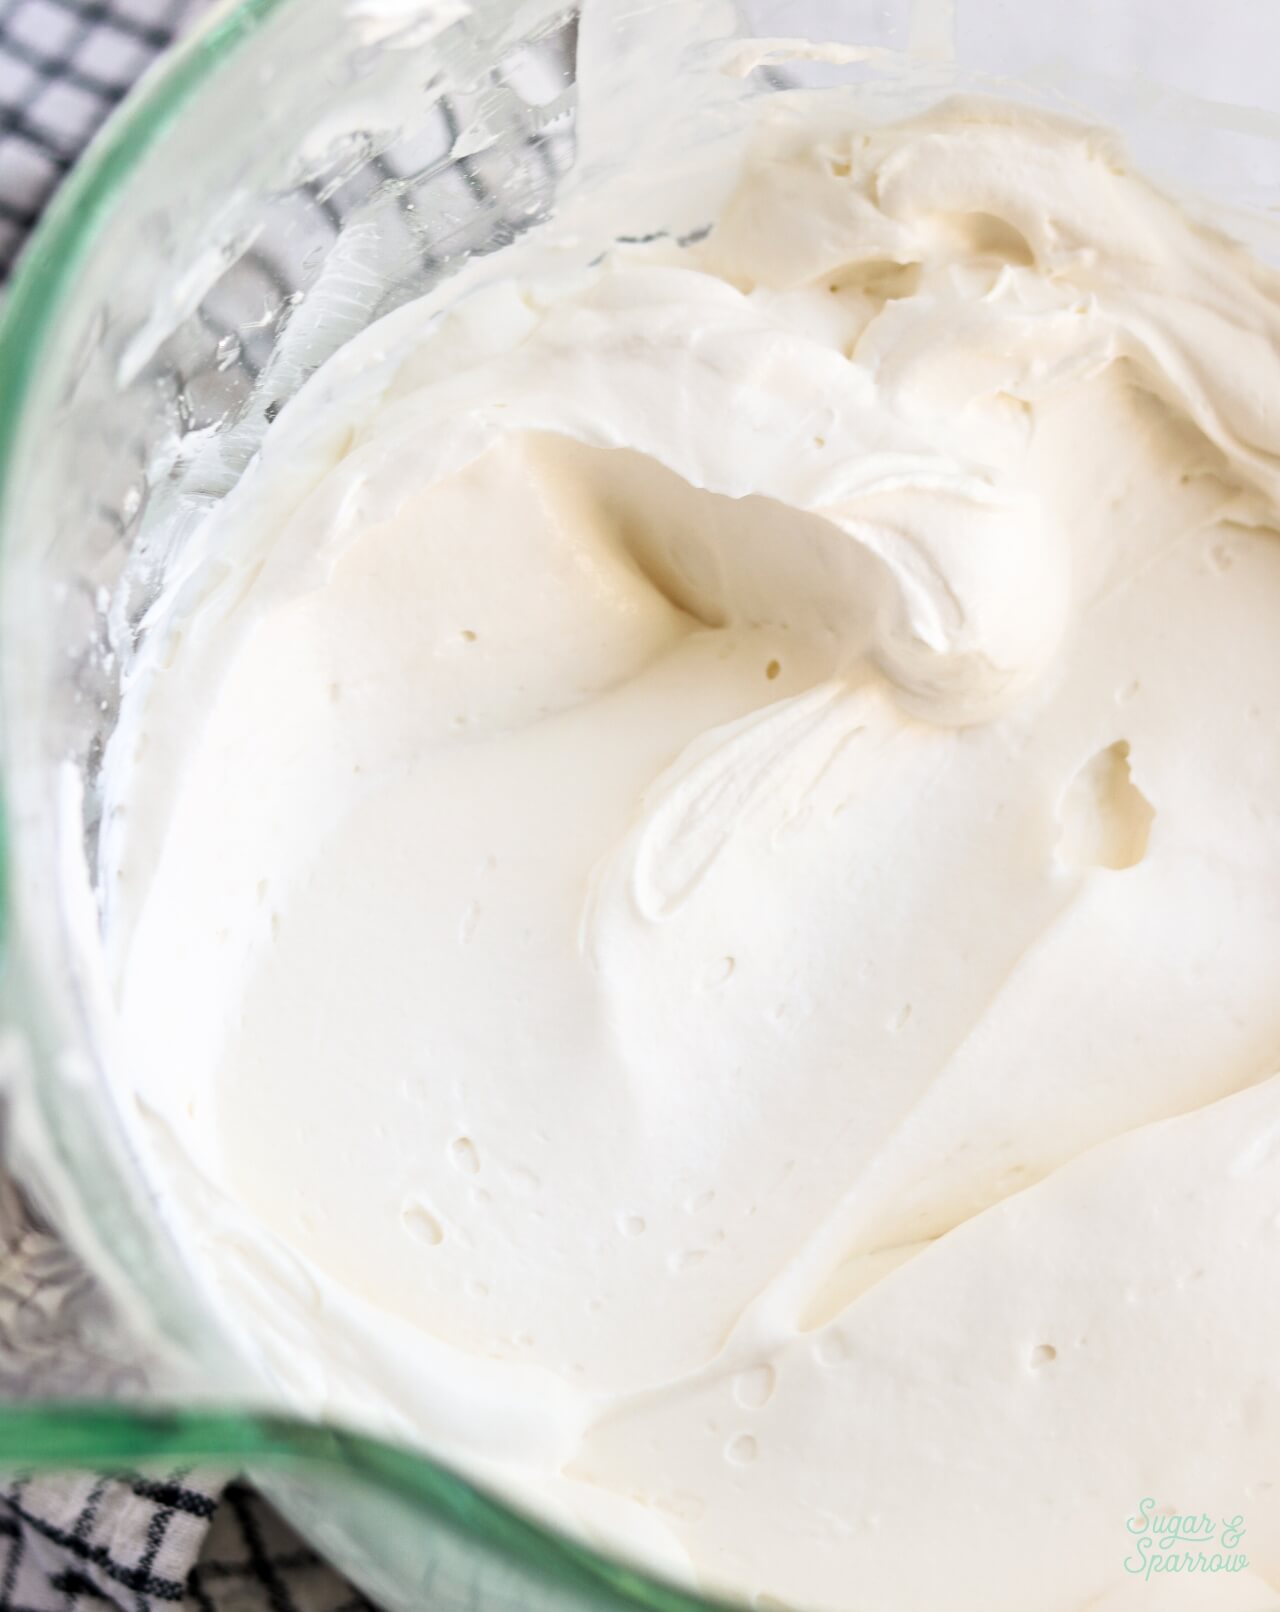
To make the whipped cream cheese frosting, you’ll basically whip up some full-fat brick-style cream cheese until creamy, then mix in a little powdered sugar and vanilla until combined. All that’s left to do is slowly add heavy whipping cream and whip until soft peaks form. You’ll want to keep a close eye on your mixer so you don’t over-whip! The resulting frosting should be silky smooth, deliciously light, and so easy to work with.
Note: it’s super important to use full-fat brick-style cream cheese in this recipe. Other kinds of cream cheese (low-fat or the spreadable kind in tubs) contain too much water and will ruin the consistency of the frosting. If you can’t find full-fat brick-style cream cheese, mascarpone cheese makes the best substitute for the cream cheese in this recipe or you can make the stabilized whipped cream frosting from my Black Forest Cake recipe instead!
Fresh Berry Topping
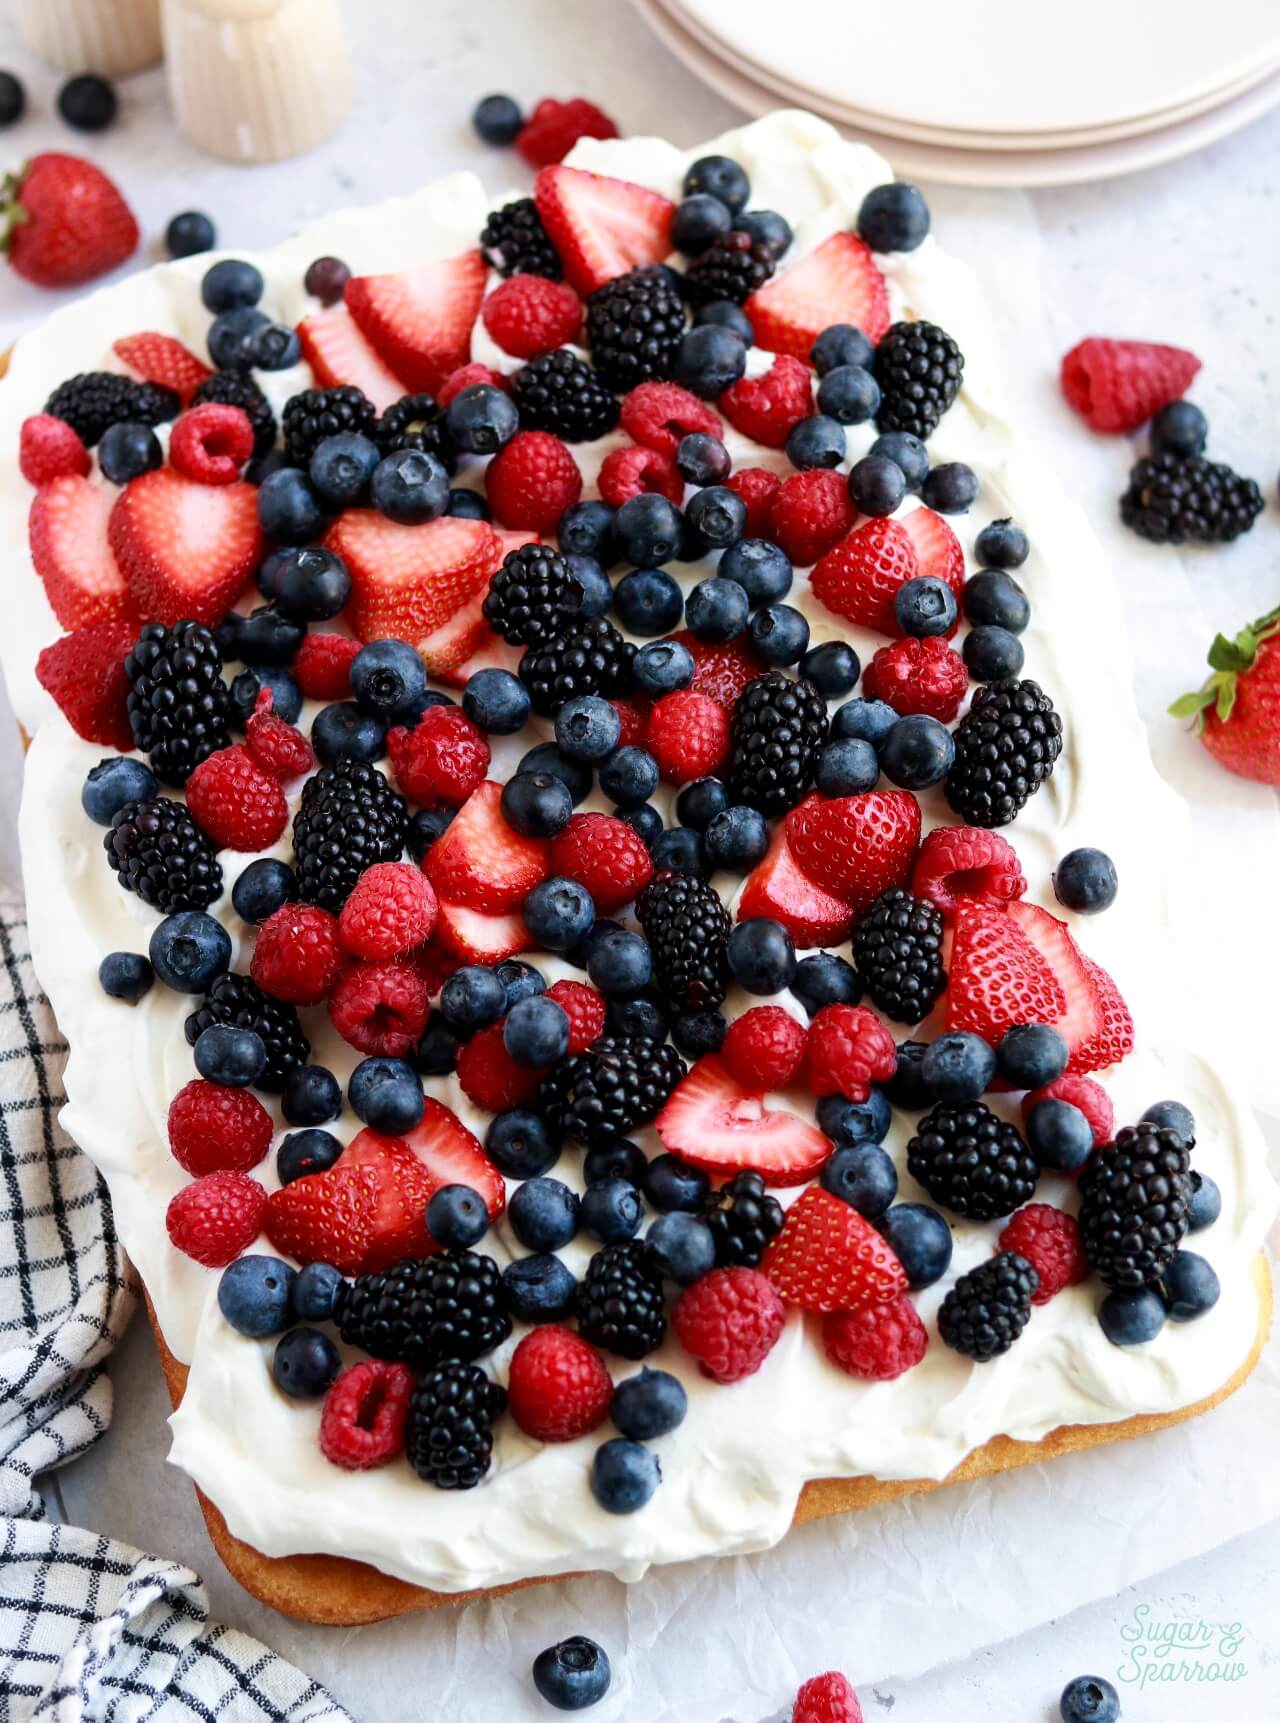
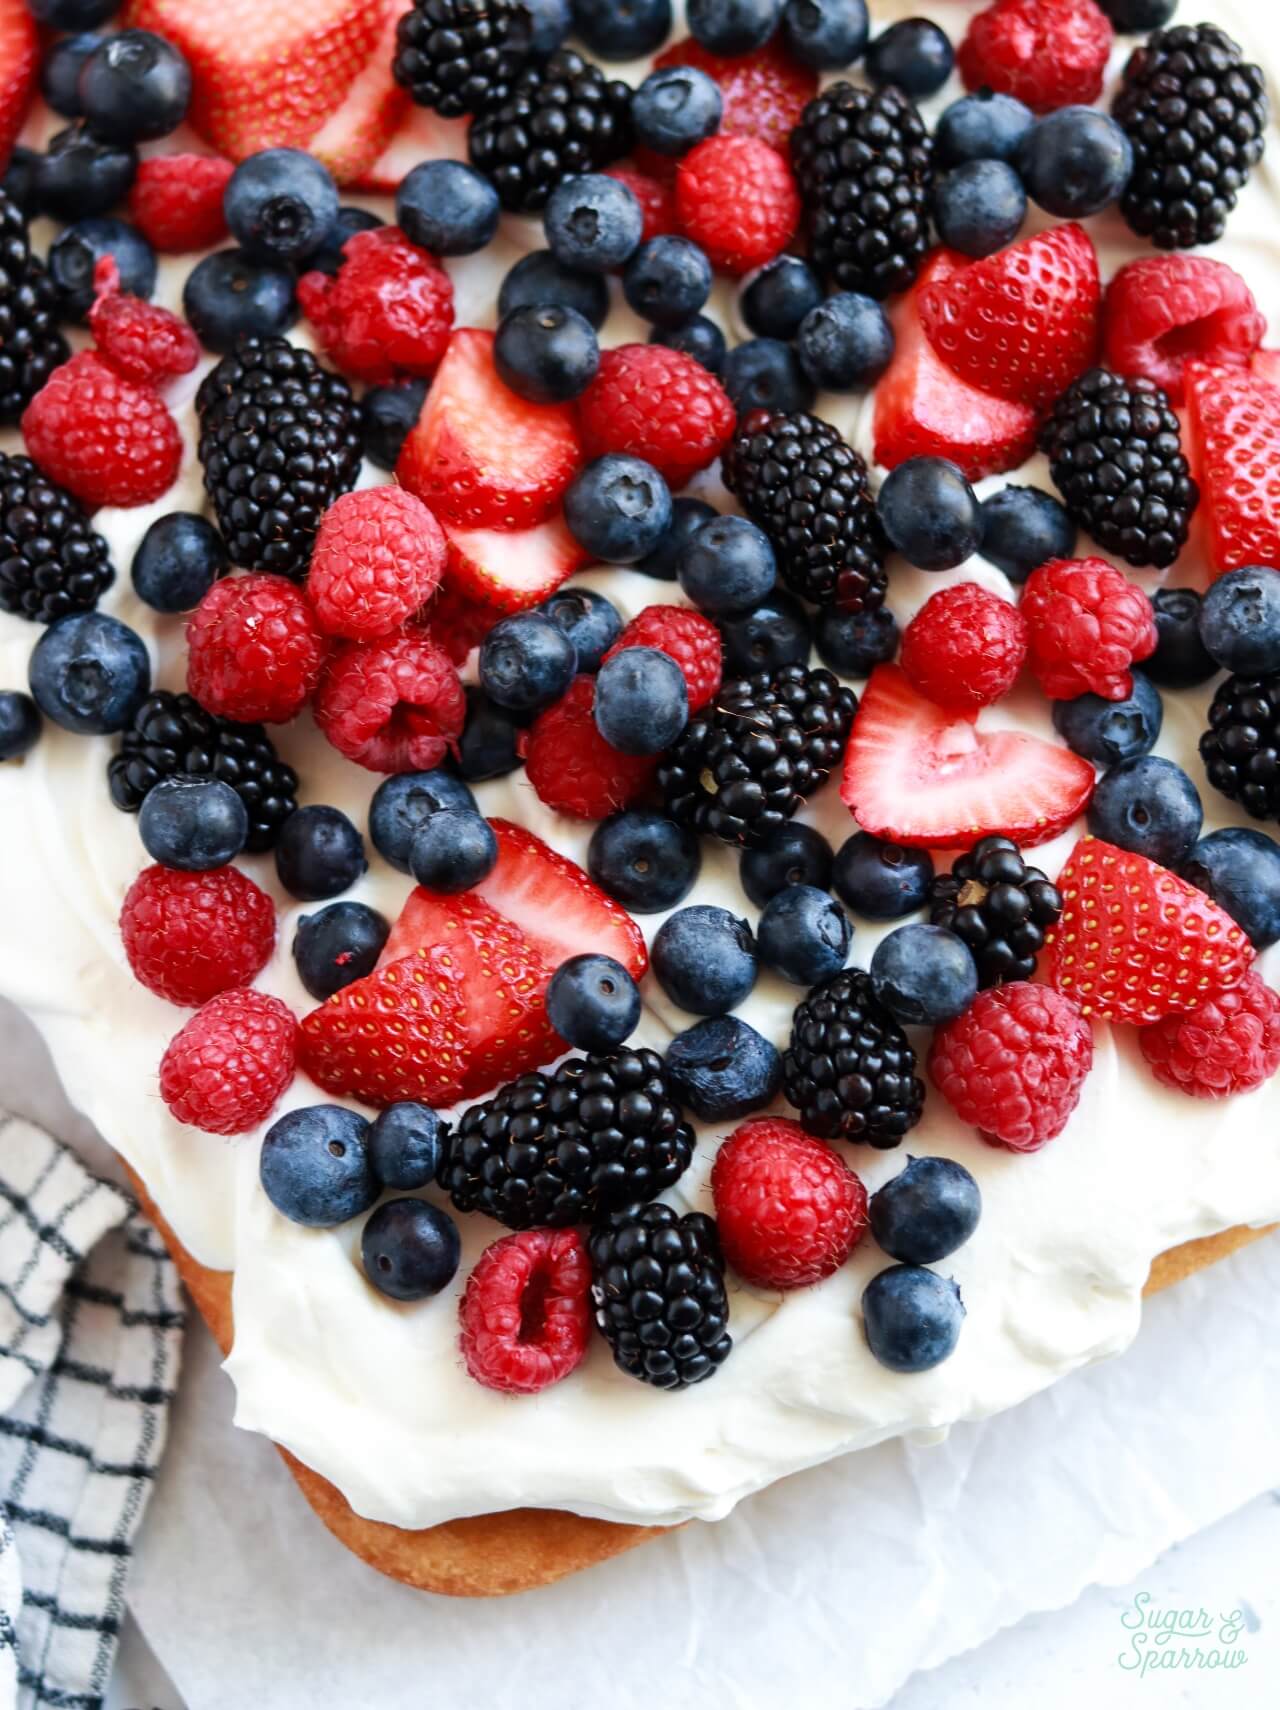
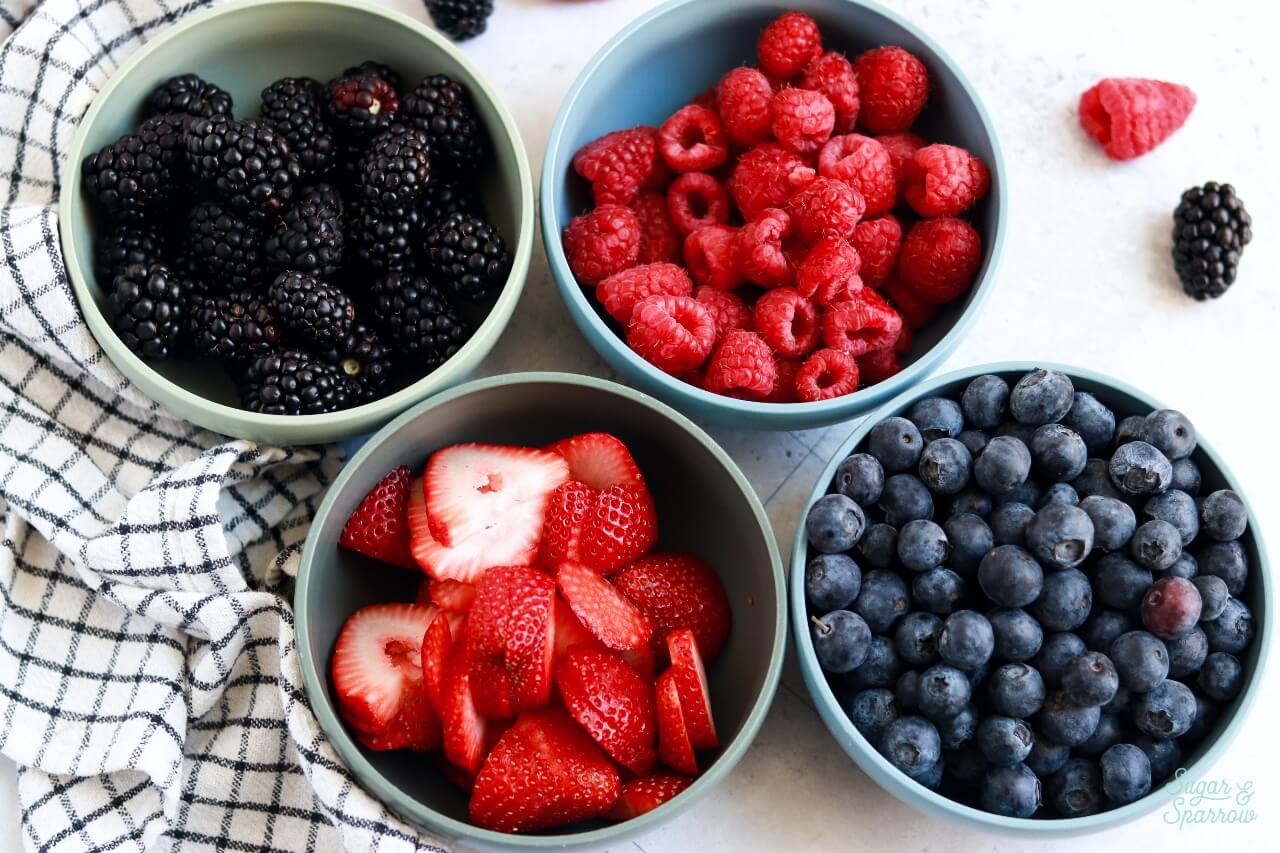
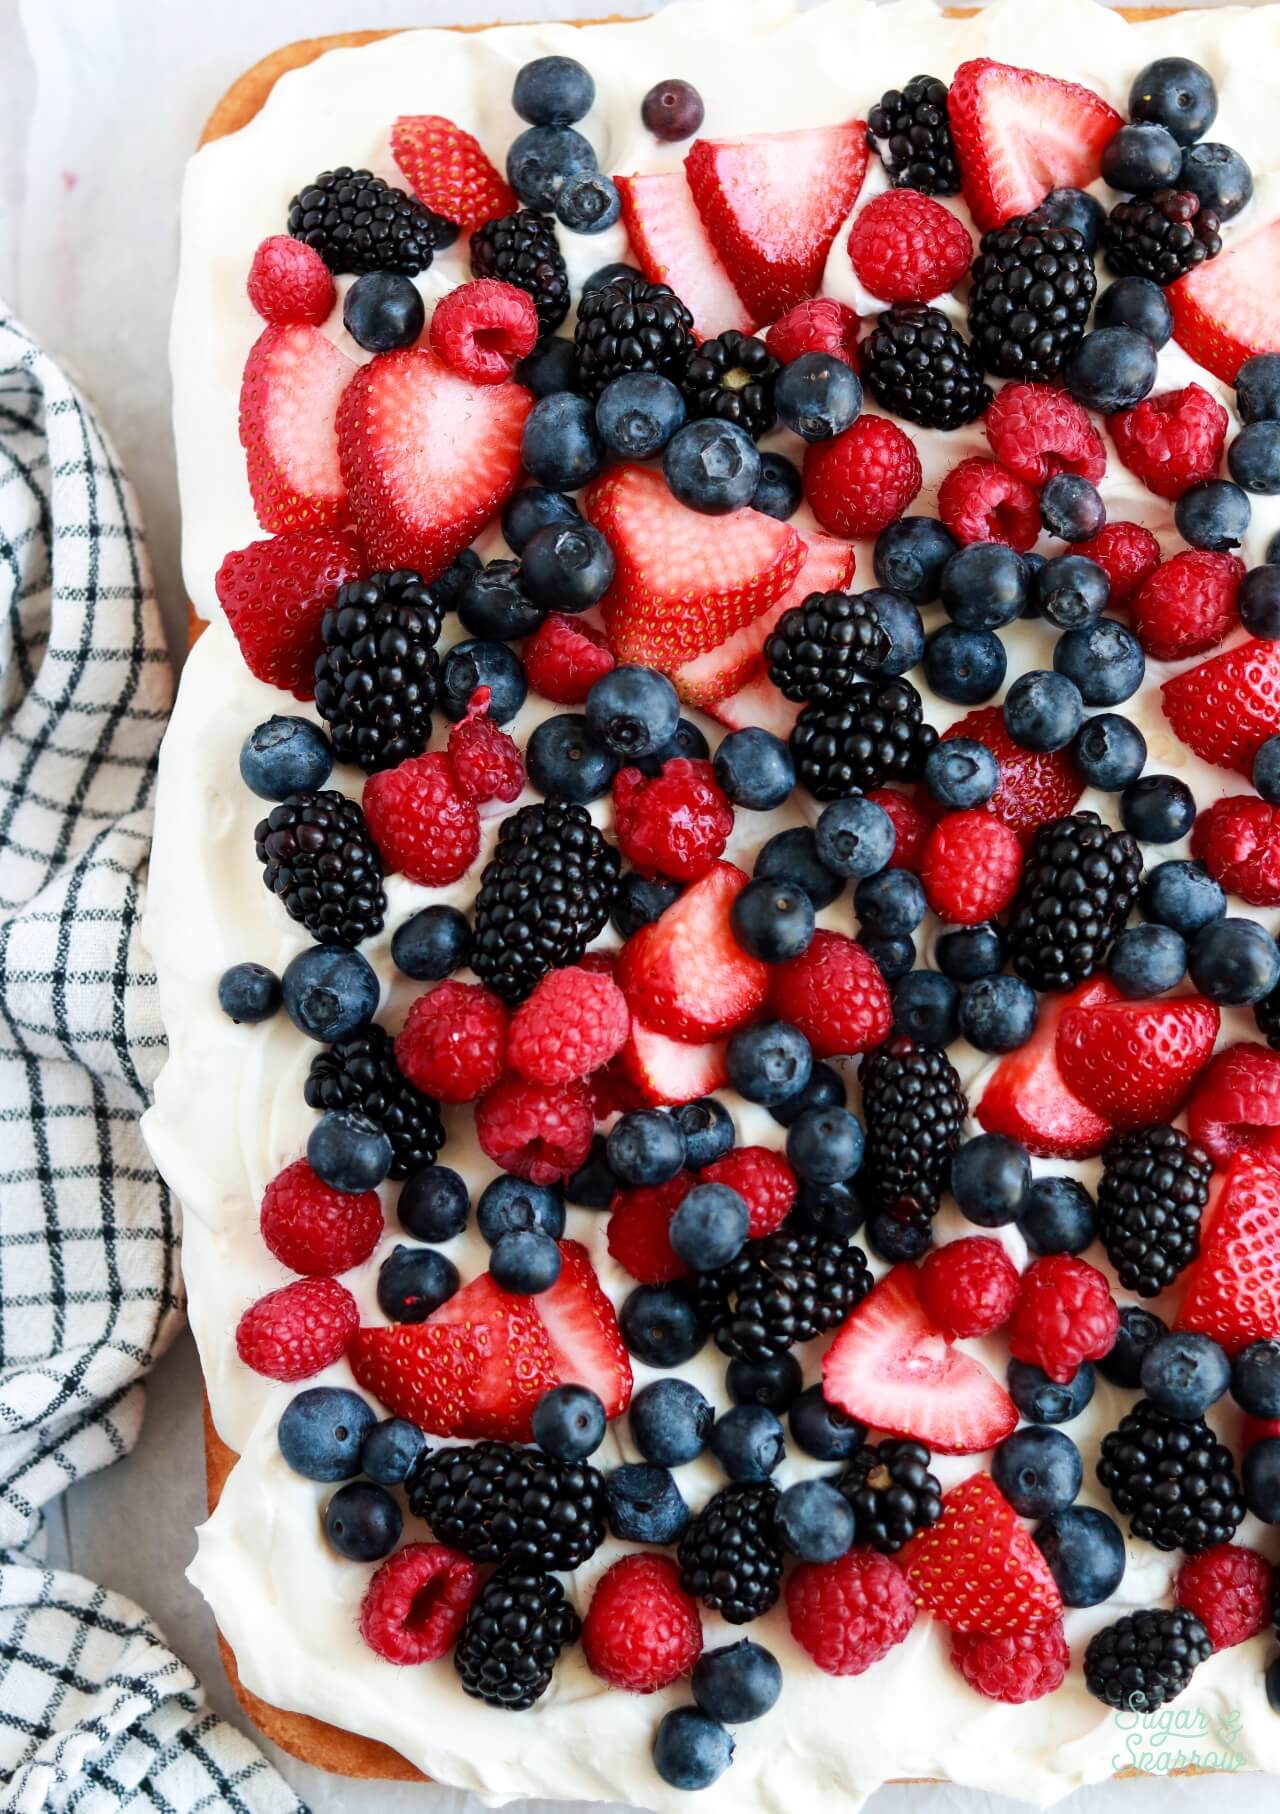
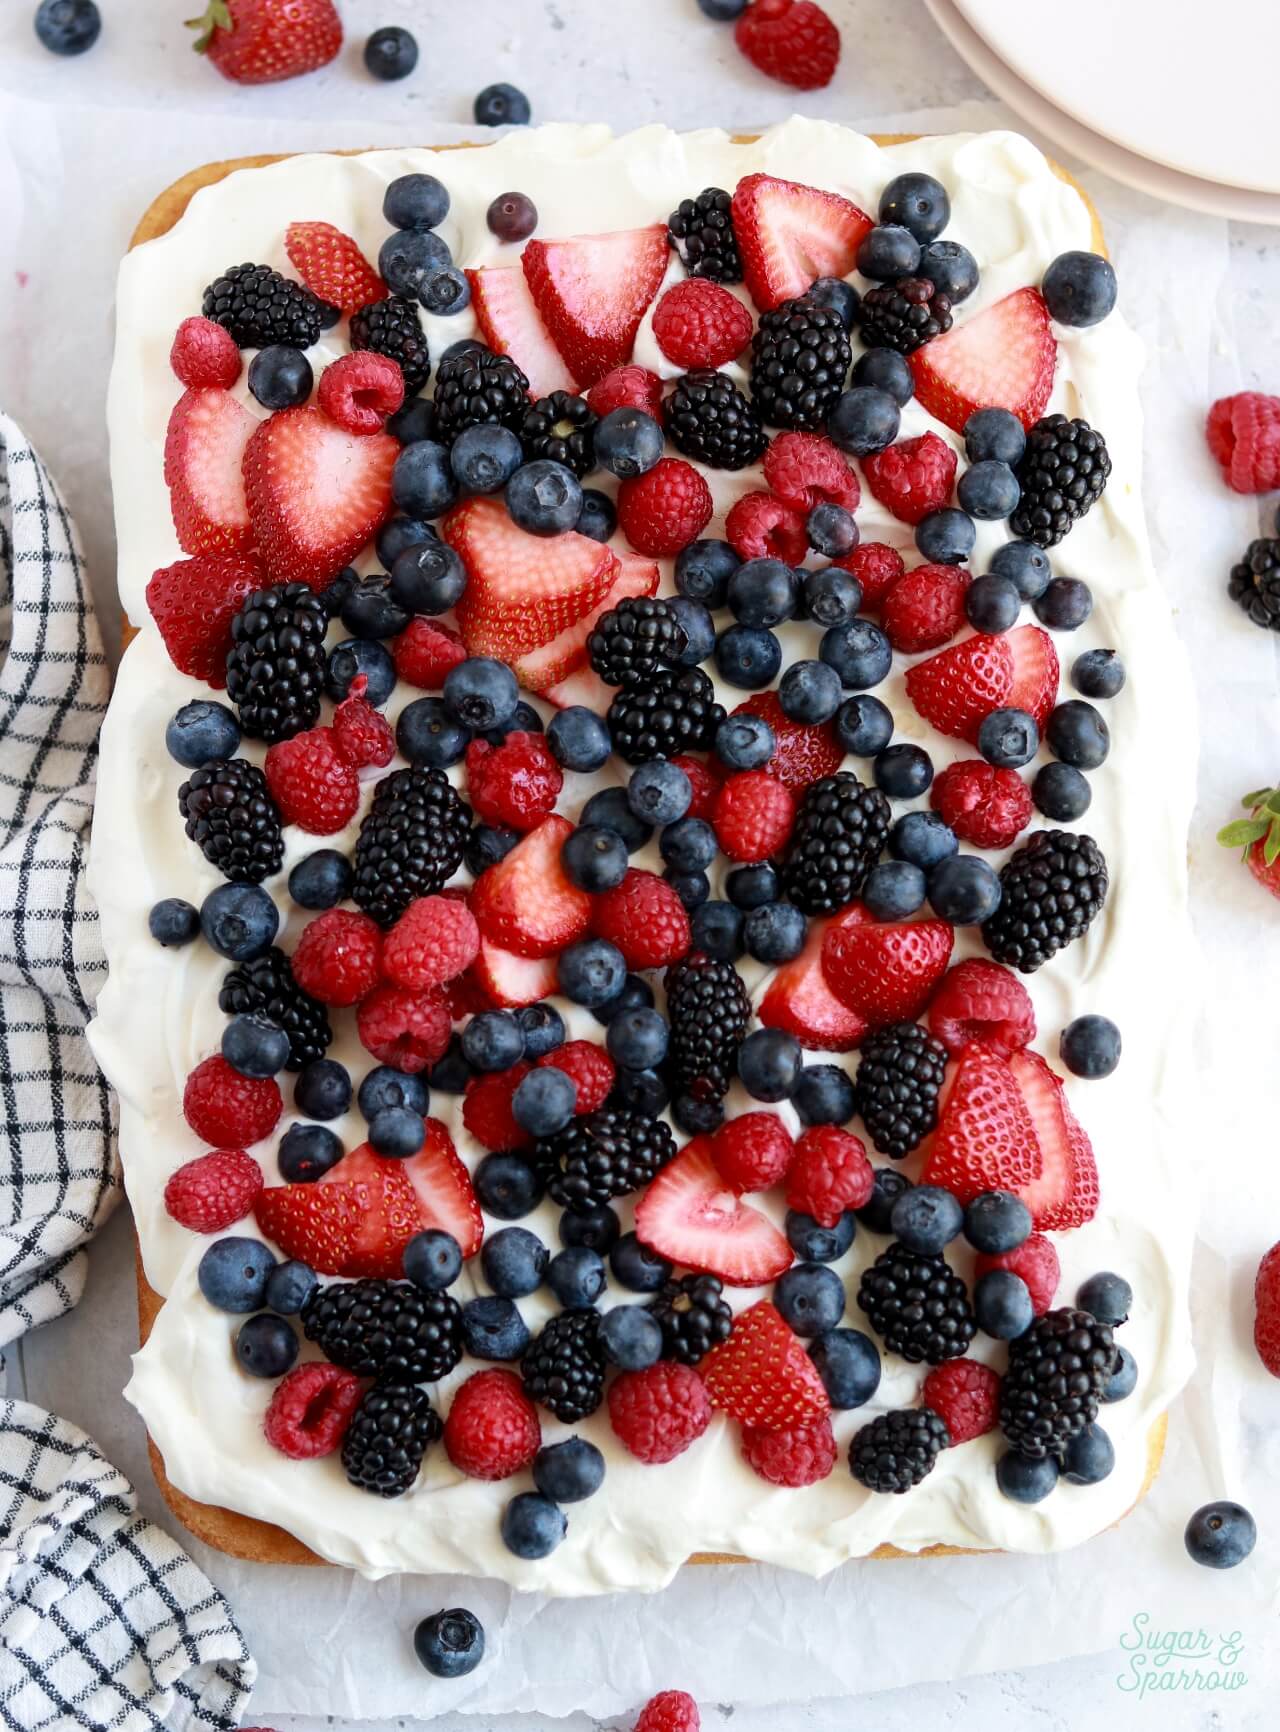
You can use any assortment of berries to top this sheet cake! I went with fresh strawberries, raspberries, blueberries, and blackberries, but you can truly use any combination of berries here. Just make sure they’re fresh (not frozen) for the best presentation.
How to Assemble a Berries & Cream Sheet Cake
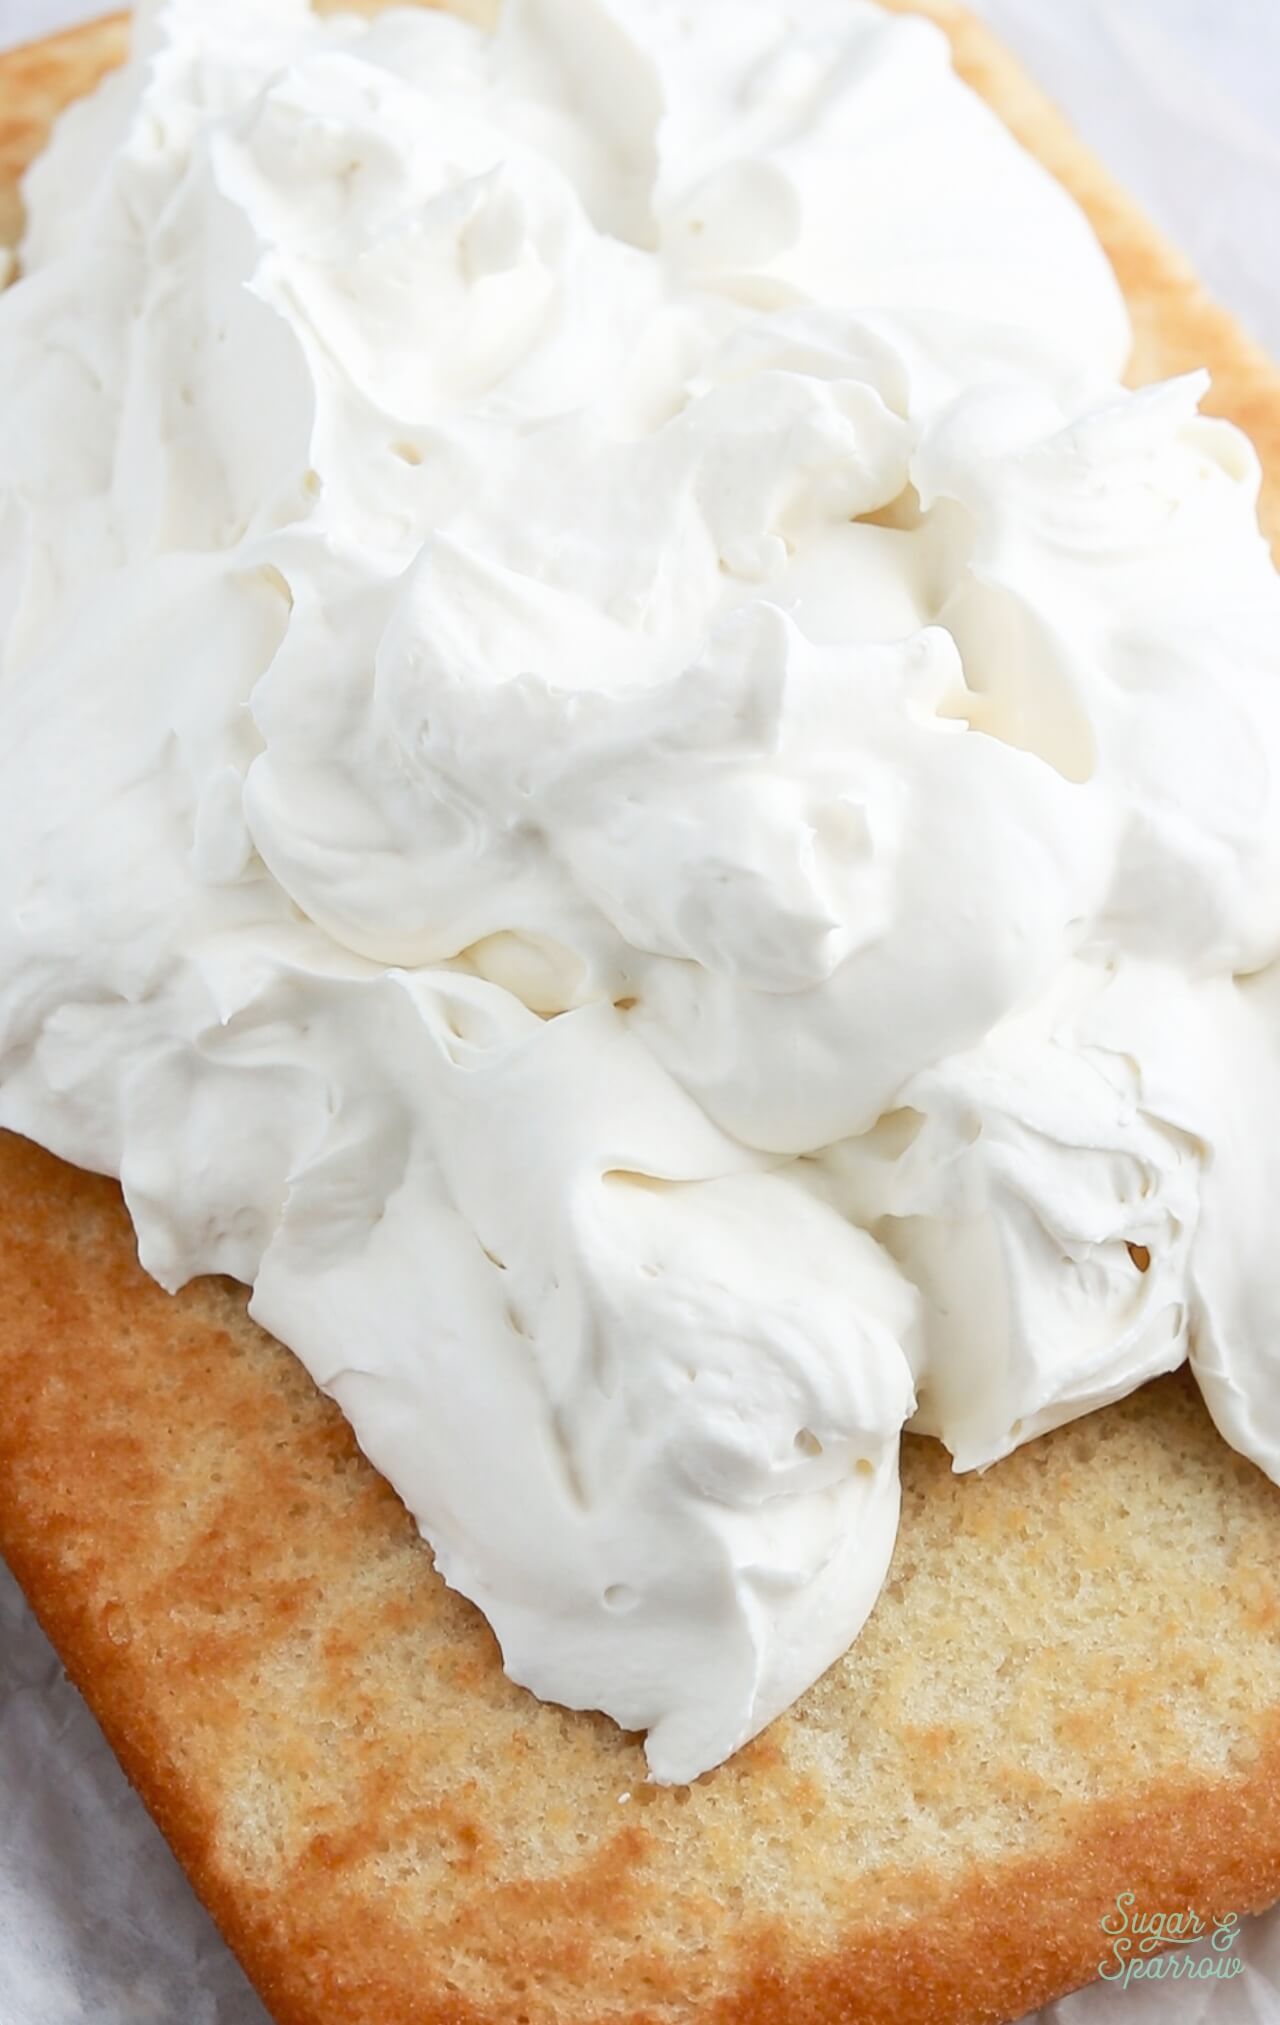
Step 1: Prepare the Vanilla Sheet Cake. Once the vanilla sheet cake is baked and cooled, remove it from the pan by turning it out onto the board or plate you’ll be serving it on. Pictured here is just a cutting board with crinkly parchment paper on it. You can also just leave it in the pan for assembly if you want to transport it that way.
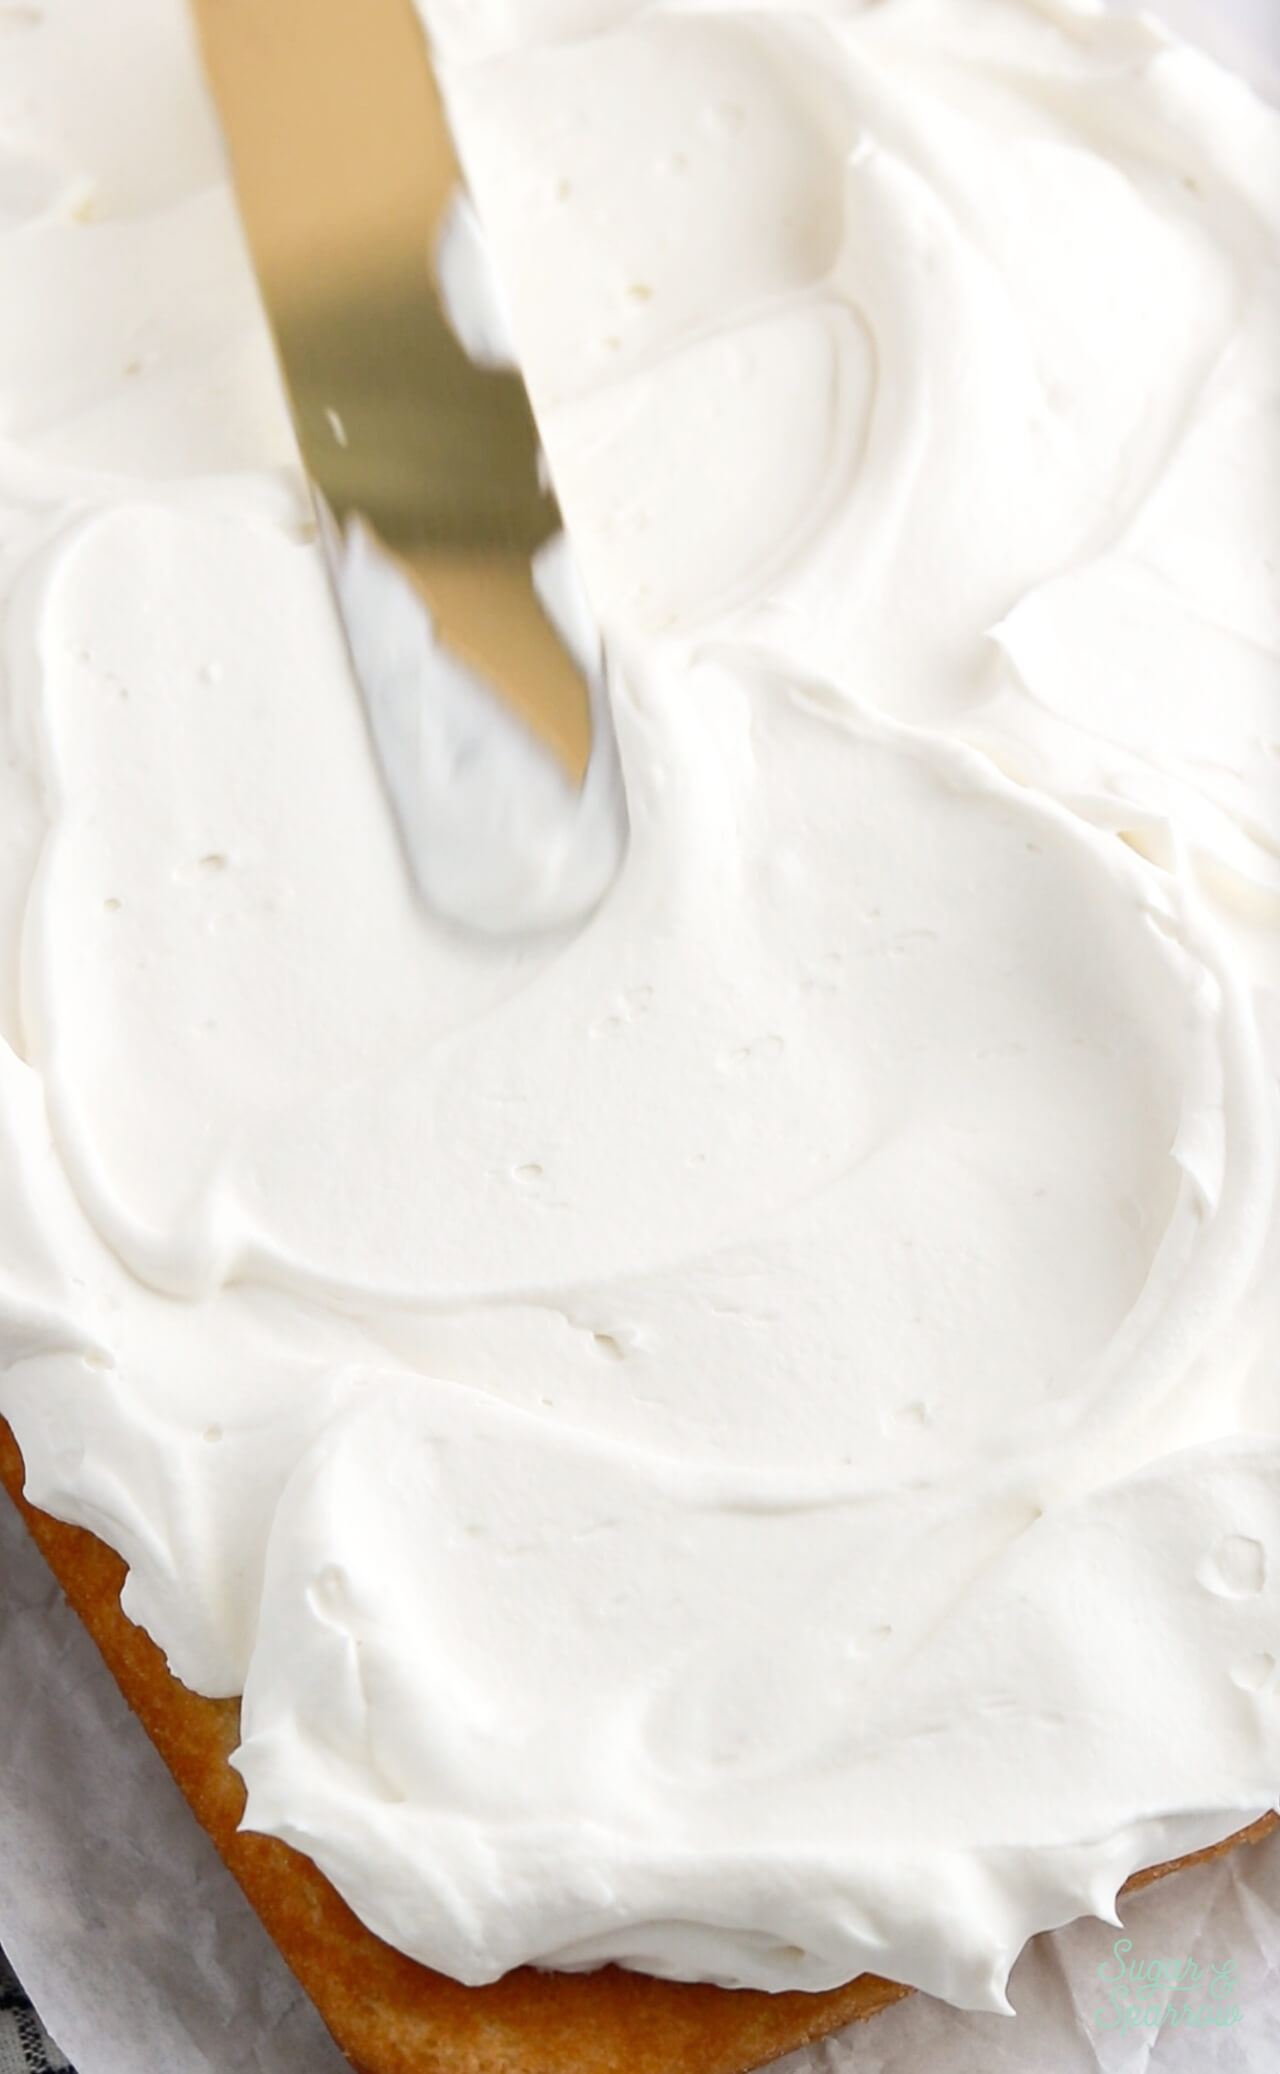
Step 2: Add the Whipped Cream Cheese Frosting. Add all of the frosting on top of the vanilla sheet cake and use an angled spatula to spread it in a semi-even layer all the way to the edges. Feel free to swirl the frosting with the spatula for a rustic look.
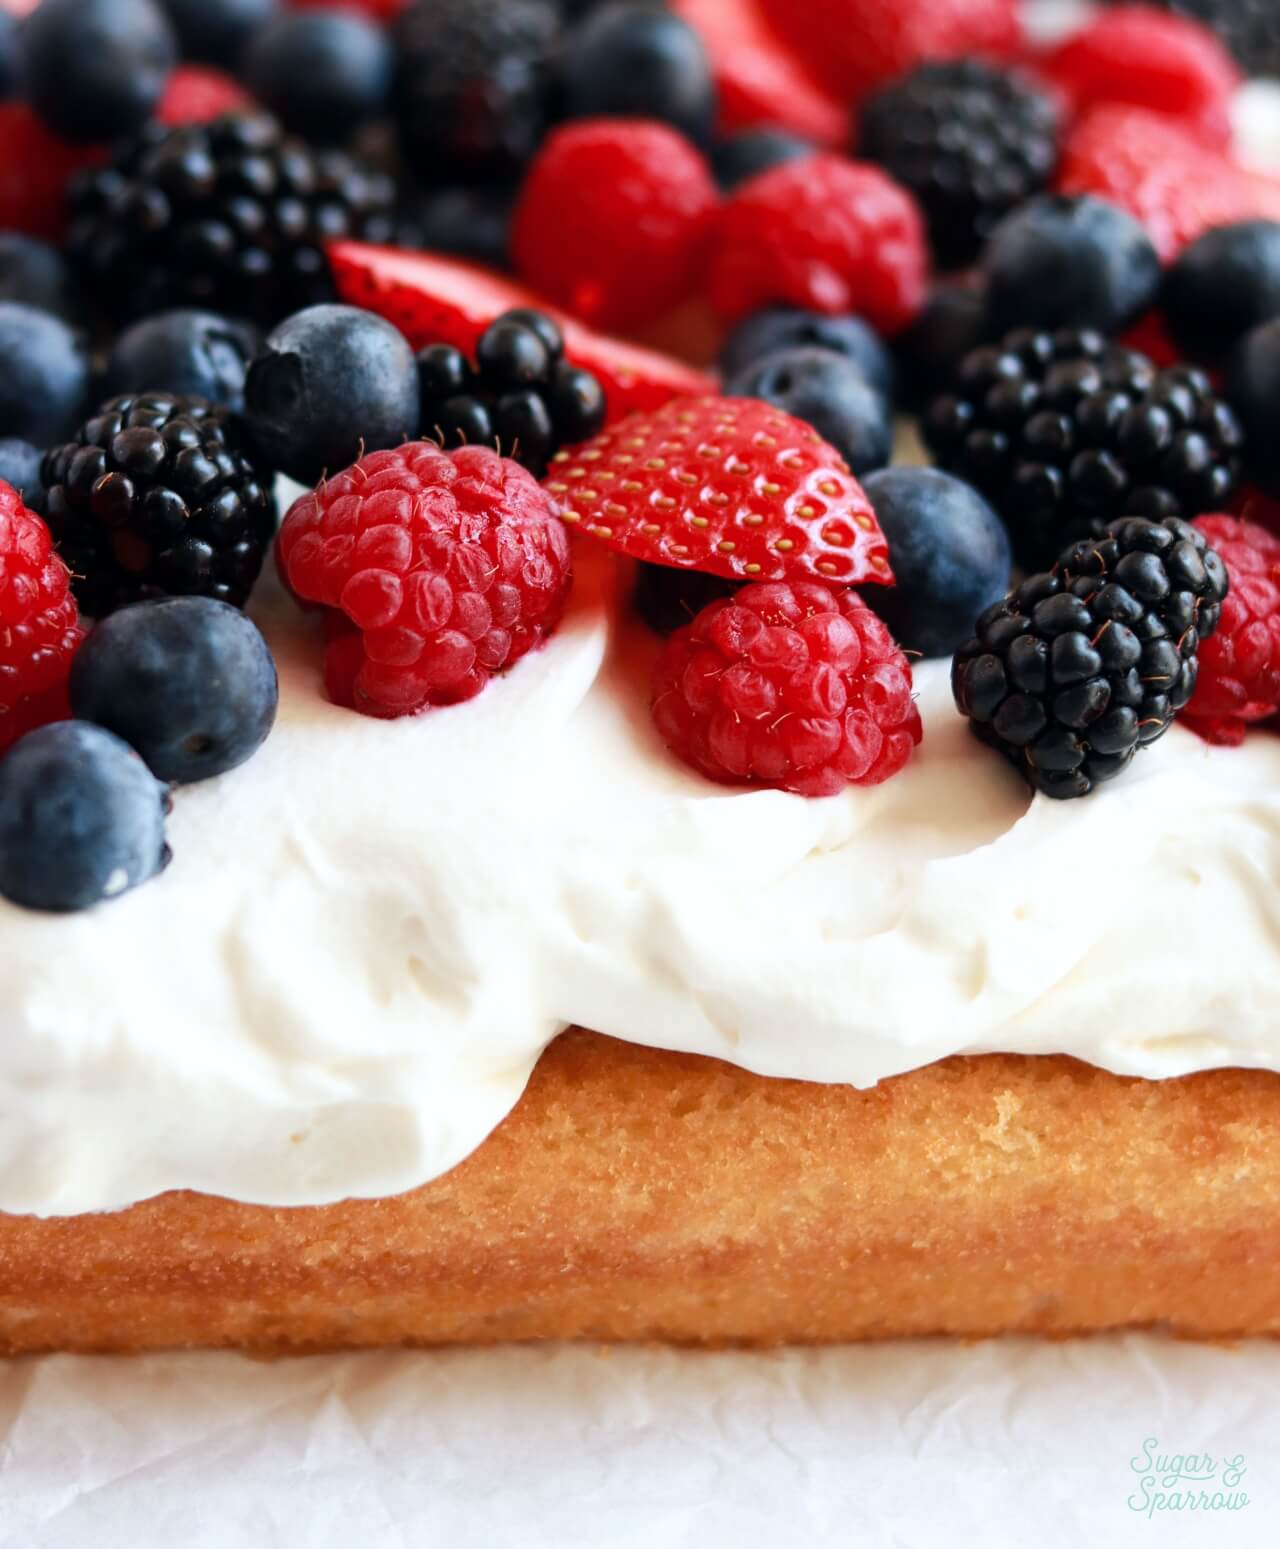
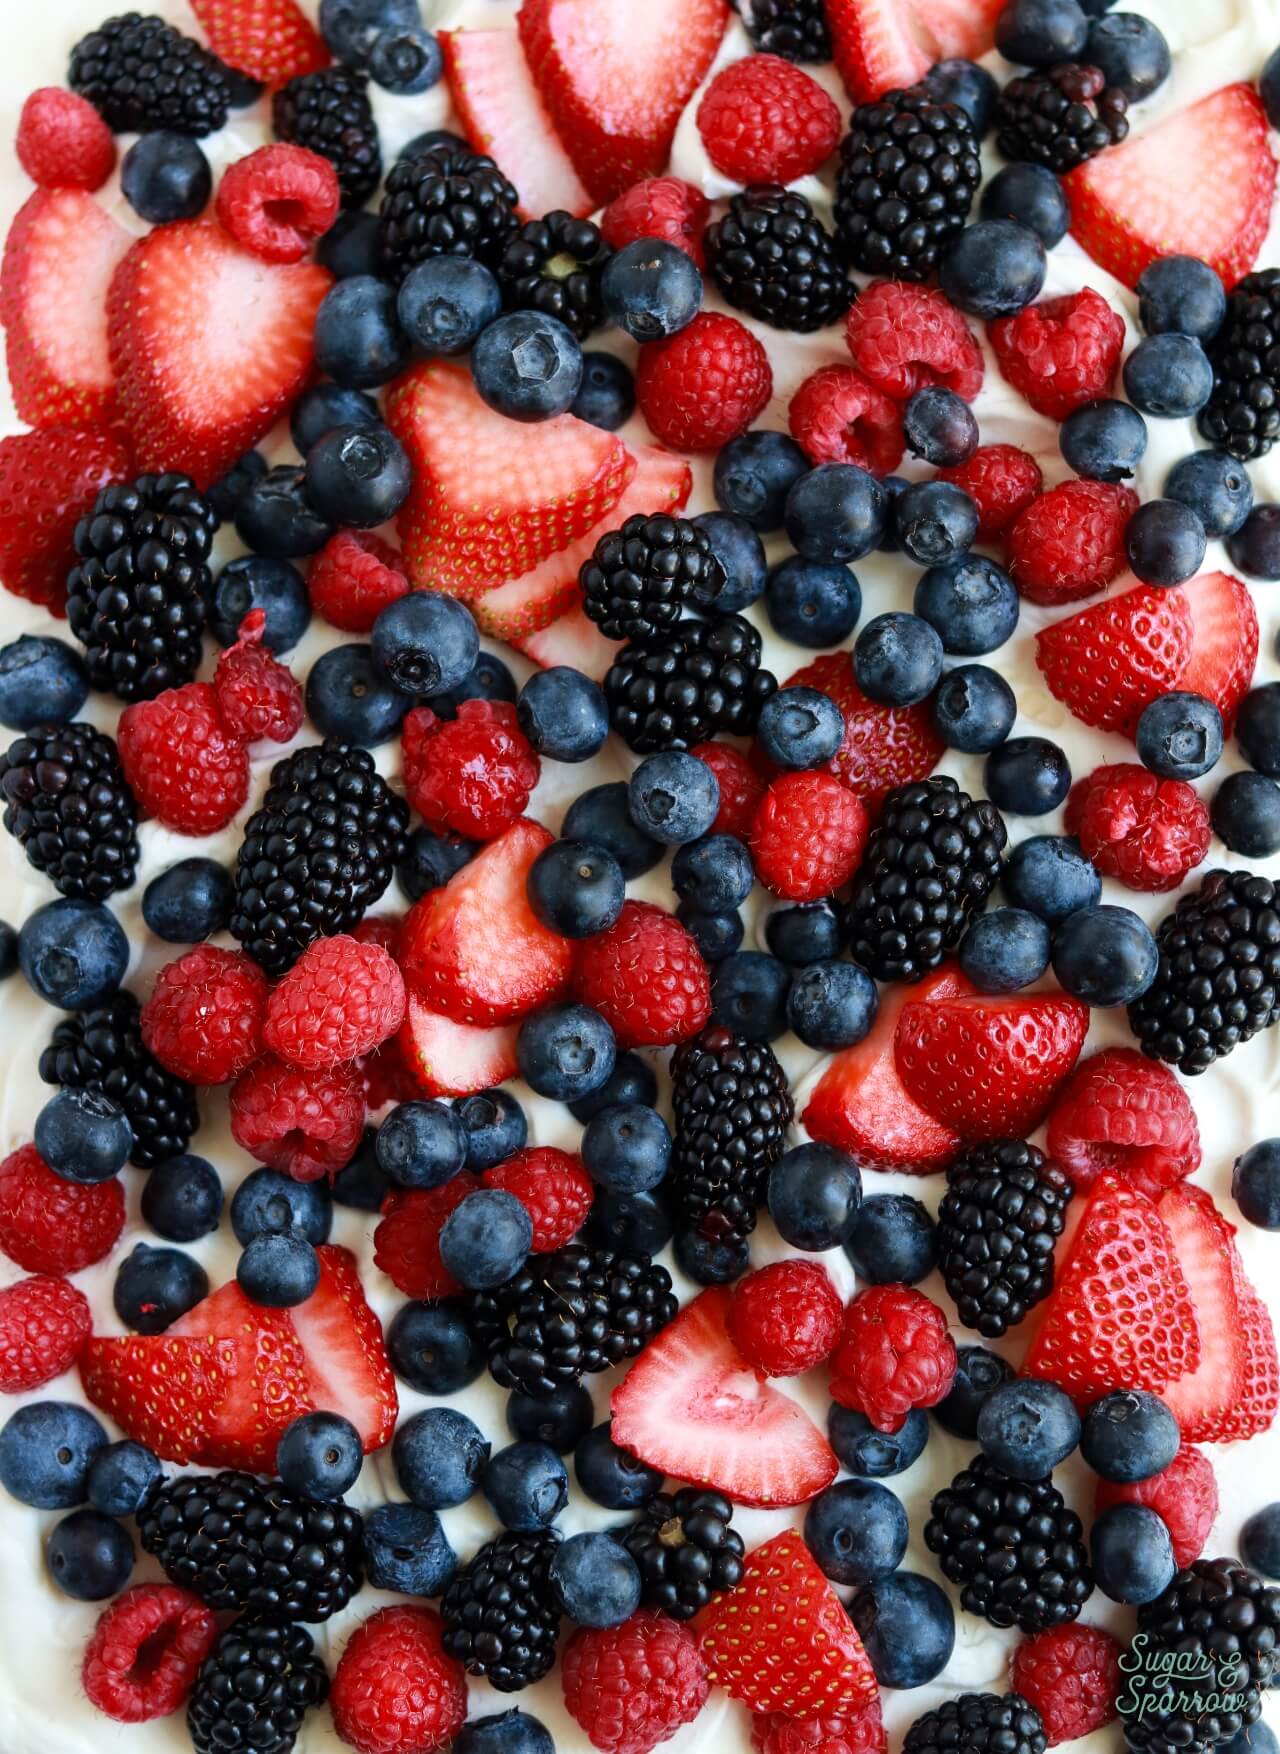
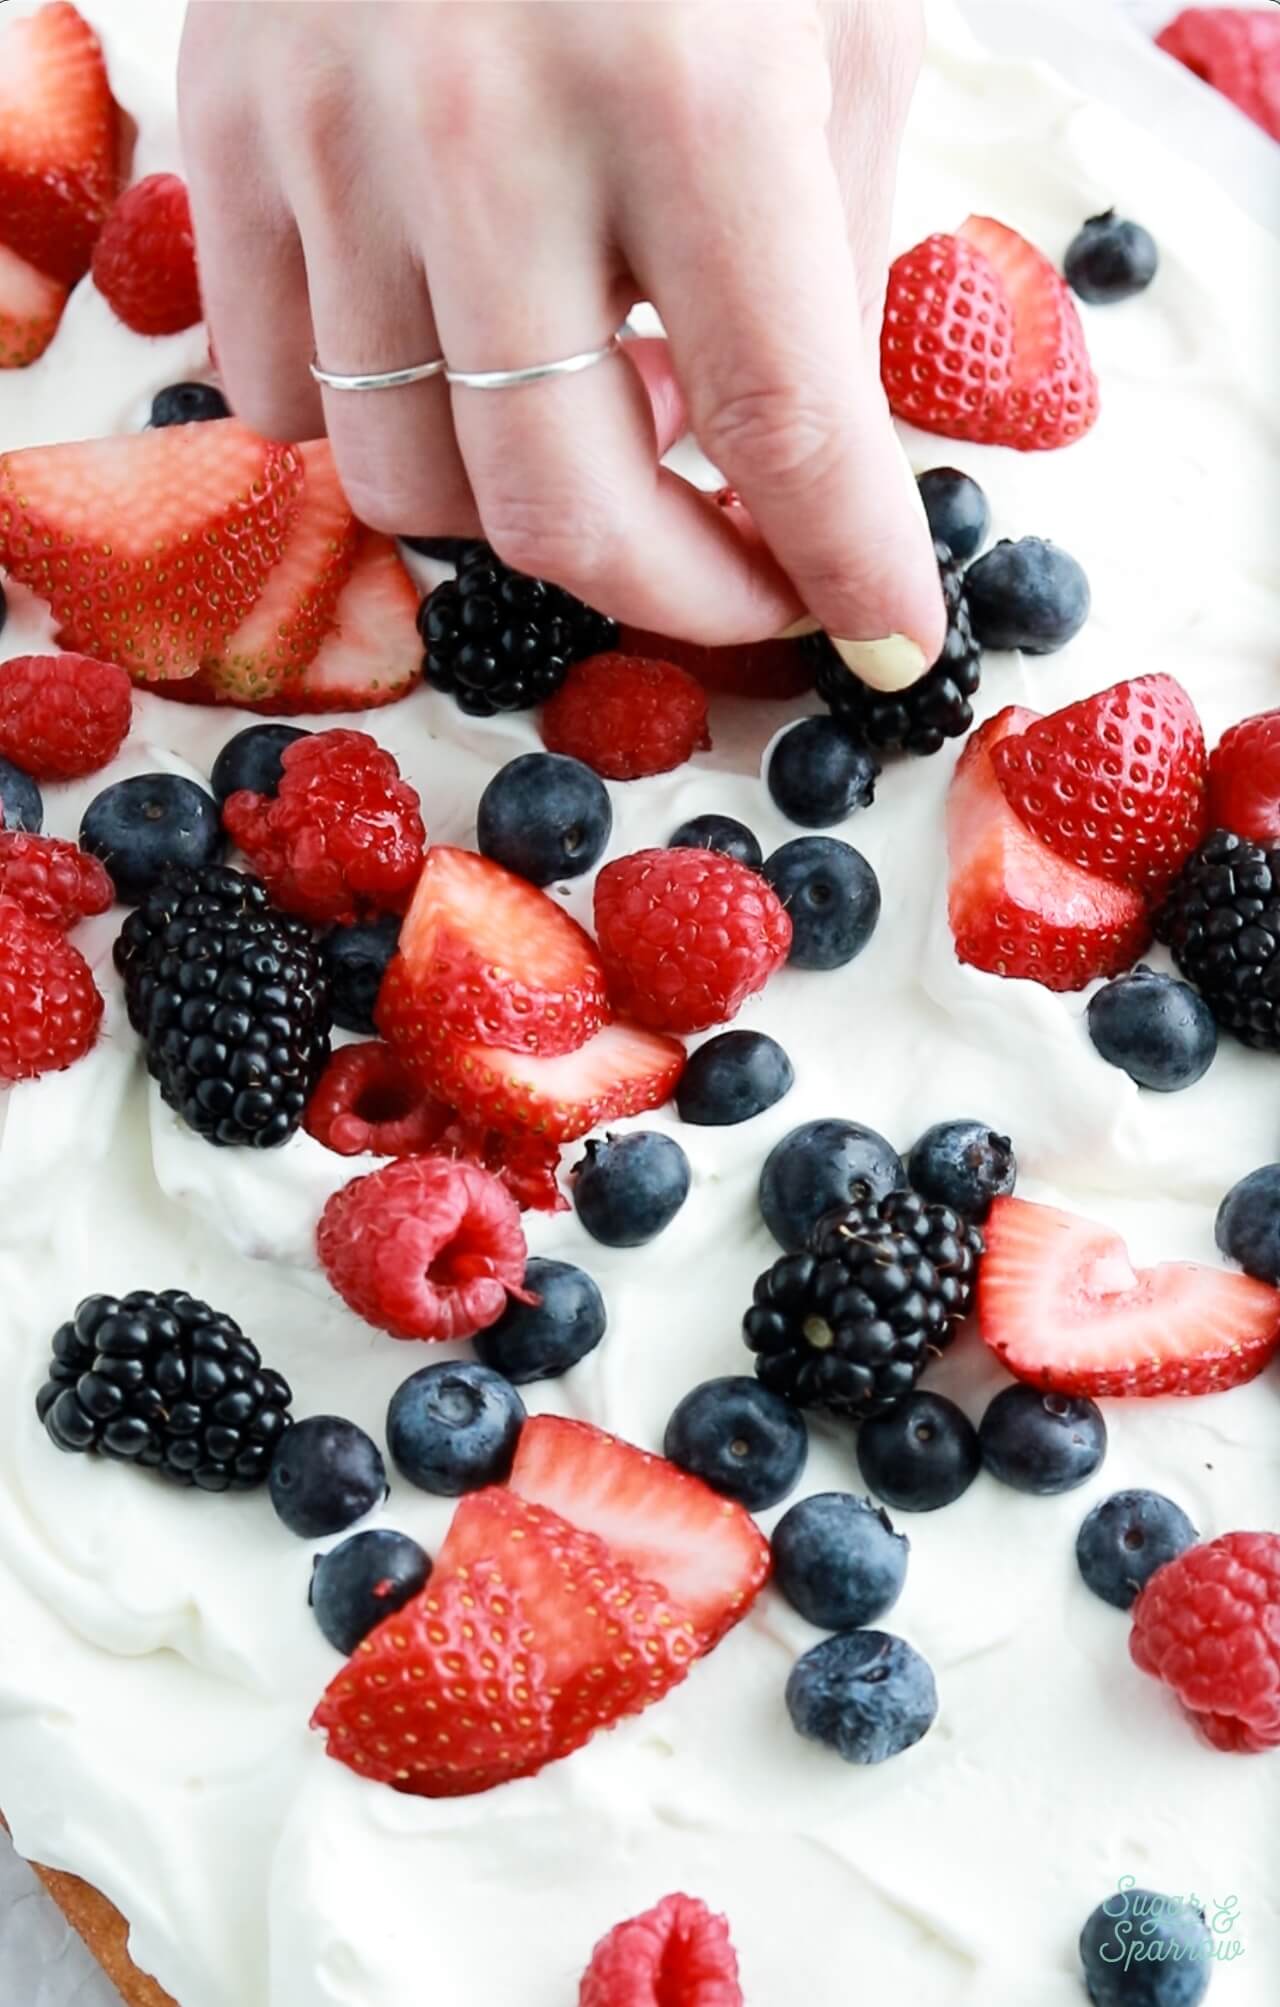
Step 3: Top with Fresh Berries. Add the berries onto the whipped cream cheese frosting in any pattern you want. I just added them randomly so that every slice had a little bit of everything.
Once the berries & cream sheet cake is assembled, store it in the refrigerator until you’re ready to serve it. I recommend assembling the day you’re serving so that the berries don’t leak much, but you can technically assemble it 1-2 days ahead of your event.
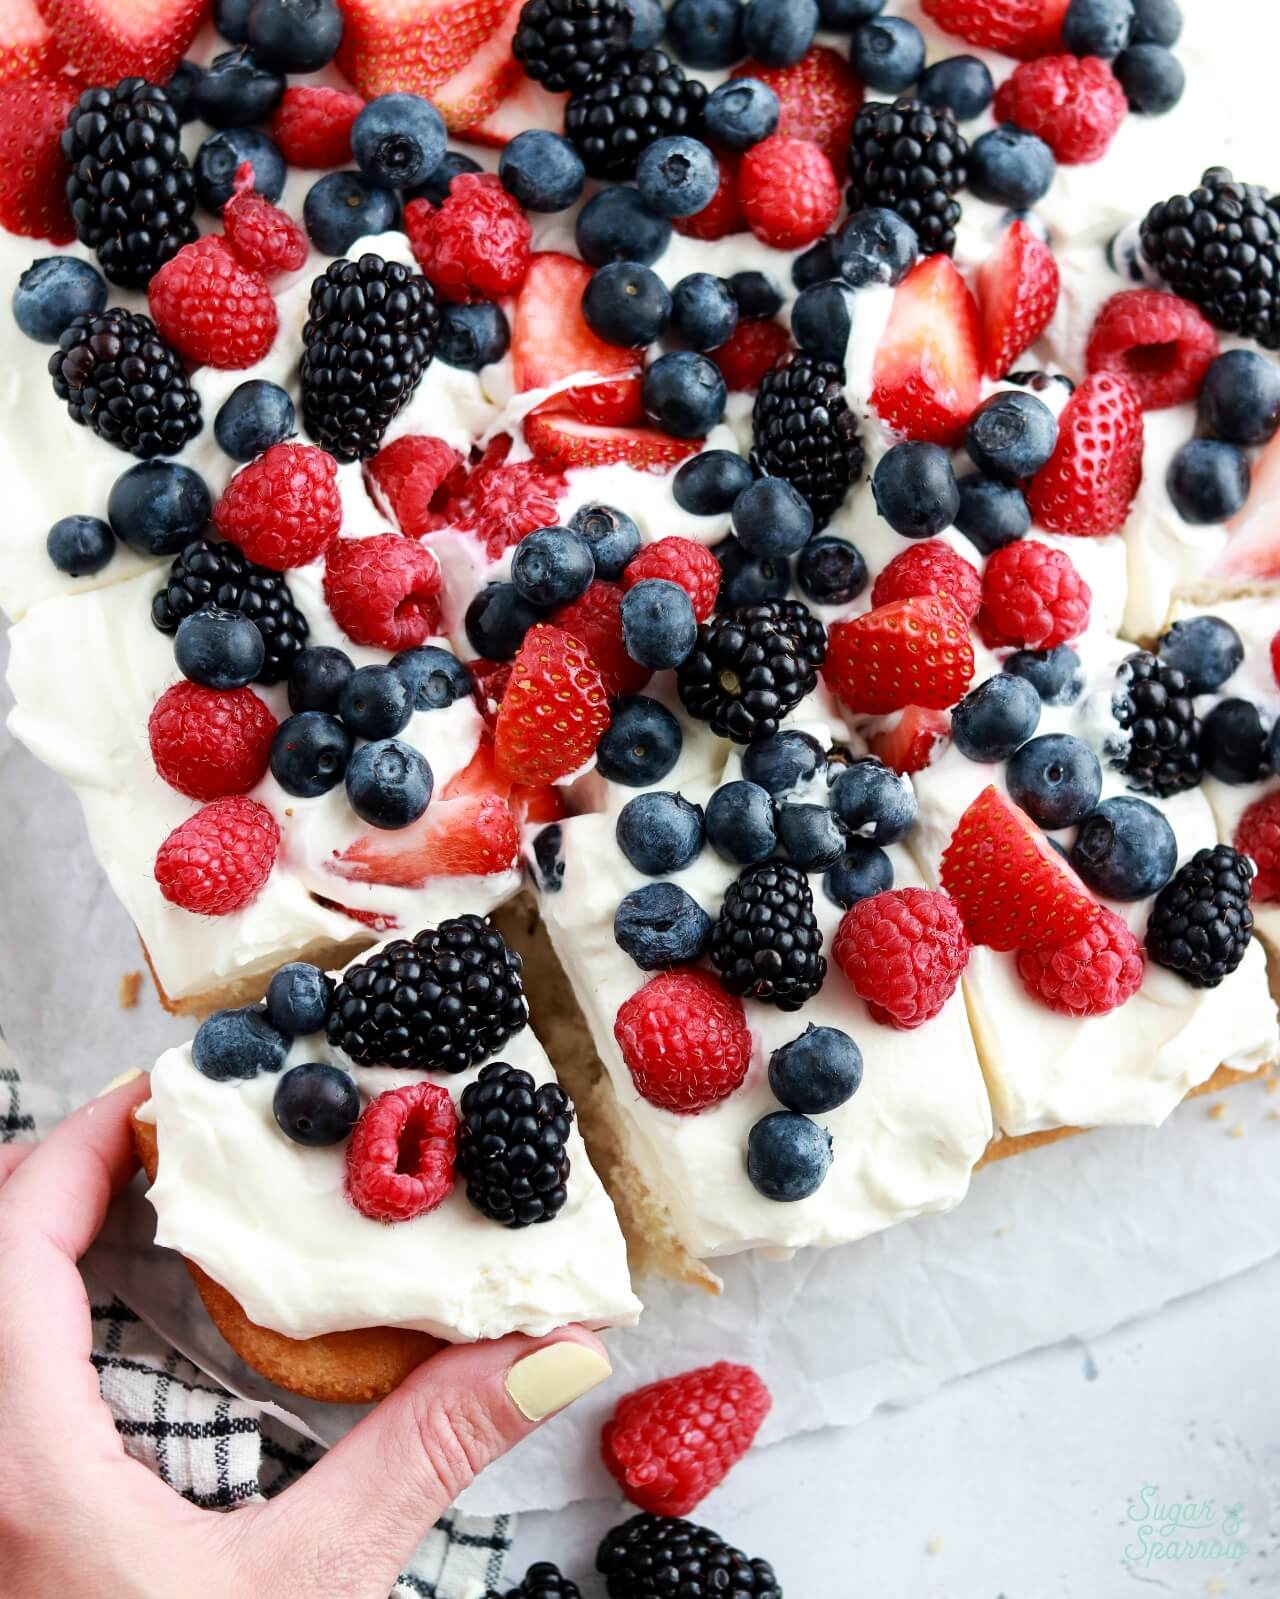
I’m absolutely obsessed with how simple yet beautiful this berries & cream sheet cake turned out! The berries really pop against that whipped cream cheese frosting. And it’s just as delicious as it looks – sure to be a hit anywhere it goes.
Recipe FAQs
- Do I Sift the Flour Before or After Measuring? In this recipe, you’ll sift the flour before measuring. I recommend having a kitchen scale for the easiest workflow – you can place a bowl on the kitchen scale and sift the flour right into it, measuring exactly what you need without having to spoon and level the cake flour into cups.
- What if I Don’t Have Cake Flour? Cake flour makes this cake extra light and fluffy, so I do recommend making a trip to the grocery store for it. However, if you don’t have access to cake flour you can make your own homemade version using all-purpose flour (or plain flour) as a base. The instructions are in the notes section of the recipe card below.
- What if I Don’t Have Buttermilk? You can easily make a buttermilk substitute using whole milk + 1 tbsp of vinegar or lemon juice. Stir it together and let it sit for about 15 minutes before bringing it to room temperature if it’s not already. Don’t worry if the milk curdles, that’s actually a good thing here.
- Can I Use Carton Egg Whites Instead of Fresh? Yes. Substitute 1/2 Cup of pasteurized egg whites in place of the 4 large egg whites in the cake recipe. Just be sure to bring them to room temperature before adding them to the batter.
- What’s a Good Substitute for Cream Cheese in the Frosting: if you can’t find full-fat brick-style cream cheese for the frosting, do NOT substitute with low-fat or spreadable cream cheese. Instead, substitute with an equal amount of mascarpone cheese or make the stabilized whipped cream frosting from my Black Forest Sheet Cake recipe instead!
- How Tall is this Cake? The cake layer bakes up to about 1.5 inches (slightly shorter on the sides). The frosting and berries add another .5 inch or so, so altogether each slice ends up being about 2 inches tall. If you want a taller sheet cake with filling in between the layers, you can double the recipe. I’d recommend baking two separate cake layers vs. torting one taller cake layer.
Similar Berry Cake Recipes You’ll Love
If you love this berries & cream sheet cake, here are some similar recipes from my blog I recommend adding to your baking list:
- Strawberry Shortcake Sheet Cake
- Berry Chantilly Sheet Cake
- Berry Chantilly Layer Cake
- Berry Fruit Pizza
- Strawberry Sheet Cake
- Strawberry Shortcake Layer Cake
Did you make this berries & cream sheet cake? I want to know how it went! Let me know in the comments (don’t forget to rate it!) and feel free to tag @sugarandsparrowco on Instagram to show me a photo. I love to see what you create with my recipes!

Berries and Cream Sheet Cake
Equipment
Ingredients
Bakery-Style Vanilla Sheet Cake
- 2 1/2 Cups (265g) sifted cake flour* DIY recipe in notes
- 2 tsp baking powder
- 1/2 tsp baking soda
- 1/2 tsp salt
- 1 1/2 Cups (300g) granulated sugar
- 1/2 Cup (113g) unsalted butter, room temperature
- 4 large egg whites, room temperature or 1/2 Cup carton egg whites
- 1/2 Cup (120ml) vegetable oil
- 1 Tbsp pure vanilla extract
- 1 1/4 Cups (300ml) full-fat buttermilk**, room temperature DIY recipe in notes
Whipped Cream Cheese Frosting
- 1 Cup (8oz, 226g) full-fat brick-style cream cheese*, cold see notes for substitution options
- 1 Cup (120g) powdered sugar
- 1 tsp pure vanilla extract
- 2 1/2 Cups (600ml) heavy whipping cream, cold
Berry Topping
- 6 oz fresh blueberries
- 4 oz fresh strawberries, hulled and sliced
- 4 oz fresh raspberries
- 4 oz fresh blackberries
Instructions
Make the Bakery-Style Vanilla Sheet Cake
- Preheat the oven to 325°F (163°C) and prepare a 9×13 metal pan or baking dish* by spraying the sides with baking spray and lining the bottom with parchment paper
- In a medium bowl, add the flour, baking powder, baking soda and salt. Whisk together and set aside.
- In the bowl of a stand mixer fitted with the paddle attachment, beat the butter at high speed until creamy, about 2 minutes. Add the sugar and cream it together with the butter at medium-high speed until light and fluffy, about 2 minutes, scraping the bowl and paddle at the halfway point. Turn the mixer to low and add the egg whites one at a time, mixing until they are just combined and scraping down the bowl and paddle as needed. Add the vegetable oil and vanilla, increase the mixer speed to high and beat for 1 minute.
- Turn the mixer off and add the flour mixture all at once. Mix the ingredients on low speed until just combined, then slowly pour in the buttermilk. Continue mixing at low speed for about 30 seconds, until the batter is uniform and combined. The batter will be slightly thin.
- Pour the batter into the prepared pan and bake for 30-35 minutes, until a toothpick inserted comes out clean. Cool completely before topping. You can either let it cool in the pan before decorating or remove it from the pan to decorate if you wish.
Make the Whipped Cream Cheese Frosting
- Place the mixing bowl of your stand mixer (or the large bowl you'll be using with your hand mixer) into the refrigerator for about 20 minutes to chill before you begin.
- Into the cold mixing bowl, add the cream cheese and beat on medium speed with the whisk attachment until creamy, about 2 minutes. Add the powdered sugar and mix on low speed until mostly incorporated, then turn the mixer to medium-high speed and mix for about 1 minute. Scrape down the bowl and whisk attachment as needed.
- Add the vanilla extract, then turn the mixer to medium-high speed and slowly pour in the heavy whipping cream. Once all the heavy whipping cream has been added, continue mixing on medium-high for just about 30 seconds longer, keeping a close eye on the mixing bowl to watch it thicken. It should come together into a thick, silky whipped cream frosting consistency at this point. To check the consistency, turn the mixer off and dip your spatula into the frosting. It should hold a peak when you hold it upright.
- Use the whipped cream cheese frosting immediately to assemble the berries and cream sheet cake, or store it in the refrigerator in an airtight container for up to 3 days ahead of time.
Assembly
- Once the vanilla sheet cake is cooled, transfer it to a serving platter (or keep it in the baking pan if you wish!). Add all of the whipped cream cheese frosting on top and use an angled spatula to smooth it to the edges. No need to be too detailed here – this cake is meant to look rustic with swoopy, imperfect frosting. Finally, top with the fresh berries in any pattern you wish. I placed them randomly and left a little room around the edges so the whipped cream cheese frosting could peek though.
Notes
- The vanilla sheet cake can be made ahead and stored at room temperature in the baking pan, the top covered with plastic wrap, for up to two days. Alternatively, you can cover with plastic wrap and store in the freezer for up to two months before thawing to room temperature.
- The whipped cream cheese frosting is best served the day of assembly, but you can make it up to 3 days ahead of time and store in an airtight container in the refrigerator.
- The assembled berries & cream sheet cake is best served the day of assembly. If you need to make it ahead, you can assemble it one ahead of time and store in the refrigerator. Any longer and the berries may begin to weep and the cake may dry out unless the exposed edges are covered. Leftovers can be stored in an airtight container in the refrigerator for up to 3 days.

Leave a Reply