
One of my very favorite pies to make for Thanksgiving is a chocolate pecan pie topped with salted caramel. The crunch of the pecans, richness of the chocolate, and sweetness of the caramel together are next level. I’m surprised it’s taken me this long to translate that flavor palette into cake form, but I’m beyond pleased with how it turned out – it’s the perfect pie alternative for your Thanksgiving feast and just an all-around amazing holiday flavor combo!

One Reader, Sydney, Says: “Fabulous cake. Even ‘non cake eaters’ enjoyed it. Personally, I loved the chewy pecan pie filling against the soft, fluffy chocolate cake. The salted caramel was really some kind of wonderful. I love to bake and I’d say top 5 cakes I’ve made, and will make again in the future.” ★★★★★
This Chocolate Pecan Pie Cake starts with my favorite ultra-decadent Chocolate Cake recipe that is super quick to throw together. It’s a one-bowl recipe and you probably have all the ingredients in your pantry already. Easy. But we’re just getting started.


The homemade Pecan Pie Filling and Salted Caramel you’ll be adding between those cake layers takes everything to the next level. I’m not kidding when I say that the Pecan Pie Filling tastes exactly like (you guessed it) pecan pie. You’ll be cooking both the filling and the caramel on the stove, and the aroma of them will fill your house with instant holiday cheer. Also, don’t be intimidated by the thought of making Salted Caramel from scratch – I promise it’s the easiest caramel you’ll ever make. There are only four ingredients and you don’t even need a candy thermometer to achieve caramel perfection.
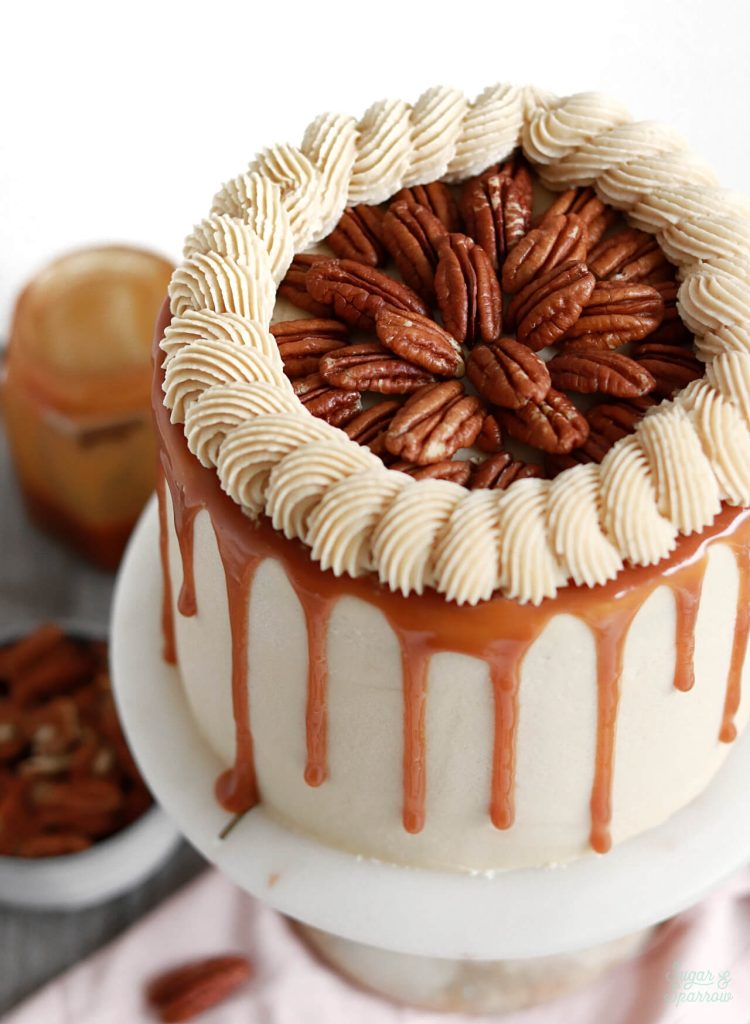
To tie all of these delicious holiday-inspired flavors together, I frosted the cake with Brown Sugar Buttercream. It’s the perfect compliment to the flavor palette and super easy to whip up and work with. Since the fillings are semi-thin, I piped a circle of Brown Sugar Buttercream around each layer before filling in the center with the fillings – a technique I explain in this Cake Basics blog post.

For decorating the cake, I frosted a smooth layer of Brown Sugar Buttercream and dripped the sides with Salted Caramel (details on that are in the assembly instructions below). Then, I decorated the top of the cake with pecan halves, much like you would decorate a traditional pecan pie. Around the top edge, I piped a rope border using Wilton Tip 4B. It’s basically piping a continuous series of swirls while rotating the turntable until you’ve bordered the entire top edge.


However you decorate this Chocolate Pecan Pie Cake with Salted Caramel, it’s sure to be tasty. It’s my ideal holiday flavor combo and I hope you love it as much as I do. Enjoy!

Chocolate Pecan Pie Cake with Salted Caramel
Ingredients
Chocolate Cake
- 2 Cups (265g) all purpose flour
- 1 2/3 Cups (340g) white granulated sugar
- 2/3 Cup (60g) unsweetened natural cocoa powder
- 2 tsp baking soda
- 1 tsp baking powder
- 1/2 tsp salt
- 1/2 Cup (120ml) vegetable oil
- 2 large eggs, room temperature
- 1 1/2 tsp pure vanilla extract
- 1 Cup (240ml) full-fat buttermilk*, room temperature DIY recipe in notes
- 1 Cup (240ml) hot coffee or hot water
Pecan Pie Filling
- 1/2 Cup (100g) white granulated sugar
- 1/2 Cup (170g) packed brown sugar
- 2/3 Cup (160ml) light corn syrup
- 1/3 Cup (75g) unsalted butter
- 2 large eggs
- 1 1/2 Cups (195g) chopped pecans, toasted
- 1/4 tsp salt
- 1 tsp pure vanilla extract
Salted Caramel
- 1 Cup (200g) white granulated sugar
- 6 Tbsp (85g) unsalted butter, room temperature, cut into six slices
- 1/2 Cup (120ml) heavy whipping cream, room temperature
- 1 1/4 tsp salt
Brown Sugar Buttercream
- 2 Cups (452g) unsalted butter, room temperature
- 1 Cup (200g) packed brown sugar
- 7 Cups (840g) powdered sugar
- 1 Tbsp pure vanilla extract
- 4 Tbsp whole milk, room temperature
- 1/4 tsp salt, or to taste
Instructions
Make the Chocolate Cake
- Preheat the oven to 350ºF and prepare three 6-inch or two 8-inch cake pans by spraying the sides with cooking spray and fitting the bottoms with a wax paper or parchment cake circle.
- Place all of the dry ingredients into the bowl of a stand mixer and stir on low for 30 seconds to fully combine them. Add the vegetable oil, eggs, vanilla, and buttermilk and mix on low until just combined. With the mixer still on low, add the hot coffee (or hot water) in a slow stream, then turn the mixer to medium and beat until smooth, about 2 minutes. The batter will be very thin.
- Pour into prepared cake pans no more than 2/3 full and bake for 35-40 minutes, until a wooden toothpick inserted comes out clean. Cool completely before filling and frosting.
Make the Pecan Pie Filling
- Combine the sugars, corn syrup, butter, eggs, pecans, and salt in a medium saucepan and bring to a boil over medium heat, stirring constantly. Reduce the heat to low and simmer, stirring constantly for 6-8 minutes until the filling is thickened. Remove from heat and stir in the vanilla. Cool completely before using as filling. It will thicken and stabilize as it cools.
Make the Salted Caramel
- Have everything pre-measured and ready to go (you’ll be constantly stirring). Place the sugar in a medium saucepan over medium-high heat and stir constantly with a wooden spoon, until it melts into an amber-colored liquid and no sugar clumps remain, 5-6 minutes.
- Reduce the heat to medium. Carefully add the butter (it will bubble up when you do) and use a whisk to combine it with the sugar mixture until the butter is fully melted and incorporated, 2-3 minutes.
- Add the heavy whipping cream in a steady stream while whisking. As soon as the cream is incorporated, let the caramel boil for a full minute before removing it from the heat and stirring in the salt.
- Let the caramel cool to room temperature before using as a filling or drip. It will thicken as it cools.
Make the Brown Sugar Buttercream
- With a hand mixer or paddle attachment on your stand mixer, cream the butter and brown sugar on medium-high until it’s creamy, light, and homogenous. About 4 minutes.
- With the mixer on low, add the powdered sugar a few cups at a time, scraping down after each addition and making sure each cup is fully incorporated before adding the next one.
- Add vanilla, milk, and salt and mix on low for another minute until fully incorporated.
Assembly
- Once the Chocolate Cakes have cooled completely, level and torte each layer to your desired height. Place the first layer on a turntable and pipe a circle of Brown Sugar Buttercream around the edge. Fill in the center with (room temperature) Pecan Pie Filling about 3/4 of the way to the top of the buttercream circle height-wise. Drizzle room temperature Salted Caramel on top of the Pecan Pie Filling. Here's a detailed tutorial on this filling method.
- Place the next cake layer on top and repeat the process of piping the buttercream circle and filling in the center with Pecan Pie Filling and Salted Caramel. Place the final layer on top, upside down so that the bottom of the cake layer is the top of the cake. Crumb coat the cake with Brown Sugar Buttercream and place it in the refrigerator for at least 20 minutes to let everything set up.
- To create the cake design pictured, frost a smooth layer of Brown Sugar Buttercream around the cake and place it back into the refrigerator for at least 30 minutes to create a cold foundation for the Salted Caramel drip. Meanwhile, microwave the Salted Caramel in 10 second increments until it's slightly warmer than room temperature and good drip consistency (this post shows examples of perfect drip consistency with Chocolate Ganache and those same rules apply to Salted Caramel drip consistency). When the cake is nice and chilled and the Salted Caramel is perfect drip consistency, drip the cake. Place it back into the refrigerator for 10 minutes to let the caramel set.
- Create a design on the top of the cake with halved pecans. Prepare a piping bag with Wilton Tip 4B and fill it with Brown Sugar Buttercream. Holding the piping bag at a 45 degree angle pointed at the top of the cake, pipe a series of continuous swirls to create a rope border around the top edge.
Notes
- The Chocolate Cake can be made ahead and stored at room temperature, covered tightly in plastic wrap, for up to two days. Alternatively, you can cover with plastic wrap and store in the freezer for up to two months before thawing to room temperature.
- The Pecan Pie Filling can be made ahead and stored in an airtight container in the refrigerator for up to two weeks. Bring back to room temperature before using in this recipe.
- The Salted Caramel can be made ahead and stored in an airtight container in the refrigerator for up to two weeks. When you’re ready to use it, reheat it in the microwave in 10 second intervals until it reaches room temperature.
- The Brown Sugar Buttercream can be made ahead and stored in an airtight container in the refrigerator for up to two weeks. When you’re ready to use it, bring it back to room temperature and re-whip in your stand mixer to bring back to smooth buttercream consistency.
Did you make this Chocolate Caramel Pecan Pie Cake recipe? I want to know how it went! Let me know in the comments below and feel free to tag @sugarandsparrowco on Instagram and show me! I love to see what you create.

I won 2nd place at my town’s baking contest with this recipe!!!
That’s amazing, Adriana! Congratulations, I’m so glad this recipe was such a hit!
Wow! Just delicious. For 3-8” pans, I increased the recipe by 1.5 for everything except the caramel (which I left off) and the frosting (had plenty even after I ate generous “samples”. SO good). One of the best cakes I’ve made, and I bake a lot. One guest said it was the best cake she’d ever eaten, and she’s 85!! Will definitely make this again. Love your recipes and decorating tips. Thank you!!
That’s amazing, SG! I’m so happy this recipe was such a hit!
This looks & sounds delicious! I have a family member who can’t eat chocolate, but loves pecan pie! Could I make this with a yellow or spice cake? That would be a perfect November birthday cake. Do you have a spice cake recipe or a yellow cake recipe?
Thank you!
Hi Alyce! Yes, I have a spice cake here: https://sugarandsparrow.com/spice-cake-recipe/ and a yellow cake here: https://sugarandsparrow.com/yellow-cake-recipe/ either of those would be delicious as the cake layers!
Hi can I use cake flour for this recipe ?
Hi Ari! I don’t recommend cake flour in this recipe because it doesn’t provide enough structure. Use all purpose flour for the best results!
Followed the recipe to a T, fabulous cake. Even “non cake eaters” (I don’t understand these people but they do exist) enjoyed it. Personally, I loved the chewy pecan pie filling against the soft, fluffy chocolate cake. The salted caramel was really some kind of wonderful. I love to bake and I’d say top 5 cakes I’ve made, will make again in the future. Thank you for the recipe!
That’s high praise, Sydney! I’m so happy it was such a hit!
Hello, everything turned out great but the pecan pie filling became hard as a rock! I can microwave to soften but still quite hard to maneuver. I made a second batch not cooking/boiling as long and still too hard. Is there anything to do to make it more soft and spreadable? Thanks!
Hi Mike! Did you include the light corn syrup in the recipe? That is what keeps the filling soft when it thickens. And is it rock hard at room temperature or only when chilled? You could try making it more spreadable by gently heating it in the microwave and stirring in a little water, 1 tsp at a time until you achieve a more spreadable consistency.
Hello,
I have dutch processed cocoa on hand. Would this work instead of natural cocoa powder?
Thanks, can’t wait to make!
Hi Sydney! Yes, dutch processed cocoa powder works with this recipe. Enjoy!
This cake was WOW!!!!!!! It’s amazing texture and out of this world taste!!! 5 stars for sure!
Yay, Amber! I’m so happy it was a hit!
Hi! I absolutely loved the cake. If I want to make a 9×13, would I double the recipe? How long should I bake it?
Hi Erika! I’m so happy you’re loving this cake recipe, it’s one of my absolute faves! You can actually keep the recipe as-is to bake in a 9×13, including the oven temp and timing. Enjoy!
Hi Whitney!
I’m having an issue with the caramel sauce. I feel like I followed it to a T – but it’s too bitter and way darker than the caramel in the pictures you’ve listed here.
What did I do wrong??
Hi Lola! If it’s bitter and darker than pictured, it usually points to over caramelizing the sugar. Next time, try cooking the sugar on a slightly lower setting, stirring constantly, and add the butter right when the last sugar clump has melted. Hope that helps!
Hi, is it dark or light brown sugar in the buttercream? Going to make this for Thanksgiving, make all components ahead following your instructions and it’s been great so far, even the caramel!!
Hi Diana! I used light brown sugar. I’m so excited for you to make this recipe!
The cake came out perfect, the caramel perfect. It was so delicious, my decorations not up to par with yours. I can’t ever get a drip to work, but it was nice enough for my family and they loved the flavors. I’m going to make your eggnog no big cheesecake for Christmas.
Hi! I made this cake but not a chocolate fan do I made your vanilla cake with it and the cake layers were so moist after they cooled but once we cut into it it was so dry and sponge like. How can I keep my vanilla cake from drying out? Can I layer the cake with froasting then do a boarder then filling and caramel then froast then add the other cake layer and repeat? Maybe it will help not soak up all the moisture?
Hi Jess! How did you store the vanilla cake before using it in the assembly? If it was dry I wonder if it was either overbaked or exposed to air for too long. One way to help lock in the moisture is to wrap the cakes in plastic wrap while they’re still slightly warm. Try that next time!
I’m getting my Thanksgiving desserts in line. To do 3 8” layers should I increase the filling and salted caramel? Thank you.
Hi Kathy! I think I answered this on Instagram but I want to answer it here as well for anyone else wondering! You don’t need to increase the filling and salted caramel for an additional layer, as this recipe makes quite a lot. Hope this recipe is a hit at your Thanksgiving!
Hello, i can’t find your answer on the topic of increasing the Cake recipe to do a 3 8″ layers Cake. Does it need to be 1.5x Cake recipe?
Thank you
Hi Cristiana! Yes, 1.5x this recipe will make the perfect amount for three 8-inch pans.