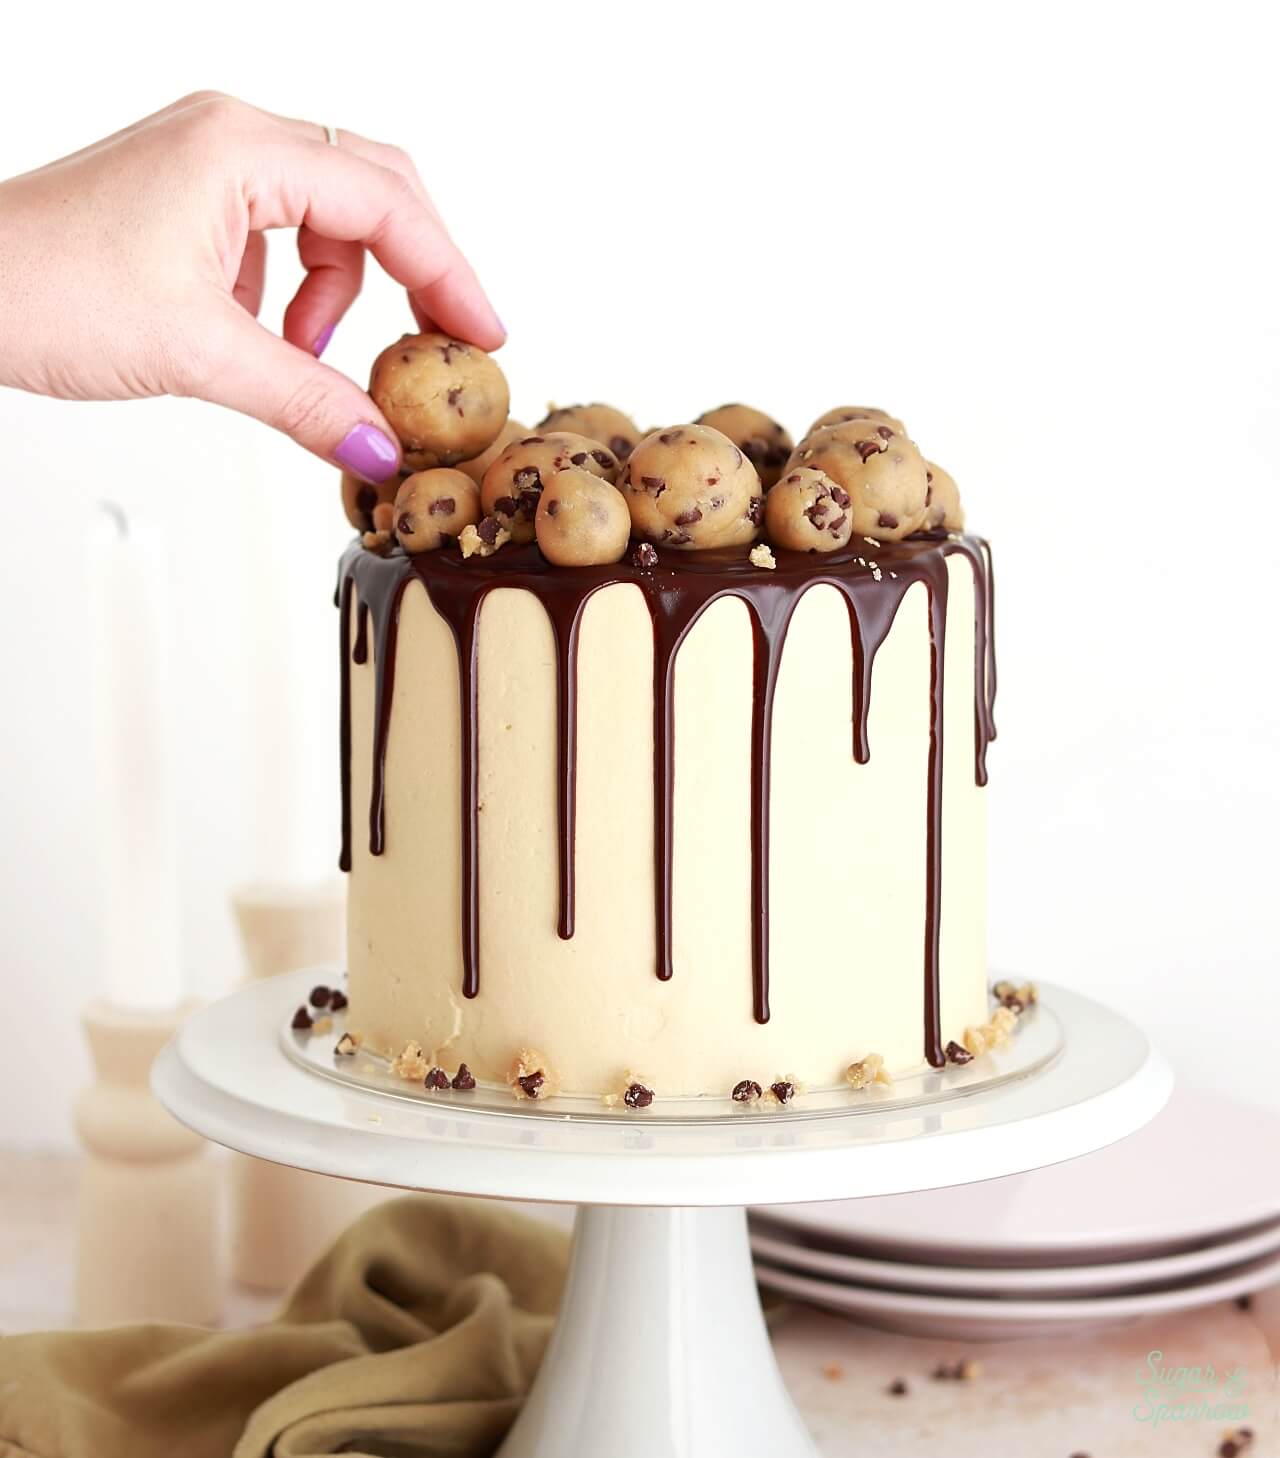
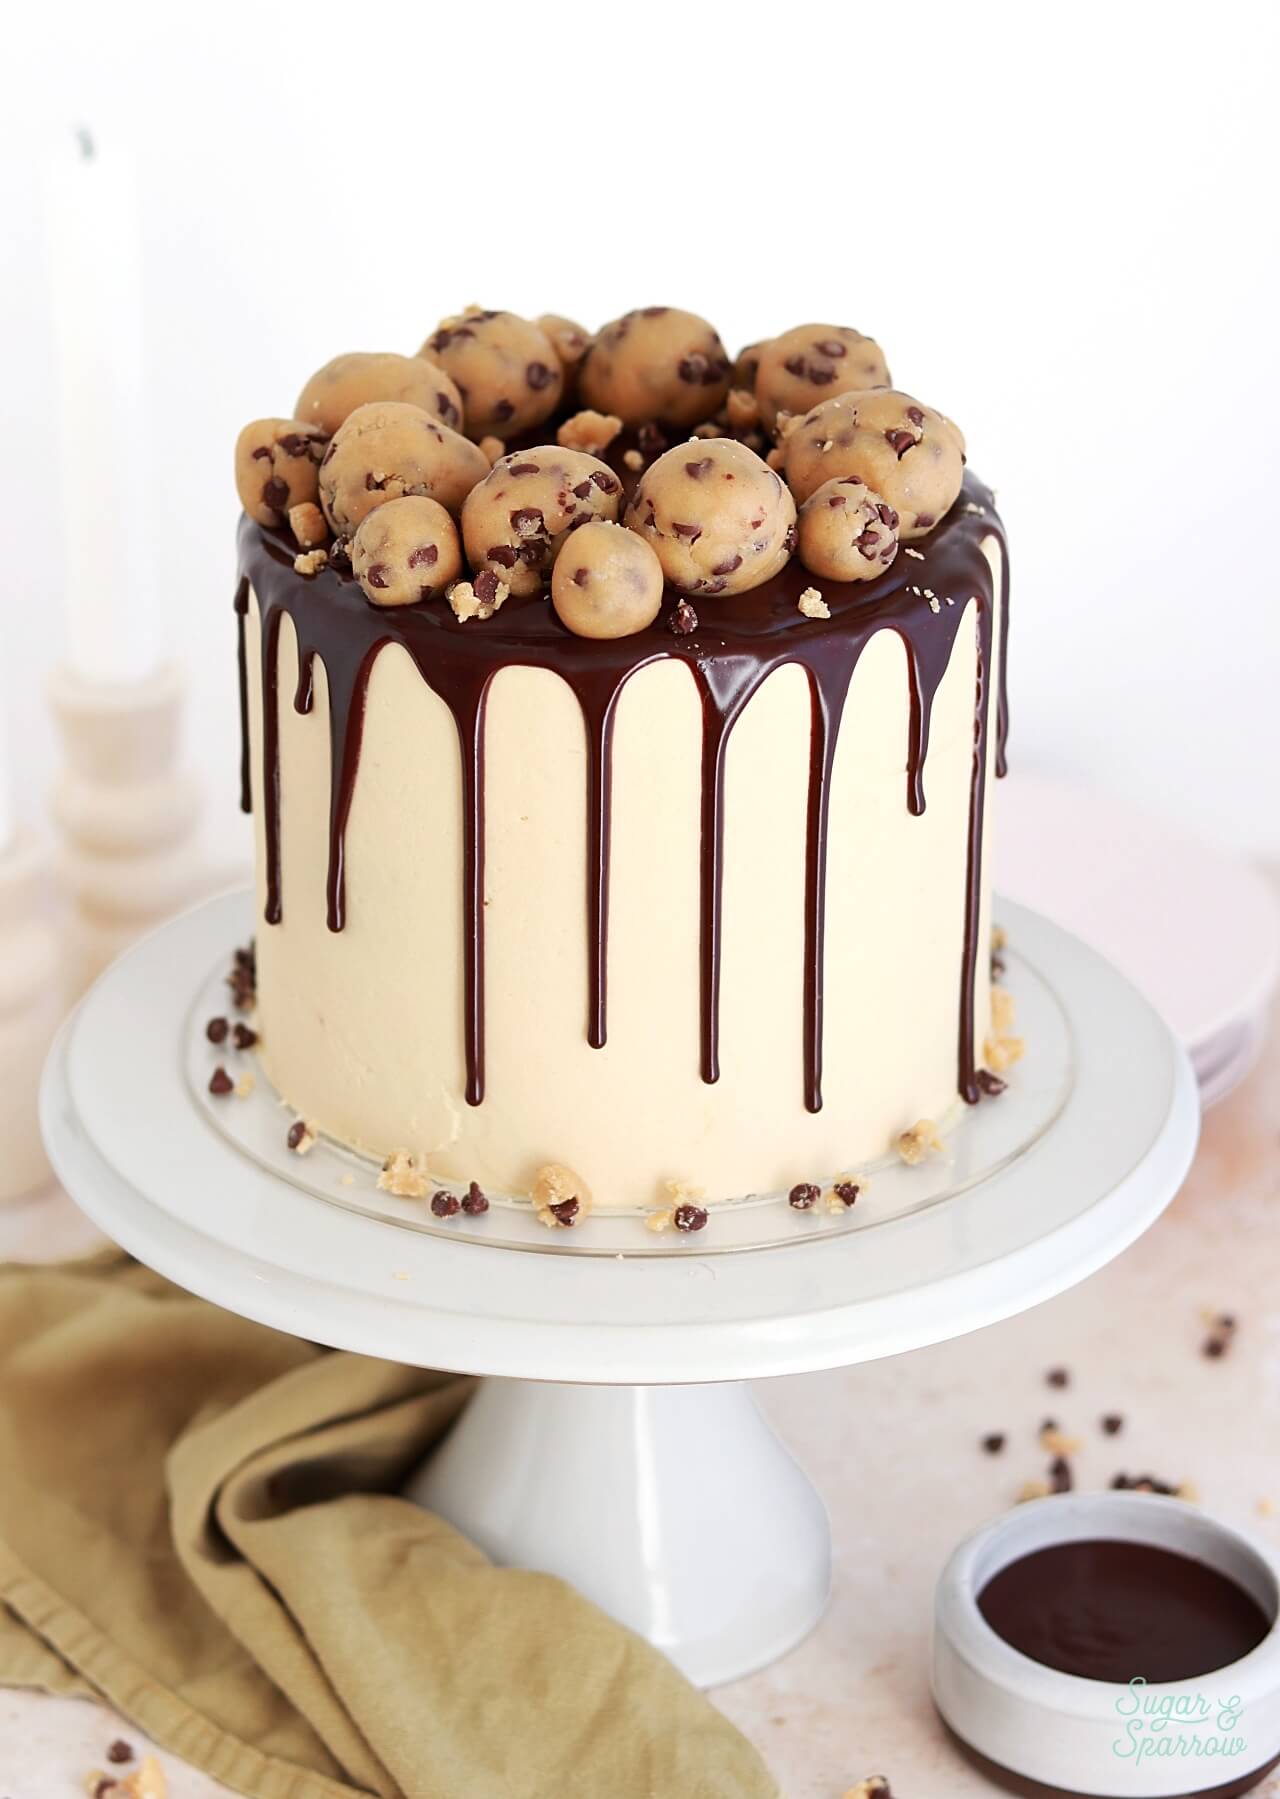
This is the ULTIMATE chocolate chip cookie dough cake featuring layers of chocolate chip cookie cake, brown sugar buttercream, and lots of chocolate chip cookie dough throughout. If you (like me) are the kind of person who samples the cookie dough every time you bake cookies, you’re going to have a good time with this recipe. The chocolate chip cookie dough is completely safe to eat and lends an amazing texture when crumbled in between the layers, plus it looks amazing rolled into cookie dough balls for the topping. Together with the soft and moist chocolate chip cookie cake, decadent brown sugar buttercream, and semi-sweet chocolate ganache, it’s everything I love about a chocolate chip cookie in cake form.
How to Make Cookie Dough Safe to Eat
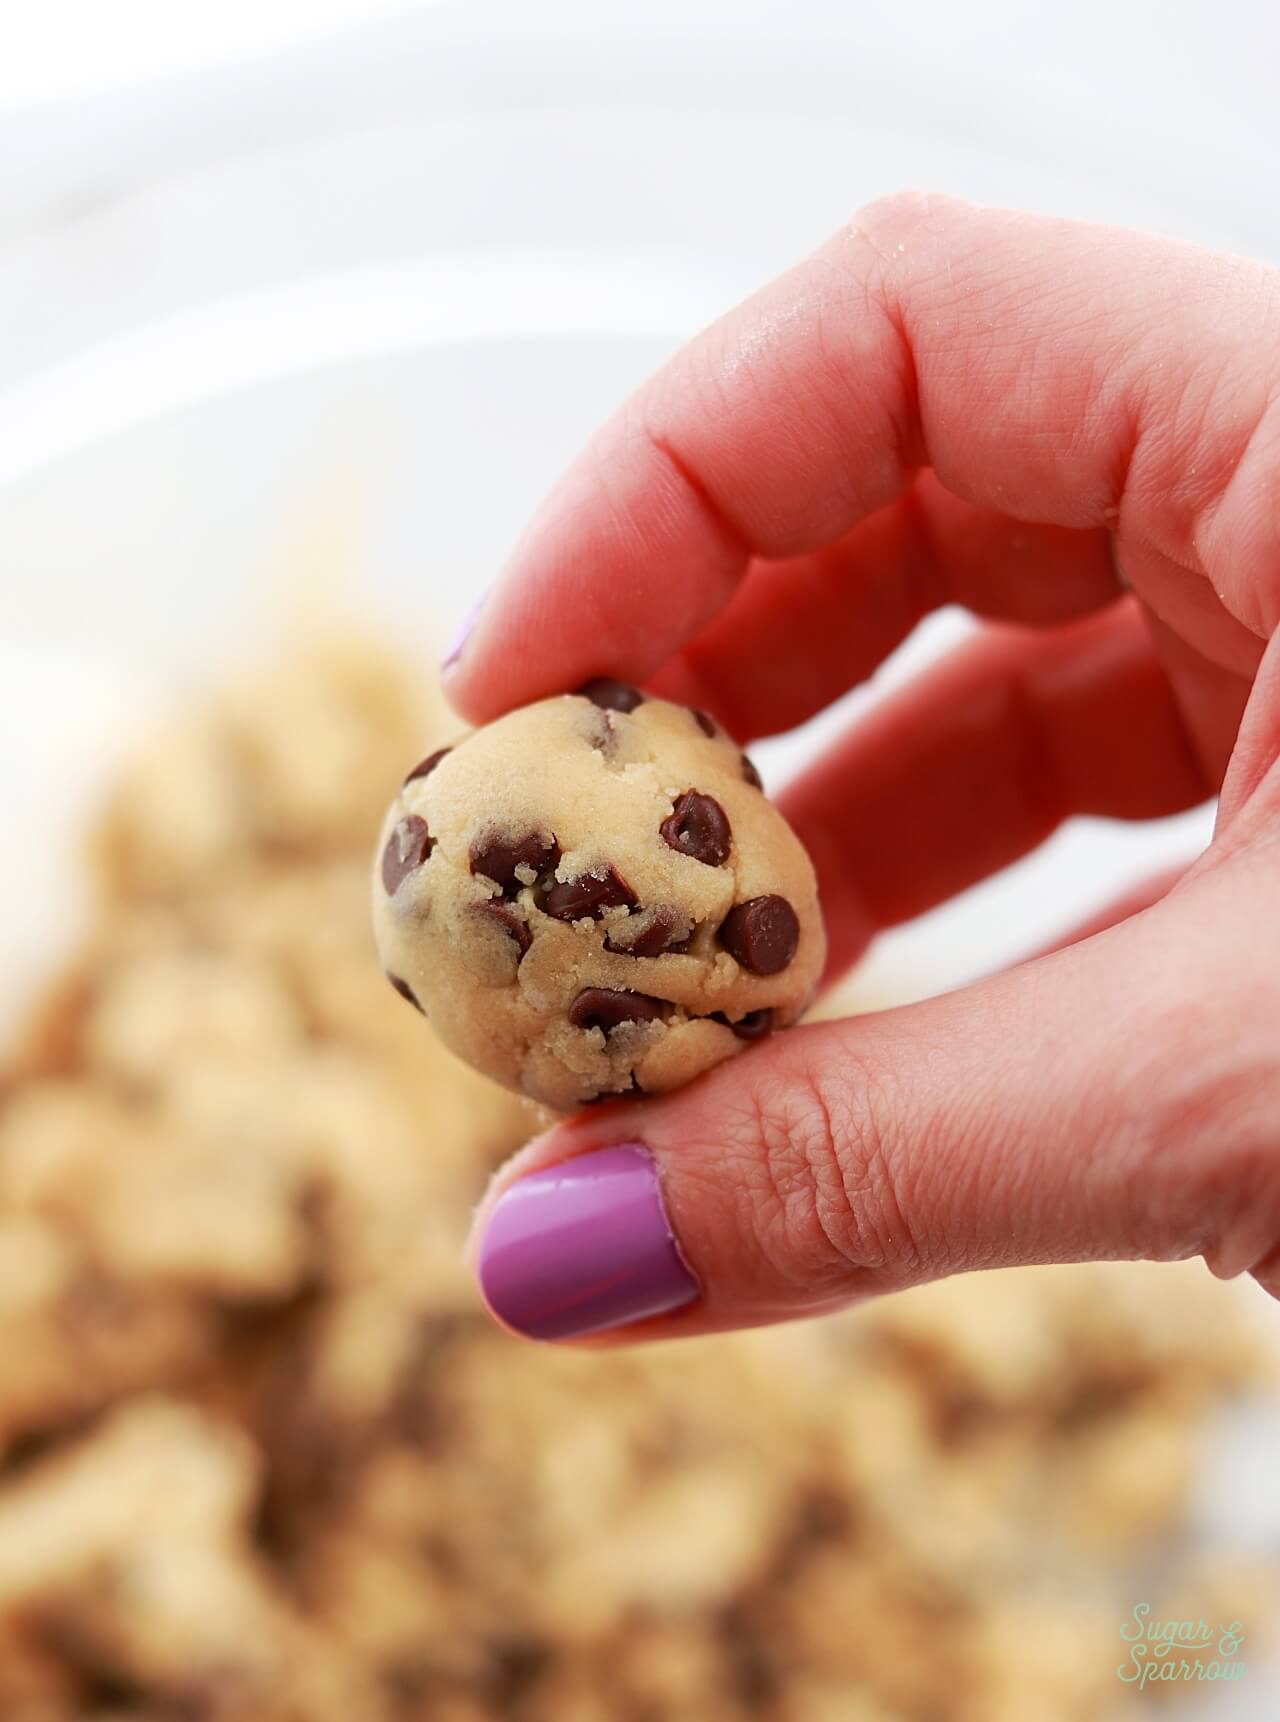
Regardless of whether you’re one to sneak cookie dough when you’re making cookies or you have more self control than I do, you probably know that it’s not usually the safest thing to eat. It’s common to think that raw eggs are the culprit because they can carry salmonella, but what can also carry bacteria like salmonella (even more so than eggs) is the raw flour. That means that you can’t just eliminate the eggs from a cookie dough recipe and call it good – you have to eliminate the bacteria in the flour as well.

The raw flour can be made safe to eat by a process called heat treating. This involves baking it at a high temperature to kill potentially harmful bacteria, all while maintaining the integrity (flavor, texture, etc) of the flour. You’ll basically place the flour on a lined cookie sheet, then bake it at 350ºF (177ºC) for 5 minutes, or until a digital thermometer inserted into the flour reads at least 160ºF (71ºC). After heat treating the flour and eliminating eggs from the recipe, the cookie dough is safe to eat by the spoonful and use throughout this cake!
Chocolate Chip Cookie Dough Cake Elements
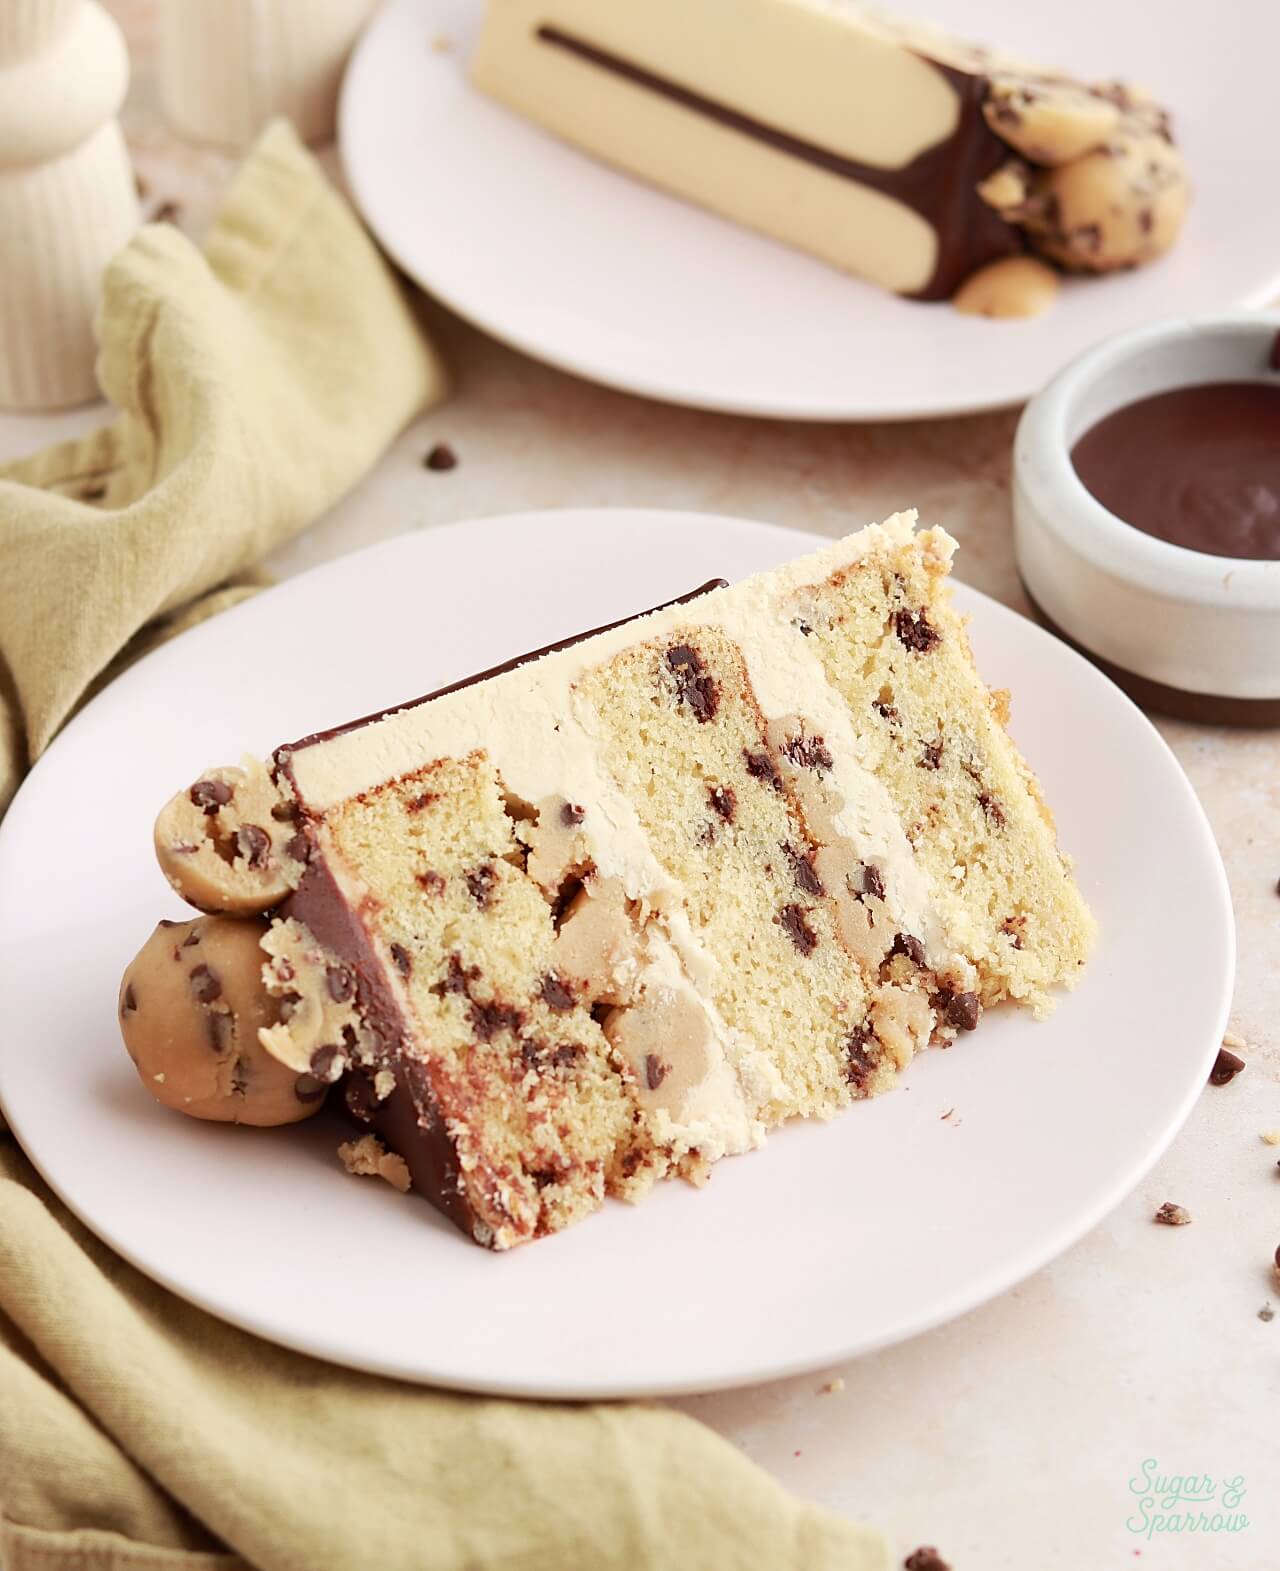
The textures and flavors going on in this cake are so good together and truly play off the entire lifecycle of a chocolate chip cookie. The layers going on here are as follows:
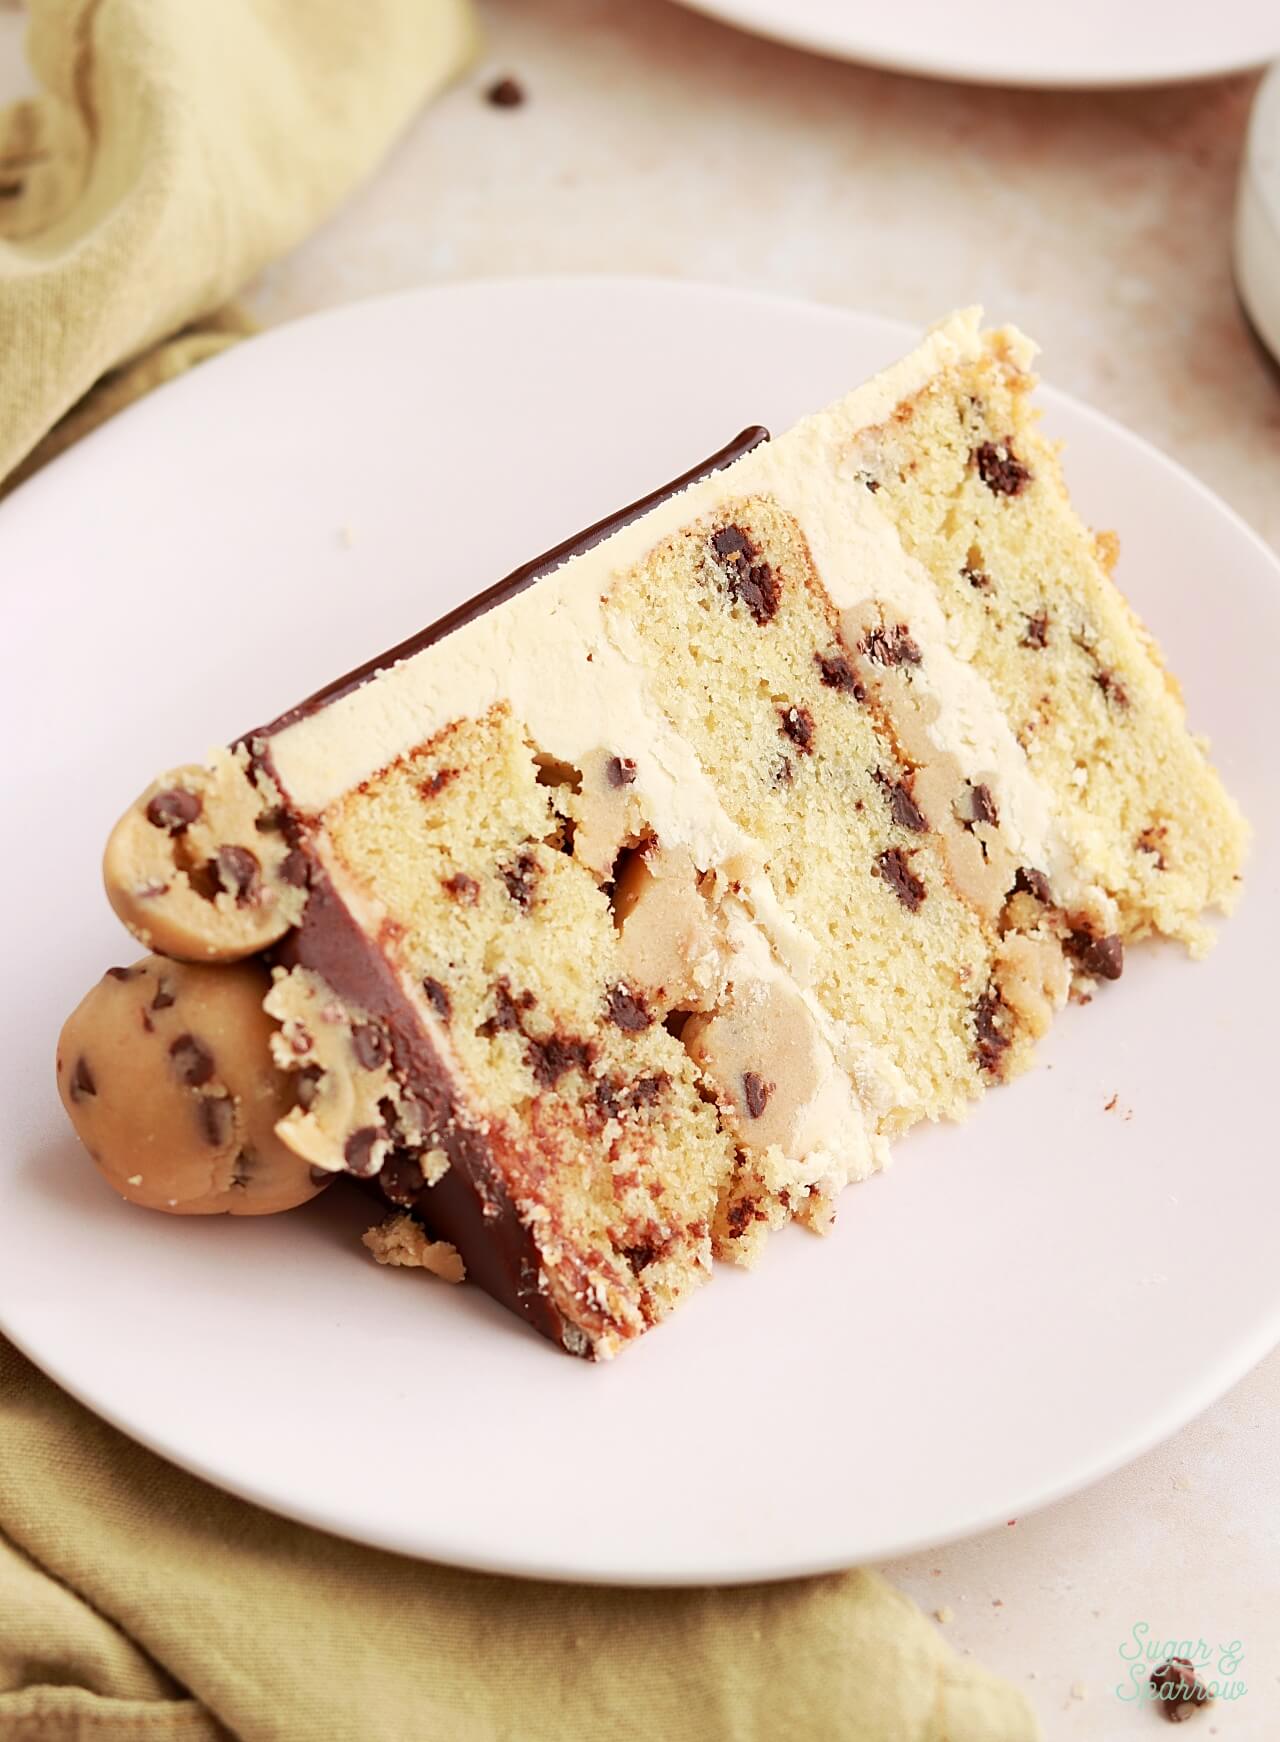
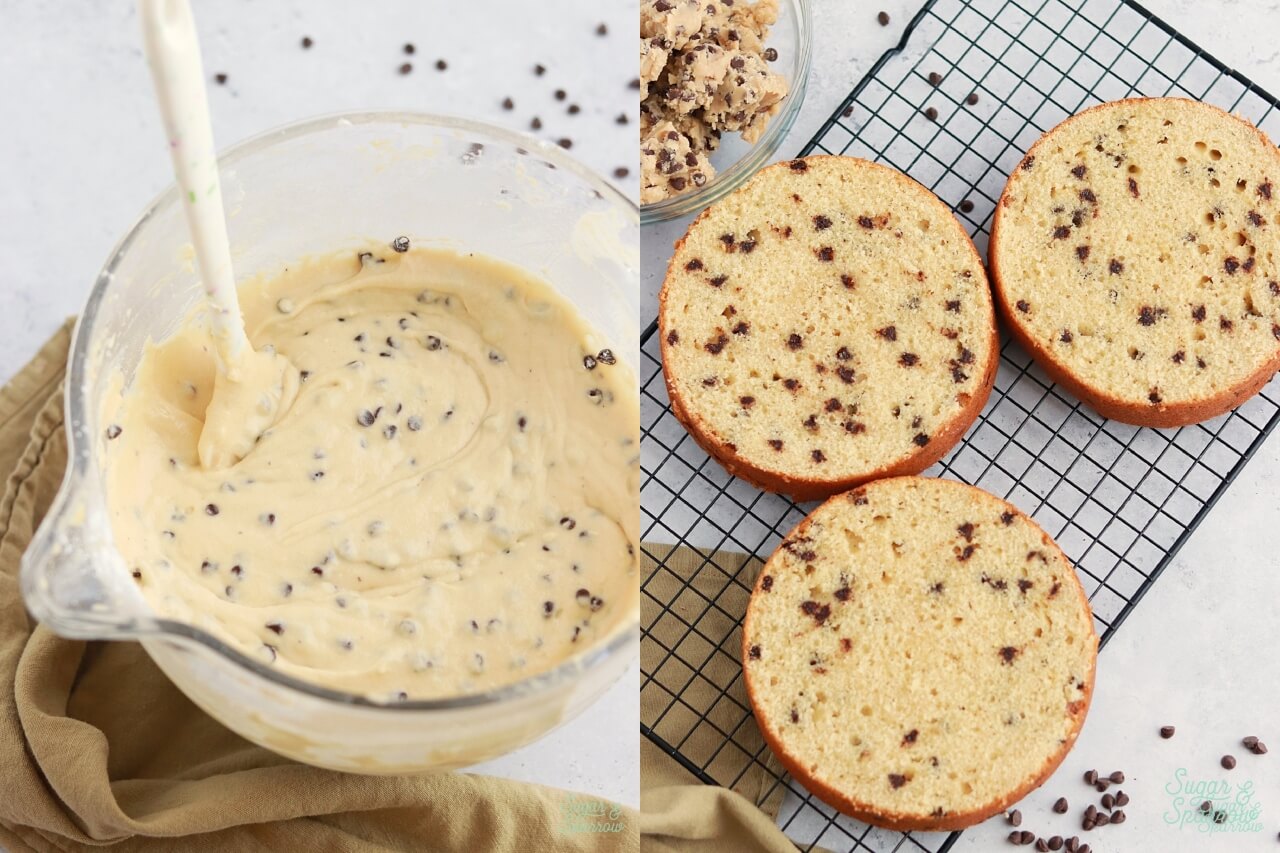
Chocolate Chip Cookie Cake. This soft and moist chocolate chip cookie cake is the same one I use in my milk & cookies cake recipe, but scaled down to make enough for three 6-inch cake layers or two 8-inch layers. It’s studded with mini chocolate chips and flavored with a little extra vanilla and brown sugar to give it more of a chocolate chip cookie flavor profile. It’s important to use mini chocolate chips in this recipe since they’re lightweight and won’t sink in the baking process, but if you only have regular sized chocolate chips you can try chopping them into smaller bits.
Brown Sugar Buttercream. Being such a noteworthy flavor in chocolate chip cookies, I had to pair this cake with brown sugar buttercream. I was a little hesitant at first, thinking it might be too sweet, but it’s PERFECT with this cake recipe. It really enhances the overall flavor of the cake and is so easy to make by infusing the butter in the frosting with brown sugar and then proceeding with a simple American buttercream recipe.
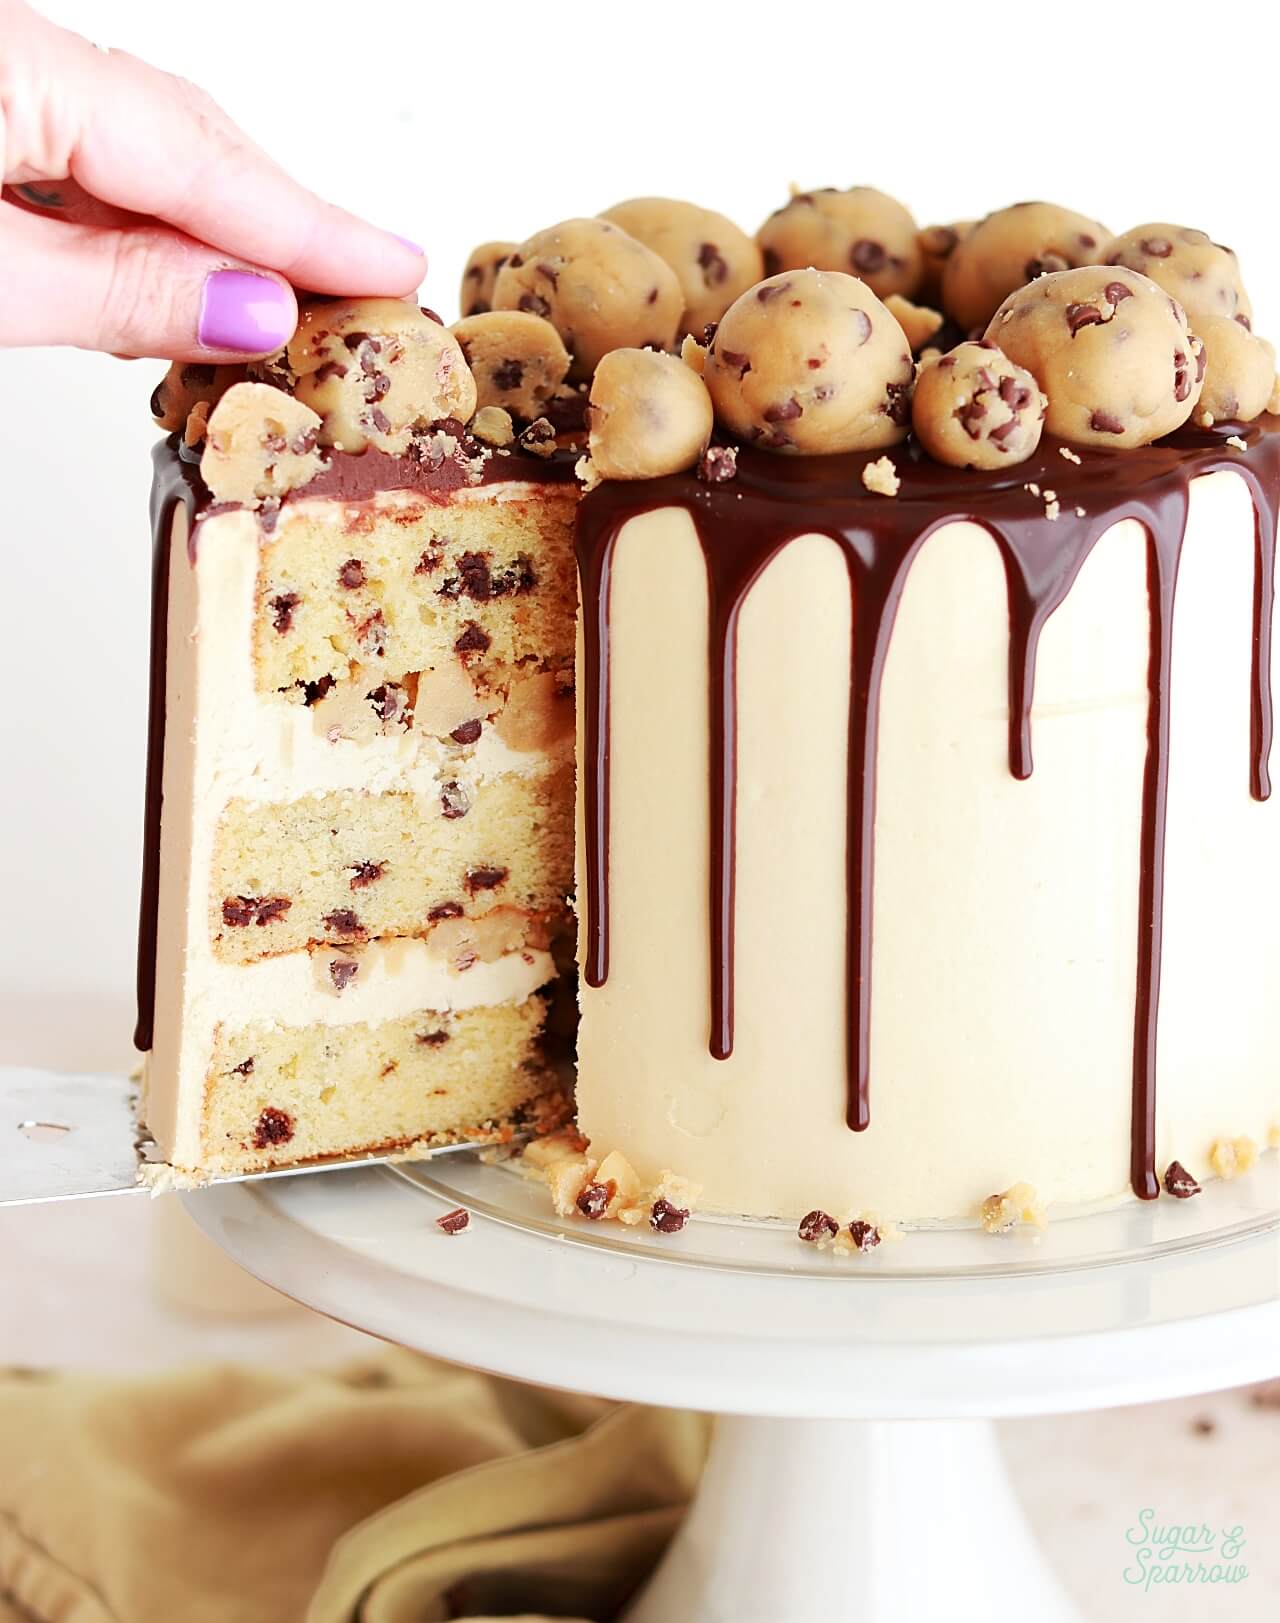
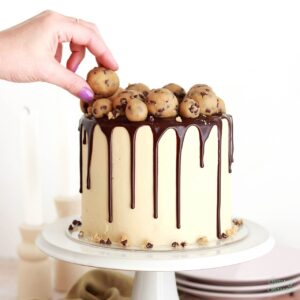
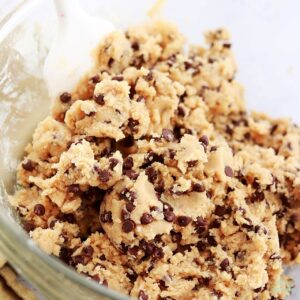
Edible Chocolate Chip Cookie Dough. In the assembly process, you’ll add a layer of brown sugar buttercream on top of the first cake layer, then crumble a generous amount of this edible chocolate chip cookie dough onto the buttercream before placing the next cake layer on top and repeating the process. The remaining cookie dough gets formed into balls and added on top of the cake as a garnish. I definitely reserved some to snack on during the making of this cake and you can feel free to do the same!
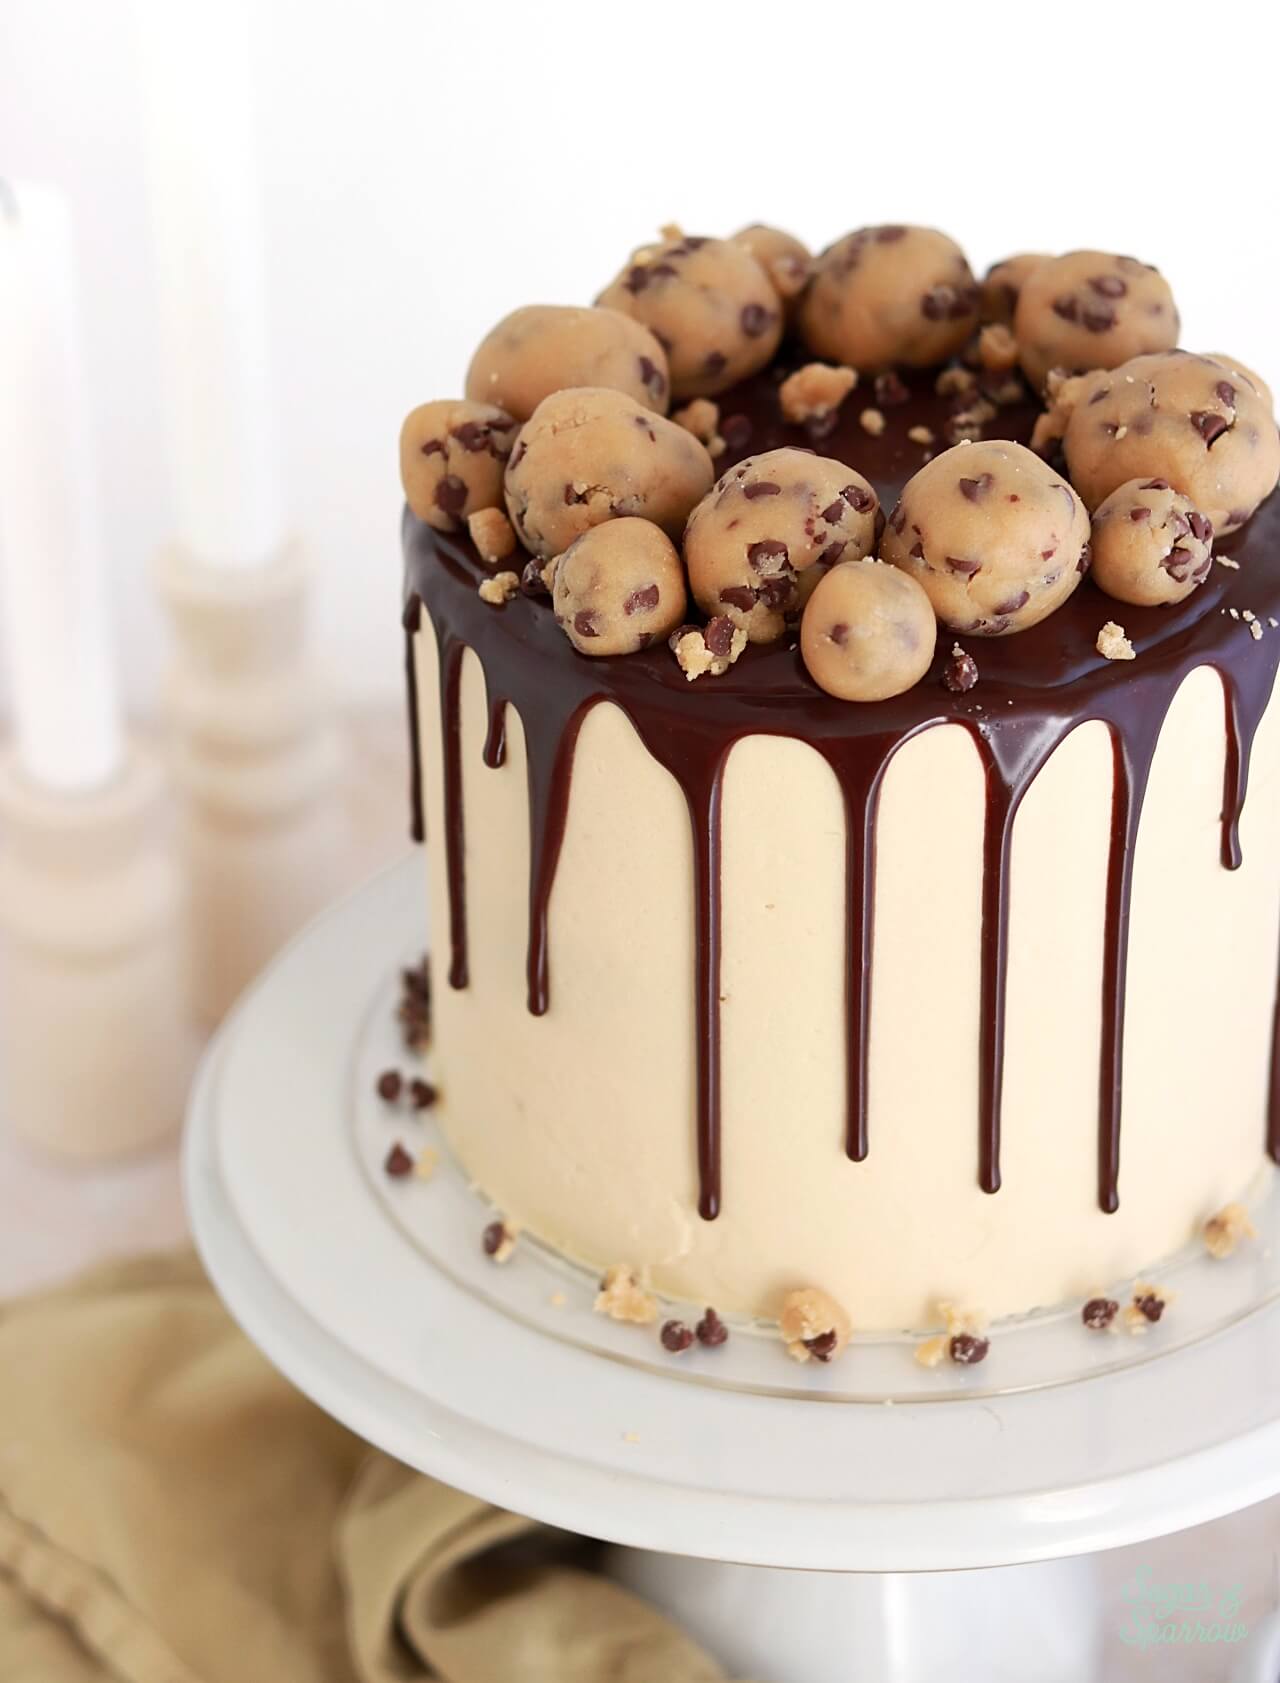
Chocolate Ganache. I love adding a chocolate ganache drip for contrast and a little extra hit of chocolate with each slice!
How to Decorate a Chocolate Chip Cookie Dough Cake
You can absolutely get creative with the way you decorate this chocolate chip cookie dough cake! I always gravitate towards cake designs that are simple yet showcase the flavor of the cake before you even know what it is. So, I started with a smooth buttercream finish using the brown sugar buttercream.
I knew I wanted to top the cake with cookie dough in some capacity, and I wanted to create some visual contrast since the dough and the buttercream are similar in color. That’s where the chocolate ganache drip comes in. It’s made with semi-sweet chocolate chips, so it was a fitting element for the flavor profile of this cake as well. If you’re intimidated by the idea of dripping a cake with chocolate ganache, this blog post has everything you need to know to make it less scary!
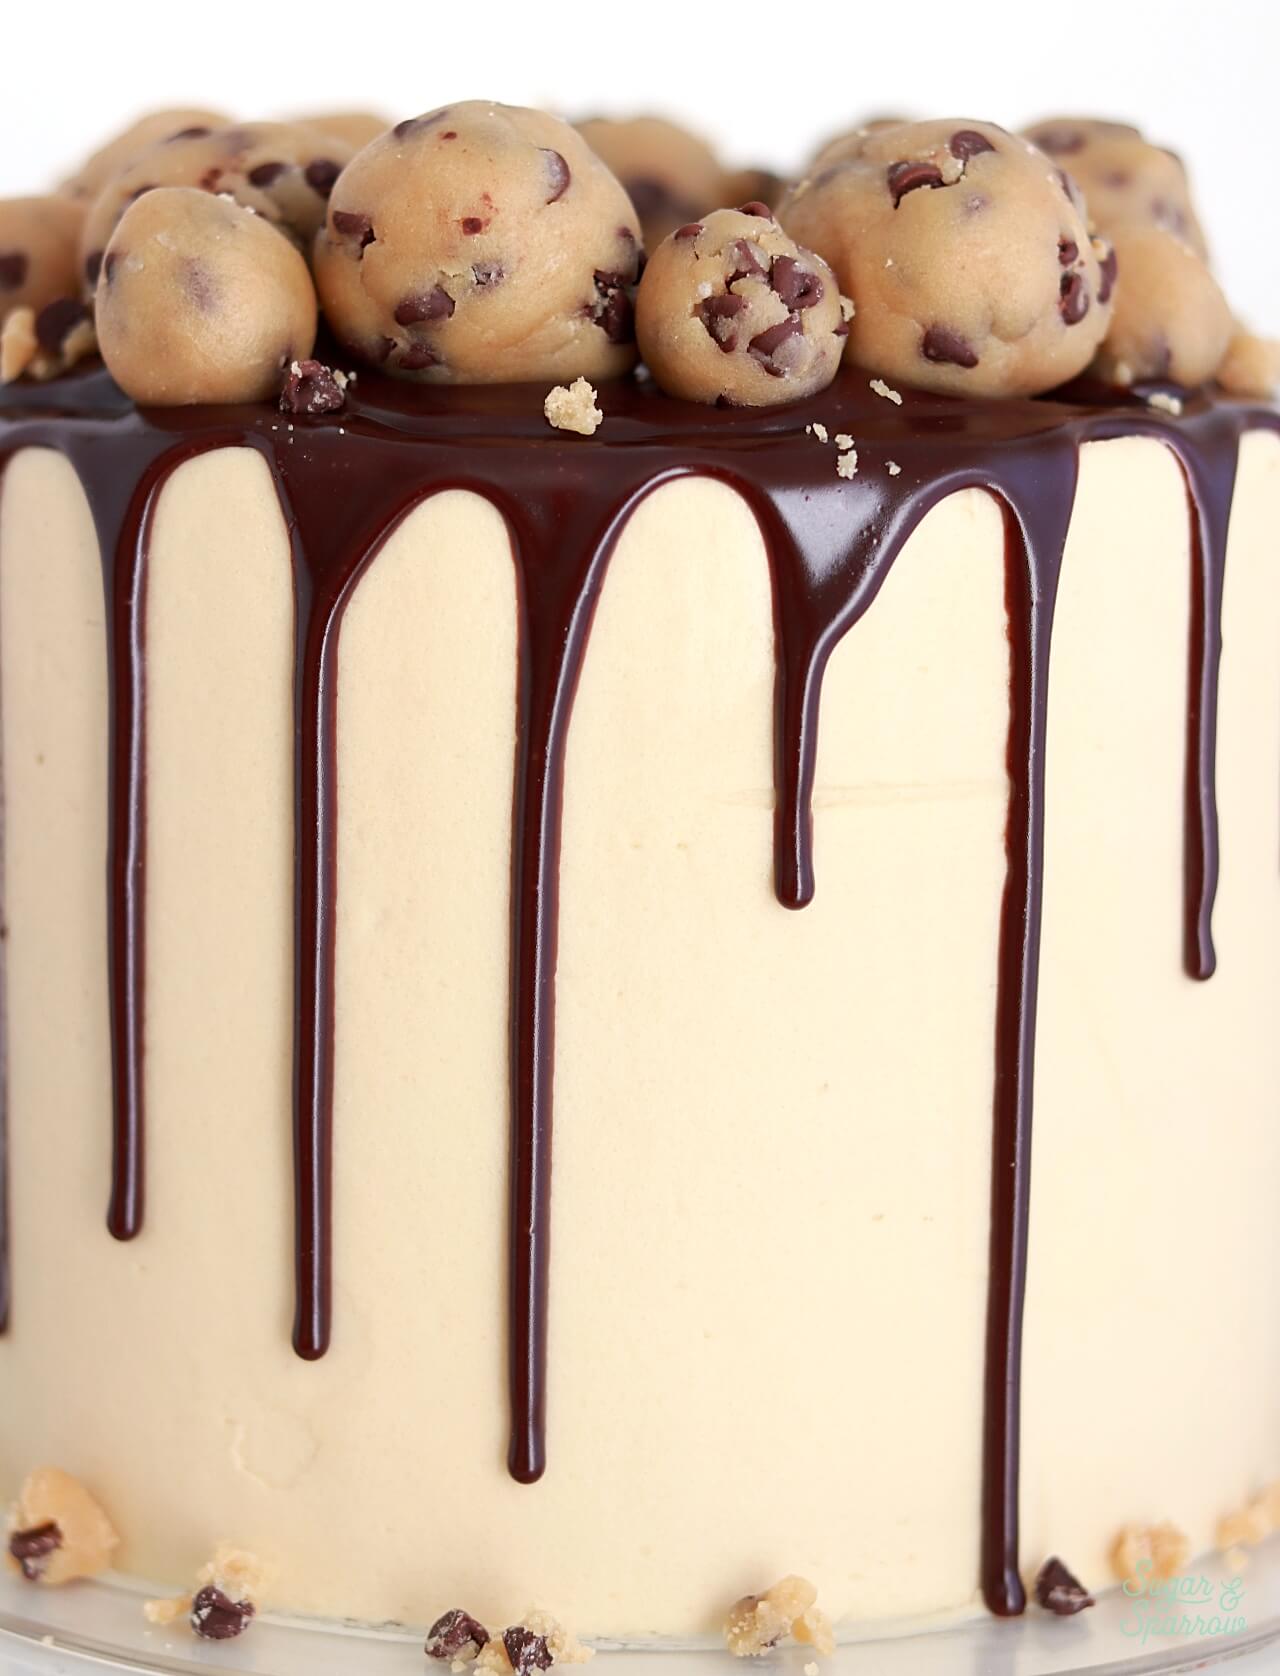
All of the elements going on in this cake are superb, but the star of the show has to be the chocolate chip cookie dough. I couldn’t just keep it inside the cake. So, I formed the remaining cookie dough into balls of various sizes for the top and arranged them like a crown. I absolutely love how it turned out!
Regardless of how you decorate this cake, it’s sure to be a hit for any chocolate chip cookie dough lover. I hope you love it as much as I do!
Chocolate Chip Cookie Dough Cake
Ingredients
Chocolate Chip Cookie Cake
- 2 3/4 Cups (290g) sifted cake flour* plus more to coat the chocolate chips
- 2 tsp baking powder
- 1/2 tsp baking soda
- 1 tsp salt
- 3/4 Cup (170g) unsalted butter, room temperature
- 1 Cup (200g) granulated sugar
- 1/2 Cup (100g) packed brown sugar light or dark
- 3 large eggs, room temperature
- 1/2 Cup (120g) sour cream, room temperature
- 1 Tbsp pure vanilla extract
- 1 Cup (240ml) whole milk, room temperature
- 3/4 Cup (135g) mini semi-sweet chocolate chips, coated in 2 tsp flour
Edible Chocolate Chip Cookie Dough
- 2 Cups (265g) all-purpose flour
- 1/2 Cup (113g) unsalted butter, room temperature
- 1/2 Cup (100g) granulated sugar
- 2/3 Cup (133g) packed brown sugar light or dark
- 1/4 Cup (60ml) whole milk
- 2 tsp pure vanilla extract
- 1/2 tsp salt
- 1 Cup (180g) mini chocolate chips
Brown Sugar Buttercream
- 1 1/2 Cups (339g) unsalted butter, room temperature
- 3/4 Cup (150g) packed brown sugar light or dark
- 5 Cups (600g) powdered sugar
- 2 tsp pure vanilla extract
- 1/4 Cup (60ml) whole milk, room temperature
- pinch of salt, or to taste
Chocolate Ganache Drip
- 1/2 Cup (93g) semi-sweet chocolate chips mini or regular size
- 1/2 Cup (120ml) heavy whipping cream
Instructions
Make the Chocolate Chip Cookie Cake
- Preheat the oven to 350°F (177ºC). Prepare three 6-inch or two 8-inch cake pans by spraying the sides with baking spray and lining the bottom with a parchment paper circle. Alternatively, you can grease and lightly flour the pans.
- In a medium bowl, add the sifted cake flour, baking powder, baking soda, and salt. Whisk to combine and set aside.
- In the bowl of your stand mixer fitted with the paddle attachment (or a handheld mixer with a large bowl), beat the butter on high for two minutes until it’s creamy. Add in the white and brown sugars and continue to mix on medium-high for another two minutes, scraping down the bowl and paddle as needed. Turn the mixer to low speed and add the eggs one at a time. Add the vanilla and sour cream, turn the mixer to high, and mix for one minute, scraping down the bowl and paddle once more.
- With the mixer on low speed, add in the dry ingredients and mix until just combined. Add the whole milk and mix until just incorporated. Scrape down the sides and bottom of the bowl and give it a few stirs to make sure there are no lumps.
- Coat the mini chocolate chips in 2 teaspoons of flour, then gently fold them into the batter using a rubber spatula.
- Pour batter evenly between the prepared cake pans (about 2/3 of the way full) and bake for 30-35 minutes, until a toothpick inserted into the middle comes out clean or with a few moist crumbs. Let the cakes cool in the pan for five minutes before turning them out onto a wire rack for an additional few hours of cooling. Make sure they’re entirely room temperature before applying any frosting.
Make the Edible Chocolate Chip Cookie Dough
- Heat treat the flour: Preheat the oven to 350ºF (177ºC) and line a cookie sheet with parchment paper. Add the flour on top of the parchment in an even layer, then bake for 5 minutes. Using a digital food thermometer, check to see that the temperature of the flour has reached 160ºF (71ºC). If it hasn't, stir the flour around and continue baking in one minute intervals until it reaches this temperature.
- Transfer the heat treated flour into a medium bowl and set it aside to cool to room temperature, about 20 minutes.
- In the bowl of your stand mixer fitted with the paddle attachment (or a large bowl with a hand mixer), add the butter, granulated sugar, and brown sugar. Cream these ingredients together on medium-high speed until uniform and fluffy, about 3 minutes. Scrape down the bowl and paddle and add the vanilla and milk. Continue mixing on medium speed until combined.
- Add the (cooled) heat treated flour, then mix on low speed until combined. Then, mix in the mini chocolate chips.
- Store the edible chocolate chip cookie dough in an airtight container in the refrigerator until you're ready to crumble it in between the cake layers.
Make the Brown Sugar Buttercream
- In the bowl of your stand mixer fitted with the paddle attachment (or with a large bowl and hand mixer), cream the butter and brown sugar on medium-high until it’s creamy, light, and uniform. About 4 minutes.
- Add the powdered sugar a few cups at a time, mixing on low speed until each addition is mostly incorporated. Scrape down the bowl and paddle as needed.
- Add the vanilla, milk, and salt and mix on low speed until fully incorporated, 1-2 minutes.
Make the Chocolate Ganache
- Place the chocolate chips into a heat resistant bowl (glass or metal) and set aside.
- In a saucepan over medium-high heat, warm the heavy whipping cream while stirring frequently until it just starts to simmer. I always look for small bubbles forming around the edges and a soft simmer starting in the middle. When it's reached this point, pour the cream over the chocolate chips and let sit for about 30 seconds.
- Whisk together until it’s uniform in consistency and there are no bits of chocolate left on your whisk. Cool the ganache at room temperature for 10-20 minutes before dripping the cake, or until the ganache itself is room temperature or slightly above. If you're planning on making this element in advance, see the Make Ahead Tips in the notes section below for storage instructions.
Assembly
- Once the chocolate chip cookie cake layers have cooled completely, level and torte each layer to your desired height. Place the first layer on a turntable and add a layer of brown sugar buttercream as filling (about 1/4 inch tall) make a slight indent in the center of the buttercream filling before crumbling the chocolate chip cookie dough on top. Slightly press the cookie dough into the brown sugar buttercream filling before adding the next cake layer on top and repeating the process of filling and stacking with any additional cake layers. Crumb coat the cake with brown sugar buttercream and place it in the refrigerator for at least 20 minutes to let everything set up.
- To create the cake design pictured, frost a smooth layer of brown sugar buttercream around the cake, then place it back into the refrigerator for 20-30 minutes to create a cold foundation for the chocolate ganache drip.
- Drip the Cake: Wait until the chocolate ganache is room temperature or slightly above (if it's colder than that, microwave it in 5-10 second increments until it is room temperature), then drip the cake. Here are detailed instructions on how to add the chocolate ganache drip + troubleshooting tips. Place the cake back into the refrigerator for another 5 minutes to let the drip set.
- Roll the remaining chocolate chip cookie dough into balls of various sizes, from 1 inch to 1/2 inch and smaller. Add them to the top edge of the cake and crumble smaller bits of cookie dough on top.
Notes
- The chocolate chip cookie cake layers can be baked, cooled, wrapped in plastic wrap, and left out at room temperature up to two days ahead of decorating. Unfrosted cake layers can be wrapped tightly in plastic wrap and stored in the freezer for up to two months before thawing and frosting.
- The edible cookie dough can be stored in an airtight container in the refrigerator for up to 2 weeks, or in the freezer for up to 1 month.
- The brown sugar buttercream can be made ahead and stored in an airtight container in the refrigerator for up to two weeks. When you’re ready to use it, bring it back to room temperature and re-whip in your stand mixer to bring back to smooth buttercream consistency.
- The chocolate ganache drip can be made ahead and stored in the refrigerator in an airtight container for up to two weeks. When you’re ready to use it as a drip, microwave it in 10 second increments, stirring after every interval until your ganache is room temperature and uniform in consistency.
Did you make this cake? I want to know how it went. Let me know in the comments section below or tag @sugarandsparrowco on Instagram to show me a photo. I love to see what you make!
Great recipe! All of my mini chocolate chips fell to the bottom of my cakes though, despite dusting in flour. I typically tap my cakes pan on the counter a few times before putting them in the oven, would that cause the chocolate chips to sink?
Hi Christina! Tapping the cakes will cause the mini chocolate chips to fall before baking. Next time smooth the tops instead of tapping and they should stay put!
Hi, i was wondering if you think that this could work with a brown sugar Swiss meringue buttercream for the frosting for people who prefer less sweet deserts?
Hi Rachel! Yes, absolutely. I don’t have a recipe for brown sugar smbc but if you find one it will totally work for filling and frosting this cake.
Hi! I just found your website and your cakes look AMAZING! I was wondering if this could be made in a 9×13 pan? I love making cakes but struggle with making layered cakes look ‘pretty’ and smooth, lol!
Thank you!!
Hi Libby! Thanks for the kind words about my cakes 🙂 you can bake this recipe in a 9×13 pan – you’ll want to bake at 325F (slightly lower temp) for 30-15 minutes. I would recommend frosting the cake with the buttercream, then crumbling the cookie dough on top and drizzling the ganache. Enjoy!
Haven’t assembled this yet, but loving this recipe so far. Just one question… do you think it would be ok to leave out overnight after decorating? We made a larger version for my son’s birthday that won’t fit in our fridge, but would like to take our time decorating.
Hi Mike! The cake will be fine to leave out at room temperature for a few days. There aren’t any elements that will spoil at room temperature involved. Enjoy!
One of my favorite recipes of yours! I’d love to make it using three 8-inch pans. How would I change the recipe for three pans instead of two?
I’m so happy you love this recipe, Carly! For three 8-inch pans, you’ll want to make 1.5x the recipe. Enjoy!
How would you make these into cupcakes with the cookie dough filling in the middle?
Hi Erin! To make these as cupcakes, fill your cupcake tins with the cake batter no more than 2/3 full and bake at 350F for 15-18 minutes. Once the cupcakes are cooled, fill them with the cookie dough by cutting out the center of the cupcake and placing a ball of the cookie dough inside. Top with the buttercream and you’re set!
Can you color the brown sugar buttercream? I was looking to make red frosting, and was wondering if it would hold?
Hi Ashley! Yes, you can add red food color gel to this. The red color might be slightly more muted since you’re starting with a light brown color but it will work.
Thank you so much! Excited to see how it turns out. Your recipes are always amazing!
Hi Whitney! Do you think this recipe will work with gluten free flour? If so do you have a recommended brand? I usually prefer Bob Mills
Hi Skylar! I haven’t tried this recipe with GF flour but I’ve heard of people having success with a 1:1 ratio of all-purpose GF flour as a sub for the cake flour in my cakes. Let me know if you try it!
Hi Whitney! I am so excited to try the chocolate chip cookie dough for my grandson’s birthday. How can I thaw the frozen cakes for crumb coating.
Hi Deba! I’m excited for you to make this recipe for your grandson. To thaw the frozen cake layers you can leave them at room temperature for an hour or two, still covered in the plastic wrap so that the wrapping collects the condensation. I have more detailed information on freezing cakes here: https://sugarandsparrow.com/making-cakes-ahead/
I made this for a Mom’s Night Out in Oslo, Norway. It was PERFECT. One mom, from Minnesota, even started to cry because it reminded her of a happy childhood memory. I’m definitely making this again soon! Thank you!!!
That’s amazing, Crystal!! I’m so happy to hear what a hit it was, thank you for sharing! 🙂