• Cake
  • Frosting
  • YouTube
  • My Favorite Tools
  • Nav Social Icons

  • Skip to primary navigation
  • Skip to main content
  • Skip to primary sidebar
  • Skip to footer
  • Recipes
    • Cake
    • Cupcakes
    • Frosting
    • Ice Cream
    • Vegan
  • Cake Basics
  • Tutorials
  • Blog
  • About
  • Mobile Menu Widgets

    Connect

    Search

Sugar & Sparrow logo in script font

Sugar & Sparrow

Lifestyle and Cake from Portland Oregon

  • Cake Basics
  • Recipes
    • Cake
    • Cupcakes
    • Cookies & Bars
    • Filling
    • Frosting
    • Ice Cream
    • No-Bake
    • Small Batch
    • Vegan
  • Tutorials
  • Book
  • Blog
  • About

DIY Party Animal Cake Toppers

July 10, 2024 · In: Featured, Tutorials

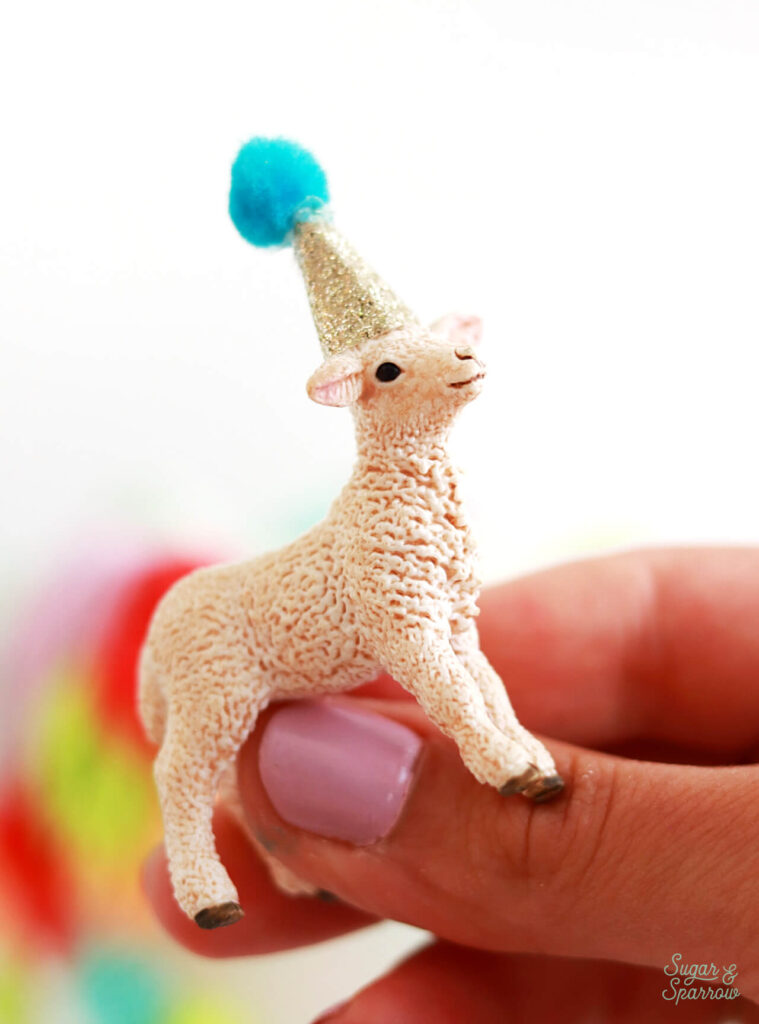
Every time I see a party animal cake I cannot help but melt a little bit. There’s something about tiny animal figurines in party hats that is just the cutest thing. So when I was thinking about smash cake themes for my youngest son’s first birthday, I first thought about his current favorite book (Mr. Brown Can Moo! Can You? By Dr. Seuss), and then I thought, baby farm animals in party hats would be right up his alley (and mine too). Just look at how cute these cake toppers turned out!

This post may contain affiliate links. For more information, see our disclosure policy.

party animal cake toppers tutorial
animals with party hats cake toppers

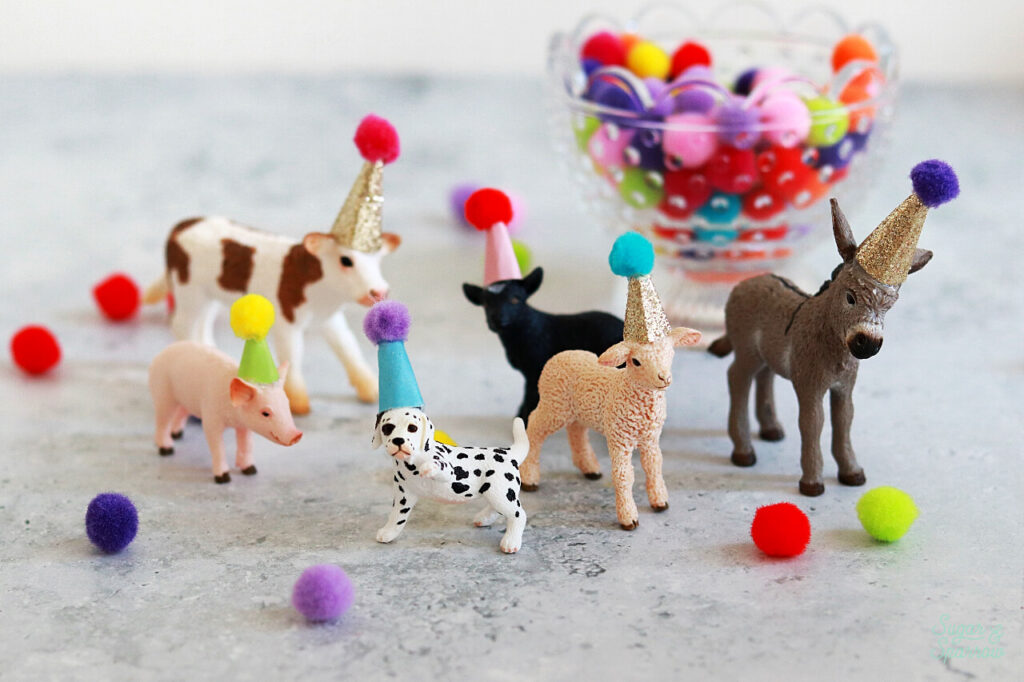
After searching Etsy and Amazon (and all the internet places) for the perfect baby party animal cake toppers, I did find some beautiful handmade sets that I was planning on ordering. And then life got busy and I completely forgot about the cake toppers until they couldn’t be shipped here in time. So I decided I had to make them. And you know what? It was very easy with a hot glue gun, some mini pom pom balls, colorful cardstock, and of course, the baby farm animal figurines. 

This party animal cake topper tutorial will work with any animal figurines you can think of. Whether your theme is jungle animals, zoo animals, farm animals, or any other kind of animal, you can follow right along to make the perfect mini party hats. 

mini party hat tutorial animal cake toppers

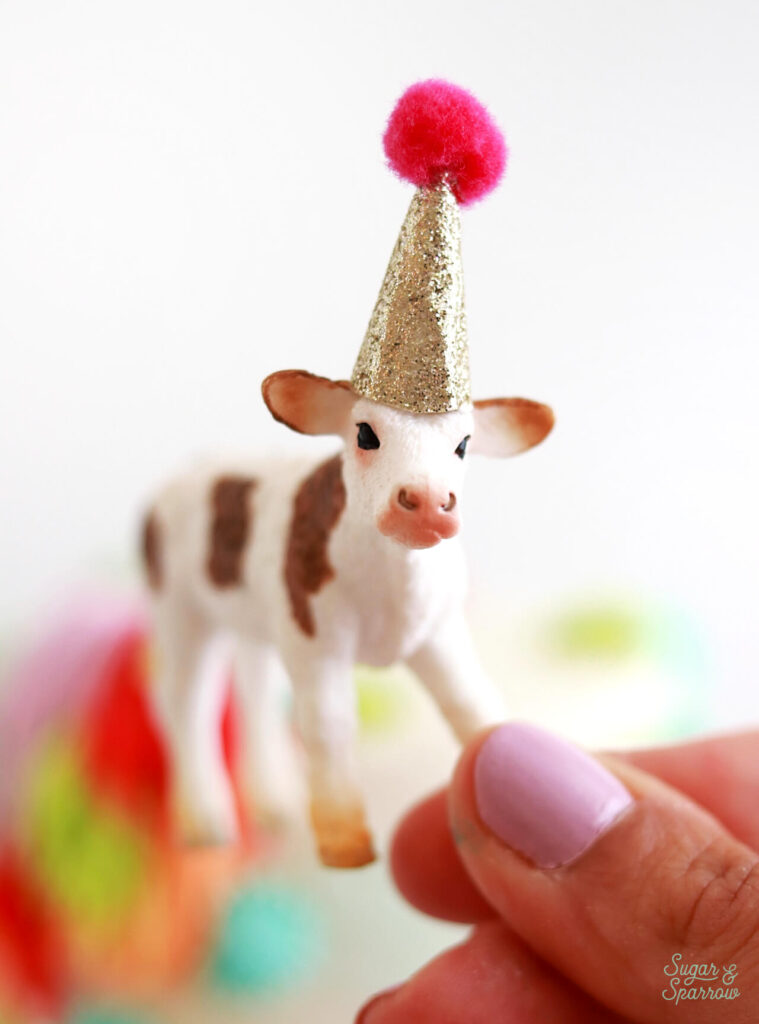
One of the best things about these cake toppers is that the hats are totally removable after you’re finished using them as cake toppers! The hot glue does a great job of holding the hats on the animal heads but then it will peel right off when you want it to. That means your kid gets a fun new set of animal figurines to play with after getting the cutest party animal cake ever! Total win win. 

Here’s a quick video showing how I made these party animal cake toppers:

If you love tutorial videos like this one, be sure to check out my YouTube channel! I’ve got a growing collection of cake recipes, decorating tutorials, and Cake Basics over there. Hit the subscribe button on my page so you never miss a new video.

You Will Need

  • Animal figurines (I used these) 
  • Hot glue gun
  • Colorful cardstock 
  • Mini pom pom balls
  • Scissors and pencil
  • Printable template (or scrap paper to make your own)

Step 1: Make a Template

The size of your template is going to depend on the size of the animal you’re trying to fit the party hat on, and here are some party hat templates you can download to get started. You’ll basically trace around this shape onto the back of the cardstock you’re using for the actual party hats, then cut out the shape.

animal party hat template

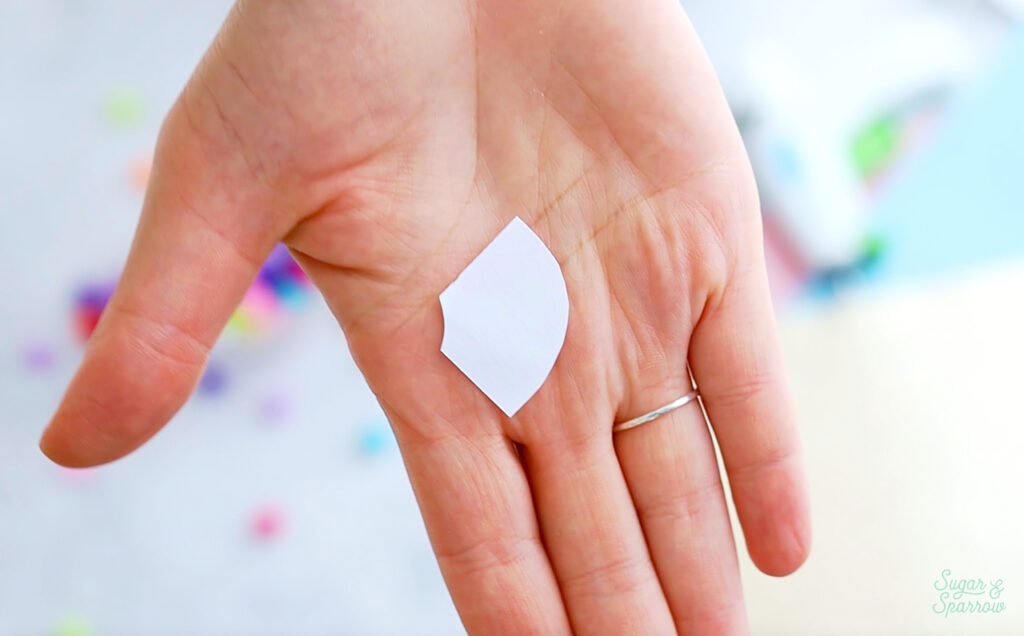
Roll the cardstock into a cone (party hat) and test it out on your animal figurine to determine whether it’s the right size or you need to use a larger or smaller template. 

mini party hats for animal figurines

Step 2: Make the Party Hat Cones

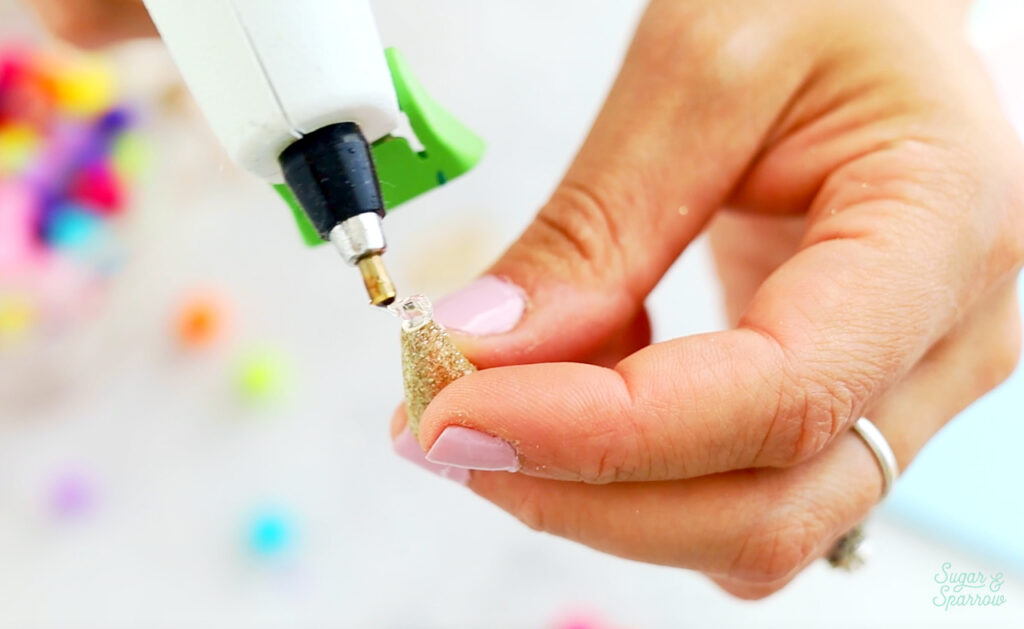
Once you determine the perfect template size, trace the shape onto your cardstock and repeat per the amount of animal figurines you have. Then, cut out all the shapes. One by one, roll the shape into a cone and use a hot glue gun to glue the edges together. 

diy party hats for animal cake toppers

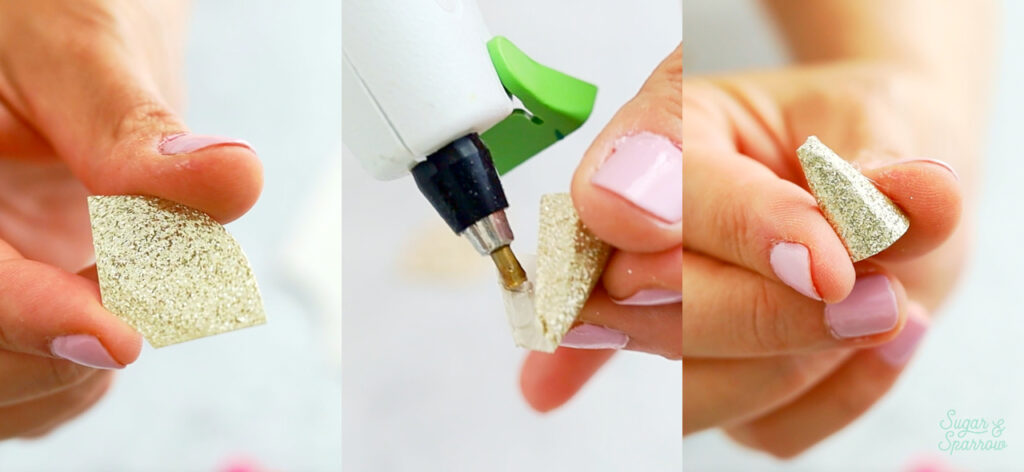
Be careful with this step. Since the hats are so tiny I definitely got my fair share of hot glue on my fingers! 

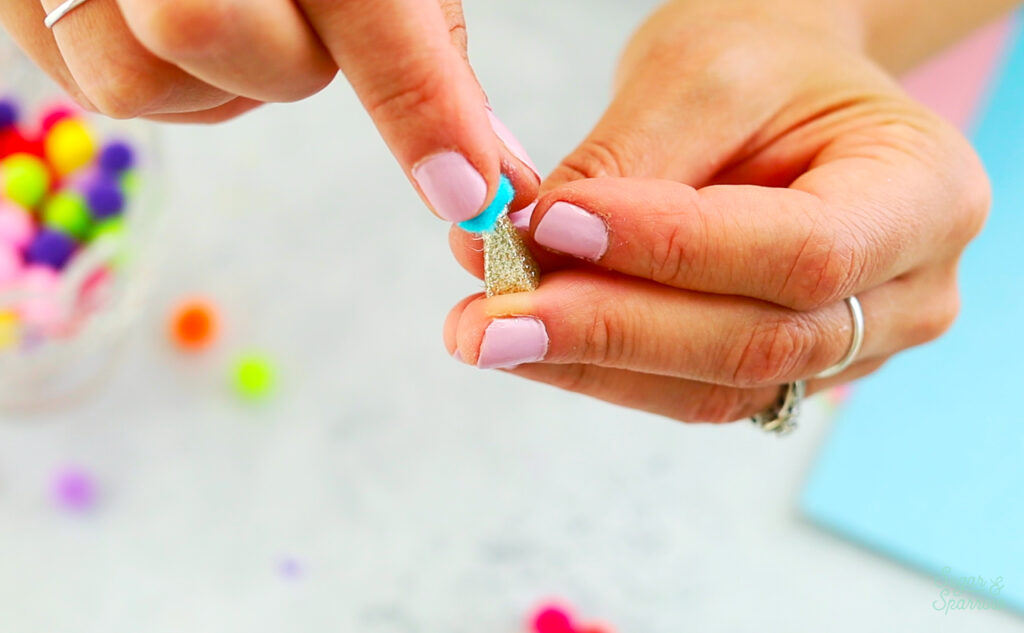
Step 3: Add the Pom Pom

When you have your cone shapes, use the hot glue gun to attach a mini pom pom to the top. If your hats are extra small (like mine), you might want to use scissors to trim the pom pom down so that it’s even smaller. 

diy party hat tutorial for animal figurines
gluing pom pom to mini party hat

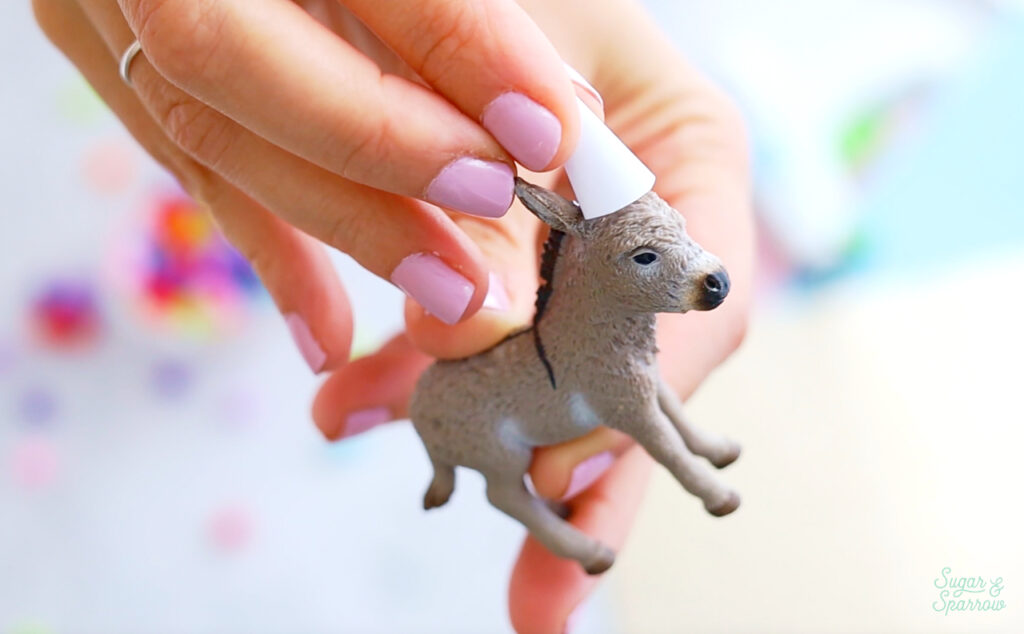
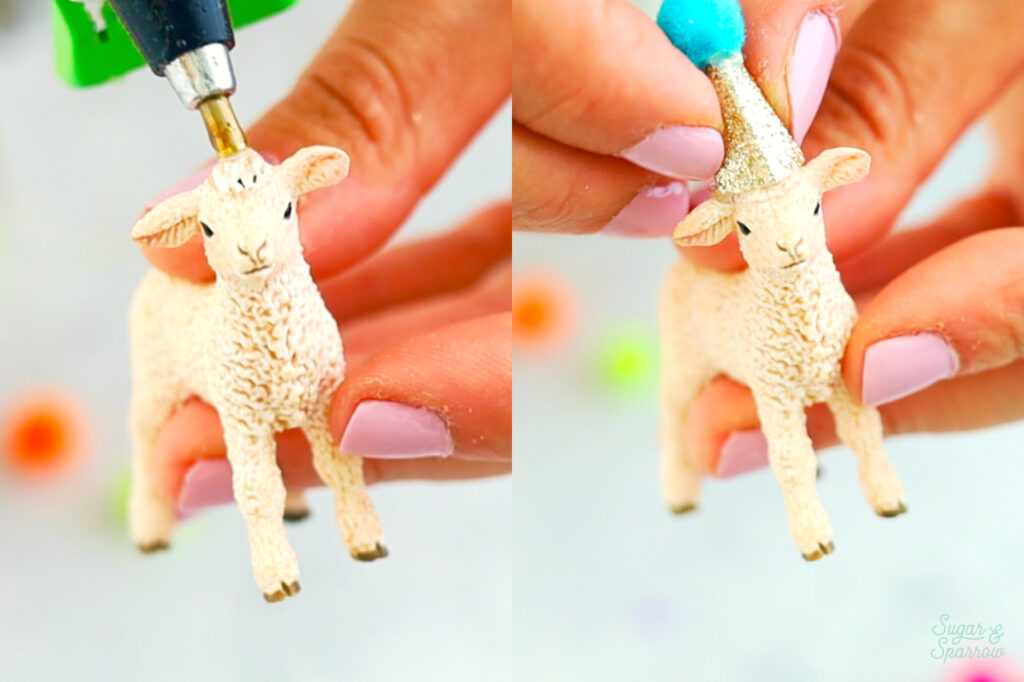
Step 4: Adhere the Party Hats 

Finally, add a glob of hot glue to the top of an animal figurine’s head and attach the party hat. Press the hat down slightly for a few seconds to make sure it attaches to the glue as it dries. 

diy animal cake toppers with party hats
animals with party hats cake topper diy

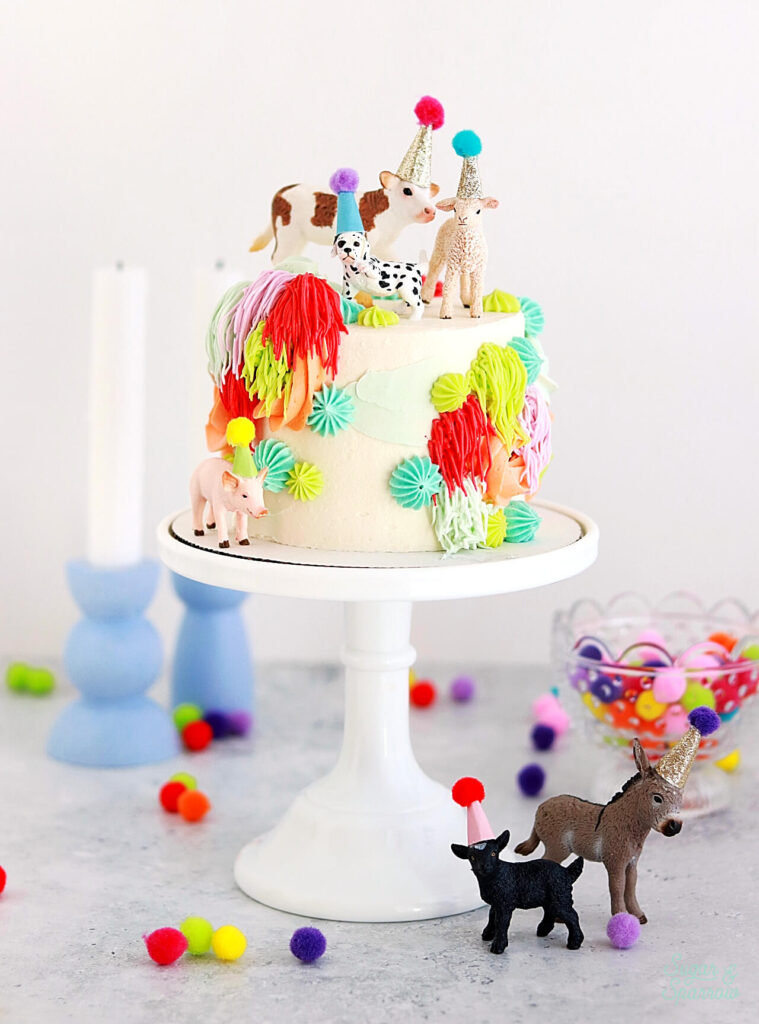
Repeat this step for every animal figurine and then behold the cutest cake toppers ever! To add them onto the cake, I just stuck their feet right in the buttercream. 

diy animal birthday cake toppers with party hats

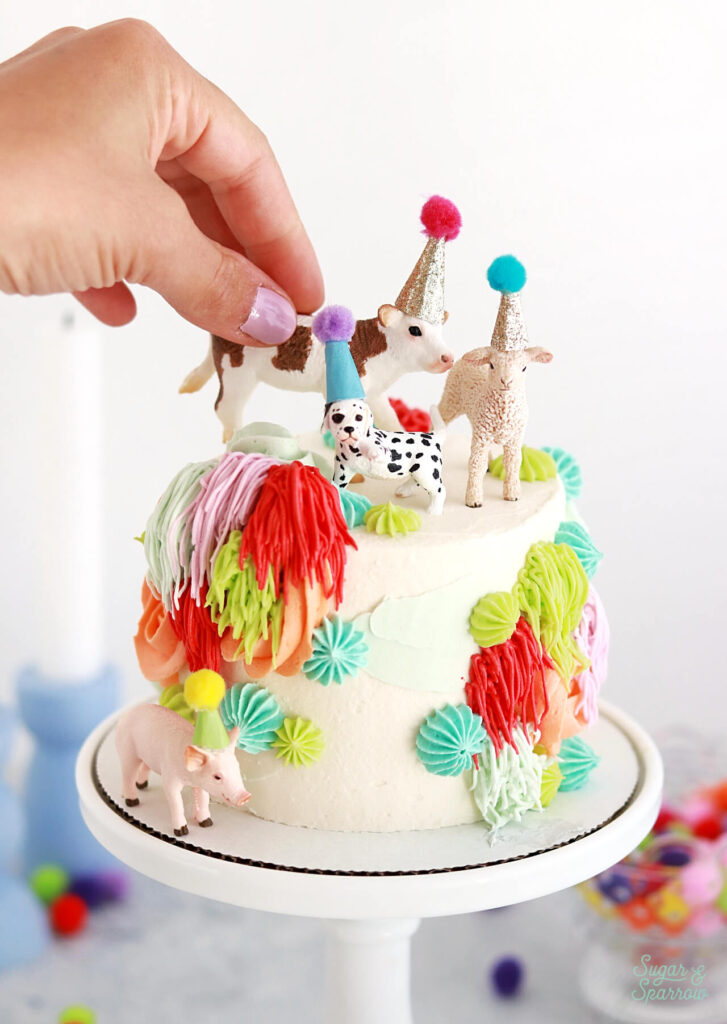
Since this cake was a 4-inch smash cake, I only added three of the party animals onto the top of the cake, placed two around the base of the cake, and placed the rest on the party table as fun little accents. 

party animal birthday cake tutorial

I will never tire of these DIY cake toppers and I hope you love them as much as I do! If you follow this tutorial, I want to see the results. Let me know how it went in the comments below and feel free to tag @sugarandsparrowco on Instagram to show me!

By: Whitney · In: Featured, Tutorials · Tagged: animals in party hats, birthday cake ideas, cake toppers, diy cake toppers, party animals

you’ll also love

sprinkle cake balls topper tutorial by sugar and sparrowSprinkle Cake Truffles
rainbow cake topper by sugar and sparrowRainbow Arch Cake Topper Tutorial
sprinkle letter cake toppersDIY Sprinkle Letter Cake Toppers

Join the List

Stay up to date & receive the latest posts in your inbox.

Reader Interactions

Comments

  1. Becky says

    February 3, 2026 at 8:50 am

    I’m wondering, Did the hats come back off the animals ok? So they can be played with later 🙂

    Reply
    • Whitney says

      February 3, 2026 at 10:21 am

      Hi Becky! Yes, all the hats came off just fine and my son still plays with the little farm animal set over a year later!

      Reply

Leave a Reply Cancel reply

Your email address will not be published. Required fields are marked *

Recipe Rating


Next Post >

Berry Chantilly Sheet Cake

Primary Sidebar

Welcome to Sugar & Sparrow

Welcome to Sugar & Sparrow

Helping you whip up pretty desserts with confidence and creativity. And hopefully sharing a few laughs with you along the way!

Learn More

Connect

let’s bake!

Get my very best recipes, baking tips, and decorating tutorials sent to your inbox

Featured Posts

oatmeal creme pie cake recipe

Oatmeal Creme Pie Cake

banana cake with brown butter frosting recipe

Banana Cake with Brown Butter Frosting and Salted Caramel

Anyone Can Cake giveaway with Wilton

Anyone Can Cake x Wilton GIVEAWAY!

Search

Archives

Follow Along

@sugarandsparrowco

LEMON CUPCAKES 🍋 after about a dozen recipe tes LEMON CUPCAKES 🍋 after about a dozen recipe tests, this one is everything I could want in a lemon cupcake! Fluffy-yet-moist, bursting with natural lemon flavor, and absolutely irresistible topped with lemon cream cheese buttercream. 

Full recipe (with frosting) linked in my bio + at https://sugarandsparrow.com/homemade-lemon-cupcakes/

INGREDIENTS:
1 Cup (132g) all-purpose flour
1 tsp baking powder
1/4 tsp salt
1/4 Cup (60ml) whole milk, room temperature
3 Tbsp (45ml) lemon juice from 1 medium lemon
3/4 Cup (150g) granulated sugar
3 Tbsp (42g) unsalted butter, room temperature
2 Tbsp (30ml) vegetable oil
2 large eggs, room temperature
1 tsp pure vanilla extract

INSTRUCTIONS:
1. Preheat the oven to 350ºF (177ºF) and line a standard cupcake pan with 12 paper liners.
2. In a large bowl, whisk together the flour, baking powder, and salt. Set aside. 
3. In the bowl of a stand mixer fitted with the paddle attachment (or with a hand mixer and large bowl), add the lemon zest to the sugar and mix on low speed until fragrant and well combined, about 1 minute. Meanwhile, combine the lemon juice with the milk and set aside. 
4. Add the butter to the lemon-sugar mixture and cream on medium speed until and combined, about 2 minutes. Add the vegetable oil and beat until light and creamy, about 3 minutes. Scrape down the bowl and paddle as needed.
5. Mix in the eggs one at a time on low speed, then add the vanilla and turn the mixer to medium speed for one minute.
6. Turn the mixer off and add the flour mixture all at once. Mix on low speed until just combined, then slowly pour in the lemon-milk mixture. Mix until just combined, about 30 seconds.
7. Divide the batter equally between the liners and bake for 14-18 min. Cool, then top with frosting of your choice (link in bio for lemon cream cheese frosting)�
#lemoncupcakes #creamcheesefrosting #lemon #cupcakes #cupcakedecorating
April in my kitchen 🌸 I published 5 NEW recipes April in my kitchen 🌸 I published 5 NEW recipes on my site, baked my Oreo cupcake recipe for a fundraiser and found it was just as delicious as I remember, and filmed/photographed 3 recipes that will be on my blog in May (Lemon Cupcakes, Lemon Cream Cheese Buttercream, and No-Bake Marbled Strawberry Cheesecake) 🥰 

Comment “APRIL” to get all the available recipes and stay tuned for more! 

#bakersofinstagram #springbaking #cakedecorating #cupcakes #bakinglove
SHEET PAN COOKIE CAKE 🍪 slice it warm for a fud SHEET PAN COOKIE CAKE 🍪 slice it warm for a fudgy chocolate chip cookie OR let it settle into a moist and chewy cookie cake that’s perfect for decorating! My fave vanilla buttercream + sprinkles turn this giant chocolate chip cookie into the perfect birthday cake alternative at the end 🥳
⁣
Full recipe + decorating ideas at https://sugarandsparrow.com/sheet-pan-chocolate-chip-cookie-cake/
⁣
INGREDIENTS⁣
1 Cup (226g) unsalted butter, melted⁣
1 1/3 Cups (267g) packed light or dark brown sugar⁣
1/2 Cup (100g) granulated sugar⁣
3 large eggs⁣
1 Tbsp pure vanilla extract⁣
1 tsp baking soda⁣
1 tsp cornstarch⁣
1/2 tsp salt⁣
3 Cups (398g) all purpose flour⁣
2 Cups (350g) semi-sweet chocolate chips⁣
⁣
INSTRUCTIONS⁣
1. Preheat the oven to 350ºF (177ºC). Grease and line a 13×18 inch sheet pan.⁣
2. In a large bowl, add the brown sugar and granulated sugar. Melt the butter in the microwave and pour it over the top of the sugars. Whisk together until uniform. Add the eggs and vanilla, then continue whisking until uniform. Whisk in the baking soda, cornstarch, and salt.⁣
3. Add the flour and use a silicone spatula to fold it in until smooth cookie dough forms. Reserve 1/2 Cup of the chocolate chips and set them aside, then fold the remaining 1 1/2 Cups of chocolate chips into the cookie dough.⁣
4. Place the chocolate chip cookie dough onto the prepared sheet pan and use an offset spatula to spread it all the way to the edges in an even layer.⁣
5. Bake the cookie cake for 14-16 minutes, until it looks golden brown on the edges and set. 
6. Enjoy warm or let it cool and decorate with vanilla buttercream and sprinkles! ⁣
⁣
#cookiecake #chocolatechipcookies #sheetcake #birthdaycake #cakedecorating
STRAWBERRY CUPCAKES 🍓based on my beloved strawb STRAWBERRY CUPCAKES 🍓based on my beloved strawberry layer cake recipe, this cupcake version is just as moist yet fluffy and bursting with natural strawberry flavor! Between the mix of fresh strawberries in the cupcakes + freeze-dried strawberries in the frosting, the flavor is out of this world 🚀

Full recipe link in my bio (with strawberry buttercream) + at https://sugarandsparrow.com/strawberry-cupcakes/

STRAWBERRY CUPCAKES
Yield: 14 cupcakes

INGREDIENTS:
5 oz (143g) fresh or frozen strawberries
1/3 Cup (80ml) whole milk, room temp
1 1/2 Cups (158g) sifted cake flour
1 tsp baking powder
1/4 tsp baking soda
1/2 tsp salt
6 Tbsp (85g) unsalted butter, room temp
1 Cup (200g) granulated sugar
2 large eggs, room temp
3 Tbsp (45g) sour cream, room temp
1 tsp vanilla extract
1 drop pink food coloring (optional)

INSTRUCTIONS: 
1. Puree the strawberries using a food processor (you’ll have about 1/2 cup of puree), then place into a saucepan over medium-low heat. Bring to a simmer, then cook for 10-15 min, stirring occasionally, until you have 1/4 cup. Refrigerate until room temp.
2. Preheat oven to 350ºF (177ºC) and line a standard cupcake pan with liners.
3. Whisk together the sifted cake flour, baking powder, baking soda, and salt and set aside.
4. In a stand mixer w/ paddle attachment (or hand mixer + large bowl), whip the butter on high for 2 min. Add sugar and beat for 2 min, until light and fluffy. Turn the mixer to low and add the eggs one at a time, then add the vanilla and sour cream, turn the mixer to high and beat for 1 min. Meanwhile, whisk together the strawberry puree, whole milk, and food coloring (if using).
5. Turn the mixer off and add all of the dry ingredients at once. Mix on low until just combined, then add the strawberry milk mixture until just combined, about 30 seconds.
6. Fill the cupcake liners 2/3 full and bake for 14-18 minutes. Cool completely before topping with strawberry buttercream (full recipe linked above). 

#strawberrycupcakes #strawberrycake #pinkcupcakes #strawberry #cupcakes
COFFEE BUTTERCREAM (recipe below)☕️ this frost COFFEE BUTTERCREAM (recipe below)☕️ this frosting has AMAZING coffee flavor, is so easy to decorate cakes with, and pairs beautifully with so many flavors (chocolate, vanilla, or any cake flavor you’d want to turn into a latte). 

All my cake pairing suggestions are linked in my bio or at https://sugarandsparrow.com/coffee-buttercream-recipe/ 

COFFEE BUTTERCREAM⁣
Yield: 2.5 Cups⁣

INGREDIENTS⁣
1 1/2 tsp instant coffee or espresso powder⁣
1 1/2 Tbsp whole milk, room temperature⁣
1 Cup (226g) unsalted butter, room temperature⁣
3 1/2 Cups (420g) powdered sugar⁣
2 tsp pure vanilla extract⁣
Pinch of salt⁣

INSTRUCTIONS⁣
1. Combine the instant espresso/coffee with the whole milk and set aside. In the bowl of a stand mixer, beat the butter on high until creamy and smooth (about 5 minutes), scraping down the bowl and paddle a few times in between.⁣
2. Turn the mixer to low and add the powdered sugar a few cups at a time, scraping down the bowl and paddle between intervals. Add the vanilla, the coffee/espresso milk mixture, and salt. Mix on low until fully incorporated, about one minute.⁣

#coffeebuttercream #buttercream #frosting #coffeecake

Footer

On the Blog

  • Cake Basics
  • Recipes
  • Tutorials

Info

  • About
  • Privacy Policy & Disclosure

stay in the know

Copyright © 2026 · Theme by Sugar & Sparrow