• Cake
  • Frosting
  • YouTube
  • My Favorite Tools
  • Nav Social Icons

  • Skip to primary navigation
  • Skip to main content
  • Skip to primary sidebar
  • Skip to footer
  • Recipes
    • Cake
    • Cupcakes
    • Frosting
    • Ice Cream
    • Vegan
  • Cake Basics
  • Tutorials
  • Blog
  • About
  • Mobile Menu Widgets

    Connect

    Search

Sugar & Sparrow logo in script font

Sugar & Sparrow

Lifestyle and Cake from Portland Oregon

  • Cake Basics
  • Recipes
    • Cake
    • Cupcakes
    • Cookies & Bars
    • Filling
    • Frosting
    • Ice Cream
    • No-Bake
    • Small Batch
    • Vegan
  • Tutorials
  • Book
  • Blog
  • About

Champagne Mimosa Cake Recipe (Alcohol-Free!)

February 29, 2024 · In: Cake, Featured, Recipes

Jump to Recipe

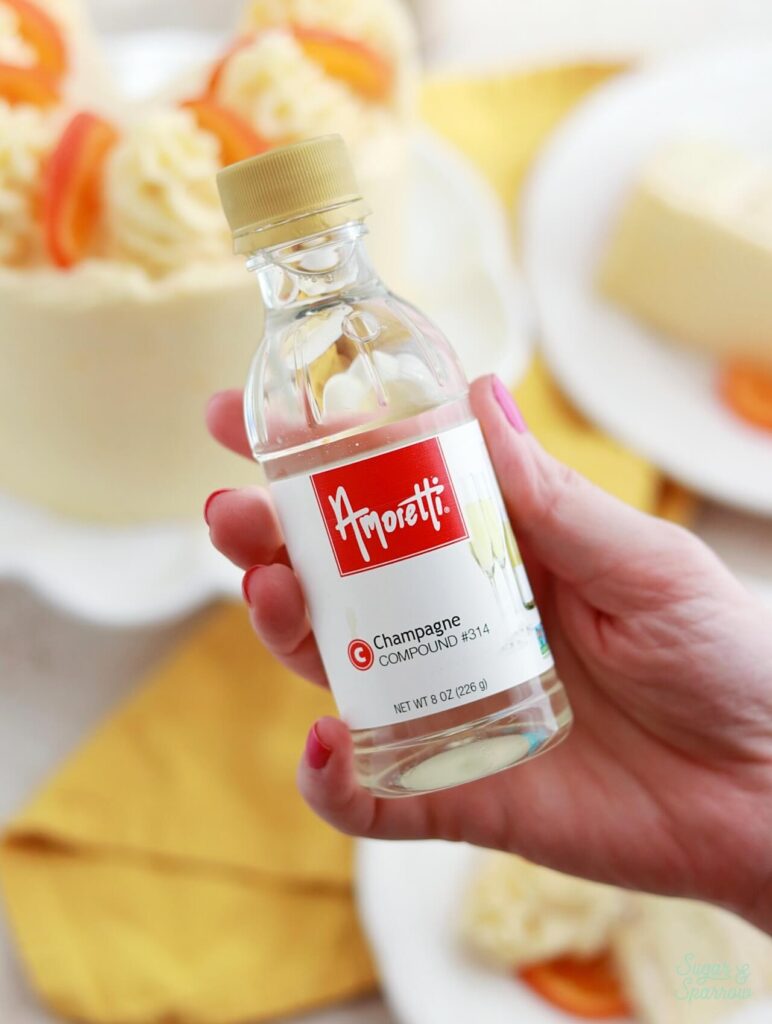
Over the years I have gotten requests for a champagne cake, but since I don’t drink alcohol I never thought I’d be able to offer a recipe. I couldn’t justify buying champagne just for recipe testing and since I’ve never really baked with alcohol before, I felt like it would take a lot of work to get the recipe just right. But to my surprise, a champagne flavor without any alcohol does exist: Amoretti Champagne Compound! And making a perfectly flavored champagne cake was as easy as adding a few tablespoons to my favorite vanilla cake recipe.

This post may contain affiliate links. For more information, see our disclosure policy.

Champagne Mimosa Cake Recipe with Amoretti Champagne Compound
Amoretti Champagne Compound

Though this cake doesn’t contain any actual champagne, it absolutely tastes like it does. I had a handful of my friends (who do drink) taste test this recipe and all were amazed at the quality of the flavor and the soft, moist crumb. It tasted so much like actual champagne that I had to double check that there wasn’t any alcohol in it. And I love that I could just add a little bit of the compound into an existing cake recipe to create the perfect flavor instead of having to come up with a totally new recipe. 

champagne mimosa cake recipe

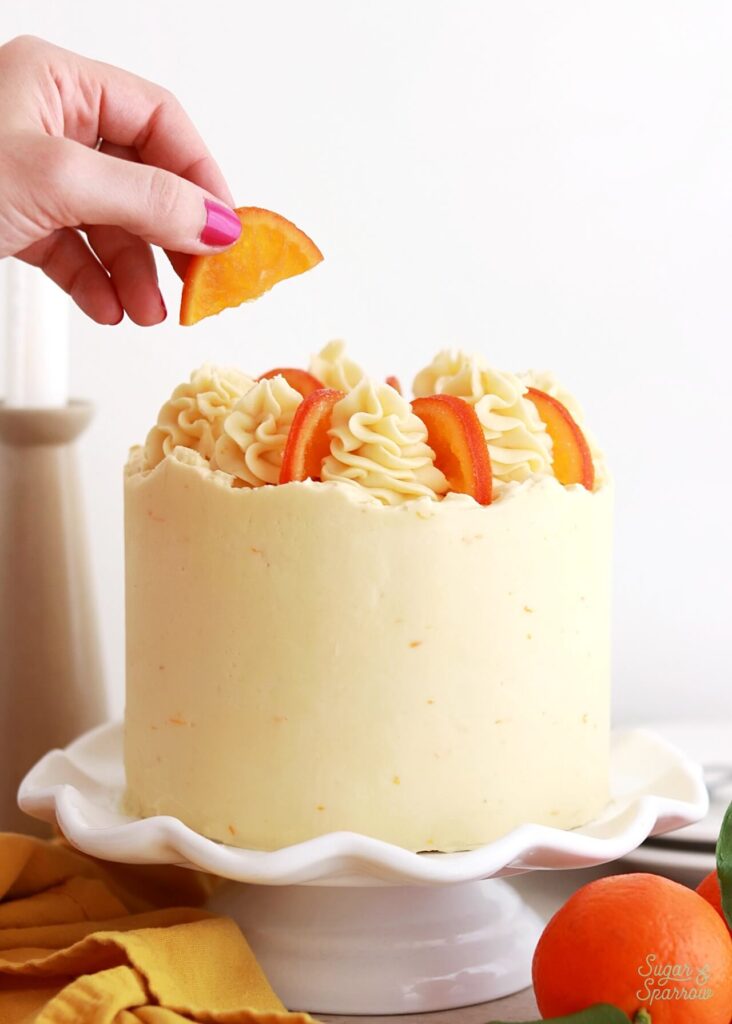
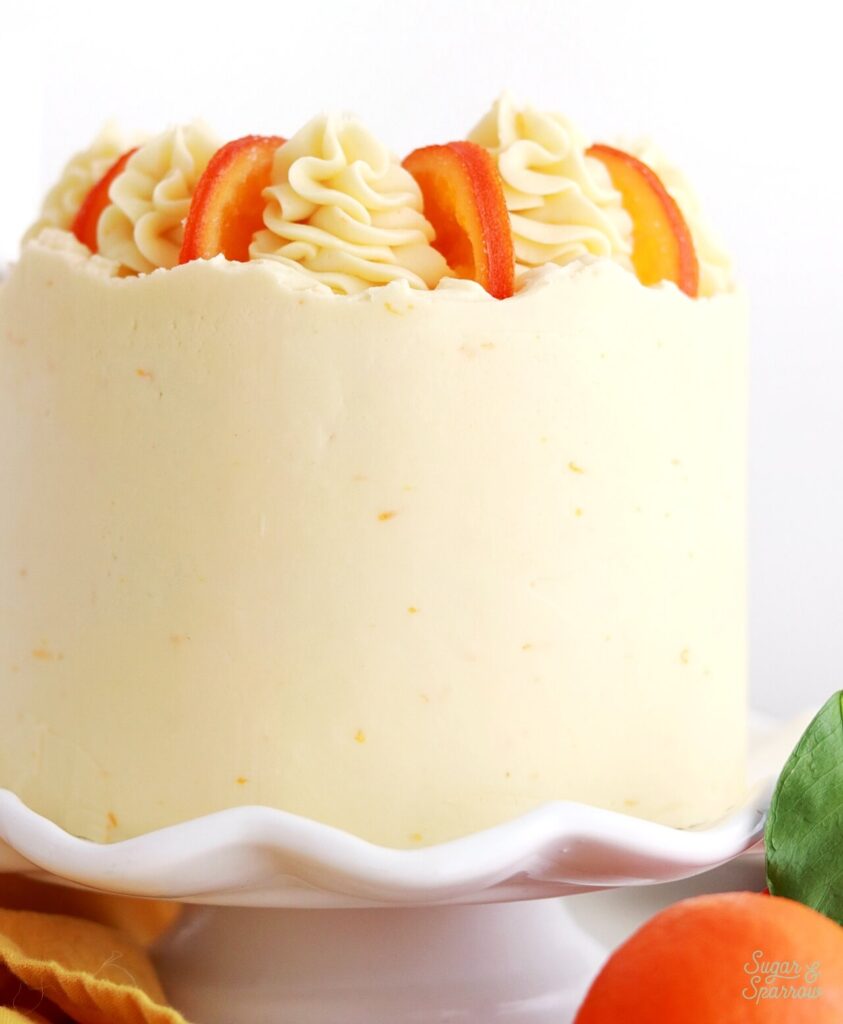
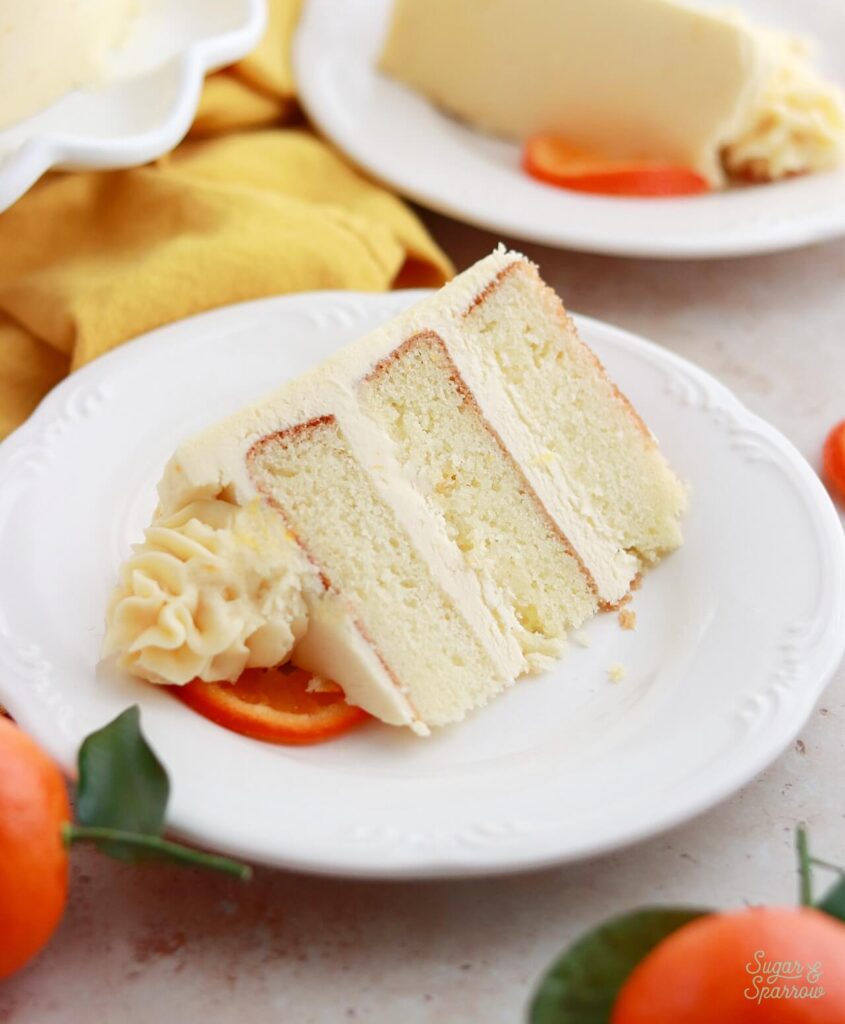
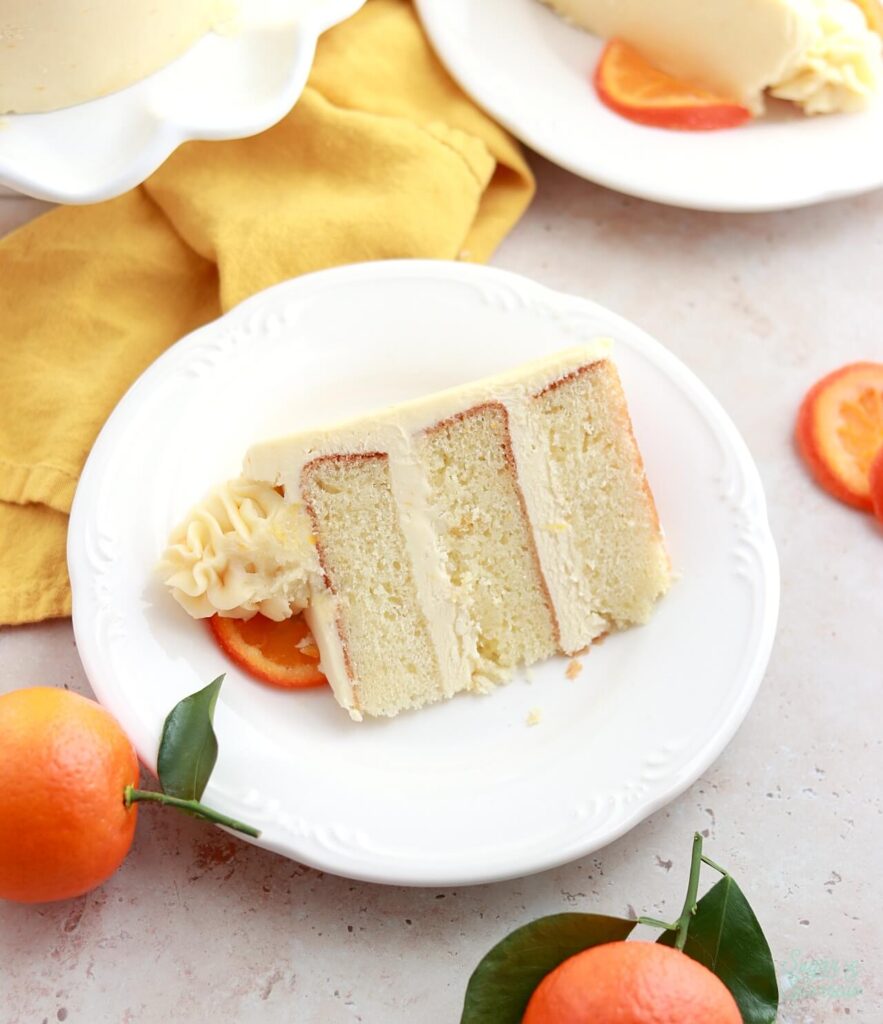
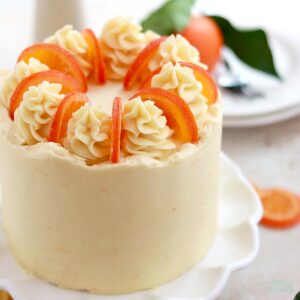
Inspired by the classic brunch cocktail, I paired these champagne cake layers with orange-flavored buttercream to mimic a mimosa in cake form. I’ve made orange buttercream before using fresh orange juice and zest, but this time I decided to try a new technique. I cooked some store bought orange juice to reduce it (let most of the liquid evaporate) and make the flavor more potent. Once it was cooled I added it to my favorite buttercream base and added a little orange zest for good measure. I love the little flecks of orange zest you can see if you look close. 

champagne cake with orange buttercream
sugar and sparrow champagne cake alcohol free

The citrus and champagne flavors go so well together and I could absolutely see this mimosa cake served at a fancy brunch, bridal shower, or birthday celebration. It’s classy, easy to whip up, and completely zero-proof so you never have to worry about serving it to kids or those abstaining from alcohol. Your friends who do drink will also be amazed! 

Amoretti champagne mimosa cake recipe

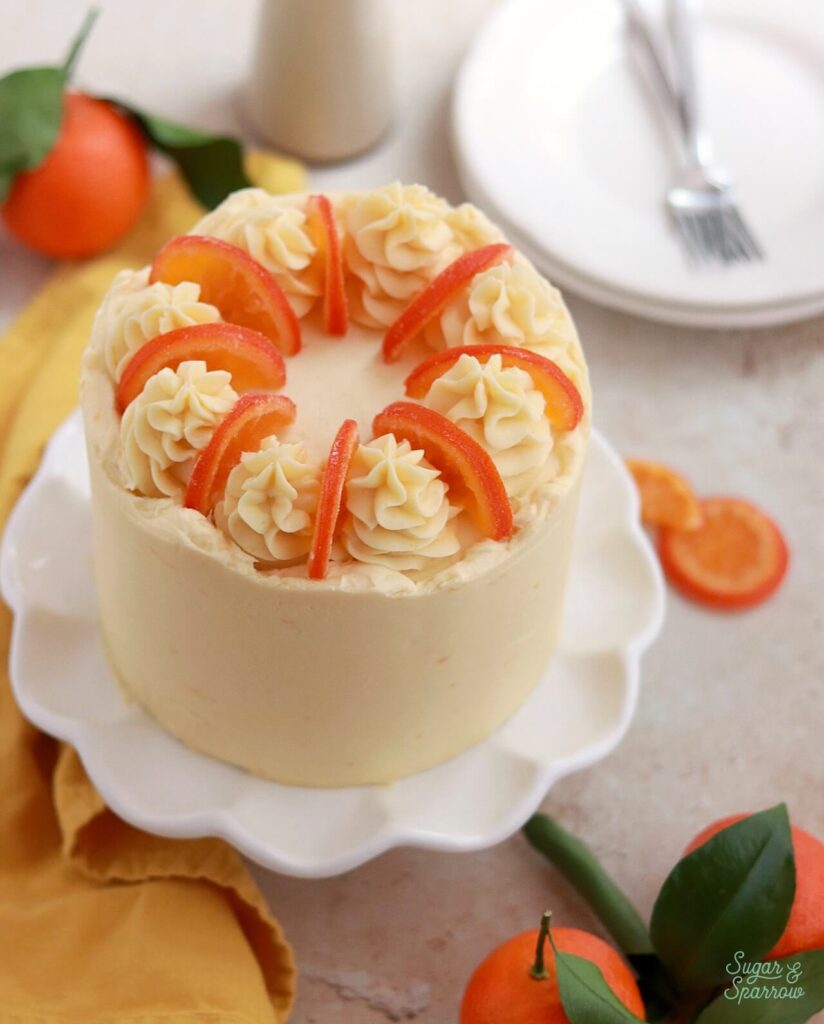
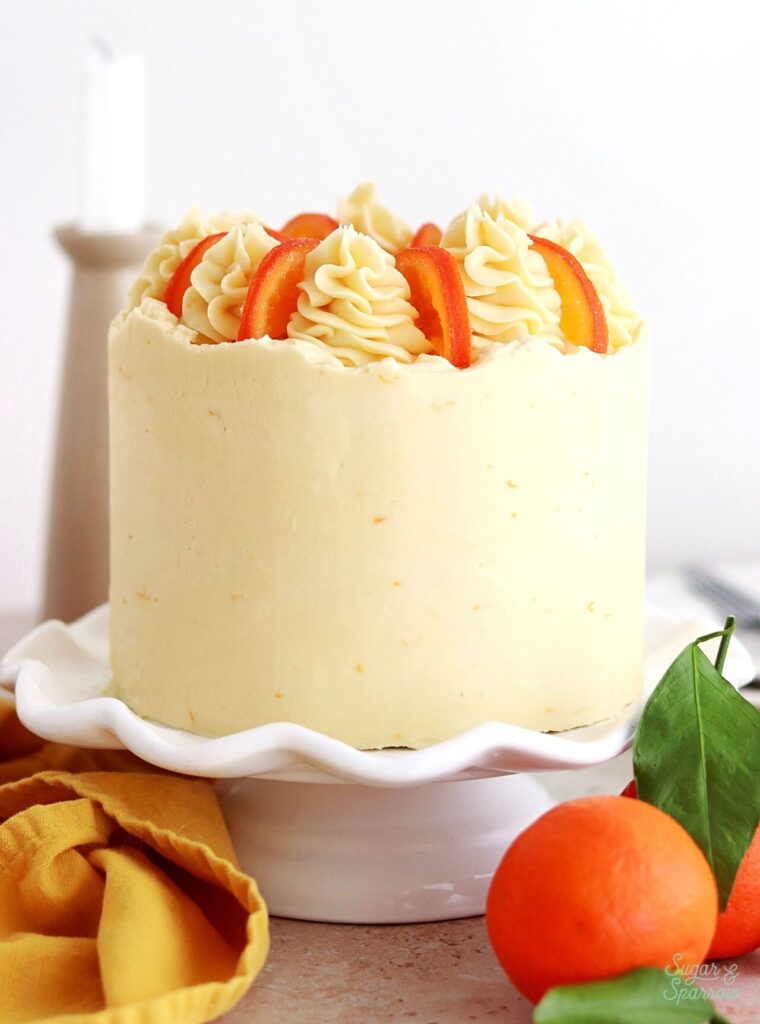
I decorated this cake with a smooth buttercream finish to let the orange zest flecks stand out, a raw edge to keep things rustic, a dainty swirl border with Wilton Tip 2D, and candied orange slices (cut in halves). You can find candied orange slices sometimes at your local grocery store, but I chose to make mine from scratch with one mandarin orange. I had to make them several hours ahead of time, but the process made my house smell like a citrus grove and they ended up looking so pretty on the cake! The instructions are in the recipe below if you want to make them.  

champagne layer cake recipe with orange buttercream
champagne mimosa cake recipe by sugar and sparrow

If you are interested in making more champagne-flavored things, Amoretti’s Champagne Compound can be added to all sorts of bakes (or no-bakes). You can easily create champagne flavored buttercream frosting, ice cream, cheesecakes, cream fillings, and more just by adding a little at a time until the desired flavor is reached. It’s made from natural ingredients and super concentrated so you don’t have to use a lot. Plus it’s shelf-stable even after opening the bottle, so you can use it whenever you feel like instead of having to worry about a fast approaching expiration date.

PS you can get FREE SHIPPING on any order at Amoretti with my promo code: SPARROWCOFREESHIP

champagne mimosa cake recipe

Champagne Mimosa Cake

Deliciously soft champagne cake layers paired beautifully with orange buttercream to create the cake version of the classic mimosa cocktail. Made without any alcohol thanks to Amoretti Champagne Compound.
Print Recipe Pin Recipe
Prep Time:35 minutes mins
Cook Time:30 minutes mins
Servings: 15 slices

Ingredients

Champagne Cake

  • 2 3/4 Cups (290g) sifted cake flour*
  • 2 tsp baking powder
  • 1/2 tsp baking soda
  • 1 tsp salt
  • 3/4 Cup (170g) unsalted butter, room temperature
  • 1 1/2 Cups (300g) granulated sugar
  • 2 large eggs + 2 large egg whites, room temperature
  • 1/2 Cup (120g) sour cream, room temperature
  • 3 Tbsp Amoretti Champagne Compound
  • 1/2 tsp pure vanilla extract
  • 1 Cup (240g) whole milk, room temperature

Orange Juice Reduction

  • 3/4 Cup (180ml) orange juice

Orange Buttercream

  • 1 1/2 Cups (339g) unsalted butter, room temperature
  • 5 1/4 Cups (630g) powdered sugar
  • 1/4 Cup (60ml) orange juice reduction, room temperature
  • 2 tsp orange zest from one mandarin or other small orange
  • 1 tsp pure vanilla extract
  • 2 Tbsp whole milk, room temperature
  • pinch of salt, or to taste

Garnish

  • 6 candied orange slices** recipe in notes

Instructions

Make the Champagne Cake

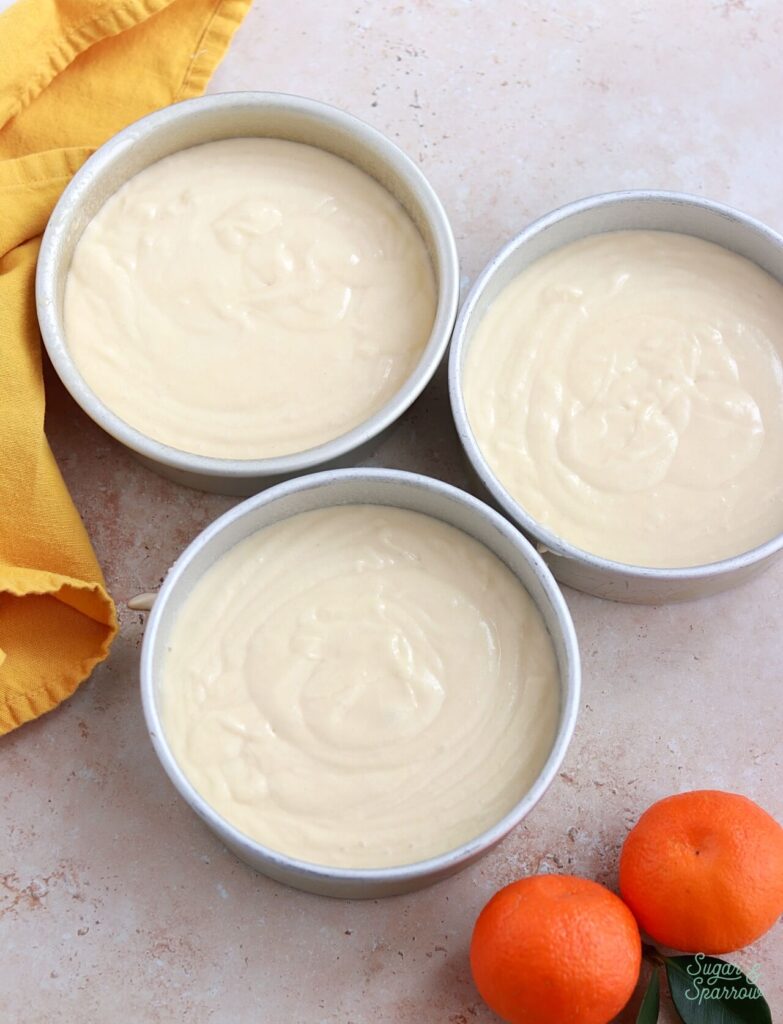
  • Preheat the oven to 350°F. Prepare three 6-inch or two 8-inch cake pans by spraying the sides with baking spray and fitting a parchment paper circle to the bottom of the pan.
  • Add the sifted cake flour, baking powder, baking soda, and salt into a bowl and whisk to combine. Set aside.
  • In the bowl of your stand mixer (a handheld mixer works fine too!), beat the butter on high for two minutes until it's light and creamy. Add in the sugar and continue to mix on medium-high for another two minutes. Turn the mixer to low and add the eggs and egg whites, one at a time, mixing until just combined and scraping down the bowl and paddle as needed. Add the Amoretti Champagne Compound, vanilla, and sour cream, turn the mixer to high, and beat for one full minute. It will look curdled at this point, but don’t worry – it will become smooth cake batter at the end.
  • Add in the dry ingredients all at once and turn the mixer to low speed. Mix until just combined, then slowly pour in the milk. Continue to mix on low speed until just combined, about 30 seconds. Scrape down the sides and bottom of the bowl and give it a few stirs with a whisk to make sure there are no lumps. The batter will be slightly thick.
  • Pour the batter evenly into the prepared cake pans and bake for 30-35 minutes. They're done when they spring back to the touch and a toothpick inserted into the middle comes out clean. Let the cakes cool in the pan for five minutes before turning them out onto a wire rack for an additional few hours of cooling. Make sure they're entirely room temperature before applying any frosting.

Make the Orange Juice Reduction

  • Pour the orange juice into a small saucepan set over medium heat. Cook, stirring frequently, for 15-20 minutes or until the orange juice has reduced to about ¼ Cup. Pour the reduced orange juice into an airtight container and place it into the refrigerator to cool to room temperature before moving on with the recipe.

Make the Orange Buttercream

  • With a hand mixer or paddle attachment on your stand mixer, cream the butter on medium-high until it’s creamy and light in color, about 5 minutes.
  • Add the sifted powdered sugar a few cups at a time and mix on low speed, scraping down the bowl and paddle after each addition.
  • Add the orange juice reduction, orange zest, vanilla, milk, and salt and mix on low for another minute until fully incorporated.

Assembly

  • Once the champagne cakes are completely cooled, level them to your desired height. Add a swipe of orange buttercream onto a cardboard cake circle and place the first cake layer on top. Fill and stack the cake with orange buttercream. Crumb coat the cake with orange buttercream, then place it in the refrigerator for at least 30 minutes to let the buttercream set firm.
  • To create the design pictured, frost a smooth buttercream finish onto the cake with orange buttercream but keep the top edge raw, meaning don’t swipe it inward to create sharp edges. Fit a piping bag with Wilton Tip 2D and pipe swirls on top of the cake. Slice the candied oranges in half and place them in between each swirl.

Notes

*DIY Cake Flour Recipe: To make your own cake flour, spoon and level one cup of all-purpose flour and remove 2 Tbsp. Add 2 Tbsp of cornstarch. Repeat per the amount of cake flour you need, then sift the flour and cornstarch mixture 4 times (don’t skip that step!). After sifting, spoon and level to re-measure the amount of cake flour you need. 
Candied Orange Slices: you can find these at some grocery stores but I made mine from scratch using this recipe and one mandarin orange: https://www.poetryandpies.com/home/candied-orange-slices
Make Ahead Tips:
  1. The champagne cakes can be baked, cooled, wrapped in plastic wrap, and left out at room temperature up to two days ahead of decorating. Unfrosted cake layers can be wrapped tightly in plastic wrap and stored in the freezer for up to two months before thawing and frosting. 
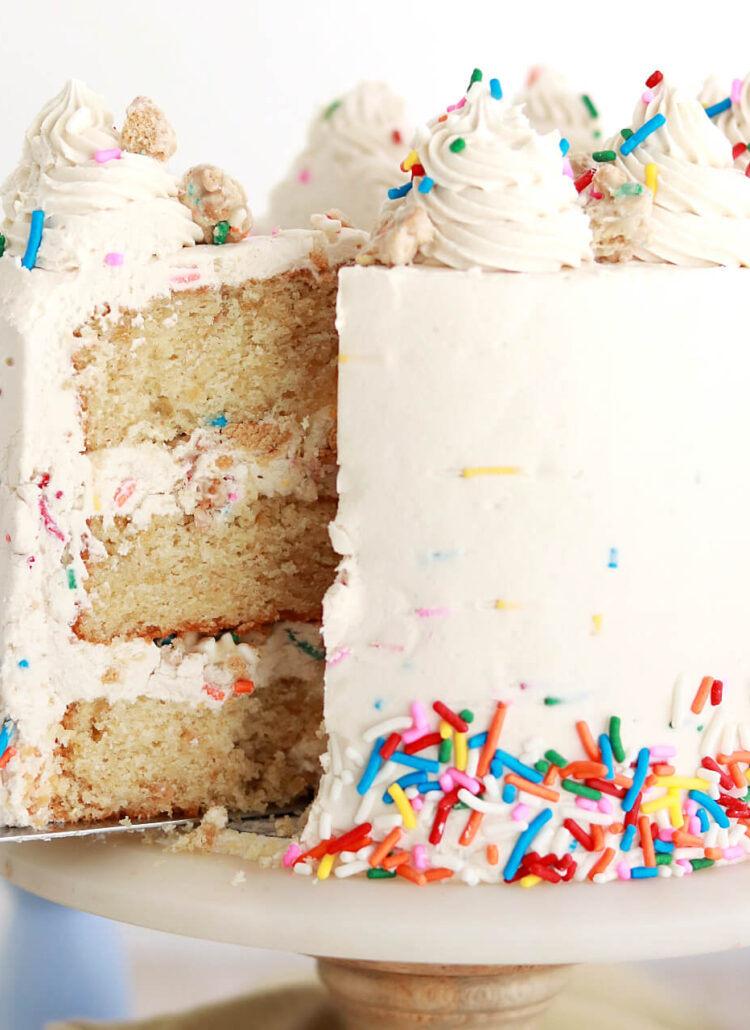
  2. The orange buttercream can be made ahead and stored in an airtight container in the refrigerator for up to two weeks. When you’re ready to use it, bring it back to room temperature and re-whip in your stand mixer to bring back to smooth buttercream consistency, then fold in the sprinkles.

Disclaimer: I was compensated by Amoretti for my work of creating this project, styling, filming, photographing, and writing about their products. As always, all opinions are honest and my own. Thank you for supporting brands that support Sugar & Sparrow.

By: Whitney · In: Cake, Featured, Recipes · Tagged: amoretti, champagne cake, champagne compound, champagne mimosa cake

you’ll also love

Dunkaroos layer cake with sprinkle buttercream recipeDunkaroos Layer Cake Recipe (feat. Amoretti)
birthday ice cream cake recipe with cake batter ice cream, brownies, and hot fudgeThe Ultimate Birthday Ice Cream Cake
cotton candy layer cake recipeWhimsical Cotton Candy Cake Recipe

Join the List

Stay up to date & receive the latest posts in your inbox.

Reader Interactions

Comments

  1. Ingrid Perez says

    May 20, 2024 at 8:18 pm

    Can this recipe be made into cupcakes?

    Reply
    • Whitney says

      May 22, 2024 at 10:48 am

      Hi Ingrid! Yes. To make this recipe as cupcakes, fill the tins no more than 2/3 full and bake at 350F for 15-18 min. Enjoy!

      Reply
  2. Tony says

    March 9, 2024 at 2:11 pm

    May I ask what size pans are you using?

    Reply
    • Whitney says

      March 11, 2024 at 10:51 am

      Hi Tony! I used three 6×2 inch pans for this cake.

      Reply
  3. Julie says

    March 2, 2024 at 9:37 am

    I would love to try this, it looks delicious but the champagne compound is $46! I can’t afford it.

    Reply

Leave a Reply Cancel reply

Your email address will not be published. Required fields are marked *

Recipe Rating


Next Post >

Small Batch Vanilla Cake

Primary Sidebar

Welcome to Sugar & Sparrow

Welcome to Sugar & Sparrow

Helping you whip up pretty desserts with confidence and creativity. And hopefully sharing a few laughs with you along the way!

Learn More

Connect

let’s bake!

Get my very best recipes, baking tips, and decorating tutorials sent to your inbox

Featured Posts

millionaire's cake recipe from scratch

Millionaire Cake (Inspired by Disney World)

london fog cupcake recipe with earl grey tea

London Fog Cupcakes

eggless chocolate birthday cake recipe by sugar and sparrow

Eggless Chocolate Cake Recipe (Can Be Made Vegan!)

Search

Archives

Follow Along

@sugarandsparrowco

RASPBERRY CAKE FILLING (recipe below) ♥️ this RASPBERRY CAKE FILLING (recipe below) ♥️ this perfectly sweet/tart raspberry cake filling is beautifully thick, seedless, and so rewarding to make from scratch! It takes just a handful of ingredients and can be made with fresh OR frozen raspberries 🙌🏼 

Get the full recipe + cake pairing suggestions at the link in my bio or at https://sugarandsparrow.com/seedless-raspberry-cake-filling/

INGREDIENTS:
2 1/2 Cups (10oz, 315g) fresh or frozen raspberries
1/2 Cup (100g) granulated sugar
1 Tbsp lemon juice
1 tsp lemon zest
1 1/2 Tbsp (12g) cornstarch
1 1/2 Tbsp (22ml) water

INSTRUCTIONS: 
1. In a saucepan set over medium heat, add the raspberries, granulated sugar, lemon juice, and lemon zest. Cook until the mixture begins to boil, stirring occasionally. 
2. Once boiling, lower the heat and simmer for 10-15 minutes while you continue stirring occasionally. Then, remove from heat and use a fine mesh sieve to strain out the seeds over a medium bowl. After straining, you’ll be left with about 1/4 Cup of seedy pulp.
3. In a small separate bowl, combine the cornstarch and water until uniform. Return the strained raspberry filling to the saucepan (wipe it free of any remaining seeds if needed) and add the cornstarch/water mixture. Cook over medium heat until boiling, stirring constantly, then reduce to a simmer and cook for 1-3 minutes, until the filling has thickened slightly, is no longer cloudy, and coats the back of the spatula.
4. Pour into an airtight container and refrigerate for at least 4 hours and up to 1 week. It will be jello-like once set but after stirring it will become a thick, jammy consistency that’s perfect to use as a cake or cupcake filling!

#raspberrycake #cakefilling #cakedecorating #raspberries #baking
STRAWBERRY LEMON CAKE 🍓🍋 this cake is so lig STRAWBERRY LEMON CAKE 🍓🍋 this cake is so light and refreshing and bursting with all-natural flavors! It’s layers of my favorite extra fluffy lemon cake + the most delicious freeze-dried strawberry buttercream that ends up the prettiest natural pink color. I’ll never get over those little flecks of strawberry in the buttercream or the tiny chamomile flowers adding so much cheer! 

Grab the recipe at the link in my bio or at https://sugarandsparrow.com/strawberry-lemon-cake/

#strawberrylemon #lemoncake #strawberrycake #cakedecorating #strawberrybuttercream
CHOCOLATE SHEET CAKE (recipe below) 🍫 🥳 this CHOCOLATE SHEET CAKE (recipe below) 🍫 🥳 this is everything I want in a chocolate cake: rich and decadent, stick-to-your-fork fudgy, ultra-chocolatey, shareable, and EASY! Like box mix easy but from-scratch and a MUST try if you’re in need of a good chocolate cake recipe to feed a crowd👩🏽‍🍳⁣ 
 
Get the full recipe (with chocolate frosting) at the link in my bio or at https://sugarandsparrow.com/chocolate-sheet-cake/ ✨⁣ 
⁣ 
CHOCOLATE SHEET CAKE
2 Cups (265g) all purpose flour⁣ 
1 2/3 Cups (340g) white granulated sugar⁣ 
2/3 Cup (60g) unsweetened natural cocoa powder⁣ 
2 tsp baking soda⁣ 
1 tsp baking powder⁣ 
1/2 tsp kosher salt⁣ 
1/2 Cup (120ml) vegetable oil⁣ 
2 eggs, room temperature⁣ 
1 1/2 tsp pure vanilla extract⁣ 
1 Cup (240ml) full-fat buttermilk⁣ 
1 Cup (240ml) hot coffee OR hot water⁣ 
⁣ 
INSTRUCTIONS⁣ 
1. Preheat the oven to 325ºF. Grease and line a 9x13 inch cake pan. ⁣ 
2. Place all of the dry ingredients into the bowl of a stand mixer (or use a large bowl with a hand mixer) and mix on low to combine. Add the vegetable oil, eggs, vanilla, and buttermilk and mix on low until combined. With the mixer still on low, add the hot coffee or hot water in a slow stream, then turn the mixer to medium and beat until smooth, about 2 minutes. The batter will be very thin. ⁣ 
3. Pour the batter into the prepared pan and bake for 35-40 minutes, until a toothpick inserted comes out clean.⁣ Full recipe (with frosting) link in my bio.
⁣ 
#chocolatecake #chocolate #sheetcake #chocolatelover #birthdaycake
VANILLA RASPBERRY LAYER CAKE ♥️ between the na VANILLA RASPBERRY LAYER CAKE ♥️ between the naturally pink raspberry buttercream, jammy homemade raspberry filling, and soft vanilla cake layers, this is the perfect cake for Spring!! It’s has amazing, authentic raspberry flavor in every bite from fresh (or frozen) raspberries in the filling + freeze-dried raspberries in the frosting 😋

Get the full recipe link in my bio or find it at https://sugarandsparrow.com/vanilla-raspberry-layer-cake/ 

#raspberrycake #raspberries #vanillacake #cakedecorating #pinkcake
SMALL BATCH VANILLA CAKE 🎂🥳 this mini vanill SMALL BATCH VANILLA CAKE 🎂🥳 this mini vanilla cake recipe makes the PERFECT amount for 2-4 people and can be baked as a tiny 4-inch layer cake or a single layer 6-inch cake. It goes with any frosting flavor but vanilla buttercream keeps it classic for date night, a small gathering, a smash cake, or satisfying a cake craving. 
⁣
✨Full recipe (with frosting) linked in my bio + at https://sugarandsparrow.com/small-batch-vanilla-cake/ 
⁣⁣⁣⁣
SMALL BATCH VANILLA CAKE⁣⁣⁣⁣
⁣⁣⁣⁣
INGREDIENTS⁣⁣⁣⁣
3/4 Cups (79g) sifted cake flour⁣⁣⁣
1 tsp baking powder⁣⁣⁣
1/4 tsp salt⁣⁣⁣
1/4 Cup (57g) unsalted butter, room temperature⁣⁣⁣
1/2 Cup (100g) granulated sugar⁣⁣⁣
1 large egg, room temperature⁣⁣⁣
2 Tbsp (30g) sour cream, room temperature⁣⁣⁣
1 tsp pure vanilla extract⁣⁣⁣
1/3 Cup (80ml) whole milk, room temperature⁣⁣⁣
⁣⁣⁣⁣
INSTRUCTIONS ⁣⁣⁣⁣
1. Preheat the oven to 350ºF. Grease and line three 4-inch or one 6-inch cake pan.⁣⁣⁣
2. In the bowl of your stand mixer (a handheld mixer works fine too!), cream together the butter and sugar on medium-high until light and fluffy, 3 min. Turn the mixer to low and add the egg, mixing until just combined. Add the vanilla and sour cream, turn the mixer to high, and beat for 1 min. ⁣⁣⁣
3. Turn the mixer to low speed and add the dry ingredients all at once. Mix until just combined, then slowly pour in the milk. Continue to mix on low speed until just combined, about 30 seconds. ⁣⁣⁣
4. Pour the batter evenly between the prepared cake 4-inch pans (or all into one 6-inch cake pan). If using 4-inch cake pans, bake for 18-22 minutes. If using a 6-inch cake pan bake for 24-28 minutes. The cake is done when it springs back to the touch and a toothpick inserted comes out with a few moist crumbs. ⁣⁣⁣
⁣⁣⁣⁣
#vanillacake #cakes #vanilla #minicake #cakedecorating

Footer

On the Blog

  • Cake Basics
  • Recipes
  • Tutorials

Info

  • About
  • Privacy Policy & Disclosure

stay in the know

Copyright © 2026 · Theme by Sugar & Sparrow