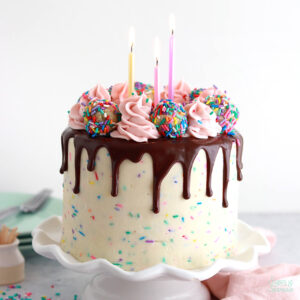
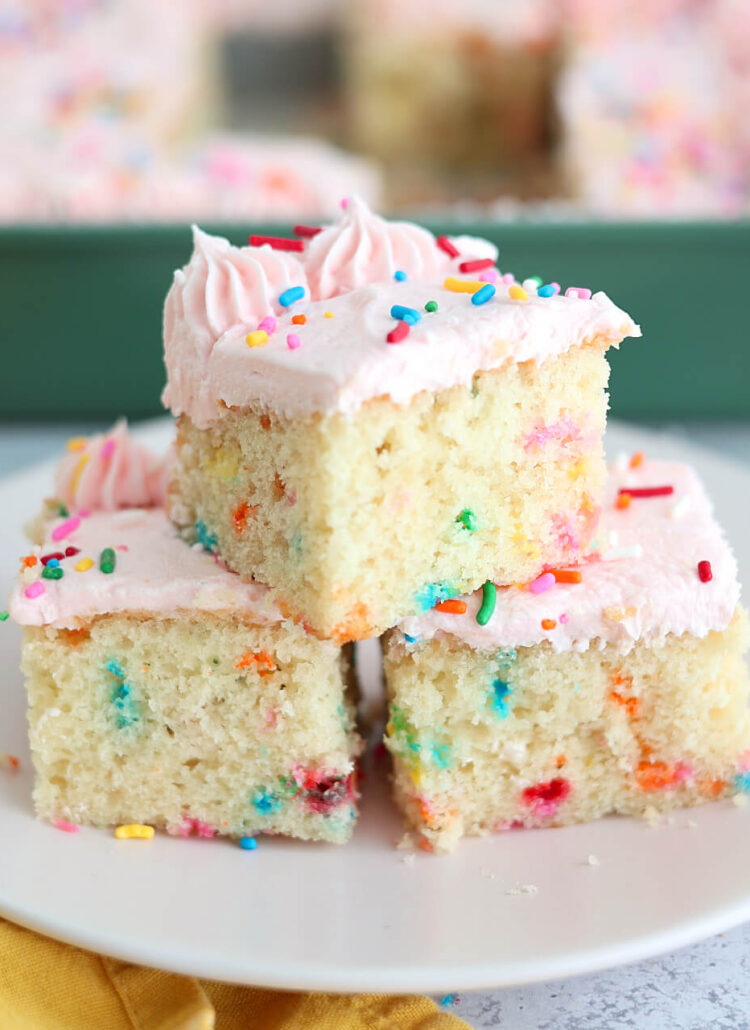
Like many cake makers do, I made my own birthday cake this year! I actually do this as a tradition every year but normally fail to document it in a blog post. This year, all I wanted was sprinkle everything with a splash of chocolate, so I made a double funfetti cake with a little chocolate ganache thrown in the mix. By double funfetti I mean funfetti cake + funfetti buttercream and there is nothing more celebratory than that combo!

This cake starts with my favorite funfetti cake recipe, which I revised for my book to yield a 3-layer 6-inch cake (this blog version yields a larger cake). The ingredients in the book version are tweaked ever so slightly to include a little almond extract and egg whites to make the cake even more light and fluffy. I’ve included the recipe below, and it’s just one of many amazing layer cake recipes you’ll find in my book, which is now available worldwide wherever books are sold!

I made a double batch of my funfetti buttercream recipe for this cake, but reserved a few Cups of the plain vanilla buttercream before adding the sprinkles just so I could pipe some pretty pink swirls on top of the cake as a finishing touch. The funfetti buttercream is so easy to work with but it’s not the best for piping since the sprinkles tend to get stuck in piping tips. These Ultimate Unicorn Rainbow Jimmies by Sprinkle Pop are my favorite to use in the buttercream recipe and the cake recipe. They don’t bleed their color easily and I just love the cool-toned rainbow colors in the mix.

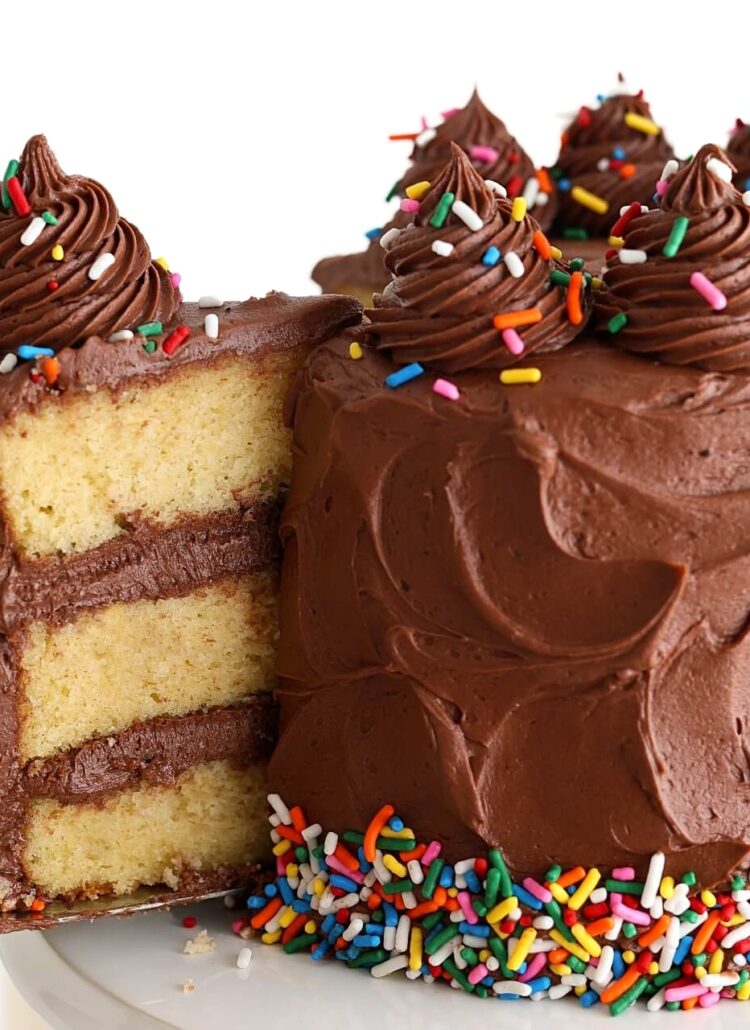
I added a little bit of chocolate ganache as filling between the cake layers and as a drip on top. My favorite way to make the ganache recipe work for both consistencies (thick for the filling and thin for the drip) is to make it a day (or at least a few hours) ahead of time and store it in an airtight container in the refrigerator. It will solidify as it cools, then you can microwave it in 5-10 second intervals to bring it back to a room temperature, peanut buttery consistency for the filling. When you’re finished filling the cake, you can microwave the leftover ganache a little more to make it slightly above room temperature, aka the perfect drip consistency.


Those cute little sprinkle truffles on top came from a last minute idea I had about how to recycle the cake scraps that were leftover from leveling the cake layers. I crumbled the cake tops in a bowl and mixed them together with funfetti frosting until the mixture stuck together enough to form balls when rolled between my hands. This is how you make cake pops, but instead of dipping the balls in melted chocolate, I rolled them in a bowl of sprinkles and then refrigerated the sprinkle cake truffles until I was ready to top the cake with them. They tasted AMAZING and looked so cute as cake toppers that I had to make them their own separate blog post.

I’m so excited to share this double funfetti birthday cake with friends and celebrate another trip around the sun. It’ll probably be my last hoorah before baby boy gets here in just a few weeks (give or take). We’re gonna end up being birthday buds and I can’t wait to make us both birthday cakes in the years to come!
Double Funfetti Birthday Cake
Ingredients
Funfetti Cake (from my book, Anyone Can Cake)
- 2 3/4 Cups (290g) sifted cake flour* DIY recipe in notes
- 2 tsp (10g) baking powder
- 1/2 tsp baking soda
- 1 tsp salt
- 3/4 Cup (170g) unsalted butter, room temperature
- 1 1/2 Cups (300g) granulated sugar
- 2 large eggs + 2 large egg whites, room temperature
- 1 tsp almond extract
- 2 tsp pure vanilla extract
- 1/2 Cup (120g) sour cream, room temperature
- 1 Cup (240ml) whole milk, room temperature
- 1/3 Cup (60g) rainbow sprinkles**, coated in 2 tsp cake flour
Funfetti Buttercream
- 2 Cups (452g) unsalted butter, room temperature
- 7 Cups (840g) powdered sugar
- 4 tsp pure vanilla extract
- 4 Tbsp whole milk, room temperature
- pinch of salt, or to taste
- 1/3 Cup (67g) rainbow sprinkles**
Optional Fillings & Toppings
- 1 batch chocolate ganache recipe link below
- 6 sprinkle cake truffles recipe link below
Instructions
Make the Funfetti Cake
- Preheat the oven to 350°F/177ºC. Prepare three 6-inch or two 8-inch cake pans by spraying the sides with a baking spray (Baker's Joy is my favorite) and fitting a wax or parchment paper circle to the bottom of the pan. Alternatively, you can grease and lightly flour the pans.
- Add the sifted cake flour, baking powder, baking soda, and salt into a medium bowl and whisk to combine. Set aside.
- In the bowl of your stand mixer (a handheld mixer works fine too!), cream the butter on high for 2 minutes. Add in the sugar and continue to beat on medium-high until light and fluffy (another 2 minutes), scraping down the bowl and paddle as needed. With the mixer on low speed, add the eggs and egg whites one at a time. Add the vanilla extract, almond extract, and sour cream. Mix for one minute on high speed, scraping down the bowl and paddle once more.
- Turn the mixer off and add in the dry ingredients all at once. Mix on low speed until just combined, then slowly pour in the milk while continuing to mix on low until incorporated, about 1 minute. Scrape down the sides and bottom of the bowl and give it a few stirs to make sure there are no lumps. The batter will be slightly thick.
- Gently fold the flour-coated rainbow sprinkles into the cake batter by hand, then divide evenly between the prepared cake pans and bake for 32-36 minutes, or until a toothpick inserted comes out clean. Let the cakes cool in the pan for five minutes before turning them out onto a wire rack for an additional few hours of cooling. Make sure they’re entirely room temperature before applying any frosting.
Make the Funfetti Buttercream
- With a hand mixer or stand mixer fitted with the paddle attachment, cream the butter on high until creamy and light (almost white) in color, about 7 minutes.
- Turn the mixer to low speed and add the powdered sugar a few cups at a time, scraping down the bowl and paddle after each addition and making sure each is fully incorporated before adding the next one.
- Add the vanilla, milk, and salt and mix on low for another minute until fully incorporated and smooth. Reserve 1 1/2 Cups of frosting if you plan on doing any piping on top of the cake at this point. Fold in the rainbow sprinkles to the rest of the buttercream with a rubber spatula.
Make the Chocolate Ganache (Optional)
- If you're planning on filling and dripping the cake with chocolate ganache (like the one pictured), make one batch of this chocolate ganache. You can half the recipe if you're only wanting to use it for the drip.
Assembly
- Once the funfetti cakes are completely cooled, level them to your desired height. If you're planning on making the sprinkle cake truffles, reserve some of the cake scraps from the leveling process in a small bowl and make them according to this recipe.
- Add a swipe of funfetti buttercream onto a cardboard cake circle and place the first cake layer on top. Fill and stack the cake with funfetti buttercream. If you want to add chocolate ganache between the layers like the cake pictured, make sure the ganache is room temperature or slightly below (peanut butter-ish consistency) and use the Soft Fillings method of filling and stacking from this blog post. Crumb coat the cake with funfetti buttercream, then place it in the refrigerator for at least 30 minutes to let the buttercream set firm.
- To create the design pictured, frost a smooth buttercream finish onto the cake with funfetti buttercream and place it back into the refrigerator for an additional 20 minutes to chill the buttercream while you heat the chocolate ganache to perfect drip consistency. Drip the cake with the chocolate ganache and place it back into the refrigerator for 5 minutes to let it set.
- If piping the top of the cake, color the reserved buttercream any color you'd like. I used one small drop of AmeriColor Deep Pink. Fit a piping bag with Wilton Tip 1M and pipe 6 swirls on top of the cake, spaced about 1 inch apart. Fill in each gap with a sprinkle cake truffle.
Notes
- The funfetti cakes can be baked, cooled, wrapped in plastic wrap, and left out at room temperature up to two days ahead of decorating. Unfrosted cake layers can be wrapped tightly in plastic wrap and stored in the freezer for up to two months before thawing and frosting.
- For best results, reserve adding the sprinkles to the funfetti buttercream until right before you’re ready to decorate with it. The buttercream (sans sprinkles) can be made ahead and stored in an airtight container in the refrigerator for up to two weeks. When you’re ready to use it, bring it back to room temperature and re-whip in your stand mixer to bring back to smooth buttercream consistency, then fold in the sprinkles.


I love it so far! I have everything baked/prepped, I just have to put it all together. How far ahead can the cake be assembled? Once the icing is added, does it need to be refrigerated? Can I assemble it the day before and leave it out at room temperature?
Hi Jake! I’m glad you’re loving this recipe so far! You can absolutely assemble the day before and leave it at room temperature. This particular frosted cake doesn’t need to be refrigerated (although I often do refrigerate my cakes and bring them back to room temp for serving). Here’s a helpful post about making cakes ahead (including a sample cake timeline) if you need it in the future: https://sugarandsparrow.com/making-cakes-ahead/
How long would I bake this cake for a 9×13 pan?
Hi Anna! I haven’t tried this in a 9×13 pan yet (it’s on my testing list!) but I would check for doneness around 30 minutes and add time from there if needed.
My daughter is so excited for me to make this a second time. We love it and it is so beautiful. The first time I made it my family thought it was too sweet for us. I was wondering if I didn’t level the confection ate sugar well, but I really didn’t eat but a tiny bit of the icing. I think it is the cake part though and not the icing. It was super dense and very sweet. Again, we all chose to eat a small sliver at a time because it was that good. My question is, is there something you suggest me substituting or another super similar receipe for those that can’t handle it this sweet. The icing, ganache, sprinkles, and design are so perfect, so we really want to duplicate this again for her birthday. Thank you for all of your tips. I love your site!
Hi Katie! I’m glad you still enjoyed a small sliver each 🙂 The cake has a pretty standard amount of sugar in it, but if you want to try reducing it by 1/4 Cup it shouldn’t affect the texture too much. Sugar not only sweetens a cake but helps soften the crumb, so if you reduce it too much the texture will be off. You can reduce the amount of powdered sugar in the frosting more easily. Try cutting back by 1/2 to 3/4 Cup and be sure to cut back on the liquid a little as well, since the powdered sugar helps thicken the frosting. Another suggestion would be to make a swiss meringue buttercream to go with this cake! It’s not nearly as sweet as an American buttercream like this and you can fold sprinkles in at the end. Here’s my swiss meringue buttercream recipe: https://sugarandsparrow.com/swiss-meringue-buttercream/
If I prepare and assemble the cake, can it be left out at room temperature for a few hours? Or do I need to worry about the funfetti buttercream bleeding color? Thank you!
Hi Keri! You can absolutely leave the cake out. The funfetti buttercream won’t bleed color.
Can I use the egg whites from a carton, if not how many whole eggs should I use instead? Thank you
Hi Laura! Yes, you can use eggwhites from the carton. Enjoy!
I only want to make a two layer 6 inch cake, could I cut this recipe in half to fill two 6 inch pans?
Hi Brittni! For two 6-inch layers, you could scale the recipe down by 2/3 to have the perfect amount of batter. You can copy/paste the ingredients list into a recipe scale calculator like this one (choose the “two thirds” option): https://www.inchcalculator.com/recipe-scale-conversion-calculator/
Hi! I was wondering if I’m not able to bake all three layers at one time, would it be OK for the cake batter to be covered and left on the counter while I’m waiting for the layers that I have baking in the oven to finish? Thank you!
Hi Chelsea! Yes, the batter can stay out while you bake the other layers. That said, you might want to divide the sprinkles into 3 portions and fold them into each individual layer instead of adding the sprinkles into the whole batch of batter. The sprinkles will most likely start to bleed color if they’re left in the batter. Hope that makes sense!
Thank you for this fantastic website and your recipes. You have kicked my cake-making back into full gear! I have a question: I can not use almond extract; can I do 3 tsp of vanilla instead?
Yay, Erica! I’m so happy to hear that! And yes, you can absolutely do 3 tsp vanilla and omit the almond extract
Thank you for all the amazing recipes here! It’s really nice to have a go website that I can always trust. I hope to achieve at least one cake done right in my life
Maybe today will be the day!
Thank you so much for everything! It’s nice to have a recipe/ website I can trust:)
This cake sounds absolutely amazing!!! I am looking forward to make it for a birthday party, however I have a few questions. I would like to make a mini version, like 4″ or 3″. In this case should I make just half portion? Also, for the buttercream, I am wondering if 7 cups are not too much? It doesn’t turn out in a very sweet cream in this case? I don’t want to be super sweet, I want a less sweet version.
Hi Laura! Your comment comes at the perfect time because I just posted a recipe for a small batch funfetti cake: https://sugarandsparrow.com/small-batch-funfetti-cake/ it makes a 3 layer 4-inch cake! And for the buttercream, you can play around with reducing the amount of sugar. The less you add, the thinner the buttercream consistency though, so if you decrease the sugar you’ll want to decrease the amount of liquid (milk) you add as well.
Hi, I am going to do 3 8” layers… 1.5x the recipe… how many eggs/egg whites? Thank you…for the buttercream. Doing crumb coat filling, hombre, decorating, how much should I make?
Hi Whitney, I love this cake but need
To scale it up. I would like to make a 3 layer, 8” cake. Math would suggest I scale thing up by 1/2, but wanted to check if that is correct. Do you have a different method you would recommend?
Hi Kalen! You’ll want to make 1.5x the recipe to make a third 8″ cake. Here’s a post I wrote on how to do that easily: https://sugarandsparrow.com/how-to-scale-cake-recipes/