
For years, I’ve been seeing my Instagram caker friends post photos of metallic gold buttercream cakes. Like, really shiny ones. After doing a bit of research into how to get the look, I decided to order the Rolkem Super Gold luster dust and try my hand at it. I’ve seen a lot of cake makers use that mixed with a little vodka to paint their buttercream cakes for a flawless metallic look. Here’s the thing though, while I was absolutely blown away by the shiny gold finish, I realized that there has been a recall on Rolkem Super Gold because (the batch I ordered at least) contains high levels of copper, which is not the healthiest for consumption. It’s FDA approved in some countries, but not the USA, so I wondered if after swooning over this amazing gold finish I could actually find a comparable option that is FDA approved worldwide.
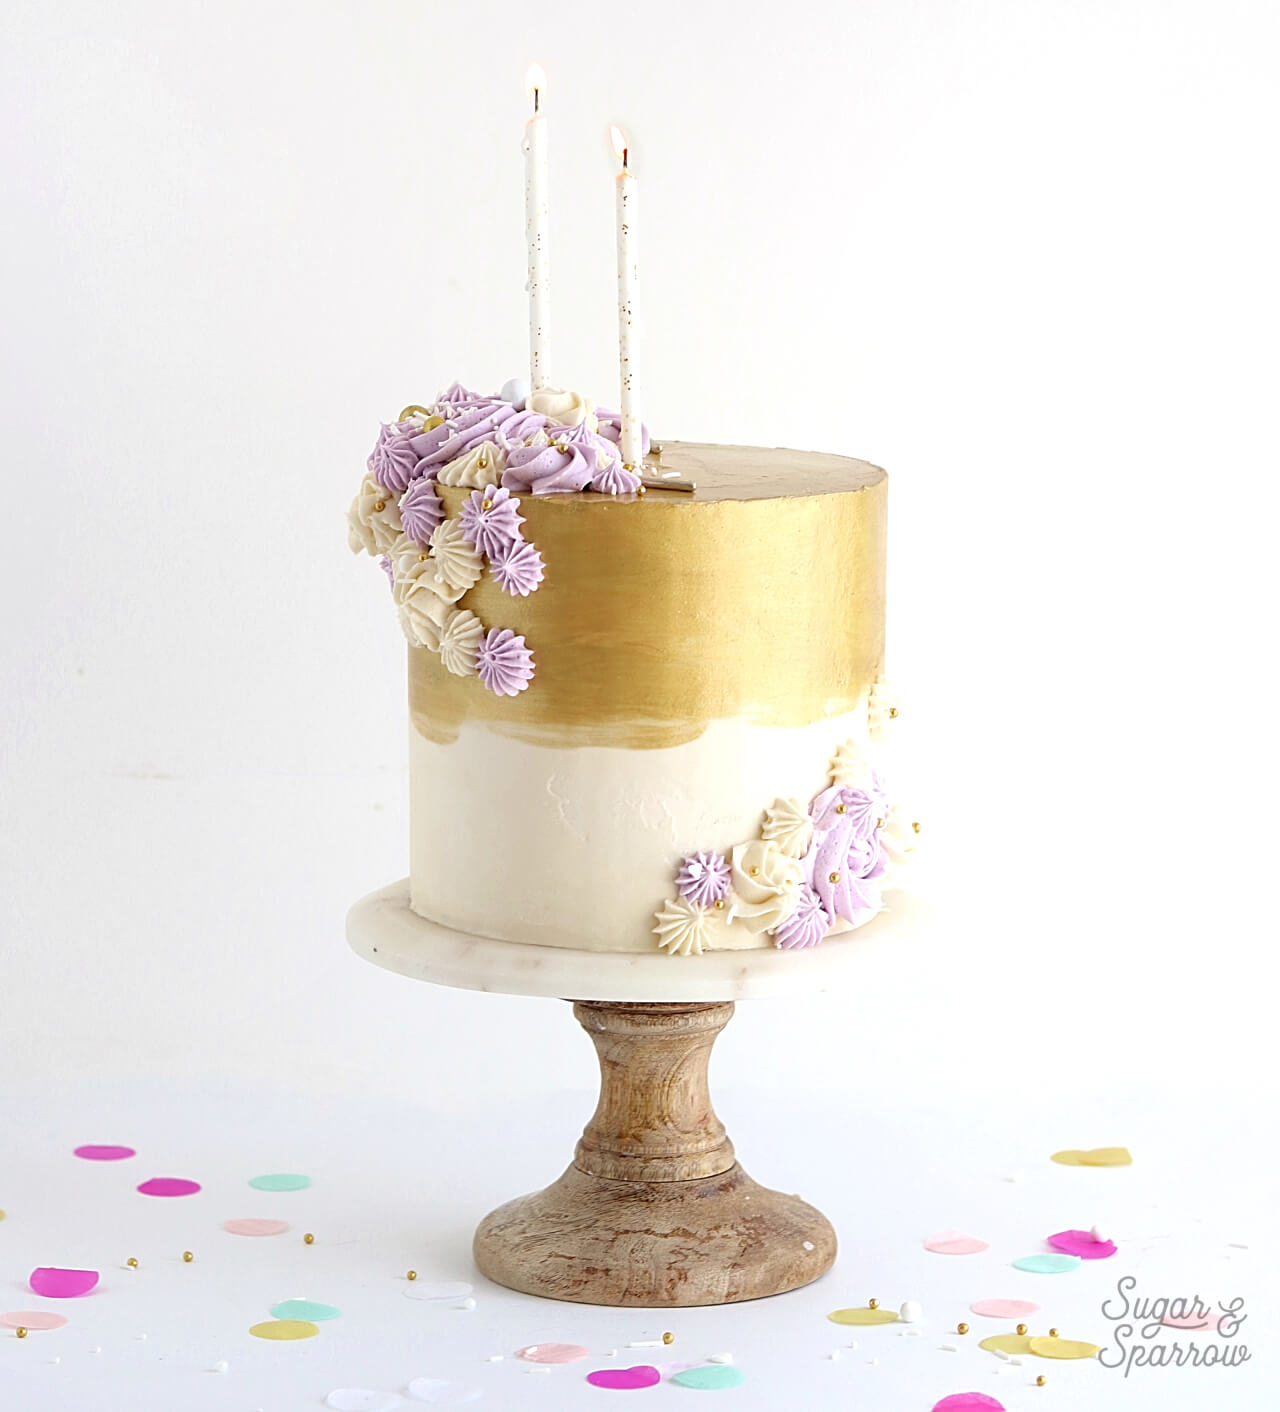
This wonderment sent me on a quest to find the best product for a perfect metallic buttercream finish: one that’s as shiny as Super Gold, as easy to paint with (aka I wouldn’t have to paint a million coats), and of course, one that is universally FDA approved for eating. After scouring the internet and reading countless reviews, I ordered three to try: King’s Gold by CK Products, Gold Pearl Dust by Wilton, and Glamorous Gold by Edible Art Paint. I made a little video to show you how they look in action:
Disclaimer: this post does contain some affiliate links, meaning I may receive a small commission if you click them and purchase items I’ve recommended. Using these links won’t cost you any extra money, but they do help to keep Sugar & Sparrow up and running. Thank you for your support!
Important Tips For Painting On Buttercream
Whether you’re painting a metallic finish or a non-metallic finish, it’s important to start with the right consistency of whatever you’re painting with, the right brush for the job, and a solid cake finish. All three of these things can make or break the final outcome. Here are my best tips for success:
First, to avoid messing up your final coat of buttercream, you must start with a well-chilled cake. After applying my final coat of buttercream, I place the cake in the refrigerator for a good 30 minutes or more, until the finish is hard to the touch.

Second, you need a good brush that won’t leave a ton of bristles in your paint job. This brush by Innovative Sugarworks is a great one, made specifically for cake decorating so you can rest assured that the bristles are made from high quality synthetic fibers and are safe for use with food. Your local craft store might have good brushes, but make sure they’re made with the right bristle fiber because a lot of paint brushes are made with animal hair. After all, the last thing you want is horse hair ending up on your cake!

And finally, you’ll need the right consistency of edible paint to get the look you’re going for and the best mixing solution to help the finish dry quickly. When working with luster dusts, you’ll need an alcohol solution to mix with so the liquid evaporates after you paint with it. Some cakers prefer vodka, but I always use grain alcohol to mix luster dusts with.
Grain alcohol can be found at your local liquor store (it’s also known as Everclear), and at 180 proof it has the highest alcohol content of any alcohol. The higher the alcohol content, the faster it will evaporate from your cake and leave you with that shiny gold finish you’re pining for. If you only have vodka or lemon extract on hand, those will work as well, they’ll just take longer to dry.
The Best FDA Approved Products For A Metallic Buttercream Finish
To my amazement, I ended up really liking all three of the products I tried for metallic finishes. There was one that stood out above the rest (read all about it below!) for color and ease of use, but all three will work depending on the color you need. Be sure to watch this video to see them all in action.

Glamorous Gold By Edible Art Paint
Rating: 10/10
Spoiler alert: this one was my absolute favorite of the three products I used. It comes in a bottle pre-mixed with the right amount of alcohol solution, so you don’t even have to worry about making that extra trip to the liquor store. Edible Art Paints come in all sorts of colors, metallic and non-metallic, and the Glamorous Gold was the perfect shimmery gold color I was after.
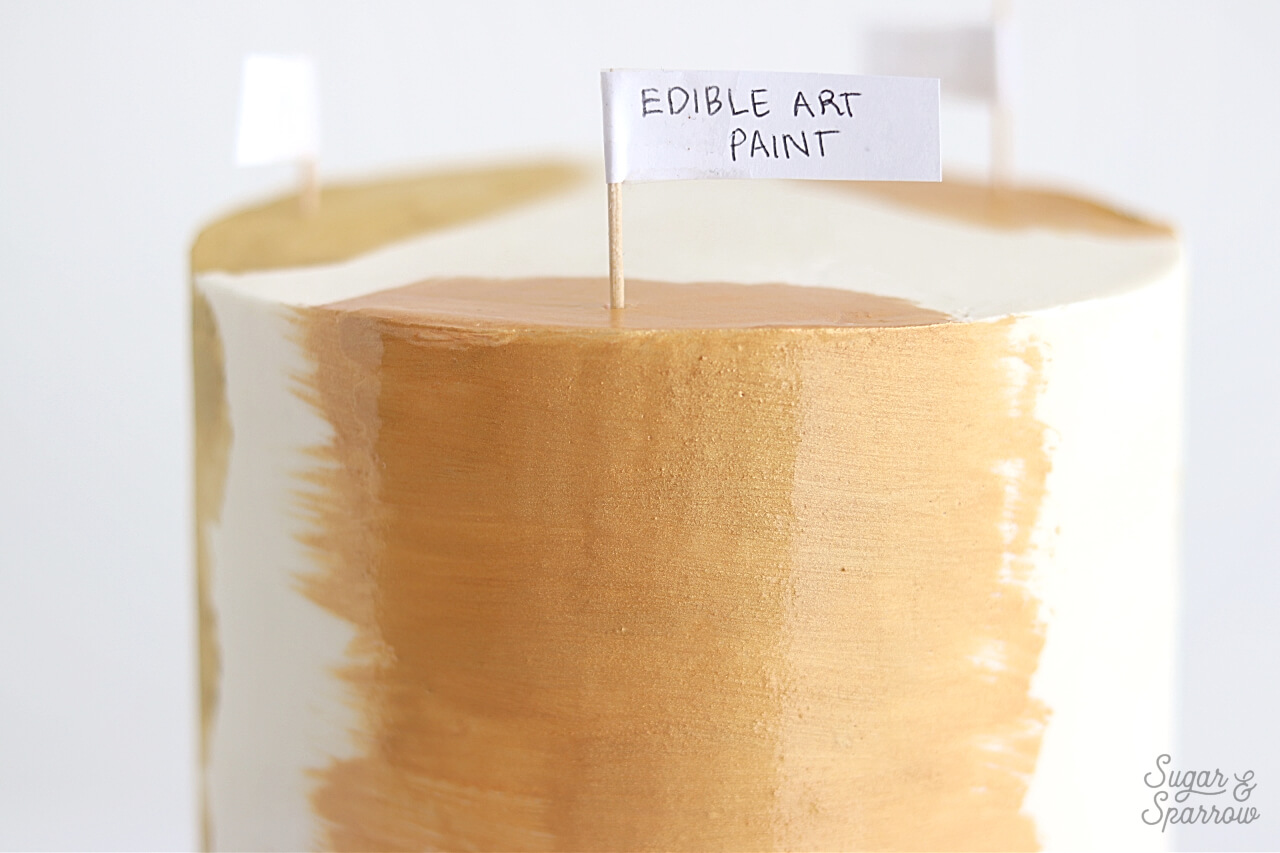
The finish dried in about ten minutes and I found that one coat was sufficient for applying to the cake. I was worried about it looking streaky, but after the first coat dried, it ended up looking really uniform.
King’s Gold by CK Products
Rating: 9/10
The King’s Gold by CK Products is a luster dust, so you will need to mix it with a solution like everclear (or vodka!) to make it paintable. After mixing it with everclear, the luster dust dissolved really well and ended up being a breeze to paint with. Here’s how it looked after one coat:
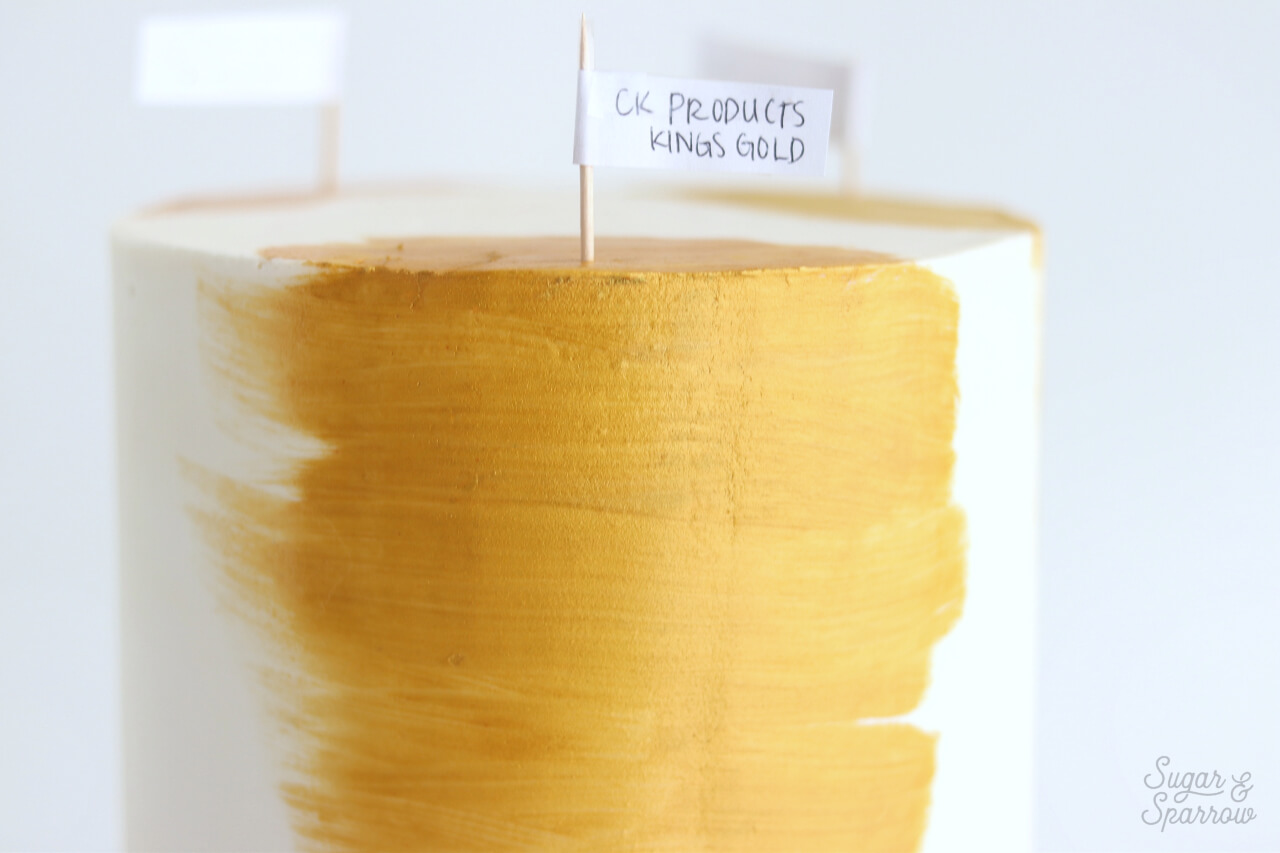
My reasoning for the lower rating is mainly because of the color and the semi-streakiness. King’s Gold was a bit vibrant for my liking, but they do make some other metallics that I would be interested in trying (there’s a Shiny Gold that looks a bit more like the color I was after). After painting a second coat, the streaks are diminished.
Gold Pearl Dust by Wilton
Rating: 7/10
The best thing about Gold Pearl Dust by Wilton is that it’s more commonly found at your local craft store. It’s a luster dust that you’ll need to mix with an alcohol solution to make it paintable, but I found that the dust didn’t dissolve as well as other luster dusts I’ve used, making it a little more grainy of a finish.

The color was also more of a champagne gold, and to my knowledge it’s the only gold metallic color option available from Wilton. If that’s the color you’re going for though, I’d totally recommend trying it. The finish ended up being shiny after two coats, although still a little streaky.
If you’re looking for the best metallic buttercream finish that’s FDA approved and edible, I would definitely recommend any of these three, my favorite being Edible Art Paint. Remember that any time you paint on buttercream, make sure you start with a well-chilled cake that’s firm to the touch. Let me know if you end up trying any of these recommendations in the comments below, or if you know of other FDA approved solutions that work well!



Hi Whitney!
I am planning to bake a cake with white IMBC, decorated with gold luster dust splattering, and gold & white sprinkles for my mum’s 50th birthday!
Can it be kept overnight in the fridge(not freezer)?
I will be serving it around 24hrs after decorating it. Is there any chance of bleeding considering I will be using vodka to mix in with the luster dust and will the sprinkles be affected?
Also, how early in time can I take it out of the fridge before serving, cause I live in a warm country?
Thank you so much!!!
Hi Shreeya! In my experience with splatter painting a vodka/luster dust mixture it has never run or bled. I would test it on a small part of the cake first though just to be sure. The sprinkles should be totally fine in the refrigerator as well (that’s how I store all my cakes!) I recommend taking the cake out of the refrigerator 1-2 hours before serving. Hope that helps!
Hey Whitney!
Thank you very much for your tip!
The cake turned out wonderful! Thankfully with no bleeding(phew!)
Thanks once again!!!
Yay, Shreeya! Thanks for following up!
Hi Whitney,
Do you think the edible art paint could be used on a stencil on chilled buttercream on the side of the cake? I’m concerned that the colour might be uneven or that the paint might drip onto the cake board.
Thanks!
Hi Heather! I’ve never tried that before but my hunch is that as long as the stencil is really flush with the buttercream it should work. I would search around to see if anyone else has tried it or do a test run if you can.
Hi Whitney, I am so in awe of this cake. I keep coming back to admire it. I am extremely new to cake decorating.
Can you tell me what food color, decorations and which number tips you used. And what kind of cake is under that beauty.
Any advice you can share with a novice would be appreciated. Thanks!
Hi Christine! I’m so happy you’ve decided to start cake decorating! It’s such a fun and challenging hobby 🙂 thanks for the kind words about this cake – it’s been awhile since I made this design so I don’t remember what kind of cake is underneath. Any of my cake recipes here would work great: https://sugarandsparrow.com/category/recipes/cake/ but if you’re looking for a classic vanilla cake to start with here is my fave: https://sugarandsparrow.com/vanilla-cake-recipe/. As for the design, I used a tiny bit of AmeriColor Regal Purple to get that pastel purple color and the piping tips are Wilton 1M (for the rosettes) and 4B (for the stars). These are the sprinkles I used: https://amzn.to/3sDzxN0 and these are the candles: https://amzn.to/3wduLI4 Hope that helps!
Thanks so much. Looking forward to making an attempt.
Sure it will take many tries before I can achieve something close to yours.
Thank you for responding.
Hi!
Thanks for reviewing these. I love the paints from Sweet Sticks as I’m a novice baker and they help me decorate with much more ease than the dusts which I seem to mix in the wrong proportions each time/over mix the amount that I need. I’m wondering if you have ever tried mixing any of the Sweet Sticks Edible Art paints that are not metallic together with one that is metallic i.e. the metallic vanilla bean colour with a non-metallic pink to make a metallic pink. I have a few of their non-metallic colours that I’d love to have some shimmer with in small areas (otherwise I’d just use a nice pearlescent shimmer dust over top) and wondered if it was worth getting a bottle of a metallic colour to mix with them. Obviously the dark pink or green I mix with the vanilla bean colour would end up a lighter pink or green.
Thanks!
Hi Kathryn! I’ve never tried mixing Sweet Stick colors together but I’m sure it would work. I saw on the Sweet Sticks FAQ section of their site that you can mix colors: https://sweetsticks.com.au/edible-paint-faq/#:~:text=Yes%20you%20can.,together%20to%20make%20your%20own.
Hi! I loved this tutorial!!
I put my cake back in the freezer overnight. When I took it out it sweat a lot. If I’m doing this for a wedding cake what do you suggest for storage overnight?
Hi Jenny! I’ve never tried putting a decorated cake in the freezer before, so I’m not sure if that is the main contributor to the condensation. I usually store my decorated cakes in the refrigerator right up until they need to be delivered. I’ve never had a problem with condensation, but I live in a very mild climate (the pacific northwest). If you live in a more humid area, you might need to take more preventative measures. Here’s a good article/video I found on the topic: https://wickedgoodies.com/2016/08/cake-condensation/#:~:text=Since%20condensation%20comes%20from%20the,the%20surface%20of%20the%20cake.
Extremely Helpful
Am trying it out on ABC..
I’ll share my outcome..
Hi Whitney.
Thank you very much for sharing your research with us!
Have you ever made gold drip from these products by mixing sugar and alcohol or something? I would like to paint a cake as well as drip. but I never made drip cake before so I would like to have your advice if that is possible please.
Hi Ellie! I have never made a gold drip before but I’ve heard that you can paint Edible Art Paint or luster dust mixed with alcohol onto a drip. I would do a little research to see what the best kind of drip would be for that. Hope that helps!
Do you know if you can use everclear with the Edible Art Paint in order to lighten the shade of the color, making it more like a watercolor?
I’ve never tried that before so I can’t say for sure but it seems like it could work.