• Cake
  • Frosting
  • YouTube
  • My Favorite Tools
  • Nav Social Icons

  • Skip to primary navigation
  • Skip to main content
  • Skip to primary sidebar
  • Skip to footer
  • Recipes
    • Cake
    • Cupcakes
    • Frosting
    • Ice Cream
    • Vegan
  • Cake Basics
  • Tutorials
  • Blog
  • About
  • Mobile Menu Widgets

    Connect

    Search

Sugar & Sparrow logo in script font

Sugar & Sparrow

Lifestyle and Cake from Portland Oregon

  • Cake Basics
  • Recipes
    • Cake
    • Cupcakes
    • Cookies & Bars
    • Filling
    • Frosting
    • Ice Cream
    • No-Bake
    • Small Batch
    • Vegan
  • Tutorials
  • Book
  • Blog
  • About

Piped Stripe Buttercream Cake Tutorial

June 18, 2018 · In: Featured, Tutorials

If there’s one thing you should know about my personal style, it’s the fact that I love all things striped. Wearing them, looking at them, and incorporating them into my cake designs whenever possible. They’re just a few of my favorite things. I first tried this horizontal striped buttercream technique about a year ago, and I was so skeptical at the thought of creating perfectly sized stripes by piping them with my own hands. I was certain that they would be wonky, but the stripes actually turned out near perfect and I was surprised at how easy it was to get the look with steady hands, a good cake turntable, and a few piping bags. And now you’ll get to see how easy it is! 

No matter how thick or thin you want your stripes or how many colors you want to use, I’ll show you my tried-and-true method for creating horizontal stripes with buttercream. Before you read all about the technique, here’s a quick video to show you how it’s done:

You Will Need:

  • A cake that’s been filled, crumb coated, and chilled for at least 20 minutes
  • Enough buttercream for a final coat
  • Food color gels of your choice
  • Bowls and spoons for mixing colors
  • Piping bags
  • Cake turntable
  • Bench scraper and offset spatula for smoothing

Step 1: Color Your Buttercream

This first part is my favorite because mixing colors is my jam! Decide how many colors you want to use for your stripes, then divide your buttercream evenly into that many bowls. Use your food color gels to tint the buttercream to your liking.

using food color gels with buttercream

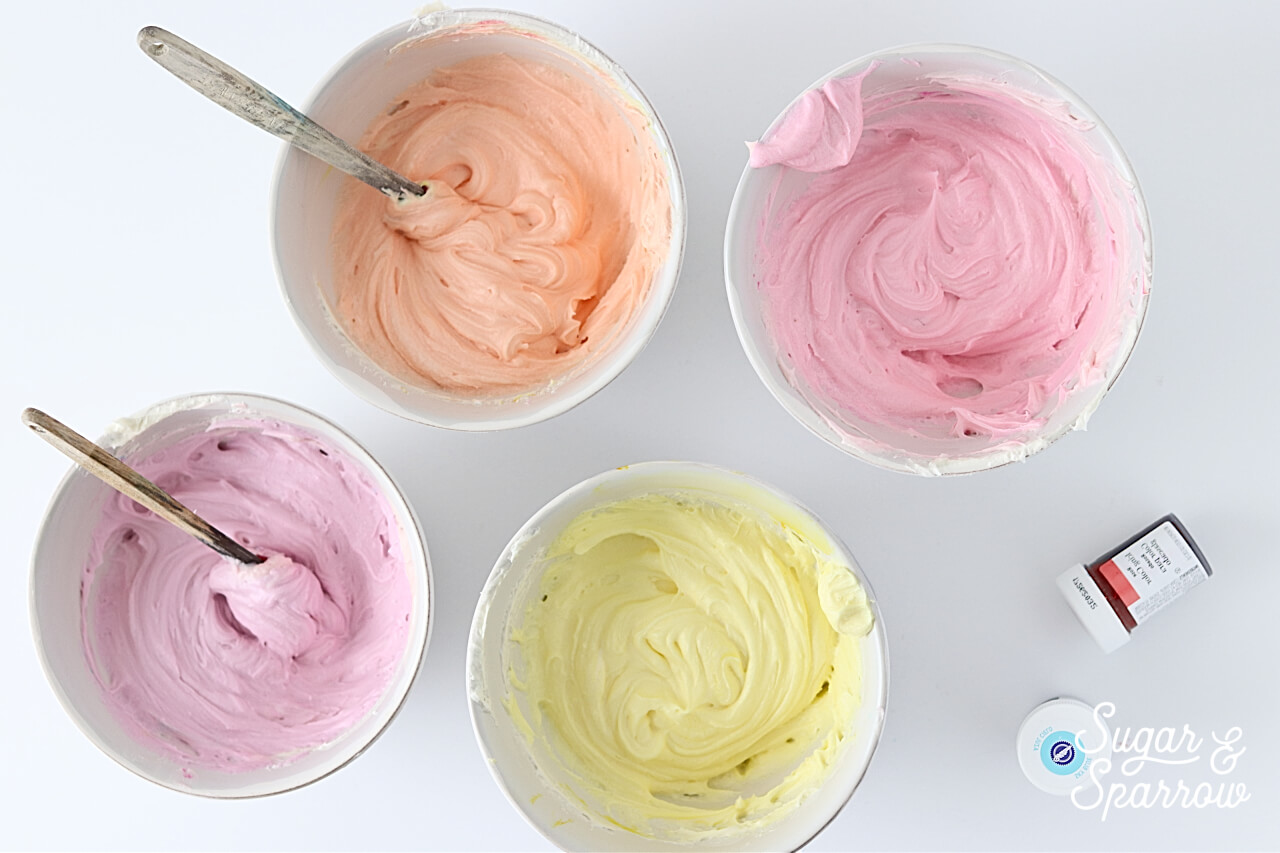
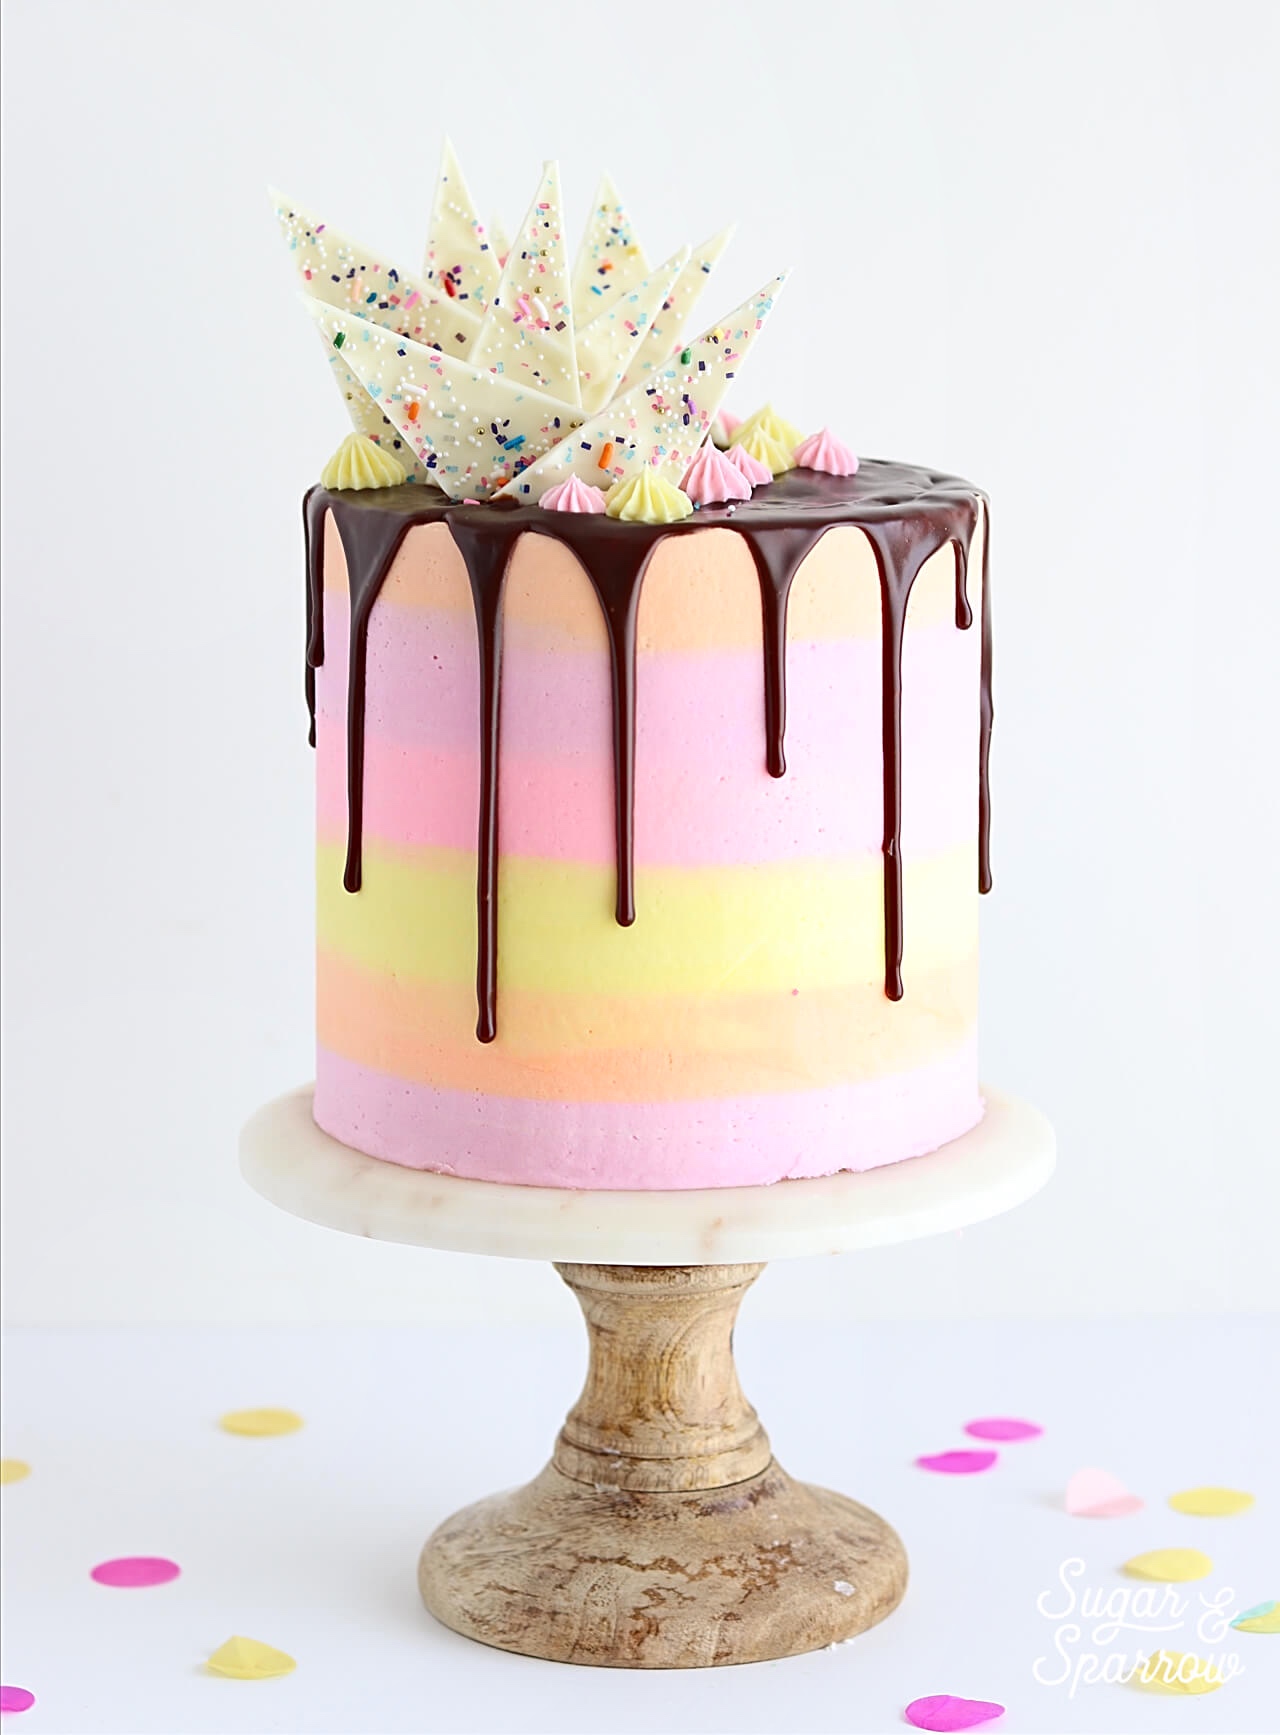
On this cake, I’m using four pastel colors: yellow, orange, pink, and purple. I used the Wilton Color Right gels to get the hues I was thinking of. Remember that when you’re trying to get a specific shade to start with just a little gel (a toothpick comes in handy for this) and mix it up before adding more.

Step 2: Fill Your Piping Bags

Once your buttercream is all mixed up, prepare some piping bags by snipping the ends off to an opening of about 1/2 inch or less, depending on how thin you want your stripes. It really helps to layer your piping bags on top of one another and snip all of the ends at once. This way, you have precise measurements for the opening of each one, which will make your striping more even.

colorful buttercream piping bags

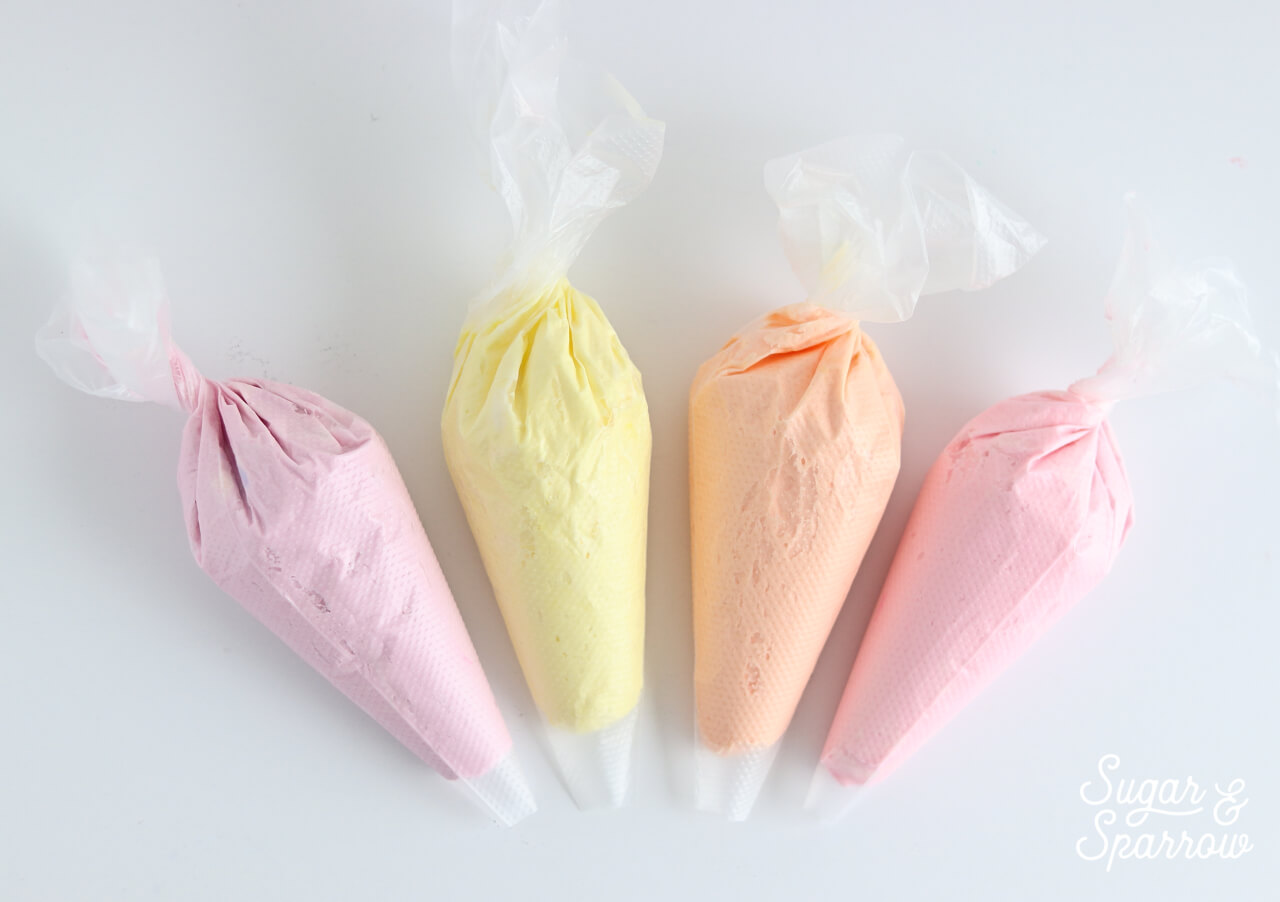
Fill each piping bag with the colors you’ve mixed up and get ready to party.

Step 3: Apply The Buttercream Stripes To The Cake

Place your chilled and crumb coated cake on a cake turntable. With your hand as steady as possible, turn the cake while you pipe a straight horizontal line with your buttercream at the very base of the cake. If you’d like thicker lines, continue with this color until you’ve reached the desired final height of your stripes, then repeat with the next color in the lineup.

how to create striped buttercream cake

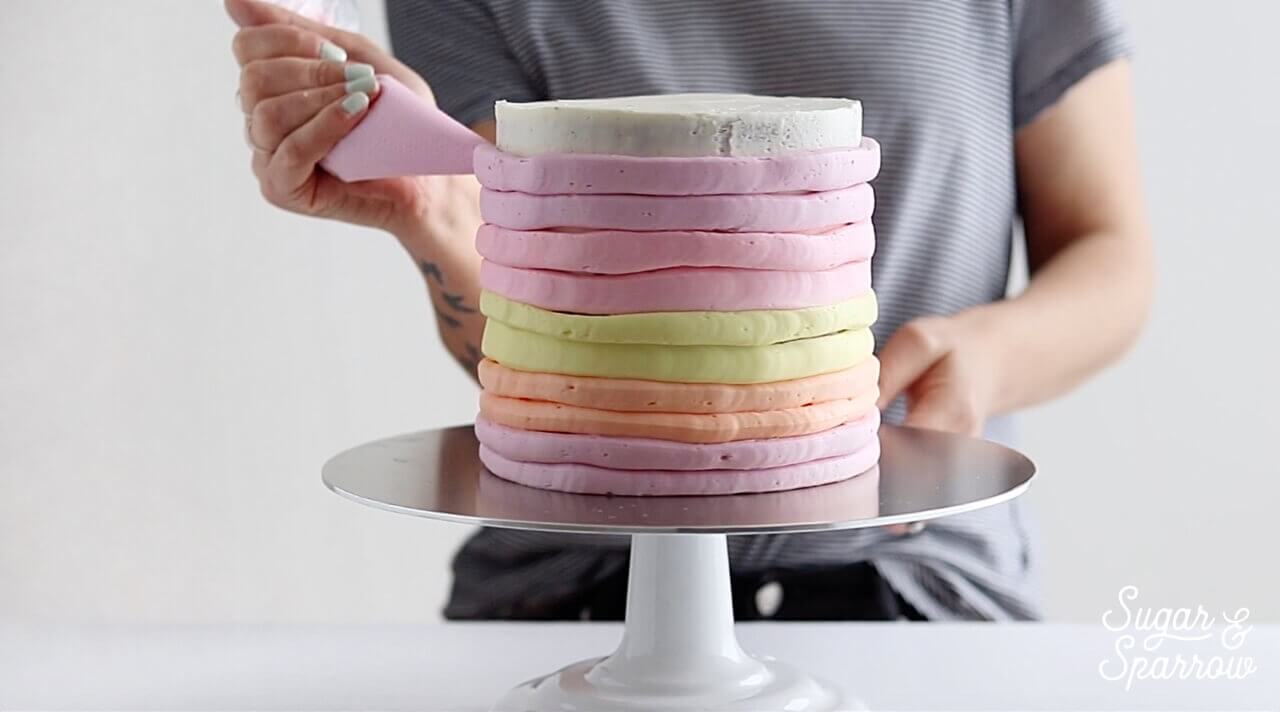
Alternate your colors however you wish until you reach the top of the cake. When you’ve reached the top, fill it in with whatever color makes the most sense visually.

Step 4: Smooth The Cake

Starting at the top of the cake, use your offset spatula to create a smooth top. Then use your bench scraper to smooth the sides of the cake while you turn it on your turntable.

how to make horizontal stripes with buttercream

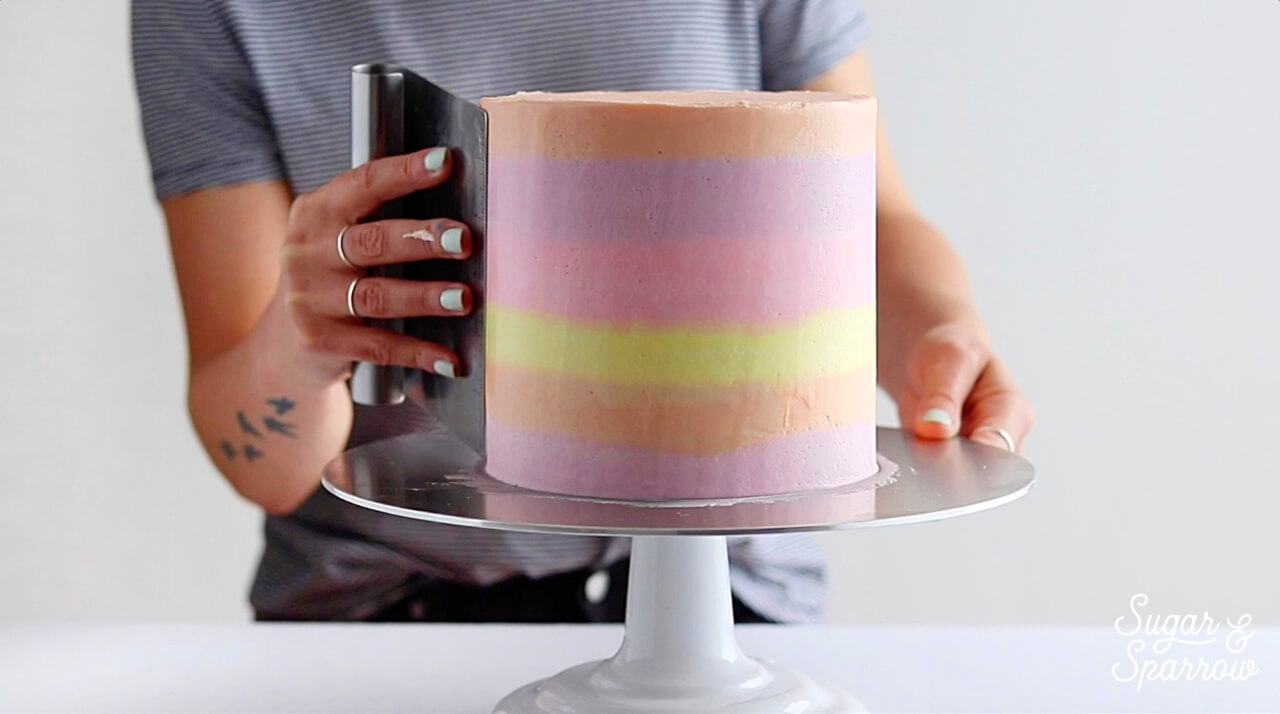
Make sure you scrape the excess buttercream off of your bench scraper before you smooth the sides each and every time. This helps with keeping the stripes perfectly straight and not tainted with other colors. If you need to fill in any gaps or holes in the sides of the cake, use the corresponding buttercream color to do so before re-smoothing to create an even finish.

Step 5: Keep On Decorating

When your striped buttercream is looking picture perfect, finish it off with some more decor! For this cake in particular, I added a chocolate ganache drip, some sprinkled white chocolate shards, and tied it all together with a some colorful open star piping. 

chocolate ganache drip cake by sugar and sparrow

Want to see more of the cake ideas I’m loving lately? Follow me on Pinterest and take a look!

By: Whitney · In: Featured, Tutorials · Tagged: buttercream, buttercream piping, buttercream stripes, cake, cake decorating, cake tutorial, horizontal stripes, striped buttercream, stripes

you’ll also love

the best vanilla cupcakes recipeThe Perfect Vanilla Cupcake Recipe
pumpkin layer cake recipe by sugar and sparrowPerfect Pumpkin Layer Cake Recipe
oreo cookies and cream cakeOreo Layer Cake Recipe

Join the List

Stay up to date & receive the latest posts in your inbox.

Reader Interactions

Comments

  1. Dalila says

    October 7, 2021 at 11:21 am

    Hi, loved this tutorial and all the tips on your website! Thanks!! Quick question, can I frost the cake the day before and leave it in the fridge overnight? Also, how long should I keep the frosted cake in the fridge before applying the chocolate drip?

    Reply
    • Whitney says

      October 7, 2021 at 2:29 pm

      Hi Dalila! You can absolutely frost the cake the day before and leave it in the refrigerator overnight. The cake only needs to be refrigerated for about 20 minutes prior to adding the ganache drips, so you can do that ahead as well if you’d like. Here are some helpful tips on making cakes ahead: https://sugarandsparrow.com/making-cakes-ahead/

      Reply

Leave a Reply Cancel reply

Your email address will not be published. Required fields are marked *

Recipe Rating


Next Post >

Nutella Banana Cake with Toasted Meringue

Primary Sidebar

Welcome to Sugar & Sparrow

Welcome to Sugar & Sparrow

Helping you whip up pretty desserts with confidence and creativity. And hopefully sharing a few laughs with you along the way!

Learn More

Connect

let’s bake!

Get my very best recipes, baking tips, and decorating tutorials sent to your inbox

Featured Posts

gift ideas oreo truffles recipe

Easy Oreo Truffles (4 Ingredients!)

buttercream sweater cake

Buttercream Knitted Sweater Cake Tutorial

pumpkin cupcakes recipe with cream cheese frosting

Perfect Pumpkin Cupcakes with Spiced Cream Cheese Frosting

Search

Archives

Follow Along

@sugarandsparrowco

Everything I baked in June☀️I was so motivated to Everything I baked in June☀️I was so motivated to bake this month (summer flavors had me INSPIRED!) and could barely keep up with myself but I ended up publishing 7 new recipes on my website + finalized 5 more that will be up ASAP! 

Comment “JUNE” to get all the recipes that are available now:

-Cookie Dough Ice Cream Cake
-Rocky Road Cupcakes (w/ homemade marshmallow creme filling!)
-Blackberry Lavender Cake
-Homemade Blackberry Filling
-Whipped Cream Cheese Frosting
-Strawberry Shortcake Cookie Bars
-Berries & Cream Sheet Cake

https://sugarandsparrow.com/everything-i-baked-in-june
 
#cake #bakersofinstagram #baking #bakinglove #cakedecorating
WHIPPED CREAM CHEESE FROSTING ☁️ this easy 4-ingre WHIPPED CREAM CHEESE FROSTING ☁️ this easy 4-ingredient whipped cream frosting is deliciously light, comes together SO easily, and is stabilized with cream cheese to make it the perfect thick consistency for filling and frosting cakes and cupcakes!! It’s so good with my strawberry shortcake sheet cake and berries & cream cake and I have a feeling I’m going to be whipping it up for many more summer cakes😍

Full recipe with cake pairing suggestions at https://sugarandsparrow.com/whipped-cream-cheese-frosting/ 

INGREDIENTS 
1 Cup (8oz, 226g) full-fat brick-style cream cheese, cold
1 Cup (120g) powdered sugar
1 tsp pure vanilla extract
2 1/2 Cups (600ml) heavy whipping cream, cold

INSTRUCTIONS
1. Chill the bowl of your stand mixer (or the large bowl you’ll be using with your hand mixer) into the refrigerator for 20 minutes.
2. Into the cold mixing bowl, add the cream cheese and beat on medium speed with the whisk attachment until creamy, 2 min. Add the powdered sugar and mix on low speed until mostly incorporated, then turn the mixer to medium-high speed and mix for 1 min.
3. Add the vanilla extract, then turn the mixer to medium-high speed and slowly pour in the heavy whipping cream (down the side of the bowl so it doesn’t fly everywhere). Once all the cream is added, continue mixing on medium-high for just about 30 seconds longer, keeping a close eye on the mixing bowl to watch it thicken. It should come together into a thick, silky frosting consistency at this point, where you can dip the whisk into the frosting and it holds a slight peak when you hold it upright.
4. Use the frosting immediately to decorate cakes and/or cupcakes for best results!

#whippedcreamfrosting #creamcheesefrosting #cakedecorating #whippedcream #frosting
TOP 10 4TH OF JULY DESSERTS 🎆 These are just a few TOP 10 4TH OF JULY DESSERTS 🎆 These are just a few of my favorite summer dessert recipes that will disappear at any Fourth of July celebration.

Comment “JULY” and I’ll send you all 20+ of my favorite 4th of July dessert ideas – naturally red white and blue desserts like my berries and cream cake, easy no-bake desserts, no-churn ice cream, strawberry shortcake inspired recipes, and all the treats that will go FAST at any barbecue.

https://sugarandsparrow.com/4th-of-july-desserts/

#fourthofjuly #4thofjuly #summerdessert #partycake #dessertideas
STRAWBERRY SHORTCAKE COOKIE BARS 🍓my hot take: str STRAWBERRY SHORTCAKE COOKIE BARS 🍓my hot take: strawberry shortcake toppings on a buttery, soft sugar cookie base is WAY BETTER than traditional strawberry shortcake. I topped my favorite sugar cookie bar recipe with silky whipped cream cheese frosting + homemade strawberry sauce and now I’m ruined 😵

Full recipe is linked in my bio + at https://sugarandsparrow.com/strawberry-shortcake-cookie-bars/ 

SOFT SUGAR COOKIE BARS
2 Cups + 2 Tbsp (283g) all purpose flour
1 tsp baking powder
1/2 tsp baking soda
1/2 tsp salt
3/4 Cup (170g) unsalted butter, room temp
1 Cup (200g) granulated sugar
1 large egg
1 large egg yolk
1 1/2 tsp pure vanilla extract

1. Preheat the oven to 350ºF (177ºC). Grease and line an 8-inch square baking pan with parchment paper, leaving a slight overhang for easy release.
2. Whisk together the flour, baking powder, baking soda, and salt. Set aside.
3. Using a stand mixer with the paddle attachment (or hand mixer) cream together the butter and sugar on high speed until pale and fluffy, 2-3 min.
4. Turn the mixer to medium and add the egg, egg yolk, and vanilla. Mix until combined, then add the flour mixture and mix on low speed until a uniform cookie dough forms.
5. Press the cookie dough into the prepared pan in an even layer, all the way to the edges. Bake for 18-20 minutes, until the edges are just starting to brown. 
6. Cool the sugar cookie bars in the pan for 30 minutes, then transfer to a wire rack to cool completely. Top with whipped cream cheese frosting and strawberry sauce (full recipe linked in my bio!)

#strawberryshortcake #strawberries #whippedcreamfrosting #cookiebars #sugarcookies
BLACK FOREST CAKE 🍒 this is my favorite thing to m BLACK FOREST CAKE 🍒 this is my favorite thing to make during cherry season! My version is decadent chocolate cake soaked with homemade cherry syrup, fresh cherry filling, and whipped cream frosting. Top it with a chocolate ganache drip if you want to go the extra mile! 

Full recipe + decorating tutorial is linked in my bio + at https://sugarandsparrow.com/black-forest-cake-recipe/

PS I’m working on a sheet cake version of this recipe that’s even easier! Stay tuned.

#blackforestcake #cherrycake #chocolatecake #cherries #cakedecorating

Footer

On the Blog

  • Cake Basics
  • Recipes
  • Tutorials

Info

  • About
  • Privacy Policy & Disclosure

stay in the know

Copyright © 2026 · Theme by Sugar & Sparrow